winterdyne
-
Posts
189 -
Joined
-
Last visited
Content Type
Profiles
Forums
Events
Gallery
Everything posted by winterdyne
-
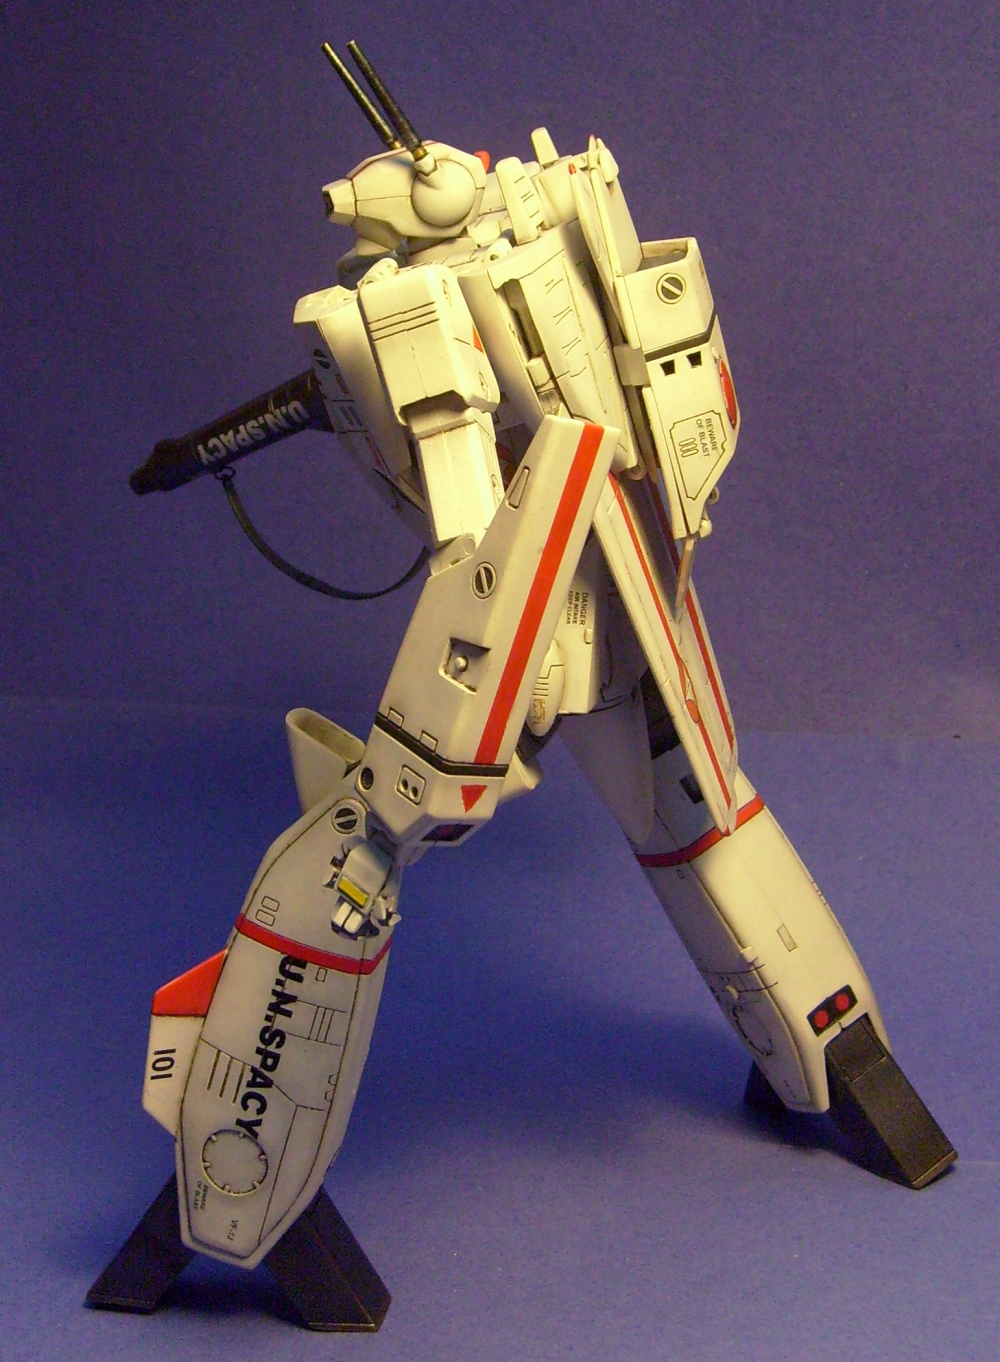
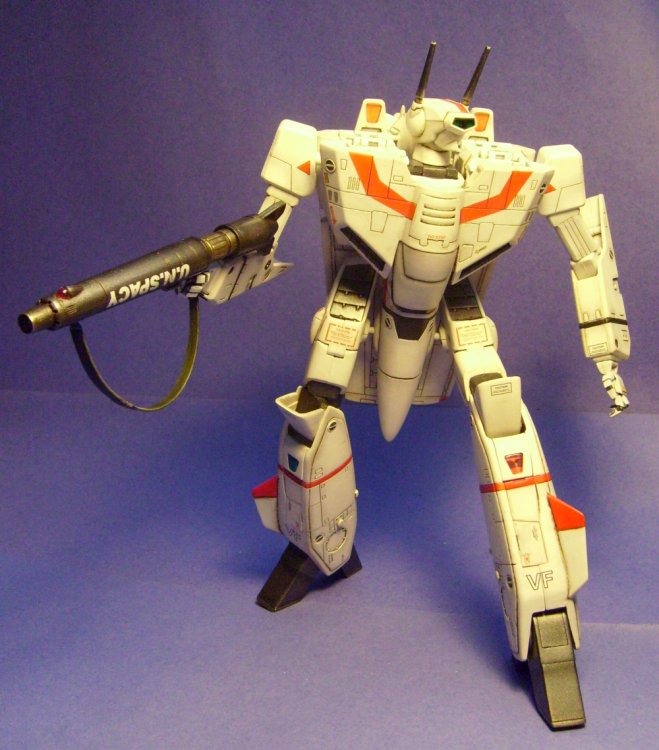
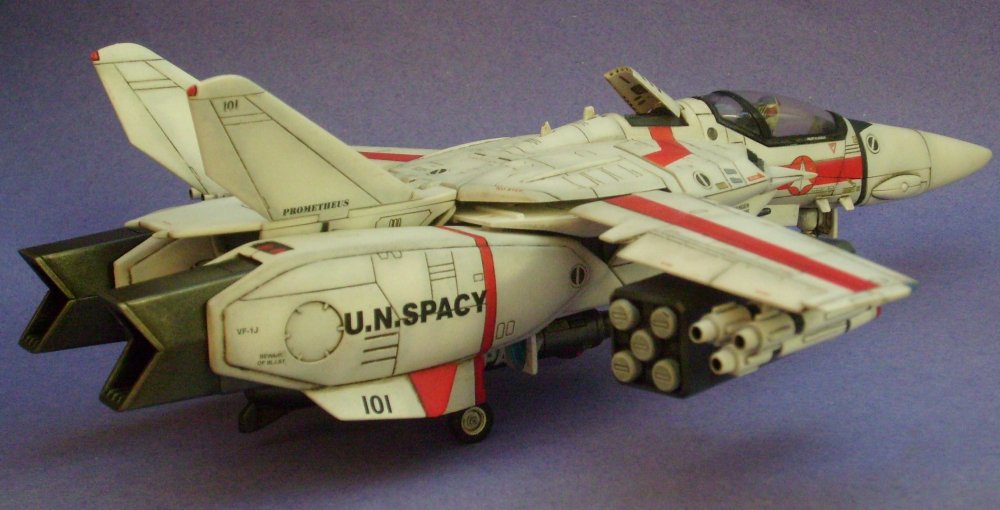
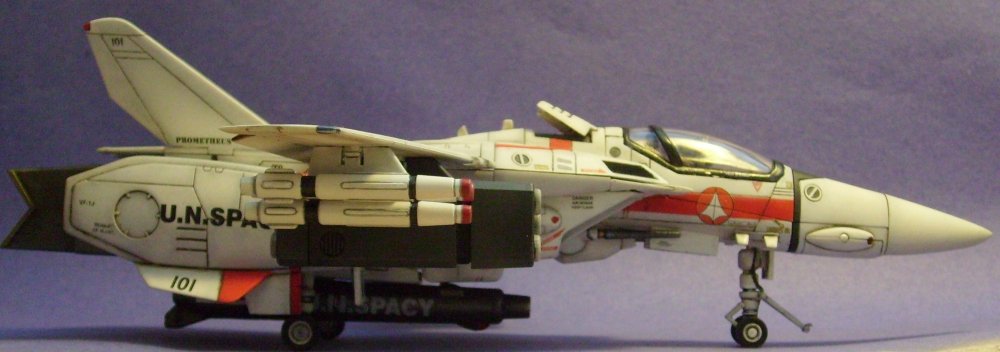
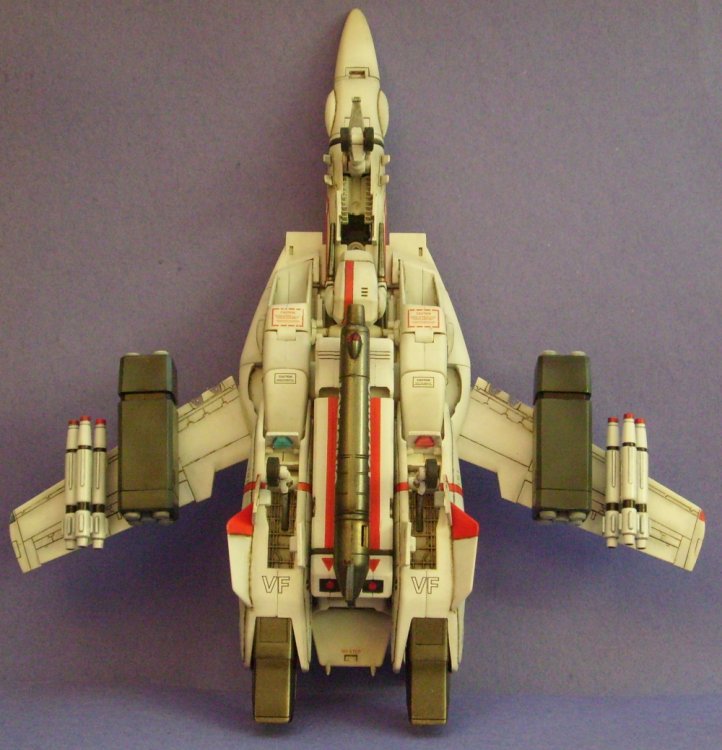
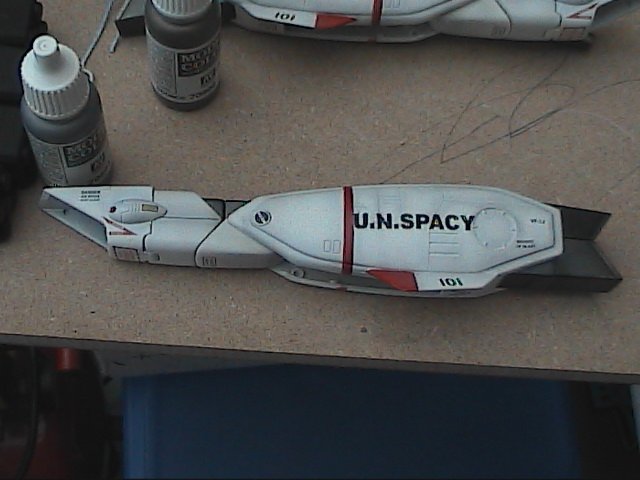
COMPLETED: 1/48 Yamato VF-1J Hikaru Custom
winterdyne replied to winterdyne's topic in The Workshop!
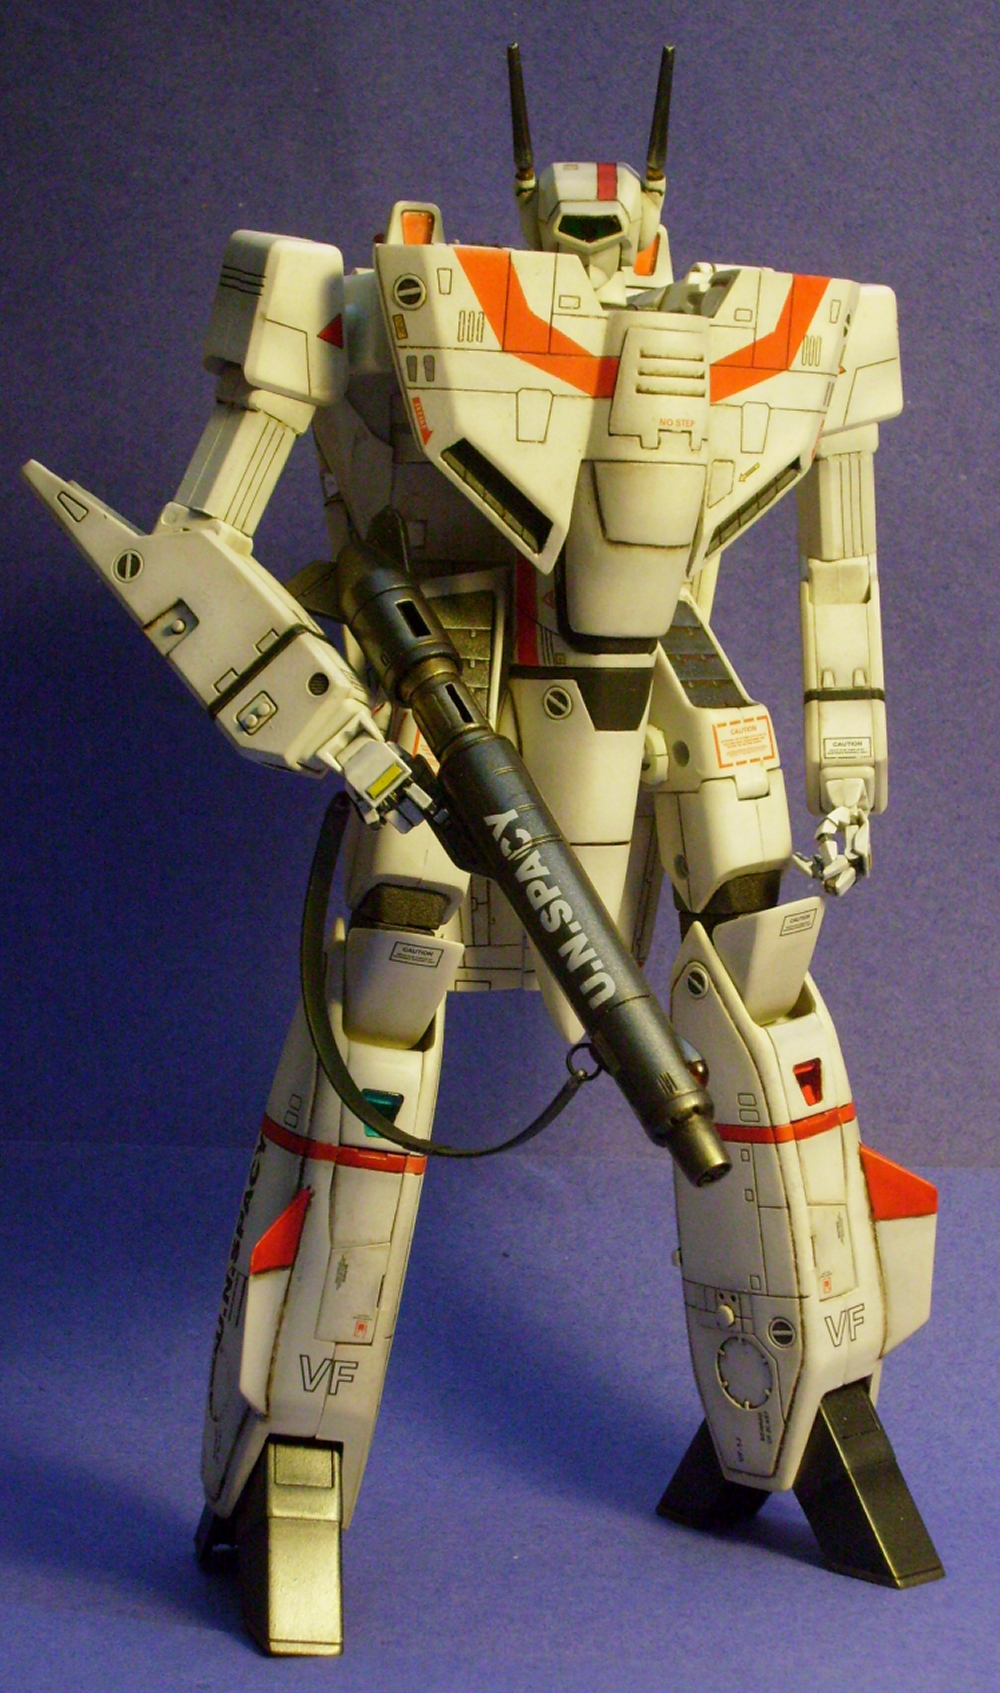
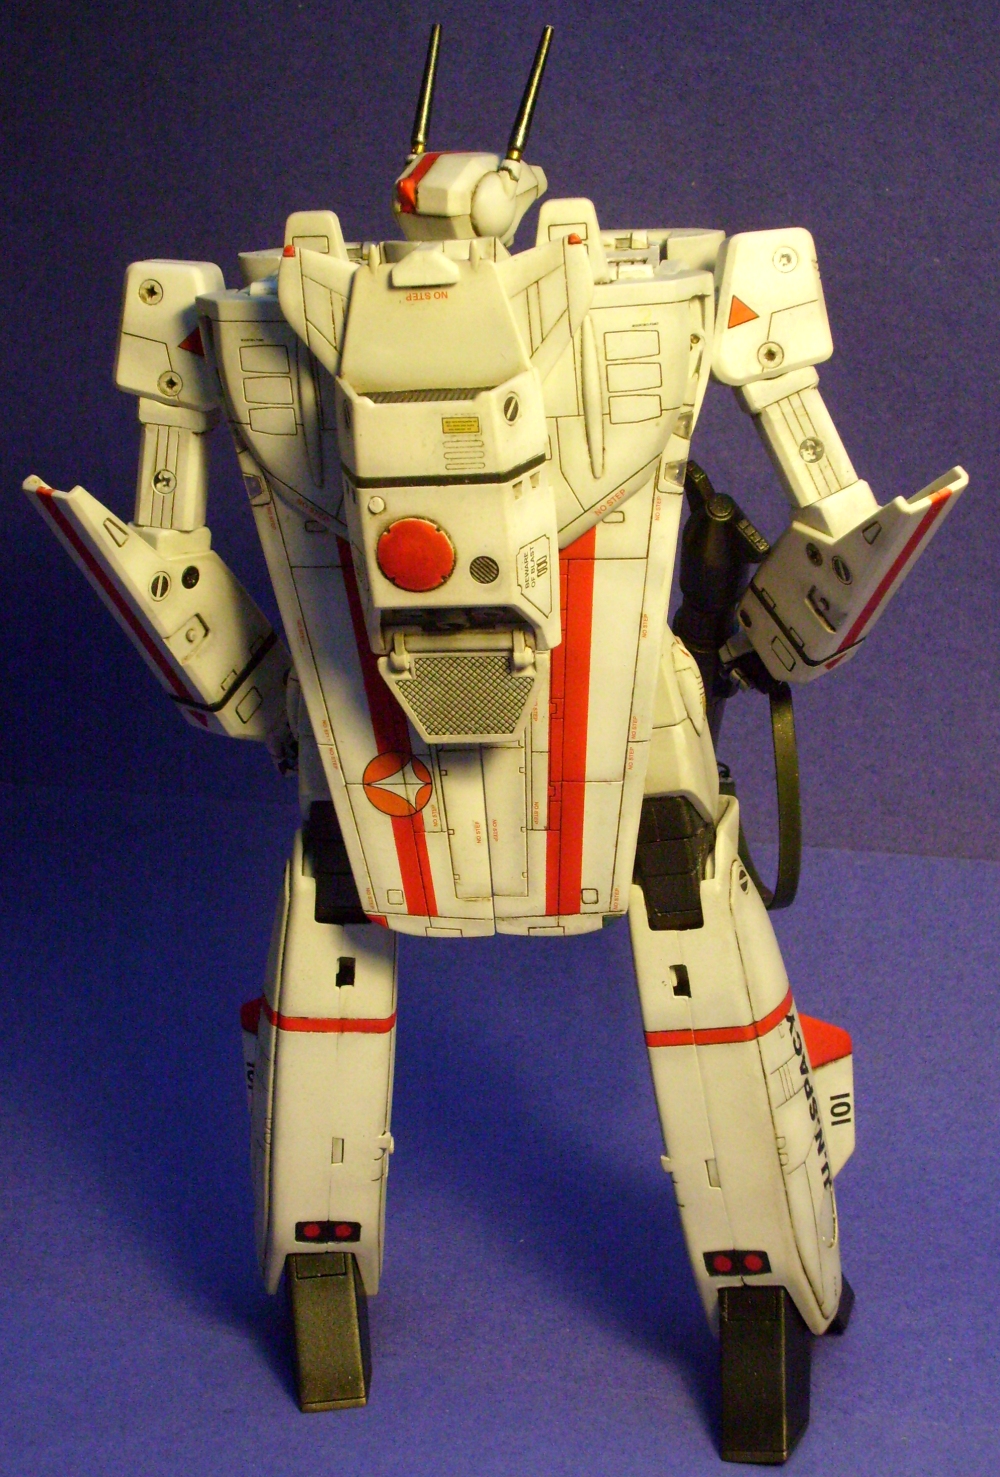
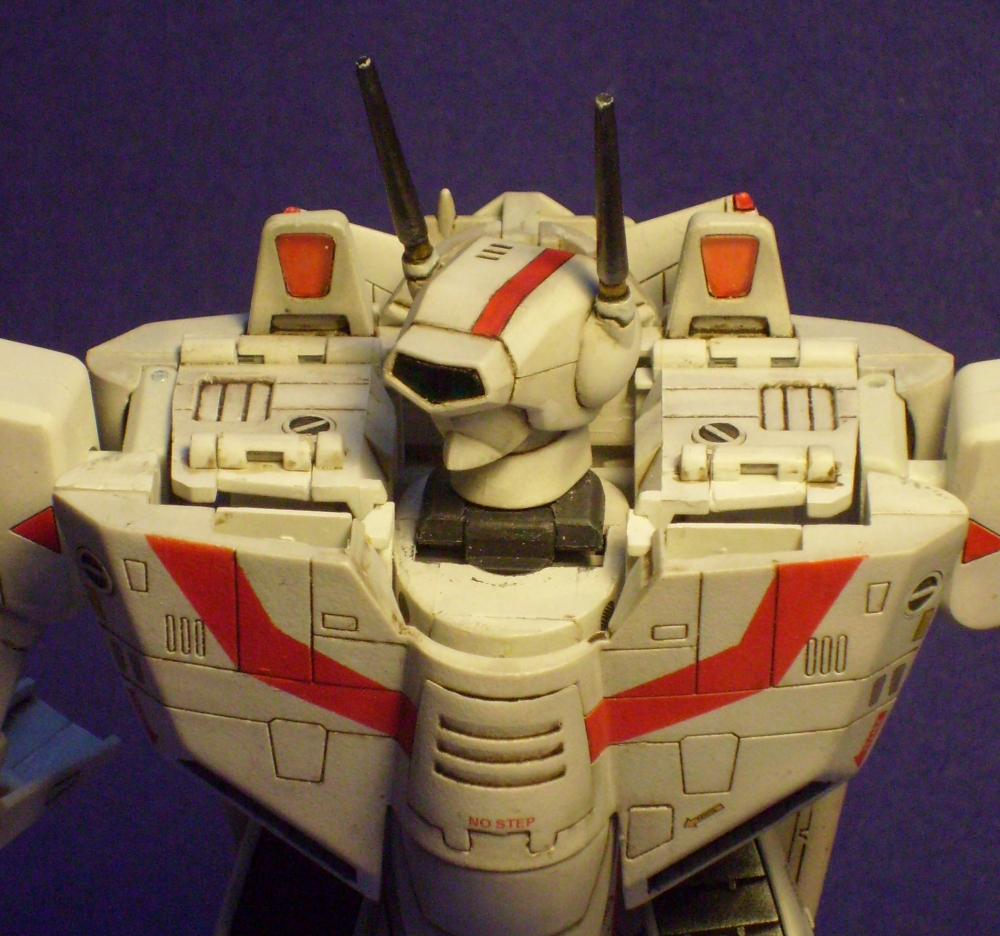
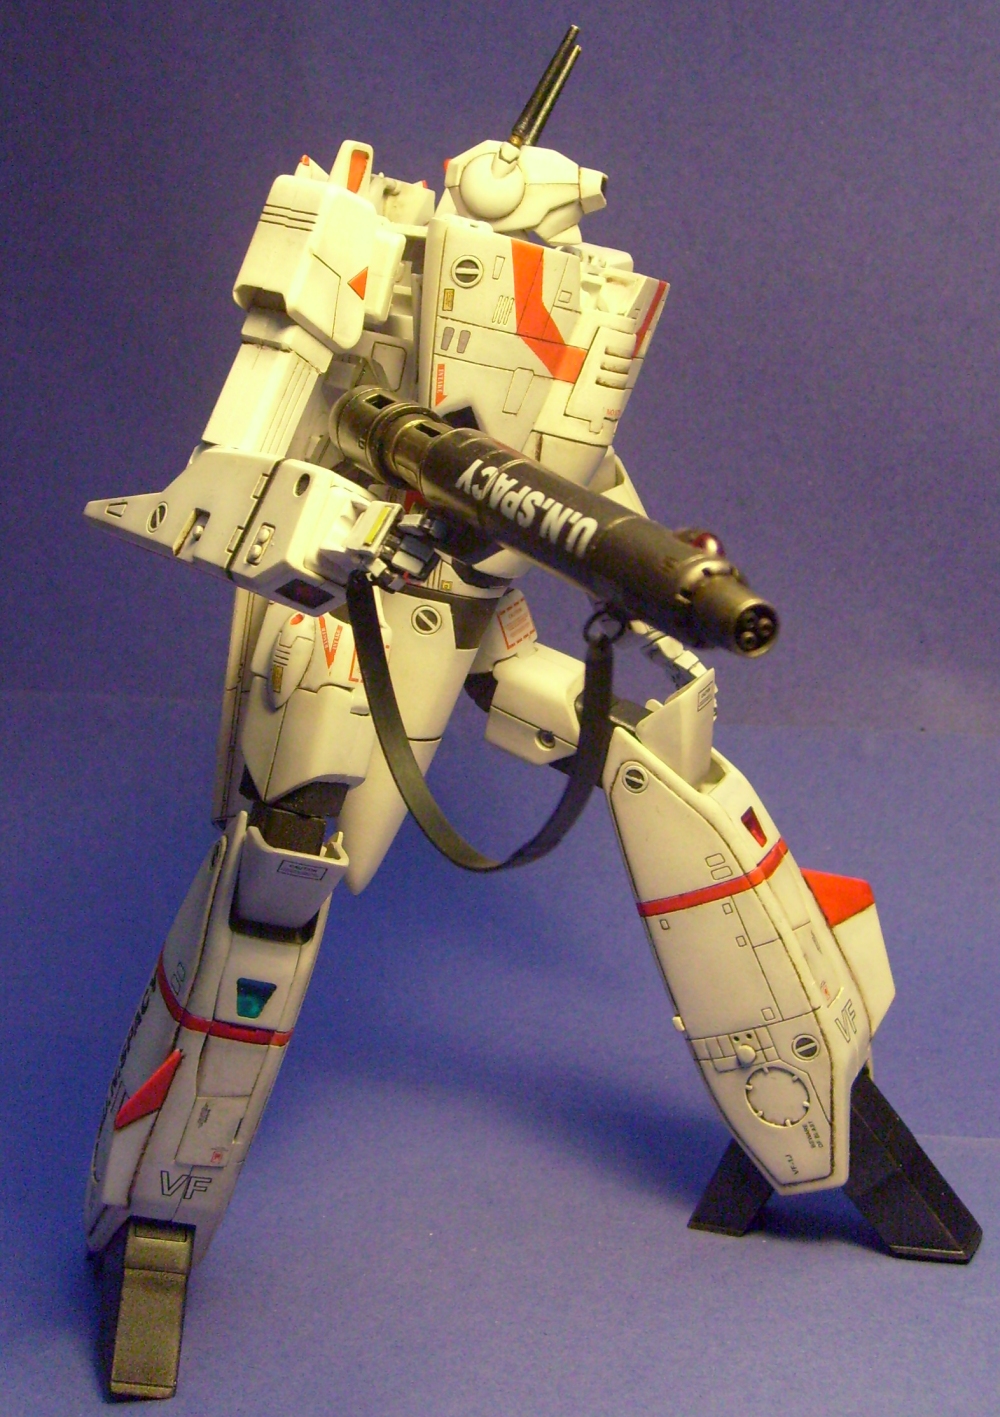
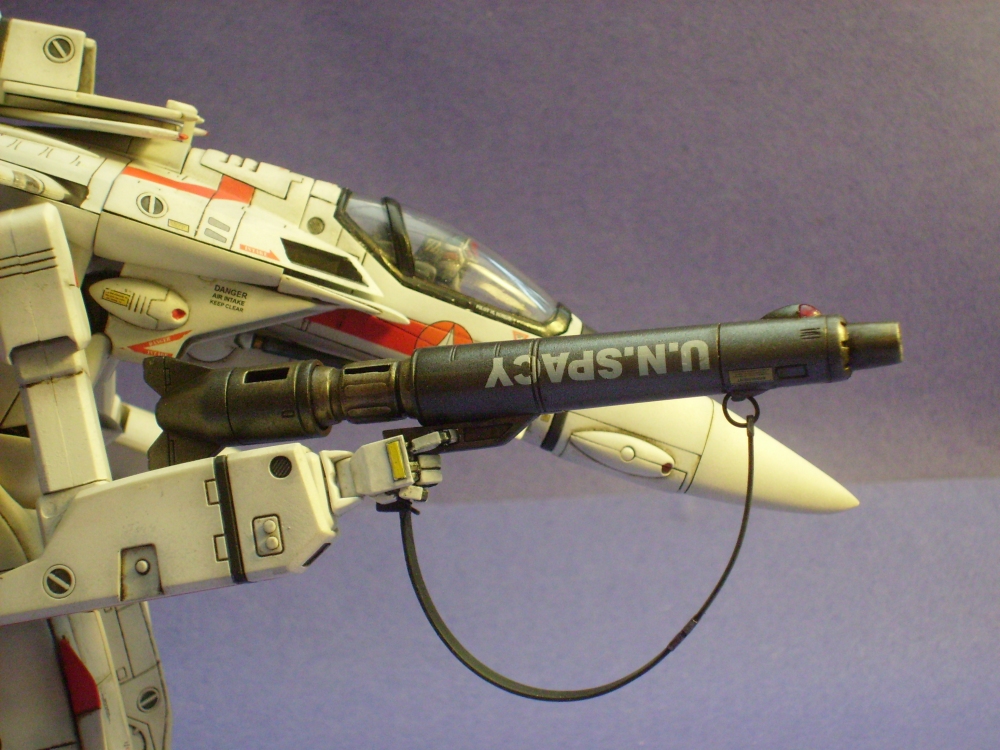
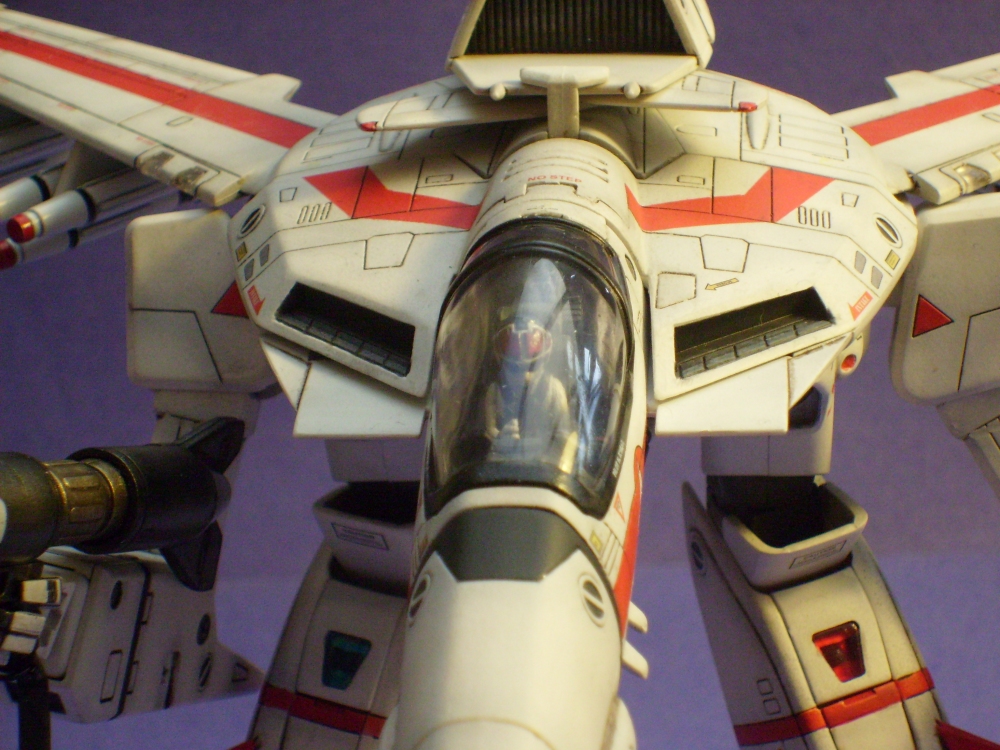
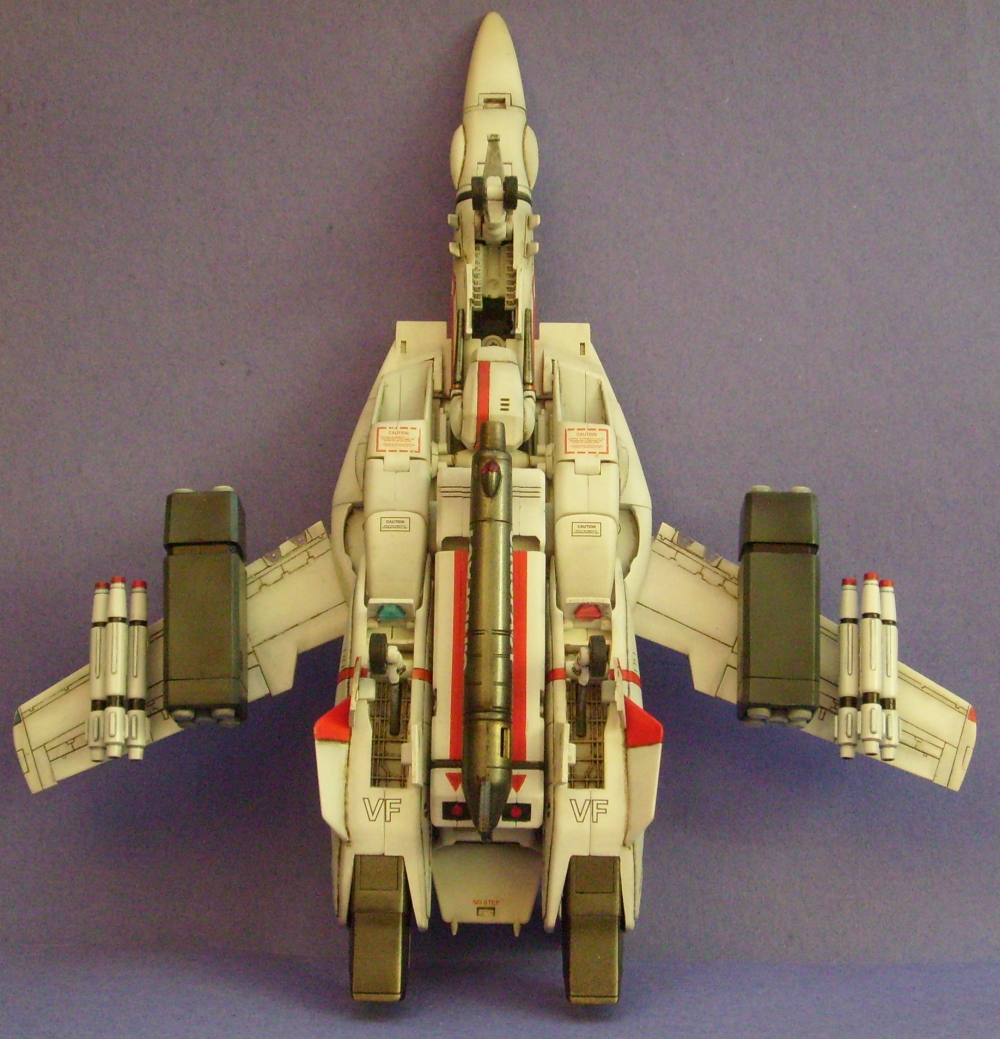
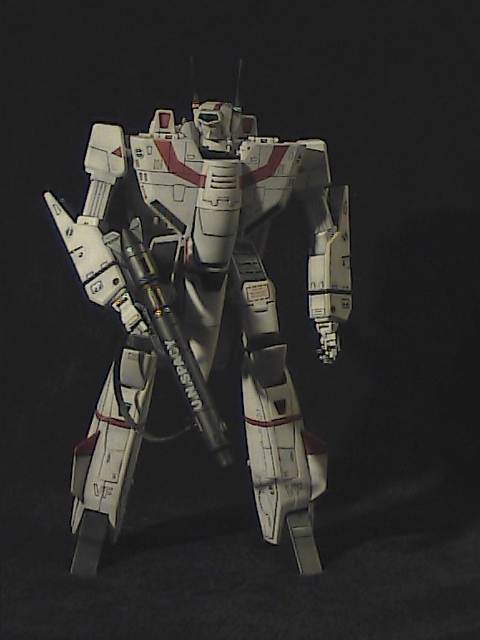
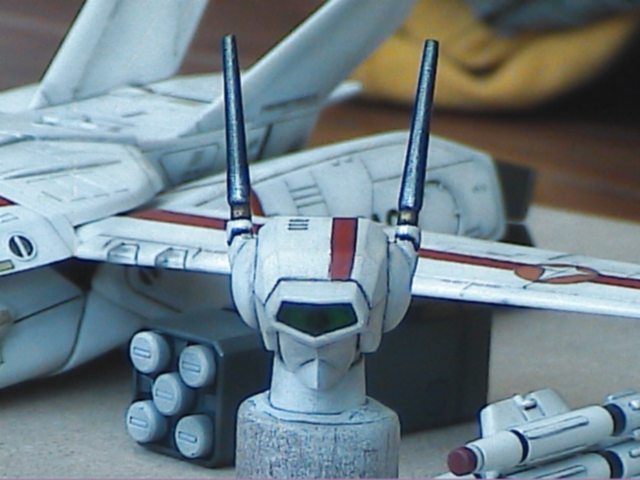
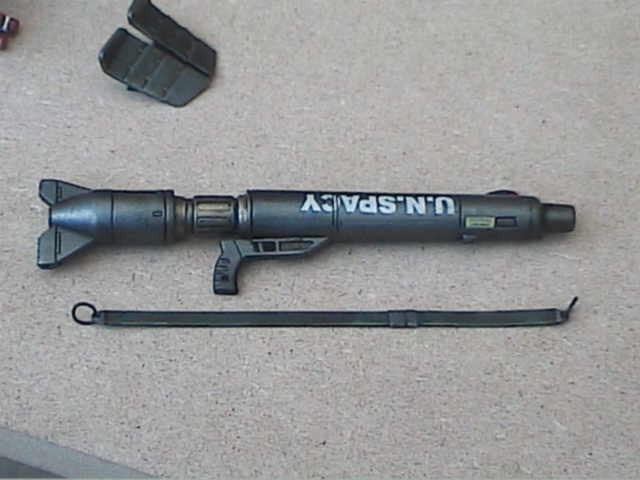
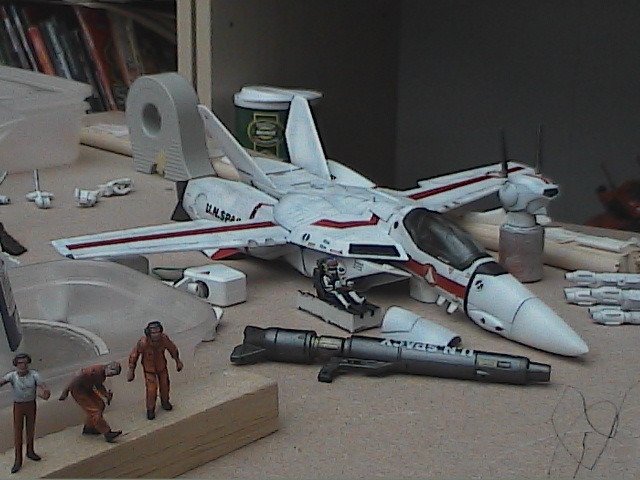
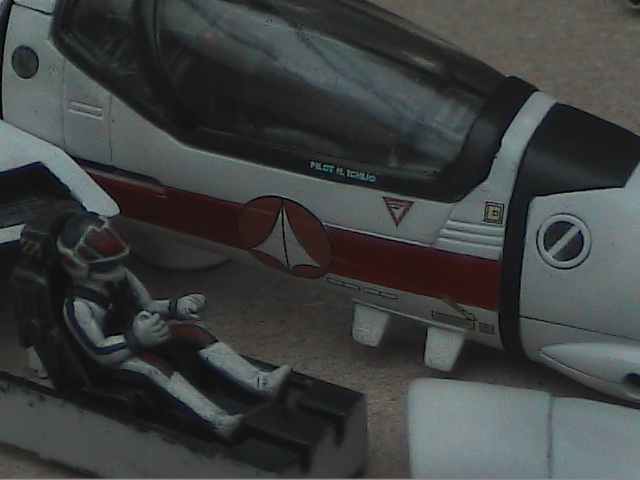
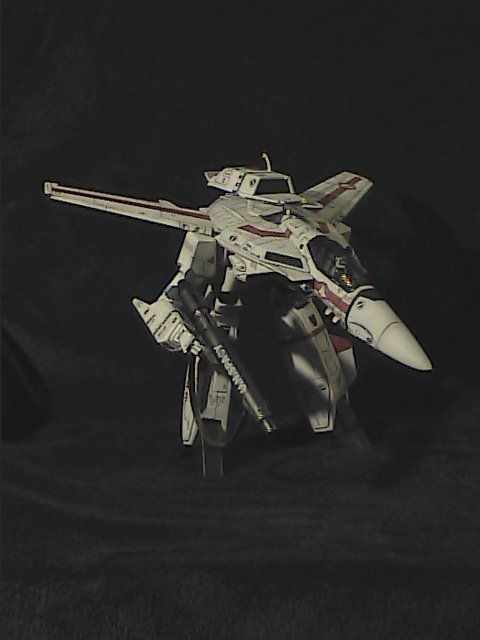
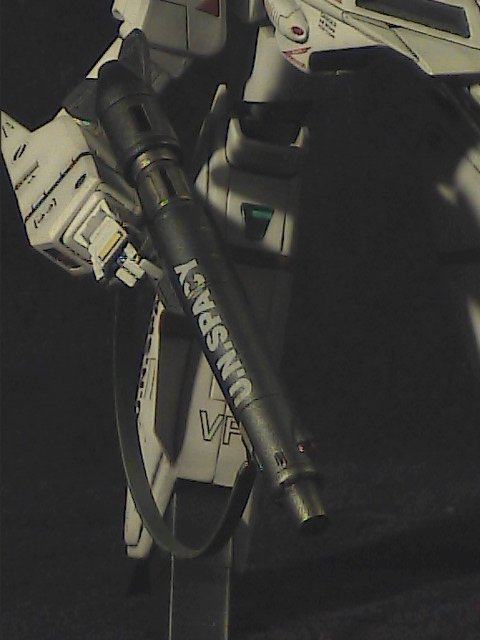
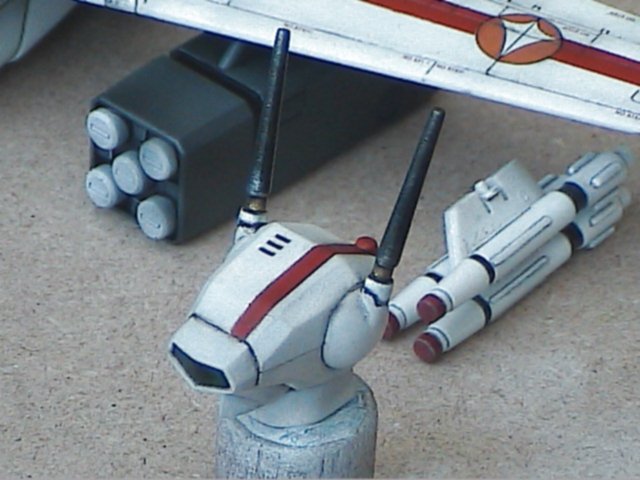
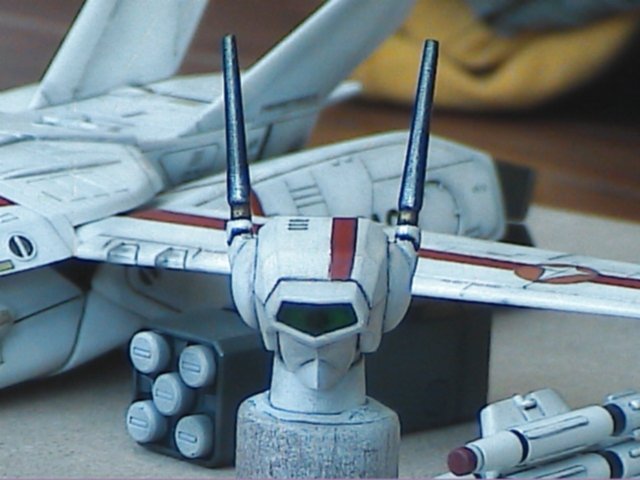
Battroid mode: Hope you like all the pics!


-
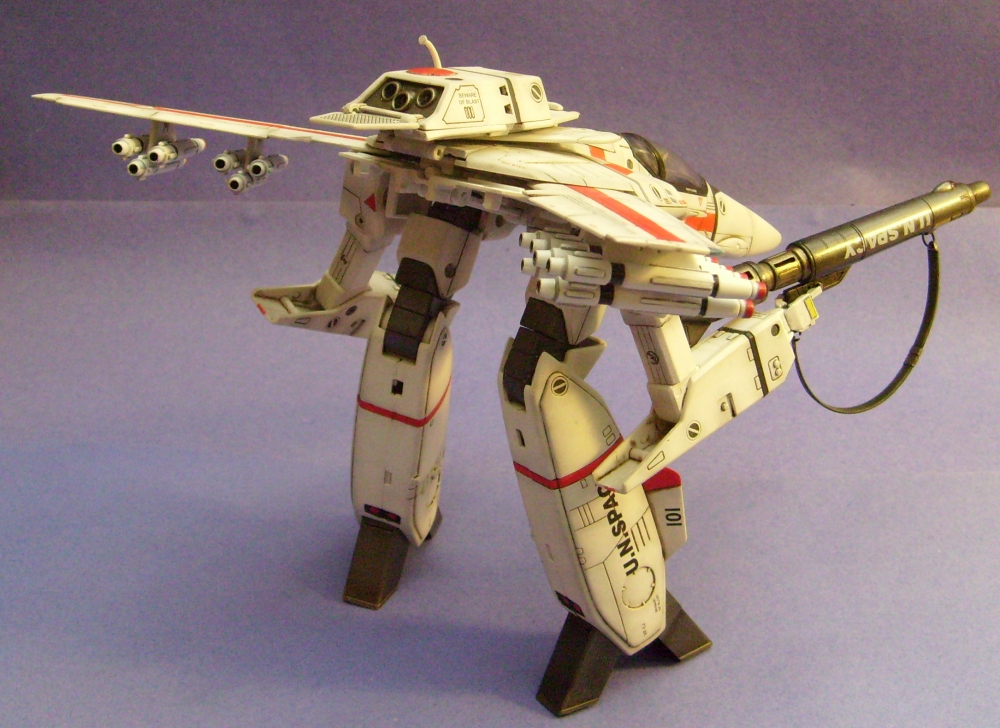
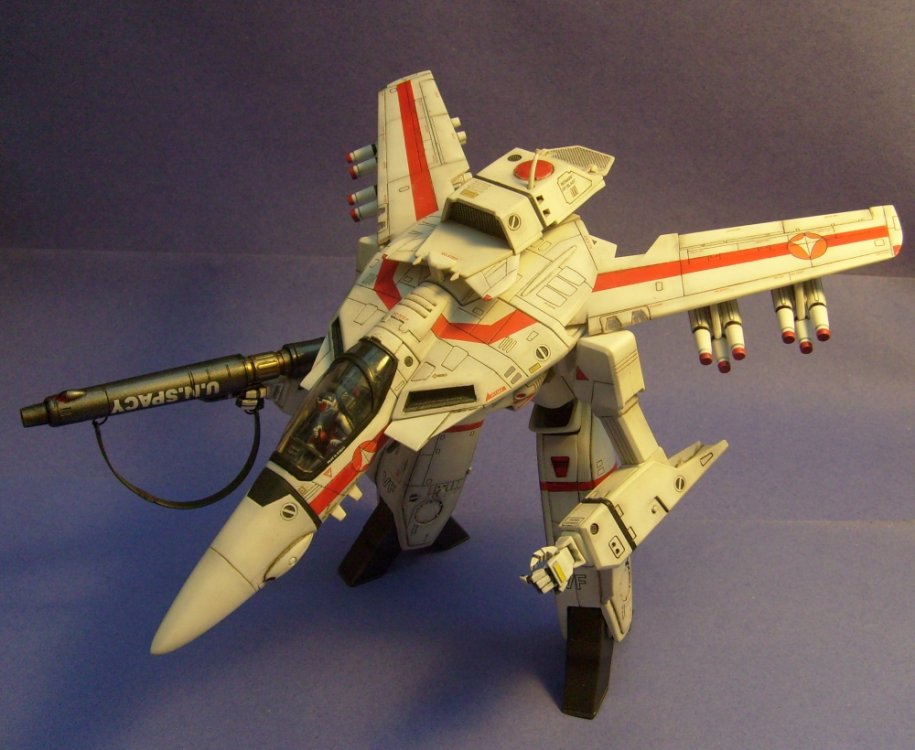
COMPLETED: 1/48 Yamato VF-1J Hikaru Custom
winterdyne replied to winterdyne's topic in The Workshop!
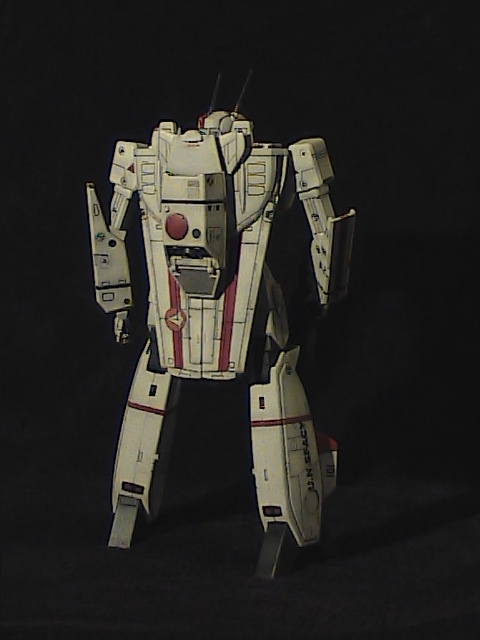
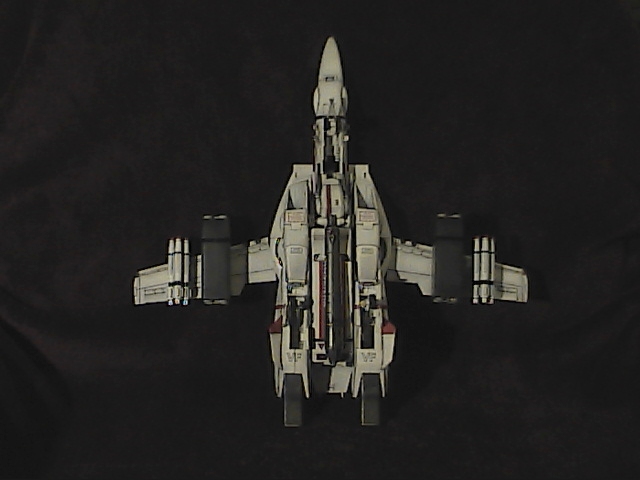
Gerwalk mode: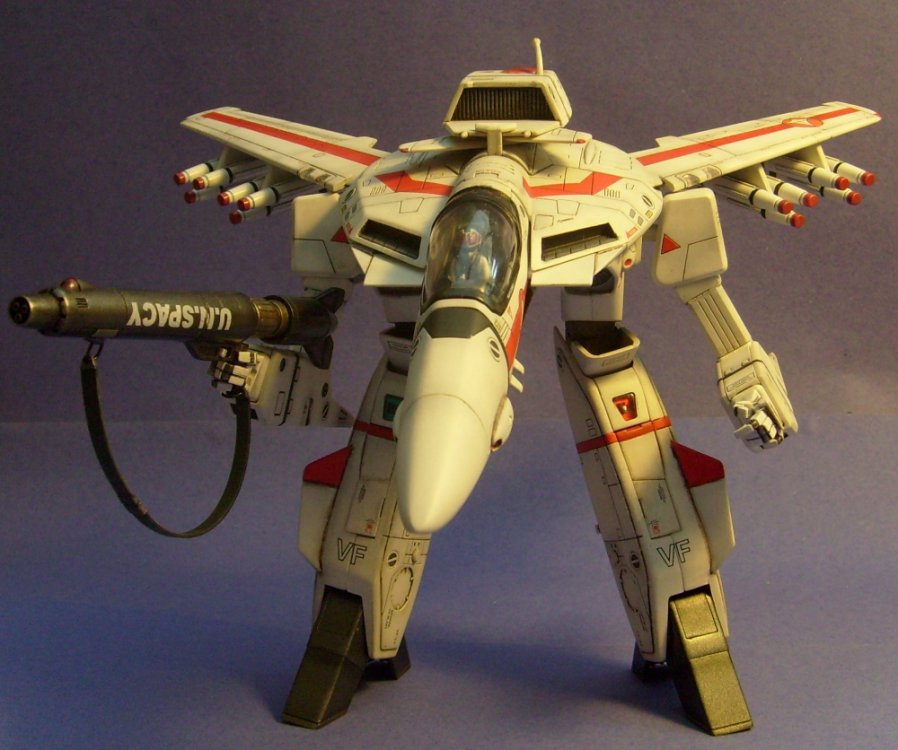


-
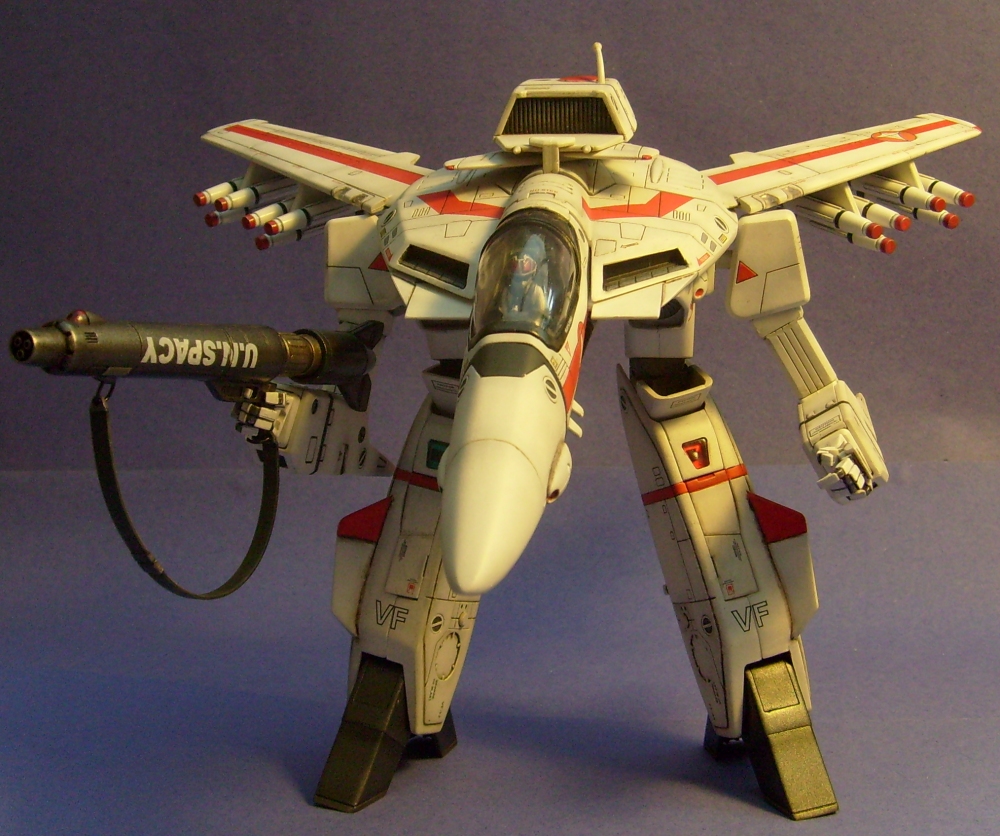
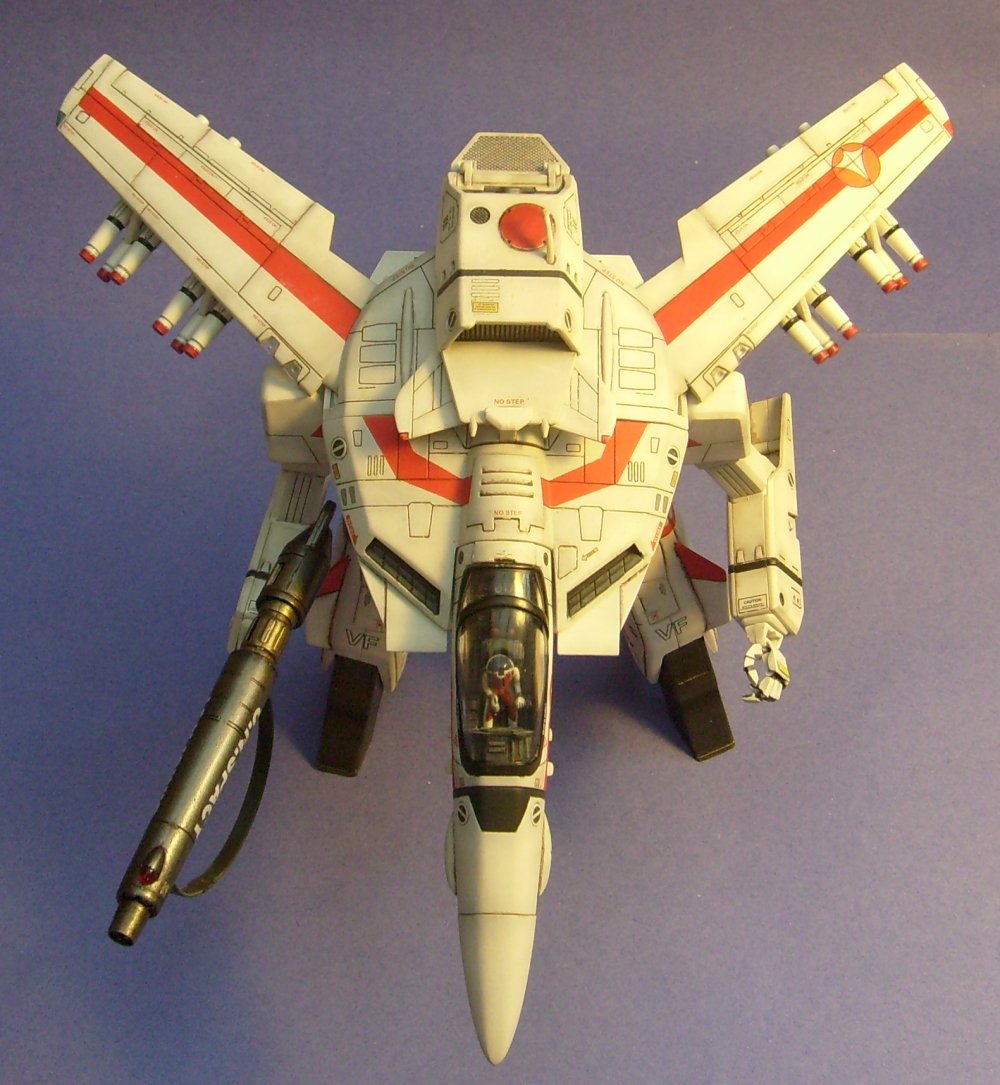
COMPLETED: 1/48 Yamato VF-1J Hikaru Custom
winterdyne replied to winterdyne's topic in The Workshop!
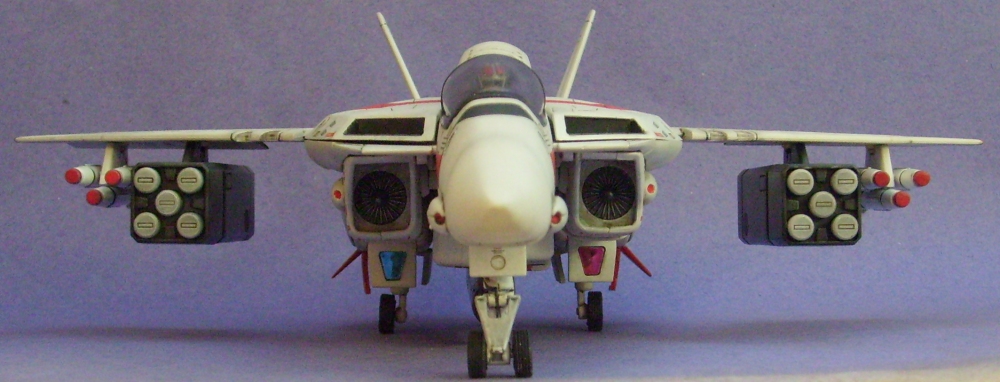
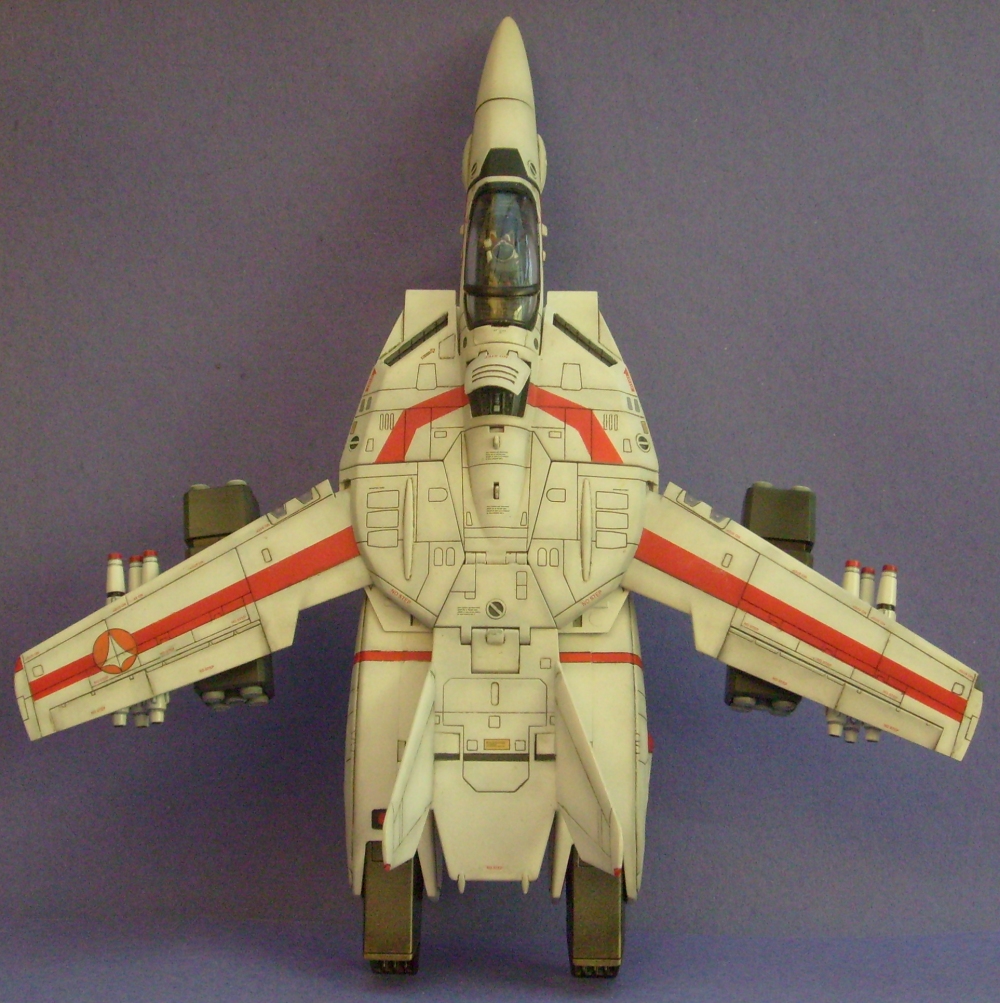
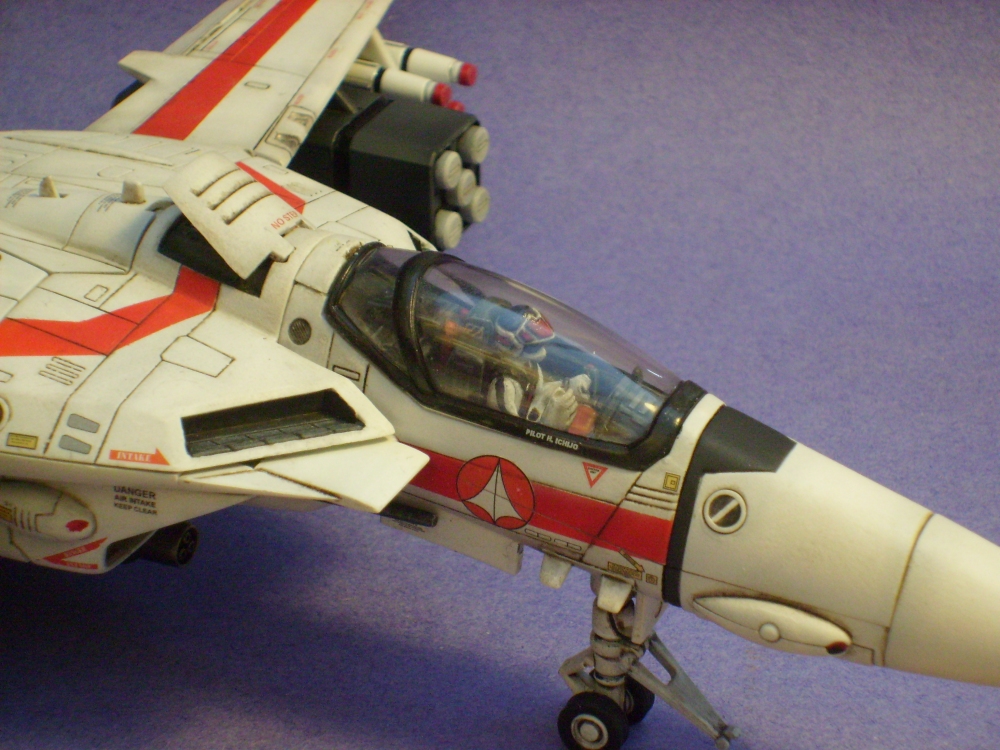
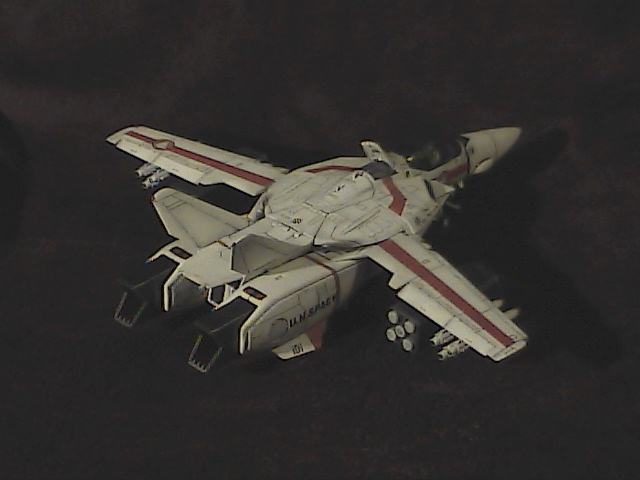
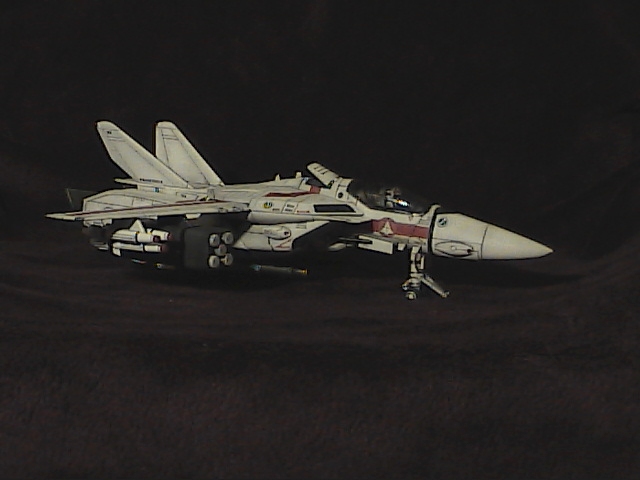
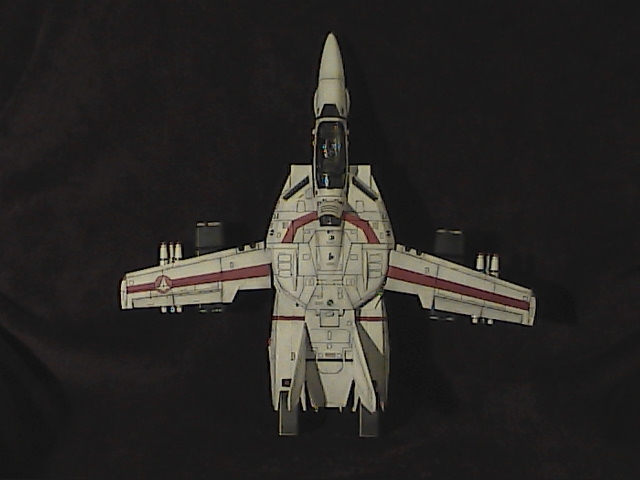
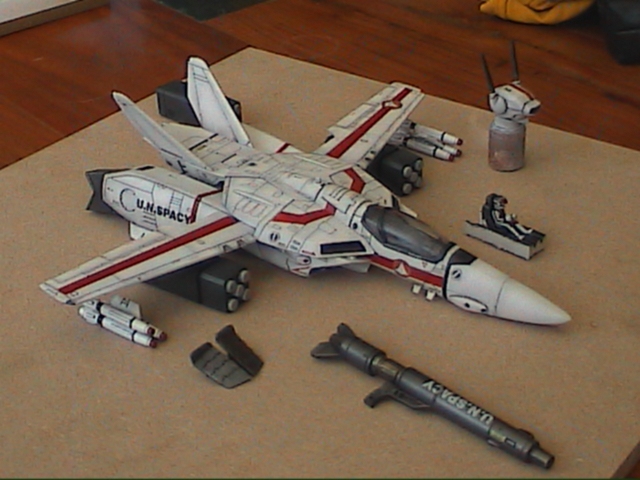
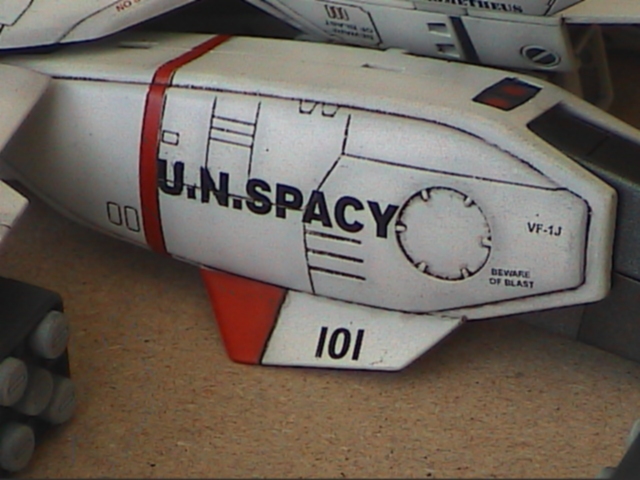
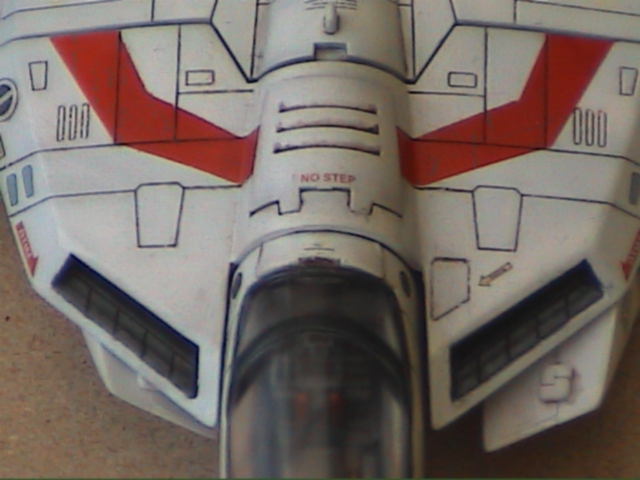
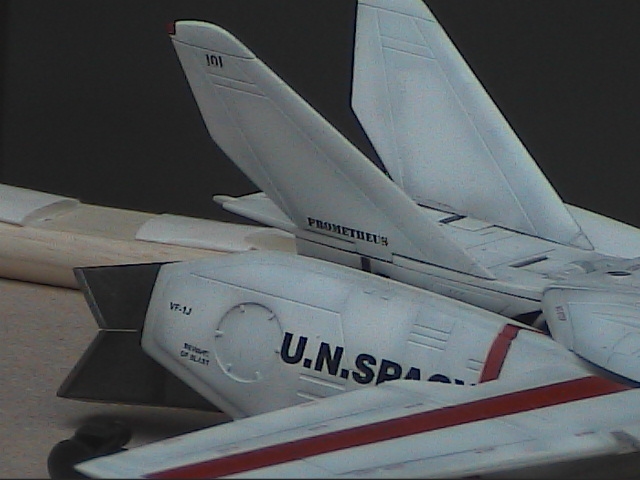
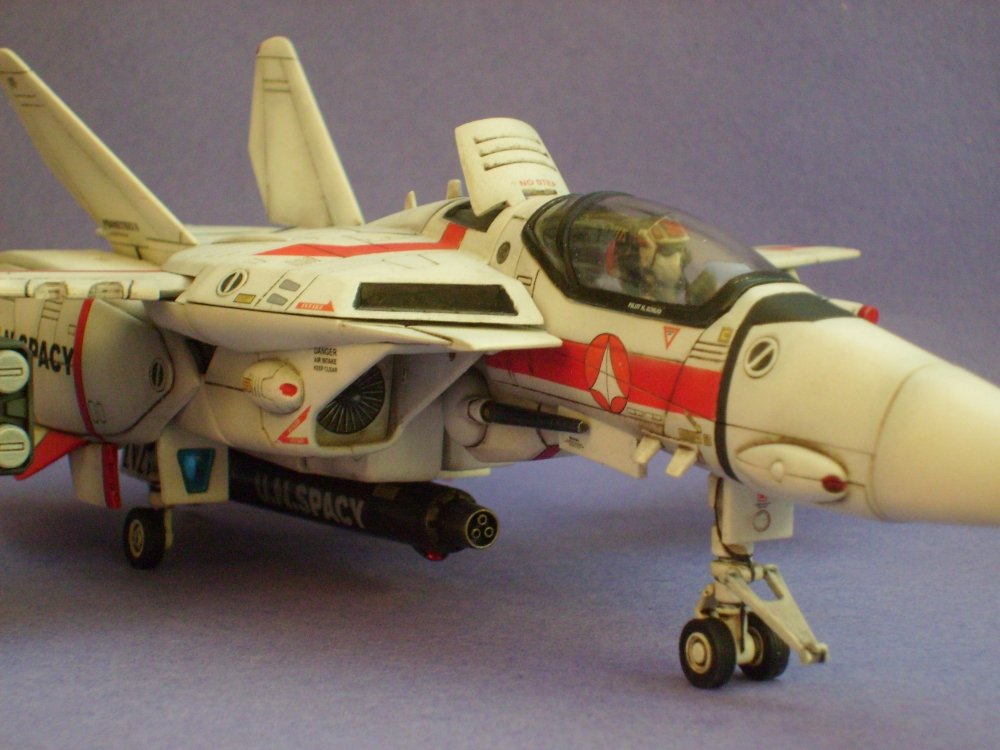
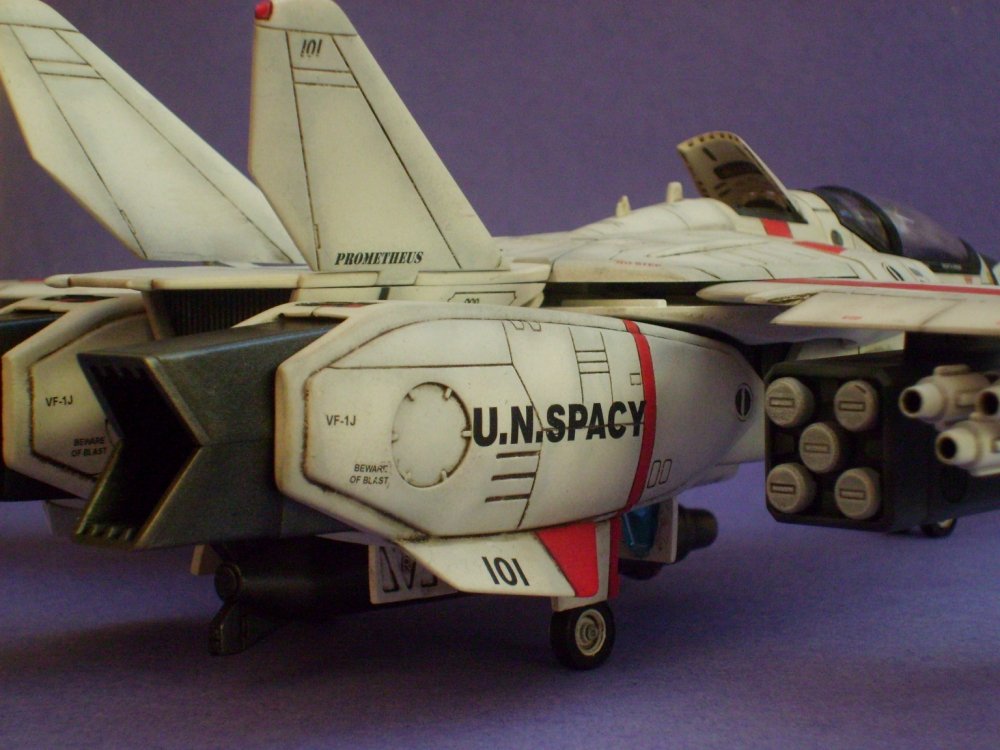
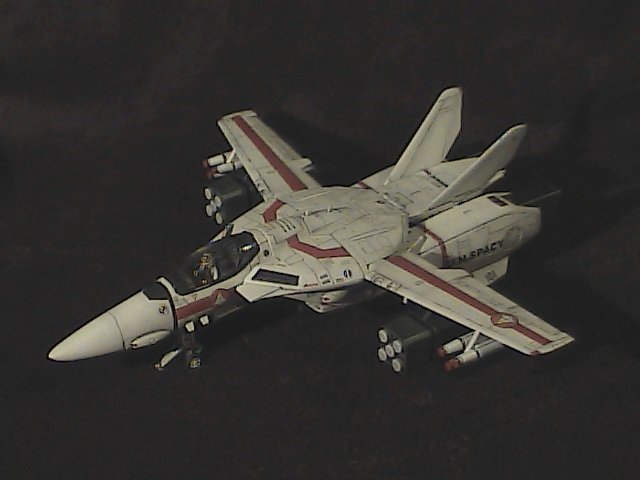
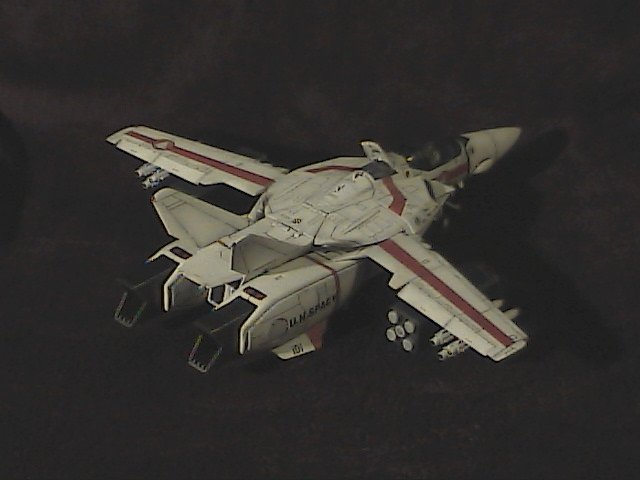
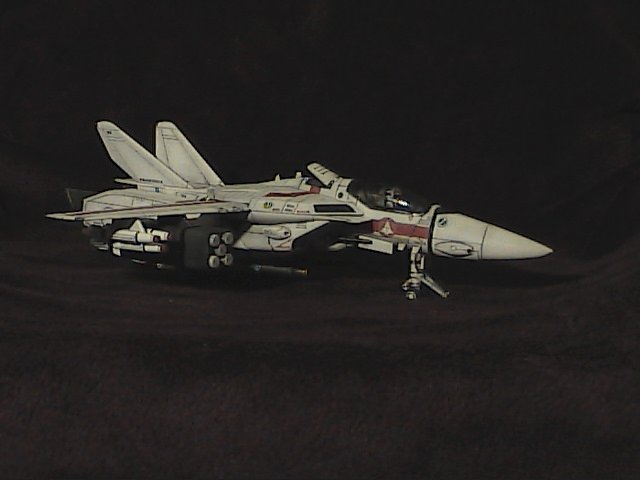
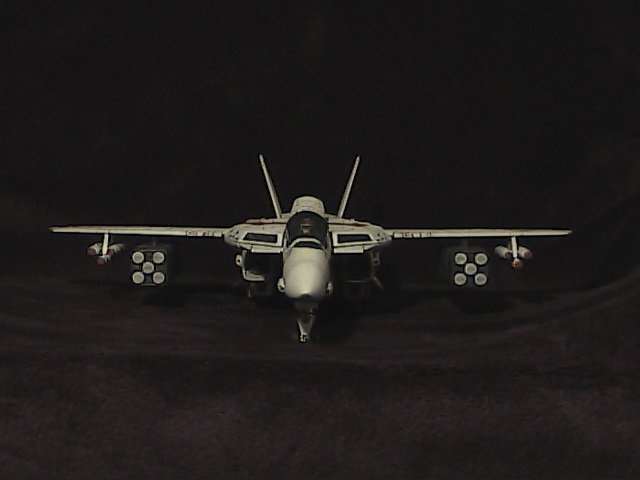
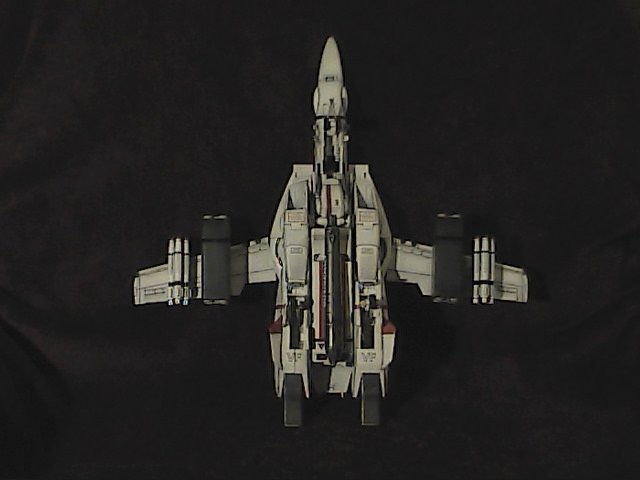
Hey all. Took some new photos, but it seems the new camera eats batteries like you wouldn't believe, so I had to avoid using the flash. I resized them to 1000 pixels wide. If you'd prefer higher, let me know, but this seems to be a happy medium between detail and file size. Anyway: Fighter mode: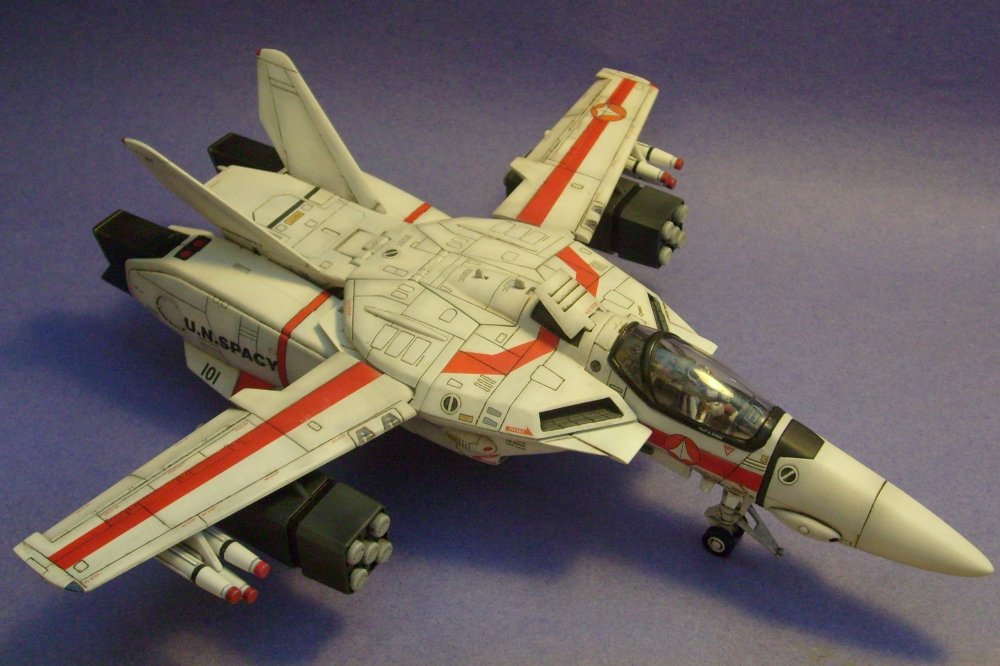


-
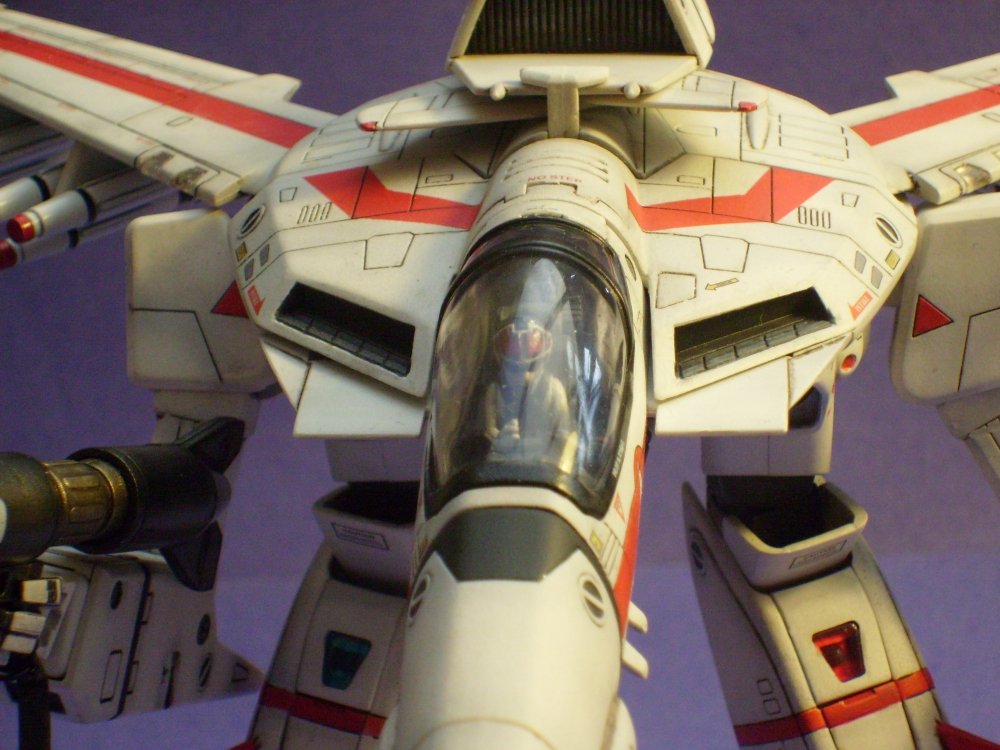
COMPLETED: 1/48 Yamato VF-1J Hikaru Custom
winterdyne replied to winterdyne's topic in The Workshop!
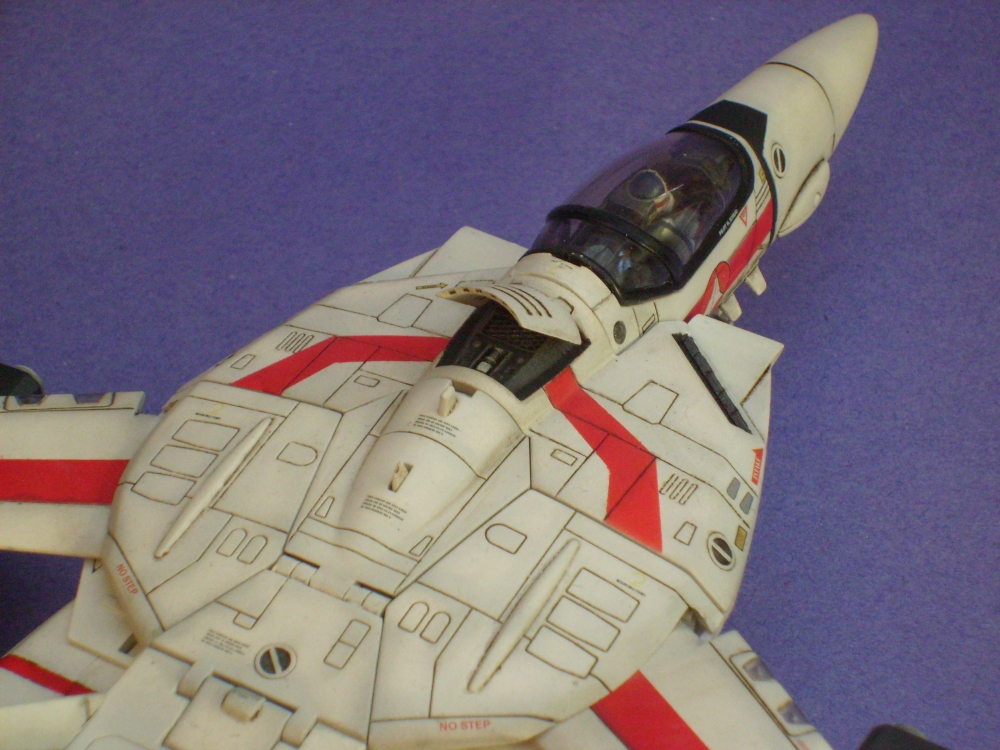
Hi res pic, just to test really. Will take more when I get a chance, with a better background.
-
COMPLETED: 1/48 Yamato VF-1J Hikaru Custom
winterdyne replied to winterdyne's topic in The Workshop!
I got a new camera for christmas, and it fits my tripod, so yeah, there'll be new pics soon. Woo! -
Planning customising/weathering 1/48 VF-1J and GBP
winterdyne replied to winterdyne's topic in The Workshop!
Ok, the valkyrie is done. Still have to flat coat the under-wing weapons and think about sealing the wash on the gunpod, intake covers etc. Not sure if I want to use a flat or gloss coat. I posted a completed thread here for the valkyrie. I'm repeating some information here and adding extra steps I did as I remember them. This thread is more the how-to sort of thing I think. Time taken: Approximately 20-30 evenings from starting disassembly to photo shoot. Equipent Used: Wet & dry paper - 320, 600 and 1200 grit. Badger single action, internal mix airbrush. A big ass compressor. X-acto knife, assorted screwdrivers, files, pokey things, tweezers, pliers etc. Size 00, 0, 1 sable brushes. Micro Sol, Micro Set. Transfers by Devin / Anasazi. Paints used: Citadel Skull White and Chaos Black 'smelly primers'. Tamiya acrylics: A big bottle of thinner, Sky Grey, Nato Black, Flat White, Flat Red, Flat Base, Gun Metal. Vallejo acrylics: Flat Red, Flat Yellow, Flat Blue, Light Grey, Gloss Varnish, Matt Varnish, Natural Steel, Bronze, Old Gold. Citadel acrylics: Chaos Black, Skull White, Scorched Brown, Catachan Green, Blood Red, 'Some prussian blue looking stuff without a label'. Oils: Low odour thinners, Raw Umber, Ivory Black. Future floor polish (SC Johnson Klear in the UK). Windowlene. Steps: First was disassembly. I basically stripped the whole thing down and set all the working pieces (ratchets, springs, foot mountings) aside. Those weren't to be painted. Clear parts that came out easily were removed. This was basically just the landing gear door lights. I SHOULD HAVE REMOVED THE CANOPY, even if damage to the cockpit resulted. That could have easily enough been repaired - certainly more so than the canopy. - All clear parts (wing lights, shoulder lights, head lens, gunpod lens, canopy) were masked with tamiya 18mm tape. Bloody good stuff. Next step was a lot of sanding and filling in the toymakers stamps on the wings. That was done with milliput extra fine white. I removed the original paint by sanding. Mr Muscle oven cleaner would have been easier, and resulted in less time spent cleaning particles out of panel lines. The heatshield line was scribed and then filed to on the lower section to create a lip. Don't think that's cannon but it helped with the wash and doesn't look too unsightly. Reassemble sub-assemblies for painting - forward fuselage, nose, upper legs, lower legs, backpack. It's a better idea to assemble parts like the lower legs prior to sanding - you'll get a better fit than I did. Again, if I'd chemically stripped the paint this is what I'd have done. Next was priming. White pieces with a white primer, dark with black. The canopy (still being on the cockpit was primed white - if removed it would have been black (which would have saved headaches). I tried a vallejo primer but it was rubbish, so resorted to the citadel primers. I use an old laundry drying rack and paperclips bent to hooks for holding and hanging to dry. Next was preshading. Tamiya sky grey along all panel lines (tight spray) and into recesses (wider softer spray). Left to dry. Dark pieces sprayed with tamiya gun metal excluding those on white pieces (upper thighs). Now basecoating - VERY thin tamiya flat white in broad spray over the whole model, and tighter spray to the middle of panels. Many many coats. Left to dry. Post shading on feet and gun with tamiya nato black. Erm, might have been flat black. Anyway, darker than the metal. Sharp line on front of foot masked to give defined edge. Now stripes - Masked with tamiya tape and paper for shielding. Nato black and flat red. Allow one set to dry before starting next. Remember to make circular masks for where the kites go or the stripe's visible through the transfer. Now details and pre-wash weathering. Gun and feet insides and ends drybrushed with bronze / old gold. Head guns painted black, drybrushed gun metal, bronze/old gold rings. Gunmetal sections on upper legs masked and airbrushed. Canopy rim painted nato black. Highlighted with a little white in the black. Stripes and so on are touched up by hand with THIN tamiya acrylic. You can't paint with this stuff from the pot - you absolutely must use a clean palette and thinner. And expect to do a few coats. Dont be tempted to pick out the black areas where the circles go if you're using Devin's transfers - they're quite transparent and you'll end up having to paint over them. Any remaining masking removed. Gloss coat - Straight Future / Klear. Couple of fairly heavy coats. Allow to dry AWAY FROM DUST. Important step to be clean in. Transfers - Devin's fine product. Micro Set to place, fix with Micro Sol. Cut as close to printing as possible, especially on kites and UN SPACY's. Gloss coat - Straight Future / Klear. One coat, nice and heavy. Allow to dry AWAY FROM DUST. Important step to be clean in. Oil washes - Mix of Ivory Black / Raw Umber - more umber on lighter areas, pure black on metal areas. Blended into recesses, pooled in panel lines. Flat coat - 'Flat future' - a mix of 7:3 Future/Klear to Tamiya Flat Base. Dead flat and pretty hard. Slice decals on joins. This applies to the kites on the forward fuselage, and the inset circles on the arms and back of the legs. If you don't slice the decal it may tear when you crack apart your sub-assemblies. Reassemble. Carefully. Hands were painted right before the photo shoot. Skull white primer, vallejo light grey wash (all over), highlight up with Citadel Skull white acrylic. Finger 'pads' - I think of them as force-feedback sensors - painted with Vallejo flat blue. Fine Citadel chaos black lines painted around those, and black also used to pick out knuckles and other 'working' parts, which were then picked out with a mix of vallejo natural steel and chaos black. -
COMPLETED: 1/48 Yamato VF-1J Hikaru Custom
winterdyne replied to winterdyne's topic in The Workshop!
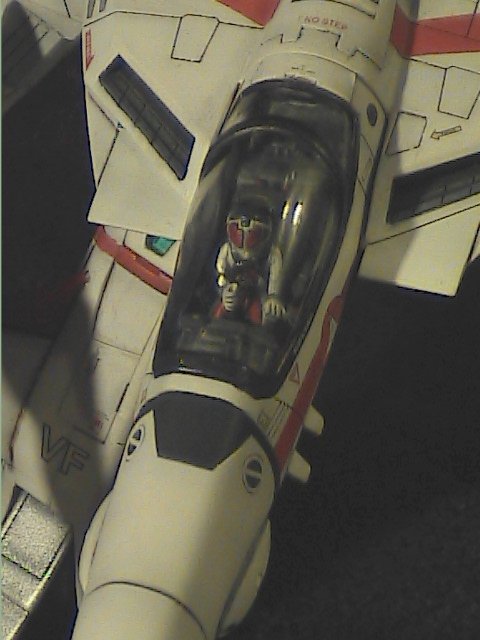
I need a better camera - these shots were taken with a little dvd hand-camcorder. Nice optical zoom on it, but its maximum resolution is only 640x480. For now I'll take some more detail shots in battroid mode, yeah? -
Yamato plastic is bonded just fine with 'Araldite' (UK name) which is some kind of fast setting epoxy resin. You do need to grip the join while it sets though.
-
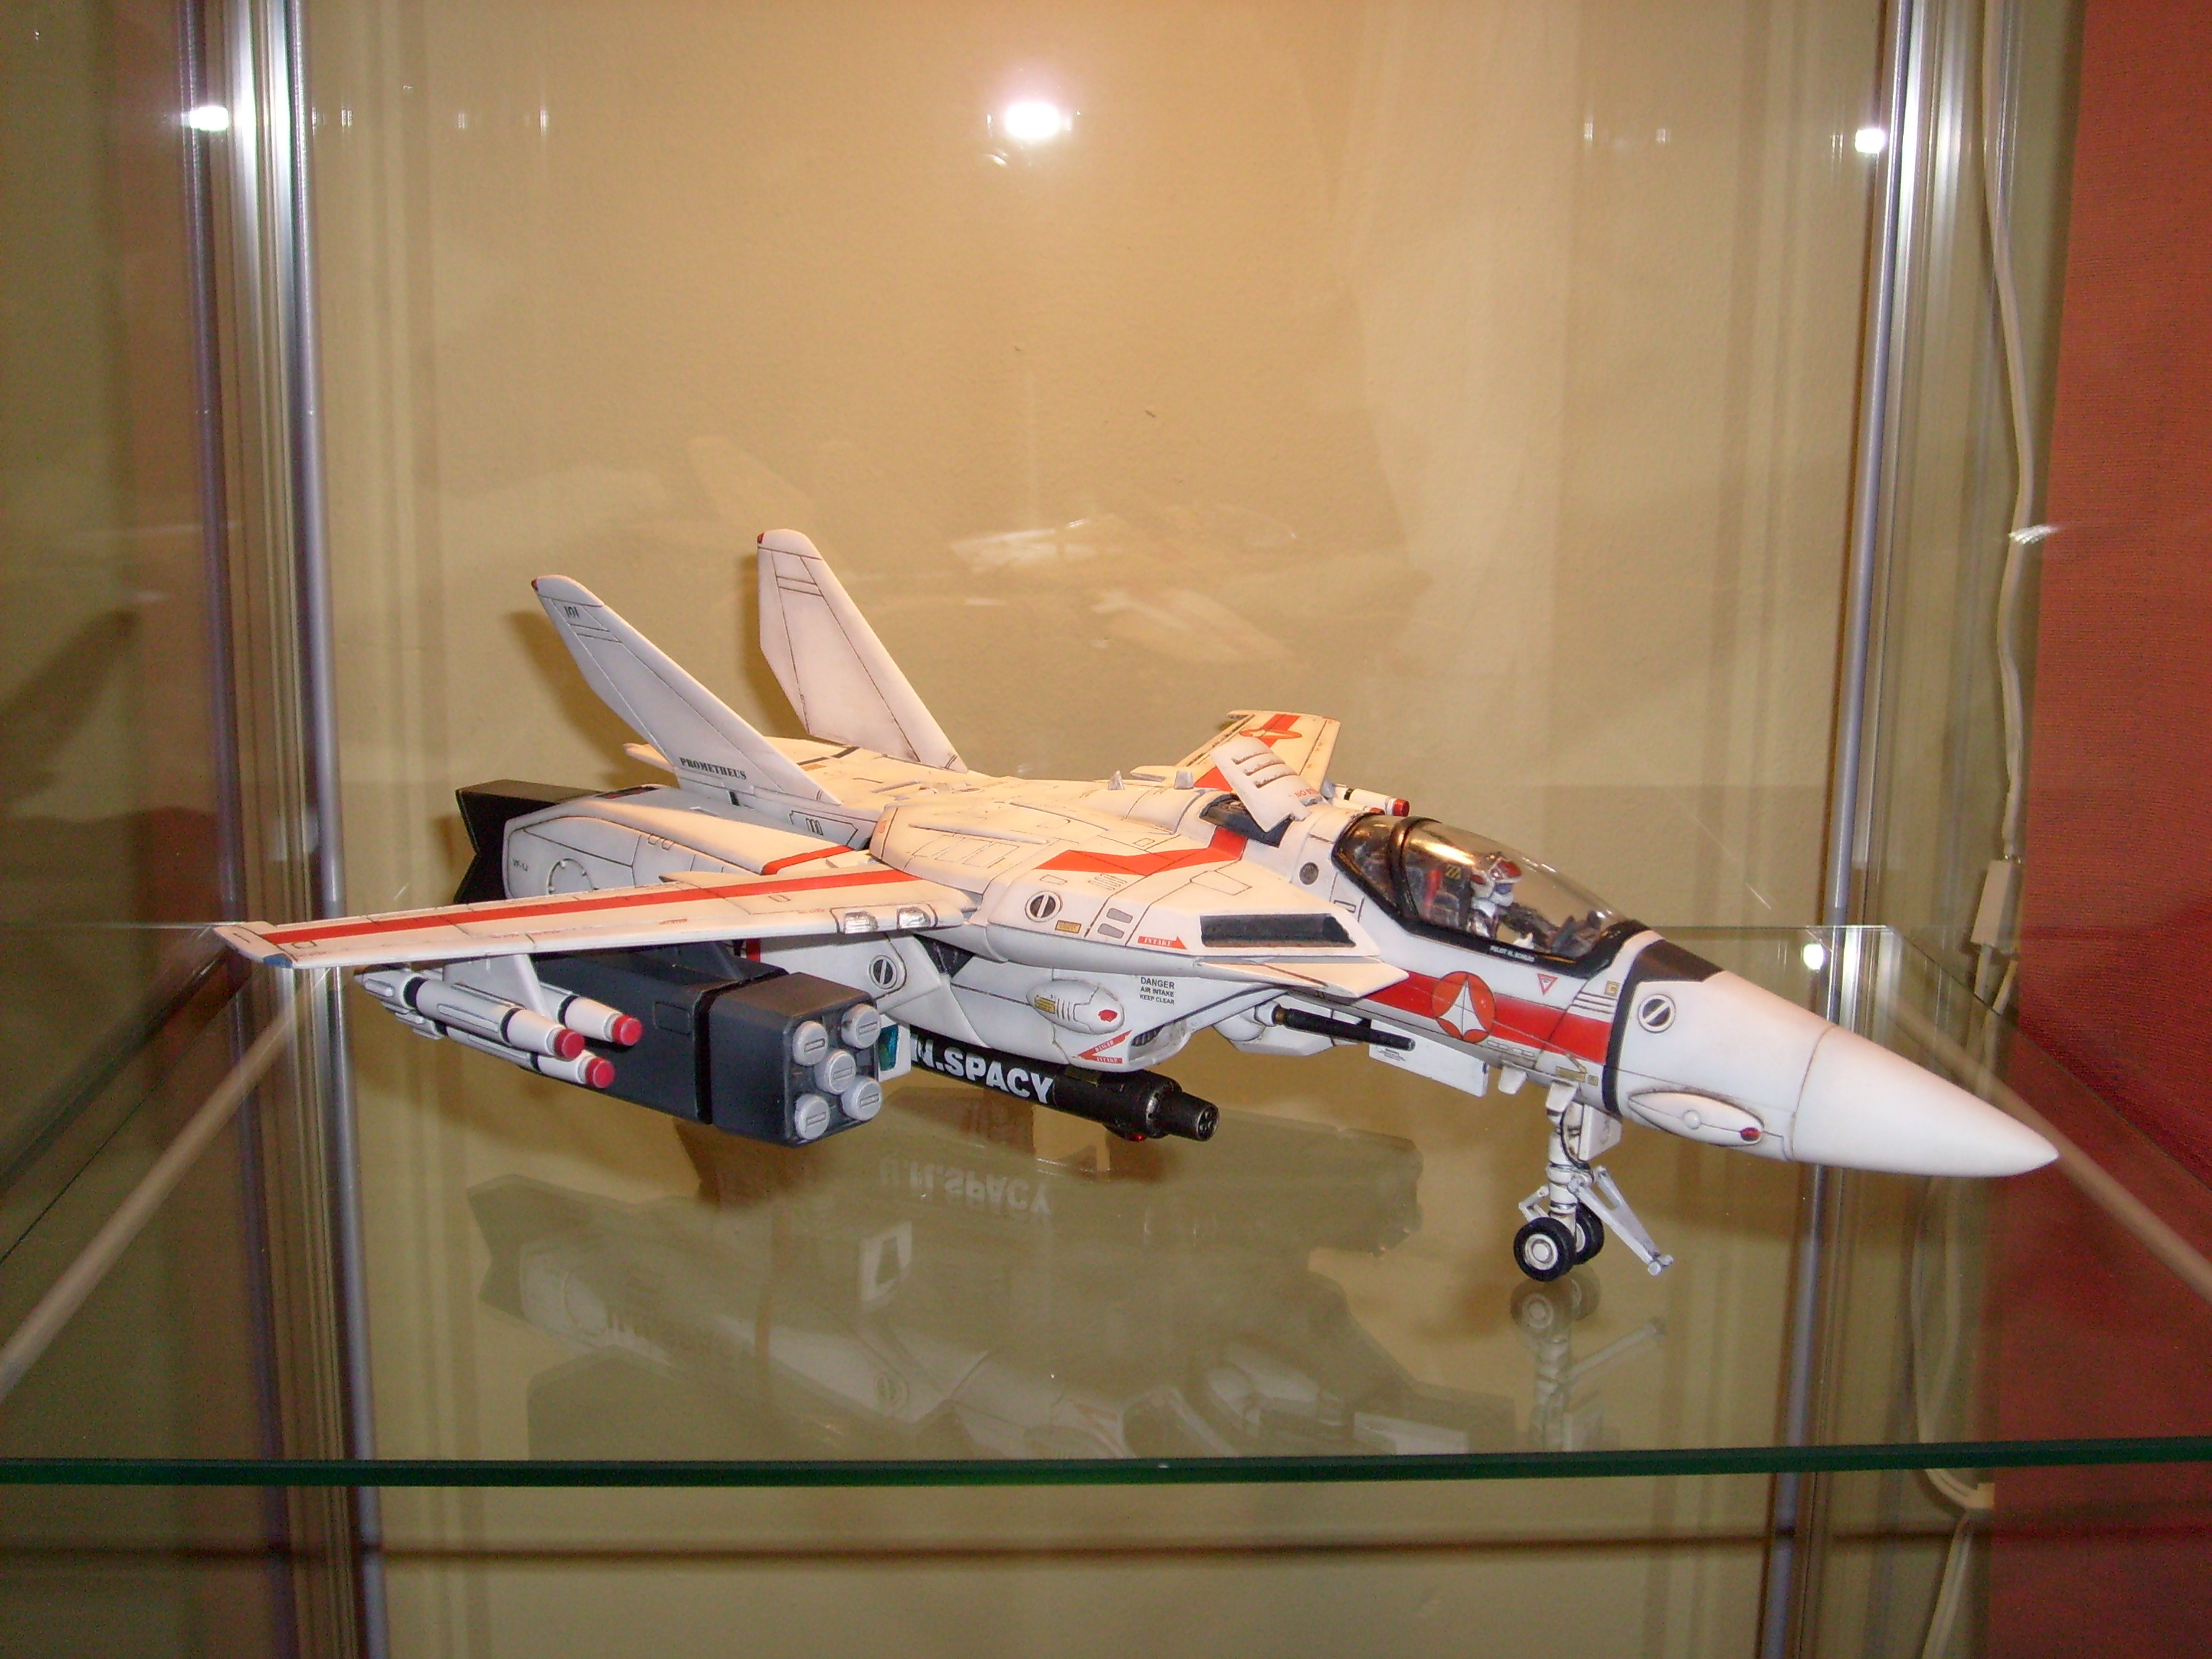
Display Your Collections...
winterdyne replied to bryan_f_davis@yahoo.com's topic in Hall Of The Super Topics
It transforms fine. Paintwork seems to hold up too. :-) -
COMPLETED: 1/48 Yamato VF-1J Hikaru Custom
winterdyne replied to winterdyne's topic in The Workshop!
First was dissambly. I basically stripped the whole thing down and set all the working pieces (ratchets, springs, foot mountings) aside. Those weren't to be painted. Clear parts that came out easily were removed. This was basically just the landing gear door lights. I SHOULD HAVE REMOVED THE CANOPY, even if damage to the cockpit resulted. That could have easily enough been repaired - certainly more so than the canopy. All clear parts were masked. First step was a lot of sanding and filling in the toymakers stamps on the wings. That was done with milliput extra fine white. I removed the original paint by sanding. Mr Muscle oven cleaner would have been easier, and resulted in less time spent cleaning particles out of panel lines. The heatshield line was scribed and then filed to on the lower section to create a lip. Don't think that's cannon but it helped with the wash and doesn't look too unsightly. Then masking - all clear parts (wing lights, shoulder lights, head lens, gunpod lens, canopy) were masked with tamiya 18mm tape. Bloody good stuff. Next was priming. White pieces with a white primer, dark with black. The canopy (still being on the cockpit was primed white - if removed it would have been black (which would have saved headaches). I tried a vallejo primer but it was rubbish, so resorted to the citadel primers. Next was preshading. Tamiya sky grey along all panel lines (tight spray) and into recesses (wider softer spray). Left to dry. Dark pieces sprayed with tamiya gun metal excluding those on white pieces (upper thighs). Now basecoating - VERY thin tamiya flat white in broad spray over the whole model, and tighter spray to the middle of panels. Many many coats. Left to dry. Post shading on feet and gun with tamiya nato black. Erm, might have been flat black. Anyway, darker than the metal. Sharp line on front of foot masked to give defined edge. Now stripes - Masked with tamiya tape and paper for shielding. Nato black and flat red. Allow one set to dry before starting next. Remember to make circular masks for where the kites go or the stripe's visible through the transfer. Now details and pre-wash weathering. Gun and feet insides and ends drybrushed with bronze / old gold. Head guns painted black, drybrushed gun metal, bronze/old gold rings. Gunmetal sections on upper legs masked and airbrushed. Canopy rim painted nato black. Highlighted with a little white in the black. Stripes and so on are touched up by hand with THIN tamiya acrylic. You can't paint with this stuff from the pot - you absolutely must use a clean palette and thinner. And expect to do a few coats. Any remaining masking removed. Gloss coat - Straight Future / Klear. Couple of fairly heavy coats. Allow to dry AWAY FROM DUST. Important step to be clean in. Transfers - Devin's fine product. Micro Set to place, fix with Micro Sol. Cut as close to printing as possible, especially on kites and UN SPACY's. Gloss coat - Straight Future / Klear. One coat, nice and heavy. Allow to dry AWAY FROM DUST. Important step to be clean in. Oil washes - Mix of Ivory Black / Raw Umber - more umber on lighter areas, pure black on metal areas. Blended into recesses, pooled in panel lines. Flat coat - 'Flat future' - a mix of 7:3 Future/Klear to Tamiya Flat Base. Dead flat and pretty hard. Slice decals on joins. Reassemble. Carefully. -
Mine. Where should I put thumbnails? http://macrossworld.com/mwf/index.php?showtopic=24528
-
Display Your Collections...
winterdyne replied to bryan_f_davis@yahoo.com's topic in Hall Of The Super Topics
My single valk. :-) Sorry for the cross-post (I have thread in building/customising) I'm just showing off. :-p
-
Time taken: Approximately 20-30 evenings from starting disassembly to photo shoot. Equipent Used: Wet & dry paper - 320, 600 and 1200 grit. Badger single action, internal mix airbrush. A big ass compressor. X-acto knife, assorted screwdrivers, files, pokey things, tweezers, pliers etc. Size 00, 0, 1 sable brushes. Micro Sol, Micro Set. Transfers by Devin / Anasazi. Paints used: Citadel Skull White and Chaos Black 'smelly primers'. Tamiya acrylics: A big bottle of thinner, Sky Grey, Nato Black, Flat White, Flat Red, Flat Base, Gun Metal. Vallejo acrylics: Flat Red, Flat Yellow, Flat Blue, Light Grey, Gloss Varnish, Matt Varnish, Natural Steel, Bronze, Old Gold. Citadel acrylics: Chaos Black, Skull White, Scorched Brown, Catachan Green, Blood Red, 'Some prussian blue looking stuff without a label'. Oils: Low odour thinners, Raw Umber, Ivory Black. Future floor polish (SC Johnson Klear in the UK). Windowlene. Approximate cost makes me shudder. I shall never think of it again.


-
But they are very fragile! I just scratched the kites on the nose of my newly cusomised valk whilst playing wi - erm, checking the transformation was still easy enough. That said, if you've got a very fine paintbrush and a steady hand, they're easy enough to blend in with thin paint. That doesn't really work on stickers as they tend to crease as they peel rather than wear away. Pro's and Con's: Transfers: Pro's: Can look really good, as though they were painted on. Con's: Extremely fragile, time consuming to apply. Use: On a custom valk that's going to get handled little and carefully. Trim your fingernails! Stickers: Pro's: Very easy to apply. Much more robust to handling. Con's: Prone to peeling over time, are obviously stickers. Use: On a valk you want to play with and aren't too concerned with a realistic finish.
-
Well, you did all the right things. Pure bad luck I guess. I wanted a painted-on look and was planning a custom paint job anyway, so I went for the decals. They're not so immediate - they're EXTREMELY easy to damage until sealed in, and need to be done after a gloss coat to avoid silvering. They also take some time and some nerve to apply. But they do look good.
-
As far as I know there's no real way to completely stop stickers peeling. You can prevent it for a good long while by thoroughly degreasing the surface to which they're applied. That way the adhesive actually does its job. For a really nice finish though, waterslide transfers and a good clear coat are the way to go.
-
Planning customising/weathering 1/48 VF-1J and GBP
winterdyne replied to winterdyne's topic in The Workshop!
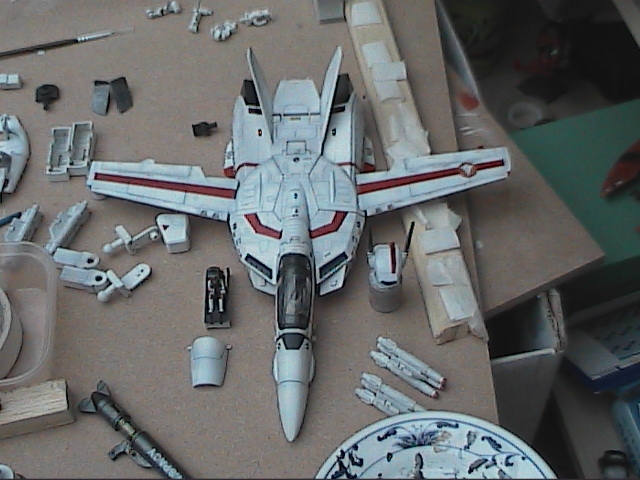
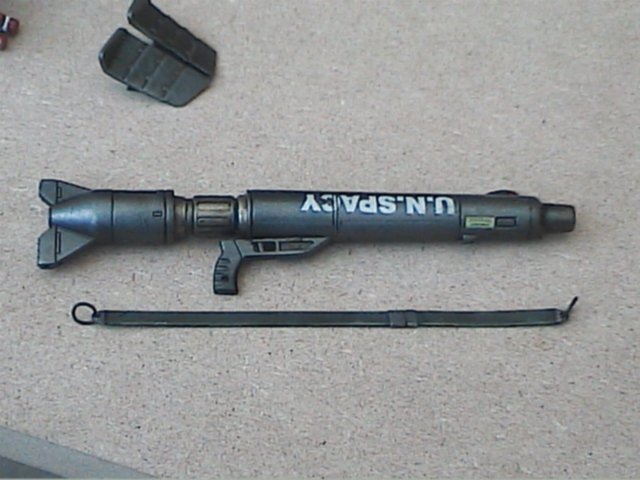
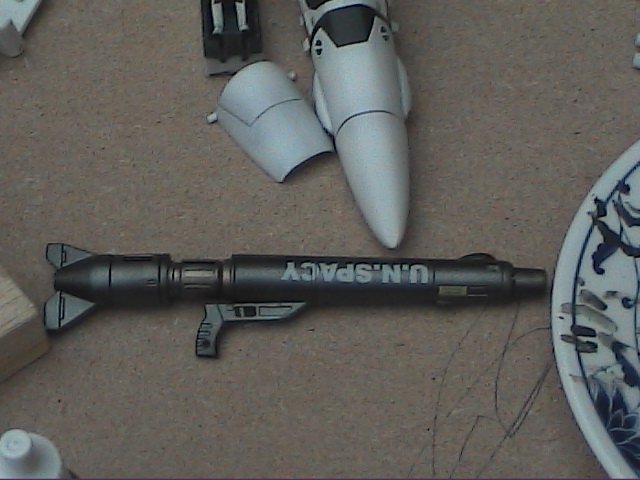
Hey all. I think I'm around 90% done on the weathering / panel lining now. A few lines need to be finished with thicker paint or scribed to finish (the front of the wing lights for example) and the canopy needs cleaning as the wet future got dusty. Grr. Oh well, some windowlene'll sort that right out. Everything else seems to be going pretty well. Pics: The whole bird: Left leg: Right leg: Chestplate (airbrake closed): Airbrake detail: This will get drybrushed up a bit to lighten it after the matt coat. Head 3/4 view: The head's actually got a very slight brown tinge to it (as does most of the valk) from the wash. Doesn't seem to show up well in photos. Head facing: Quite pleased with this. Need to darken the lining by the red stripe. Gunpod: This has come out pretty well. No idea if the workings of a gun are supposed to be a bronze/brass. Looks pretty though. Gunpod tip: This was also highlighted in bronze/brass to give a burnt metal effect. A heavy black wash brings out the detail and blends it in. That's all for now. I want to get finished for christmas...


-
I might be tempted to take a commission - but the question is what's a good price for what standard of work?
-
I'd check the U-bend / drain trap first. It's surprising what gets left behind in there.
-
Yeah, it's good stuff. I used it on my yammie. Tamiya paints stick to it very nicely. It does have a slightly grainy finish but it sands up nicely. I wouldn't bother stripping - better to keep it as an example of what you were like. I have a rather embarrasing hand painted RX78-2 Gundam on my shelf for that reason. That said, there are still some details on it that I like.
-
Planning customising/weathering 1/48 VF-1J and GBP
winterdyne replied to winterdyne's topic in The Workshop!
Thanks! I've been meaning to ask you about getting some recast parts - especially a couple of heatshields as I've recarved mine and am not sure I like it. If I can get 'em in resin they'll be easier to carve grooves into. I'm also thinking of sculpting a standing Hikaru holding his helmet or set of pilot parts, which would be nice to get cast up, either in metal or resin. Just had a nice mail back from HLJ, they can help with getting spares. Woot! For the next project, I'm thinking of a VF-1D - is anyone still making the custom kit for this? -
Planning customising/weathering 1/48 VF-1J and GBP
winterdyne replied to winterdyne's topic in The Workshop!
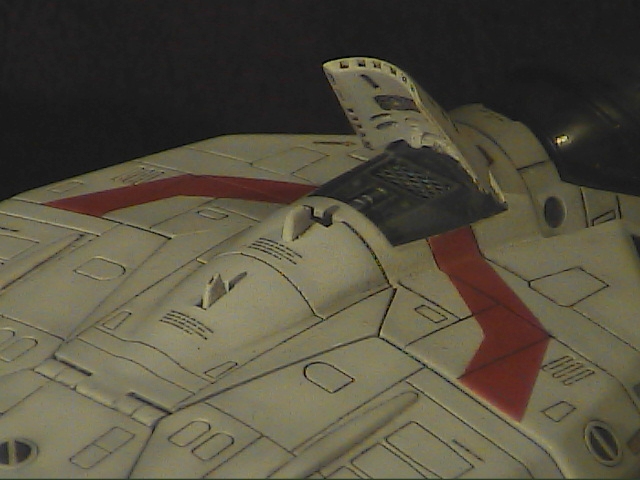
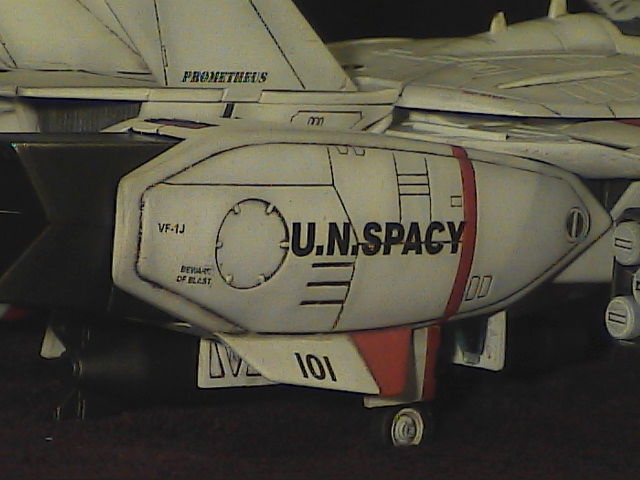
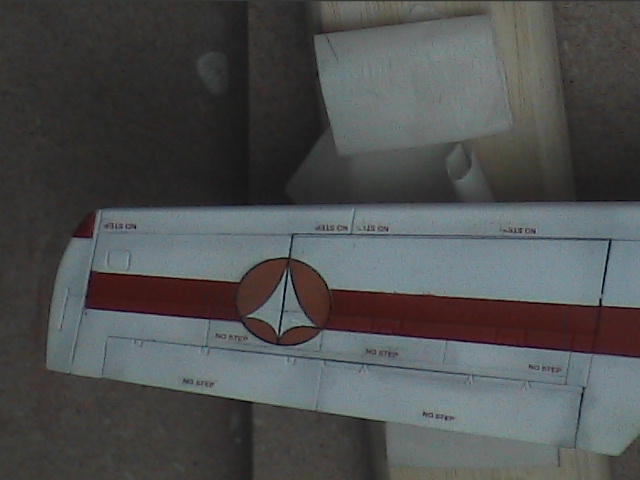
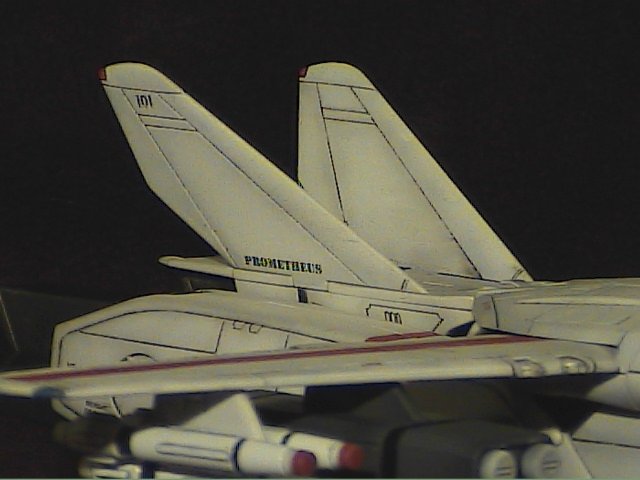
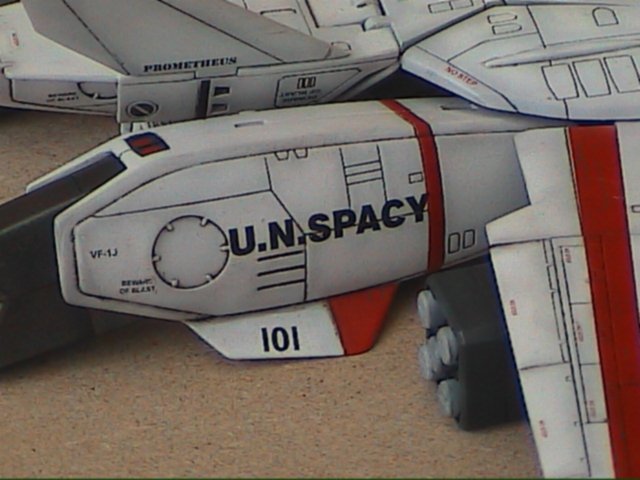
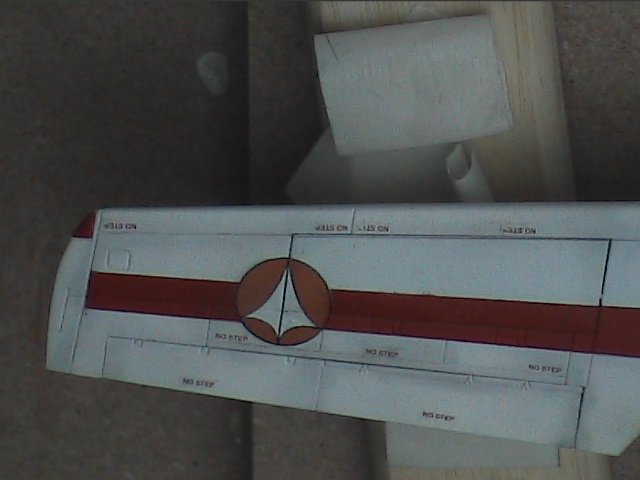
Ok, I've finished the transfers. I'm probably going to buy a spare set when I do the next valk so I can redo a replacement canopy. I need to apply a seal of future over these ASAP. Will probably do this as soon as soon as the paint on the micro missile pods is dry. From above: A good shot of the preshading. From front/right: Yup, looks like a custom valk now. Canopy closeup: Devin's transfers ROCK... Gunpod closeup: ... as does vallejo bronze / tamiya gunmetal for contrast. Left wing closeup: I ruined quite a few 'no-step' markers. It may have been an idea to practice with the setting solutions. :-) But where would the fun be in that? Tailplane closeup: I'll have to repeat this shot once the panel linings done. Left leg closeup: The UN in UN SPACY is a little shaky. I've tried to tidy it up with a scalpel, but I think I may need to try and blend in some white (over the future, into the preshade) to neaten it some more. Perhaps the oil wash will even things out? Then again, this valk will eventually be GBP'd at least some of the time. Comments, opinions, critique welcome (begged for in fact) as this is my first ever (!) airbrushed aircraft as well as custom valk. I'm thoroughly enjoying it tho, and can't wait to do another. I'm also planning on lighting the GBP legs for a laugh.


-
Anasazi Decals now available through Robographics
winterdyne replied to Anasazi37's topic in The Workshop!
I also can't recommend these decals highly enough! I've finished decalling my custom hikaru VF-1J. And it looks excellent. If I don't completely wreck it in the panel lining phase, I'll post finished pics here. I'm going to be ordering some more transfers (including a spares sheet) when my next valk turns up. Anyway, big kudos to Devin for providing this service again. I hope no more nasty impatient customers turn up. If so, they should probably try to get themselves an ALPS printer and see how long THAT takes. :-) -
Planning customising/weathering 1/48 VF-1J and GBP
winterdyne replied to winterdyne's topic in The Workshop!
ARGGGGHHHHH! I snapped the hinge on the canopy! Guess I sprayed the future a little thick in there and it's overstressed the part. Anyhow, I ripped it off, repaired it, filed down the recess for the hinge and it's now floppier than well, I leave it to your imagination. Looks alright closed though, and can always be tightened by wrapping tape around it. EDIT: Nope, just snapped it again. Still looks ok closed, but I'm going to need to epoxy a new hinge onto it. Grr. TOP TIP: If you're customising a 1/48 and are going to work the cockpit / canopy you really should remove the canopy before priming. It's held on by the part on the top/rear of the nose/cockpit assembly, which is glued in and held by a couple of pegs. The best way of removing it seems to be a big, flat nosed pair of pliers and just to wobble it off (snapping the pegs). It doesn't come of that easily. I didn't remove the canopy during painting and now wish I'd had the cojones to snap off that restraining piece and remove the canopy safely. Would have saved headaches in the long run. The cap piece could then have been lightly tacked back in place for preshading along with everything else then snapped off before reassembly. I'm basically now in the position where I can use the canopy I have (already decaled) for now but would like to replace it with a fresh one (and redecal that when I do my next valk - yes, the addiction has set in!). So, what I need to know is how the hell do I order (indeed CAN I order) a replacement part from Yamato? I neither read nor speak japanese, nor do I personally know anyone that does. That said, as you may have gathered I've now futured the whole plane and am busily applying Devin's excellent transfers. He's not kidding when he says they work well with MicroSol / MicroSet. Very nice transfer sheets, if you're planning on customising a valk I'd say they're essential, although they could do with some spares - especially the tiny 'no step' markings which I managed to destroy a few of. Mind you I haven't applied a transfer for a good few years before this project. :-) I'll try to get some pics up over the weekend. -
That's nice, I hope mine turns out as well!