winterdyne
-
Posts
189 -
Joined
-
Last visited
Content Type
Profiles
Forums
Events
Gallery
Everything posted by winterdyne
-
Planning customising/weathering 1/48 VF-1J and GBP
winterdyne replied to winterdyne's topic in The Workshop!
Washes are pretty much done... been using ivory black for the white (it's a dark brown) and carbon black on the green. Some light grey drybrushing, but it's not going well, will leave it now till after the flat coat, when there'll be more light grey drybrushing and a filter spray of desert yellow or tan/buff over the gbp armour only. Pics: Hope to have this finished in around 3 sessions from now (probably a couple of weeks). Still not very good at the low-light photography. Whilst the lights look ok, I can't seem to get the colours looking right, and the nato black strips look green, but that might just be reflection in the gloss coat. -
My GBP continues... washes pretty much done, still need to do missiles, and a bit more weathering.
-
As long as you won't get your ass kicked by your neighbours 'cos your compressor makes a racket, you can use an airbrush safely. It's what you put through it that can be nasty. I don't think an extractor setup is absolutely required, but you have to be aware that breathing paint particles is not good for you. Ensure you ventilate the room (open a window!), and work in short shifts, allowing the air to clear in the interim. Avoid using lacquers if you don't have a proper respirator / mask and painting room (one that stops the stink from spreading), or use those outside only. Tamiya paints and future are fine indoors, not too smelly and not too persistent. Priming with a rattlecan remains a smelly step though.
-
Erm, just noticed that in the small inset on the card in the background the cockpit appears to be open. Guess there will be a pilot and detailed cockpit then.
-
They bloody will when I'm done with it! And the cockpit and targetting sensors on the guns. Oh yes... I want sooooo bad.
-
The general sequence is: Clean and sand Mask Prime Base coat Preshade Mask Livery colours Gloss Decals Gloss (or apply just on top of decals if you're setting with future) Oil wash Gloss (optional) Flat coat First - before using an oil wash ensure the future is fully cured. If you're using microsol / microset you also need to work on fully cured future. If using future to set you can be a bit more cavalier, but it still works best on a cured surface (as the future you use to set your decal dissolves the stuff under it - if its not fully cured this can happen a bit too fast). Oil washes can have different consistencies depending on what you're trying to achive. I use a fairly thick wash around 2-3:10 paint / spirit mix. With a fine brush loaded (without a droplet on it - just the paint in the bristles) touch it into the panel line groove. It'll flow along the line like magic. Allow this to dry for an hour or so, then there are a couple of tricks you can use: First is for clean lines - use a q tip just barely dipped in the spirit (slightly moist, not wet) to gently pick up the oil from outside the line. Move it and turn it simultaneously so clean q-tip is always in contact. Dispose of as soon as dirty. Second is for flared lines or pre-weathering - get a large, flared, very soft brush (1/2" diameter round) and with no paint at all on it, move it with fast, gentle flicking motions parallel to the lines. Do not stab or scrub with the brush. This has the effect of streaking the wash and can look good for air flow. Because the bristles don't touch the recessed part of the panel line the oil is left there. This is basically the drybrush technique. You can also put some spirit on the brush to really spread the oil around. Be aware that oils WILL find the edges of decals unless you microsol'd them with extreme prejudice. You should be careful applying your wash if you set with future - the edges can stay proud. Once done, allow to dry for at least 24 hours before sealing. More is better. There is another drybrushing technique where you apply paint to your brush then wipe it almost all off. Use the flicking motion described above on the back of your hand. If the paint puts a dusty finish on the texture of your skin, you've got about the right amount of paint left. Gently tickle the raised areas and paint will adhere. It's surprising how little paint you need. Weathering itself is a massive subject. Some paint 'clean' then dirty up. Some use preshading (early in the painting process). Some use grubby washes at the panel lining stage. Some use grubby washes after everything. Some use dry pastels (effectively a drybrush technique), some crunch em up to make gak (modeller term for fake mud) or washes. Only experimentation wil tell you what you like. Me, I use a grubby oil wash (raw umber / black) and preshading. My GBP is also gonna get a fine spray of 'some light brown / sandy kind of shite'. It's that precise. Oh yeah - with dry pastels I've heard it said that after the flat coat is the best time to apply them. They dull less, but if you screw up it's bad news. Personally I've not used em so I can't offer first-hand opinions. Most effects can also be done to some extent with oils and a good eye I suppose. Except gak, as that's a texture thing.
-
No, to clean up an oil wash use low-odour mineral spirits (available where you get your oil paint). Don't use windowlene (or any ammonia based solvent) on top of klear, as it will remove it. If you're working on a model that'll be handled a lot, it's probably advisable to put another coat of gloss between your wash and your flat coat. Incidentally, I've had great success with using the klear to set decals. The technique's described in the complete future. It works.
-
Klear can be got at Wilkinsons, Morrisons, Safeway and Tesco for sure, Sainsburys as well. About £2.40 / 500ml. You'll also need windowlene to clean the airbrush after using it. If using 'flat future' - the klear/flat base mix, blast through with water first to remove the bulk of the stuff, then windowlene, then thinner. Rather than windowlene you can use an ammonia solution (from chemist) watered down, but that stuff really stinks. Oh - it does work wonders on the 1/48 canopy too - makes it look a lot thinner and clearer. Edit: Although a little goes a long way, I've heard a very nasty rumour about Klear being discontinued by SC Johnson. I'd advise you getting a few bottles in case this is true, especially if you do other modelling as well - it's an excellent all-purpose varnish. Edit: Guh, Tamiya Thinner, £5 on Amazon. Bargain.
-
Might need you to pick up a couple of bottles of thinner for me! Gonna have another look round first though see if I can't get em somewhere. I think Tamiya do enamels, but I've never seen them. X-20 is the thinner I think. Yes, you do need to thin it. Micro sol and set work well, I paid £3.50 a bottle. Can't see em running out, like ever. I've just started experimenting with setting decals on with future (see below) to avoid silvering which would look worse than a slightly proud decal on my mostly dark green gbp. Yet to see how the wash stands up to it. Primers generally are flat, so there's no intermediate flat coat no, if that's what you're asking. Panel lining - there's a great article called 'The Complete Future' accreditted to Swanny iirc. I'd probably be slapped if I didn't mention it, but the gist is to use a floor polish called 'Klear' ( 'Future' to the colonials ;-) ) instead of lacquer. Mix it with a little Tamiya flat base (around 8:2 - 7:3 Klear:Flat Base) and you've got your flat coat (and lots of it) for cheap. The oil wash technique - go look at some of wm_cheng's step-by-steps and follow the instructions and it's easy.
-
That's an external mix. Don't like 'em. THERE IS A REASON THEY'RE CHEAP. Not saying any more. But yeah, those are the sort of jars you want. This ebay listing looks like a nice one, though I think this at machine mart is the same thing for a couple of quid less. These are dual action, they take a little more getting used to, but (because) you get much more control. I strongly advise testing your spraying on paper before your model with each pass, and only adjusting the paint flow when you're not aiming at your work.
-
I took it off and put it back on several times - off to paint under it, on to preshade the top surface of the valk etc etc. It goes on and comes off easy.
-
I didn't remove those - just masked them, on my hikky 1j they were glued in good. :-) Same for the wing lights and visor/eyepiece and the red light on the gunpod. The rear wheels look to be attached by a flared tubular axle. This is basically a thin tube glued into the gear leg, passed through the wheel and then flared with a punch. Sounds very much like you either need to re-punch the axle (to flare it out so the wheel doesn't fall off). If the axle doesn't protude enough through the wheel, you'll need to make a new one - many options you could go for. Personally I'd probably look for a very small, flat headed brass rivet, drill into the gear leg and epoxy it in. Note that when punching a tubular axle, you need to use a round punch and knock as in line as you can to the centreline of the axle, or it'll flare to one side and look wrong (and be impossible to correct).
-
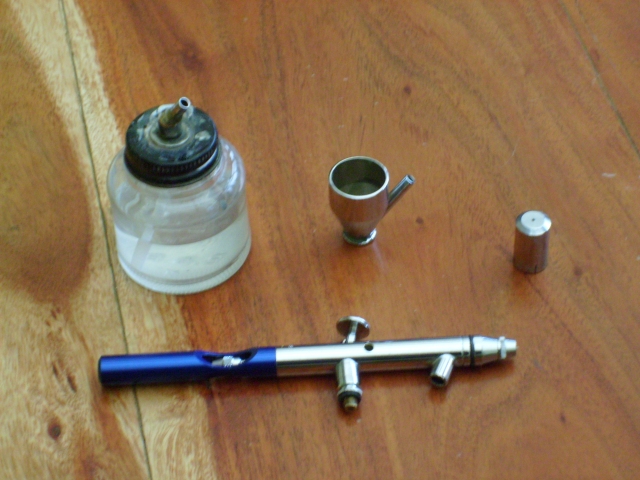
That compressor looks ok - small and quiet, and at the moment the bidding's pretty low. I think I've seen that model in a local model shop for around £200. Jar with attachment and removable cup. These fit both my airbrushes. As I said, you'll be wanting at least half a dozen jars, but you can scrape by with only a couple of the attachments for them - it just makes it easier to clean your brush by having one just for water, and another for paint. Airbrushing is one of those things where having the right kit (and enough of it) can make your life much easier. As for the brush (bristle brush), as long as the bristles are fairly long (>1/2") and soft, it doesn't matter too much. You need to be drawing the paint smoothly, not flicking or scraping it as it dries. Doesn't need to be sable (but synthetic brushes will be killed by cellulose thinner if you paint with lacquers) and doesn't need a fine point - this is for touching up without leaving brush strokes. It does need to be soft - keep it clean at all times. Unlike a fine-detail brush, where a little left over paint can help keep a stiff point, left over paint on it will simply mess your finish. Automotive emery papers are fine. 1200 for finishing / sanding coats or drops or runs, 600 for prep work, and 320 for being a butcher. Work wet on bare plastic, dry between coats and have a bigger soft dusting brush (ladies' blusher brushes (CLEAN) are ideal) for removing the dust.

-
A photo of the damage would be good. Has the peg/axle fallen out or is it just loose?
-
I use a nu-air NAG700 compressor. Sounds like a motorbike, but has a nice big tank. Not really sure where the regulator came from. I use a Revell Profi-plus IDB750 dual action airbrush. Paint wise, Tamiya is I think best. Use Tamiya thinner, and thin with around a 80-20 paint-thinner for solid work, 40-60 for preshade, then 30-70 for overspraying (blending). You'll be wanting a lot of thinner. Buy the larger bottles, not jars. It's substantially cheaper. They're a bit difficult to get hold of, there was talk of being able to use iso-alcohol instead, but there are apparently issues with that. You can spray with GW acrylics, but they're not so well formulated for it. I thinned with water and a tiny amount of washing up liquid to break up surface tension. This also worked with vallejo acrylics. I will experiment with this more (given the difficulties with getting tamiya thinner) but to date I haven't dared try on anything expensive. Tools you'll need: Compressor WITH TANK, REGULATOR (pressure guage and outlet), MOISTURE TRAP, and 1/8" connector (I think that's the standard airbrush hose). Ensure the regulator can be closed and has a pressure release on the outlet so you can remove your airbrush (and or hose) whilst there's still air in the tank. Otherwise cleaning becomes a bit of an exercise. The guage, you just need to be able to read. Mine's in bars (~15psi/bar). Similarly, a marked regulator (settable in bars) helps. Various techniques call for different pressure settings. An airbrush - to start go with a single action (dual takes practice). These adjust paint flow by screwing the needle in or out of the tip, as opposed to levering the trigger. Internal mix (inside the body of the brush) is best to avoid spattering. External mix blow air across a small opening to draw paint up into the airstream. They spatter more. Get an airbrush that takes a small tube as a feed for paint - either a removable metal cup or a jar adapter fits into this. Airbrush hose - do not leave this attached to your compressor. Repairing it when it splits is a pain. Cheap and vinyl, or expensive braided. Your choice. Bear in mind that the braided hoses, although much tougher can still suffer from buckled connectors etc. Jars. Lots of little jars. Buy them from hobbycraft in the uk for about 60p. Also get jar adaptors (with a little tube!) that fit the top of the jar and have a connector for your airbrush. These are well worthwhile for cleaning, and dealing with mixed and thinned paint. You'll want at least half a dozen. Gloves. Latex gloves to keep paint off your hands and finger grease off painted surfaces. When you gloss with an airbrush for the first time you'll know why these are on the list. A Mask. Something to stop you breathing paint particles. Cotton buds / Q-tips. These are great! Use em to clean your airbrush (dipped in thinners) regularly. A wet q-tip fits neatly in the feed of a standard airbrush, and helps clean it out. Also used for cleaning up oilwashes etc etc. Cocktail sticks. Superglue to parts you're painting and use as handles. Stick em into a block of polystyrene foam as a quick and easy 'paint tree' to hold up wet parts. Use to mix paint, test consistency etc. Newspaper and 'spray boxes'. Unless you're using a paint booth you've built, chances are you're trying to paint on a table in your house. I use a shoebox, a document box, and a large house removals box as paint boxes. Those go on the table, and get lined with newspaper (taped on with cheap masking tape). Spray into the box (so it doesn't go all over your table / house so much), and toss in your crap like used sticks and q-tips. When finished, or it's too messy, just fold the paper in and bin it. No mess. Sandpapers. Yes, you may need to sand your paintwork if you get a nasty run or droplet. I use 1200 grit (DRY) for this, with very very little pressure. Make sure the paint is fully cured before trying to sand it. If it runs, finish the coat if appropriate and sand away the run once it's all dry. Unless working over a preshade, this usually works for me, even then the resultant weird colouration can be disguised with weathering. Masking tape - some cheap, some tamiya. I've not found any tape that compares to tamiya for actually masking on other paintwork. The cheap tape is for sticking newspaper to stuff mostly. Soft, long bristle paint brushes - Can also be used to pick up runs, and for removing dust. Patience - Your most valued tool. Read up on techniques for anything you're wanting to try (google airbrush preshading techniques, google the complete future), and test your hand with *your* airbrush on a bit of paper or old model before frustrating yourself on something costly. Think that covers it. Oh yeah, when you get an airbrush, take it apart, and put it back together at least 3 times. You'll want to be able to do that quickly to clean it once it starts spattering when you have a mix you can't quite remember in the cup.
-
Car shops are good for sandpaper. My local one (in addition to primer etc) sell 320, 400, 600 and 1200 grit paper to me quite regularly.
-
A good trick for long fine stripes is to put two blades into your knife, with a spacer between them to spread them apart. Use a good-edged steel ruler and very little sideways pressure and you can cut a very thin strip of masking tape. Still need to be careful with applying it, but I've seen this trick used for pinstriping trousers on large scale figures. Looks like a good method, but have yet to try it myself.
-
If you're painting in the house stick with acylics - tamiya are ok and not too smelly, and work very well.
-
If you're not too fussed about noise, a large tanked compressor can be got at machine mart for a reasonable price with regulator and moisture trap. The airbrushes they stock are ok too - dual action all metal fetch around £30. Wayyyy cheaper than model-specific. Just go in, tell 'em what you're trying to do and they'll show you appropriate kit. The most important thing is to get a compressor with an air tank - not a simple pass-through one. You WILL notice the pulse, and it won't help you at all. The tank is paramount. Those cheap little compressors pulse like anything - avoid!
-
Looking good! Irreplacable decals? Am I the only one looking at getting into printing them then? Really need to think on how to secure the cash to buy the rig... preferably without taking pre-orders.
-
For masking, go with tamiya tape. It's very good at not lifting the painted surface you put it on, and it allows very little creep under it if applied properly. Regular DIY masking tape is ok for larger areas / attaching paper masks, but don't apply it directly to your work. Pay the extra for the proper tools and materials, it's worth it.
-
The lower leg screws are hidden behind verniers at the top, and behind the 'grid like' piece at the bottom, both on the inside. Be careful prising these out, it's easy to scratch the surrounding area. Sounds like the plastic may have reacted to the brake fluid. You'll probably have to repaint it on both sides. Decals - not sure who's printing these at the moment. I'm looking into getting started up, but it's expensive to buy the kit. Extra parts - should have come with your valk and armour. Unless you mean the small folding hands, which can be tightened up with nail varnish.
-
I don't know anything about pine-sol. For the oven cleaner, I put my parts in a clear plastic take-away food tray, with lid. Spray the foam over it, cover it, and put it aside. You'll be able to see when the foam's died down, at which point rinse and scrub with an old toothbrush or nail brush. You'll probably need to repeat a few times. Seems to take a couple of hours for the foam to die down. Depending on the paint, you may need 3-4 repeats to clean something up well.
-
Assuming the ball joint construction is the same as the 1/48's - dismantle the casing (shoulder). Inside there will be two soft plastic / rubber covers that enclose the ball. Take these out and coat the inner surface with a few coats of nail varnish (or coat the ball). This will tighten the joint. Reassemble. Remember to allow to cure fully between coats and reassembling, and make sure the nail varnish wont attack the rubber by testing the back first. A more temporary fix is to use PVA glue, but this will rapidly wear out and need replacing (and you'll notice it falling out of the joint).
-
Oddly, I saw it on a Ma.K. site, the guy had used it on wreckage behind a couple of space-types. Anyway, you prime up as normal, and apply your 'undercoat' - usually dark grey to represent primer. Then you spray it with a water based hairspray (tresemme I think was what he used). Then you paint over that as normal. Cos the hairspray's water based you can clean it off (and the paint on top of it) with a damp, stiff paintbrush, scuffing it up to get a nice chipped look.