winterdyne
-
Posts
189 -
Joined
-
Last visited
Content Type
Profiles
Forums
Events
Gallery
Everything posted by winterdyne
-
Skull-1's right - the sanding is the most important part on a transformable job - but if you're using acrylics the primer provides better adhesion than the raw (even sanded) plastic. The paint rub effect you can minimalise or make look 'right' by using an appropriate primer for the part - if you've got white shining through on something that's meant to be metallic it'll look wrong, but black doesn't look so bad. On my valk I actually had to prime some parts in differing colours - the upper thigh has both black and white sections on it. On small scale kits, you only really need a light coat of primer, since it's not going to get a lot of handling your main motivation is to get as even a colour as possible with as minimal a thickness of paint as possible.
-
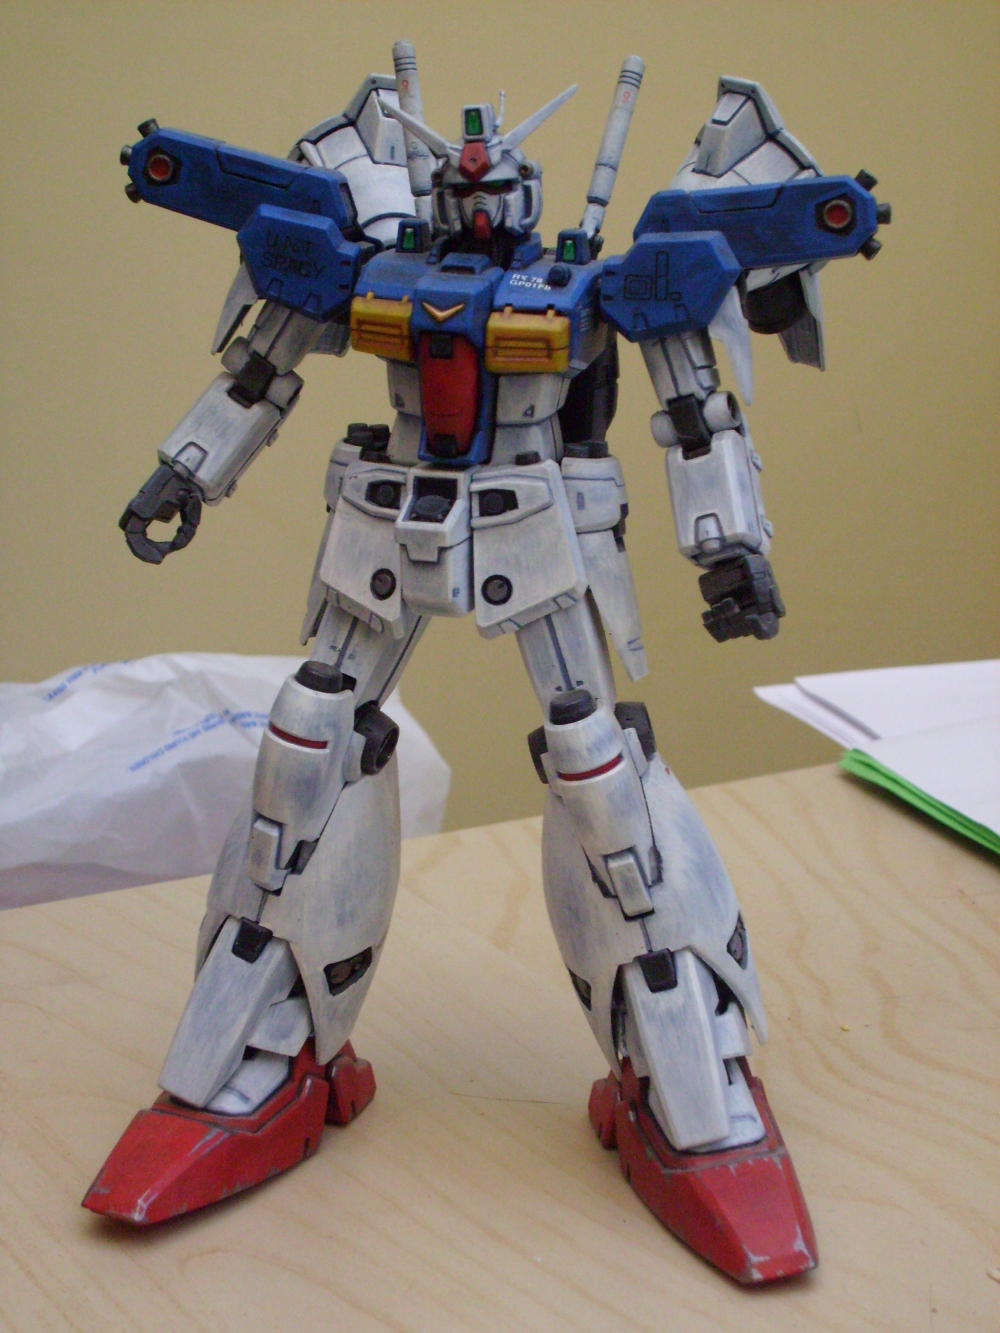
If you just want to strip the whole thing Mr Muscle Oven Cleaner rules. Just don't breathe it, wear gloves and it'll take everything off. You can also use a little tamiya thinner on a qtip, brasso (wadding type) etc. Acrylic comes off pretty easy. It does dry fairly fast - especially the tamiya ones when used neat. The paint is often too dry before it hits the model which is why it needs thinning more than the others I've used. To paint white solidly, the best way is to ensure you have a white or light grey undercoat (primer) and to use a soft, wide brush and 3-4 coats of thin paint. Sometimes the only way is to paint with a high pigment grey (Vallejo 'light grey' works well) first, and then the white on top. This is the rule of thumb - for an even solid colour on a larger area use a softer, wider brush. Don't be tempted by cheap brushes! For fine detail, use a 'pointy-tipped' brush. The number of 0's doesn't matter nearly so much as how well the brush holds its point. Natural sable brushes work exceptionally well in both regards. Also, look after your brushes (or they won't last 2 sessions): 1) ensure you clean paint away from the ferule (the metal bit holding the bristles to the handle) 2) clean bristles after rinsing by gentle pulling through a paper towel or tissue away from the ferule. 3) reform bristles into a point before storing BRISTLES UP. Don't be tempted to 'scrub' your brush on a rag or surface, and never store bristles down. Going back onto white techniques: I generally paint a white surface by highlighting up as opposed to shading down - this means I paint the surface grey and apply successive thin coats over it. On a small scale aircraft or vehicle you can do this to get a feathered effect for highlighting / weathering. I used less than 3 passes on this rushed GP01Fb: You can also do 'scrub drybrushing' with a very old brush and an absolutely minimum amount of paint. Unfortunately I don't have an example to photo. The technique for that is to use an old, flared, soft bristle brush in a circular 'scrubbing' motion (like ladies' blusher) to lighten an area. Concentrating in an area (by moving in smaller circles) gives you a faster, tighter application. This trick's about as close as you can come to airbrushing without actually having an airbrush.

-
Tamiya acrylics work best when thinned with the tamiya thinner (although an isopropyl / water mix apparently works quite well too). The other brands I mentioned thin with water. Priming is necessary for 2 reasons: First, to give the second layer of paint something to adhere to - the primer (usually an enamel or lacquer) melts the plastic slightly and bonds to it - the other paints don't and need the keyed surface provided by the primer. If your model is going to get handled at all, you need the additional toughness this gives to your paint work. Second, to provide an even base colour - white primers work well under bright colours, grey under neutral and darker tones and black under metallics or very dark colours. When brush painting you DON'T want to put too thick a coat on (where you can end up with brush strokes in the surface), instead it's better to put on a 2-3 coats when doing a 'block colour'. Basically, strokes in the colour at first, not the surface. You want your paint to be about the consistency of milk or thin cream. 70-30 tamiya paint to thinner works, as does about that ratio of the other brands to water.
-
Using spray paint with a brush will almost always give you a terrible finish. Much better to simply prime with a spraycan, then paint using brush-formulated acrylics - citadel or vallejo are good. Foundry (www.wargamesfoundry.co.uk) are also very good paints. You can brush paint with tamiya, but you need to thin it appropriately, and this is tricky without practice.
-
Already have, and sent him a link to the printer I'm thinking of using as I know he has to do transfer work as his job.
-
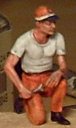
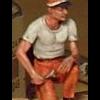
Yeah... I've also got contacts in the figure casting field and if this takes off I might look into getting some pilot figures cast up. I like the idea of a Roy leaning back and swigging from a hip flask, and a Hikaru in civvies for the VF-1D... It's been ages since I sculpted anything though.
-
I'd give it another light coat of primer. Providing you're not obscuring any panel lines etc, you should be fine.
-
Hey all, I'm thinking about starting up a service to print custom decals, and could do with some information, so I can figure out if it's worthwhile, and how much time I should devote to the Macross / fantasy / sci-fi stuff (which I like) and stuff like model railroads and wargaming stuff (which I find a little tedious). I'm talking about laser printed, clear film backed waterslide decals. Oh yes, with WHITE printing. On the poll, please use the following guideline: Question 1 - Please specify yes, no or undecided, and then select which ranges you are most interested in. Question 2 - Specify roughly how many sets you'd be likely to order over the next year. Question 3 - Specify roughly how much you could spend in one go - shipping isn't likely to cost more than $15 to anywhere in the world. I also need high resolution scans of appropriate sticker sheets - I'd appreciate anyone who can provide these to drop me a PM. Please note, I am NOT ready to start taking orders. I'm just trying to get a handle on whether there's sufficient demand for me to put out money to provide the service for macross related stuff.
-
Where the hell are you finding 1/48's for that cheap?
-
Er, yeah. The 1/48 Yamato beats the pants of the 'masterpieces'. Unfortunately for the masterpieces to become the 'collectors items' they're supposed to be we're going to have to wait a few years. Like fifty. By that time enough of them will have been thrown into walls to make them valuable. Get yourself a 1J and GBP though. Seriously heavy lump of toy. :-) Regarding the diecast, on a toy the size of the 1/48 you really don't want it for anything that will create a lot of weight on pivots (so the majority of the toy is plastic). They've kept the metal for load-bearing parts - the swing bar (nicely hidden) and landing gear, and parts that would otherwise be very fragile (the front landing gear doors).
-
When you gloss before weathering you MUST ensure your gloss uses a different solvent to whatever you're going to put on top. I'm guessing your gloss is acrylic. You should also allow the gloss coat to cure fully - with future I'd recommend 2-3 days, but 24 hours works if you're gentle and used a relatively thin coat. Many people use future (an ammonia based acrylic floor polish) and panel line with oils, thinned with low-odour mineral spirit. That's what I did and it worked like a dream, first time. You'll need to find out what your equivalent local product to it is. Usually it's made by S.C. Johnson. Clean your airbrush with windowlene. Note: If you do a matt coat with future (mix 7:3 future:tamiya flat base) beware of clogging - the windowlene can react with the flat base and make horrible blobby things. Take the time to ensure your brush is CLEAN after. When removing excess DO NOT apply thinner or solvent to your model. You only need the barest amount on the end of a cotton bud / q-tip. Rotate the q-tip as you move to keep a clean part in contact. This makes sure you're picking up paint, not spreading it. Don't rub it, gently draw it across the surface. I've not tried using pastels / chalks but I'd assume a damp q-tip would pick up just as well. Chalks may be abrasive in water only and coupled with a heavy hand this could also rub through your gloss. You could try an oil (low odour spirit) carrier.
-
I had my 1J on the shelf, not in direct sunlight (shady room) for the best part of a year, no noticeable yellowing, but the plastic is an off white to begin with. I really like the 1/48's. Kinda hard to get hold of in the UK, and a touch on the expensive side but they're lovely toys. And they're to scale (as much as can be expected) with the standard 1/48 aircraft models, which is a nice touch. I've got my little crew guy perched on the shoulders of a battroid and it looks cool in the display case. Buy it. You won't regret it. Edit: They also paint up REALLY well, and look stunning with transfers rather than the stock stickers.
-
1/48+fp's, 1/60, And 1/72 Picture Gallery Pt 2
winterdyne replied to VF-18S Hornet's topic in Hall Of The Super Topics
Is it weird of me to be staring more at the finish of the table than the valk? -
HWR, are you going to replace the road sign with a printed one / printed outline? The hand painted one seems to stick out style wise to my eye.
-
Planning customising/weathering 1/48 VF-1J and GBP
winterdyne replied to winterdyne's topic in The Workshop!
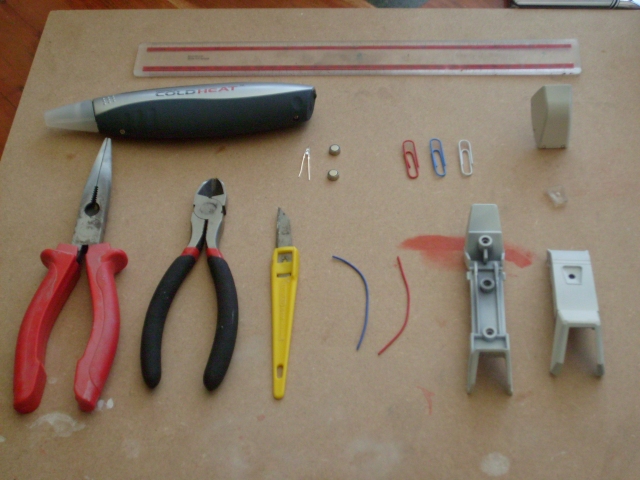
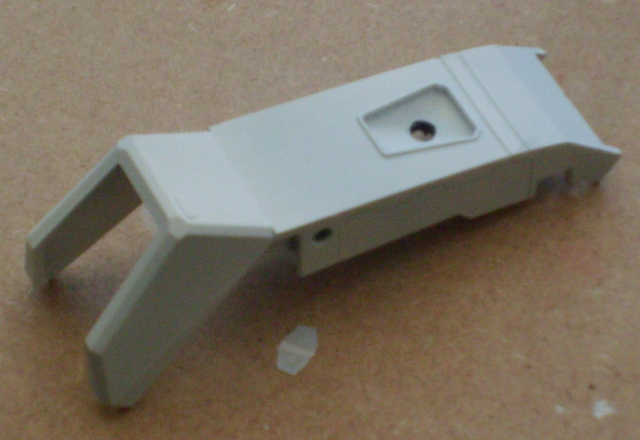
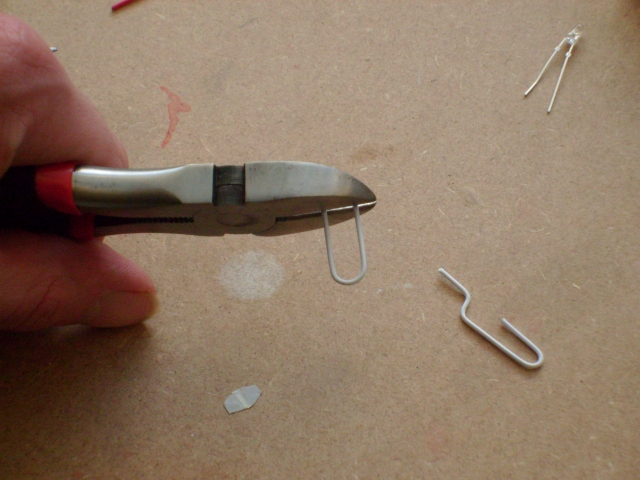
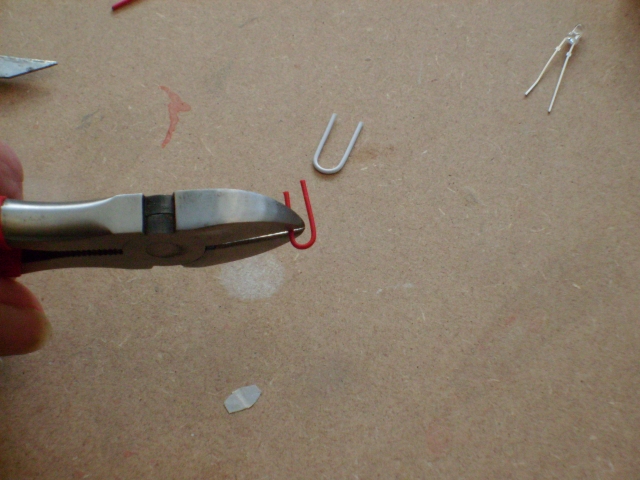
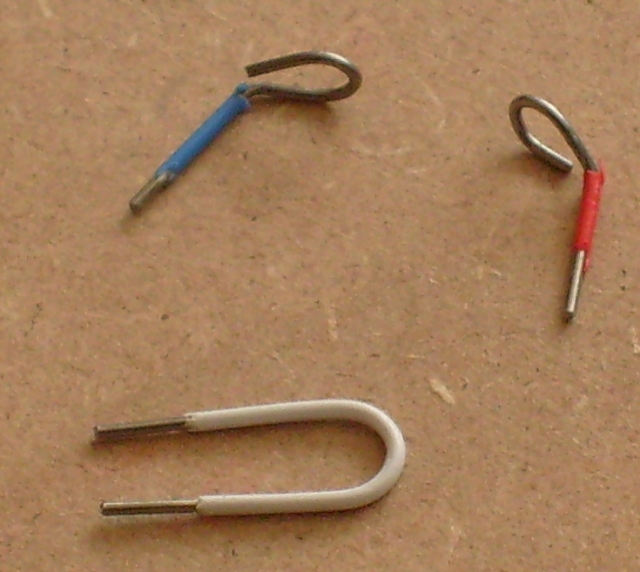
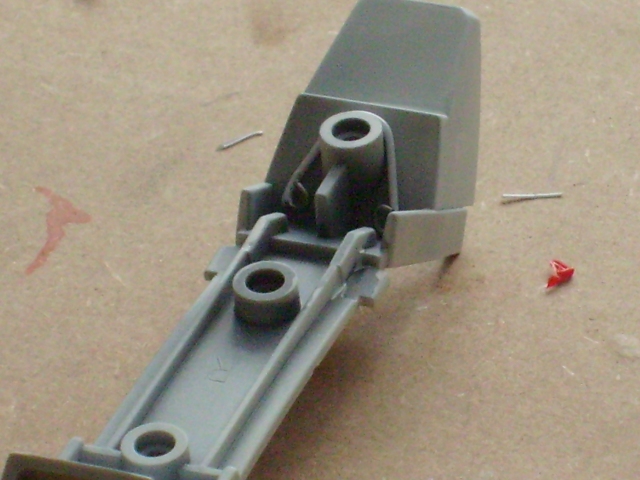
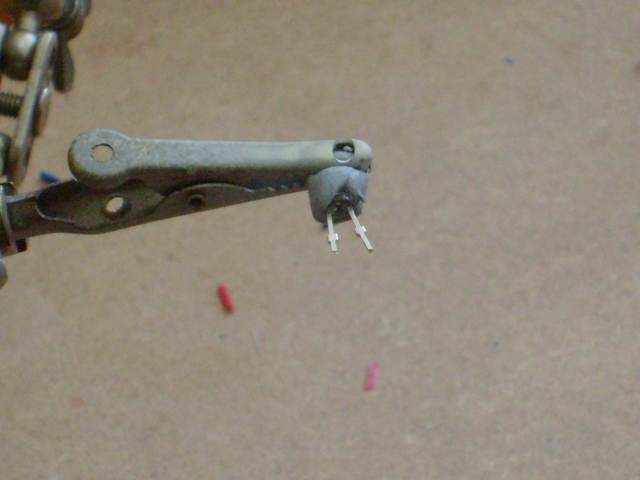
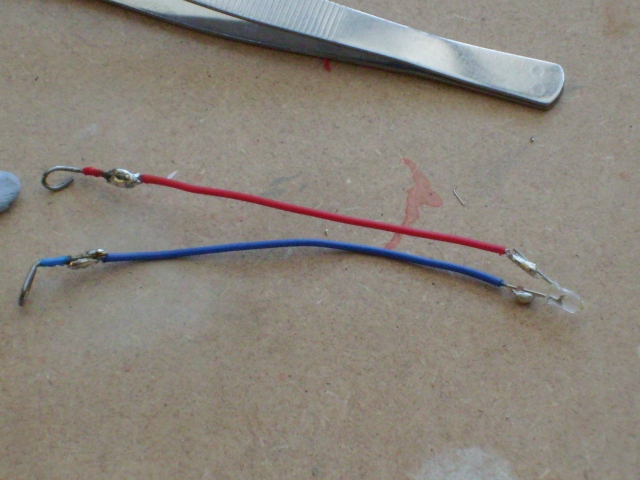
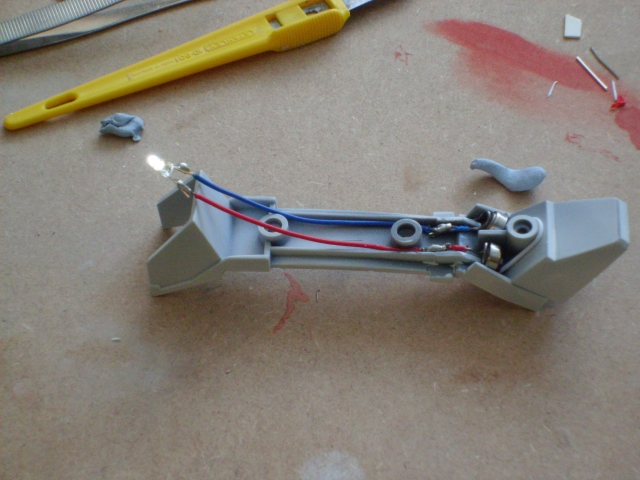
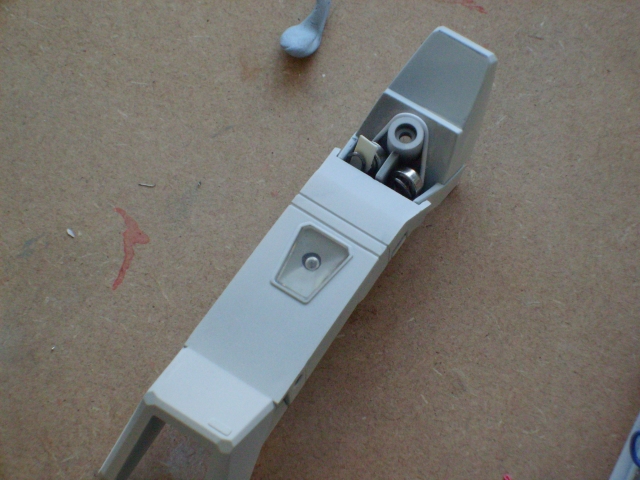
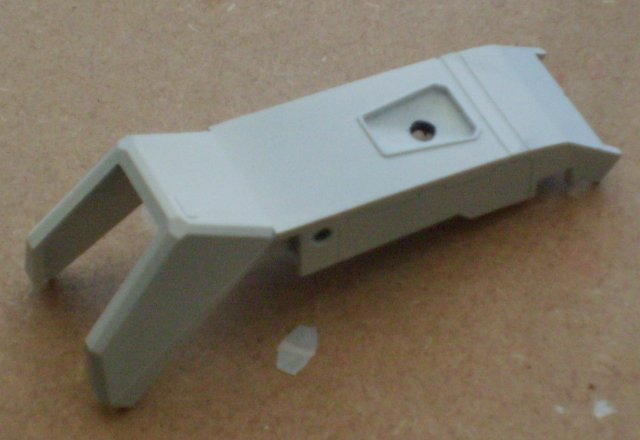
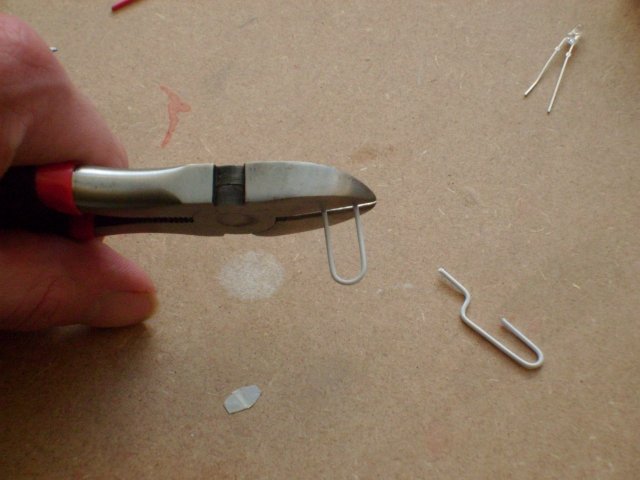
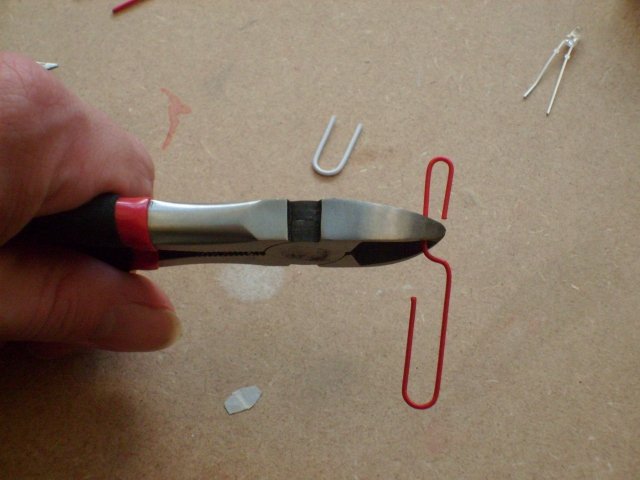
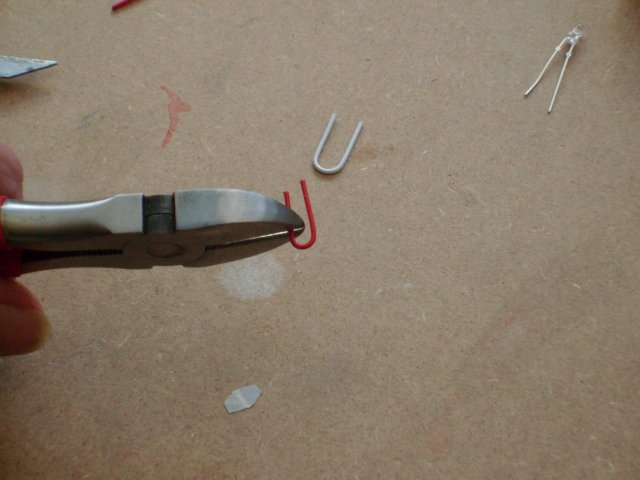
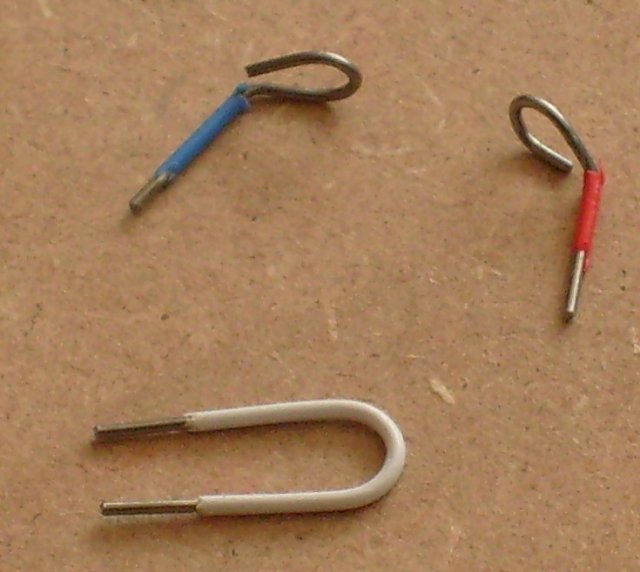
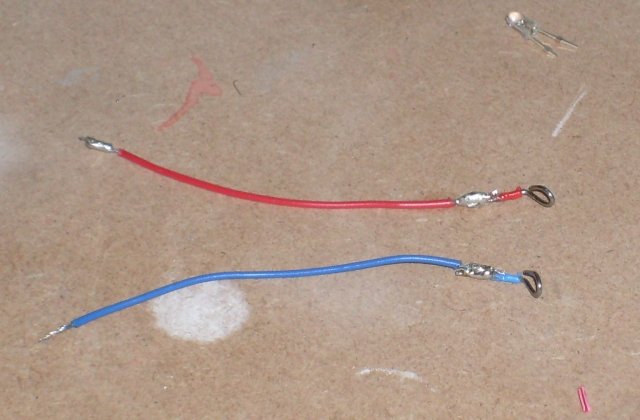
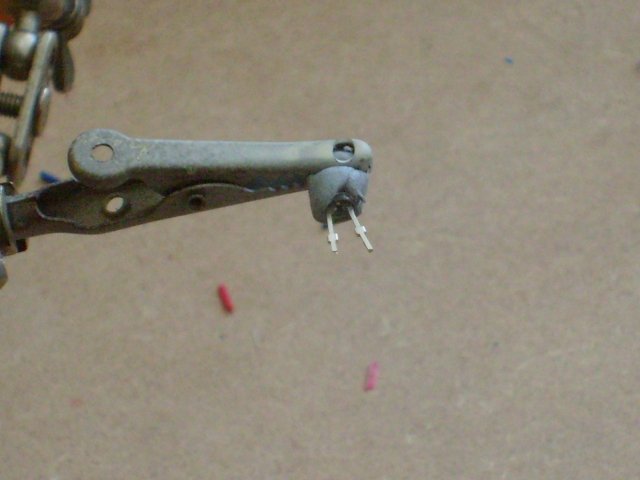
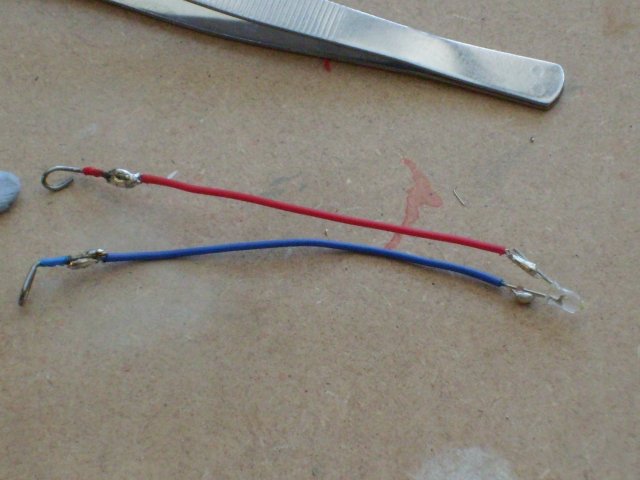
Ok, a brief mini-how-to on how to light the leg of a GBP... This was EASY. Preparation: You will need: Tools: A dremel / craft drill/grinder (not pictured) Needlenose pliers Snippers A soldering iron and some solder A knife, scraper or other favorite trimming and poking tool Parts (for each leg): 1x 4V extra-bright white LED. 3.2cd. 3mm diameter. Nice and bright 2x LR41 (AG3) button cells 3x paperclips - ideally plastic coated and in different colours 2x 3 inch lengths of wire You'll need to remove all paint from the back of the lens. Mr Muscle does the job. This will need to be re-silvered avoiding the indent (where your LED will illuminate). Step 1: Dremel out a hole in the front of the GBP leg as shown. Using the pliers and pincers, straighten out the paperclips, trim to length and rebend as shown - the white one will form the spring for the battery mount, the red and blue the contacts for the LED. Remove the plastic (leaving some to colour code) with your scrapy knife. Bend the white clip around the locating peg on the inner part of the leg as shown and then curl the ends into springs. CA it to the inner part of the leg. Step 2: Strip an appropriate length from the ends of your wire. Solder the contact parts onto your lengths of wire as shown. Put a fairly generous blob of solder on the other end. Don't worry about neatness, the wires are quite far apart so there's no real danger of shorting, and nobody should ever see them anyway. Put a blob of blu-tack or similar around your LED, and put it in a clamp. If you've not already trimmed the pins, trim them now. Remember that the SHORT PIN IS THE ANODE (connects to -ve). Don't trim the pins to the same length! Solder the blue wire to the anode pin, and the red wire to the cathode. Again, don't worry too much about neatness (although a neater job here helps with pin bending). You should now have: Step 3: CA the contacts to the inner part of the leg. CA the wire down to keep it neat. It helps to have the battery in position to do this. Adjust the white paperclip with pliers to improve spring. This will always be easier to adjust. You should now have: That's pretty much it. Reassembling will give you: You can switch off the lights by inserting a thin shim of plasticard between a battery and a contact like so: If you can find a small enough switch to mount under the kneecap, that's also the place to do it. In either case, it's a good idea not to screw the knee cap on. I'm looking forward to seeing what it looks like painted up!


-
Holy sh*t.
-
I have a few tips that I found useful: 1) Strip the brush down and get familliar with it. You'll need to be able to do this quickly and efficiently to clean it when changing colour, or if you made a mix too thick. 2) Have a sheet of card to hand (from a cereal packet is great). Test your spray on this, and get the technique right before you aim your brush at your model. Helps with judging distance, paint flow and air pressure. Also helps to check your paint is thin enough. 3) Use thinner paint and more coats. Too thick a paint mix will clog the brush and cause spatter. You'll hear it and feel it. If it's spattering you can't paint any more without cleaning the needle. Sometimes just spraying through neat thinner will do the job, sometimes you'll need to strip the brush down. 4) If you're unsure about preshading, use a more subtle selection of colours - Grey rather than black. Expect it to look really messy at first. You get a look closer to finished sooner, which helps your confidence. When preshading, the over coat (base colour) is EXTREMELY thin. You'll use many many passes. Again, have the card to hand to practice. Edit: 2 More: 5) Make sure your compressor has a tank. Compressors without tanks tend to 'pulse' which cause odd things to happen if you're trying to spray a reasonably uniform line (like for preshading). Bigger tank, longer time spraying. 6) Buy the BIG (250ml I think) bottles of Tamiya thinner. Don't buy the little jars, they're way more expensive. Buy a good quality, fine point sable brush for touchup work. Don't skimp on painting supplies, go with what works best. Unless you're really looking for a challenge.
-
Planning customising/weathering 1/48 VF-1J and GBP
winterdyne replied to winterdyne's topic in The Workshop!
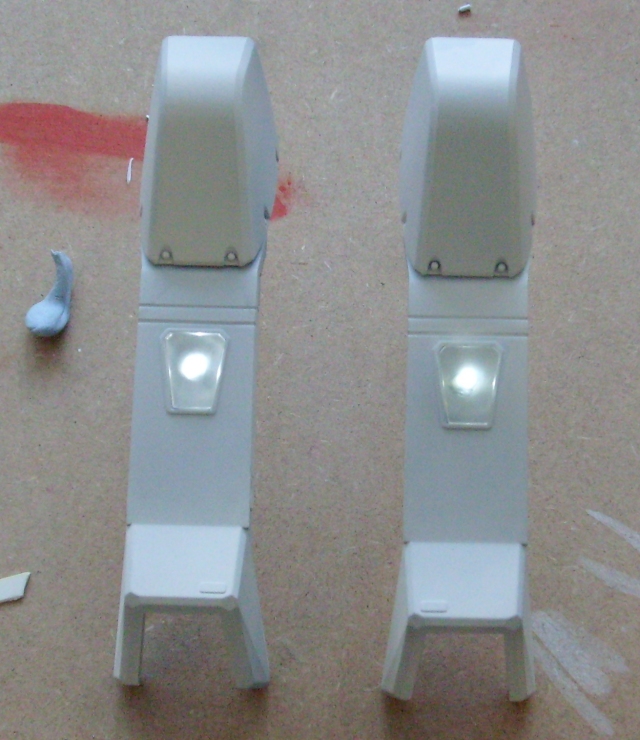
Yay! I've managed to light a leg! I'll take photos step by step for the next one - I've not chromed the back of the lens yet, but it looks very effective! Nice overlapping parts, little light leakage. And with the removable kneecap, it's almost like they designed it with this modification in mind! -
COMPLETED: 1/48 Yamato VF-1J Hikaru Custom
winterdyne replied to winterdyne's topic in The Workshop!
The GBP armour will be more noticeable I think. I've picked Tamiya JA Green as the base colour, so it won't be too drab looking. I'm aiming to get something that looks like the Nichimo kit box. I'm glad the effect isn't too noticeable on the valk itself. I was concerned about having too harsh a preshade (so I only used sky grey, nothing too dark). Not bad for a first effort - it's better to err on the side of caution. The armour will have a much more defined preshade to give it a feeling of weight. -
COMPLETED: 1/48 Yamato VF-1J Hikaru Custom
winterdyne replied to winterdyne's topic in The Workshop!
I don't actually have fastpacks. I am currently working on the GBP, just finished priming it, and my god, it took a lot of primer. -
Any idea what a UK brand for that would be? Sounds good stuff, but such things are expensive when imported. :-(
-
Assuming you want to clean the entire part you have a few options: 1) Oven Cleaner. One of the nasty caustic ones may lift the paint, and shouldn't harm the plastic. Mr Muscle is a UK brand. Apply, leave for a couple of hours, and scrub with a old toothbrush. Repeat if it seems to be working. Oh, wear gloves! 2) Enamel Thinner, q-tips and elbow grease. The thinner should work on the enamel, but may attack the plastic. Use sparing amounts of solvent on the q-tip, apply with one end and almost immediately remove with the other and be prepared to spend a long time. If you're really brave, use cellulose thinner (lacquer thinner). This will remove the paint, and will attack the plastic. Be prepared to deal with abrasion marks and stuck fibers from the q-tip. And note that if the q-tip's not real cotton, the thinner will disolve it. Use if you're in a hurry, and don't mind sanding the part down again, or plan to polish it up. DO NOT USE solvents on the canopy. Repolishing canopies is a lot of work. 3) Sand it off. 600 grit paper's fine. Should leave a fairly scuffed surface, good for re-priming and repainting. Use finer grades to smooth the finish, and polish in light motions, varying the stroke as you progress through grades. You will need to wash the part repeatedly as you go. 4) Wadding type metal polish. This lifts paint fairly well, but can polish the plastic (actually had the legs on my valk with a mirror finish at one stage). Lightly sand to roughen it. Note that all of these with the exception of the oven cleaner will change the finish of the plastic. Not so bad if you're repainting the whole part, but may not help you if you're just trying to remove a stripe. If you need to sharpen up a line due to overspray this trick works (but is tricky to master on a painted surface). Get a straight razor blade. VERY gently touch down the razor's edge on the line you want to trim to. Now shave toward that line with the razor, putting no pressure on it (just let the weight of the razor do the work). If you put too much pressure on, you'll scratch the surface underneath. Also make sure there's no dust or other foreign material on the surface. What should happen is the dry paint will flake off the underlying surface, but when you come to the scored line the flakes will break on that stress line leaving you with a neater edge. The razor for this has to be exceptionally sharp - thinner than the thickness of paint you're trying to remove, and it has to have a dead straight edge. If it's not sharp enough, or the edge is ruined, you'll get scratches.
-
If you're asking these sorts of questions the following tricks should help you with resin kit assembly: 1 - Clean and sand, clean and sand. Then clean again. Before painting you need to clean off all mould-release agent. It's also a good idea to rough up the surface a bit with say 600 grit sandpaper. Clean away dust with water, and clean parts with very weakly soapy water - ie not foamy. 2 - Dry fit. Ensure you know how everything is put together before you so much as think about gluing. Doing this also helps you figure out which joints will need pinning. You can if you wish start to prime at this stage, but you'll want to remove paint from mating surfaces for gluing. I tend to prime only once major subassemblies are complete (legs, body sections etc). 3 - Pinning: On heavy load-bearing joins pinning will help the durability of your finish model no end. Get yourself a pin vice and a selection of bits for it 1mm is a good general size. You'll also need a corresponding guage wire (copper wire from electrical cable is great!) and some clippers to trim it with. Have a pot of inky, oily paint handy, and a small brush. Drill a hole into one part (generally the lighter, more easily handled one, and CA a short length of the wire to it, leaving a good inch or so over. You can use this on subassemblies as a painting 'handle'. In any case, once you're ready to attach the part, trim the pin to an appropriate exposed length (usually around 5 mm (1/8") is ok). Long enough so it'll go into the other part without sticking through or anything. Now put a drop of your oily paint on the end of the pin and line up the parts, and bring the pin into contact. If all goes well, your pin should mark with paint where you need to drill to get the parts aligned properly. Drill there, clean off the end of the pin, apply CA and insert. Hope this helps!
-
Planning customising/weathering 1/48 VF-1J and GBP
winterdyne replied to winterdyne's topic in The Workshop!
Ok, moving on to the GBP. I'm planning a green (Nichimo style) colour scheme, and I'm going to be lighting the legs. First step has been to strip the armour down and clean it up with warm soapy water. The lenses in the legs have been removed and the silver paint removed from the back. These will be futured, then silvered on the back with as reflective a stuff as I can find - suggestions for the chromiest paint are apprectiated! I'll drill out the armour behind the lenses' 'bulbs' and mount a super bright LED behind each, with leads trailing up to the knees (where I'll mount the batteries and dip switches behind the kneecaps). Should look good. -
COMPLETED: 1/48 Yamato VF-1J Hikaru Custom
winterdyne replied to winterdyne's topic in The Workshop!
If I were to do commission work to this standard, what would people be willing to pay? My girlfriend has suggested I do some commission work for extra cash. :-)