winterdyne
-
Posts
189 -
Joined
-
Last visited
Content Type
Profiles
Forums
Events
Gallery
Everything posted by winterdyne
-
Yes, if you're sensible. The only tricky bits are removing the screw covers from the leg and getting the canopy off. Everything else just unscrews nicely or is held on with a pin that you can push out with a pointy tool then remove with pliers. Make sure you use a good screwdriver and plenty of pressure as some of the screws are quite tight, and ruining the screw head is not good. For the screw covers I found it best to use a VERY sharp, VERY pointy knife (or a dressmakers pin) to prise it up - anything else will scratch the surrounding area (meaning sanding / filling work). The canopy is held on by a part that's quite firmly attached over the top of the hinge. I reckon the only way to get it off is to snap it off (but it should glue back fine, especially if pinned).
-
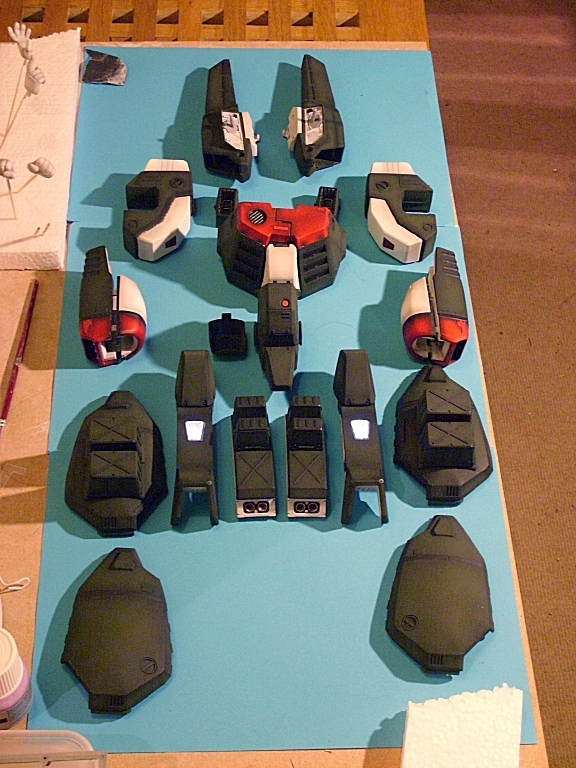
Planning customising/weathering 1/48 VF-1J and GBP
winterdyne replied to winterdyne's topic in The Workshop!
Just about ready for the first gloss coat and decals:
-
Do you have the parts you need cast up already? The head etc?
-
QFT. Yamato valks are *designed* with customisers in mind I'm sure. The plastic sands well, takes paint well, they come apart easy and (better yet) go back together pretty easy. The hardest thing will be matching the blue. That said, chances are there's a tamiya shade that matches exactly. Edit: If you're planning on painting the back side, I'd advise against sanding it if you can help it- try the oven cleaner and scrubbing brush method first. Otherwise, you'll have to polish it up to get a nice finish.
-
Looks like hairspray technique for chipping. Gonna have to have a try at that on the MaK competition build I've got lined up after finishing this:
-
The sandpaper I use is from the local auto shop - all are 'wet and dry', in a range of grits - 320 (very coarse - only use where you need to remove a lot of material), 600 (general surfacing prior to painting / priming) and 1200 (between coats). I don't bother with sanding the canopy, but if you do, you need to use 1200 grit, and then a polishing compound (toothpaste works) and then future. Work wet on the raw plastic and allow to dry fully before painting. The oven cleaner is UK Mr Muscle brand, a foaming type. Strips paint but the vapour is terrible - makes me retch and cough, so don't work with this in enclosed space - I put the parts in a carton from a chinese take away (plastic tray type) spray the foam over them, then put the lid on. Seems to contain the fumes.
-
1/48 heatshields are made of the same stuff as the canopy. Oven Cleaner works, but bear in mind it's the *back* surface that's painted (cos it receives less scratching). On my custom I painted the whole thing (looks better) but you must sand it down well and give it a good thick coat of future to protect it, and also sand the chestplate to provide a little extra clearance.
-
They're all so much nicer than the stock scheme... makes me want to pick up a 19 and FB just to paint.
-
Looks very nice so far... are you planning on casting this up when you're done?
-
Kurt does full preshading paint jobs. To do that you need an airbrush, and no objection to taking a dremel to your expensive valk. I've got a thread on customising a hik 1J that's got some tips. I wanted it to be a proper walkthrough, but it's tricky to get photo shoots done without a dedicated workspace. The panel lining is done by oil wash. Again you need an airbrush to gloss coat the valk. wm_cheng's guides are great for this, so is the aircraft resource centre. An easier method is to use a mechanical pencil or gundam marker. One thing some people do is use waterslide decals or takatoys' stickers rather than the yamato stickers, which are, well, toy stickers, and they look it.
-
I ended up paying around £120 (including shipping) for a 1J Hikaru and GBP. I've probably spent the best part of another £100 on paint and supplies to customise it. It's taken me months and months and I've enjoyed every minute. Balance that against spending £40 on an xbox game I play for maybe a couple of weeks before getting bored, or £30 in a pub for the evening and it suddenly seems like money well spent. And it does look nice in a display case so you carry on getting enjoyment out of it. Plus you can take it out when the gf and kids are away and act like a 10 year old again...
-
It's unlikely that a major (triple-A) Macross game would work without some serious legwork on the part of the licensee. Primarily this is due to the licensing arrangements between HG and Big West. Without both companies agreeing on licensing a studio to produce works based on Macross, any work done would suffer piecemeal release for a localised market. This is why the existing Macross games weren't translated out of japanese. When you've got a multi-million dollar project, you kinda want it to hit the global market, and you don't want the possibility of someone saying 'you can't sell that here without paying us X.' I'm not sure what the current arrangement is, but as HG have released Macross related merchandise (through ADV and Toynami) stateside it might be relaxing slightly. Regardless, it still potentially involves licensing from two different parties, which puts a lot of developers off even approaching them.
-
With the vallejo paints, try having a drop of washing up liquid on your palette and mix a tiny amount in when you thin the paint.
-
The stuff you get in a rattlecan is often enamel - MechTech's referring to the fact there's less cleanup time after a rattlecan paint session.
-
lol, I want you to keep going and build a full 1/8 valk... exceptional work there!
-
Hmm. I was brush painting white... seemed to work fine. I generally do use the proper thinners though. I can't see the point in shirking a few quid on painting supplies and possibly messing up an expensive toy or model.
-
No, the print setup is to be a pair of OKI3200 laser printers, one with white toner, the other with sublimation colour toner. I'm waiting for there to be sufficient interest to print a fairly large amout of decals before I order them - I need to be sure I'll get my money back.
-
Yeah, they'll get a coat of future.
-
That's beautiful!
-
To avoid brush strokes: 1) Use thin paint! Your paint should go on wet so it can self-level, and not so thick that it holds the stroke. Thinners for a brand of paint will usually tend to work best (as they're formulated for that purpose). For tamiya / gunze-sangyo the iso-alcohol / water mix works, for citadel/vallejo just water with an optional drop of washing-up liquid works pretty well too. 2) Use a long-bristle SOFT brush. Hard brushes will pull the paint off the surface, soft brushes will flex and be drawn off the paint, allowing it to self level. 3) Vary direction - work roughly perpendicular to the coat beneath. 4) If necessary, gently sand with very fine sandpaper. This is more used on larger areas, and depends greatly on the 'sandability' of the paint. Tamiya paints sand well as did humbrol acrylics back in the day (they're dry, powdery in finish), citadel / vallejo sand very badly (they're more rubbery in finish).
-
David: The VF-0 and SV-51 were already up there. I've added an option for the macross plus stuff. Excillon: It's printing equipment that's been the real killer. Most custom decals have been printed on a machine commonly referred to as the Alps. It's been out of production for over 10 years, and production of consumables stopped (IIRC) a couple of years ago. Things are now starting to dry up. Luckily there's a few alternative options starting to appear (mostly driven by the custom clothing transfer market) that can be adapted to modelling purposes. They're still expensive, but they're at least operable in a home / garage environment rather than a full workshop. Mog: There's nothing to stop me printing on sticker sheet rather than decal film. You'd still need to be a ninja with an exacto blade though.
-
Apparently my sample print is on the way by priority mail from the toner manufacturer. I'll let you guys know about the quality when I get it.
-
Actually doing nice decals for the nichimo kits is something I'd like to do. The ones they provide are umm... well... not very good. Simple enough to produce by scanning the original decals and colouring / tweaking. I'll add an option on the poll for them.
-
Quick update on this: I'm currently chasing the printer / toner manufacturer for information on how easy it'll be to align the colour layers over the white backing. This is really important for decals that'll go over a dark background (like the kite symbols) and warning markings (and pretty much everything for GBP). They're being very slow in responding which makes it look like this could be an issue. Perhaps this won't pan out after all, or it may be that for some things two decals will need to be aligned at application time. Fiddly! More news as it develops. The bottom line is to get the cost for a sheet (letter size) of transfers down to around $25 I'll need to shift 400 sheets in a fairly short space of time. I'm using the poll to gauge custom from this site, so if you're interested you really need to vote! Those of you that have ideas on other modelling sites I could put a similar poll on please let me know - the setup will allow us to do fairly bespoke work but I don't think it's worth getting on the strength of macross stuff alone.
-
I'd like to see 1/60 destroids with MG gundam style features - opening service hatches etc. Not the monster - leave that to the crazies that can afford tons of resin. Actually - on this subject, I'd really like to see gashapon-style sets of 1/60 scale sdf macross figures something like: Minmay in skirt & sweater, kid in pilot suit, cola machine, roy with microphone, hikaru in civvie jumpsuit and scarf Roy, Hikaru, Kakizaki and Max in pilot suits You get the idea - stuff that can be displayed (and painted) along with the new 1/60 valks. This's just wishful lazy thinking 'cos I don't particularly want to sculpt 'em myself.