

sketchley
-
Posts
7404 -
Joined
-
Last visited
Content Type
Profiles
Forums
Events
Gallery
Everything posted by sketchley
-
Huh... who'd have thunk? 🤯 I'll see about acquiring it as soon as possible. In your guys's experience, about how long did it take to revitalize the paint? Also, what ratio do you recommend for bone dry paint? Is 1:1 too much, or not enough?
-
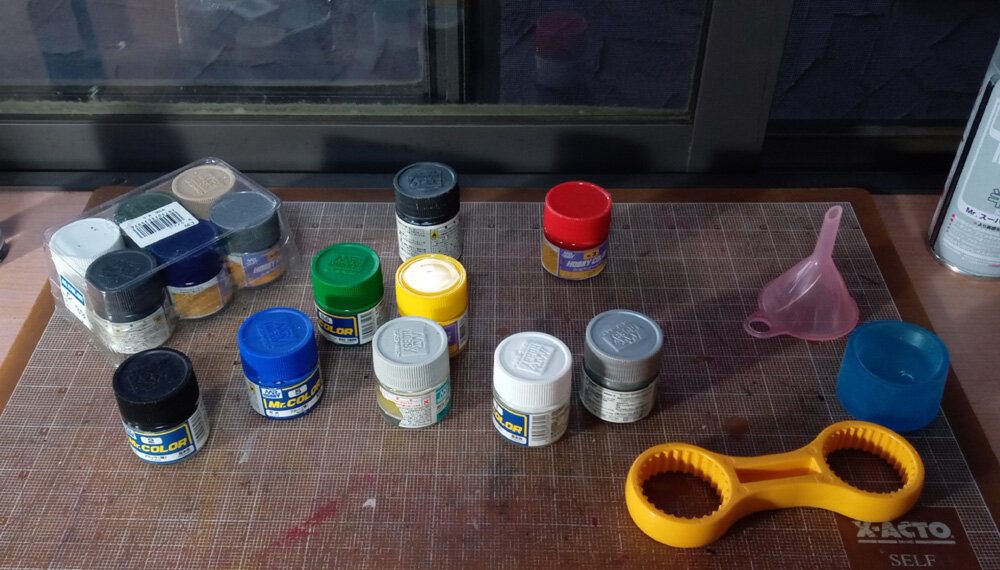
The 'YF-24' conversion For some reason I was thinking the PlaPlate was 1/10 the thickness it actually is! 🤪 Looks like I only need a single sheet (the sheets are 1.2 mm, and the gap is less than 2 mm). Any advice on how to get a curved leading edge (when viewed from the side), but keep it straight and uniform (when viewed from the top)? Re: Rigādo Recon Pod It looks like I won't be able to get away without painting it. There are a couple of places that need "silver" as a reflective surface behind some of the red and green clear parts. So, my best course of action is... to buy the Rigādo Light Missile Pod! 🤣 While I don't mind the painting, cleaning the brushes is a royal pain. So, I think it's best to paint all 3 Rigādo in one go. In addition to silver, the instructions call for 'black' on the engine nozzles behind the knees, and 'burnt iron' inside the main engine nozzles. I'm going to swap the black for GX Metal Black (my go to colour for Valkyrie engine nozzles and gun pods), and I'm curious about the burnt iron. ... and speaking of paints, alas, almost all of them have dried solid in the jar!!! 😫 Buying new paints isn't a problem. Disposal of the old ones, however, is. Advice on Japanese websites is to "remove" the dried paint (break and remove it with 'old spoons or disposable chopsticks'), and dispose as per local municipal instructions (glass and plastic are separate, in other words). However, one site suggested attempting to recover the dried paint first. It recommends using "Mr Color Replenishing Agent for Mr Color" (GSI クレオス Mr.カラー専用 真溶媒液): Does anyone have any experience using this? Should I even bother attempting to salvage the dried paint?

-
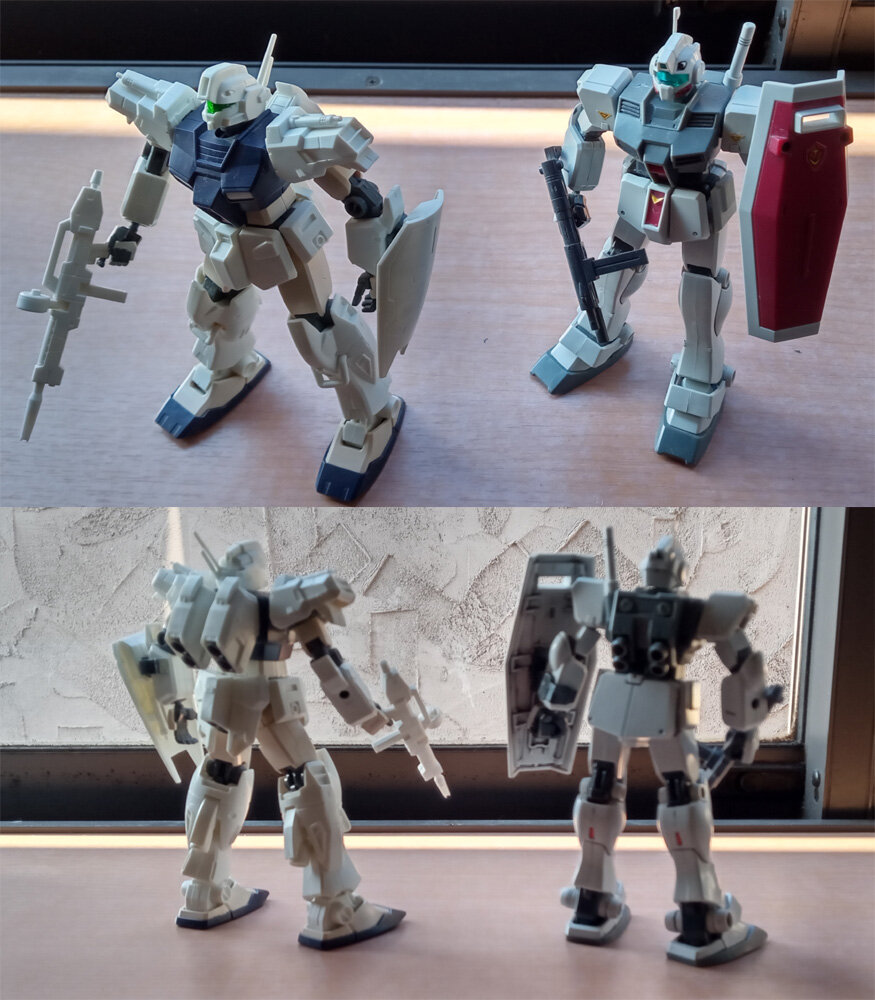
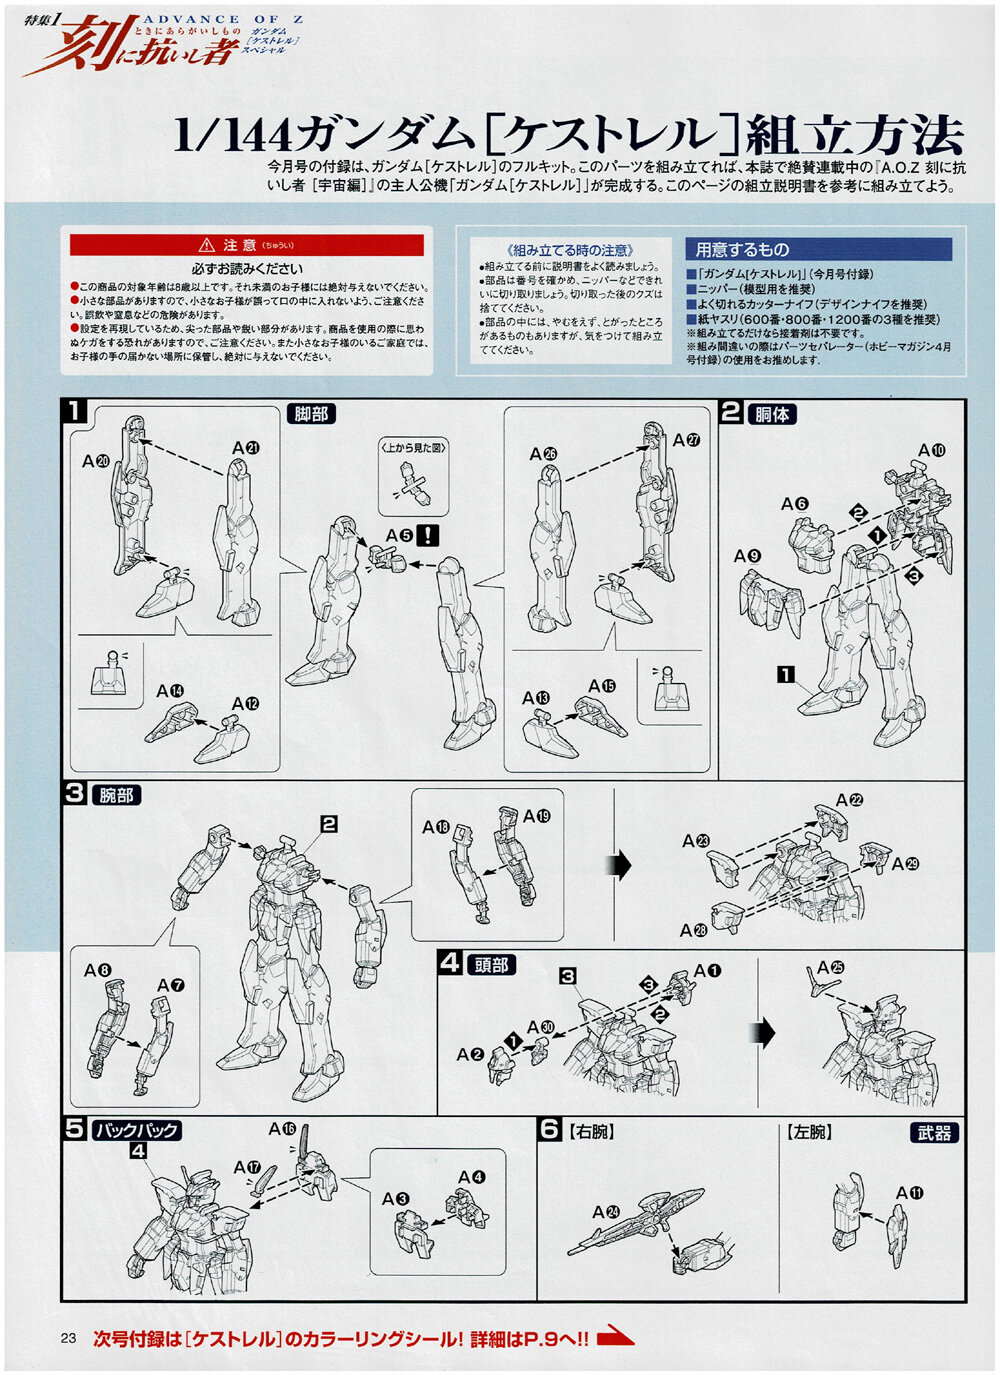
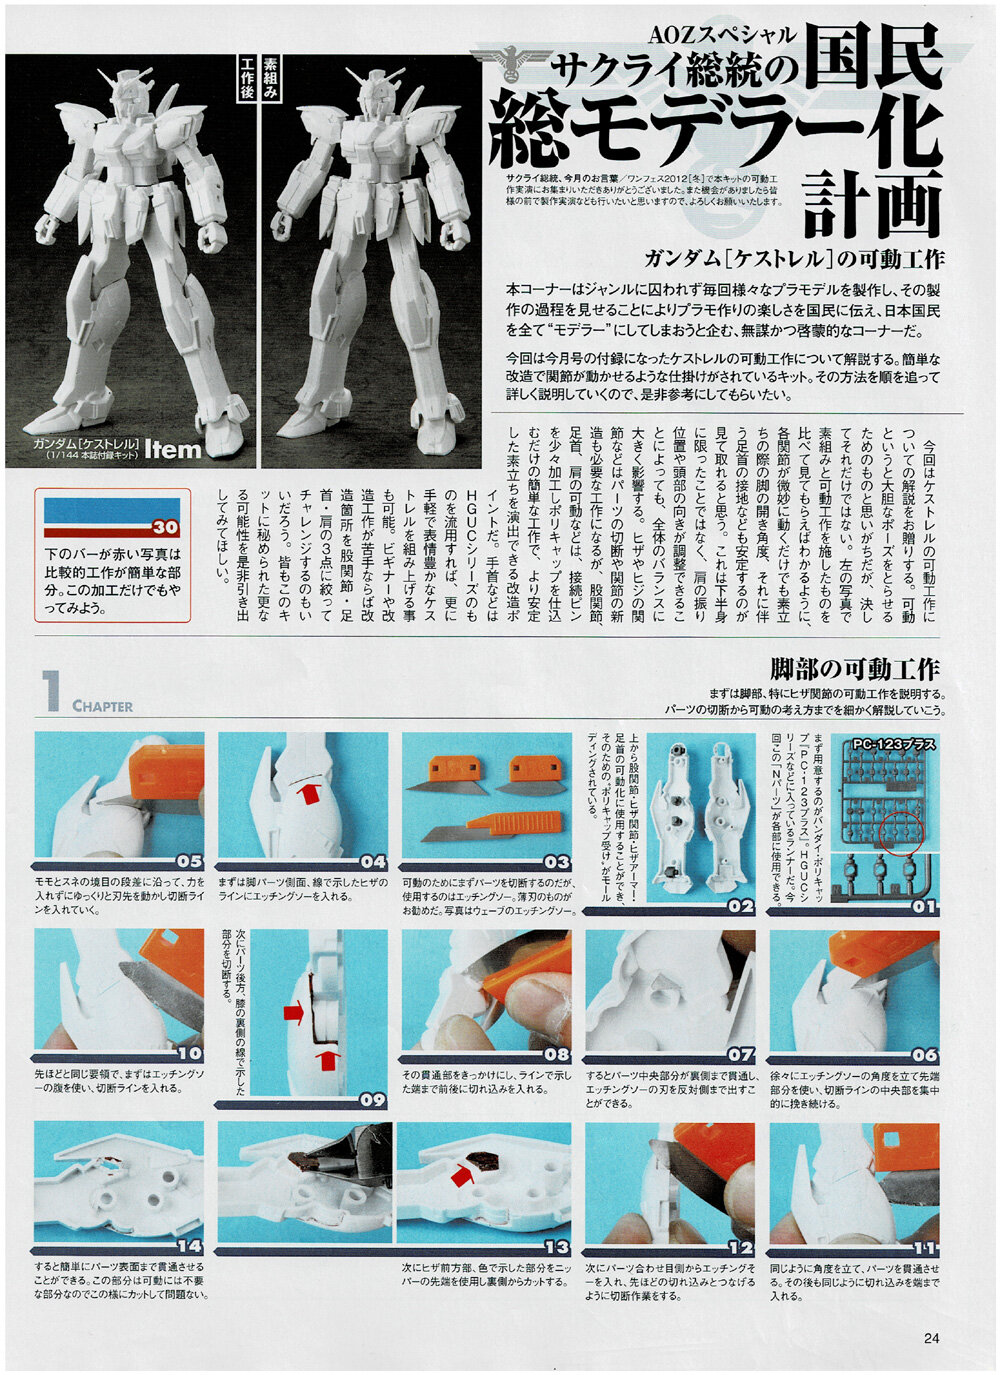
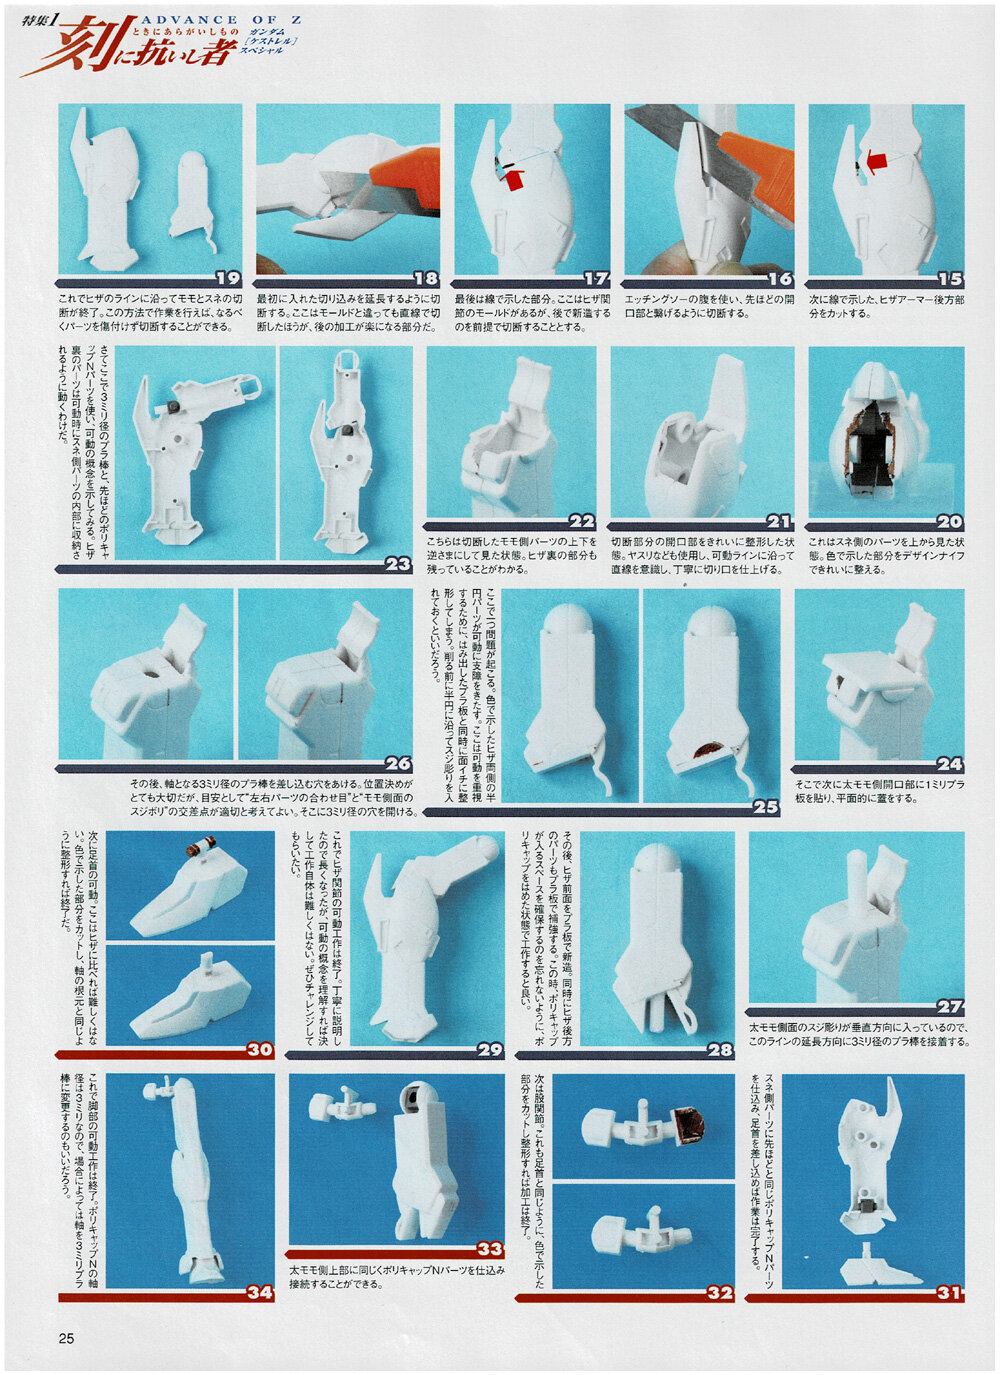
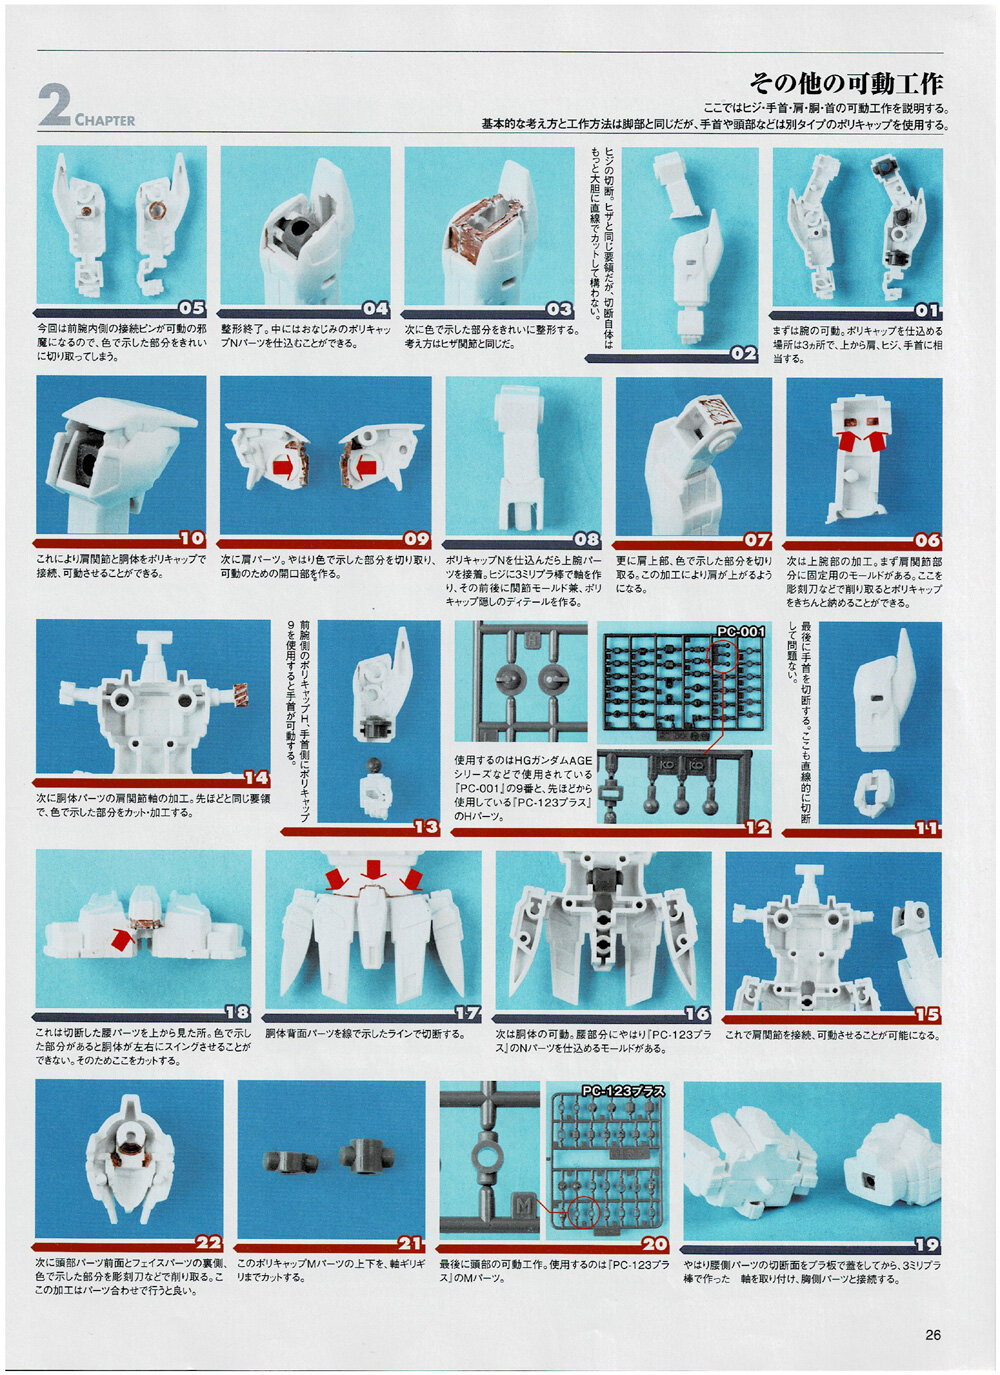
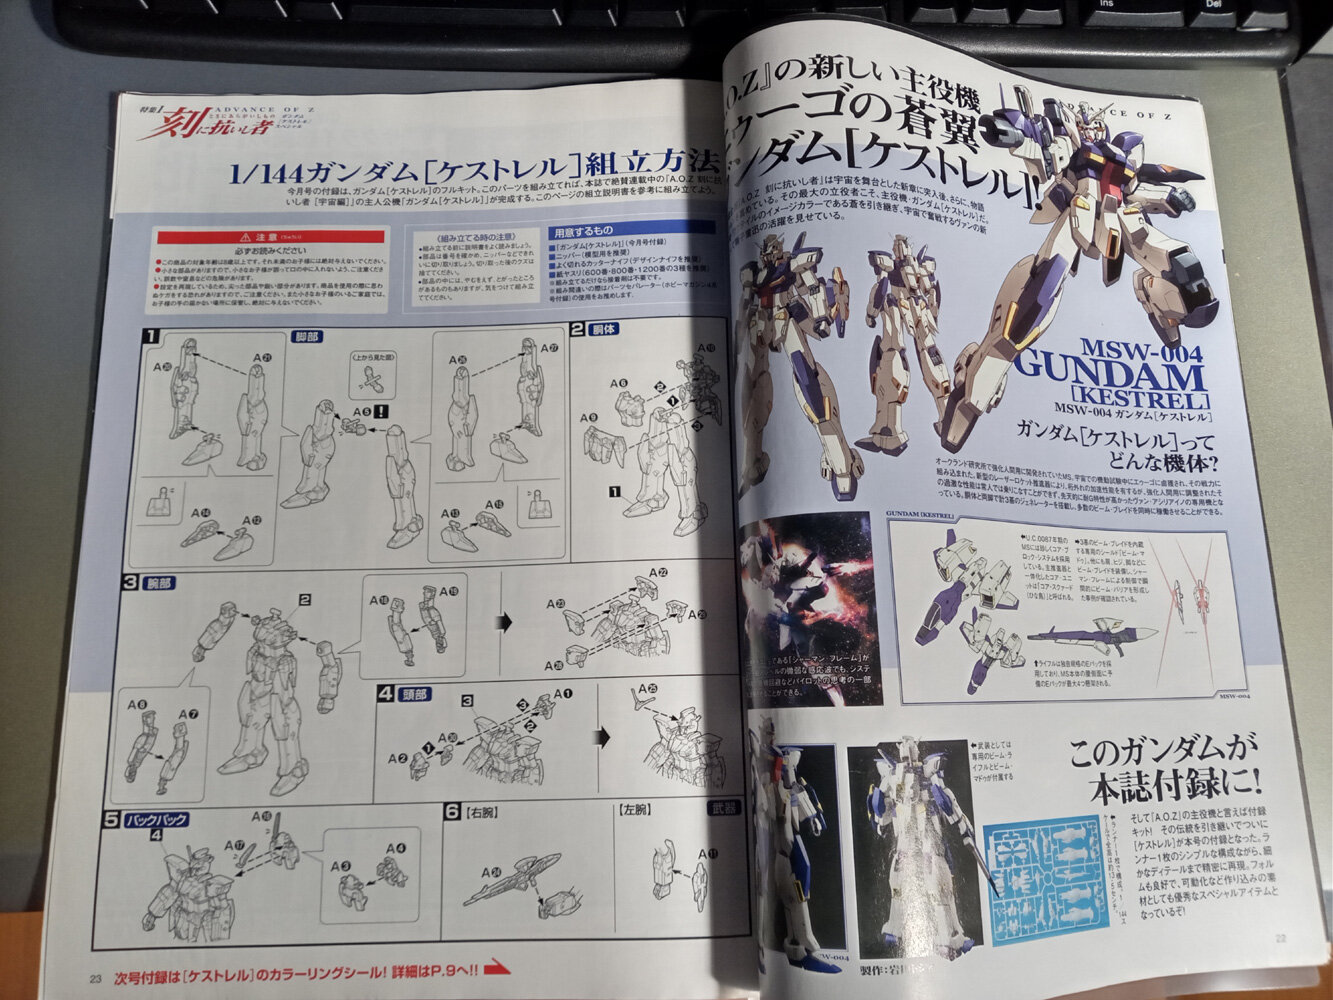
Update on the Lego repair: The top side came out as well as expected. The bottom leaves a bit to be desired. Nevertheless, it passed the build test—a little snug removing the bottom brick from the plate that first time, but normal thereafter. Incidentally, after seeing the horror show search results for 'Lego brittle brown', I'm treating all the brown parts in my Lego collection a lot more gingerly... 😅 The Wagtail was a nifty conversion. As they didn't have the GM Command at the first shop I went to (when I built it), I picked up the Cold Weather GM unit thinking any GM will do. Of course, that didn't work out. Nevertheless, as Gunpla kits at that scale are as cheap as chips, I was pleasantly surprised by how the Cold Weather one came out. I'm not sure if I ever planned to paint the Wagtail. I quite like the subtle effect of the white (Wagtail parts) on creme (Command GM parts). The pictures don't really capture it (it's most visible in the upper vs lower legs). What do you guys think? I think I will. I have yet to go through the spare parts box to see if I have any more PC parts that are usable in the conversion (a mobile waist joint would be nice). Once I get some scrap bits of the Plaplate (from the VF-25 conversion project), I'll make some headway on the Kestrel. I may be able to skip steps 24-26 (even though it's relatively simple). Building the back of the knee (step 28) looks a bit challenging, but doable. Then its merely a matter of finding enough plastic rod to finish all the joints (the writer says he used "3 mm" rod). I wonder if spare sprues 'thickened' by clear nail polish (if the sprues aren't the right size) would be enough? And some proper scans of the instructions:
-
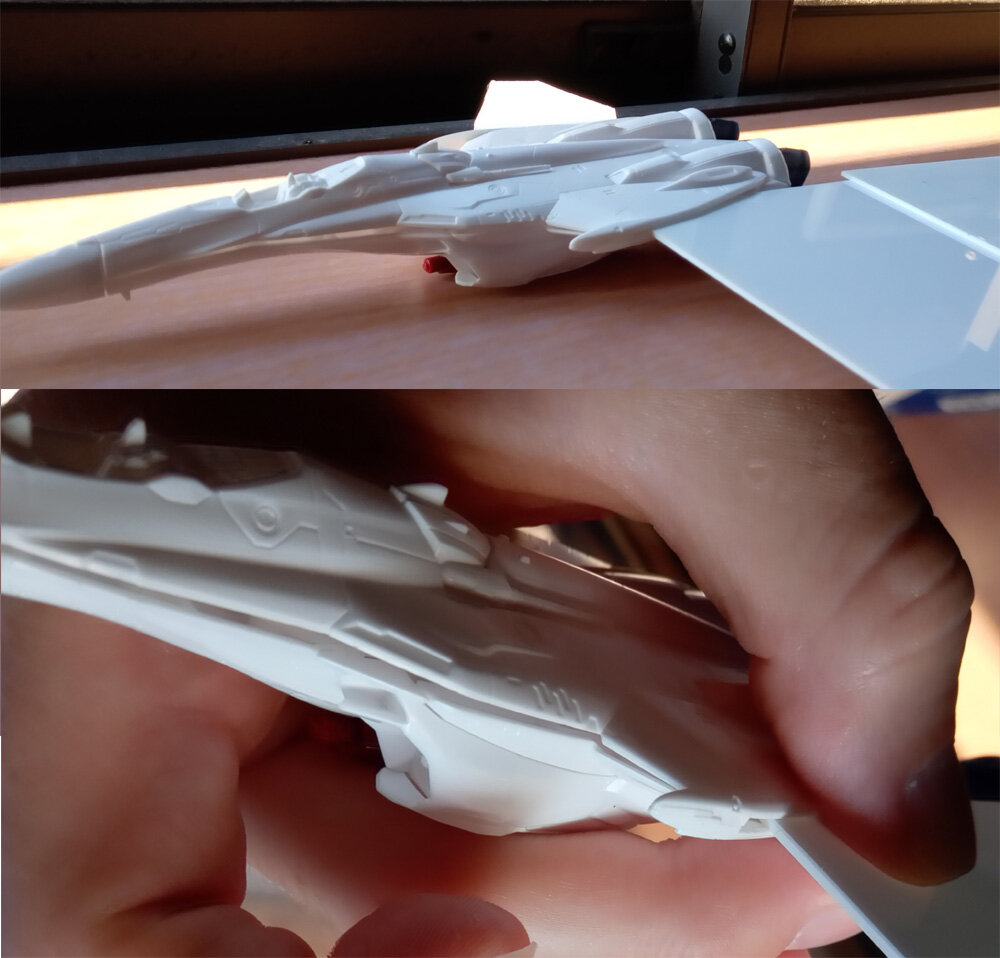
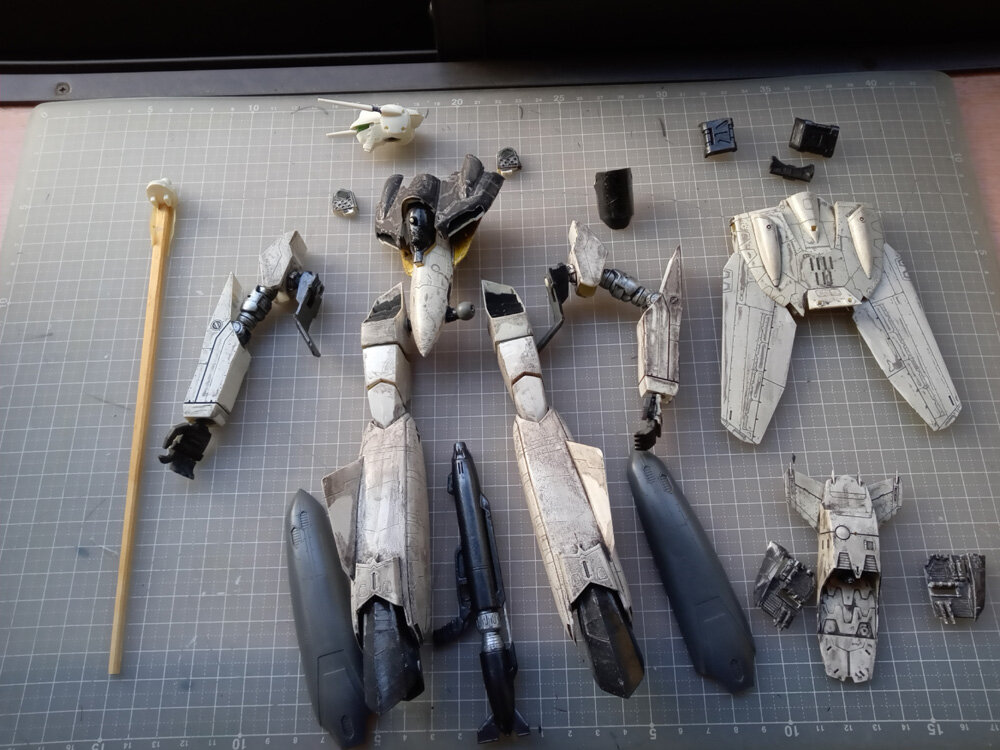
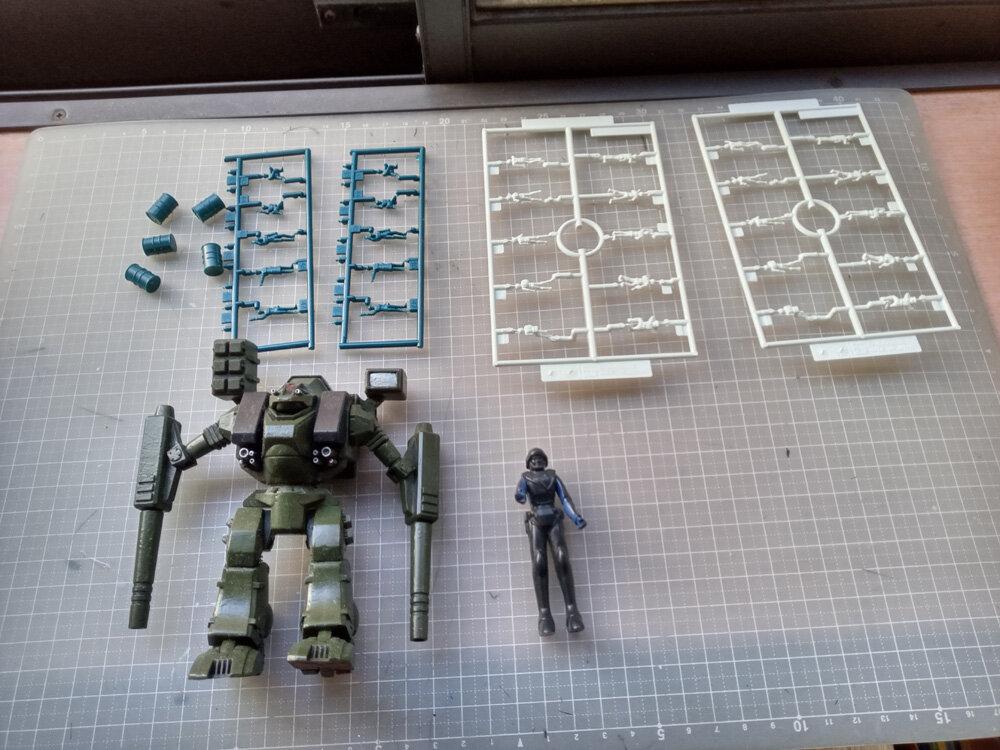
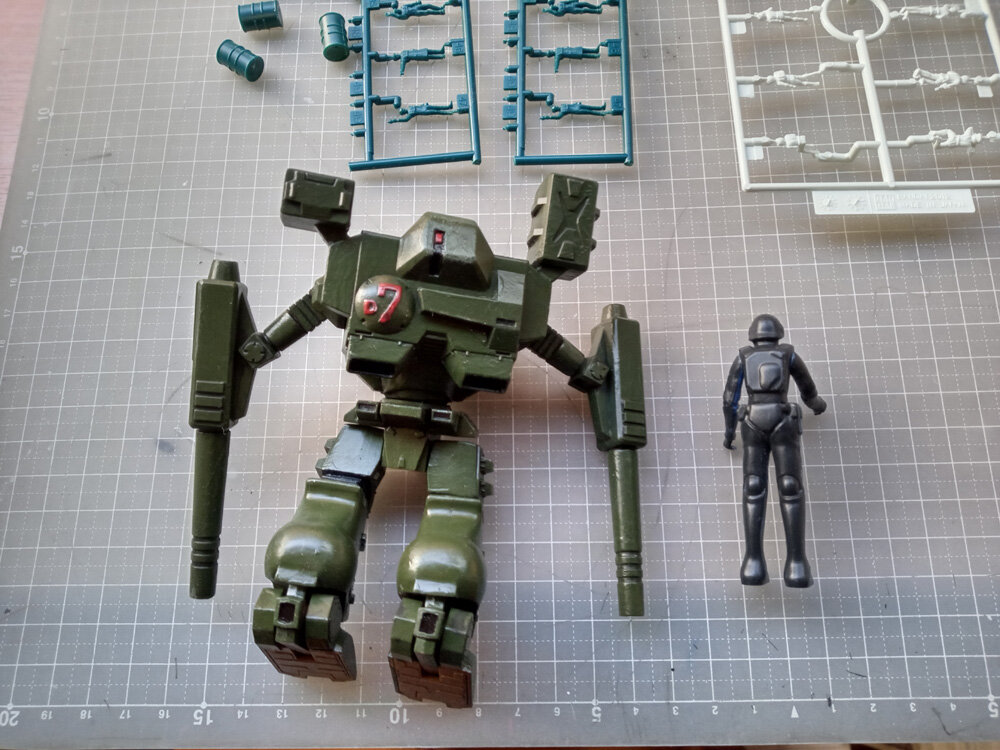
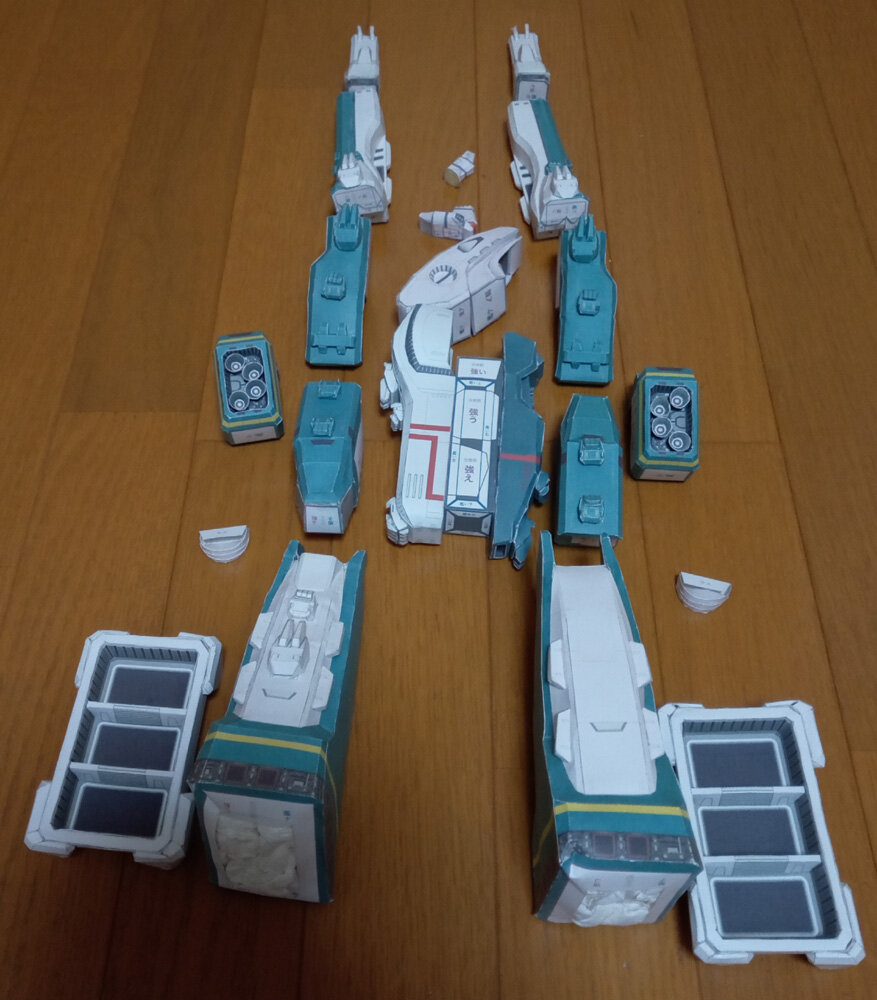
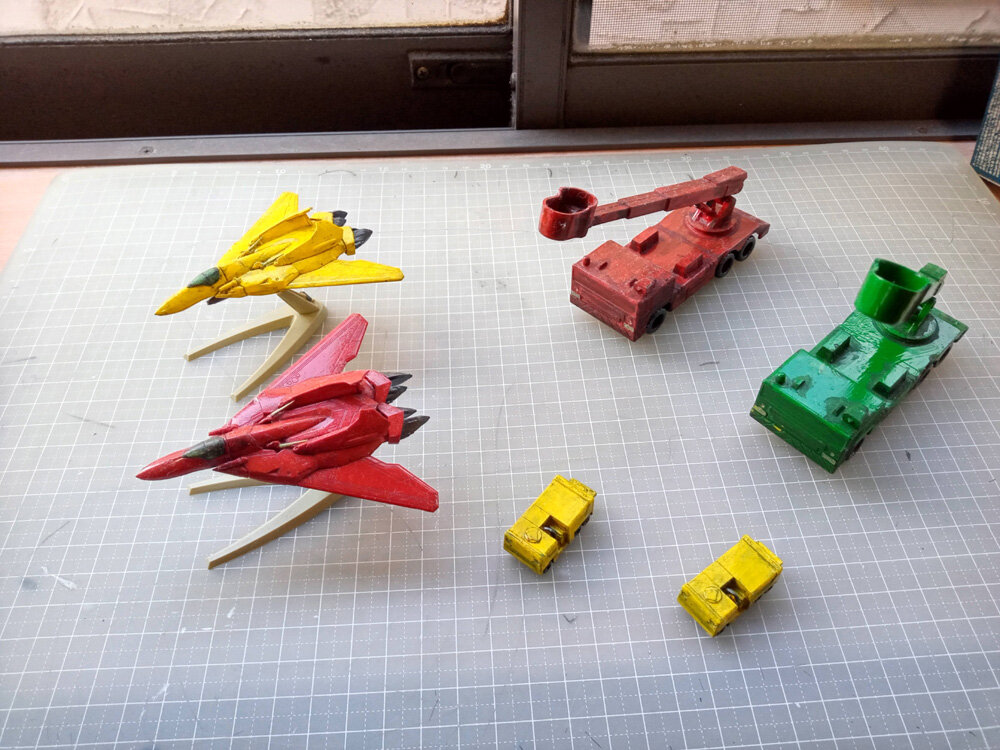
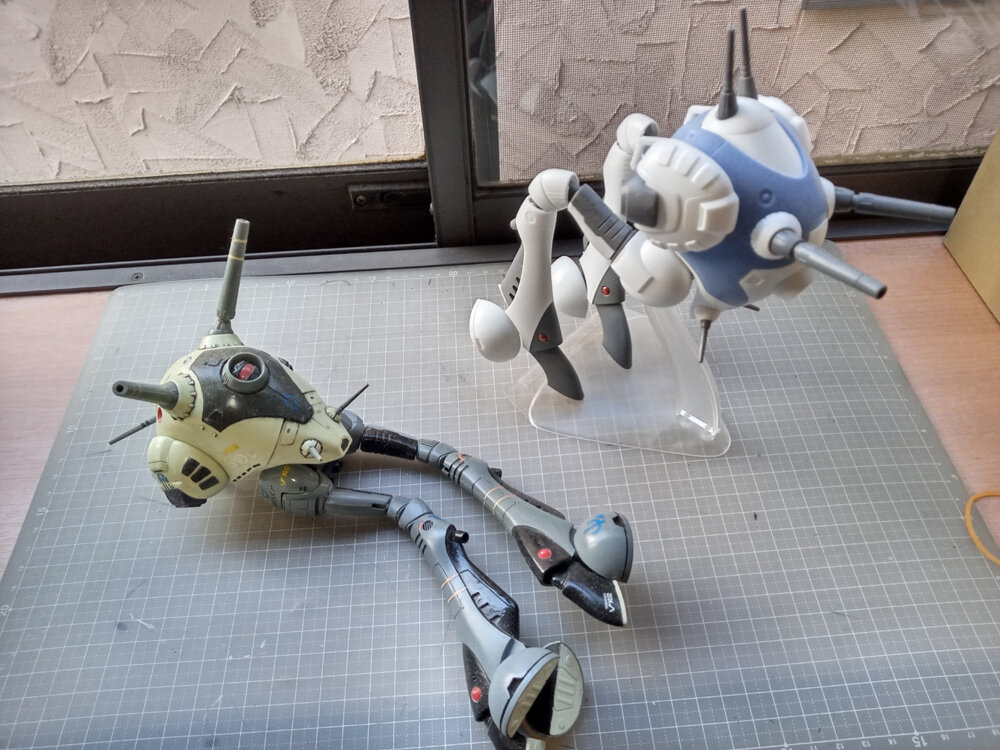
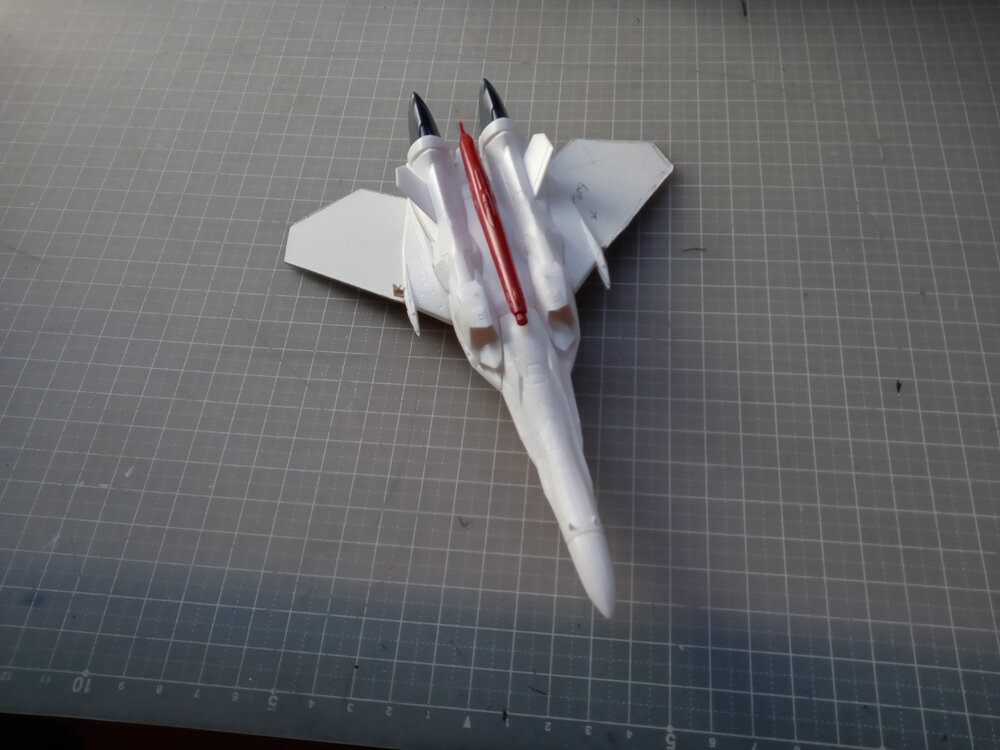
Project 3: stalled on the final stretch VF-0S Phoenix In the midst of removing the panel lining wash. The problem is a) I put two much on (see the chest plate), and b) for one reason or another, the wash partially burned into (or stained) the white paint. So, the kit is at the tedious stage of meticulously removing the excess wash, while not further damaging the paint underneath, and aiming for a well-weathered look. Macross Factory (and Zentradi!) The MBR-04 Tomahawk is rather close to being finished. Looks like it's just decals (and possibly a final matte clearcoat). The ancillary vehicles that came with the Macross Factory are another work in progress. I think the oil drums were the next thing I was going to start painting. Not sure what's going on with the Zentradi... VF-171 The ancillary vehicles from the Macross Factory are either done (the 2 yellow utility trucks) or in the midst of having the wash removed (the two crane trucks). After that, I think there's only 1, maybe 2 decals apiece. I figure I can get away with leaving the trucks rather grubby. Thoughts? I think both of the VF-171 are finished (the red one might need the panel lines rescribed and a new wash). Then it's just the kit's stickers, and they'll join their wingmate: The red is a spoof of the red VF-17 that appears in Macross VF-X2. Perhaps the yellow one should have been green like the VF-17D Kai (I think I chose yellow to avoid the Christmas colours). Anyone know of any all-yellow Valkyries? Paper SDF-1 Macross The tedious job of rolling up and gluing all those little tiny gun barrels was about when I lost steam on this project. At that scale, square parts are so much easier to get decent results with. If you've noticed that the colours are washed out, it's because they're actually scans of the papercraft book printed on manga paper. The ultimate goal is to make this one in spaceship mode, and the other one in robot mode. Too ambitious? 🤣 Rigādo Perhaps the most ambitious project: making the Bandai re-release Rigādo stand on its own two legs! I started to glue the leg (knee) joints so it wasn't such a floppy mess, after getting fed up trying to jury-rig a stand for it! Got lost in the weeds thinking about making it stable in a good-looking pose. 😫 The Hasegawa Rigādo... it's waiting for its buddy (the Scout, not the floppy monstrosity!) and then I'm planning to do something about the gap in the blue plastic between the guns and engine pods... Any thoughts on which project(s) I should tackle before work starts again at the end of the summer holiday?


-
Project 2: the next projects are, let's just say, the rather ambitious ones: VF-25 → YF-24 conversion The plan is to replace the wings in the 1/100 VF-25 kit with delta wings made out of multiple layers of plaplate glued together. I got so far as making templates out of cardboard. The point that I stalled at was contemplating how to create the curved edges of the wings. I figure I can cheat the back end (making it just as thick as the front edge), but how to achieve a rounded form? Gluing plates slightly smaller on top of each other (like a staircase) and then sanding it down seems easiest, but the odds that I'll sand off the same amount on both wings is remote... 😅 Is epoxy putty the way to go? VF-11MAXL Kai → VF-11MAXL conversion This project stems from contemplating what the VF-11MAXL looks like. Based on the other 'Kai' Valkyries in M7, I figure there were very few changes to the external fuselage when they made the in-series conversion into the VF-11MAXL Kai. Therefore, the plan is to shave off the parts that become the chest speakers, and use putty to fill in the holes. Then lay down some kind of grey or other 'low vis' paint. Not sure what I was planning to do with the head... maybe just trimming down or removing those pink parts, and possible adding a backwards facing laser machine gun? The roadblock with this one is that I've never used epoxy putty before. Any advice?


-
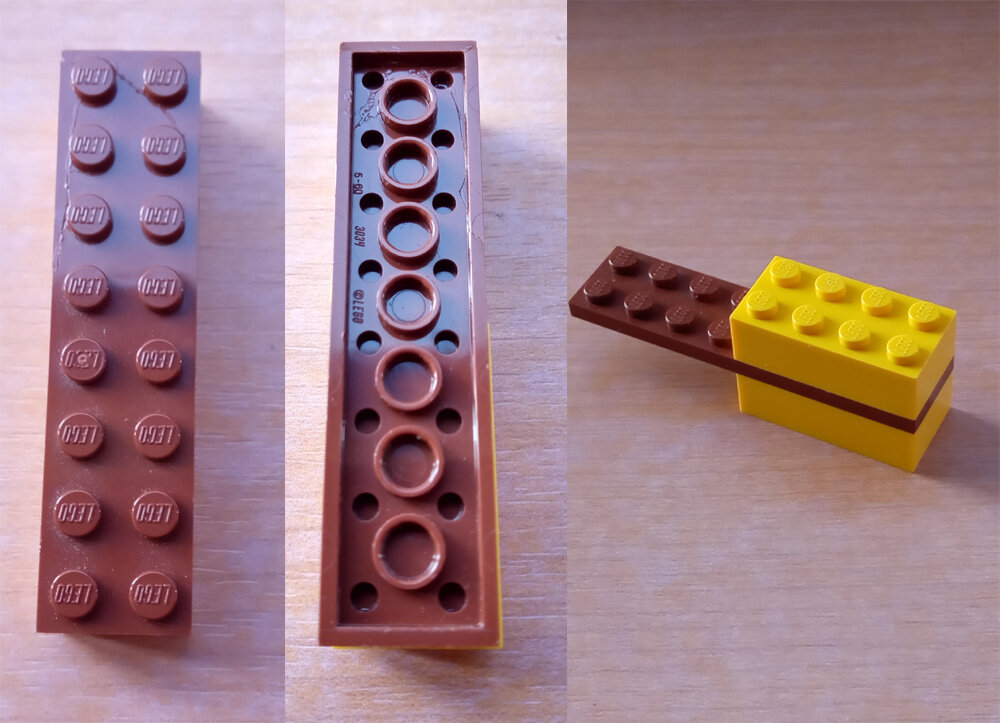
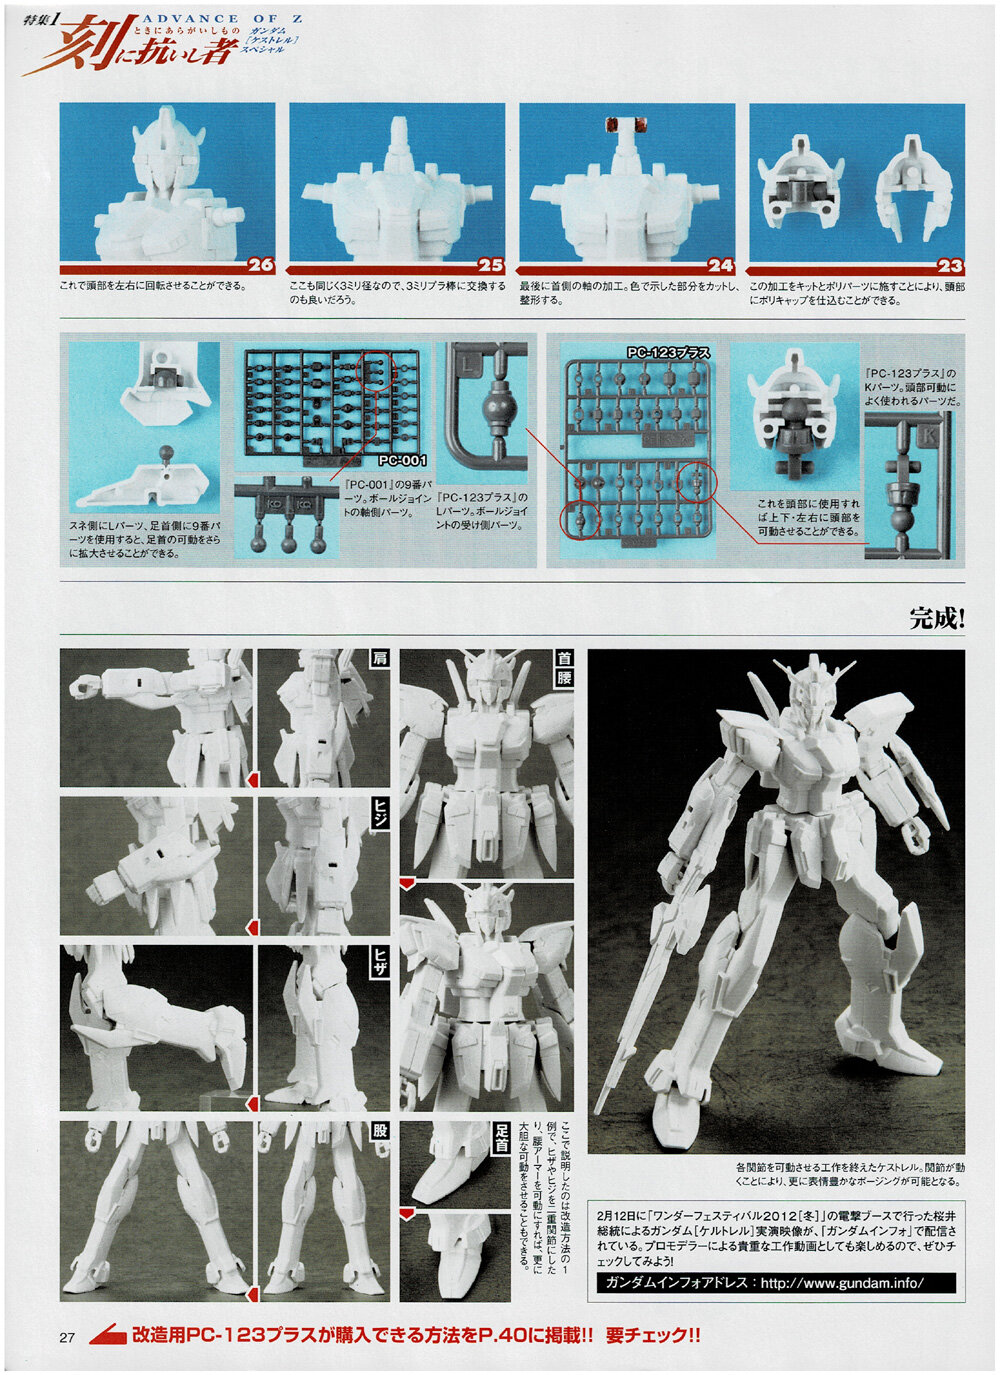
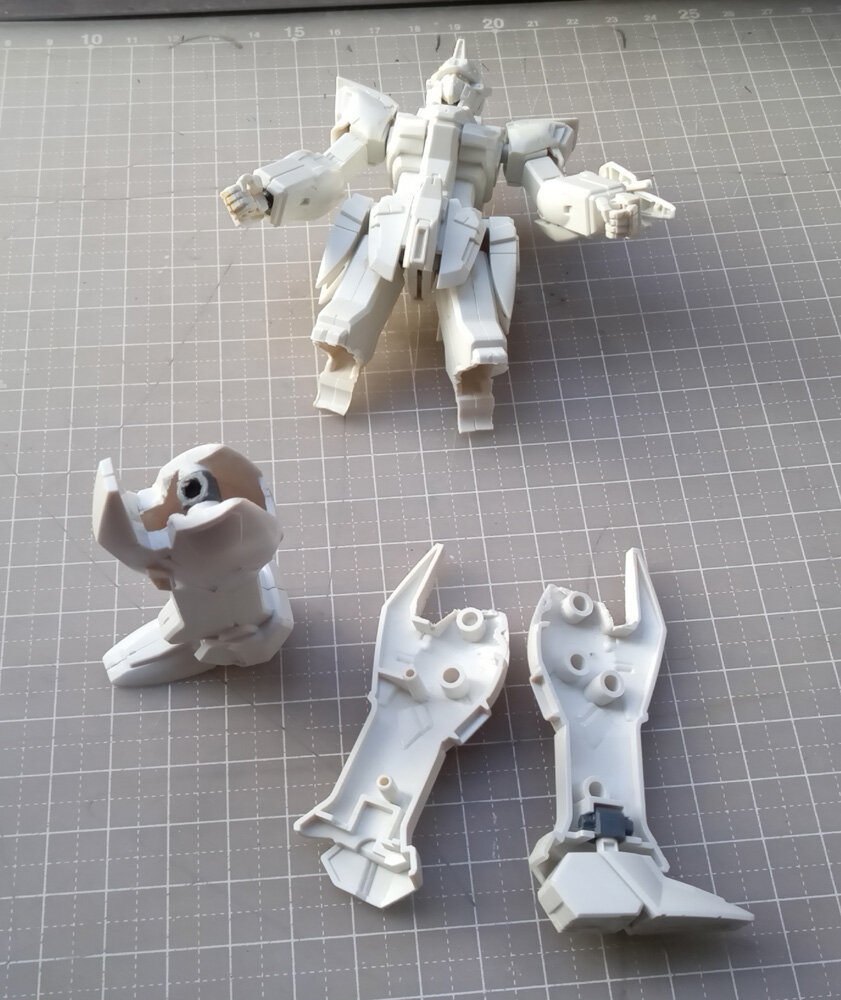
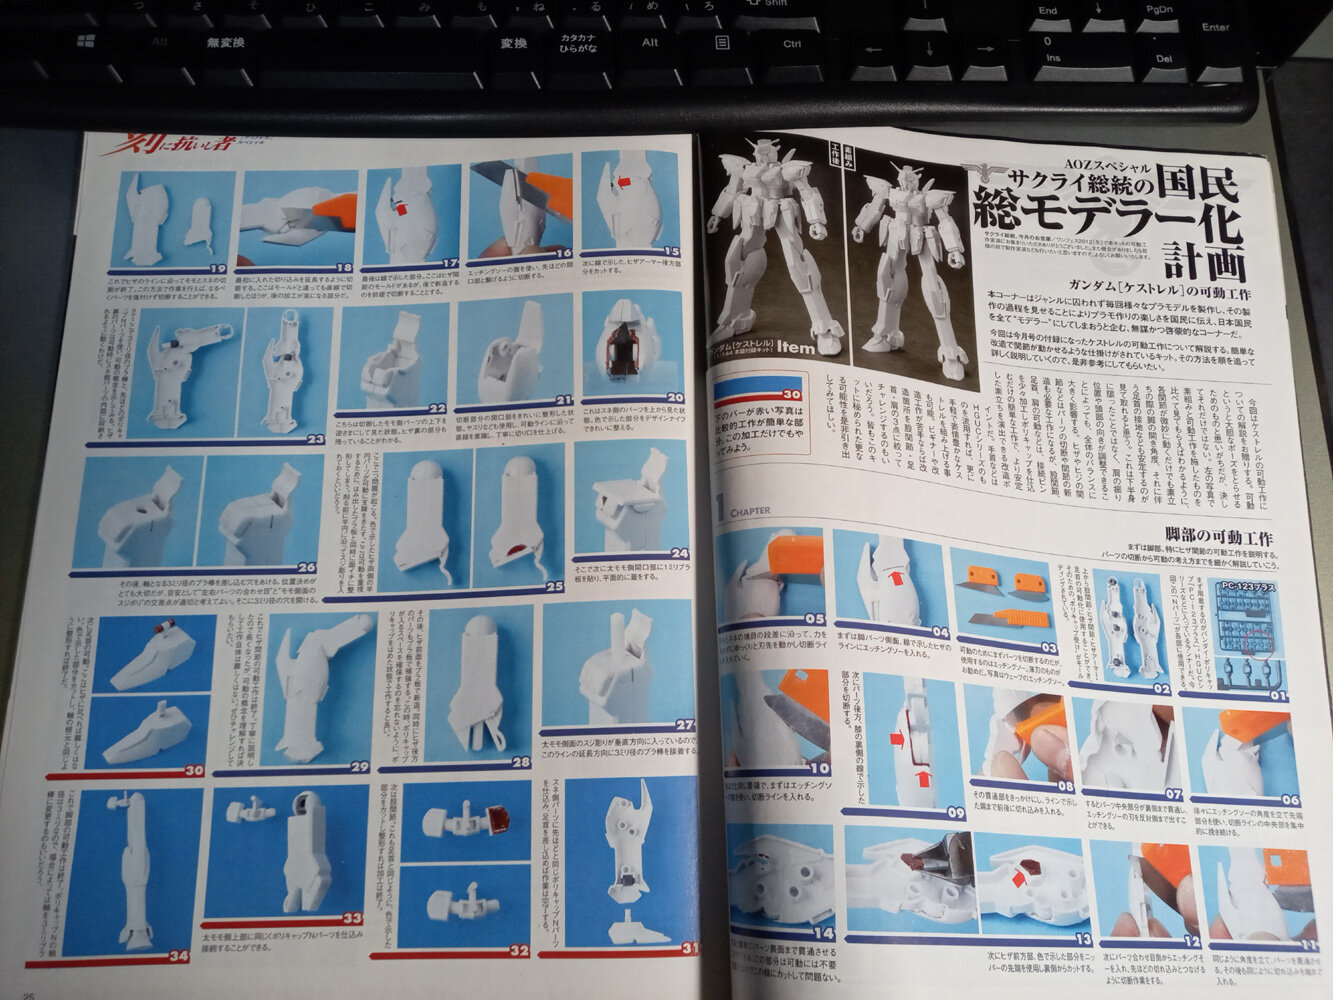
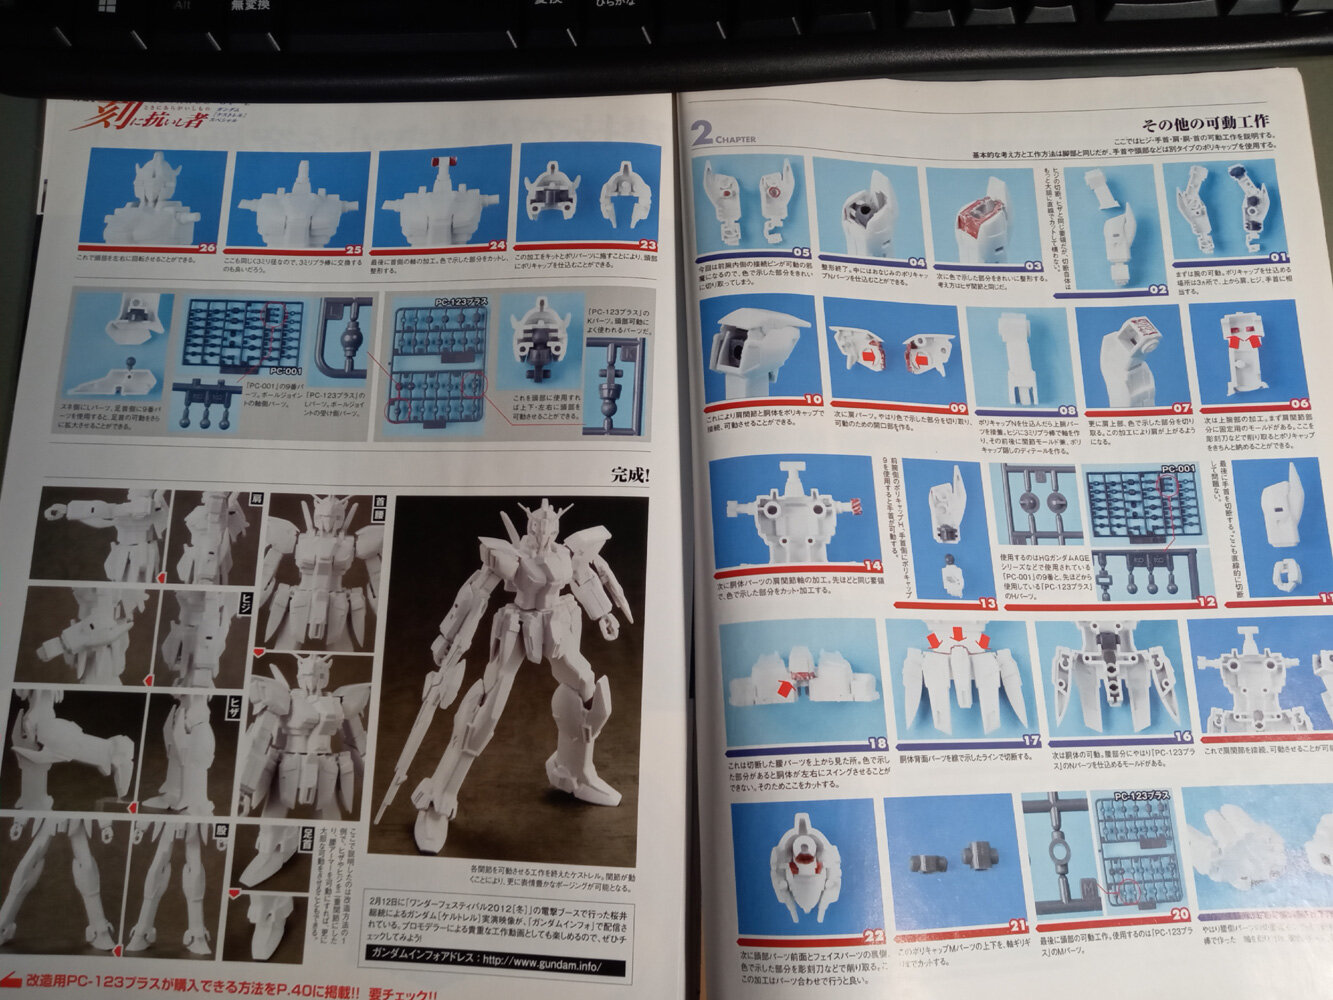
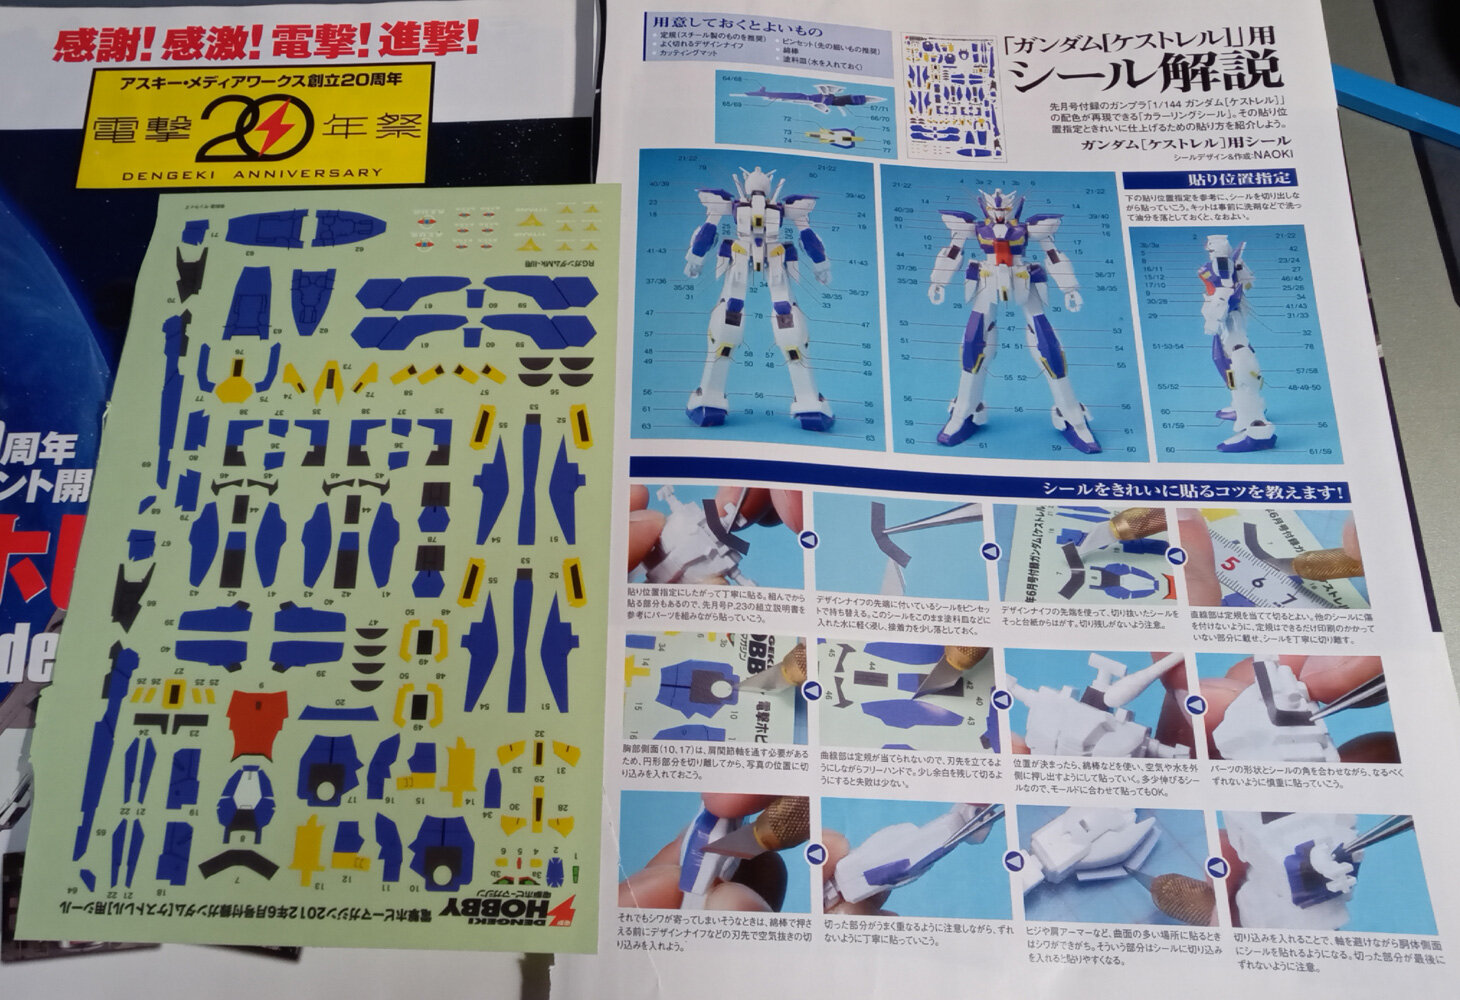
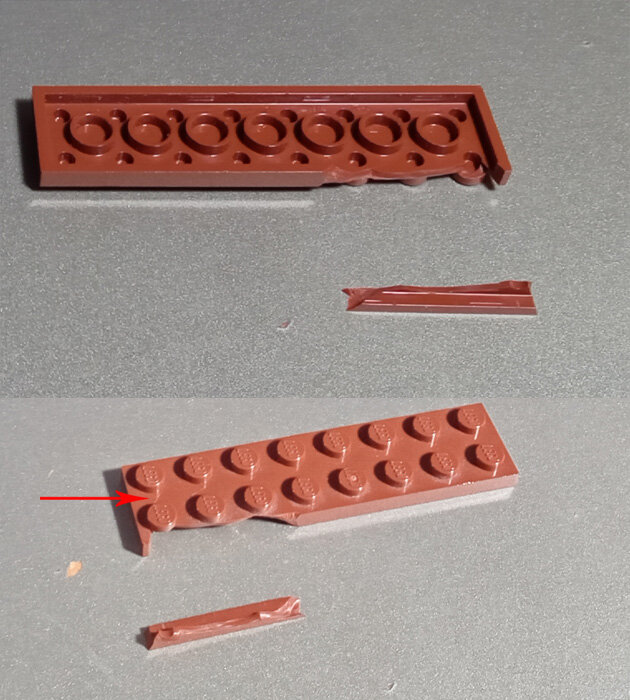
In the midst of repairs. Figured it's best to break it into two stages—glue the hairline crack, and after that dries, the broken off piece. The crack is the harder one, simple because it doesn't open very wide. Used a toothpick and gravity/osmosis to feed the glue into the underside while holding the gap open. Regrettably, added a drop too much glue in one area, but achieved the goal of having as little excess glue on the top side as possible. While waiting for it to dry, I was motivated to go through my boxes of work-in-progress. Some projects have been gathering dust for 5~, 10~, or more years... 😅 There are various reasons why they were pushed off the back burner, ranging from being overwhelmed at the scale/complexity, to merely changing interests. Project 1: You might be wondering what's going on here. This Gundam was released bundled with Dengeki Magazine around the time they were serializing "Macross the Ride" in 2011. It's a set based on a Gundam that appears in a Dengeki original story. It's an old school style kit with limited mobility meant to be quickly snapped together. However, the neat thing about it is that it was designed with expert modellers in mind and came with additional instructions on how to convert it into a fully posable model! All one needs are a bit of plaplate, some plastic rods (or leftover sprues), and a set of "PC-123 Plus". Didn't have the PC-123 set, but as I had enough PC parts leftover from other kits, I attempted to do as much as I could. I think I've got as far as step 23 for the legs, and I believe I've converted the neck, both shoulders, and one of the wrists (didn't attempt the elbows or waist at the time). Here's the instructions (first page is the straight build, next four pages are instructions on the conversion): The subsequent issue included a sticker sheet and instructions. As it's for the straight-up build, we get the wonky thing of a sticker wrapped around the open spaces in the gun! (top right of the page on the left)
-
Update: Lego (Japan) is sending the replacement part. That's pretty good service for a set I bought 8 or 9 years ago! (If I'm not mistaken, the piece is from 2015's 70412 Soldiers Fort.) Looks like I'll be starting that Rigādo Scout sooner than I thought! Acetone appears to be readily available here at what they call "home centers" (akin to hardware stores). E.g.: https://www.cainz.com/g/4935185031067.html Thanks for the advice on acetone—and the reasons to avoid using that nail polish remover. I think I'll try the Tamiya Cement on the Lego part. Long story short: I don't foresee any other projects to use it on, and it'll be like that bottle of nail polish remover—after using only a bit on a certain modelling project over a decade ago, it's been sitting gathering dust ever since... 😅
-
Thanks for the helpful responses! On the one hand, reading this was a relief (I.e. was it something I did? Left it in direct sunlight too long?) However, it has engendered a whole new headache, as most of my Lego was purchased in the "brittle brown" period. 😭 As this is my first experience with it, it has me wondering if different factories (and thus, different plastic mixtures) were used for the sets released in Japan. In short, as the packaging differs (no set name under the Lego code), are the bricks also different? (See spoiler for an idea of how the packaging differs) It's not too late! After reading Gabe Q's response, I've placed a request on the Lego (Japan) website for a replacement. I've decided to hold off attempting any repairs until I get their response (it's summer vacation right now). With luck, they'll send a replacement (it's a common part, so it should still be available). If they do, I am intending to use the broken piece to test glue. The glues I have on hand are: Tamiya Cement and Mr. Cement Deluxe appear to be exactly the same (acrylic resin 11%, organic solvent 89%, cyclohexane, butyl acetate, acetone). The nail polish remover is much more dubious—what one can expect from a ¥100 store product (acetone, water, propylene glycol, fragrance, drometrozole, tocopheryl acetate, yellow 6). I think it's best to avoid anything that will introduce 'fragrance' and artificial colour... Thoughts?

-
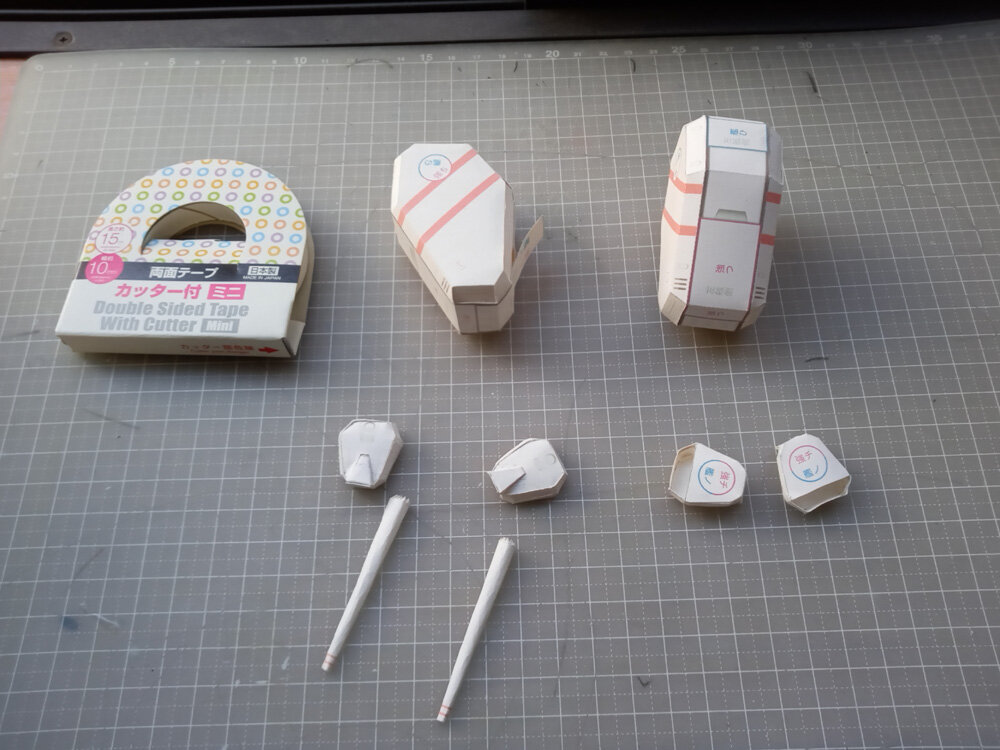
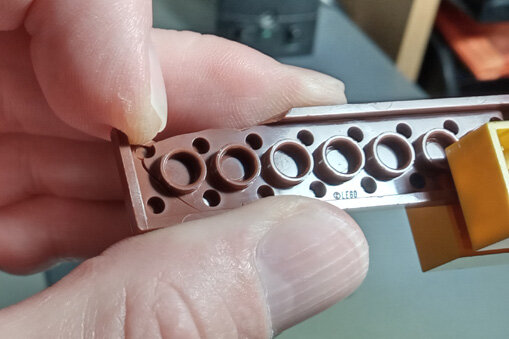
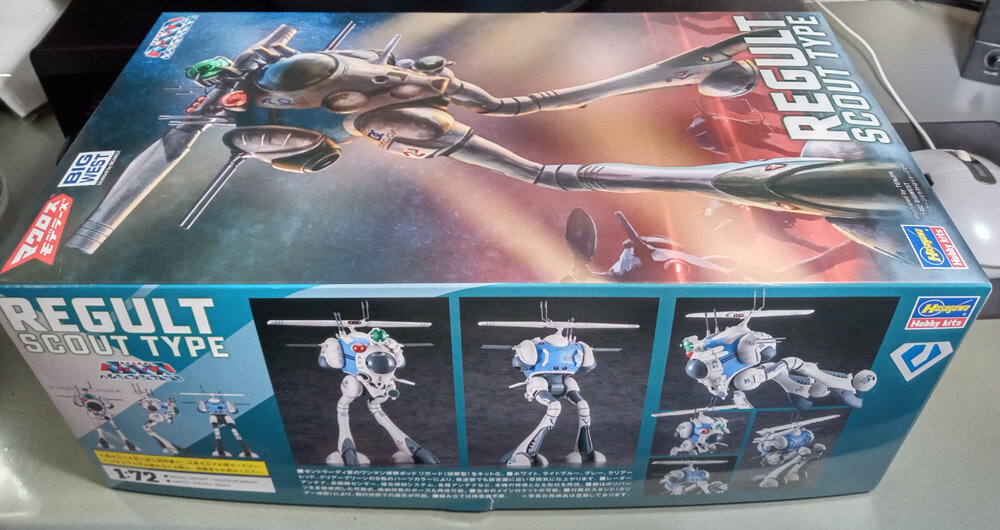
It only took 4 months since I ordered it, but my reissue Rigado Scout finally arrived! (apparently I ordered it right when the started offering preorders for it on Amazon.jp ... 😭 ) HOWEVER, before I get started on it, something more pressing came up: While it seems relatively straightforward, there's also a diagonal hairline crack (red arrow) that extends from the break (the 'left' side of the leftmost stud), between the studs, and almost all the way to the 'top' edge (next to the second stud). Apparently plastic model cement (E.g. Tamiya Cement) works on Lego. Anyone have any experience fixing broken Lego?
-

Tell us about your avatar, name, etc.
sketchley replied to Pontus's topic in MW Site News & Member Feedback
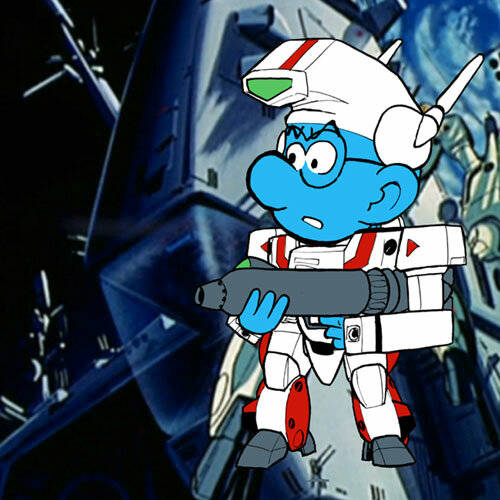
For one reason or another, I was given the custom tag "Smarter Than Brainy Smurf" way back when on these forums. My avatar was the result of mashing together that and Macross. The original idea was to spoof the opening of SDFM: At one point, I was changing it every couple of months, and as Gangnam Style was hot at the time, we got these strange iterations. Incidentally, the background of the 2nd picture is the full-size VF-25 exhibit that was making its way around Japan at the time (note Sheryl Nome cosplayers in the lower right and the people standing on the Valkyrie's hand looking into the cockpit in the upper left): The cropped version (current) was due to a change in forum software that changed the larger square display space to a much smaller circular one. I've (unsuccessfully?) attempted to make it look like the Smurf is peering through a porthole. Aside from all that, there's not anything deep going on with the avatar beyond taking an idea and running with it. Here's the full size: https://www.deviantart.com/studiootaking/art/Brainy-Smurf-SD-VF-1-264897023


-
Metal Skin Panic MADOX-01
sketchley replied to Valkyrie Hunter D's topic in Anime or Science Fiction
All it says on the poster under the English is "開発中!!". → in development (or under development) -
Super Macross Mecha Fun Time Discussion Thread!
sketchley replied to Valkyrie Driver's topic in Movies and TV Series
That's the million dollar question. From what we know, the Unified Forces were far, far behind on producing what they believed they needed to protect the Earth (such as the Grand Cannons, Destroids, Valkyries, etc.) Even if they knew how to properly conduct an anti-main fleet war, it's doubtful that the Earth would have had all the armaments ready by the time Boldoza's fleet showed up (in the TV series timeline). Now, if the Earth was a lot more proactive, headed out into the galaxy a bunch of years before the Zentradi show up, and were somehow able to hijack a bunch of Factory Satellites... there's a chance they would have made enough. -
Fixed! Main link: http://sdfyodogawa.mywebcommunity.org/ Macross Chronicle: http://sdfyodogawa.mywebcommunity.org/MCindex.php Variable Fighter Master File books: http://sdfyodogawa.mywebcommunity.org/OTvfmf/OTvfmf.php
-
For some reason, Kawamori-san opted for a sword-name theme for all the ~9 Valkyries: Cutlass (VF-9), Excalibur (VF-19), Durandal (YF-29). However, things went really esoteric and dives deep into Arthurian and Norse mythology when Ukyo Kodachi got involved in the franchise from Macross the Ride: Caliburn (VF-19EF), Nothung (VF-19ACTIVE), Perceval (YF-29B—as in "Perceval's sword").
-
Great Mechanics G 2024 Summer has a substantial article on DYRL (15 pgs). Nothing new in terms of artwork, but the Japanese text is more substantial: The 3 Deculture points in DYRL, Famous Scenes and Famous Lines, an interview with Kawamori-san, and much more.
-
Super Macross Mecha Fun Time Discussion Thread!
sketchley replied to Valkyrie Driver's topic in Movies and TV Series
It may be helpful to consider the out-of-universe reasons for how the YF-19 ended up looking the way it does. There are two main factors: ① Kawamori-san was designing the VF-11, YF-19, and YF-21 at the same time, to appear in the same shows (Macross 7, Macross Plus). ② Kawamori-san's way of doing things is to make his designs visually distinct from each other—at the silhouette stage. He chose the Quadoran-Rō's silhouette for the Battroid form of the "enemy" YF-21. The VF-11's Battroid has a traditional VF-1-style silhouette. Therefore, the YF-19's Battroid had to be something that was different from both of them. Moving the wings to the legs was a great way to do that. Diving deeper into this rabbit hole, one could say that the large blocky things coming off of the hips is the common design element in the AVF fighters, and Kawamori-san could have been using that as a visual cue to help the viewer differentiate between 'normal' VFs (like the VF-11) and the AVF. -
Super Macross Mecha Fun Time Discussion Thread!
sketchley replied to Valkyrie Driver's topic in Movies and TV Series
Fixed. Here's the text from the 3rd issue of Macross the ride: And there's a bit more on the Sv-52—specifically how many were produced—in the subsequent section on the Sv-51: -
Super Macross Mecha Fun Time Discussion Thread!
sketchley replied to Valkyrie Driver's topic in Movies and TV Series
I say "fourth" because of the way that "Macross the Ride" indicates that Stonewell and Bellcom are separate companies: "新星を中心に新中州重工、ストンウェル社、ベルコム社の各社航空部門が..." So, pending the source, it's either "three companies" (Macross Chronicle glossay entry), or "four companies" (Macross the Ride). Regarding Macross Chronicle Worldguide Sheet 06A: is this the line you're refering to? 2012年に新中州重工、ストンウェル、ベルコムの航空部門が合併して誕生(新星中心の再編と思われる)。 "The company was formed in 2012 through the merger of the aviation divisions of Shinnakasu Heavy Industries, Stonewell, and Bellcom (believed to be a reorganization centered on Shinsei)." The only difference between it and the 2 quotes in my preceding post is that the 4th company (Shinsei) is in brackets. ?? I think you've got two distinct companies confused: "Shinsei" and "Shinsei Industry". Or did you intend to write "Shinsei Industry" for the M+ and M7 era? -
Super Macross Mecha Fun Time Discussion Thread!
sketchley replied to Valkyrie Driver's topic in Movies and TV Series
Isn't it the aircraft divisions of the respective manufacturers, along with a fourth company called "Shinsei"? E.g.: Macross the Ride's glossary: Military Manufacturers: Shinsei Industry A military manufacturer that rivals General Galaxy in VF development. It was created in 2012 through the merger of the aircraft divisions of Shinnakasu Heavy Industries, Stonewell, and Bellcom, with Shinsei at its core. The company released the VF-11, VF-19, and VF-25 in quick succession—and all were officially adopted by the New Unified Forces. The company is known for its solid designs. Macross Chronicle: Shinsei Industry [Plus, 7, F] The company was established in 2012 through the merger of such companies as the aircraft development divisions of the Shinsei, Shinnakasu Heavy Industries, and Stonewell Bellcom companies. They started with the VF-5000, and after sending out the VF-11—the main Unified Forces VF in the 2030s—the company presented the prototype YF-19 to the "Super Nova Project", a competition for the adoption of the next main Variable Fighter (AVF) for the Unified Space Forces. After many twists and turns, that VF won the adoption competition and was officially adopted as the VF-19 Excalibur. Since then, Shinsei Industry has continued to lead the development of major VFs, including being involved in the development of the YF-24 and VF-25. -
Picked up the Monthly Hobby Japan Jul. 2024 issue yesterday. The attached Macross Valkyrie Picture Book is a definite must have—for new collectors as well as those with a substantial collection. In general, it is organized as: 1/2 to 1 page with the series name, synopsis, and key/main characters, and then multiple pages of the series' Valkyries. Reasons to get it: covers all Valkyries from SDFM to the latest Delta movie. Valkyrie stats (especially for the Delta Valkyries—I don't think I've seen stats for the VF-31AX Armoured Kairos in print before, and this book has them) Frustrations: no VF-4G Battroid image. Odd as they include the Max and Miria colours AND the VF-14 from the Sega Saturn Macross M3, as well as the YF-25 (another Valkyrie with limited stats) and the YF-30 from Macross 30. Maybe they couldn't get the license for the VF-X games? (The VA-3M is also 'missing', though the book does have the VA-3C Kai from Macross 7 Dynamite.) no stats for the Sv-303 (blanks or "armaments: details unknown") Surprises: a substantial section on the Macross II Valkyries the Macross II VF-XS in all 3 modes The inclusion of the VF-XS makes this more than worthwhile for collectors—I've only ever seen images of it in scans of an extremely rare anime magazine posted by a MW member a couple of years ago. Nice to have it in print.
-
In short, yes, it was loosely based on the Sea Dart. About 15 years ago, I came up with my own interpretation of what the VF-5 would look like based on the little information we have on it (single engine, based on the Sea-Dart, water landing capable, etc.): https://www.deviantart.com/studiootaking/art/VF-5-Go-Title-Page-136613604 https://www.deviantart.com/studiootaking/art/VF-5-Go-Pages-01-and-02-128200177 https://www.deviantart.com/studiootaking/art/VF-5-Go-Pages-03-and-04-128725540
-
If memory serves, there's nothing that specifically states that the YF-21 doesn't have wing hardpoints. As it and the VF-19 are based on the YF-22 and YF-23, I think it's safe to say that the YF-21 is just like the real world VF-22: it can mount things under the wings, however doing so degrades performance—reduced stealthiness, no shapechanging wings, and reduced kinematic performance. As it is a model kit, my only input is: rule of cool—more missiles are always better.
-
It's a common problem with machine translation. The workaround is—in the translation site of your choice*: 1) translate individual sentences, and if that doesn't work, 2) break the sentences into sections (e.g. break at a comma [,]). It's super annoying, but that's the way it is... * DeepL is my current go-to site. However, Google Translate should be sufficient most of the time.
-
Super Macross Mecha Fun Time Discussion Thread!
sketchley replied to Valkyrie Driver's topic in Movies and TV Series
They don't. Long story short, the canon VFs in Plus and Frontier were outperforming the Macross II Valkyries in all aspects (speed, manoeuvrability, firepower, etc., etc., etc.) If anything, the Macross II Valkyries arguably fit in (capability-wise) somewhere between the VF-11/VF-14, and the VF-17. -
It's the "Nyan-Nyan" Chinese restaurant delivery box—a nice visual pun for the ad, as both Minmei and Ranka worked there. 😉 Maybe these delivery boxes are just in Japan... anyhow, a real world example: (the 2 and 3 level ones are "sold out" at this particular manufacturer) https://shop.nakao-alumi.jp/products/出前箱-n-103
