

sketchley
-
Posts
7405 -
Joined
-
Last visited
Content Type
Profiles
Forums
Events
Gallery
Everything posted by sketchley
-

Build log - Aoshima V.F.G. VB-6 König Monster
sketchley replied to Urashiman's topic in The Workshop!
Thanks for doing this build up! After seeing the marketing pictures of this, I'm really curious if the Destroid (AKA Gerwalk) and Battroid modes can be built (or transformed) without the VF girl-scale bicycle handlebars exposed. -
If memory serves with regards to Macross 2, he was forced to do a style reminiscent of the TV series, etc. So, his character designs in Macross 2 should be considered an outlier. A better progression would be to look at how it changed from SDFM → DYRL → Macross 7 → Macross the First. Nevertheless, I wouldn't describe it as a 'changed' drawing style per se. More like an evolution. Some aspects of his art are a lot more simplified (as in easier and faster to draw), but other parts have hardly changed at all (e.g. the way he draws noses).
-
Aircraft Super Thread Mk.VII
sketchley replied to David Hingtgen's topic in Anime or Science Fiction
That design raises a lot of questions. E.g.: the thrust vectoring plates: why are the top plates jagged (= stealthy), and the bottom plates square (= not stealthy)? And then there is this: * https://en.wikipedia.org/wiki/AVIC_Baidi_Type-B Makes one wonder if the whole thing is a mistranslation of what the aircraft really is—like, as renegadeleader1 said, a movie prop—or we are seeing a masterclass in misdirection. -
While it is essentially an impossible question to answer, one way to look at it is the big purchases made by the Earth government. In short: in addition to fully funding the ongoing costs to repair the environmental damages to the Earth, the Earth is able to fund the creation of dozens upon dozens of fleets at the same scale as the 7 and Frontier fleets, at the rate of 1 to 2 per year.
-
I "like" how they went to all the effort to remove the copyright and replace the ARII logo—even going to far as to put the safety instructions in Chinese (in the bright yellow box)—but they can't be bothered with the domestic Japanese number for paint inquires. 🙄 Begs the question: did the bootlegger have some kind of connection with Hobby Color? 🤔
-
Super Macross Mecha Fun Time Discussion Thread!
sketchley replied to Valkyrie Driver's topic in Movies and TV Series
That kind of has already happened—with the VF-X2 game. The player has to choose whether to join the rebels or stay with NUNS at the end of level 9. The rebel storyline is much longer and generally what the rest of the overall Macross timeline is based on. However, because the conflict ends quite differently and months apart depending on the player's choice, it's truly left in a which way did it really happen state in the official timeline. 🤷♂️ -
Super Macross Mecha Fun Time Discussion Thread!
sketchley replied to Valkyrie Driver's topic in Movies and TV Series
Macross Digital Mission VF-X is a bit of an odd ball. Its apparent location spawns a list of incongruities (the travel times TG Remix mentions, how could the Unified Forces dispatch a ship there so quickly, etc., etc.) It appears that the people who wrote the official Macross timeline (in Macross Chronicle and elsewhere) treat it with a grain of salt. In essence: the Milky Dolls kidnapping happened, but the circumstances are left vague and the 'real event' was probably very different from what's depicted in the game. Just to keep my head from blowing up, I've interpreted Elysium's location as being in the part of the Carina-Sagittarius Arm closest to Earth, and either at the 'top' or 'bottom' side of that arm (= the edge of the galaxy). I can't recall the specific Japanese term used to describe its location, but it definitely is NOT akin to 'in the outer rim'. I think the writers of Macross are doing a bit of fudging on top of being unaware of (or downright ignoring) the distances and apparent travel times. In a way the fast territories that Chaos and SMS operate in align with Kawamori-san's evocative description of Macross F's setting as "the great age of exploration, with e-mail". In that context, Chaos and SMS being akin to the East India Company and operating trade ships (fleets?) on decade-long cargo runs makes a bit more sense. Especially if its something like the Spanish Galleons traversing the oceans with cargo holds full of silver and gold. Things get more reasonable after the introduction of the Super Fold Booster technology. That above mentioned 10 year journey shrinks to a 1 year journey, bringing intergalactic trade closer to the modern container ship trade. However, none of that really addresses how the Macross Frontier Fleet was described as being a popular place for tourists, especially as the fleet was travelling so far away from colonized planets, and the apparent rarity of passing close enough to another Emigrant Fleet (E.g. Macross Galaxy) to enable tourism! 😵 I can't recall the specific reasons why we added that, but I think it has its origins in the differences between the Frontier and Galaxy fleets, and how different their respective environments are. It makes sense for the people in Galaxy to be envious and jealous of Frontier, and the people in Frontier to look down at or disdain Galaxy. So, from a story-writing perspective, the 'how perceived by others' adds a lot of colour. One wonders if the writers of the Macross shows have something similar in their production story bibles... -
Super Macross Mecha Fun Time Discussion Thread!
sketchley replied to Valkyrie Driver's topic in Movies and TV Series
It would be nice, but it all depends on what type of story Kawamori-san wants to tell, and what kind of setting is needed for it. As the direction is trending towards the next generation of Valkyries, the best we can hope for is something akin to the situation inVF-X2: advancing the timeline forward with the latest Valkyries, but set in the near Earth area. Over the years, myself and others have dabbled a bit in trying to figure out where the planets named in such things as Isamu Dyson's service record are, and the logical conclusion is that the majority of named planets that we know of must be within 100 to 200 ly of Earth. Otherwise the transit times involved make it ludicrous (either physics are broken, or Isamu has experienced some serious time dilation). From the opposite perspective: the official materials have stated that it took 20 years for the M25 Fleet to get to where it is in 2059, and the fastest route back to Earth will take half that time (= 10 years). I'm not sure how usable it is, but this is a 'map' that we came up with: http://sdfyodogawa.mywebcommunity.org/Stats/Locations/Locations.php#Local The planets in green text are official (at the very least, providing a glimpse of the untapped story potential), and we placed most of them within 100 ly of Earth ('sector 1'), and a handful in the 100-200 ly radius beyond that. The next significant list of planets are the ones from the Emigrant Fleets that headed toward the center of the galaxy. But as they're so spread out in such a huge area, it's more like the Mariana Islands in the vast Pacific Ocean. So, yeah, I fully agree that they should set the next story near Earth and explore and develop that area far more than they have so far! On a certain level they're more like "plot devices" and "plot speed bumps", which defy explanation... 😅 -
Alas, "Now Printing" is the pic. The temporary placeholder pic, that is.
-
Super Macross Mecha Fun Time Discussion Thread!
sketchley replied to Valkyrie Driver's topic in Movies and TV Series
Correct! It's one of those mecha that I would have liked to have seen more (completed) images of in such publications as Macross Chronicle. Alas, the only image source is Kazutaka Miyatake Design Works, and the majority of those are developmental images. Alas, Kawamori-san decided that skipping ahead to the M+/M7 timeframe would make for a more interesting story. And subsequent anime releases have all based themselves from there. As Seto indicated, beyond that initial 100 ly, human colonization in the galaxy is messy and random. It probably looks closer to something like a >55-legged box jellyfish, with legs stretching thousands of light years in all directions. -
Super Macross Mecha Fun Time Discussion Thread!
sketchley replied to Valkyrie Driver's topic in Movies and TV Series
The same thing could be said about its predecessor, Macross Digital Mission VF-X, the Sega Dreamcast's Macross M3, and the Sega Saturn's/PS1's The Super Dimensional Fortress Macross: Do You Remember Love. The first two are mentioned in multiple timelines produced after their release. Macross M3 is also the only production that gives us any information on Macross's roughly 30 year blank space between Flashback 2012 and Macross Plus. Elements of the SDF:DYRL game need to be added to an animated version of Macross The First—especially because a good chunk of them are predecessors (or stepping stones) to designs that show up in later releases* (at the very least, they embellish and further round out the SDFM era). * E.g.: Zentrādi APC → Gjagravan-Va → Large Vajra -
As I can access the site right now*, it makes me think that there is some kind of security protocol that is blocking your access to it. This could be your ISP (less likely) or your browser. With Firefox under Privacy & Security (in settings), I have Enhanced Tracking Protection set to standard, HTTPS-Only mode set to don't enable HTTPS-only mode, and Enable DNS over HTTPS using set to default protection. There may be something else (i.e. antivirus software, Windows defender) that could also be blocking the site. * http://www.gearsonline.net/series/gallforce/eternal/ships/starleaf.html
-
Is your browser set to https only? Try disabling that.
-
Great Mechanics G 2024 Autumn is out: https://www.futabasha.co.jp/book/97845754655630000000?type=1 Macross Content: The third instalment of their "Macross Festival 2024"—Macross Plus. Macross Plus 30th anniversary articles (17 pages): Macross Plus Keywords Macross Plus Mechanic File Macross Plus Famous Scenes Characters The Dogfights Shoji Kawamori Interview Kazutaka Miyatake's Designs As they're doing a "Macross Festival 2024", one wonders what (if any) series will be featured in the December issue.
-
The one with it pitching backwards feels the most appropriate—defeated in a way that keeps the Jedi safe. For comparison: the one with it pitching forward doesn't feel "Jedi" enough—it looks like it might fall on top of the Jedi!
-
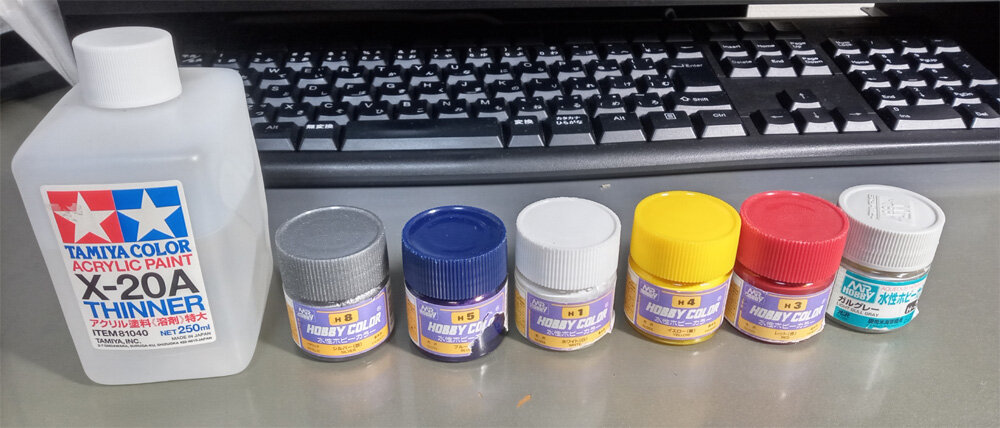
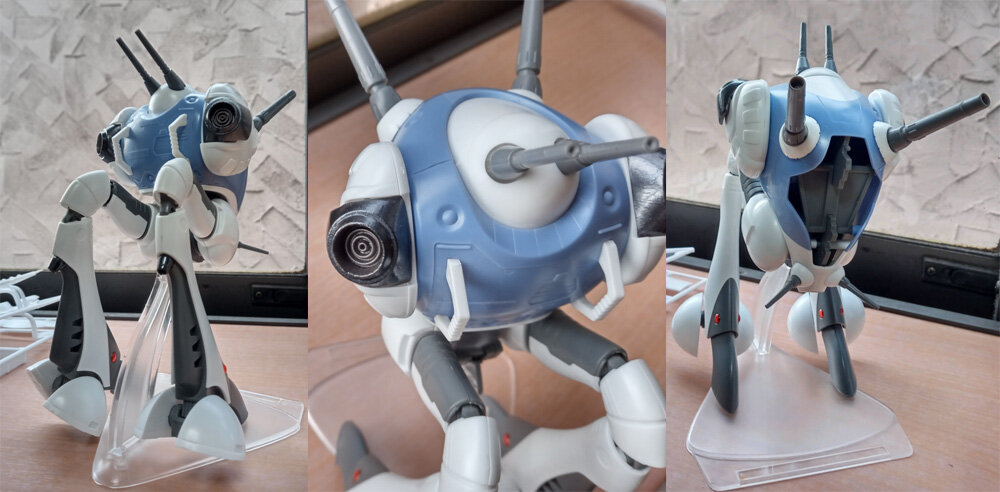
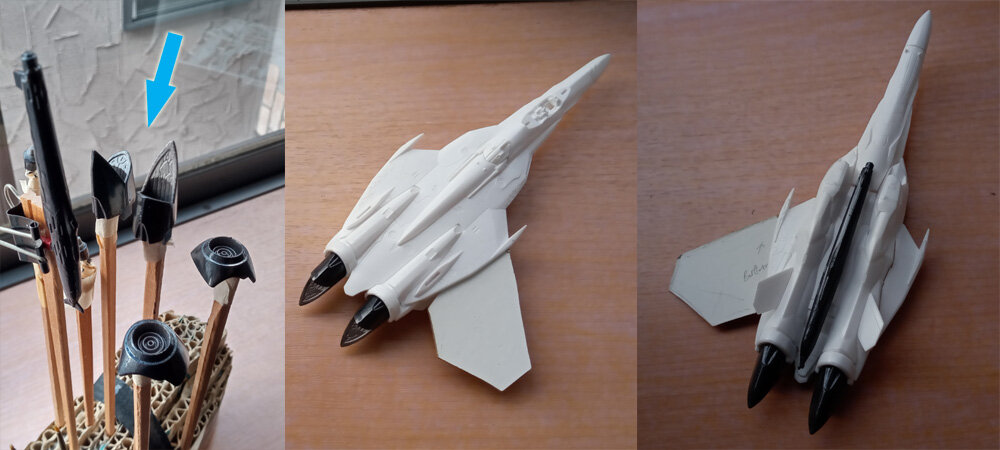
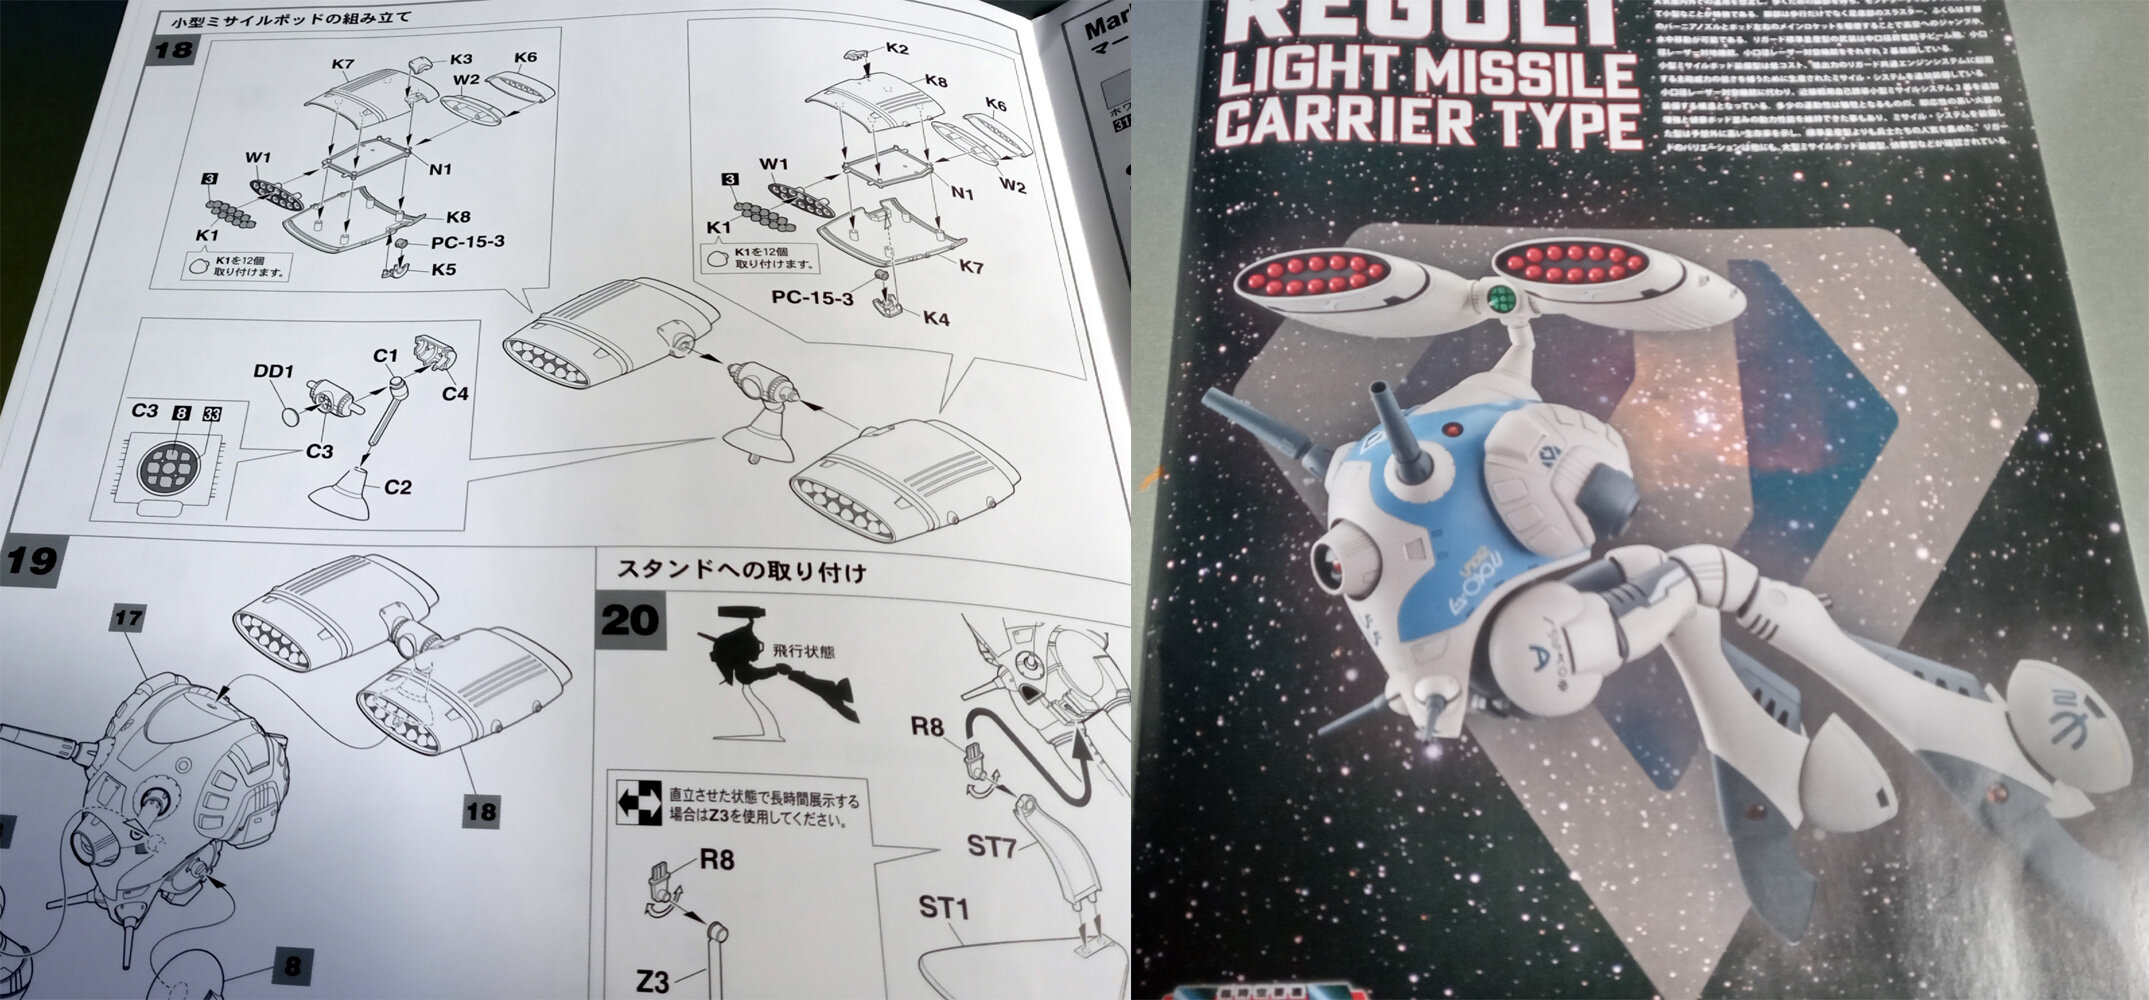
Hobby Color Paint Restoration - the water-based paints strike back They are truly striking back. Of the 5 (the Mr Hobby Color still had life in it), only the red and yellow returned to factory fresh after adding the X-20. They were also the only two that had a significant amount of 'liquid' paint in them. The white is reacting slowly, so I'm leaving it for now. The blue and silver were both bone dry, and the X-20 had virtually no effect. There was only a little blue left, so I was hoping for some kind of reaction, but after 2 days, the solvent still looked like water. There was quite a bit more dry paint in the silver jar, and the X-20 reacted a little with it, but no where near enough. As an experiment, I've put a bit of Mr Color Replenishing Agent into both. Within a few hours the blue was liquefying and starting to look like paint. I'm not sure if it's worth salvaging or not as a pseudo Mr Color paint. The silver... it doesn't look like there's much of a reaction going on. Just like the X-20, only the top layer of paint appears to be dissolving. Looks like I won't be able to avoid having to chip it out with a used spoon or something... 😫 Edit: It's starting to attain a consistency like wet sand. Not sure if it can ever return to something resembling paint. But at last I don't have to chip it out! 😅 Anyhow, the restored red paint went down as well as can be: If you're wondering what's up with all the black on the other parts: I'm attempting to kill two birds with one stone. Some of the parts (E.g. the interior of the cone around the sensor eye) are supposed to be painted black. I've used the water-color wash to get both a matte-black colour, as well as aiming for a seamlessly blend with the final wash when the kit is completed. All the black on the parts that become the front and back of the missile pods are to pre-wash the parts that will be nigh-impossible to properly do when assembled. I'm also aiming at representing the scorching and soot from repeated missile launches—akin to what a Space X Falcon 9 looks like after a dozen landings. I'm waffling over whether or not to wipe off most of it, some of it, or none at all. Scorched black louvres looks neat, but as there's a dark grey part going in behind them, they won't be as visible as they are in the pictures above and below. What do you guys think? Is the soot covered Falcon 9 the right or wrong direction to head in?
-
I'm still waffling over what to do with it. When I looked through the instructions again yesterday, I thought I saw another small part that needs to be painted black. I'll have to double check, but if so, I think I'll hand draw both parts with manga ink. Battle damaged models are something that I simultaneous say "why would you want to mess up such a pretty model?!" and "cool!!" (mixed in with a bit of envy). 🤣 How did you get the rolled up effect on the foot damage? It's a neat effect that suggests there are more layers under the surface.
-
Tried the Blue Tack/Eraser Putty trick. The plan was to use the wash (black watercolour paint + water + a bit of X-20A to give it a bit of bite) over the painted parts. Due to things like the Gun Chrome Paint I used not being able to be fully restored to factory fresh, things didn't go to plan... Upper picture: Blue Tack in situ. The wash didn't pool as much as I would have liked in between the raised bits. Nevertheless, the tack did it's job. Lower picture: Blue Tack didn't come off all in one go. Generally massaging excess Blue Tack into the stubborn bits removes it all. Which back fired, as the Blue Tack immediately picked up the excess wash on the raised bits, and started smudging it into the places that I didn't want it!!! I stopped as soon as I noticed what was going on... After using moistened Q-tips to remove the excess wash from the raised bits. While the part now has a nice and grimy 'well-used' look, it's not exactly what I was aiming for, and looks more like a flashlight reflector and less like a collection of sensors... So, I have 3 options: 1. wash off the wash, and try again (most likely getting similar results) 2. leave it as is 3. dust off my oil based manga ink, and draw in the lines. I've done it before and it's painstaking and slow. As the ink is next to impossible to get off, it means even more caution and care...

-
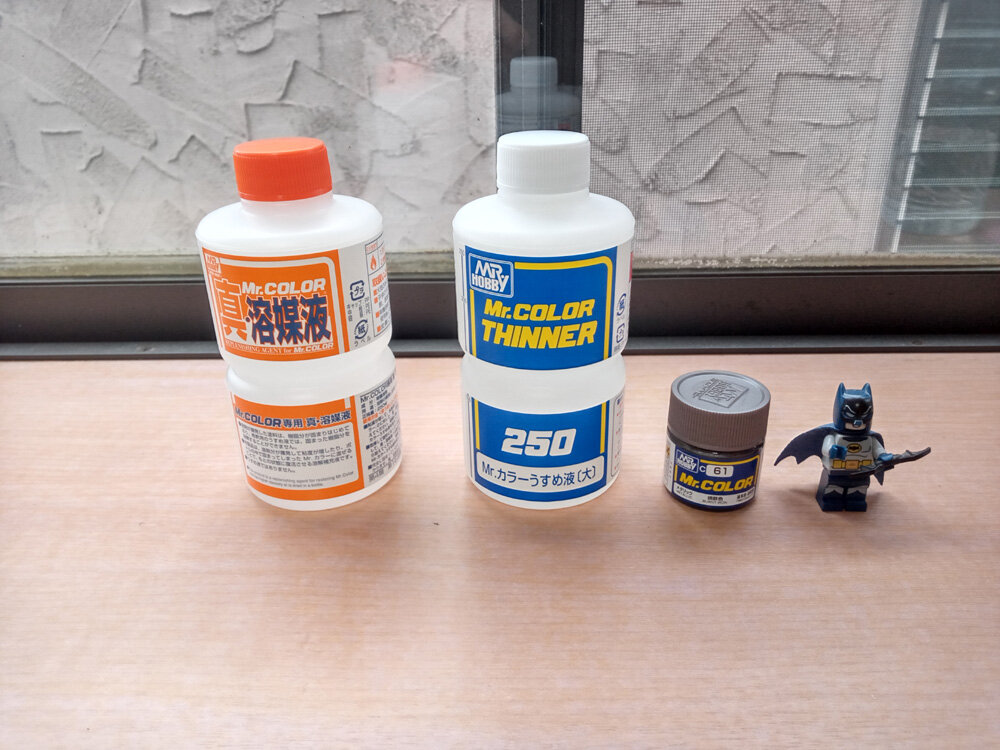
Hobby Color Paint Restoration - the water-based paints strike back Next on the workbench are the water-based paints. Not sure how old they are (getting on 15? 20 years?), but unlike the Mr Color paints, the ones I need are still liquid (highly viscous... ). While diluting them with water is feasible, the information I've been able to find indicate that solvents (E.g. Aqueous Color Thinner, X-20A) are preferable to water. Does anyone have any experience with mixing X-20A into Hobby Color? One of the sites I looked at has this guide (double circles = excellent/very good, single circle = good/OK): https://love-p.jp/mokei-color-solvent#i-7 That site indicates that own-brand solvents are best, but there are more or less no problems when used in different brand paint. (it's well worth a look, as scrolling up there are a bunch of other similar diagrams for the other commonly available modelling paints and solvents in Japan). Another site goes into detail about mixing Tamiya and Mr Hobby paints. Long story short, it's basically OK, but some individual colours don't react well (clumping up, etc.): https://peg4009.livedoor.blog/archives/9002979.html This last one goes into a bit of detail about the differences between the old (circa 1996) and new Mr Hobby Aqueous paints. In short, the big difference is the availability of solvents. https://fudepla.com/tips/hobbycolor-mizuwari/ Edit: Just so there's no confusion, the Hobby Color and Aqueous Hobby Color are one and the same, just a rebranding (old / new versions): https://blog.goo.ne.jp/me262a/e/9f60b878c8d4ad2c2b93a394d20f7f82

-
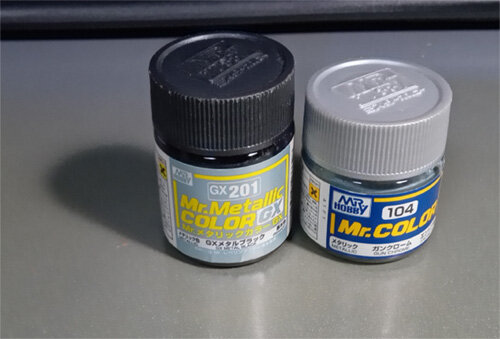
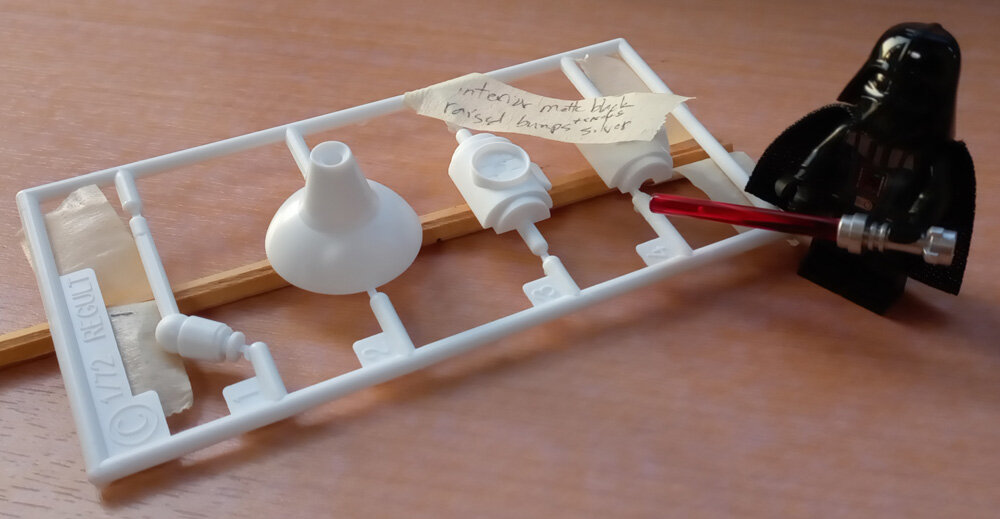
Mr Color Paint restoration project: Considering that the paint was bone dry in the jars (the 'gun chrome' was particularly crusty!) a couple of weeks ago, AND I didn't melt any of the styrene that I painted it on, it looks I more or less pulled it off. It wasn't quite 100%, but as the company warned that it won't work on metallics, that was kind of anticipated. The two colours used: The Mr Metallic Color GX Metal Black was the more successful of the two. Initially I feared that I hadn't diluted it enough, and the paint was going on too thick. However, aside from a few spots, it came out perfectly (in the sense of just like before it had dried out in the jar). The Mr Color Gun Chrome was less successful. It didn't go down smoothly, and I had to manipulate the paint after some of the liquid had vaporized. The end result was basically matte when it should have been gloss. Initially I thought it was because it was too diluted. However, two days later when I looked inside the jar, it was settling out with a clearish/greyish liquid having formed on top and the metal flakes settling at the bottom. The Mr Metallic Color was exactly the same two days later, so I'm presuming that the two types use different recipes that react differently to Replenishing Agent + Paint Thinner. The results: As most of these parts are hidden behind other parts (clear lenses, etc.) and are destined merely to reflect light, I'm satisfied with the result. The only trouble spots I had with the Metal Black were the areas that (I think) I put it on too thinly. That "reflection" in the nozzle on the upper right is not a reflection, but because it dried matte. If memory serves (from 5 or more years ago! 😅), I think this occasionally happened before. So, it's something to keep in mind when applying Mr Metallic Color GX (my 'story' is that Regults get banged up all the time, so of course they'll have scuff marks.) They don't look half bad when assembled. However, I'm getting strong urges to paint the gun barrels on the front the same colour to make it look more balanced! I also slapped it onto the gun pod and engine thrusters of the VF-25→VF-24 conversion. Was it worth the extra effort to add the Burnt Iron colour on the insides of the engines on the Regult (middle picture, above) and the Valkyrie? Or is the colour difference too subtle? I tried this route. Sadly, the paint (and my brushwork 😅) didn't come out as well as I would have liked... That eraser putty is a good idea! I have some blue tack lying around that should do that trick.
-
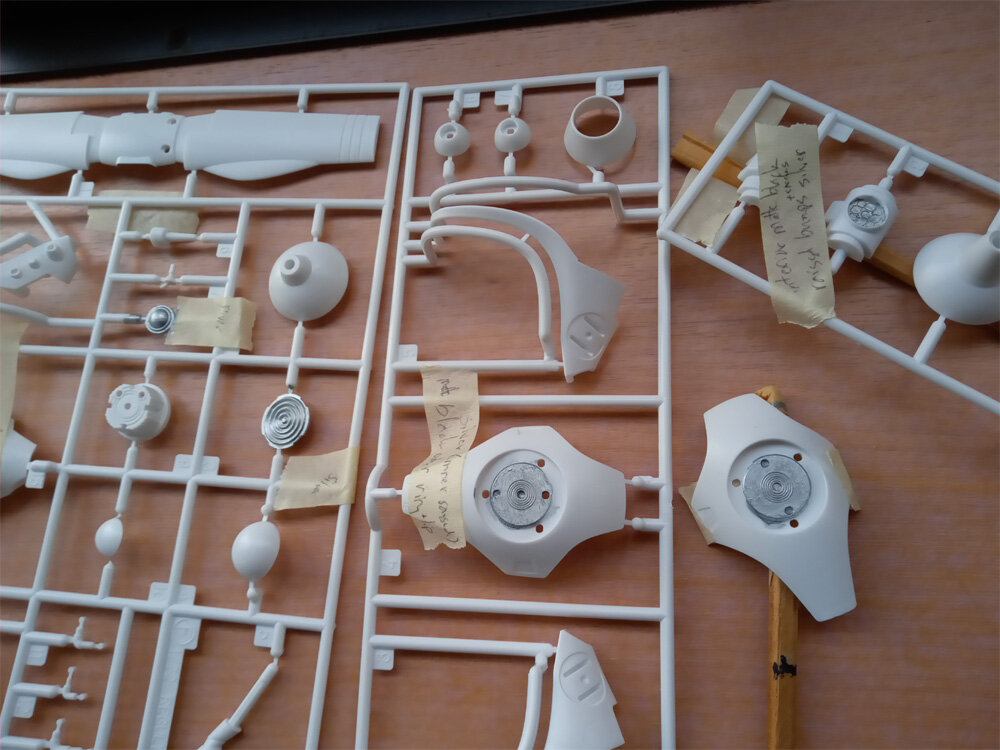
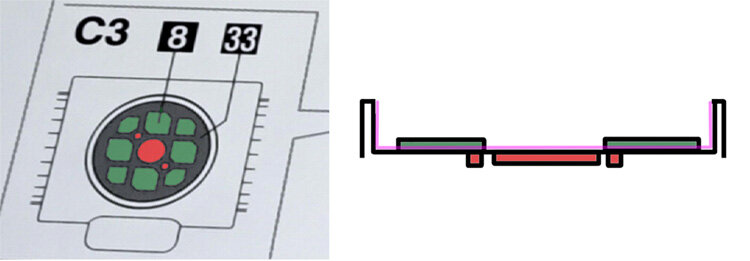
Mr Color Paint restoration project: It looks like I've reached the stage where I don't need to add any more of the Replenishing Agent, need to dilute them with paint thinner, and will be able to start using the recovered paint. It's taken this long mainly due to only adding a bit of Agent at a time. The 1:1 ratio* is a bit of a challenge to achieve, as dried paint has significantly less volume than wet paint, and adding too much Agent will cause a whole slew of new problems. Nevertheless, I've achieved my minimum goal of making the bottles easy to clean. If I don't screw up now, I'll have successfully resuscitated the paint. That said, the two colours I need to use first are both metallic—something that Mr. Color says the Replenishing Agent doesn't work with! I suspect that their warning may be for spray painting, as it doesn't really make sense for brush painting, especially if it's right after mixing the paint. Speaking of painting, the Regults need a surprising amount of minor colour swatches all over the place—such as silver behind the clear parts to get an additional light kick. There is one part though on the Light Missile Pod that I've been hemming and hawing over the best way to approach. It's the sensor eye between the two missile pods—the indented part with greebles that the light sabre is pointed at: The instructions call for a black background, and silver surfaces. The problem is: some of the surfaces are above the background, others are below. (The green bits are raised, the red are lower, and the pink line is supposed to be black.) I've been waffling over painting it black first, and dry brushing silver later, to painting it silver, and then putting a black watercolour wash over the top, and removing as much of that from the red indented parts as possible. The complication is the size (I think I'd need to add paint using a needle to make the smaller red pits silver, nevermind a lack of fine brush control!) On the other hand, as it will end up covered with a clear green part, and as most people tend to focus more on the red missiles when looking at it, I figure that whatever I end up doing, I won't have to be very precise. What do you guys think? * I'm aiming for something closer to 1 (70% agent, 30% thinner) : 1 (paint)
-
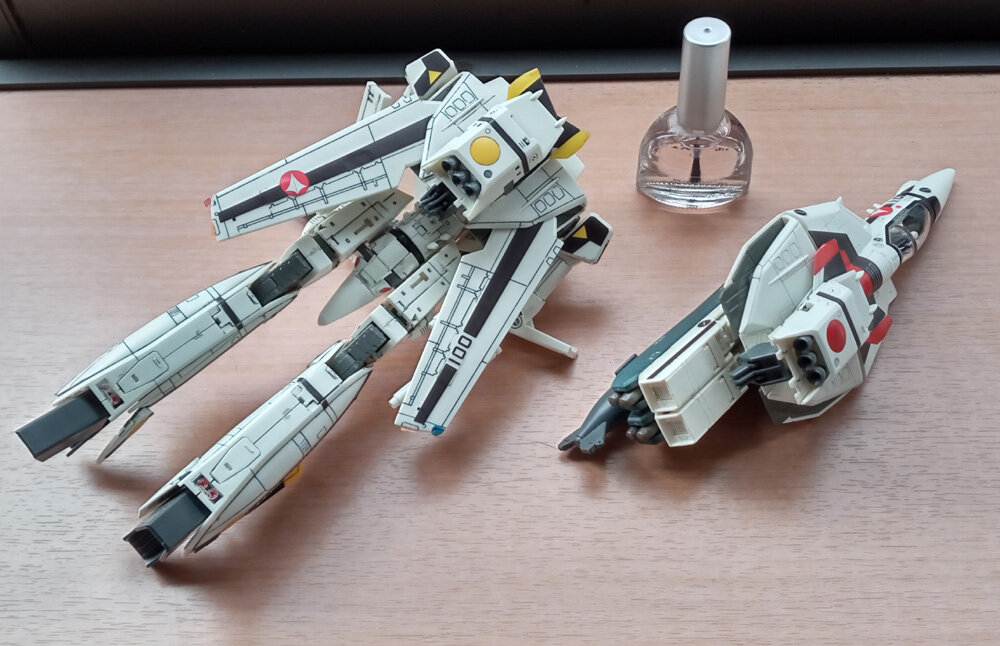
The desired goal is to add a thin layer onto the nubs that get worn down when handling (E.g. posing) your kits. Sometimes it takes multiple layers of nail polish to get it back to a snug enough fit that'll keep its pose. I'm not sure if CA would have the same effect—my impression is that a layer of dried CA glue is very thin. The trick works best when you can pull the parts apart so the nail polish doesn't get everywhere and lock the joint. Joints on such things as the old school Destroids (like the ones in my post above) can't be pulled apart, so the trick doesn't really work on them. Which sucks, as it's generally the styrene on styrene that wears the quickest (like in those Destroids), and hardly happens with styrene on polycap (E.g. Gunpla joints)—which are super simple to take apart! Here's an example of the trick being used to make a custom adapter for a Gunpla stand using a bit of leftover sprue that wasn't quite large enough for the hole in the bottom of the 1/144 VF-11:

-
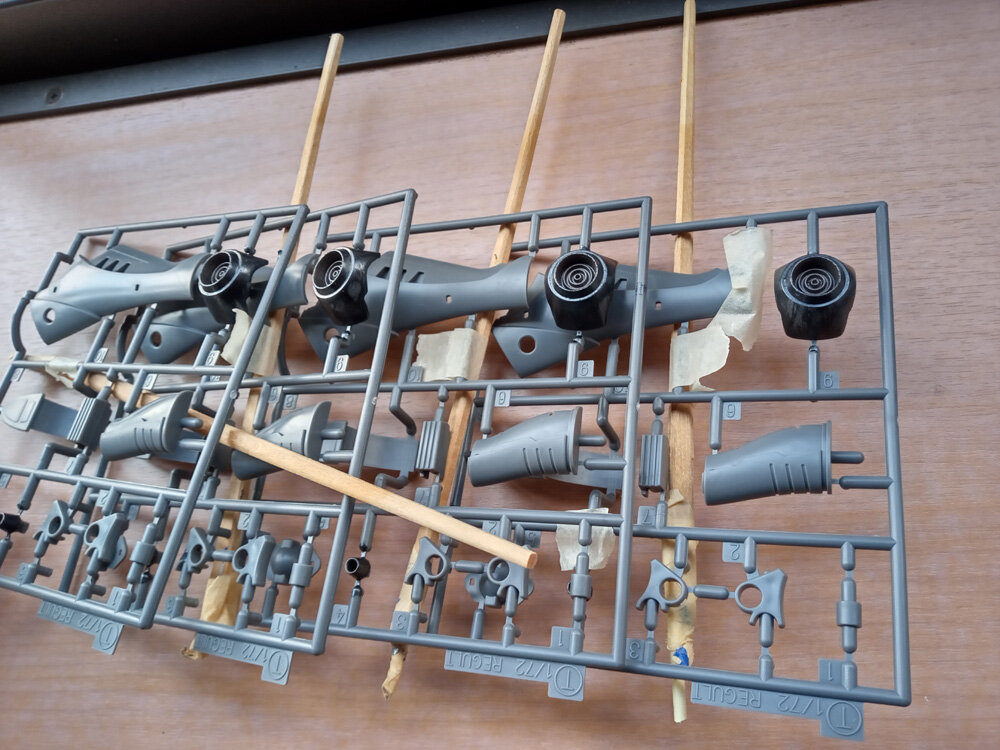
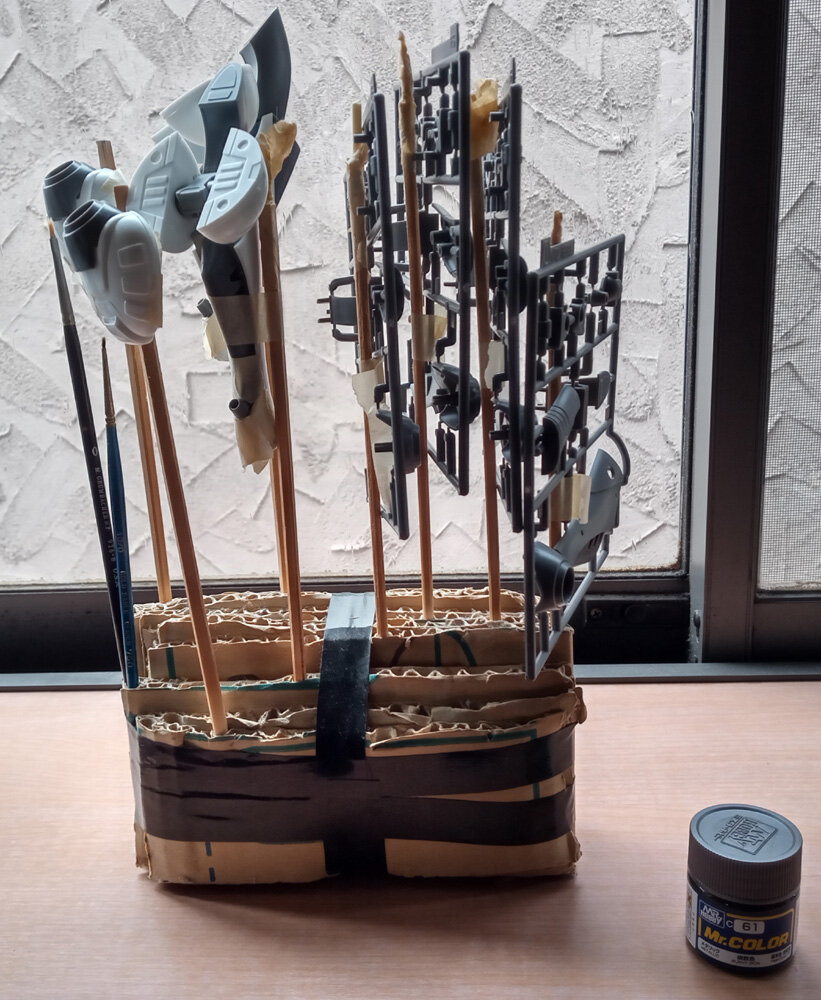
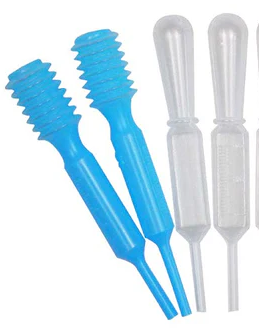
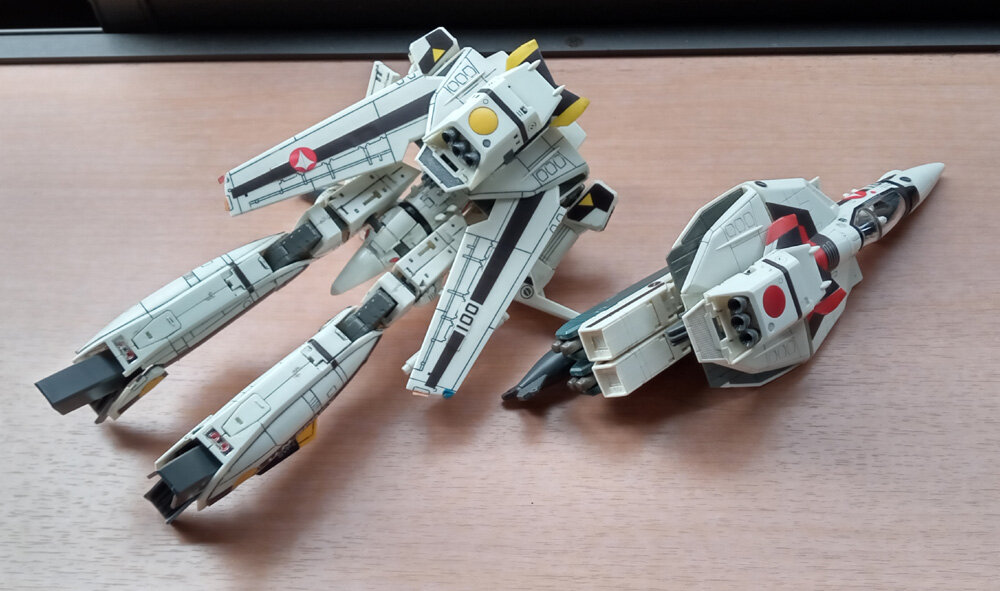
I think I've become a Regult Factory Satellite 😁: First up, painting the rocket thrusters on all 3 kits—of course the typhoon has decided to make a u-turn, and is sending humid rainy weather my way again 😫: Oh, update on the Replenishing Agent—I had a mini disaster yesterday: the eye dropper I was using to transfer the agent into the paint jars disolved on me just as I was getting started! In its defence, it was old, used, and sun damaged (or worse!!! It's shaped like the blue ones in the following picture, but was white). Thankfully I had a spare (that is surviving. So. Far.) It was really bizarre when the plunger part just separated into a bunch of plastic rings on me! 🤣 So yeah, VERY, VERY potent stuff. So, while waiting for the weather to clear yesterday, I started fixing my pair of Bandai fully transformable VF-1. First step was the ol' trick of using clear nail polish to rebuild worn surfaces. On these kits, it's the nubs where the 'buttflap' attaches to the back pack—both were falling off at the merest vibration! 😫 Before: After: The VF-1S (Fokker) is basically done and stands on his own two feet (he may have lost a thumb at one point—not that anyone notices or anything). Hikaru's VF-1A on the other hand... I want to keep it in GERWALK (the joint where the backpack connects with the fuselage broke, so it can't transform completely into Fighter, and that support stand connector piece is a permanent part of the kit now). At this point, I'm mulling over whether or not I should only use the nail polish trick to reinforce the leg connection pins, or basically disassemble the torso of the model and glue it permanently in GERWALK when I put it back together. I think I'll try the nail polish trick on the back FAST Pack connector pins, as keeping them removable will make dusting (etc.) a lot easier!

-
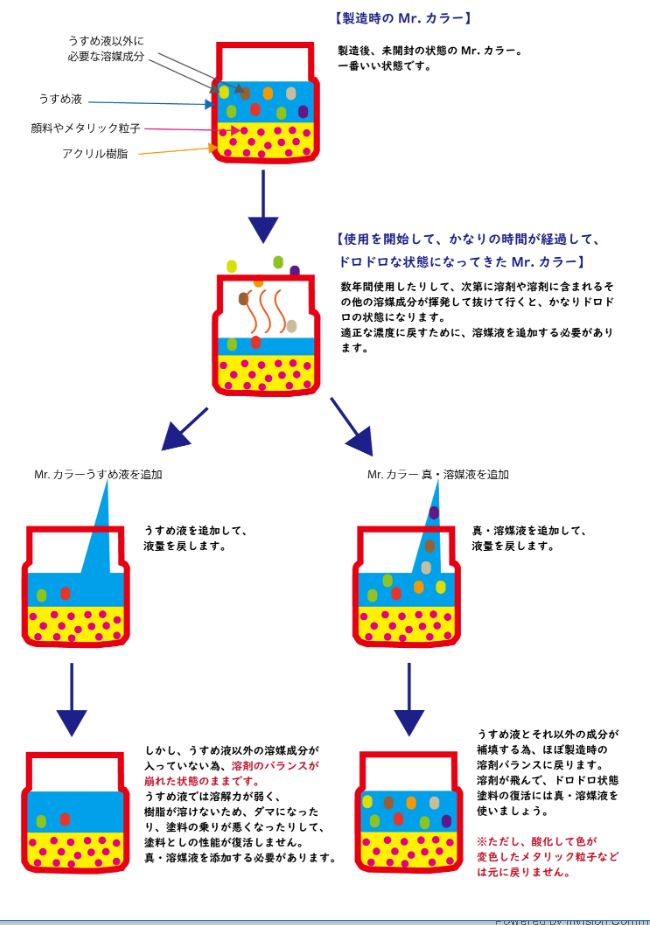
Update: got the Mr Color Replenishing Agent: If you're wondering why it has taken so long: just because one is in Japan, it doesn't mean modelling products are readily available! 😅 Long story short: the replenishing agent is apparently very popular product, as it's sold out on Amazon.jp, and all the local hobby stores I went to didn't have it! Ended up getting it at Yodobashi Camera in Umeda (while I don't like the 'downtown' price bump, it's fully replete in models and modelling paraphernalia. Well worth a visit.) Now, what about that Thinner? In the week before heading to Umeda, I did a little research on the Replenishing Agent: The Mr Hobby website* has this warning on the product: "For use with Mr. Color only. Cannot be used with water-based hobby colors, Mr. Metal Color, or paints from other companies. Cannot be used as a thinner. Colors that have too much solvent liquid in them may dissolve the plastic. Be careful not to add too much." * https://www.mr-hobby.com/ja/product1/category_7/163.html Digging deeper, I found a site where someone actually tried just that—bottom picture after the paint jars, captioned: "The image shows the solvent dripped onto a 0.3mm plastic plate and wiped off after a few seconds. The surface of the plastic plate has slightly melted": http://plamotukuruyo.blog65.fc2.com/blog-entry-93.html That site suggests: "If it's like syrup, add 2 parts color to 1 part solvent. If it's solid, add 1 part color to 1 part solvent." However, it and other sites all depict the revitalized paint being diluted with thinner after the solvent has done it's job. Another site did some experiments, and suggests a solvent 7: thinner 3 ratio: https://nippper.com/2020/10/12656/ Regrettably, there's been a typhoon over Japan these past few days. So that's been another delay on this project. 😫 The Mr Hobby site also mentioned that the Replenishing Agent won't work on Mr. Metal Color. Which sucks, as one of the paints I want to revitalize is "GX Metal Black"! Their image below illustrates the difference between paint thinner and the replenishing agent. (top picture: newly opened—blue is paint thinner, coloured dots are important components in the paint, yellow is acrylic agent, and red are things like metallic particles). Left bottom two pictures are adding "Mr Color Thinner", the right two pictures are adding "Mr Color Replenishing Agent". The red text on the bottom right is a warning that such things as metallic particles won't return to their original state.
-
I'm not disagreeing with you, but the comment about how Bandai shapes the expectations and mindsets is intriguing to me. As I live in Japan—so my perspective is based on that—Bandai's kits come across as something tailor-made for the domestic market: for the people who don't have the space/time/tools/etc., but still want to do the hobby. I.e. your dining room is your living room is your bedroom is your kitchen: anything with toxic fumes are out of the question—and not only is there no space outside, even if there was, the weather (humidity, etc.) messes with drying paint, etc. For example (and with that loft for the bed, this is a larger one, about 1.5x to 2x the size of many apartments—what they call "one room mansions"—that I've seen. Can you spot the washroom and shower? Hint: they're under the loft.): In addition, Bandai sets on the lower end are as cheap as chips—the same (or less!) than the Big Mac set (🍔 from ¥750~ vs Gunplay from ¥500~). Due to those reasons, the lower end Bandai Gunpla kits could be considered disposable: build, panel line and sticker, and toss in the garbage once you get and finish the next kit. Living in a house, I have a bit more space. But even then, display space is at a premium, and a good 2/3 to 3/4 of my completed kits are "in storage" as I'm loathe to toss any of them 'just in case'. Japanese people are far less reluctant to toss anything that is taking up space and has outlived its immediate usefulness... 🤷♂️ Anyhow, I can appreciate how these kits aren't a disposable item overseas due to the markup from importing them. Nevertheless, it is both interesting and baffling that Bandai kits—essentially a niche product developed for very specific domestic conditions and consumer demands—has taken on a life of its own overseas (the 'standard' of model kits for some people, etc.) Regarding the Bandai Macross Plus HG 1/100 kits: These past few days I've visited a couple of model shops (looking for paints and paint thinners), and I came across the YF-19 kit. What caught my attention is that they also had the decals on sale next to them—as a separate item. It's annoying that the decals have to be purchased separately, but I can appreciate Bandai both cutting costs to reduce the price of the kit (for those that don't need the decals) and making it easy (at least domestically) to purchase them if you do need them.

