jadefalconguard
-
Posts
388 -
Joined
-
Last visited
Content Type
Profiles
Forums
Events
Gallery
Everything posted by jadefalconguard
-
Nice build up Ido looks like it's going to be a nice bird . Anyway, regazrding the floor and sheet styrene ... once the hood get's over there you won't see to much of the floor. you might want to consider to add some ribbing to the insides of the fuse.
-

What is lying on your workbench?
jadefalconguard replied to Tuffskull's topic in Hall Of The Super Topics
HWR MkII, man you give me a ...... on with that. Do you know how hard I'm searching for a second VF1 Awesome work. You're pace is sure faster then mine. Nice work. -
To bad, thanks for the assist anyway. I'll need to look at DYRL and the entire episodes of Macross again and make screen grabs
-
*wind blows and tumble weed rolls pass
-
@ Dean, something I just noticed you're talking about the 1/48th Ultimate Detail model kit. Some little remarks : 1/ You'll have trouble finding one as the original model was only a limited build (2* 300 pc) 2/ Recasts are only by a certain number When building resin kits (esp. recasts) think about the issues you'll encounter which aren't limited to : - shrinkage - bad fit - warping - sanding, filling, .... for short, take your time, build up experience with some easier kits before you start on the voyage of the VF1 UD.
-
Pinch.......auch...this is for real Awesome work, need to get one, need to get one. Now I know what to ask for Xmas to my wife
-
What is lying on your workbench?
jadefalconguard replied to Tuffskull's topic in Hall Of The Super Topics
Whooot, can't wait to see it finished, great work...... -
Let's make a deal....you finish the the molds for the Rex and I'll post pics with the finishing touches BTW if you're on a waterless beach for 4 months you have plenty of time to finish the Rex Seriously, finishing touches....I hope to finish her to the point where the diroama has to start by the end of this week (that is if my work doesn't interfere ). I only need to : 1/ add the geardoors, slats and part of the weapon pylons (part will be on a loading vehicle). All painted, drybrushed and sealed 2/ decide wath to do with the gun and finish it 3/ finish the cockpit and reveal the hood So let's say, before the first of september I'll have her finished Took my only 9 months to finish this bird
-
I know, no offence intended Sean Just a little try at humor. Man amazing how you get all that work done on such a short time. Nah, I guess it's me who's getting old
-
I don't really where to put this, so I thought this might be the best place : I'm building the VF1 Strike Valkyrie G-system recast and planning to make a diorama depicting the load out of this bird. The fluff around the model will place it in the repair sattelite (ok, so it's not canon ). Anyhow, this is the build up thread here : 1/48th build up I was wondering if any of you already have made a CG representation of a valk hangar or have pictures, drawings etc. that can be used to fuel my imagination. If any would have an idea and is willing to work together please shoot me a mail. Thanks in advance G.
-
@ HWR, oh boy someone hijacked my post Great to see you started the build, nice work..... Just one point of warning though, dryfit your legs to the body to get a good fit so you don't mess up the paintscheme. You might want to add the reinforcements I had to do to the legs. Maybe we can make a digital collage from the models or hook up and get a group shot @Logan, subassemblies make it easier to get a coherent paintsheme and makes weathering much easier.
-
Nice birdie, me want, me want. Nice work on the 19 great to see it finished
-
Macross World Map Project.
jadefalconguard replied to Metal_Massacre_79's topic in Conventions and Local Gatherings
This is mine (first one from Belgium ?) latitude 51.007 51° 0' longitude 3.796 3° 47' -
Basicly it's a VF1S Strike version. I've worked out an idea in my head where I'll be placing this aircraft in the former Zentradi Repair Sattelite. Main mision of the VFA 86 Sidewinders is the protection of the sattelite and to deter any possible attacks from Zentradi Forces I'm still working on the pilot for this bird, but it's going to be a lady for sure
-
Well money ofcourse is one thing. Speaking for myself I have a tight budget for models but I've been building them since I was a kid. So basicly sometimes I buy a model because it's a nice kit, even though I haven't got time to build it or I'm building something else. For goofing up, as long as you don't loose any parts almost anything is salvagable even cockpithoods. Just drop a mail if you have any questions
-
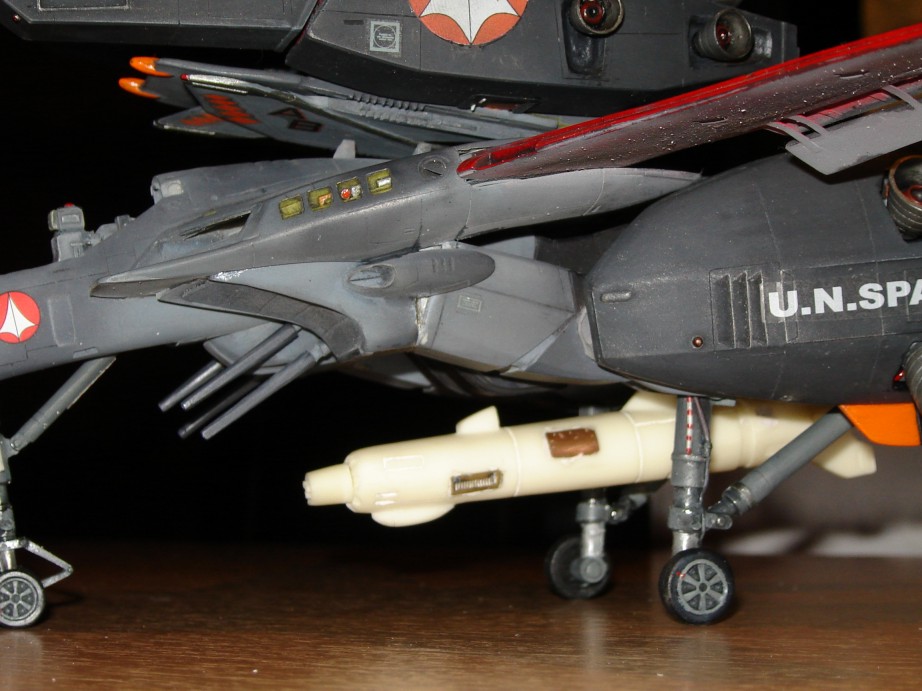
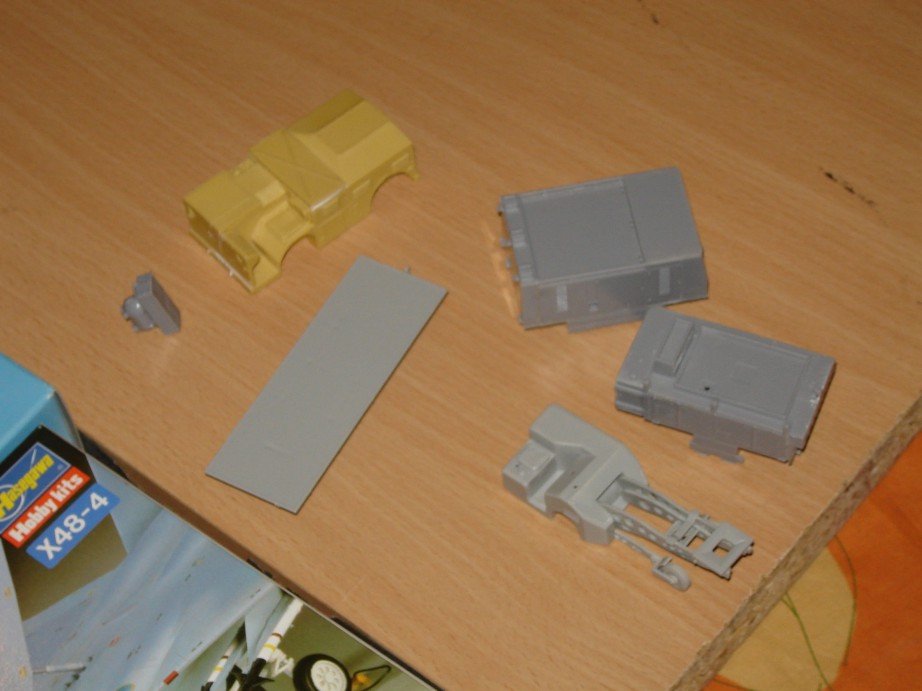
I aslo started with the auxillary equipment for the diorama. Hasegawa has a nice serie of extra equipment in 1/48th scale, the us ground crew set A and a combat support group from Italeri. I'll go in detail over them when I start the diorama, but the Italeri kit is very basic and quit devoied from details, anyway, the serve as 'secondaries' on the dio, so I'll be updating them a bit. The yellow vehicle is from Verlinden, prob, no introduction needed for this. If I have time this week I'll be adding the wheeldoors (drying right now) and the cockpit hood (boy, have I've got a suprise ). There are a few nice movies this week, Remember the Titans, Sleepy Hollow and Wing Commander, so I'll have to squeeze in some modelling time EDIT : If somebody has some clear prints from an A-10A power loader I might scratchbuild one for loading the GU11 gun. The powerloader basicly reloads the monster gun from the A10A in the field and is spec. build for the A10. The only prints I have don't really show details so any help would be appreciated. G.
-
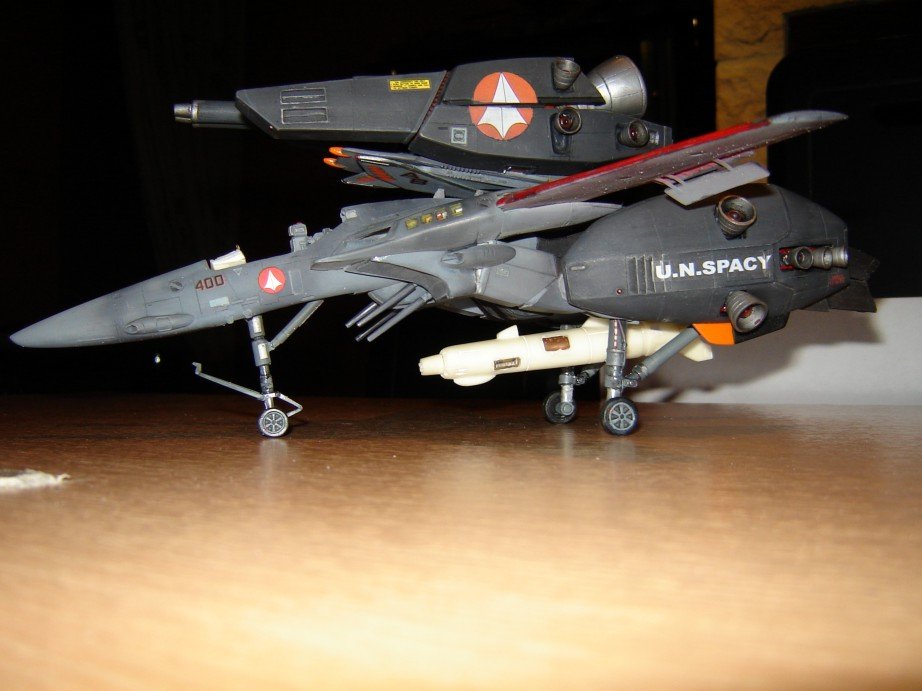
By request some updates. She stands on her own feet Never tought this would be a mile stone, but it is. I was finally able to let her stand secure on her wheels : The little setback was bigger today as one of my twinboys got his tiny hands on the backpacks The dual canon broke off as where all the thrusters on there. Luckily it was easily solved, but took some time However, this is a close up of the fracture on the leg...almost invisble The white specs on the wing are actually some residu from grinding in the resin to enter two metal pins in the leg (the red lines on the second pic). I filled the intakepart with putty so the pins could get a good grip. The resin was drilled out with a fine drillbit on my dremel and, after inserting the metal pin, filled with salt and 2 drups of crazy glue.


-
2 b honest I don't know any model I ever made I didn't goof up on some part. the trick is to go back a step and do it again. With painting just use some thinner and you can start again My Resin Mad Dog (aka Vulture for Inner Sphere Stravags) was first painted in Jade Falcon Cammo (3 tones green) and completely weathered, decalled. After that I sealed it with Dull Coat.....only to have a completely grayed out finish ; It took me three months to gather my whits and strip it completely and redo it (in a desert camo this time). As to collecting...... I have about 50+ kits laying around to build (nearly all mainstream models). I just don't get to building them and I have 1 from which to box art is worth alot (S3A Viking from AMT with the Kursk in the background). But I'll be building this one as soon as I can find the wingfold update If you have questions, just drop them here, you'll get an answer for sure
-
If you would like to keep it for "money" sake your down for your trouble. The price for your model will be at least divided in two because your started building it. So I say go ahead and build it The main purpose of a model kit is to build it, not to let it gather dust on the shelf.
-
It wasn't the flying that was the problem.....but the landing Anyway I use a small needlefile to remove the CAglue. To bad the plastic part between the airduct and the kneepart of the leg is broken, so I'll strenghtend it by putting a brass rod in there. Holds up for now so I'll see what happens next
-
Beautifull.....Small question, won't the CG pose a problem on this model ? Never really thought about this on the scale model but looking at the pics you'll have to place most of the gear in front of the CG which will make it extremely nose heavy, then again better that then taildragging Hope to see the inflight pics very soon
-
Alright, we're experiencing some major problems.... one of the legs broke of while installing the landinggear. It broke right behind the airintake on the place where the model takes the most force from the strange angle of the legs. So I'll have to add some reinforcement to this leg in order to get it in the right angle again. I needed to take off the FP's from the arm to be able to get the leg back in place.... Keep your fingers crossed I'll be able to repair it without to much visible damage.
-
Actually, this problem could be from older decals wich tend to yellow over time and/or the carrier is thicker hence more visible. You'll get to see it with experience which decals are troublesome and wich are good to use. Microset/sol helps to soften the decals to conform better to the surface of the model (panellines, rivets ed.). Basicly, you can discard one with white vinagre as this is used to clean the surface, while the other softens up the decal (never seem to remember which one is for what ) hopes this helps; G.
-
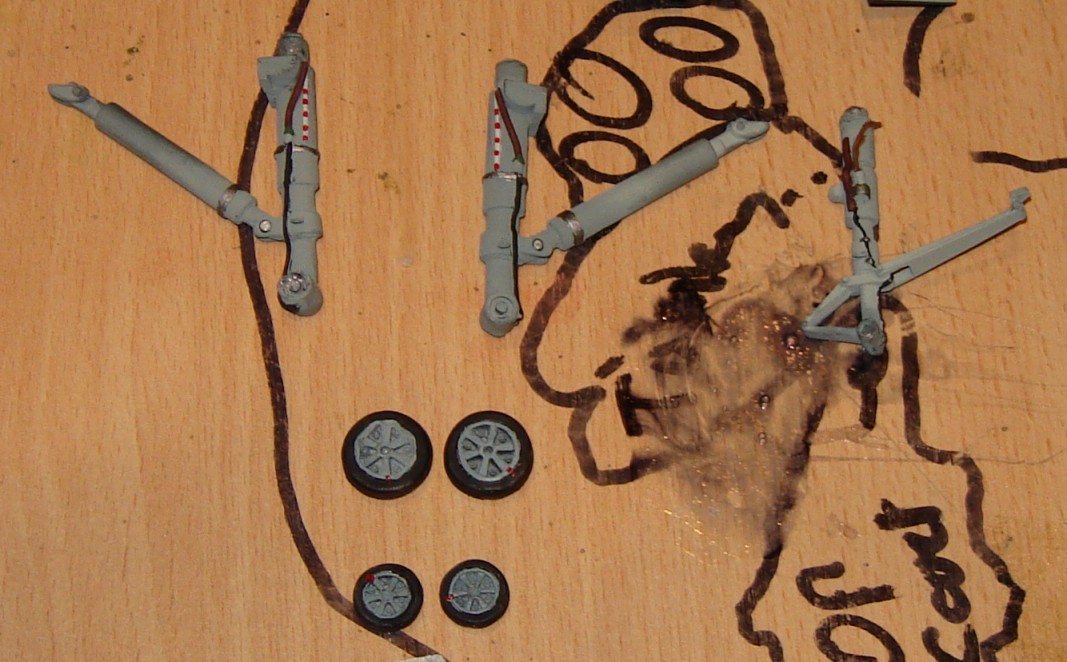
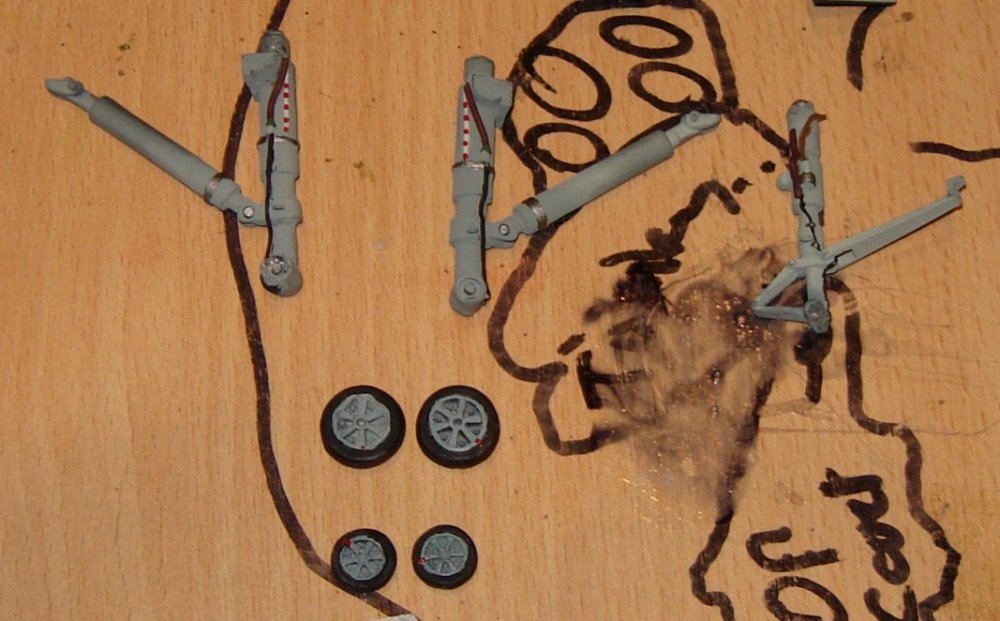
Made some time to paint the wheelstruts and the gearbays on the VF1. After this dryed I detailpainted the different hoses on the gears and made the wheels. Now these are a b#"ch to make. The resin and the white metal are different diameters and to much force will bend the metal...as can be seen on the first pic Anyhow, tomorrow I'll be washing the landinggear and putting it on the V1. Normally will have some pictures...
-
Now, if you could move them individually, you're on your way to make a fully functional battroid Nice work