
Chas
-
Posts
954 -
Joined
-
Last visited
Content Type
Profiles
Forums
Events
Gallery
Everything posted by Chas
-
Awesome! I have wanted a model of this since the 80's.Was this a Woderfestival kit? Don't remember seeing it. Where/ how did you pick it up?
-
Thanks Thom. I'm hoping I can finally bring it to a satisfying conclusion with this round of working on it. 🤞
-
Speaking of old builds, I started this kit-bash/scratch build I think 10 years ago? Some of you may remember my older posts on this. Well I picked it up again, inspired by a lucky win (at a good price) of a 1/500 S. B. Yamato on yahoo Japan auctions. It started life as a 1:700 Nimitz class aircraft carrier - Abrahan Lincoln I think?), but now it's a 1:500 Space battleship Yamato carrier. Overall it measures 61cm (24 inches) which puts it at a comfortable 305M/1000ft. I spent most of my time this weekend reacquainting myself with what I had done, and trying to remember what I wanted to do. You see I'm pretty much just making this up as I go along. It is loosely based on some ref. Images though. After I figured things out a bit I decided to get to work on adding some greeblies to the rear section above the engines. Now that that's done I think I'll move on to adding some plating to the main hull below the flight deck to give some detailing and cleaned things up a bit. The superstructure and flight deck area will likely be last, as I have too many ideas that I need to pare down. None of that stuff on top is glued down yet - just working out placement and such. Anyway: Here are the greeblie bits I worked out today: And some you have some idea where on the ship those bits are:


-
Got most of the panel lines on the Minerva done. Got a good start on the in scale fighters too.

-
🤣🤣 That actually looks really good! I'd also replace the wings with something a little bigger though. What you've done actually reminds me of this.

-
That's what I love most about Crusher Joe - the Mechanical Designs are top notch!
-
@electric indigo Another spectacular plane! That prop really sells it, but your paint and finishing is gorgeous (as usual). Really great looking build. @Papa Rat that's a nice kit, lots of great detail. Not a resin expert, but if the parts are tiny and not load bearing do they really need to be pinned? Maybe some research is in order, as trying to drill and pin tiny, or thin parts may case damage and if not necessary then best avoided? The Minerva is coming along well. I decided to use a modified version of the paint scheme from the OVA, as I like the extra blue on the wings and tail fins.

-
Even though it's just tape it's nice to see some colour on it!
-
 Great read Greg. Shopping, hanging out with friends, food, fun and music, then falling asleep on the train ride home brings back memories of life in my 20's ( and what happens whenever I visit back home without my wife and kids.) Sounds like you had a good time.
 -
Working on Hasegawa's creator's works Minerva from Crusher Joe at the moment. Planning on a straight up out of box build with a small alteration in colour scheme. As I don't like pure white on model builds, I'm going with a slightly gray-white for the base. Gonna use the artists acrylics for this one, as the tests I did worked well over Mr. Surfacer 1000 as primer. They didn't hold very well over straight, unprimed plastic - just lifted right off, but held firm over the Mr. Surfacer.

-
That is a really beautiful looking model. I was looking to pick one of these kits up last summer, after rewatching the original series on Pluto TV. Think I'll start searching again. Thanks a lot 505th! Just what I needed another kit to add to the stash.🙄 and I gotta agree with everyone else @Papa Rat that Q-Rau looks fantastic!
-
Awesome video Greg! Thanks so much for taking the time to do this, (so I can enjoy seeing all these great kits that I'll likely never be able to own/build🤣) Seriously though I do love being able to live vicariously through your camera!
-
Will do some tests with smoe spoons tomorrow, my youngest is having a sleepover tonight and my bench is in the basement which I've been told is off limits, so . . .
-
Haven't done any modeling today, but I just perfected a home made thinner that let's me spray my wife's old artist's acrylics (from tubes/jars) through my airbrush. So now I have a huge supply of acrylic paints that I can use (straight from the container, or mixed into custom colours) for my modeling. My wife hasn't done any painting in a few years, but the paints are all in good shape though; I made sure they were stored well. I'm particularly excited about the multiple large jars of white gesso, as I have been using a lot of white lately.
-
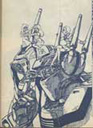
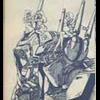
Calling this one done for now. Oh Damn! Just realized, I forgot the rifle strap! 😲😵💫


-
Love the skin tone on that Nadia and the colour variation on Deedlit's hair Greg! Got the oil weathering passes done on the Battroid, ( it's very light and doesn't show up to well in this photo. I'll have try some close ups when it's all done) Just a hint of chipping and the clear parts left to do. Also did an oil wash on the figure. Might do a bit more on him- not sure.

-
Here's a 3 yr. Old reddit post I came across the other day that discusses the hyper thinned Mr.Hobby Super Metalic with comparison pics.
-
Thanks @wm cheng. And yes that figure isn't nearly done yet. Your Zero looks a beaut! Why not try the weathering after the decals?
-
Whoa! Silent Mobius! Haven't thought about that one in quite a while. Last night I did the decals on my pla-MAX VF-1J. ( also did a quick pass on the tiny figure from the VF-1A kit.) And a first pass with a middle gray oil wash in the panel lines tonight.


-
What temperature was the water you tried? I don't have any experience with Florry's, but if the water you added was room temp, I would try the hottest tap water you get at home and see if that helps break down the clumps.
-
Thanks Greg, you're the main reason it happened @tekering yes the Mechanical arm is part of the kit. I was toying with the idea of making it foldable and actually able to store away inside its compartment, but wasn't sure how much working the old plastic could handle, so I decided to just leave it as intended - an add-on bit. Making painted resin look clear is a tough gig man, I don't know if silver would work any better than white. Maybe try curving the lines on the white to emphasize the domed curvature of the 'canopy', then mask around it and do a few layers of gloss clear? Next up is completing a kit I left unfinished a little while ago. Because Plamax chose to make their VF-1J Kakizaki a 'Japan Only' item I chose to get a 2nd Hikaru 1J to paint up as Max's machine, and do my Max VF-1A in Kakizaki's tan/brown. Base coat just about done. ( white is bare kit plastic).


-
Calling the Arii Bronco II done. Had a bit of a hiccup at the finish line. The matte coat before the chipping orange peeled on me and when I was wet sanding it down I went through the base coat in some spots. Luckily my base coat was very close to the colour of the plastic, so I was able to just even it out in the most affected areas using thinner to remove the paint and redoing the dot filter on the bare plastic. This worked, but made the finish a little dirtier than I wanted, so I ran with that and made her really weathered. Turned out passable, but much more weathered than I wanted. Added some blast marks to cover up some excessive chipping, and all in all I OK with the final result. Final pics Fighter: Gerwalk: With the mechanical arm extended: Don't think I mentioned it before, but like the legs, that door for the mechanical arm closes with a magnet. Thanks again. Hope you enjoy the pics or this rarely built retro kit.


-
Work on the Bronco II continues. Base coat, panel lines and decals done. Surprisingly the 42 year old decals held up perfectly after a coat of gloss Mod Podge - 0 breakage! Next it was time to dirty her up a bit. One of my favourite things about anime mecha is the fact that, because they are imagined, there is a lot more freedom in weathering them. Here is a first pass with an oil dot filter. You can see the difference between the fuselage which has the filter and the engines without: And here the engines have been done: Next up some selective paint chipping.Not sure which technique I'll use for that yet. I must not fear. Fear is the mind killer. Fear is the little-death that brings total obliteration.

-
If they do anything more with Stranger Things I think it will centre on the story around the man in the mineshaft and the origin of that rock, and maybe what happened to Henry between that moment and his becoming Papa's pet.
-
Why can we not see who has liked a post?
Chas replied to Chas's topic in MW Site News & Member Feedback
I don't really use the like feature either, preferring to actually comment. It's not a major concern, it just struck me as odd that there was no way for me to see who had liked posts, and I got curious as to if that was how the software was designed, or an admin. choice and what the reasoning behind it was. Now I know. Thanks all.
