
MechTech
-
Posts
4691 -
Joined
-
Last visited
Content Type
Profiles
Forums
Events
Gallery
Everything posted by MechTech
-
Thanks! Cool to know they are doing more Macross stuff! - MT
-

DEFENDER 1/200 kit - a simple mod grants great improvement
MechTech replied to Ranka-Killer's topic in Model kits
Gran modification! Se ve ms realista. - MT -
Derex - Thanks for sharing the photos, that's cool! Talk about flashbacks! I know what you mean. I laughed when you mentioned about Starblazers! I did something similar. I had recently built a USS New Jersey (maybe the same kit as you-back in the 70's?) After I saw "Space Battleship Yamato" on a local movie show, I was amped! I took my model New Jersey and drilled a big hole in the bow. I guess that was my first model mod!!! Neptunesurvey - I like your effects! They add a nice touch to your completed build! The lighting looks cool. - MT
-
NICE splinter scheme NZEOD! That gives the Phalanx a realistic touch! Pengbuzz - And he scores again with masking tape!!! That's cool Derex! That just reminded me of the cardboard SDF-1 I used to have. It was suspended from the ceiling (wouldn't fit anywhere else). I hung a bunch of 1/200 Nichimo Valks around it. - MT
-
Cool NZEOD! I saw the similar kit being offered with all the under-wing ordnance and was tempted to get it. - MT
-
Welcome to MW! How can I get cable TV for MY Valkyrie!? Just kidding, that's really cool! What components did you use for the monitor? - MT
-
WM Cheng - Thank you very much, I appreciate it! Likewise where you are great with finishes, I suck at them! My local club is challenging me to improve though. Maybe this ship will be show worthy. Pengbuzz - STILL the MASTER of masking tape - and cardboard! Cool setup! Do robots need a med center? Inquiring minds want to know. - MT
-
Congrats Derex, you have a family now! The set looks great and will look especially good as a display in your home! On to Buzz now? - MT
-
WM Cheng - First off, sorry about your canopy! Crack kills in more than one way! In all seriousness, I feel your pain as the same thing happened to me. Besides that, your model looks awesome!!! For a new canopy, try Hasegawa's distributor in Canada. Odds are they may help you. When I worked for a hobby distributor, they parted pieces all the time. Lightspeed Global: https://www.lightspeedglobal.ca/contact Joscale - That is looking good! I'm sure it will work out. Long story short, the best place to put my crane ended up being on the transom, flush with the deck. So a few modifications later and a large poly-cap to hold the crane, here it is. - MT
-
CrossAir - That looks great! Nice-n-clean! That paint scheme pops out too. Chavakaiser - Both of your valks came out great! I keep thinking of Vietnam War era paint schemes when I see your Super Valk. - MT
-
Thanks NZEOD! WMCheng, I'm glad the site helped! There is also their official Flickr page which will have other content too: https://www.flickr.com/photos/usnavy/ That paint job and weathering is looking great! That scheme really shows off how it got the nickname "Rhino" to keep the catapult settings from getting confused between the old and new airframes. RTKF - That looks very realistic and the base helps put it in the moment. I'd add the figure in as part of the diorama to give it scale. ALL - Did you guys hear about the Blue Angles and Thunderbirds fly-over at various locations? I heard the Blue Angels are in trouble - for not maintaining social distancing while in formation - MT
-
NZEOD - Samsung CNT? Not finding it except corporate info. I'm thinking of a new Samsung to replace my 8 year old phone! I'm not an Apple fan due to past security/data fixing issues. - MT
-
Hi Convectuoso! It will if it gets into the joints. If you can keep the joints masked off, that should be safe. A clear coat on a transformable model IS a GREAT idea since you want to seal down the decals so they do not rub off easily. It's keeping it out of the joints that's fun. IF you can build parts, seal them and then assemble them (masking off the finished parts) that helps. Carefully look at your model and think about where the coating could flow into. I hope that helps. - MT
-
Cool, post some pictures! Remember, I can stop anytime I want to! - MT
-
That's a cool idea! - MT
-
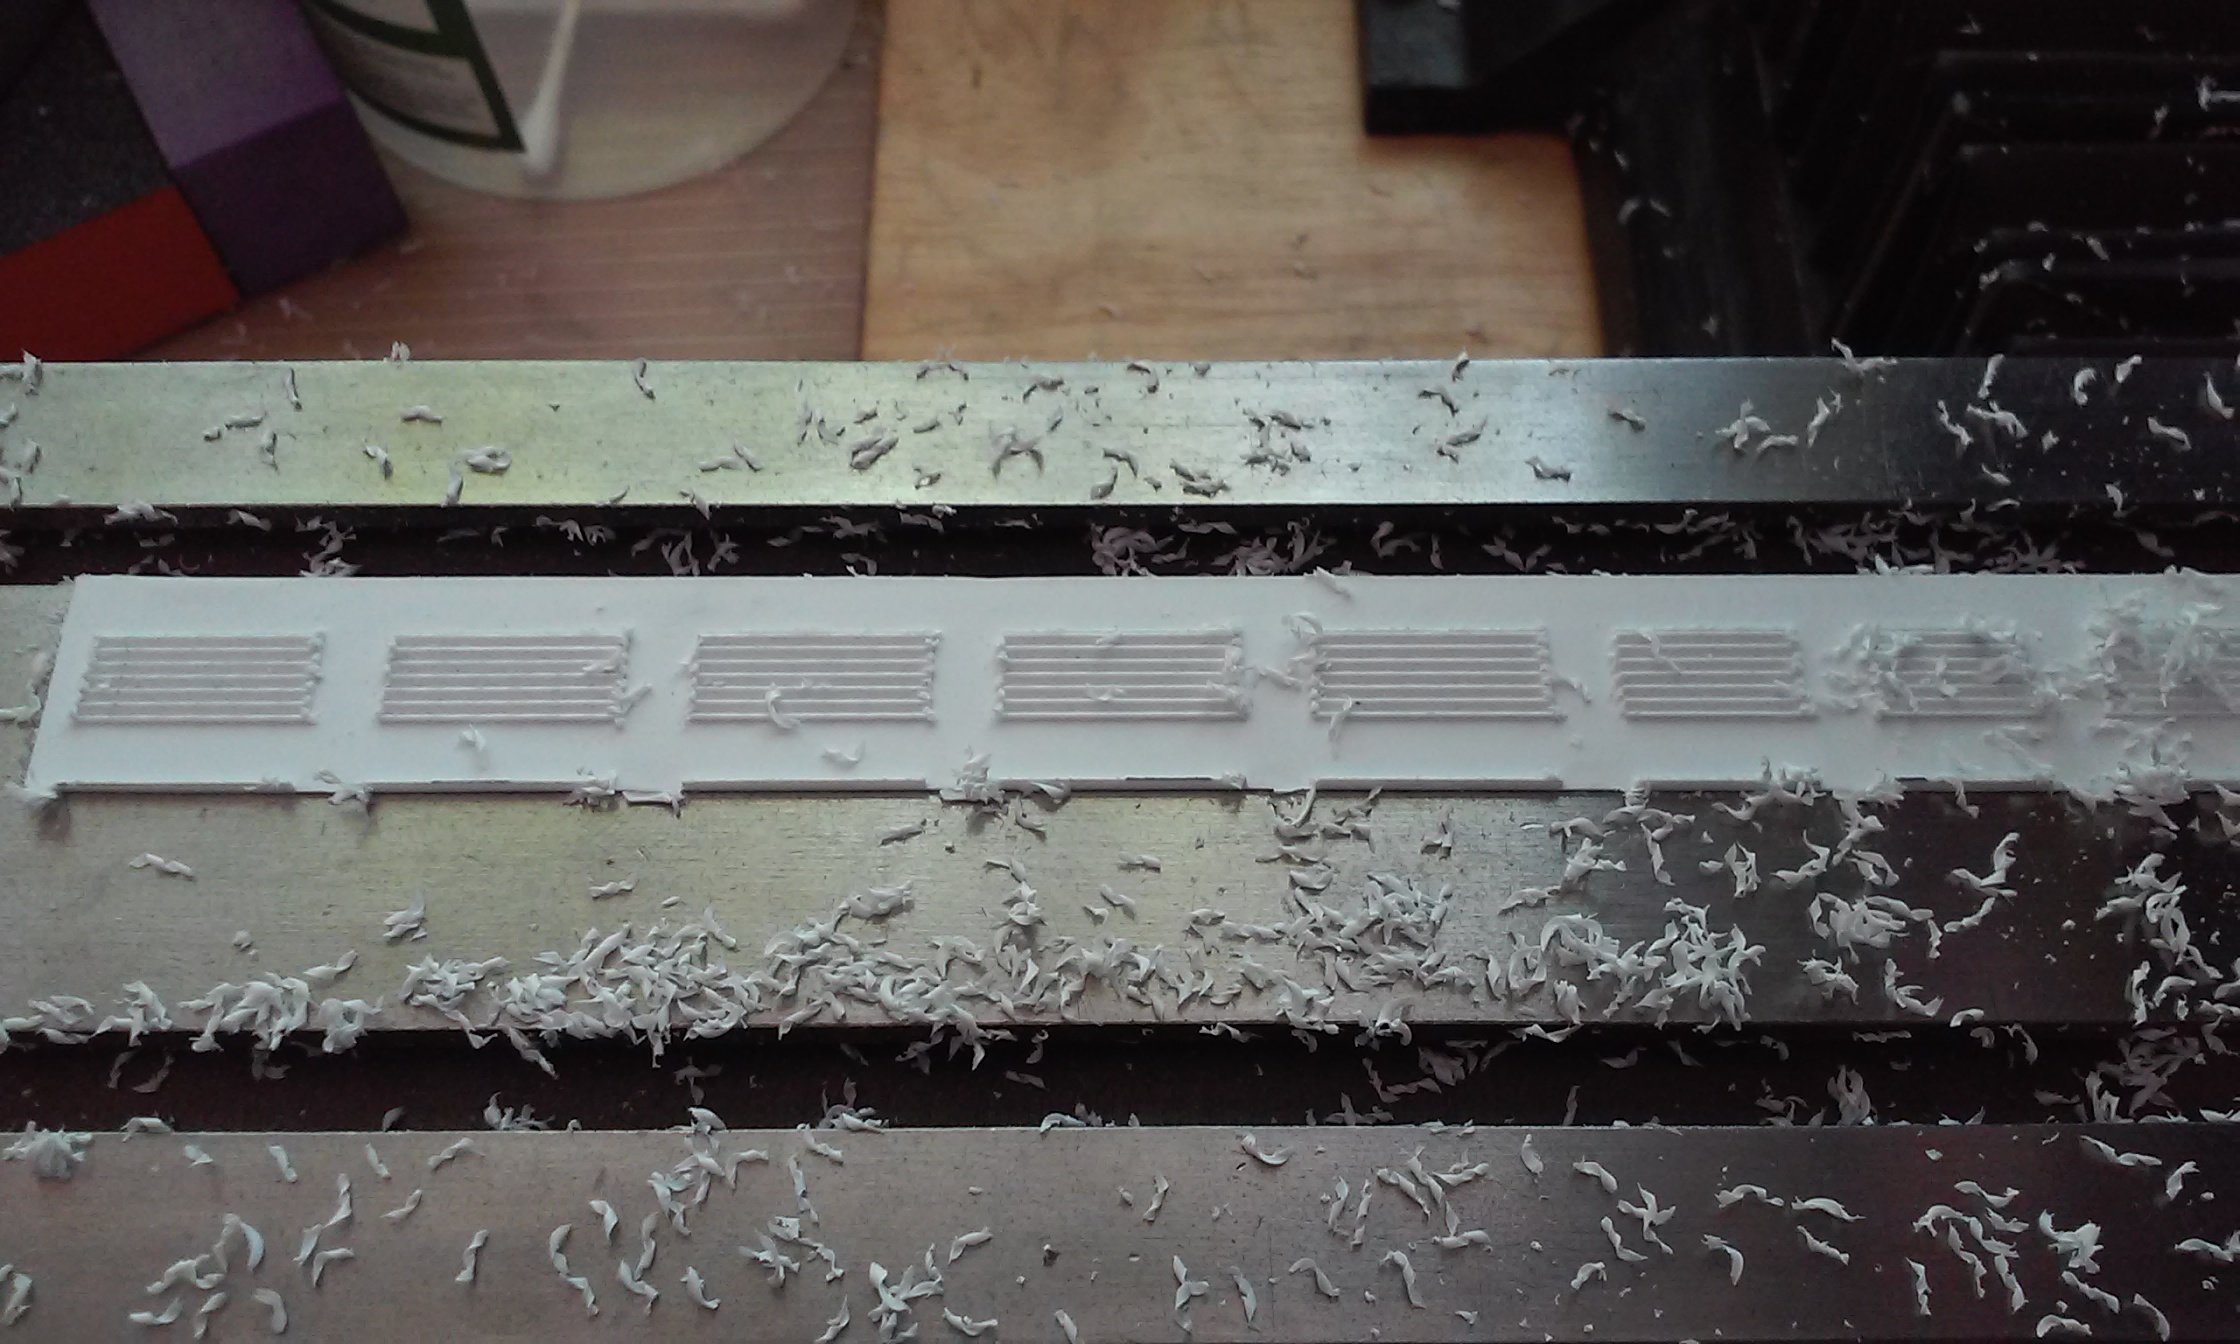
Thanks guys, if you'd like, I can post a quick how-to for the machine I made. It can be relatively cheap to make and easy to use. The louvers were made on my mill. The other machine is not as good for this. NZEOD - That Tomahawk looks great! The photos are great too! Did you use a tiny camera? I'm guessing you were able to shoot from below an edge to get that steep of an angle? WMCheng - We get a lot of Super Hornet traffic overhead where I live. Load-outs can vary. Like NZEOD said - embrace the bomb Since the airframe is dual role, they are not afraid to use both types of ordnance on them at all. The downing of a Syrian Su-22 (2017) was a perfect example of that. They started the mission as a close air support mission in "air-to-ground mode" (sounds like a Valk) and then switched to air-to-air when an Su-27 was spotted orbiting the area. Shortly after, an Su-22 started entering the area and even with flares being fired right up in his face, failed to leave the area. Then started in on his bomb run. They fired an AIM-9X which failed to track the target. Then they fired an AMRAAM which finally did it in. David has some great points on accuracy. I don't know if you've been there, but the U.S. Navy's website has TONS of photos with new ones being added everyday. www.navy.mil - Media - Photo Gallery I spell it out because they have some videos too. A direct search link: Super Hornet Ordnance Try other types of searches too. Just watch the dates. Some searches go way back and may not be up to date for your build. - MT
-
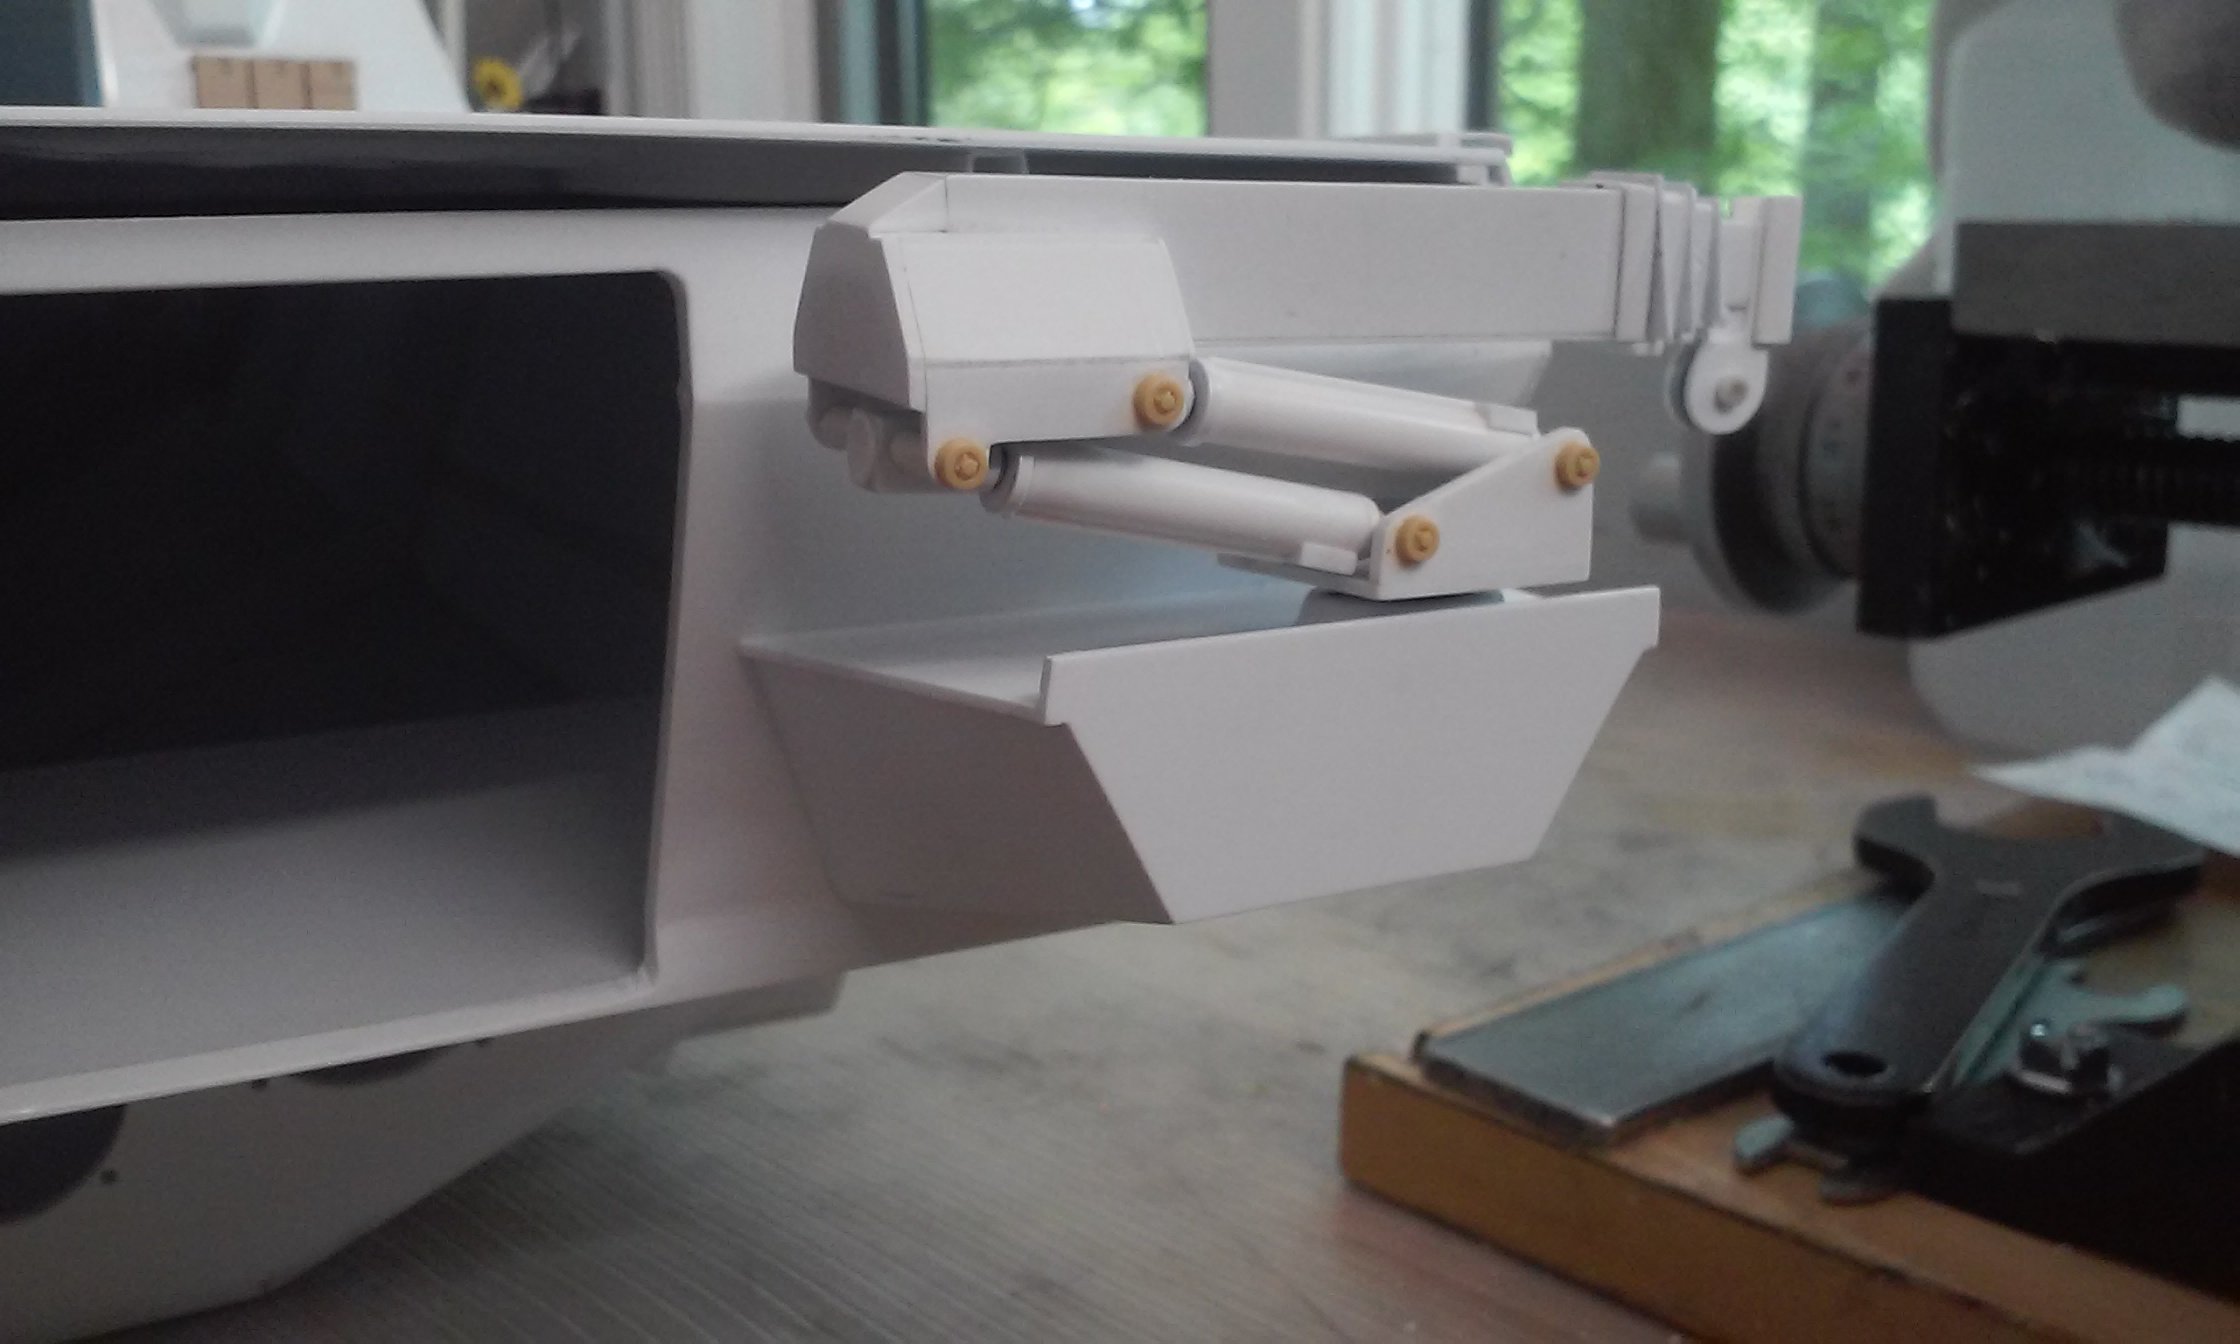
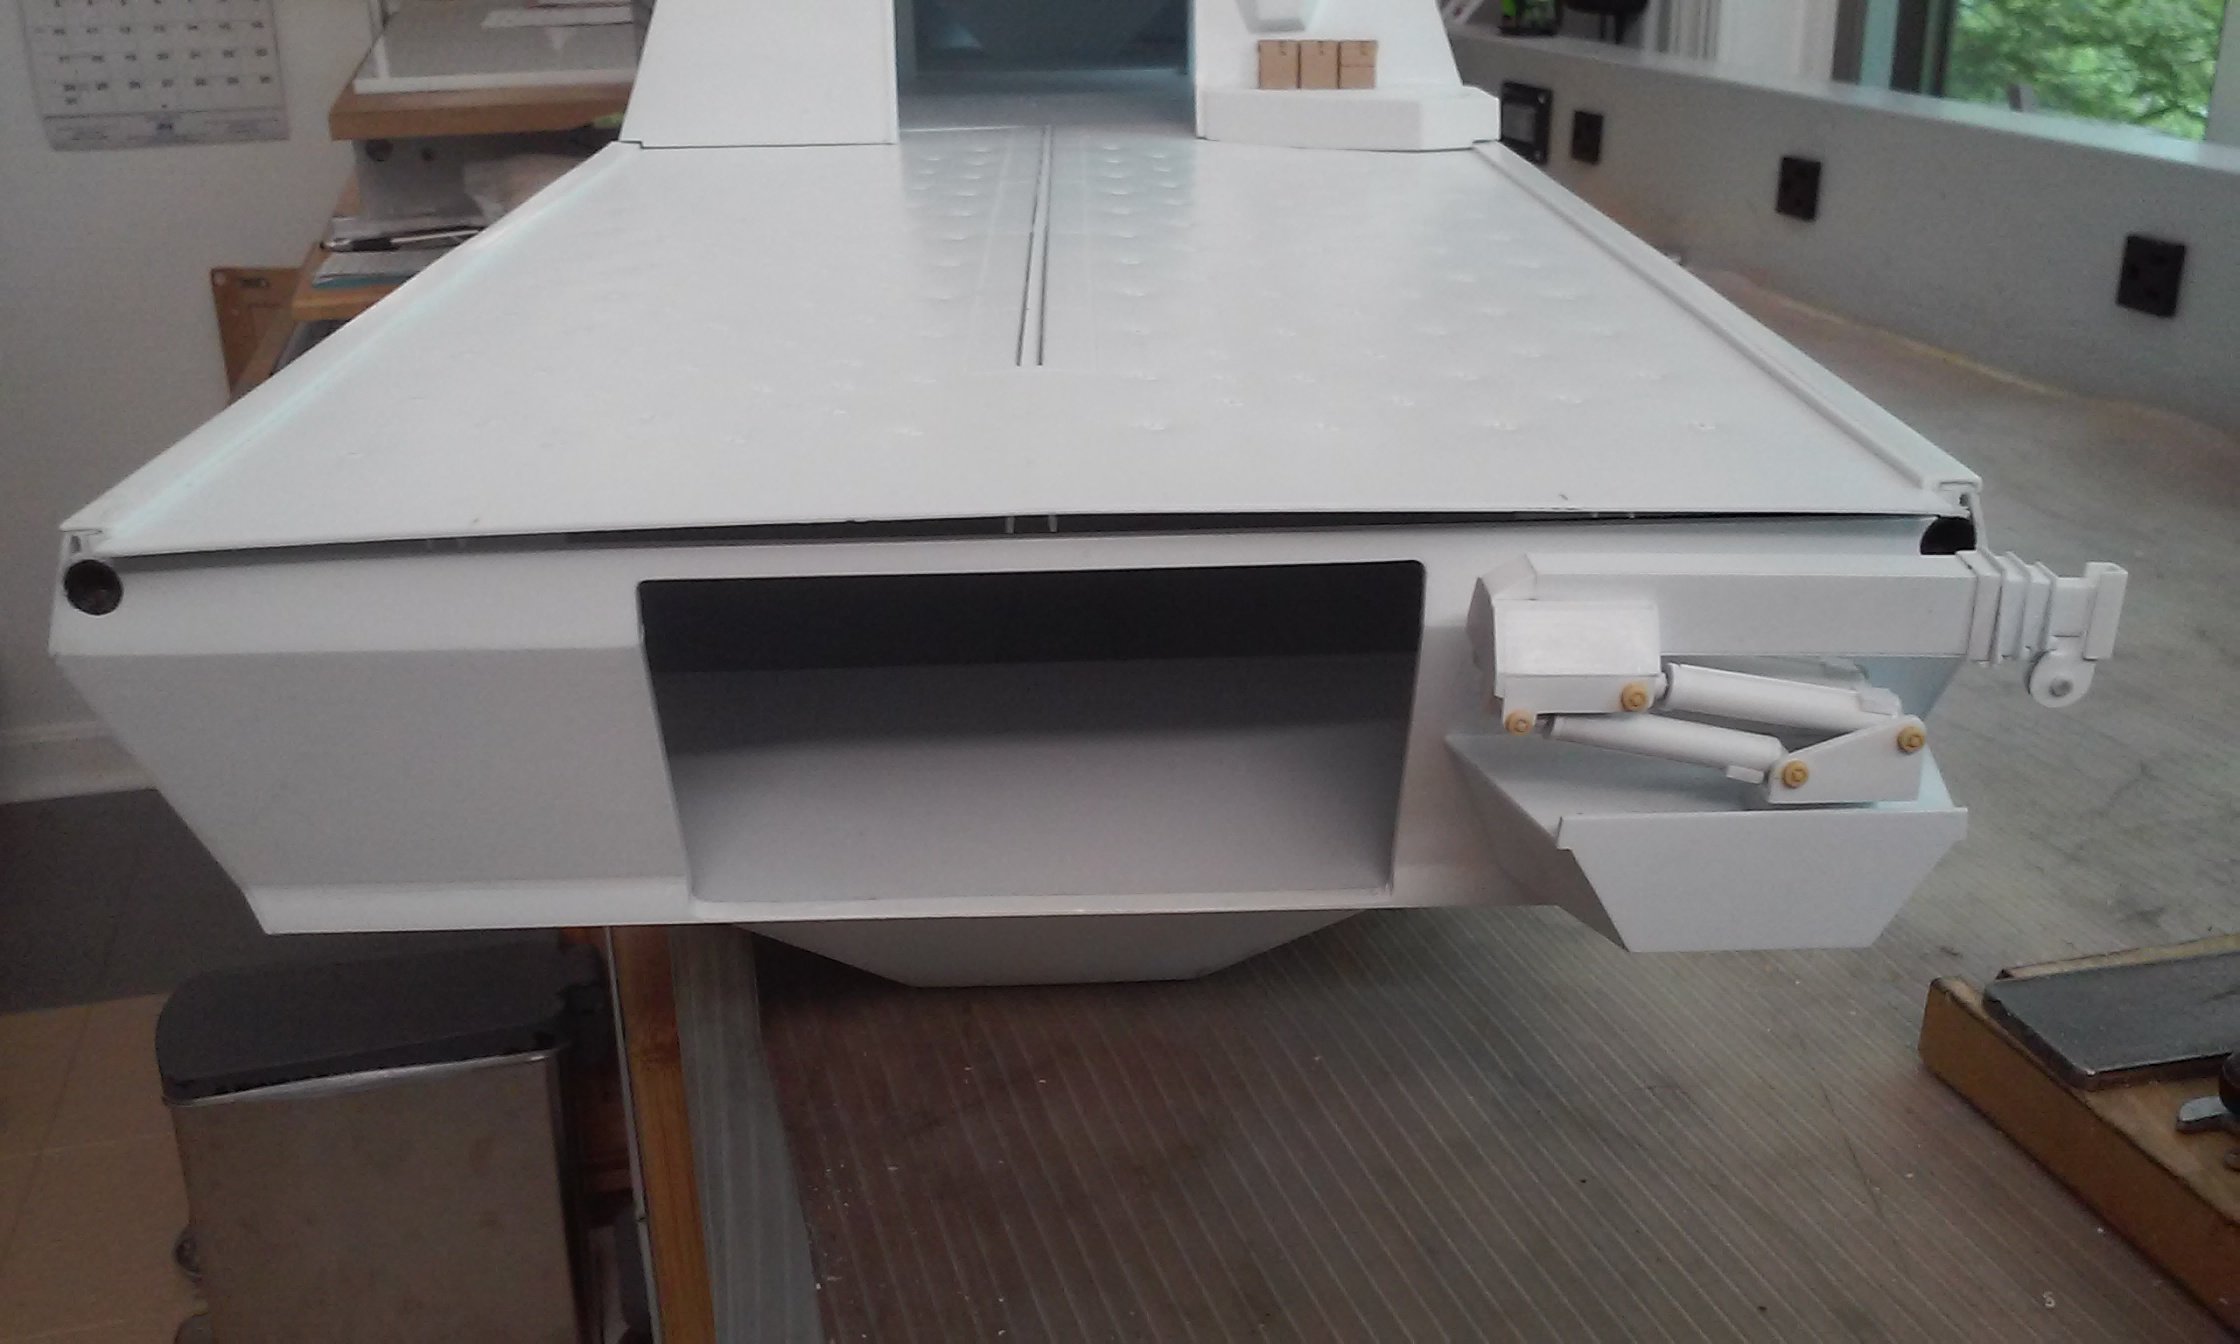
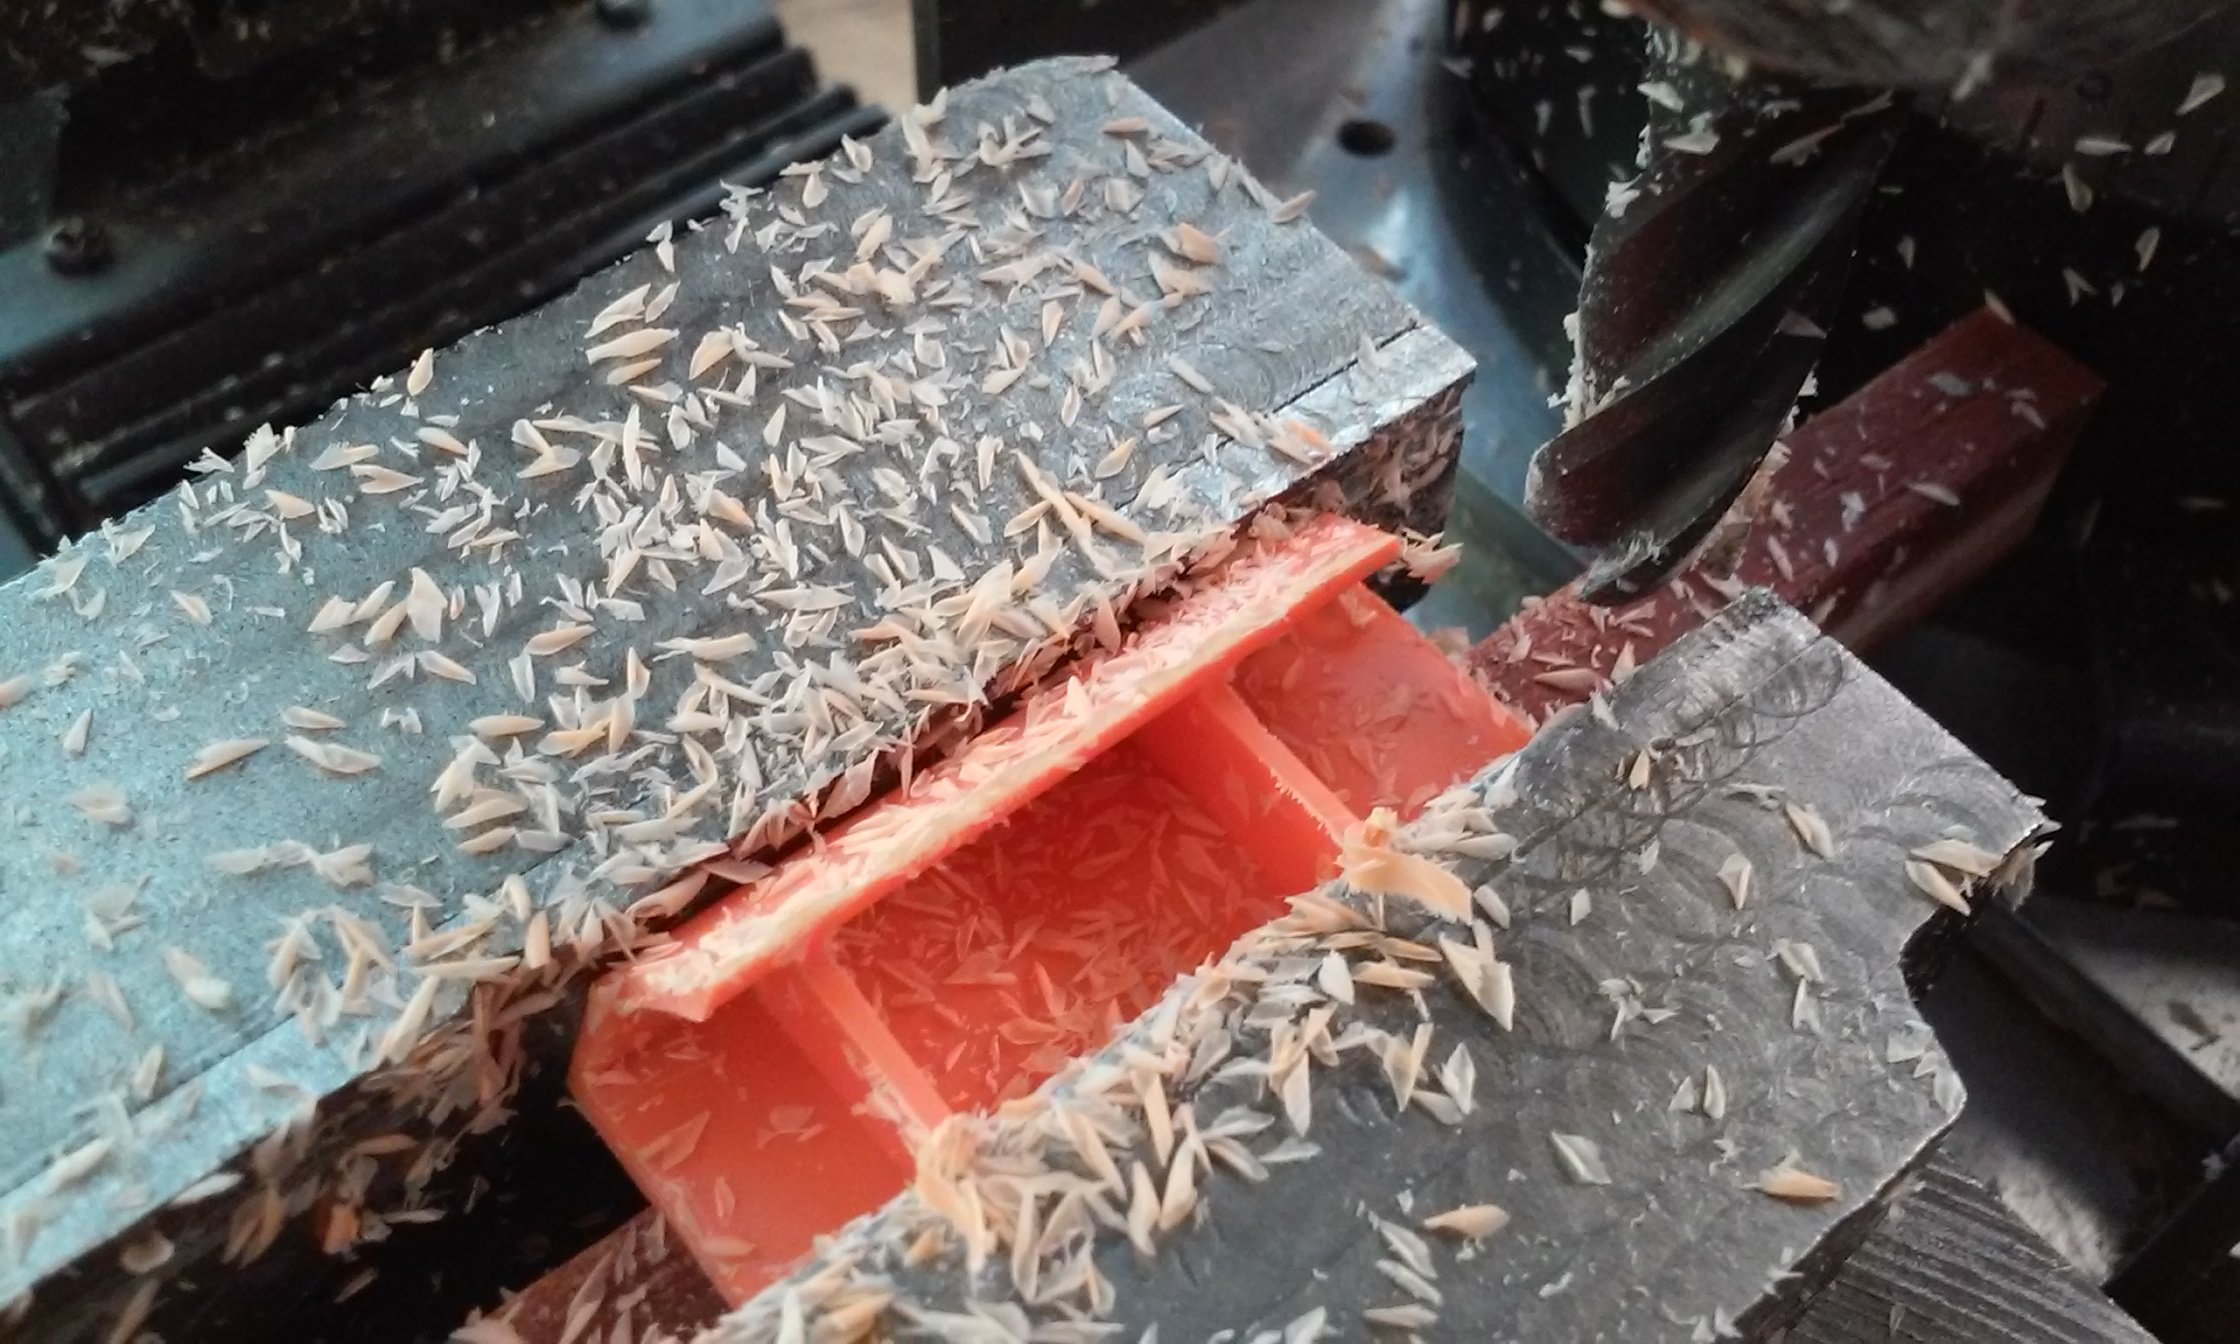
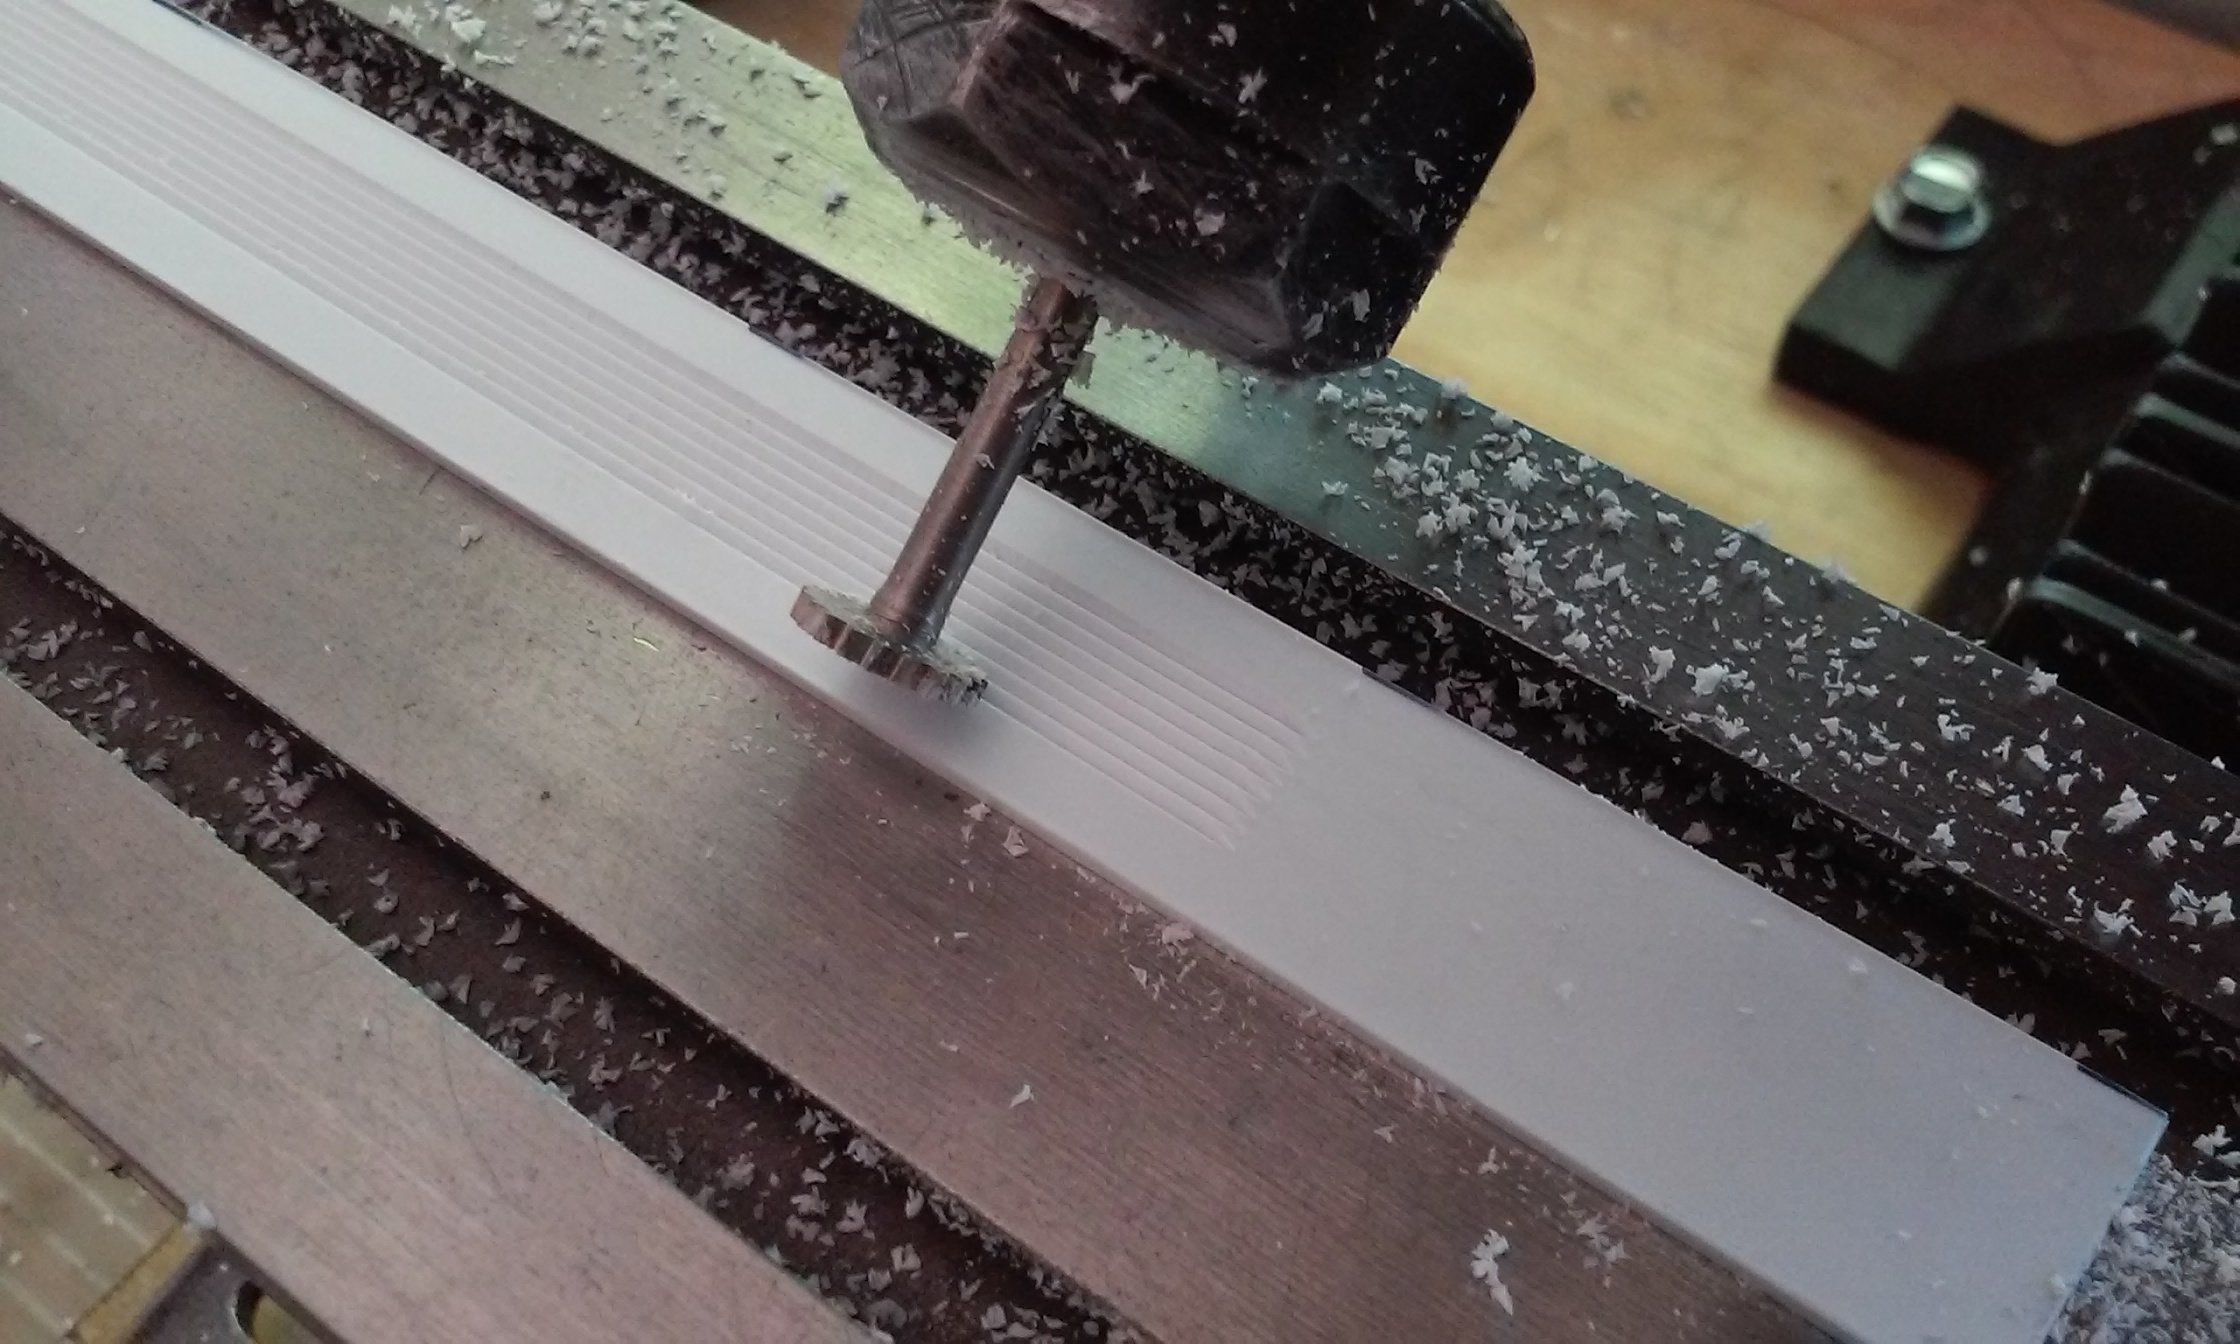
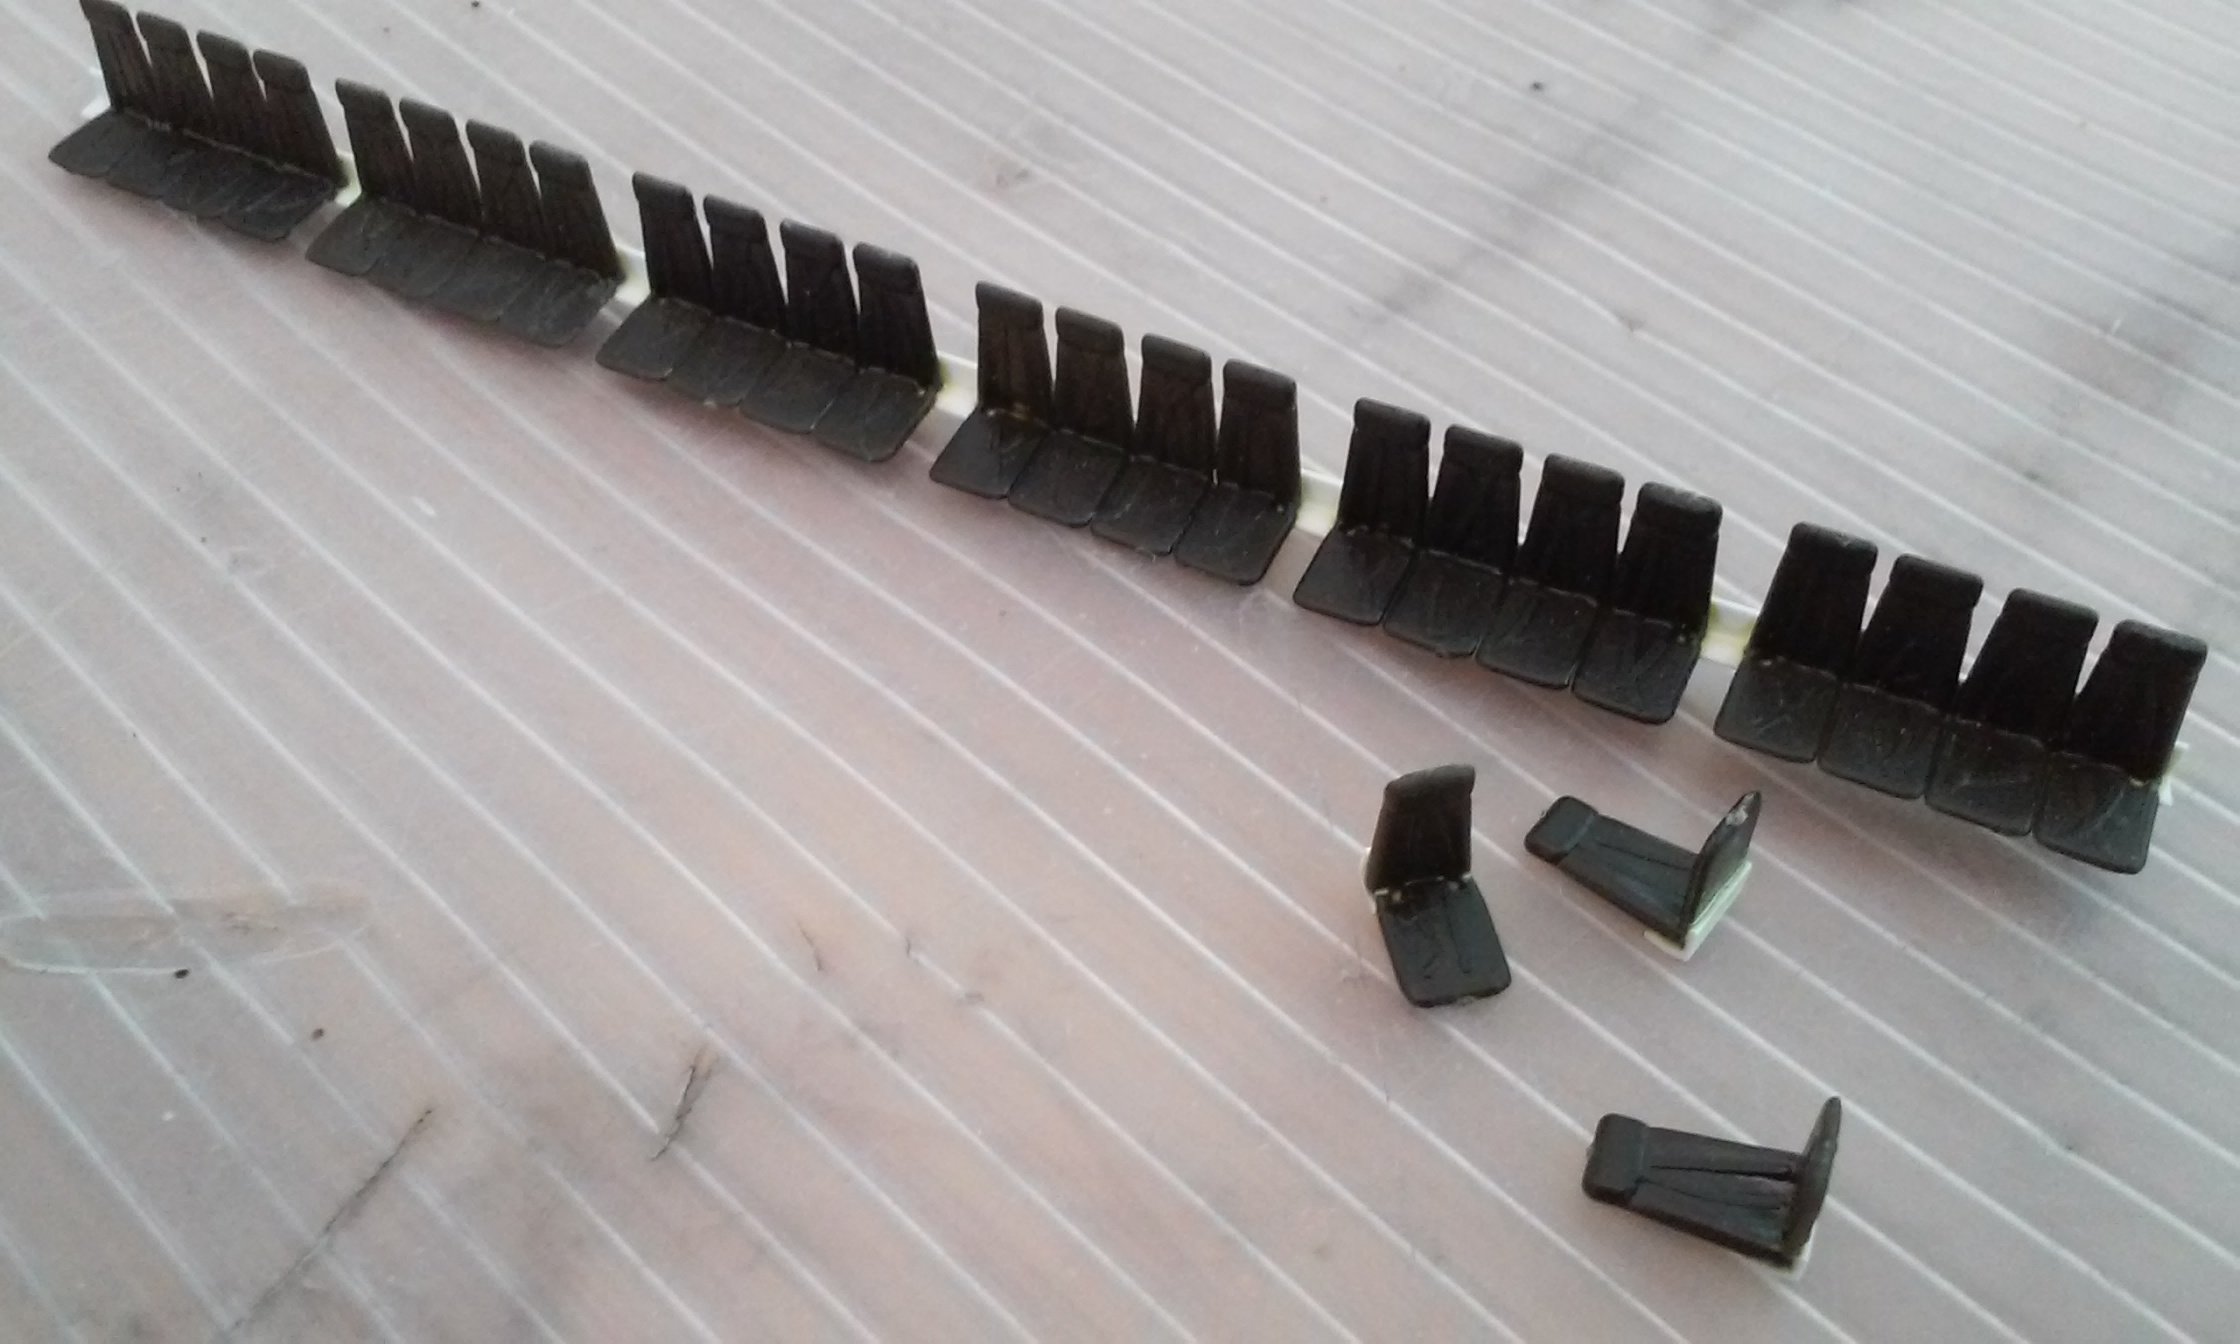
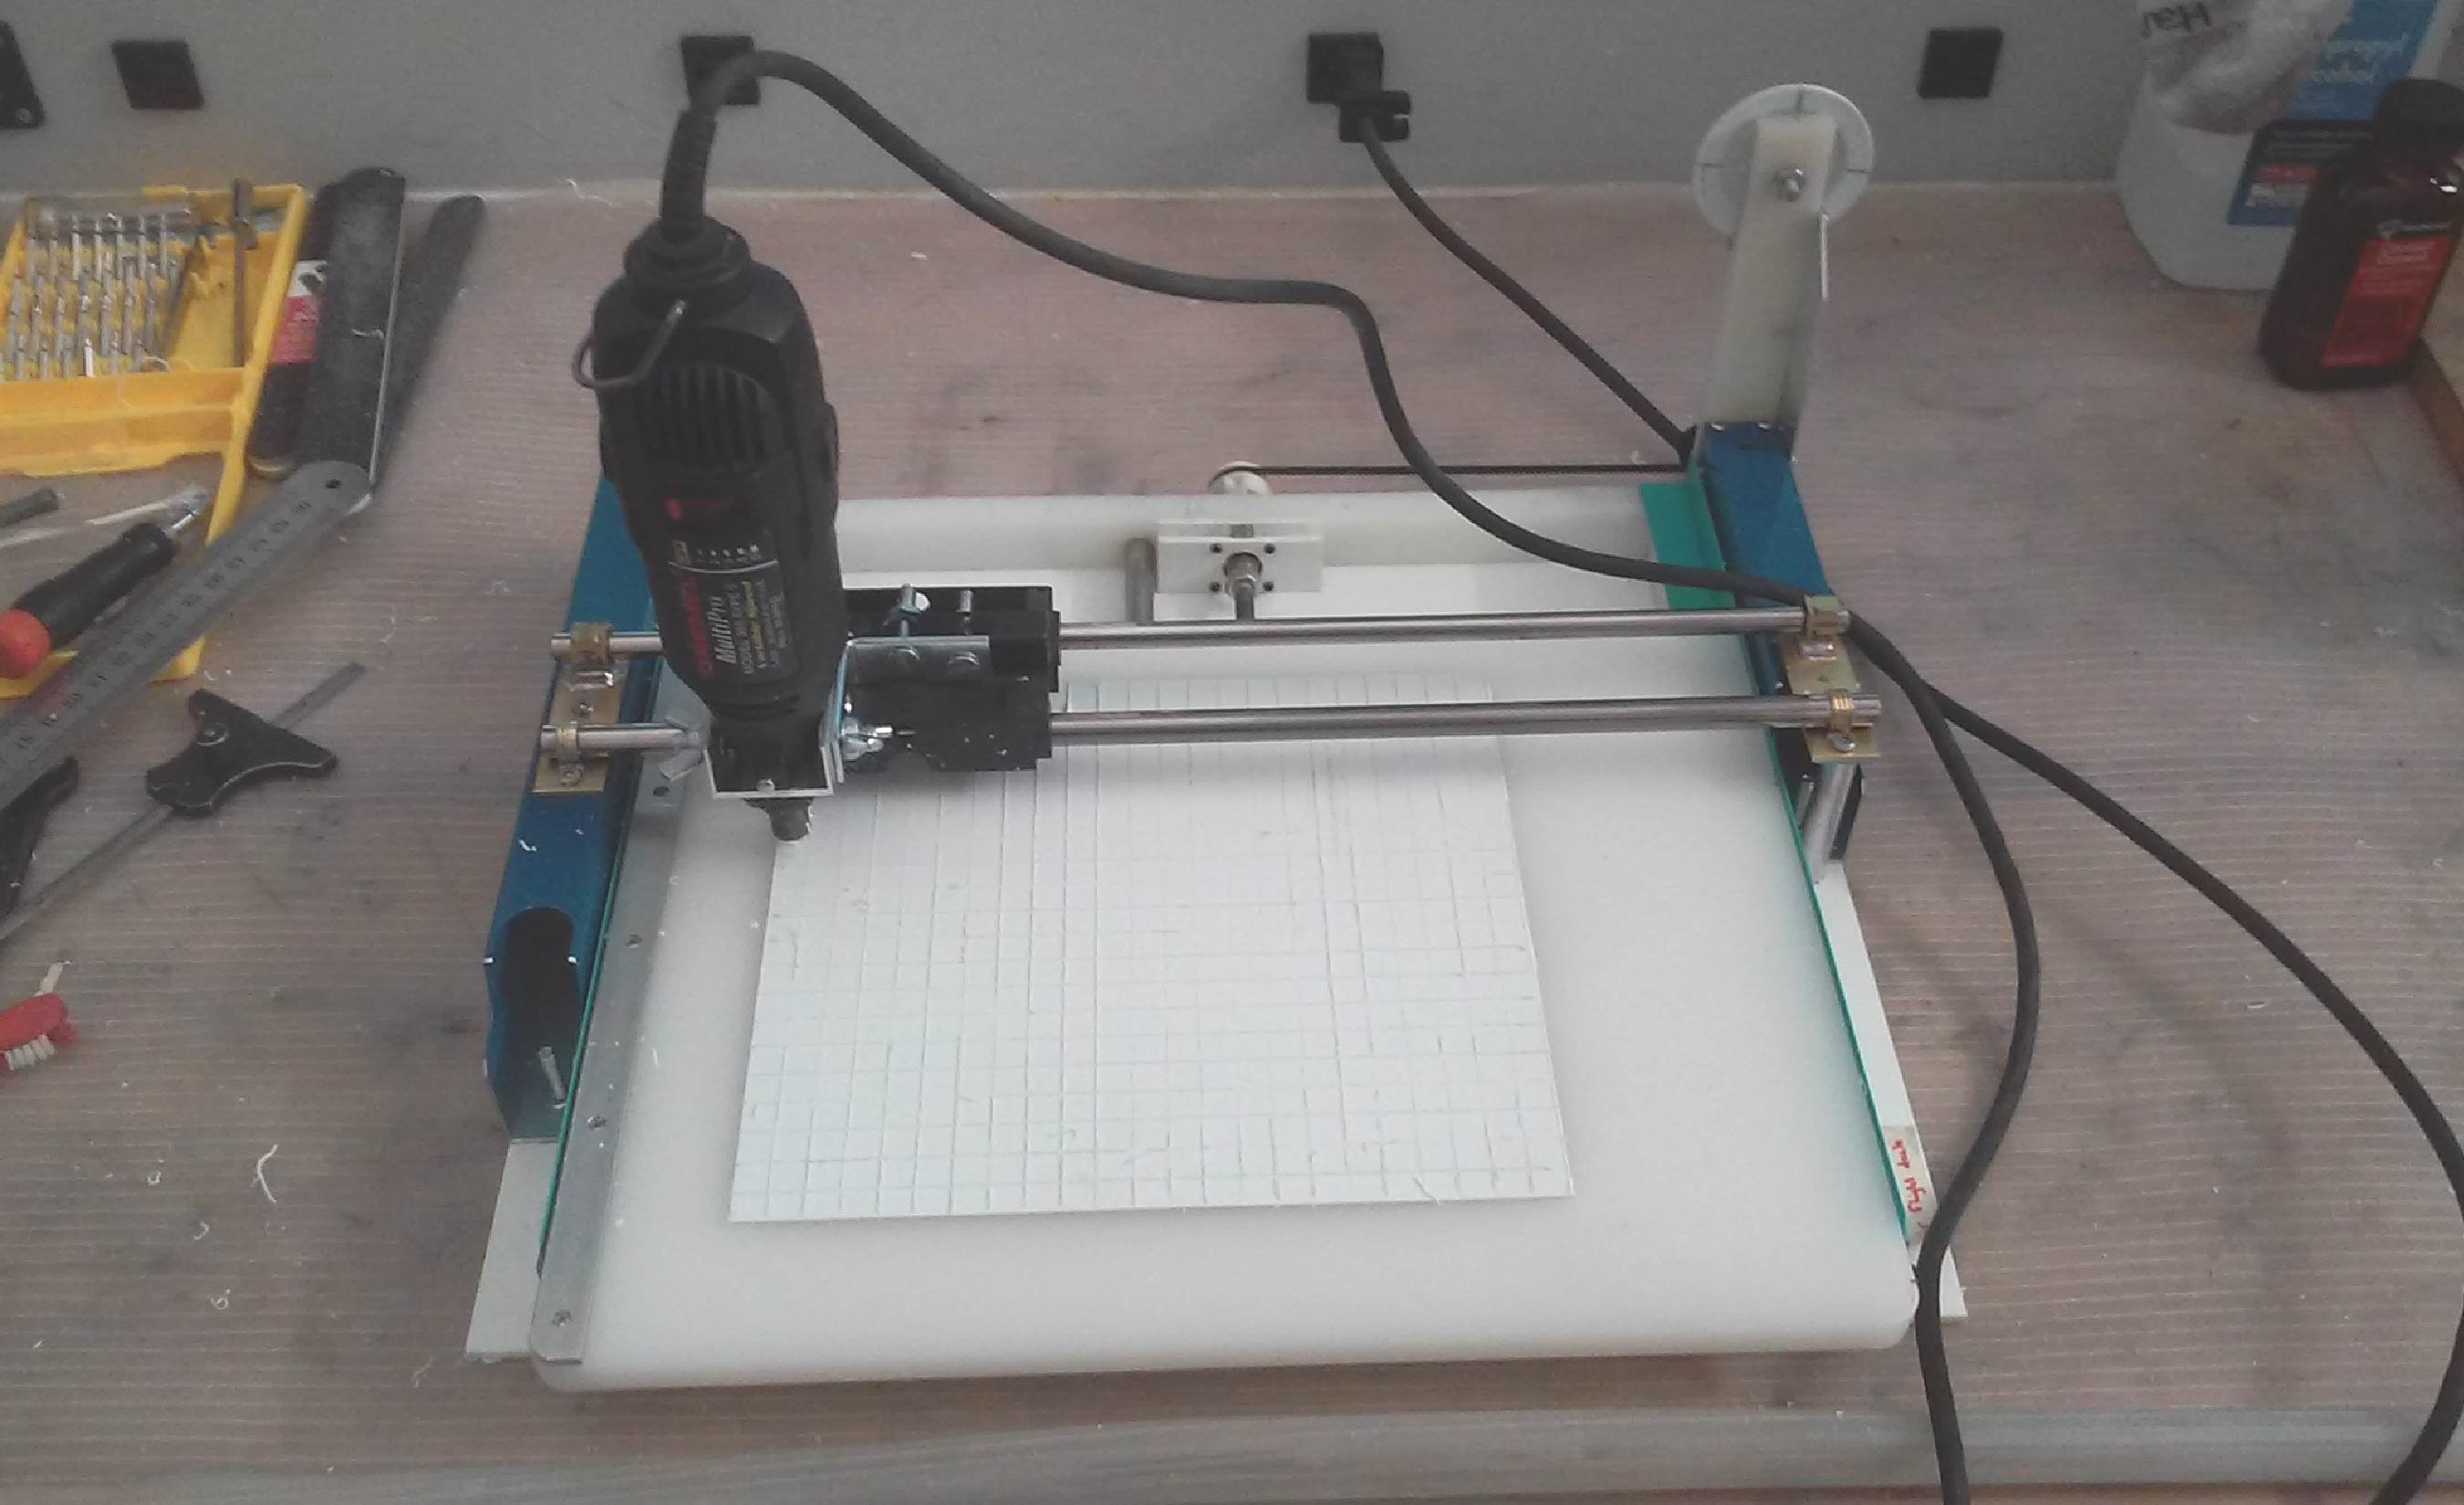
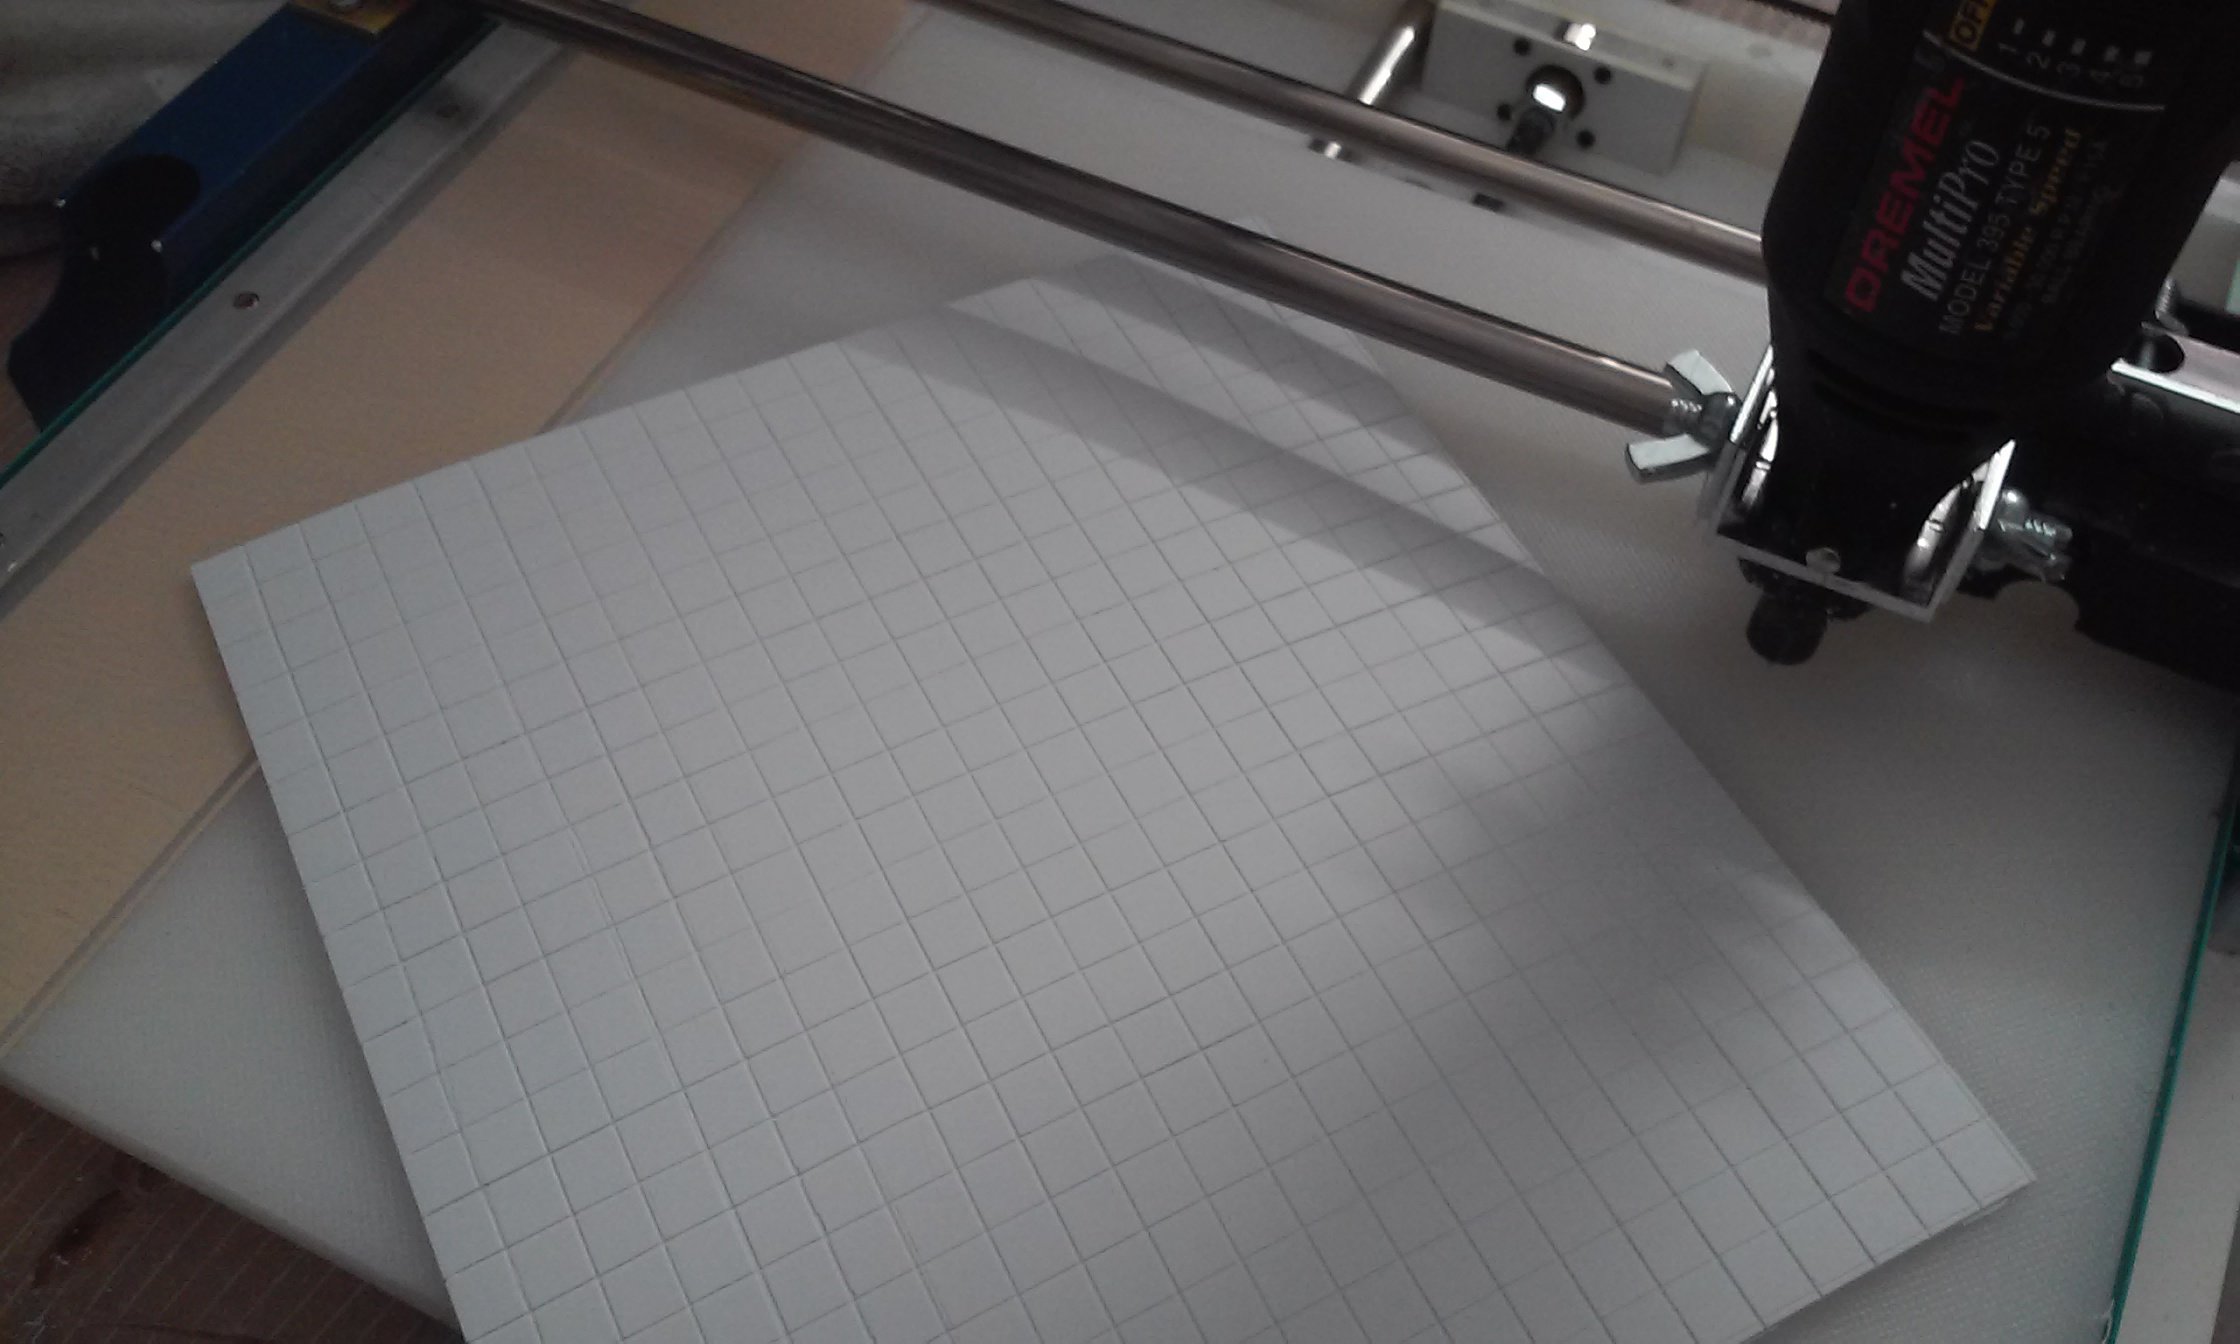
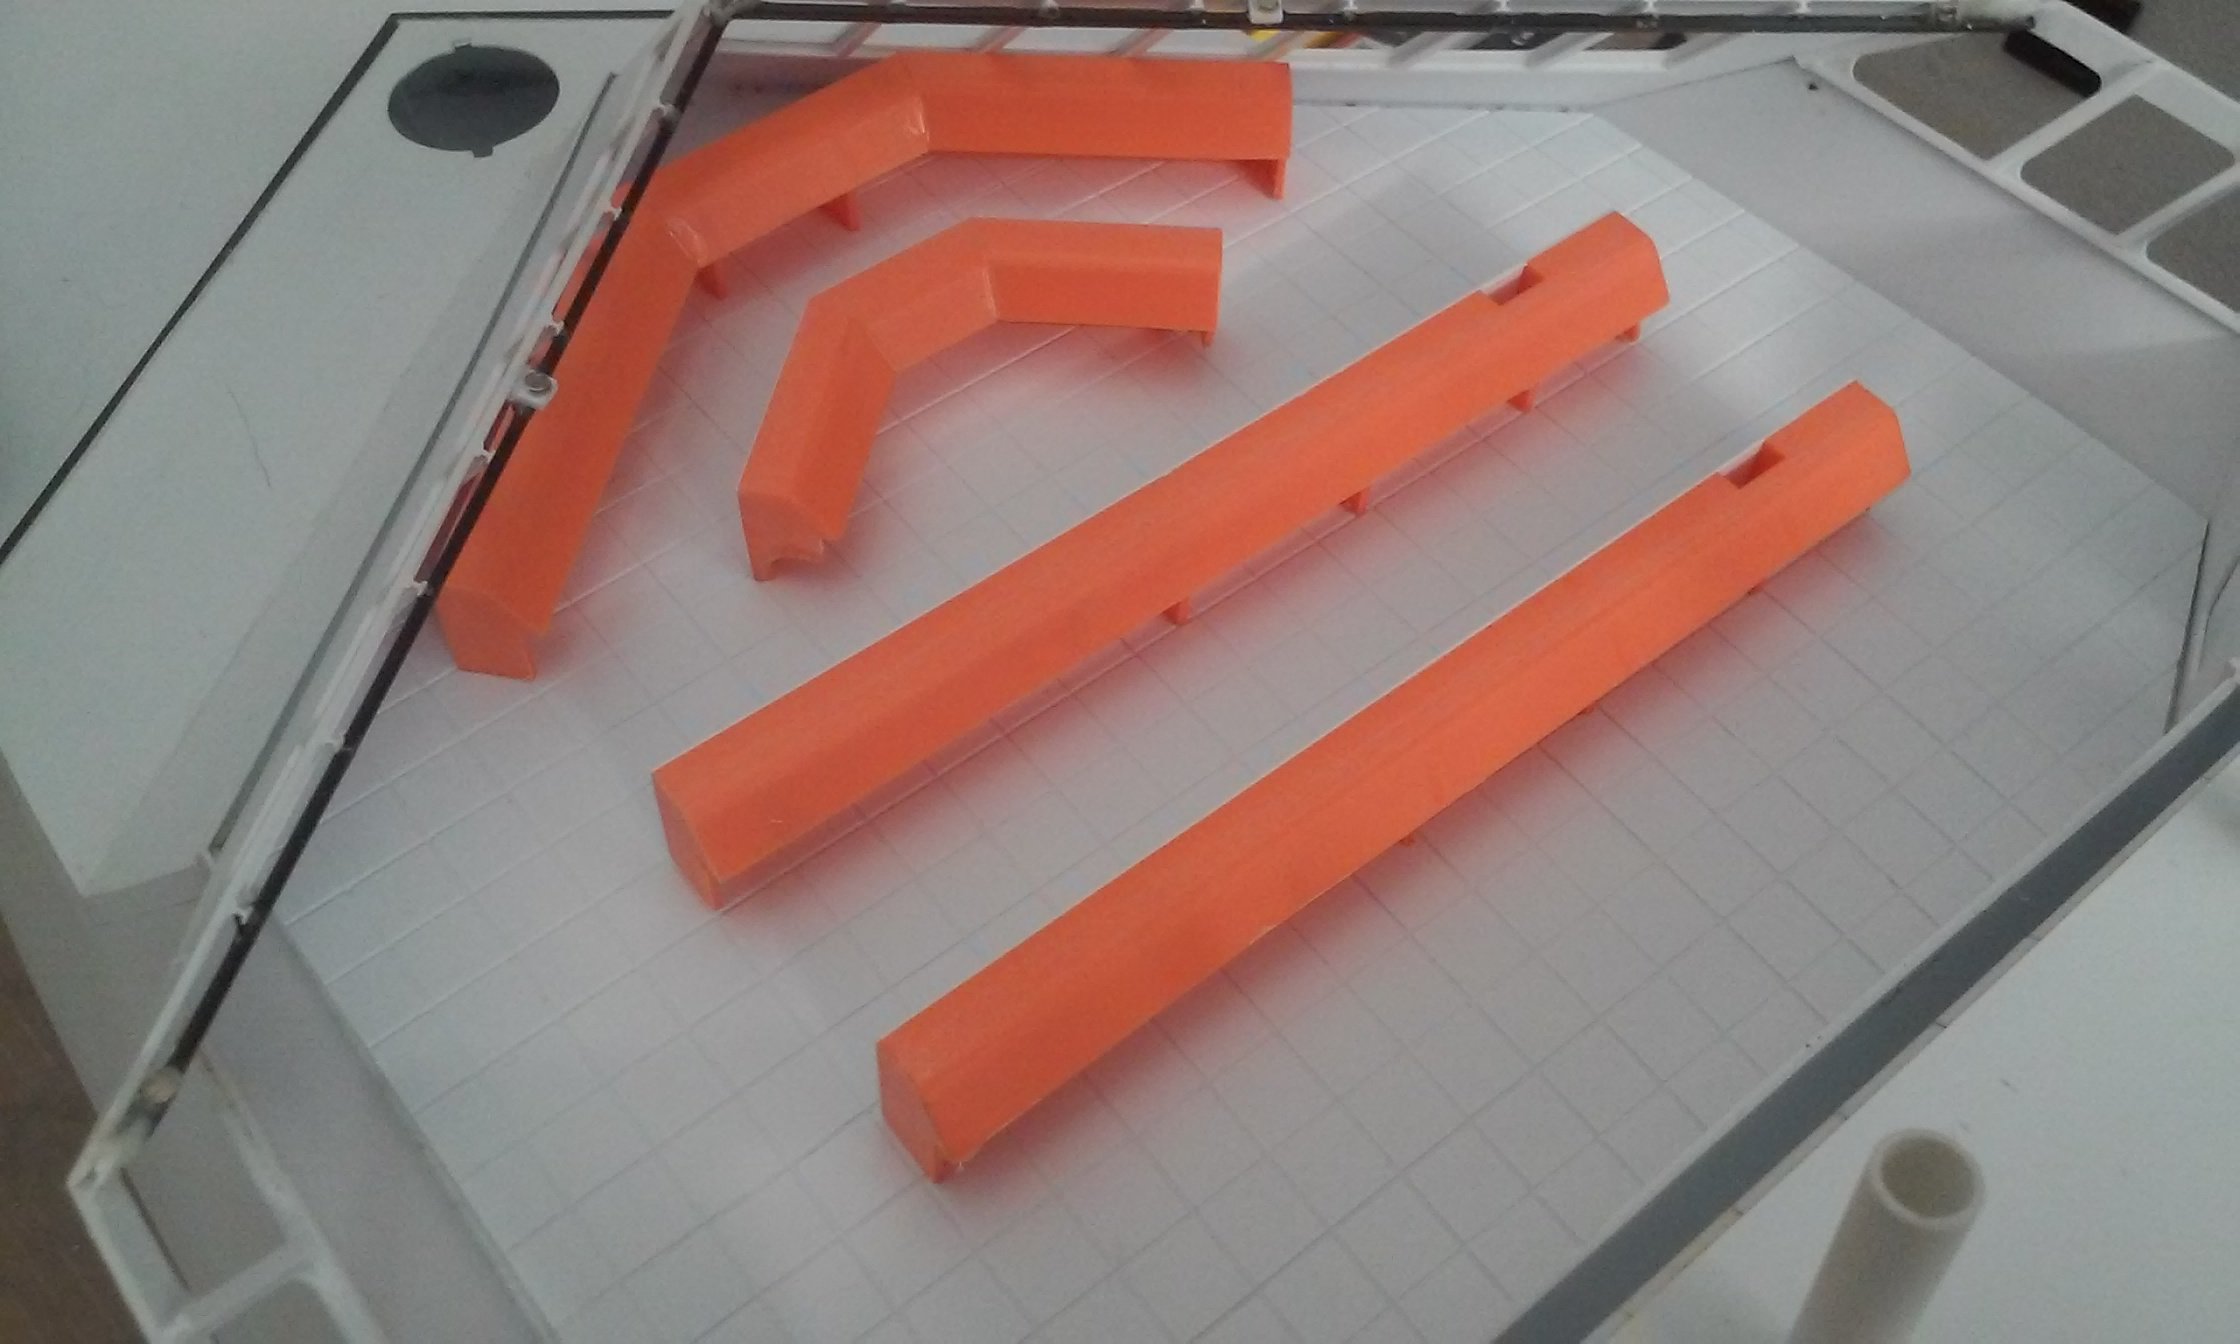
Derex, you have another fine addition to your fleet! Keep Trekking on! WMCheng, your hornet is coming along great! I'm glad the canopy trick worked for you. And no, it's just not you! I'm in a model club with a whole lot of members that when we describe how we built our model, we all have LOTS of screw ups! The bad part is when your scratch-building, and screwing up your own stuff! I'm always taking two steps forward, more steps back it seems. Hi everyone! This is catching up about two weeks of work so sorry for the extra photos. I will always say, “Save things you think you can use - without hoarding.” Someone was about to throw away some orange toner cartridge covers that were cool shaped and styrene. So, I kept them! They are now consoles on the bridge. The bridge is a combination bridge and combat information center (CIC). So, there are several rows of consoles in it. First, pieces were trimmed so they were the right shape. Then angles cut and pieces glued together. Details are what make models believable so instead of only plain rows of consoles, I wanted louvered vents like many consoles have. “Louvers” were cut into styrene and then the louvers were cut out like islands, so they stick out from the surface. If I had Evergreen cladding sheets, I could have just used them, but I don’t. Ordering from hobby shops stateside is about two weeks wait right now. The louvered sheets were then glued onto the sides and allowed to dry for a couple of days. The ship needs about 24 seats for the bridge crew. Besides Shapeways, where are you going to find them? Thankfully I had some HH-60 parts in my spare sprues’ boxes. They were glued together with an angle piece to support them. These were then cut out when dry. The bridge needed simulated two-foot floor tiles for "under floor cabling and cooling" like in computer centers. When I made the 1/200 Daedalus years ago, it needed nearly six feet of embossed deck area to simulate tie-downs. The hand-cranked machine I made was modified to accept a Dremel (which moves manually across the rails). The machine feeds according to how many cranks you make. This is easier than trying to grid-out the sheet and manually scribe/screw-up all the lines. One side was done, then flipped 90 degrees and the other side done. Clean-up STILL needed scribing which still created some mistakes – which thankfully were cut-out. Why not mill this? The sheet is too big for my little mill. Once again, Evergreen makes the right sheets, but I'm already waiting on other parts in the mail - so time to push through... Then everything was dry fit together. The consoles still need desk areas and maybe cup holders. Anyone know a good deal on 1/72 keyboards? - MT

-
Thanks! I actually managed to get the Imai kit you listed. It's cool. Now if someone would make Max's fire extinguisher "GU-11" from when Millia starts a fire on the stove shortly after they are married. - MT
-
Takatoku Toys 1/320 Macross 4-Kit Collection Sets
MechTech replied to jvmacross's topic in Collectors
Thanks JVMacross! I actually got 1 and 2. Now I know what is in 3, thanks to you! That would have been cool to get. When I did a bunch of 1/350 stuff, I used the armored valk as the starter before HIGHLY modifying it into a garage kit. Most are actually around 1/350 (no big deal anyhow). Thanks again for sharing! - MT -
Thanks for sharing! Looks JUST like a GU-11 - MT
-
Upgrading a classic: yet another custom Bandai/Matchbox 1/3000 SDF-1
MechTech replied to tekering's topic in The Workshop!
Cool ideas Tekering! I think your decal idea was great! Have you considered multiple colors of lines, maybe slightly off color panel lines? Similar to regular models or metalic model finishes? I'm thinking about getting one of those cri-cut machines. It could cut masks, stencils, thin styrene and my decals out after printing. Thin styrene may help too. I think you had a good idea with that. It just has to be straight or it looks off. Keep up the great ideas! - MT -
Mog’s a Low-Down, Dirty Rotten Copy-Cat (Modded Matchbox SDF-1)
MechTech replied to Mog's topic in The Workshop!
Looks great Mog! HUGE improvement over the stock version! Congrats on a great mod Mog! - MT -
Welcome back Benson and Dobber! Long time no see! Those B wings look great Dobber! And May the 4th be with you too! - MT
-
NZEOD is back with a vengeance and blowin' stuff up! Great fire effects by the way! Bolt - Your model is looking sleek and clean! Chronocidal - You're right! Monogram was the bomb back in the day. Even Tamiya was relatively new and unknown then. One Christmas back in the 80's my parents got me a bunch of Monogram kits for Christmas. A local membership store had them sitting out on display and when we were out shopping, I must have been drooling over them. So they got me all these Monogram kits for me. That was an awesome Christmas as a kid! The 1/24 Rambo Huey was great! It was HUGE, had all the ordnance and even had flexible ammo chutes for the machine guns. Likewise, their 1/32nd F-4E Phantom II had a ton of ordnance and was a well detailed model. Even their 1/72nd F-16 was great with all the ordnance, a tug an engine trainer and removable engine. I think I got the 1/48th B-17G then too. The gimmicks helped make them all likable to those of us who were younger. Ahh, simpler times. - MT
-
I hate the TV show "Hoarders", but this would be an episode I would watch My wife and daughter complains about the 20 large plastic containers of models I have (it protects them and made it easy to move them while in the military). With the whole virus thing going on, our monthly modeler's club meeting has gone weekly over Zoom. Seeing inside some people's houses looks almost like this video! Some of our members' "rooms" look like hobby shops -with- shelves! One guy has a large Craftsman tool cabinet. Every drawer is PACKED with paint! All the paints are grouped in shades. He must have thousands of dollars worth of paints - no over-emphasizing! After our first virtual meeting, I told my wife she has NOTHING to complain about with my "stash." Thanks for sharing Shawn! - MT
