MechTech
-
Posts
4702 -
Joined
-
Last visited
Content Type
Profiles
Forums
Events
Gallery
Everything posted by MechTech
-
HWR, I'd consider doing the Daedalus doorway if you guys were dead serious. Not to be a killjoy, but my current project is in that "dragging" stage where it seems to be taking forever. My "Macross allowance" (yeah, it's in our budget) is dragging too.
-
Understood. I had to do lots of filling from where I sanded back to even it out. Happy sanding! - MT
-
OK, there's lot's o' talk and just two pictures at the beginning of the thread (very subtle hint). - MT
-
"Talos" was an awesome kit. The biggest walking mecha hands down next to the 1/48 "Crab Gunner." I think Mike's 1/72 Monster kit holds the new title now.
-
HWR, I'm glad your your eye feels better. I feel your pain, litterally. I did the same thing once and it seemed to take forever for the stinging to go away. The monster I built in the photo is a scratchbuilt 1/100 (styrene and Milliput) monster with one of those cheap re-released Spartans at it's side. It's so heavy it is about 3/4 of an inch lower than the Spartan. I went with the TV version paint scheme. I almost put the smoke grenades on there like they show in the one TV episode, but I thought "just one more thing to break off." Have you really chosen which of the two versions to go with - movie or TV? If you want to go with a Daedalus attack, you really only need two monsters... Two can only fit side by side anyhow, trust me. I hope all works out with the paint! - MT
-
I found out the hard way that Imai models and line art have some "differences" to put it softly! Can't wait to see what you guys come up with! - MT
-
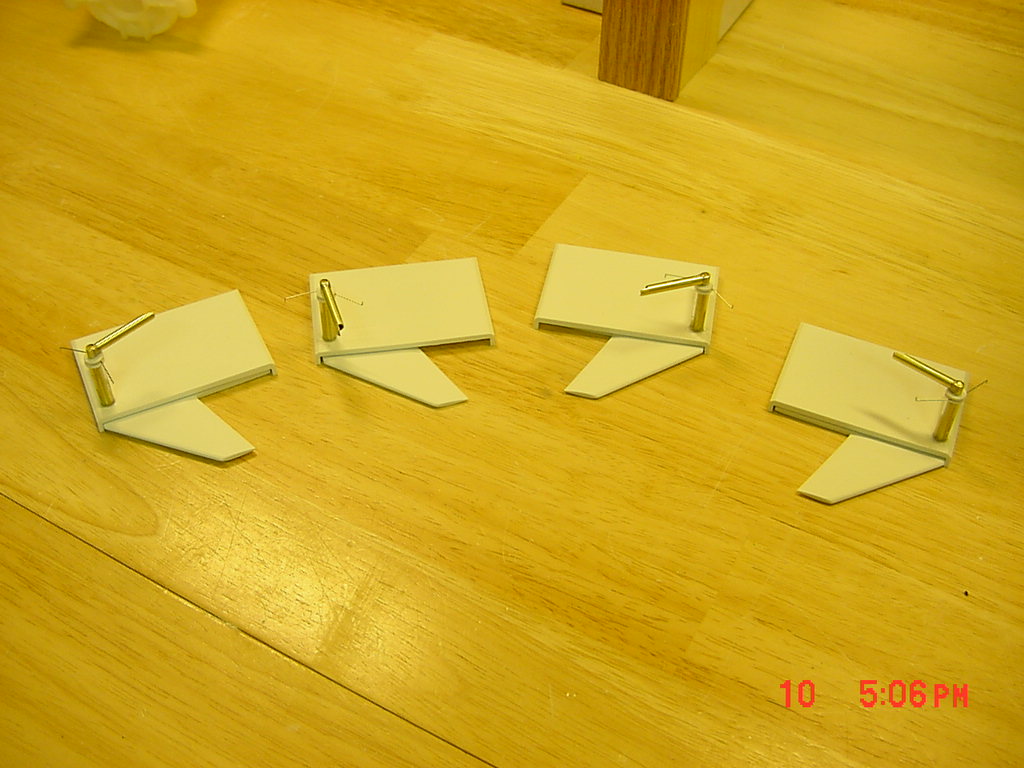
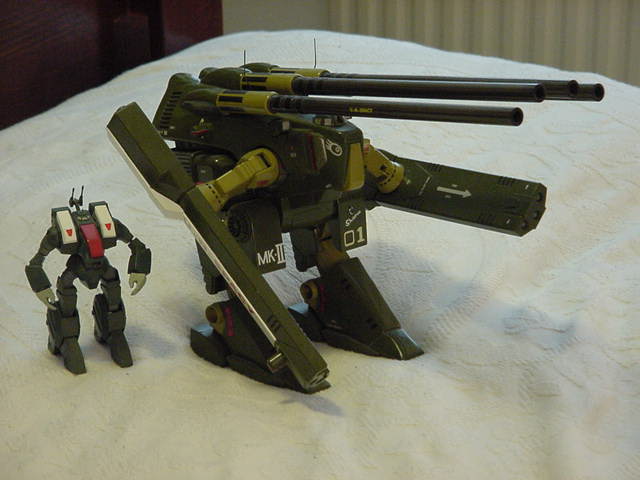
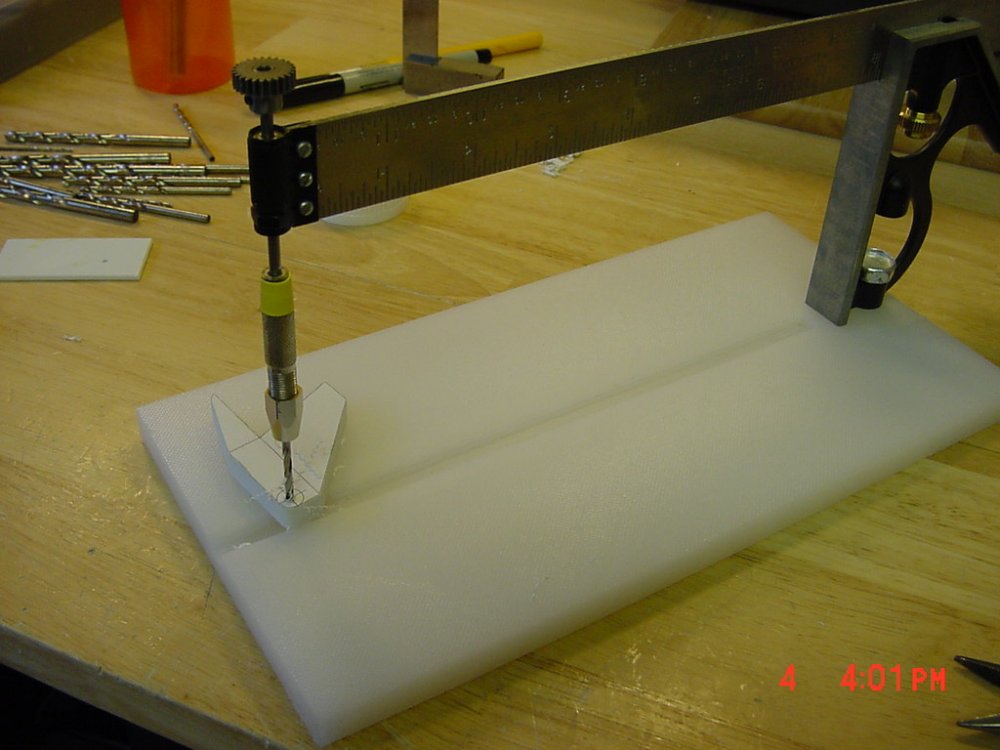
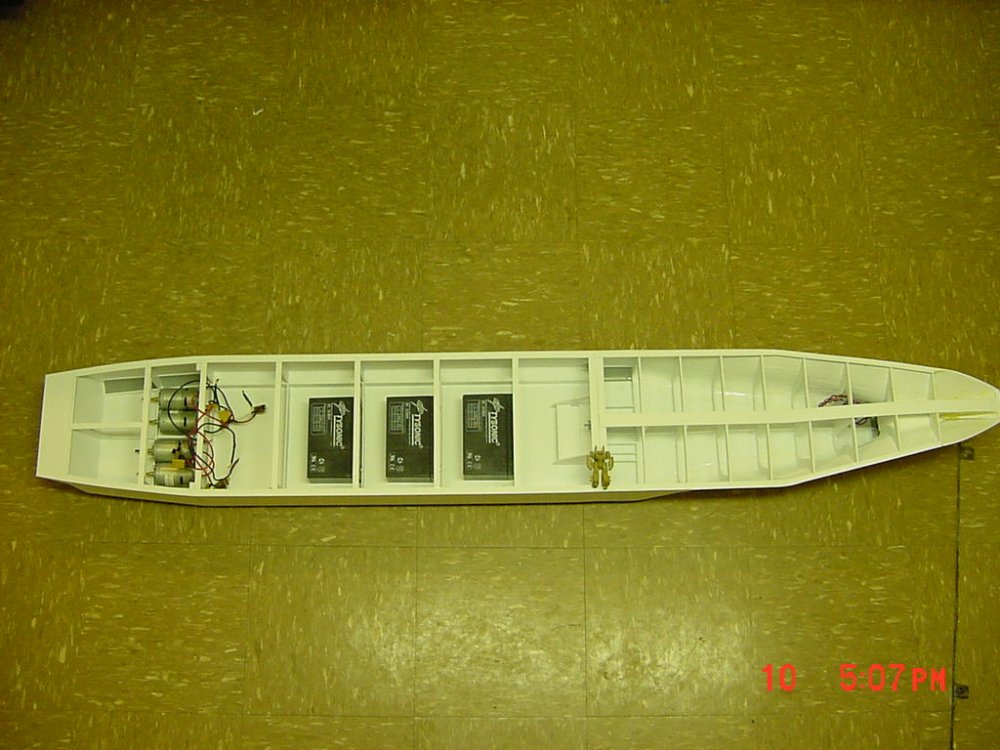
Hey guys, you all make me wish I remembered more from my high school chemistry class. Problem is all the chemicals I've used since then! Here's samples from what I've done so far: Drilling the stab's Stab assembly parts Sample parts layout I glued all the sheets together with super glue (a small bit) and pasted my printed blue print on them for cutting out. The one photo shows my make shift hand drill press for drilling pilot holes. The stabilizer assembly parts are shown loosley fit together and deployed. The "L" springs can be seen sticking out on the posts. I now have to make up the catches and solenoids to catch and release the stabilizer fins. The above shot shows the batteries and motors just stuck in there for an idea of size. Note the 1/200 armored VF-1J in the middle for size comparison (as requested). The motors will actually be in pods at the stern below the overhang (see side photos posted earlier for view). The motors are about "700-720" size. The average RC car uses a 540 size. That's it for now. I gotta get to bed. - MT

-
Can you say razor blade and small hammer? Hopefully the glue will give before your resin.
-
That's a roger on the foot art. It would look great. This a years old BAD photo of the 1/100 one I scratchbuilt (it's packed away still). Over the left leg "whistle" you can see the "Shamu" logo. A better decal on your foot would look awesome! You can't build something as big as that and leave it "plain" looking. I saw an awesome one years ago in "Little Tokyo, L.A." that was airbrushed with a mean tempered parrot face on it. Sounds funky in type: looked awesome in person! - MT

-
Dudes, I just read in Fine Scale Modeler where one guy had problems masking OVER his other paint jobs whithout removing the masking tape and tearing it up. It's slightly off topic, but here goes. He uses slightly damp coffee filter paper! Sounds funky enough to work too! Model Base Guy once suggested Glad "Press and Seal" too. - MT
-
I built the vinyl version a long time ago. I'd reccomend splitting the cockpit and fuselage parts and inserting a 2 to 3 mm thickness of styrene in there (smaller diameter) and then filling it in. Minimal sanding and loss of detail. The slightly longer nose would probably go un-noticed. That's what I which I had done. I had the same problem. - MT
-
The first comparison picture is worth a thousand words...
-
OK, so in a pinch, rubb grass on your body filler to safely thin it down? I knew Acetone was a surficant, but I didn't know it builds up in your body. I may not have to go buy some when I run out. I keep a can of Laquer Thinner handy too, that should break it down also. It's strong, but I use it in moderation and ventilation. I had to get a respirator just because of the quantity of glue I was using. Opening windows in the dead of winter is highly unpopular with the family. Chas, I have no real accurate count on building hours, but I started Jan 24th and work on it an average of an hour or two a night. Some weekends about four hours. Don't get started on money...
-
Great work! Where can I enlist? - MT
-
HA Ha! I knew you couldn't hold out dude! You know that kit is burnin' a hole in collection and calling your name to be built. I bet you lost sleep over it too! It's OK, as addicted modelers "we can stop anytime we want to!" (sounds like an AFN commercial) Somebody sent me this as a reliable magnet source some time ago: http://www.kjmagnetics.com/ Take lots o' photos! - MT
-
Chas is right about the cautioning. Most CA debonders are acetone based. They will break down styrene and at least soften ABS plastics. The paint is a gonner too. CA glue does have a weekness, it's brittle. Can you possibly loosen it up? Sometimes some organic cleaners like pine oil (Pinesol) or almost straight dishwasher detergent will loosen it up, but it may not penetrate into the joint. Pine oil will strip paint and heavy greases (that's where the "sol" in Pinesol comes from; solvent). Any other ideas or experiences guys? - MT
-
Thanks Thor. I'm glad we're getting cooler weather so I can get going on some hull work. I just got the batteries and motors today. The batteries are 6 volt 12 amp instead of the advertised 10 amp - bonus! The motors are larger then mentioned in the catalog too, but hey, there's room! - MT
-
Thank you. It takes all kinds of talent. Don't downplay the work it takes to do a good 3-d drawing. I can do 2-D, but clueless in 3-D. I think I figured out several angles. Want to give them a try? The upper deck (the boxy area) has to be square in the front for the ramp to fold up (and be water tight like the text description). But the pictures and Imai model have a slight inward angle. I'm guessing square in the front and angled gradually towards the back? I believe the main door is at an 85 degree angle, but I'm still looking into that. The four stabilizers on the sides I believe are at the same level, but two near the bow, just before the bend into the bow and two near the stern, just before the rear bend area. The single verticle bow stabilizer, I believe is at the lowest part (still looking into that). Those are the areas I'm working on. Want to try modeling them? - MT
-
The wallace and Gromit model is cool. I almost got it for my children because they love all the episodes/movie. Fiddley bits? Sounds like the lingo is rubbing off Oh yeah, use thick walled boxes or double box your models. The packers (or my furniture leaning up against them) used to always crush a box! I started betting myself which models were busted before I bought ammo cans to put stuff in. Especially since I bet you're going back across the pond. - MT
-
Hey guys, just finished cutting the stabilizers and thought I'd take a break. The house is cooling down and the children are in bed...phew. Chas and rotorhead, no sweat on the chemical stuff. I won't get that far untill all hardware and lower hull parts are completed. I'm curious too! Thanks for the compliment guys. I'll pose a destroid with the hull in my next photos. It'll also help me remember why the heck I started this thing! Back to the stabilizers! - MT
-

Help On Scratch Build, For A 1/72 Fold Booster
MechTech replied to deadghost's topic in The Workshop!
Valkyrie has it right on. I was looking at the basic shape and thinkin' "lathe" before reading Valk's post. If you don't have access to a lathe (or drill press in a pinch), You have two choices. 1) Cut out the parts in 3-D styrene and fill them in with lightweight filler. 2) Carve the body out of wood and seal it to take away the grain texture. (I gotta get me a lathe). Make the clear parts out of vacuformed plastic -or- heat up the plastic and push your "male" part through it. Hope that helps. - MT -
IGNORE, I think the server was hangin' up - MT
-
mac666er: does this look familiar? http://www.macrossworld.com/mwf/index.php?...opic=18403&st=0 I wish it was taking less time for my project! I saw your SDF-1 and thought it was a B/W photo of the Imai model at first glance! It all looks good! If you want some tips on any of the angles or other aspects, just say the word. I've been studying drawings of this thing for months now! Keep it up man! - MT
-
Olivers: I checked out Boots too since it is commonly sold at "chemists" (drug stores) in the U.S. They told me to check out an office supply/stationary store. It is used for cleaning toner from copiers. I'd go that route. An office machine maintainer may have some. Maplin has it too: http://www.maplin.co.uk/Free_UK_Delivery/I...cohol_28994.htm Mephistopheles: I don't think there'd be enough styrene in the world! Rotorhead is right about isopropyl, it WILL cause blindness and other severe bodily harm.
-
Review And Comparison Of The 1/72 Mk Ii Monster's
MechTech replied to Grayson72's topic in Model kits
Mike's kit is superbly detailed and VERY accurate!!! I studied the monster drawings for a year before building my own in 1/100th. All those photos bring back memories of all the drawings and screenshots I studied over for hours and hours. Mike's sculpt is not only extremely accurate, the resin quality sure looks better too! I'm glad I don't build in 1/72nd or I'd HAVE to buy one! - MT