MacrossJunkie Posted November 18, 2010 Posted November 18, 2010 I'm probably in the minority here but I really don't like using that "ProModeler" stuff. I've tried using it and found it to be absolute pain. Like David I all it tended to do was bead up and pull out of the panel lines except that I tried mixing in dish soap starting with a very small drop and gradually increasing the amount, but I never saw much improvement. When I finally did get the stuff to go into the engraved detail and stayed there long enough to try, the result was rather unimpressive. the lines where weak and splotchy, Not at all what I wanted. Personally I stick to Gundam markers and heavily thinned enamel paint. Well, whatever works for you. Everyone has different preferences. I started out with heavily thinned enamel paints, but I don't have any workspaces that are ideal for venting the fumes from the thinner besides working in the garage with the door open. I then went to the gundam markers which allowed me to work on the valks anywhere without subjecting myself to toxic fumes, but it made the panel lines too heavily emphasized or looked too artificial which I felt didn't look good. The promodeller kind of gives me the best of both worlds. For me it's close to the look of thinned enamel paints while at the same time being non-toxic and odorless. I haven't had much problem with the beading. I've even panel lined the DX VF-27 with the promodeller wash which ought to be the hardest since that thing has super glossy plastic which tends to be hydrophobic and I really had no trouble. I think the key is using a very fine brush in addition to lessening the surface tension and just going along the panel lines. As for your results looking weak and splotchy, I don't know what to say. Perhaps the batch you got wasn't mixed well with a high enough concentration of clay particles? I got the Dark Dirt and Light Dirt washes and I pretty much just use the dark dirt as the light dirt wasn't what I expected and looked almost completely white. But there are darker colors available for those who find the panel lines in my pics are too light or subtle for their tastes. How do you weather colored sections of a valk? I noticed many of the pics above are not weathered in colored areas, such as Max's VF-1A TV. It is just harder to weather colored sections? Do you mean weathered or panel lined? I guess it doesn't matter. Either way, it's really no harder to panel line or weather colored areas, but sometimes due to lighting or color, it may be hard to see. Using that Max VF-1A as an example, I can't see panel lining on the arms, but it could just be the lighting causing it to be washed out or he just didn't panel line that area. You can see in my pics though that both panel lining and weathering were applied in all the colored parts. You just have to use shades that are distinguishable from the surface you're panel lining if you want to be able to see it clearly. Like the dark dirt wash I used would be nigh invisible on the dark gray/near black surface of Gamlin's VF-22. Ideally, you'd go with a bit of a lighter shade. I went with black gundam marker and said "meh, good enough". Quote
ae_productions Posted November 19, 2010 Posted November 19, 2010 Thanks for help MacrossJunkie. Question: seems fans choose to either panel line or weather. Do you do either or because it would be "too much detail" in the valk? Again, thanks for all the pointers to everyone. Once I get brave enough to do this, I think it will really give some new life to my 1:48's and 1:55 Mospeada toys. Quote
MacrossJunkie Posted November 19, 2010 Posted November 19, 2010 Thanks for help MacrossJunkie. Question: seems fans choose to either panel line or weather. Do you do either or because it would be "too much detail" in the valk? Again, thanks for all the pointers to everyone. Once I get brave enough to do this, I think it will really give some new life to my 1:48's and 1:55 Mospeada toys. I'd do both if I'm doing weathering. Just do an image search on Google for "model weathering" and you'll see both weathering and panel lining on planes, tanks, etc. Quote
Valkyrie Driver Posted November 22, 2010 Posted November 22, 2010 Damn, all of these look so cool, unfortunately I am loathe to take paints to my valks just yet, as my oldest one has been in my collection for 2 years. Thankfully I got all of mine New In Box. Still, I'd hate to splotch paint on them and leave them looking worse, my hands aren't as steady as they once were. Quote
boyarque Posted November 23, 2010 Posted November 23, 2010 My panel linings are inconsistent at best...so when it comes to my macross, I prefer to send it to a friend of mine for expert makeover...heheheeheh... Here's his blog: http://rkdesigns.blogspot.com/2010/03/yamato-148-vf1s-roy-focker-weathered.html And the paintjob still hold until now.... If you ask me, the linings and detailings add depth and character to your collection, yessireee..... Quote
Valkyrie Driver Posted November 23, 2010 Posted November 23, 2010 I do think it's cool, I'm just hesitant to do it. I think I'll try doing the custom trial stuff with my ver1 vf1a Quote
MacrossJunkie Posted November 24, 2010 Posted November 24, 2010 My panel linings are inconsistent at best...so when it comes to my macross, I prefer to send it to a friend of mine for expert makeover...heheheeheh... Here's his blog: http://rkdesigns.blogspot.com/2010/03/yamato-148-vf1s-roy-focker-weathered.html And the paintjob still hold until now.... If you ask me, the linings and detailings add depth and character to your collection, yessireee..... That's a very nice job with the shading that he did there. I like it very much. Quote
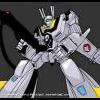
Mog Posted April 22, 2011 Posted April 22, 2011 I use Sakura brush pens. I loathe using them for drawing, but I found another use for them when it came to toys. What I do is generously brush on a lot of ink on the surface, enough to seep between the panel lines. Then after a few seconds or so, wipe off with tissue paper. In doing so, I accomplish 2 things: Inking in the panel lines Give off a weathered look It made a world of difference on my Classics Jetfire, and eventually I plan on trying these techniques out on one of my Yamatos. These and the Copic or Micron pens is the method I use to panel-line my various Valks. I usually prefer a more subtle panel-line, so I typically use a grey pen to fill in the lines, especially on the white portions of the Valks. However, the black pens are better to use (and more noticeable) on the colored portions. But yeah, if you make a mistake with these pens, a little sweat/spit and some tissue paper can easily wipe the stuff off. However, as I've said in other posts, just make sure you ink in the lines at an angle. Don't use these pens completely perpendicular to the surface you're lining, or you risk damaging or completely losing the pen tips. In any case, here's an in-process pic of my latest project: The right side's been panel-lined, but the left side isn't yet. It's subtle, but inking in the panels definitely makes them "pop out" more. Quote
Recommended Posts
Join the conversation
You can post now and register later. If you have an account, sign in now to post with your account.