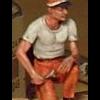
winterdyne Posted March 22, 2007 Share Posted March 22, 2007 (edited) People asked about how I paint the figures. Here's a step by step thread. All these techniques will work just as well on 1/72 figures, although eyes may not work so well. This is a hasegawa figure (crewman using a generator, hence the odd pose - generator to come soon). The facial sculpt's rubbish, so I'd expect a similar overall result on a good 1/72 figure too. STEP ONE - Cleanup and Assembly First, clean up the figure parts. I use a ground down high-speed steel hacksaw. A good knife is essential. Cheap shoddy knives lose their edge when you scrape off flash, and bend their points when you use them to carve out flash from recesses (like belt edges). Note- I assume you've already degreased using warm soapy water! Assemble using a thick glue and push arms up through the glue to produce a bead on the visible (top) edge. This can be scraped away with your trusty knife when dry to hide the join. Don't worry about it if there are some small visible gaps, paintwork can hide a multitude of sins. Once assembled. CA the figure onto a block. Just a dab on one foot will do, you want to be able to snap it off when building your diorama. With the figure mounted, do any final cleanup. Use a large, stiff brush to dust off any particles of plastic. Your figure should now look something like: STEP TWO - Prime, Cleanup, Prime. First, get a big stiff brush. I use an old Citadel 'Tank Brush'. I use Citadel Skull White here. Thin your primer to roughly the consistency of milk, and with *very little* paint on your big fat brush, very gently (almost drybrushing) coat the figure. The paint will be splotchy, uneven, and will run into the recesses. If it beads up into puddles, either your figure is still greasy or you have too much paint on your brush. Don't put too much paint on at this point, the goal here is to highlight flash you've missed previously. You should end up with something like: Now, let that dry for a bit. As you were painting, you'll probably have noticed flash you didn't see before. Get your knife and scrape away: The paint also acts as a depth guide for gaps at part joins. Scraping at the join till the paint disappears will indicate a flush surface, which you may or may not want. Once you're done scraping, remove the scrapings with your big dusting brush. Finally, repeat the undercoat to cover plastic you've exposed by scraping and even up the coverage a bit. Since in this case our subject matter will be grimy and filthy, an uneven surface tone isn't that much of a disadvantage. You should end up with a 'fairly white' figure: STEP THREE - Base Colours. You'll need a couple of brushes here. Both need to have reasonable points. I use a Citadel 'Standard Brush' (Equivalent to a 0 or 1) and a Citadel 'Fine Detail Brush' (Equivalent to a 0 or 00). Both are sable. Sable brushes are flexible, fine-bristled and keep a point well. Cheaper brushes get stiff (which tears paint surfaces creating a horrible streaky finish) or flare (which stop you making clean borders). I have yet to find an acrylic brush I can get on well with. I use Citadel acrylic paints (although I'm thinking about shifting to Vallejo). They're very high pigment, water based paints. So no stink, and good coverage. They have a slightly rubbery consistency when dry, and are pretty durable to handling. Start with the smallest and 'deepest' visible colour area. In this case it's the techie's white t-shirt. This gets thin glaze/wash of Citadel 'Fortress Grey' - a very light 'cement dust' grey - just to provide some shading. Then the flesh - a solid covering of thinned Citadel 'Dwarf Flesh'. This is the 'pinker' kind of flesh tone you can buy (as opposed to the very pale skin tone). Ignore detail areas like hair, mufflers, and solid black areas that can best be done later like boots. Finally, the overalls. I use Citadel 'Fiery Orange'. A fairly solid colour is the objective here, but as mentioned since the overalls will be stained heavily, a bit of splotchiness doesn't matter. You should now have something like: STEP FOUR - First Washes. Two washes to do. On the overalls I use a mix of around 25% Flaming Orange 75% Scorched Brown. This is about the same colour as melted milk chocolate. Thin this mix to the consistency of milk and apply smoothly over the overalls. The wash will settle into the recesses. If it puddles too much just wipe your brush on the back of your thumb to drop some paint, and pick up paint from the puddle. On the face and hands I use a thinned 'Scab Red'. A mix of about 90% pure red and 10% black should be similar. Doesn't really matter, the tone you're looking for on the figure is 'skinless flesh', or a bad sunburn. Once done it should look like this: STEP FIVE - First Highlights. Start with the overalls. This is a run of drybrushing, so sort out your oldest, nastiest brush. THIS DESTROYS BRUSHES - NEVER USE YOUR BEST DETAIL BRUSH TO DRYBRUSH. I used Vallejo Flat Yellow, and Citadel 'Skull White' and 'Fiery Orange', for four passes. First I drybrushed pure Fiery Orange to pick up the highlights. On large areas I moistened the brush slightly to turn the drybrush into a glaze to help smooth out the wash. Then I mixed in a little yellow, then a little more, then finally a little white into the mix (ending up with a 'peach' colour). The face is highlighted using the fine detail brush and slightly thinned 'Dwarf Flesh', picking out cheekbones, brows, nose, upper and lower lip, and finally chin and jawbone. The fingers on the hands are picked out, as are 'pads' on the palms, and the outer edge of the back of the hand, leaving a pinkish area in the middle by the wrist. Several passes are done with thinner paint to build up a smoother highlight on larger figures. At this scale (1/48) a single pass will usually do. The second run of highlighting on the face is done with Citadel 'Elf Flesh'. This is the pale, pasty fleshtone. Thinned slightly and applied in layers, the 'two skin tones' / Verlinden technique works very well. At this scale a single blended pass will do. The result should look like: STEP SIX - Glazes and 'fine washes'. To blend together the previous stages, we now prepare a glaze of around 75% Fiery Orange and 25% Scorched Brown. It's a definate browny-orange colour. This is thinned slightly (not to make it a wash) and applied smoothly over the overalls. It's purpose is to tone down the yellowness of the highlights and brighten the recesses, basically unifying the colours. Pure scorched brown is used whilst the glaze is wet to line around the ends of the sleeves and legs. Doing this while the glaze is wet allows us to work toward the overalls, and blend in any overpaint. Scorched brown is also used to pick out the belt, and as very localised washes on the pockets, around the collar and under the rim of the hat. It should now look something like: STEP SEVEN - Details. The rim of the hat is painted with... um, actually the pot's not marked. I believe it's a very old Citadel 'Midnight Blue'. But it's basically Prussian Blue. Anyway, the rim of the hat is painted blue and highlighted with just a touch of white in the blue. Discs are painted above the rim (leaving room for the white stripe) and on the left shoulder. The eyes are picked out with slightly thinned Scorched Brown, and a very delicate wash is added between the fingers. Hair is painted with Scorched Brown. The feet are painted black. A black chevron is added to the right arm, and a thin black wash is applied to the hair. The blue should now be dry. White discs are painted inside the blue (for the UN Spacy kite badge). White is painted inside the black chevron. A white band is added to the cap. A red triangle is added to represent the kite in the badge on the hat, and a red arrowhead is used to make the kite on the larger shoulder badge. A few streaks of thinned black are added to the overalls and hat to represent oil stains - including over the badge. It's important to weather badges as this blends them into the overall figure. The ear mufflers are painted black. The band is painted Vallejo 'Natural Steel' (although any generic Silver is just fine). The mufflers themselves are painted Citadel 'Dark Angels Green' and highlighted with a little 'Goblin Green'. A non-drab dark green is the result. It should now look like: Ok, we're done. Snap the figure off the painting block (use a knife to pry it away if you have to - don't snap him off at the ankle!) and CA it to a 'storage block' - this stops figures rubbing against each other in a bits box before you use them, and makes them much easier to handle and check for consistency against each other: I hope this was useful to someone. Now - if someone could post a 'how to use an airbrush properly if you don't know the first thing about them' article, that'd be nice. Edited: Just to put pictures back in sequence Edited January 10, 2008 by winterdyne Quote Link to comment Share on other sites More sharing options...
Grayson72 Posted March 22, 2007 Share Posted March 22, 2007 Hey that was awesome thanks! Quote Link to comment Share on other sites More sharing options...
big F Posted March 22, 2007 Share Posted March 22, 2007 Thanks for that. A link to this goes in my links folder. Quote Link to comment Share on other sites More sharing options...
Valkyrie addict Posted March 23, 2007 Share Posted March 23, 2007 wow! thanks for the step by step you make it sound so easy, too bad you appeared after I busted my ass and eyes painting my VF-22S max Quote Link to comment Share on other sites More sharing options...
cowie165 Posted March 23, 2007 Share Posted March 23, 2007 Thanks winterdyne, great how-to! Cheers Quote Link to comment Share on other sites More sharing options...
winterdyne Posted March 23, 2007 Author Share Posted March 23, 2007 Valkyrie addict, what scale is that? Quote Link to comment Share on other sites More sharing options...
Valkyrie addict Posted March 23, 2007 Share Posted March 23, 2007 Hasegawa's 1/72 Quote Link to comment Share on other sites More sharing options...
winterdyne Posted March 23, 2007 Author Share Posted March 23, 2007 Can you not remove the pilot and repaint? If not you can probably apply a couple of thin washes with it in place - a blue on the flightsuit and grey on the helmet. Quote Link to comment Share on other sites More sharing options...
promethuem5 Posted March 24, 2007 Share Posted March 24, 2007 Winterdyne, I am blown away, thanks for the write up. I use Citadel paints for alot of colors (earth tones, reds, greens, and mettalics) but I have had better luck with Valeijo for blues, and the best whites and greys I have worked with are from a craft paint cheapo brand... I've also found that synthetic brushes can come in handy for super fine detail work line eyes and trim, but only if that's all you use the brush for. I can't wait to see your larger scale work! Quote Link to comment Share on other sites More sharing options...
MechTech Posted March 24, 2007 Share Posted March 24, 2007 Looks great man! The guy in the white shirt doesn't look like he's feeling too good ! Keep it up! - MT Quote Link to comment Share on other sites More sharing options...
ChaosWarrior Posted April 13, 2007 Share Posted April 13, 2007 Very nice step by step, ending up in very nicely painted figures. ChaosWarrior Quote Link to comment Share on other sites More sharing options...
orguss01 Posted December 2, 2007 Share Posted December 2, 2007 (edited) Looks great man! The guy in the white shirt doesn't look like he's feeling too good ! Keep it up! - MT Yeah he's like "why today?? why do they have to attack today?? I should have never went out with Major Foker last night..." Nice job on the figs... Edited December 2, 2007 by orguss01 Quote Link to comment Share on other sites More sharing options...
Recommended Posts
Join the conversation
You can post now and register later. If you have an account, sign in now to post with your account.