winterdyne Posted February 23, 2007 Share Posted February 23, 2007 (edited) Hello everyone! I've been lurking here for a few years now, and I'm really impressed with the quality of some of the weathering/customising work done. I've just bought a 1/48 VF-1J Hikaru, and GBP armour set, which I plan to decal up, possibly battle damage and weather. I'm not planning a custom paint job (this is my first custom job on a toy this expensive), but I would like to reduce the toyishness of the piece, without reducing the playability - I like to handle my toys! Sorry if this seems like a long rambling post, but it's probably a good idea to get as much information across on what I can do before asking for new techniques. I'm a fairly good miniature painter (wargames and militaria) so I already know a lot of techniques that work well on static models, but a transformable item with armour to be added / removed is going to get a lot of wear. I know how to sand, file and fill, and I know pretty much every brush technique there is going. I have almost NO experience with airbrushing (so this is something I'd like advice on!). I fully expect to buy kit (compressor, a new airbrush) so advice on what's good is also appreciated. There seems to be a lack of 'start-to-finish' threads here on customising (or at least I can't find 'em) so I will be documenting everything I do for others to follow. I realise that might repeat a lot of information given in this thread but I expect this one to get sidetracked a bit, and a concise one would be easier for others to follow. Ok - the plan I have is, based on handling wargames stuff: 1) Disassemble the valk. 2) Detail paint the cockpit, pilot, missiles, extra hands, and other 'low wear' items. 3) Glosscoat the valk parts - will I need to strip original paint / repaint and sand down high-wear areas? 4) Apply decals from Robographics / Anasazi. Seal. 5) Weather the valk parts. Gloss / hard seal everything for durability. 6) Matt varnish everything. 7) Repeat for GBP I'm a little concerned that this many coats may thicken up the parts a bit too much... But it seems to be what's generally done from what I've read here... Advice / hints would be GREATLY appreciated (I've just spent damn near $300 and do NOT want to f*ck this up). :-) Thanks all. Edited February 23, 2007 by winterdyne Quote Link to comment Share on other sites More sharing options...
MechTech Posted February 24, 2007 Share Posted February 24, 2007 First off, welcome to MW! I HIGHLY advise you check out the search eangine feature. It's all been done here at one point or another, even flying R/C SV-51's! I think this will help: http://www.macrossworld.com/mwf/index.php?showtopic=21499 Some of one of our renound artisits works: http://www.macrossworld.com/mwf/index.php?showtopic=691 Make sure you wash up your parts and give them a VERY LIGHT sanding with high grit paper to help the paint stick. Let any parts you wet sand dry first. ABS plastic does hold small amounts of water. - MT Quote Link to comment Share on other sites More sharing options...
winterdyne Posted February 24, 2007 Author Share Posted February 24, 2007 First off, welcome to MW! I HIGHLY advise you check out the search eangine feature. It's all been done here at one point or another, even flying R/C SV-51's! I think this will help: http://www.macrossworld.com/mwf/index.php?showtopic=21499 Some of one of our renound artisits works: http://www.macrossworld.com/mwf/index.php?showtopic=691 Make sure you wash up your parts and give them a VERY LIGHT sanding with high grit paper to help the paint stick. Let any parts you wet sand dry first. ABS plastic does hold small amounts of water. - MT Thanks for the welcome! Yeah I was planning on washing and keying everything... as luck would have it I'm being loaned a good quality airbrush and compressor by my brother (badger variable action airbrush, might need to buy fine needle / nozzle for it) and he's going to give me some 'hands on' training. With the VF-1J, would people recommend stripping any existing (yamato) paintwork and redoing, or just applying the decals, panel lining and weathering on top of the existing paintwork (well, on top of a glosscoat on top of the existing paintwork)? My gut instinct is that it'll wear like buggery like that, so the original paintscheme might as well be stripped (since necessary sanding would ruin it). Quote Link to comment Share on other sites More sharing options...
promethuem5 Posted February 24, 2007 Share Posted February 24, 2007 (edited) Hey, I did the exact same thing you are about to embark on, and for the GBP, yI didn't sand or touch up anything and everything worked fine... I panel lined the decalled the 1J underneath as well, but bc/ all i did was panel lines and decals, I didn't need to sand anything or whatnot... just spray on a clear matte coat afterwards... I buy all my decals from Devin (formerly selling them himself, now distrubuted and printed thru Robographics... check the for sale thread I think) they are top notch stuff, and make the whole process much easier. Here's the ancient thread for mine... really needs some new pics... Edited February 24, 2007 by promethuem5 Quote Link to comment Share on other sites More sharing options...
winterdyne Posted February 24, 2007 Author Share Posted February 24, 2007 (edited) Hey, I did the exact same thing you are about to embark on, and for the GBP, yI didn't sand or touch up anything and everything worked fine... I panel lined the decalled the 1J underneath as well, but bc/ all i did was panel lines and decals, I didn't need to sand anything or whatnot... just spray on a clear matte coat afterwards... I buy all my decals from Devin (formerly selling them himself, now distrubuted and printed thru Robographics... check the for sale thread I think) they are top notch stuff, and make the whole process much easier. Here's the ancient thread for mine... really needs some new pics... Nice work, I think it's the old threads my searches don't seem to find... That's just an oil wash over the toy, then a drybrush (with some airbrush scorching)? Did you apply a gloss coat before the decals and a setting solution etc? Oh how much disassembly did you have to do on the valk? I'm a little nervous about taking it completely apart... Edited February 24, 2007 by winterdyne Quote Link to comment Share on other sites More sharing options...
promethuem5 Posted February 24, 2007 Share Posted February 24, 2007 Hi, glad I could help... I did some dark ink washes (oil paints work better, Im just now learning to use them.) And a couple layers of drybrushing... then a gloss spray coat. I applied all the decals and coated them in decal solution, then a coat of Future brushed onto all the decals to blend the edges, then a spray matte coat. In retrospect, I should have done the drybrushing AFTER the decals bc/ the gloss coats really faded the drbrushing... after the matte coat I did all my pastel weathering and sealed it with one last matte coat. For detailed valks, I've never taken apart more than popping the legs off at the already removable joint (the hip comes off of the socket piece if you just pull firmly straight out) and inscrewing and removing the arms... I've got a weathered CF in the customs gallery too, and I ddin't need to disasemble any more than that. I'm going to be doing another weatered detailing job on a Strike Roy, and then later down the line, a fuly repainted Minmei Guards valk, so I'm sure I myself will learn more abouyt what has to be taken apart by then... Quote Link to comment Share on other sites More sharing options...
winterdyne Posted February 24, 2007 Author Share Posted February 24, 2007 Hmm. The CF doesn't look as good as the GBP... There's still some very plasticky looking bits, which I want to avoid. I guess that'll mean a total strip down and rebuild... now where are my jewellers' screwdrivers? I think I'll also fill the Big West / Made in China panels on the bottoms of the wings... I HATE seeing stuff like that (and once I notice it I simply can't not see it, if you know what I mean). And filling means painting... Quote Link to comment Share on other sites More sharing options...
promethuem5 Posted February 25, 2007 Share Posted February 25, 2007 Do you mean there's some plasticy looking bits on /my/ CF, or the CF figure in general? If its something on mine, I'm kinda curious... I know the heat shiled looks silly bc/ its transparent and painted on the underside to avoid scratching... thats just how it came. Quote Link to comment Share on other sites More sharing options...
winterdyne Posted February 25, 2007 Author Share Posted February 25, 2007 Do you mean there's some plasticy looking bits on /my/ CF, or the CF figure in general? If its something on mine, I'm kinda curious... I know the heat shiled looks silly bc/ its transparent and painted on the underside to avoid scratching... thats just how it came. Yeah, on yours. Specifically in battroid mode, the linkages and hinges between the front and rear fuselage (torso) sections, and a few other places that'd blatantly be hard to reach or paint well without dismantling (like the inner surfaces of the knee covers). I've not received my valk yet (my first yammie) so I didn't know about the transparent heatshield - There's no way you can get that to look right without painting the exposed surface (but like you say, that makes it susceptible to scratching). Quote Link to comment Share on other sites More sharing options...
promethuem5 Posted February 26, 2007 Share Posted February 26, 2007 Heh, good catch on those... I wans't too worried about that kind of thing, because I was shooting for 'detailed toy' rather than 'model kit quality'... I still play with it all the time, reposing it and scuh (occasionally even zooming it around ) so that kind of stuff doesn't bother me for Yammie customs... Quote Link to comment Share on other sites More sharing options...
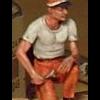
winterdyne Posted March 19, 2007 Author Share Posted March 19, 2007 Hey all... well, I've actually started! It'll be another couple of weeks till I can go an borrow my brother's compressor and airbrush to work on the valk and gbp itself, so I've started with brush work on the pilot. [attachmentid=41302][attachmentid=41303] This is also the first time I've used Vallejo paints, having been using Citadel almost religiously (and Tamiya for airbrush work in the past). I have to say, I'm very impressed. I bought myself some 1/48 ground crew (the hasegawa set A and the Italeri Combat Aircraft Support Group). Jesus. The mould quality on the Hasegawa figures is disappointing. I don't think any of them will look reasonable at all. The equipment seems ok though. Italeri's figures are sharp and precise and will paint up nicely though. Next update will be 'bloke with spanner'. If anyone has reference links for UN Spacy ground support crew (or can remember any SDF episode with such chaps in) that'd be a great help. Quote Link to comment Share on other sites More sharing options...
MechTech Posted March 19, 2007 Share Posted March 19, 2007 (edited) Dude, my avatar! [attachmentid=41306] And these guys too (they're not as cute) [attachmentid=41307] [attachmentid=41308] [attachmentid=41309] Can you say orange? Does this give you any ideas? Hope that helps! - MT Edited March 19, 2007 by MechTech Quote Link to comment Share on other sites More sharing options...
Dante74 Posted March 19, 2007 Share Posted March 19, 2007 I wonder if the diorama in that last pic is sitting at Yamato's office right now? Or maybe it's a part of Graham's collection? Quote Link to comment Share on other sites More sharing options...
winterdyne Posted March 20, 2007 Author Share Posted March 20, 2007 (edited) Thanks dude. Filthy orange is actually quite a challenge to paint and highlight properly. Was fun. Here's the result. Would have put it up last night, but I got migraines at the mo. :-( [attachmentid=41336][attachmentid=41337] That diorama... there's a couple of the Hasegawa ground crew sets in there, and what looks like a verlinden US Navy carrier tractor (anyone know any other firms that make these?)- but what are the trailers made from? Edited March 20, 2007 by winterdyne Quote Link to comment Share on other sites More sharing options...
promethuem5 Posted March 21, 2007 Share Posted March 21, 2007 WOW! I can't wiat to see your valk work, because frankly your figure work is amazing. How long have you been painting figures? Quote Link to comment Share on other sites More sharing options...
winterdyne Posted March 22, 2007 Author Share Posted March 22, 2007 (edited) WOW! I can't wiat to see your valk work, because frankly your figure work is amazing. How long have you been painting figures? I've been figure painting (properly) for around 20 years. I'd say I got to 'pro' standard (as in I did commission pieces for quite a lot of money) around 10 years ago. These aren't up to that standard though. I've just finished my 4th techie (done 2 Hasegawa, 2 Italeri). Damn. I do not like the Hasegawa figures. They really don't paint up very well. Much more 'Macrossy' in style (big overalls) but the faces are like bad Dr. Who monsters. The Italeri ones, although being rather 'Korean' in style (very sharp trouser creases) lend themselves to painting much better. Even holding up to Verlinden flesh work (which on anything under 1/32 is in my opinion good). Much skinnier than the Hasegawa figures, but with very nice hands. Hands are important - they're a focal point on any humanoid figure. [attachmentid=41383] From left to right: Italeri 'slightly camp chap'. Fourth painted. Left eye doesn't stare like in the photo - there is actually an eyelid over it on the model which the camera didn't pick up. Hasegawa 'spanner bloke'. Third painted. Spanner's cute, and the hand's aren't *too* bad, but the face is godawful. Thank god he's looking down. Hasegawa 'Lurch'. Second painted. Oh jesus he's ugly. Nuff said. Italeria 'spanner chap'. Nice. (and I copied the hat from MechTech's avatar, thanks MT). All are painted the same way; if you want I can post a stage-by-stage for the next one I do, it's pretty easy stuff if you've got a half decent brush and a table to lean on. The valk I'm quite scared about. I really have very little airbrush experience. Getting the compressor on Sunday. :-) Edited March 22, 2007 by winterdyne Quote Link to comment Share on other sites More sharing options...
KiriK Posted March 22, 2007 Share Posted March 22, 2007 wow.... nice paint jobs on those figures... i'm sure you'll do fine painting up a valk... gluck with that Quote Link to comment Share on other sites More sharing options...
winterdyne Posted December 2, 2007 Author Share Posted December 2, 2007 Ok, here's where I'm up to. Not a great pic: I primed the valk with citadel skull white primer (quite a good 'dusty finish') primer. Preshade with tamiya sky grey, and cover with many light coats of very thin flat white. Stripes are tamiya flat red and nato black. You may notice the heatshield looks a little different. I've sculpted a raised upper section onto it, (actually by filing/sanding down the lower section). Should look nice with a wash. Next step will be a thin coat of future, then decals, the seal those in with a thin coat of future, then oil wash, future, then matt. Then assemble. Hopefully everything should still move! Quote Link to comment Share on other sites More sharing options...
misterryno Posted December 2, 2007 Share Posted December 2, 2007 winterdyne, I just got done reading this whole topic and first off I extend my welcomes to you friend. Secondly I must say you are doing a fantastic job on this piece. Quote Link to comment Share on other sites More sharing options...
winterdyne Posted December 2, 2007 Author Share Posted December 2, 2007 Thanks! I do have a question though, for anyone who's done this before: You know those little semi-circles in the screw-caps etc (don't know what you'd actually call them)? Should I paint those in prior to wash or just let the wash darken them? Quote Link to comment Share on other sites More sharing options...
nightmareB4macross Posted December 2, 2007 Share Posted December 2, 2007 Thanks! I do have a question though, for anyone who's done this before: You know those little semi-circles in the screw-caps etc (don't know what you'd actually call them)? Should I paint those in prior to wash or just let the wash darken them? Paint the verniers (in their respective places) then wash them. If you paint then then try to reinsert them you run a good chance of chipping paint in the process. Great job. Quote Link to comment Share on other sites More sharing options...
winterdyne Posted December 2, 2007 Author Share Posted December 2, 2007 Thanks. Next time I get a chance to do some painting I'll do them. Quote Link to comment Share on other sites More sharing options...
PetarB Posted December 2, 2007 Share Posted December 2, 2007 As for putting 'too many coats on' . . . As long as you use an airbrush, and thin your paint down, you will be surprised at what you can get away with! Looking forwards to seeing more progress! Quote Link to comment Share on other sites More sharing options...
MechTech Posted December 2, 2007 Share Posted December 2, 2007 Back at it again. So far so good! - MT Quote Link to comment Share on other sites More sharing options...
warpaint22 Posted December 2, 2007 Share Posted December 2, 2007 First things first WELCOME to MW. Very nice work, your figures look great and I look forward to seeing this project all finished. Really awesome work. Quote Link to comment Share on other sites More sharing options...
promethuem5 Posted December 3, 2007 Share Posted December 3, 2007 Lookin good WD... Quote Link to comment Share on other sites More sharing options...
winterdyne Posted December 7, 2007 Author Share Posted December 7, 2007 (edited) ARGGGGHHHHH! I snapped the hinge on the canopy! Guess I sprayed the future a little thick in there and it's overstressed the part. Anyhow, I ripped it off, repaired it, filed down the recess for the hinge and it's now floppier than well, I leave it to your imagination. Looks alright closed though, and can always be tightened by wrapping tape around it. EDIT: Nope, just snapped it again. Still looks ok closed, but I'm going to need to epoxy a new hinge onto it. Grr. TOP TIP: If you're customising a 1/48 and are going to work the cockpit / canopy you really should remove the canopy before priming. It's held on by the part on the top/rear of the nose/cockpit assembly, which is glued in and held by a couple of pegs. The best way of removing it seems to be a big, flat nosed pair of pliers and just to wobble it off (snapping the pegs). It doesn't come of that easily. I didn't remove the canopy during painting and now wish I'd had the cojones to snap off that restraining piece and remove the canopy safely. Would have saved headaches in the long run. The cap piece could then have been lightly tacked back in place for preshading along with everything else then snapped off before reassembly. I'm basically now in the position where I can use the canopy I have (already decaled) for now but would like to replace it with a fresh one (and redecal that when I do my next valk - yes, the addiction has set in!). So, what I need to know is how the hell do I order (indeed CAN I order) a replacement part from Yamato? I neither read nor speak japanese, nor do I personally know anyone that does. That said, as you may have gathered I've now futured the whole plane and am busily applying Devin's excellent transfers. He's not kidding when he says they work well with MicroSol / MicroSet. Very nice transfer sheets, if you're planning on customising a valk I'd say they're essential, although they could do with some spares - especially the tiny 'no step' markings which I managed to destroy a few of. Mind you I haven't applied a transfer for a good few years before this project. :-) I'll try to get some pics up over the weekend. Edited December 7, 2007 by winterdyne Quote Link to comment Share on other sites More sharing options...
Fly4victory Posted December 7, 2007 Share Posted December 7, 2007 I have bought parts from HLJ.com and received replacements from Yamato USA. The parts from Yamato USA were for the Garland... do not know if they will be able to get Macross parts. Some people part out Valks in the for sale section here and on Ebay. I recommend writing HLJ and Yamato USA. Excellent work! The results look well worth the effort. Quote Link to comment Share on other sites More sharing options...
winterdyne Posted December 9, 2007 Author Share Posted December 9, 2007 Ok, I've finished the transfers. I'm probably going to buy a spare set when I do the next valk so I can redo a replacement canopy. I need to apply a seal of future over these ASAP. Will probably do this as soon as soon as the paint on the micro missile pods is dry. From above: A good shot of the preshading. From front/right: Yup, looks like a custom valk now. Canopy closeup: Devin's transfers ROCK... Gunpod closeup: ... as does vallejo bronze / tamiya gunmetal for contrast. Left wing closeup: I ruined quite a few 'no-step' markers. It may have been an idea to practice with the setting solutions. :-) But where would the fun be in that? Tailplane closeup: I'll have to repeat this shot once the panel linings done. Left leg closeup: The UN in UN SPACY is a little shaky. I've tried to tidy it up with a scalpel, but I think I may need to try and blend in some white (over the future, into the preshade) to neaten it some more. Perhaps the oil wash will even things out? Then again, this valk will eventually be GBP'd at least some of the time. Comments, opinions, critique welcome (begged for in fact) as this is my first ever (!) airbrushed aircraft as well as custom valk. I'm thoroughly enjoying it tho, and can't wait to do another. I'm also planning on lighting the GBP legs for a laugh. Quote Link to comment Share on other sites More sharing options...
promethuem5 Posted December 9, 2007 Share Posted December 9, 2007 I actually tarted up the canopy on my Cannon Fodder just the same way... your paint-work looks stunning as usual tho. Quote Link to comment Share on other sites More sharing options...
nightmareB4macross Posted December 10, 2007 Share Posted December 10, 2007 Wow, great job on the paint. It's funny, maybe it wasn't you who mucked up the "NO STEP" markings, but one of your little illiterate support crewman. Keep us posted to the sweet and inevitable end. Quote Link to comment Share on other sites More sharing options...
winterdyne Posted December 10, 2007 Author Share Posted December 10, 2007 Wow, great job on the paint. It's funny, maybe it wasn't you who mucked up the "NO STEP" markings, but one of your little illiterate support crewman. Keep us posted to the sweet and inevitable end. Thanks! I've been meaning to ask you about getting some recast parts - especially a couple of heatshields as I've recarved mine and am not sure I like it. If I can get 'em in resin they'll be easier to carve grooves into. I'm also thinking of sculpting a standing Hikaru holding his helmet or set of pilot parts, which would be nice to get cast up, either in metal or resin. Just had a nice mail back from HLJ, they can help with getting spares. Woot! For the next project, I'm thinking of a VF-1D - is anyone still making the custom kit for this? Quote Link to comment Share on other sites More sharing options...
winterdyne Posted December 17, 2007 Author Share Posted December 17, 2007 Hey all. I think I'm around 90% done on the weathering / panel lining now. A few lines need to be finished with thicker paint or scribed to finish (the front of the wing lights for example) and the canopy needs cleaning as the wet future got dusty. Grr. Oh well, some windowlene'll sort that right out. Everything else seems to be going pretty well. Pics: The whole bird: Left leg: Right leg: Chestplate (airbrake closed): Airbrake detail: This will get drybrushed up a bit to lighten it after the matt coat. Head 3/4 view: The head's actually got a very slight brown tinge to it (as does most of the valk) from the wash. Doesn't seem to show up well in photos. Head facing: Quite pleased with this. Need to darken the lining by the red stripe. Gunpod: This has come out pretty well. No idea if the workings of a gun are supposed to be a bronze/brass. Looks pretty though. Gunpod tip: This was also highlighted in bronze/brass to give a burnt metal effect. A heavy black wash brings out the detail and blends it in. That's all for now. I want to get finished for christmas... Quote Link to comment Share on other sites More sharing options...
winterdyne Posted December 21, 2007 Author Share Posted December 21, 2007 (edited) Ok, the valkyrie is done. Still have to flat coat the under-wing weapons and think about sealing the wash on the gunpod, intake covers etc. Not sure if I want to use a flat or gloss coat. I posted a completed thread here for the valkyrie. I'm repeating some information here and adding extra steps I did as I remember them. This thread is more the how-to sort of thing I think. Time taken: Approximately 20-30 evenings from starting disassembly to photo shoot. Equipent Used: Wet & dry paper - 320, 600 and 1200 grit. Badger single action, internal mix airbrush. A big ass compressor. X-acto knife, assorted screwdrivers, files, pokey things, tweezers, pliers etc. Size 00, 0, 1 sable brushes. Micro Sol, Micro Set. Transfers by Devin / Anasazi. Paints used: Citadel Skull White and Chaos Black 'smelly primers'. Tamiya acrylics: A big bottle of thinner, Sky Grey, Nato Black, Flat White, Flat Red, Flat Base, Gun Metal. Vallejo acrylics: Flat Red, Flat Yellow, Flat Blue, Light Grey, Gloss Varnish, Matt Varnish, Natural Steel, Bronze, Old Gold. Citadel acrylics: Chaos Black, Skull White, Scorched Brown, Catachan Green, Blood Red, 'Some prussian blue looking stuff without a label'. Oils: Low odour thinners, Raw Umber, Ivory Black. Future floor polish (SC Johnson Klear in the UK). Windowlene. Steps: First was disassembly. I basically stripped the whole thing down and set all the working pieces (ratchets, springs, foot mountings) aside. Those weren't to be painted. Clear parts that came out easily were removed. This was basically just the landing gear door lights. I SHOULD HAVE REMOVED THE CANOPY, even if damage to the cockpit resulted. That could have easily enough been repaired - certainly more so than the canopy. - All clear parts (wing lights, shoulder lights, head lens, gunpod lens, canopy) were masked with tamiya 18mm tape. Bloody good stuff. Next step was a lot of sanding and filling in the toymakers stamps on the wings. That was done with milliput extra fine white. I removed the original paint by sanding. Mr Muscle oven cleaner would have been easier, and resulted in less time spent cleaning particles out of panel lines. The heatshield line was scribed and then filed to on the lower section to create a lip. Don't think that's cannon but it helped with the wash and doesn't look too unsightly. Reassemble sub-assemblies for painting - forward fuselage, nose, upper legs, lower legs, backpack. It's a better idea to assemble parts like the lower legs prior to sanding - you'll get a better fit than I did. Again, if I'd chemically stripped the paint this is what I'd have done. Next was priming. White pieces with a white primer, dark with black. The canopy (still being on the cockpit was primed white - if removed it would have been black (which would have saved headaches). I tried a vallejo primer but it was rubbish, so resorted to the citadel primers. I use an old laundry drying rack and paperclips bent to hooks for holding and hanging to dry. Next was preshading. Tamiya sky grey along all panel lines (tight spray) and into recesses (wider softer spray). Left to dry. Dark pieces sprayed with tamiya gun metal excluding those on white pieces (upper thighs). Now basecoating - VERY thin tamiya flat white in broad spray over the whole model, and tighter spray to the middle of panels. Many many coats. Left to dry. Post shading on feet and gun with tamiya nato black. Erm, might have been flat black. Anyway, darker than the metal. Sharp line on front of foot masked to give defined edge. Now stripes - Masked with tamiya tape and paper for shielding. Nato black and flat red. Allow one set to dry before starting next. Remember to make circular masks for where the kites go or the stripe's visible through the transfer. Now details and pre-wash weathering. Gun and feet insides and ends drybrushed with bronze / old gold. Head guns painted black, drybrushed gun metal, bronze/old gold rings. Gunmetal sections on upper legs masked and airbrushed. Canopy rim painted nato black. Highlighted with a little white in the black. Stripes and so on are touched up by hand with THIN tamiya acrylic. You can't paint with this stuff from the pot - you absolutely must use a clean palette and thinner. And expect to do a few coats. Dont be tempted to pick out the black areas where the circles go if you're using Devin's transfers - they're quite transparent and you'll end up having to paint over them. Any remaining masking removed. Gloss coat - Straight Future / Klear. Couple of fairly heavy coats. Allow to dry AWAY FROM DUST. Important step to be clean in. Transfers - Devin's fine product. Micro Set to place, fix with Micro Sol. Cut as close to printing as possible, especially on kites and UN SPACY's. Gloss coat - Straight Future / Klear. One coat, nice and heavy. Allow to dry AWAY FROM DUST. Important step to be clean in. Oil washes - Mix of Ivory Black / Raw Umber - more umber on lighter areas, pure black on metal areas. Blended into recesses, pooled in panel lines. Flat coat - 'Flat future' - a mix of 7:3 Future/Klear to Tamiya Flat Base. Dead flat and pretty hard. Slice decals on joins. This applies to the kites on the forward fuselage, and the inset circles on the arms and back of the legs. If you don't slice the decal it may tear when you crack apart your sub-assemblies. Reassemble. Carefully. Hands were painted right before the photo shoot. Skull white primer, vallejo light grey wash (all over), highlight up with Citadel Skull white acrylic. Finger 'pads' - I think of them as force-feedback sensors - painted with Vallejo flat blue. Fine Citadel chaos black lines painted around those, and black also used to pick out knuckles and other 'working' parts, which were then picked out with a mix of vallejo natural steel and chaos black. Edited December 23, 2007 by winterdyne Quote Link to comment Share on other sites More sharing options...
winterdyne Posted December 31, 2007 Author Share Posted December 31, 2007 (edited) Ok, moving on to the GBP. I'm planning a green (Nichimo style) colour scheme, and I'm going to be lighting the legs. First step has been to strip the armour down and clean it up with warm soapy water. The lenses in the legs have been removed and the silver paint removed from the back. These will be futured, then silvered on the back with as reflective a stuff as I can find - suggestions for the chromiest paint are apprectiated! I'll drill out the armour behind the lenses' 'bulbs' and mount a super bright LED behind each, with leads trailing up to the knees (where I'll mount the batteries and dip switches behind the kneecaps). Should look good. Edited December 31, 2007 by winterdyne Quote Link to comment Share on other sites More sharing options...
Recommended Posts
Join the conversation
You can post now and register later. If you have an account, sign in now to post with your account.