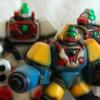
promethuem5 Posted August 19, 2004 Share Posted August 19, 2004 Hi all, I have never displayed anything on this site before, but I have been using Macross kits for other things, and I finally painted up a couple of them in the Macross schemes. the first one is a Super Brown VF-1A in 1/200 scale. It is moderately posable, with swivels and neck, sholders,a nd hips. I did it with a drybrush and ink scheme. I jeweled the cockpit green. The second piece is Hikaru's VF-1J in the GBP armor, in 1/200 scale. I did this one also with an inking and drybrushing scheme, and it looks pretty beat up. The cockpit on the one os also jeweled green. I BSed the markings on both due to a lack of proper reference materials, so bear with them. Quote Link to comment Share on other sites More sharing options...
tetsujin Posted August 19, 2004 Share Posted August 19, 2004 (edited) It's a good effort, but you've got seam lines all over the place and your paint work is kind of sloppy-looking, particularly the armored battroid. I'm not sure if that's intentional - but you should work on developing a basic, clean paintjob before you try to make things look weathered. I like the color work on the fast packs, however. Edited August 19, 2004 by tetsujin Quote Link to comment Share on other sites More sharing options...
007-vf1 Posted August 20, 2004 Share Posted August 20, 2004 Everybody's a critic... Quote Link to comment Share on other sites More sharing options...
neptunesurvey Posted August 20, 2004 Share Posted August 20, 2004 Of course. Quote Link to comment Share on other sites More sharing options...
Checkmate Posted August 20, 2004 Share Posted August 20, 2004 I don't like it. could be imporved. Quote Link to comment Share on other sites More sharing options...
tetsujin Posted August 20, 2004 Share Posted August 20, 2004 Everybody's a critic... Hey, if you post model photos on a model forum, people will post their honest reactions. I mean, what am I supposed to say? The seam lines are there, plain as day... the white paint didn't seal out the injection color, so it's patchy and uneven, he's got a nicely photographed close-up of the VF-1J's head and its white patches on the green visor... Face it, the models have problems. Maybe, though, he'll learn something while he's here and his next one will be better. Quote Link to comment Share on other sites More sharing options...
jardann Posted August 20, 2004 Share Posted August 20, 2004 First and foremost, we all need to remember that we build models for fun. If you are having fun by building kits and if you enjoy the end results then the model is great. I think some constructive criticism is in order here. We aren't all as good as master Cheng. I've built some of those models in the past. They are very hard to work with and not of the best quality. The parts line up so poorly, that you would need to spend hours sanding the seams. I think you have a good start on the Super-1A, aside from the seams. The colors are accurate, and you have given a nice shading/weathering effort. The armored battloid seems dirty/dusty(dirt really shows up in pictures) and could use a more subtle weathering technique. Sometimes less is more. I would suggest that you try some of the 1/100 Arii models. They are relatively cheap and easy to find and at that size, they are much easier to work with. The fighters are pretty accurate, gerwalk and battloid, not so much, but they will provide good experience. Then try a hasegawa! Starting with a superior kit will put you much farther on your way to superior results Please keep posting, there are many members of this forum that share great techniques, and I like to see as many examples from as many different modelers as possible. Thanks for sharing! Quote Link to comment Share on other sites More sharing options...
promethuem5 Posted August 20, 2004 Author Share Posted August 20, 2004 (edited) {Edited for being a dumbass} Thanks all for looking. sorry I didnt properly explain what was intended in the finishes of these figs. Yes, I have a 1/100 from Arii, and no, I dont have much exp. in larger figs. most of the stuff I do is about 2 or 3 inches tall at most. see here for some examples: http://www.lordsofthebattlefield.com/galle...s.php?album=151 Edited August 23, 2004 by promethuem5 Quote Link to comment Share on other sites More sharing options...
tetsujin Posted August 20, 2004 Share Posted August 20, 2004 dude, tetsjun, you obviously know little to knothing about painting miniatures and models. ... As for the 'white color of the plastic showing thru', I would just like to add that neither one of these kits was white, the GBP was I think green,a dn the VF 1A was like dark gray IIRC. Whether I know anything about painting models, you can judge for yourself. I'm no WM Cheng either, but I'd say I know a thing or two: http://cybermodelcomp.com/apr04.asp?pic=tetsujin1 http://1-4-4.home.comcast.net/models/Works.../regult_01.jpeg http://1-4-4.home.comcast.net/models/Works...nnon_close.jpeg http://1-4-4.home.comcast.net/models/Proje...id/action2.jpeg As for miniatures, I know very little. I haven't done any minis or figures (unless you count Nichimo Macross kits as minis), but I've learned just a little bit about how it's done. As for the "white color of the plastic showing through"... read it again. That's not what I said. I said, "The white paint didn't seal out the injection color, so it's patchy and uneven". Yes, even if I didn't have that particular kit, I would know it's molded in green. That's exactly the problem. You need more layers of white. If you want to pass this as an intentional effect, I'd say it's a poor effect. It doesn't look like a weathered robot, it looks like a patchily-painted model kit. Weathering needs to be done in-scale. I saw the dust, too, but I wasn't critiquing the dust, just the model it's on. I hope you'll continue to build models and continue to improve your work, as we all must do. You should start with seam work: it can be difficult, but if you can improve your seam work your models will look a lot better. Then work on making a smooth, uniform paintjob. Then that can be the base for weathering. A little bit of drybrushing and well-placed discolorations can make a simple paintjob look killer. Quote Link to comment Share on other sites More sharing options...
neptunesurvey Posted August 20, 2004 Share Posted August 20, 2004 Play nice. No one likes to have something they did critized. Its true that the seams do have a negative affect on model kits. I could show you a few of my first ones, man do they look horrible, but practice makes perfect. The question you need to ask yourself when finishing a kit is if you are happy with it. Quote Link to comment Share on other sites More sharing options...
tetsujin Posted August 21, 2004 Share Posted August 21, 2004 No one likes to have something they did critized. Well, yeah, but that's life... I'm not being mean here, I'm just pointing out that these are areas that need improvement. There's really no nice way to deliver an unpleasant message - but it needed to be said. It's fine to be happy with one's own work: but once you share that work, it'll be judged by the standards for the community. If that's not something an artist is prepared to accept, they might be better off not sharing their work. There is a wealth of knowledge here and in other places online among the more experienced modelers. I didn't have that when I started out, and I wish I had. It could have saved me a lot of trouble. I've since learned a lot from other modelers - often as not, because they brought up valid criticisms of my work that I may not have recognized on my own. Quote Link to comment Share on other sites More sharing options...
promethuem5 Posted August 21, 2004 Author Share Posted August 21, 2004 fair enough, I stand corrected. looks like reading the whole post thouroughly does help, lol. That first gunam and the regult and the valk look great. True tho, that is a whole diff style we're talking about... clean and even. Id just thought I would throw in somehting I reemberd, looking over the Armored valk fig again....the unevenness of the white isnt in fact from the base being uneven, its because I botched up the ink job and quick still semi wet slopped some more white onto it. I had forgotten about that. Also, on your 'Guncannon" Gundam thingy (sorry, nto xactly sure what it is), you could definetaly use the jeweling techniqu on the cockpit. It looks kinda bland the way it is...at least some dark green ink to darken the border, adn then some gloss maybe... Is that regult the Nichimo kit as well? Ive got two of those in box waiting to be done, along with about 15 other boxes of the Nichimo kits. How exactly did you get the seems to be gone like that? The reason I have had so much trouble with mine is the fast that the seems are all AWEFUL on these kits. One last thing, what did you panel line that valk with? Ive tried pencil, marker,a nd paint and not gotten a good finish Quote Link to comment Share on other sites More sharing options...
promethuem5 Posted August 21, 2004 Author Share Posted August 21, 2004 (edited) while I was at it, I just thought I'd throw up these two 1/200 pics to at least show that I do know what I'M talking about, and that I can in fact do better, lol..... These are in paint schemes from Battletech, where most of the Macross designs used to be used until the HG suit enjoy: Edited August 21, 2004 by promethuem5 Quote Link to comment Share on other sites More sharing options...
Grayson72 Posted August 21, 2004 Share Posted August 21, 2004 Ok gotta jump in here: First, applause to promethuem5 for putting himself out there, sharing and openning himself up to criticizm in the first place. Applause to Tesujin for being as honest as possible. A few things to remember: If you can't say anything nice don't say anything at all. And yes there is a good way to deliver an unpleasant message. Observe "Hey promethuem5 thanks for sharing those pics, they look to be painted in the classic style of gaming miniatures. Will you be trying some larger scale kits in the future? There's a lot of great modellers on this site that post all sorts of helpful tips and tricks for larger scale models. Not sure how exerienced you are with models but there's some great products out there to help you improve the overall look of your models even further. Tamiya putty can really help out with filling and smoothing seamlines. Hiding the seems where the parts go together can really enhance the look of the model" Like Neptune survey said, play nice. Grayson72 Quote Link to comment Share on other sites More sharing options...
promethuem5 Posted August 21, 2004 Author Share Posted August 21, 2004 I think I have heard of Tamiya putty before, in use on other models. When I do try and fill seems, I usually Spackle or, of all things, woood glue . I have found that wood glue is truly amazing stuff. I have done alot with wood glue, from decently filling seems and gaps, to casting bases and minor parts in uncooked sculpey molds (its true!! I'm making alot of my mini bases out of it now on smaller figs, instead of balsa ) I apologize if my first reswponse came off too harsh... I guess it just came out wrong Ben Quote Link to comment Share on other sites More sharing options...
HWR MKII Posted August 21, 2004 Share Posted August 21, 2004 (edited) hello promethium and welcome. ive noticed your drybrushing technique. it looks good and conveys the extremely beat up look that you are wanting. i personally build tank models mostly so i do alot of drybrushing myself. what kind of brush do you use for your technique and how wet is the paint when you do it. i have found that you can get a really crisp edge highlight and more subtle effects by using a wider flatter brush with the paint being almost completely dry on the bristles. i use mainly PollyS or testors arcyl for my drybrushing. heres the kind of results i have gotten on my tamiya 1/16 scale tiger 1 Edited August 21, 2004 by HWR MKII Quote Link to comment Share on other sites More sharing options...
promethuem5 Posted August 21, 2004 Author Share Posted August 21, 2004 Yeah dude, I do the exact same thing, having learned it from the exact same source, lol. I originally started painting models, but moved into minis pretty quickly. I still keep in mind alot of model stuff, and since the Battlemechs i paint are just like tanks, a modified tank painting technique scaled down can work wonders. If you are looking, pick up Greenburg's Guide to painting WWII German Armor. Sweet book with sweet photos...love it to death. I Sometimes use a crappy normal small paintbrush to dyrbrush small stuff, but I have a great flat brush from Games Workshop that works wonders. As for the paint, I get a blob on the brush, then wipe the brush off on a rag until it stops leaving streaks going in a sweeping motion, then drybrush. I do have one little tank model that I went full out weathering on...I could get you pics if you want. Ben Quote Link to comment Share on other sites More sharing options...
HWR MKII Posted August 22, 2004 Share Posted August 22, 2004 i have been building models since i was 5 and german armor since i was 12 so i am well versed in the custom of painting and detailing german armor as the above pic shows i hope. i was juts going to suggest trying to highlight the edges of the model more than the flat panels of it. if you do that it could help hide the seams until you develop a technique of your own. the way your drybrushing is now it highlights the seam but if you draw the eye from it the seam wouldnt be as obvious. you do good work and im not slamming you just offering some advice you could find useful. happy modelling Quote Link to comment Share on other sites More sharing options...
tetsujin Posted August 23, 2004 Share Posted August 23, 2004 fair enough, I stand corrected. looks like reading the whole post thouroughly does help, lol. That first gunam and the regult and the valk look great. True tho, that is a whole diff style we're talking about... clean and even.Is that regult the Nichimo kit as well? Ive got two of those in box waiting to be done, along with about 15 other boxes of the Nichimo kits. How exactly did you get the seems to be gone like that? The reason I have had so much trouble with mine is the fast that the seems are all AWEFUL on these kits. One last thing, what did you panel line that valk with? Ive tried pencil, marker,a nd paint and not gotten a good finish True, most of my paintjobs are pretty simple. The Strike Gundam, in particular, I was a bit lazy. I'd planned to do drybrushing on it but I was going for a contest deadline, and I ran out of time. That project was mostly about the rejointed arms, anyway. The Battroid has more weathering on it, but I tried to do it in scale so it doesn't really jump out at you from a low-res photo. I want to start being a little more ambitious in my future projects: but I try not to go overboard. I think it's very important to keep weathering effects in the proper scale. The Guncannon does have shading, I think it's a nice subtle effect. I do think the visor might have been better if I'd left it gloss-coated. One of these days I may re-gloss it... but right now I'm more interested in the next big project. My Regult is, as you guessed, the Nichimo Regult. It's a pretty sweet little kit. I didn't think the seams were too bad, the main problem was that the panel lines (such as they are) didn't always line up. A lot of that I just left alone, because I didn't want to spend a lot of time on the Nichimos or use any advanced tools or techniques. (I was building them as demonstration pieces for the Mecha Modeling Workshop I organized for Anime Boston, so I didn't want to use any techniques that people would be unable to use in the workshop. I cheated just a little here and there - like using SGT to fill the screw holes (since you're familiar with the kit I'm sure you've noticed that the screw holes are conspicuously missing), and custom-printed water-slide decals on both kits. But most of the work was kept quite basic.) As for the seams themselves - after the parts were glued together with solvent glue it was just a matter of puttying and sanding. If the seam is recessed, fill it with putty. If it's raised, sand it down. If you're not sure if you're finished with the seam, wipe it clean and mark it with a Sharpie. If you can see the line, you have more work to do. It's also important to line up the parts as well as you possibly can before gluing them, even if you have to cut off the alignment pegs to do it. I spent a total of about 20 hours on the Regult - I was trying to work fast because I wanted to see if it would be feasible for people to finish their models in the time available in the class. (Clearly not!) But I used Tamiya putty - it's great stuff, check it out. As for the panel lines: I gave the model a gloss finish, then filled the lines with an acrylic wash (about 10 parts water, 1 part paint, something like that. And a tiny bit of dishsoap.) With the gloss finish, the wash can flow into the panel lines, and wipe cleanly off the surfaces where I don't want it. Gloss is important - if the model has a flat finish, the wash will get stuck wherever you put it. Then once the wash was done I re-dullcoated the model again. Even if you're going for a dirty look, the work should be precise. De-emphasize the things that indicate the object's true nature. (Seams, mainly) Get some Tamiya Putty, that stuff is excellent. Anyway, I look forward to seeing your future work. I really think that if you took care of those seams and refined the paint work a bit, there would be a significant improvement in your work. HWR's got good advice, too - if you don't get the seams perfect, at least keep the drybrushing and washes from getting in them. I believe he knows his stuff, too. Also, the wood glue casting sounds interesting... I may have to try that sometime. Another thing you may want to try for that sort of thing is Bondo polyester putty. It's pretty noxious stuff, but you can use it to make simple casts and molds (you can prevent the casting from bonding to the mold by using a layer of petroleum jelly) and it's very cheap - $10 for a big gallon can. I love those little Nichimo kits. They're so much fun. Check this thread out: http://www.macrossworld.com/mwf/index.php?showtopic=8583 It's mostly "clean-looking" models, so not necessarily where you would want to look for your styling cues, since you favor the weathered look, but there's some nice work with the little kits in that thread. Add some drybrushing for faded edges to some of those and I think it'd make for a pretty sweet weathered look. Check out Mervin's full-open Armored batt. I love that thing. Grayson: this isn't about gaminig mini style vs. model style, it's about precision and refinement in model work. There really is no way to ensure my critiques will be nice to hear without compromising their honesty. It's not as though I get off on cutting people down. And I certainly don't agree with "If you don't have something nice to say..." - at least not on a technical (as opposed to personal) level. If I don't say that I think sloppy work is sloppy to spare someone's feelings, the message doesn't get across. If people whose opinions I trusted hadn't told me my work was sloppy, I would have continued thinking it was very well done, and I wouldn't have improved to the extent I did. (Yes, my model work used to be worse than it is now. ) I will say this, though: I think I did sell his work short on the first pass. I'm still not liking the armored batt too much, but in addition to the fast packs I'm finding I like the browns on that super batt, too. Quote Link to comment Share on other sites More sharing options...
promethuem5 Posted August 23, 2004 Author Share Posted August 23, 2004 Holy crap!!! I want SDF-1 1/200s!!! Thoise Destroids look great too...something to try and mimic on some of the dozen more ive got (and that's just the Destroids ).....the best news is that Ive got SO MANY of these things left, that I should get enough proctice to really get them right by the end.... That Strike Gundam is still awesome..... cant get over it. love the kanji on the waist cowl especially, and all the joint mods. As for inking on a gloss surface, I have intended to do it on a couple diff things, and always forgotten to....however, I think ive got the perfect thing to finally try it on... Quote Link to comment Share on other sites More sharing options...
tetsujin Posted August 24, 2004 Share Posted August 24, 2004 Holy crap!!! I want SDF-1 1/200s!!! Thoise Destroids look great too...something to try and mimic on some of the dozen more ive got (and that's just the Destroids ).....the best news is that Ive got SO MANY of these things left, that I should get enough proctice to really get them right by the end....That Strike Gundam is still awesome..... cant get over it. love the kanji on the waist cowl especially, and all the joint mods. As for inking on a gloss surface, I have intended to do it on a couple diff things, and always forgotten to....however, I think ive got the perfect thing to finally try it on... Well, technically it's 1:15000. A 1:200 SDF-1 would be like 20 feet tall. The Nichimo Macross is a pretty decent little kit, though. Actually I'm just nuts about the whole Nichimo line. I initially picked them up to go with my 1:200 scale Destroid Monster, but they're great little kits. Thanks for the kind words about the Strike. A lot of work went into it. Also, about gloss: you may already know this, but a great source of clear acrylic is a product called "Future" (in the US) or "Kleer" (in Europe) - it's a floor polish, but it makes a great gloss-coat for models. Quote Link to comment Share on other sites More sharing options...
promethuem5 Posted August 24, 2004 Author Share Posted August 24, 2004 Yeah. I use Future for the washes themselves in place of dishsoap. works like a charm. I know that you can use it for gloss coats too, but I havent tried that out yet. I was gonna go over the mini with Krylon Gloss coat, then future-ink wash it. You got a 1/200 Monster....I HATE you!!!! Was it a sealed in box, or loose? I have seen them go for like a hundred bucks or more on ebay. I had a hard enough time getting a 1/200 Glaug Officer pod...had to get one loose. Well, I have chosen my next piece, a Cannon Fodder VF-1A Battroid and Guardian mode. Im gonna try and all the seam lines right, and get the white to look right. Im not sure on a few things tho. Firstoff, I figured I would build the arms and legs and paint them, but then Im not sure what to do with the body...assebmling it nd painting...How will I deal with the big seam lines on the sides and top if I paintr it unassembled, but then how will I paint it assembled without messing up the white on the shoulders and arms....? Quote Link to comment Share on other sites More sharing options...
tetsujin Posted August 24, 2004 Share Posted August 24, 2004 Yeah. I use Future for the washes themselves in place of dishsoap. works like a charm. I know that you can use it for gloss coats too, but I havent tried that out yet. I was gonna go over the mini with Krylon Gloss coat, then future-ink wash it.You got a 1/200 Monster....I HATE you!!!! Was it a sealed in box, or loose? I have seen them go for like a hundred bucks or more on ebay. I had a hard enough time getting a 1/200 Glaug Officer pod...had to get one loose. Well, I have chosen my next piece, a Cannon Fodder VF-1A Battroid and Guardian mode. Im gonna try and all the seam lines right, and get the white to look right. Im not sure on a few things tho. Firstoff, I figured I would build the arms and legs and paint them, but then Im not sure what to do with the body...assebmling it nd painting...How will I deal with the big seam lines on the sides and top if I paintr it unassembled, but then how will I paint it assembled without messing up the white on the shoulders and arms....? I got my Monsters through Yahoo! Japan. I think I paid about $150 total for both of them (including shipping and proxy bidding fees). One is complete in box, the other had a few parts missing or assembled. If you want to get one, I would recommend checking E-Bay regularly - they do pop up from time to time, and sometimes they don't go for a very high price. The key is to watch for an auction that's not getting a lot of attention. Maybe somebody spelled the item name wrong, or didn't add enough extra searchable keywords to make the item really easy to find. Or maybe they just chose the wrong week to try to sell it. But choose a price (maybe $50), bid on each Monster that comes along, and don't go over your price... some Monsters will slip through your fingers, but eventually you'll snag one. If you want to try Yahoo! Japan - it's a great resource for this sort of thing, but you'll have to proxy-bid through Celga or something (most Japanese sellers won't ship outside of Japan), and you may need to be able to find the item on Yahoo! Japan - so reading kana is helpful. Babelfish may work as well. There's all kinds of model kits on there, chances are there's a Monster listed right now. Future for the washes themselves? Interesting... So does that mean there's a lot of Future in your wash mix, or a little? As for the arms on the Battroid and Gerwalk... it can be tough. On my Nichimos (Super Battroid and Regult) I made most of those parts removable by snipping off some of the plastic from the arm/head/Regult booster, which would otherwise have forced me to go with a sequential build-up like that. So I assembled the arms, assembled the chest, and then plugged the arms into the chest. It still holds a pose just fine, and the arms don't tend to fall out at all. Try to snip off just enough that you're able to plug the arm into the chest. I'll try to get some photos up tonight to show you what I mean. Alternately, the way to go might be something like this: assemble the arm, clean up the seams, then assemble the chest, clean up its seams, and then paint both. It's a little more complicated, because you have to deal with having those parts together when you paint them. You'd need to be more careful when painting, or possibly try masking off the arm parts with tape. I think it's much better, when possible, to modularize the assembly and then deal with the separate parts separately. Quote Link to comment Share on other sites More sharing options...
promethuem5 Posted August 24, 2004 Author Share Posted August 24, 2004 I was thinking about it....and I figure that I can asemble and paint the arm, then assemble the torso, adn paint, but leave a gloss finish on the arm so i can wipe off any paint i get on it. I also had one other thought....polycaps . Ive done it before, and could prolly mod the arms on this one to have poly caps. I did a Super VF-1S to be Jetfire,a dn added a bunch of Gundam parts to super poseable it. Its got neck, waist, ball jointed hips and shoulders, right wrist, and knees. it rocks, but I need to repaint it...that'll be next on my list. As for the washes....i dont measure exactly, but it is usually about ten drops ink, between five and ten drops water, and two or three drops future. It thins out the ink AND acts like the dishsoap would, in helping with adhesion, but it aslo does alot to make it flow into the grooves only. it also smells nice and fruity while is is drying Quote Link to comment Share on other sites More sharing options...
tetsujin Posted August 24, 2004 Share Posted August 24, 2004 Yeah, polycaps are another option, though I find they can be a bit difficult at this scale. I installed 3mm polycaps in the hips of one of my Destroid Tomahawks (unfinished). It was tough, there wasn't much space. You might want to check these out: 2mm rod 3mm rod 2mm polycaps 3mm polycaps 2mm and 3mm polycaps Basic metric drill bit set The matching drill, rod, and polycap sets can make polycap installation a lot easier. Particularly the rods, it saves a lot of time to have rods that are already the exact size for the polycaps. 3mm is one of the most common polycap sizes in Gundam kits. I don't think they use 2mm in Gundams so much, but they can be very handy for smaller work. Most often I anchor the polycaps and rods with either Bondo or SGT. Bondo's a lot faster, but sometimes SGT is stronger. I'm not sure if the gloss finish on the arm will be enough to protect it from the torso paint. I really don't know, though. I guess it depends on the circumstances. If you're going to paint the torso while the painted arm is permanently installed, you may just have to be really careful, or else mask the arm part. You may want to check this place out, too: when I was first collecting my Nichimos, I was able to find some here that I wasn't able to other places. (These days they mostly just have the common stuff, but it might be worth checking out if you want a Regult or something... http://shop.store.yahoo.com/akihabaratoys/nic12scalsna.html Quote Link to comment Share on other sites More sharing options...
promethuem5 Posted August 24, 2004 Author Share Posted August 24, 2004 Well, I just fit all the limbs together and sanded down some parts....and put some filler on all the seams....will sand down when dries. Quote Link to comment Share on other sites More sharing options...
HWR MKII Posted October 15, 2004 Share Posted October 15, 2004 hey promethium you havent posted in a while. i was wondering how your latest work was? Quote Link to comment Share on other sites More sharing options...
promethuem5 Posted October 15, 2004 Author Share Posted October 15, 2004 oh haha....ive gotten so tied up with school and m new Warhammer 40k obsession that they are still on the wooden stalks i mounted the pieces on for spry painting....haven't done anything.... Will try and get them done sometime... Quote Link to comment Share on other sites More sharing options...
Recommended Posts
Join the conversation
You can post now and register later. If you have an account, sign in now to post with your account.