MechTech
-
Posts
4679 -
Joined
-
Last visited
Content Type
Profiles
Forums
Events
Gallery
Everything posted by MechTech
-
Lookin' Good! You might as well go all the way and put a colored lens in with reflective backround like that one guy did a couple of months ago, can't remember the name. Keep it up! You guys seriously got me thinking about gettng a 1/55. Can't beat the classics! - MT
-
I'll never look at a box of sugar smacks at the store again ! - MT
-
I really love the fast pack portion of the 1/170 kits, they're perfect for 1/200, but are stretched on the 1/170 bodies. Hey Bushy, you might want to get some "N" gauge figures to go with your kits. Find a good train shop/hobby store. The ones in the factory sets are actually 1/100 (TOO big). The vehicles are too big, but perfect for 1/100 stuff. - MT
-
Thanks guys. I'm actually waterproofing some potential week spots and finishing a couple of others not finished yet. I'm hoping to at least put it on the water soon! Hooking everything up will be the easy part. Sailing to America, well, let's just say it's not a Coast Guard registered vessel. - MT
-
That is what you call "multi-media" modelling. Tree huggers call it recycling, and I call it an EXCELLENT model and great engineering work of art. The trees didn't die in vain for this project! - MT
-
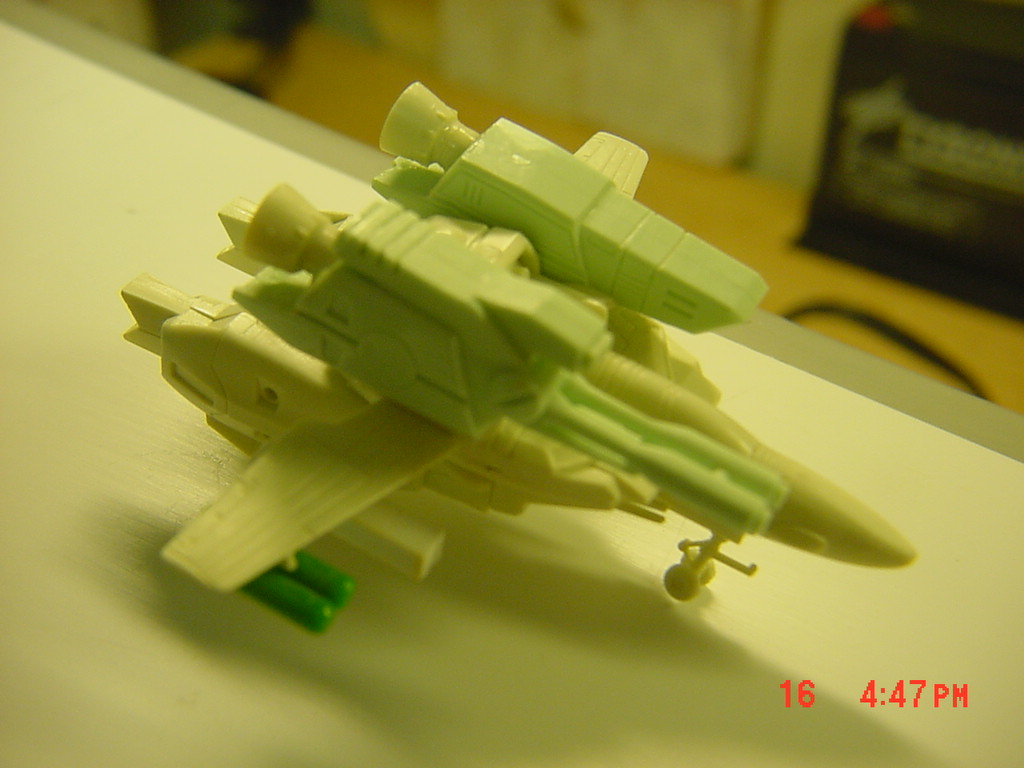
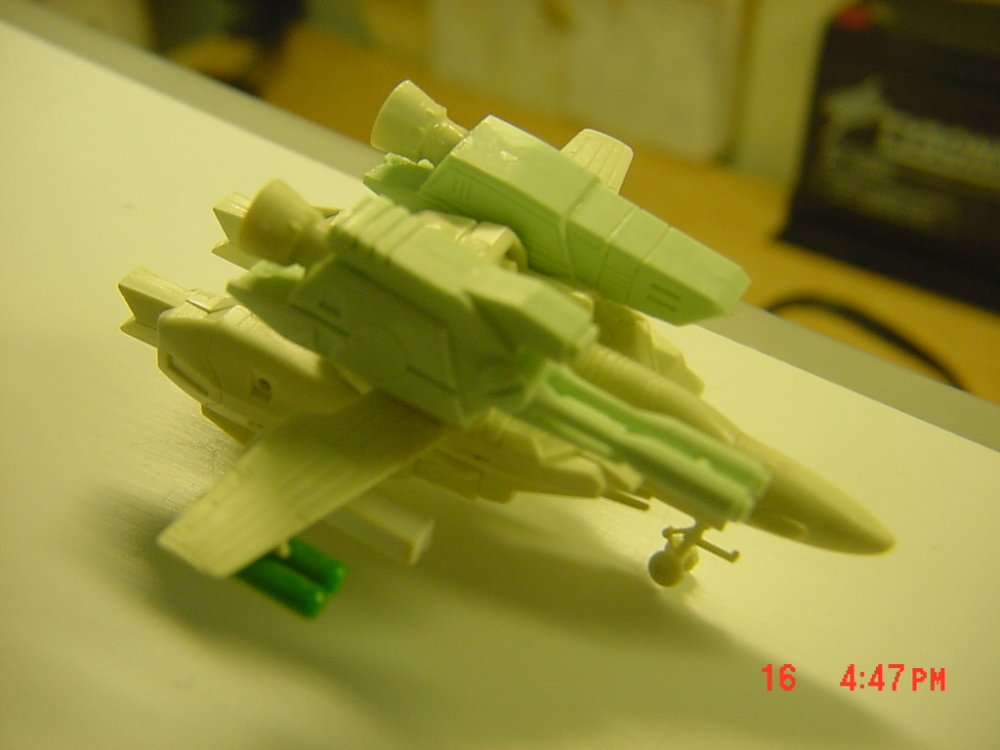
Don't tell Bushy I did this, but... [attachmentid=38218] I combined these parts (HEWAT) 17 years ago or so with the 1/200 basic body!? It was just a TEST, but with new underwing armament, it will rock! The fast pack components (legs not on) are the light green of course. (Ignore the dust). I remembered this years later and bought several from "The Galactic Trade Commision" for more Nichimo upgrades! You can guess on which ship they will be stationed - MT
-
Sounds like some cool 1/144ish scaled valks!? Pictures please! - MT
-
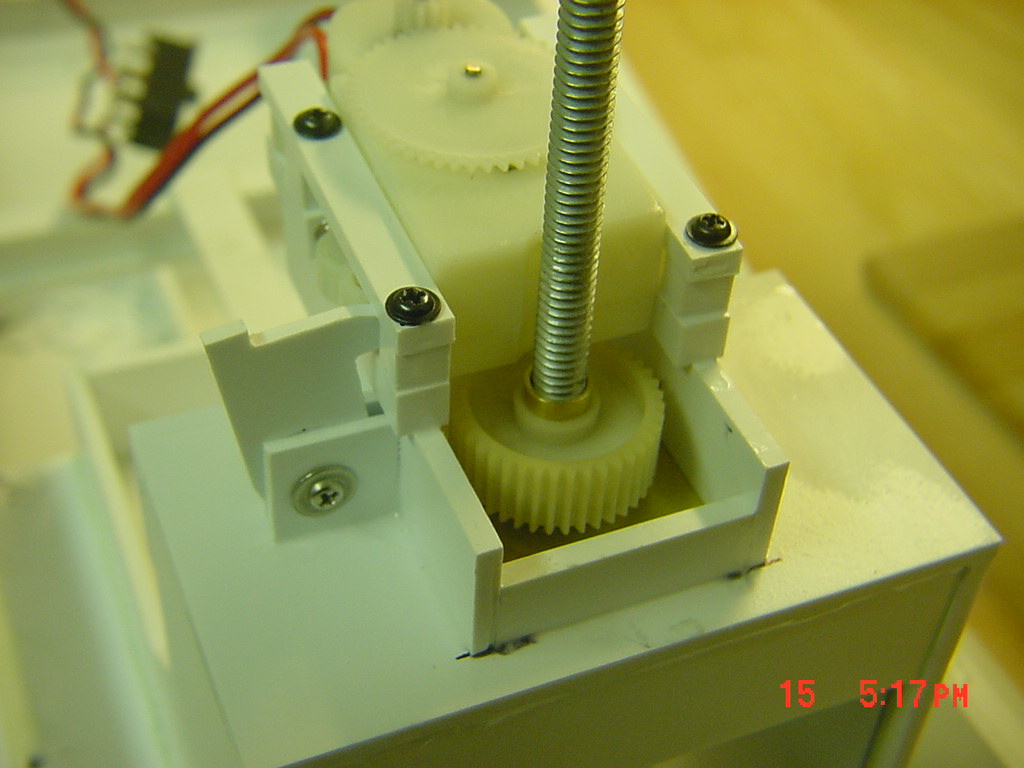
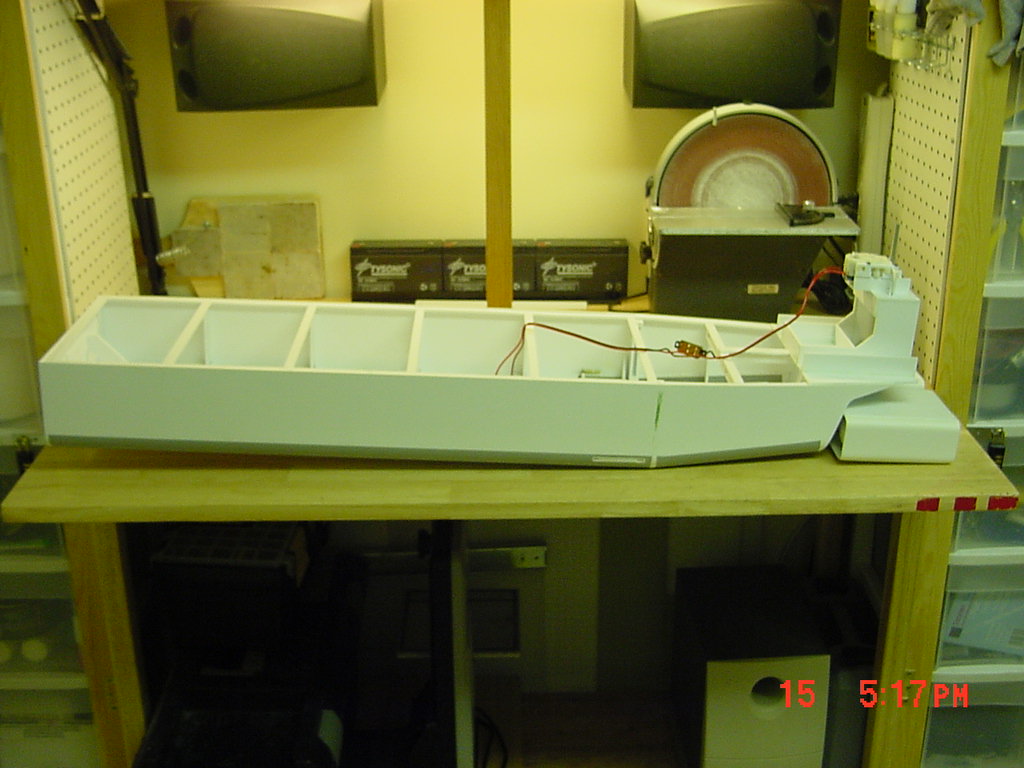
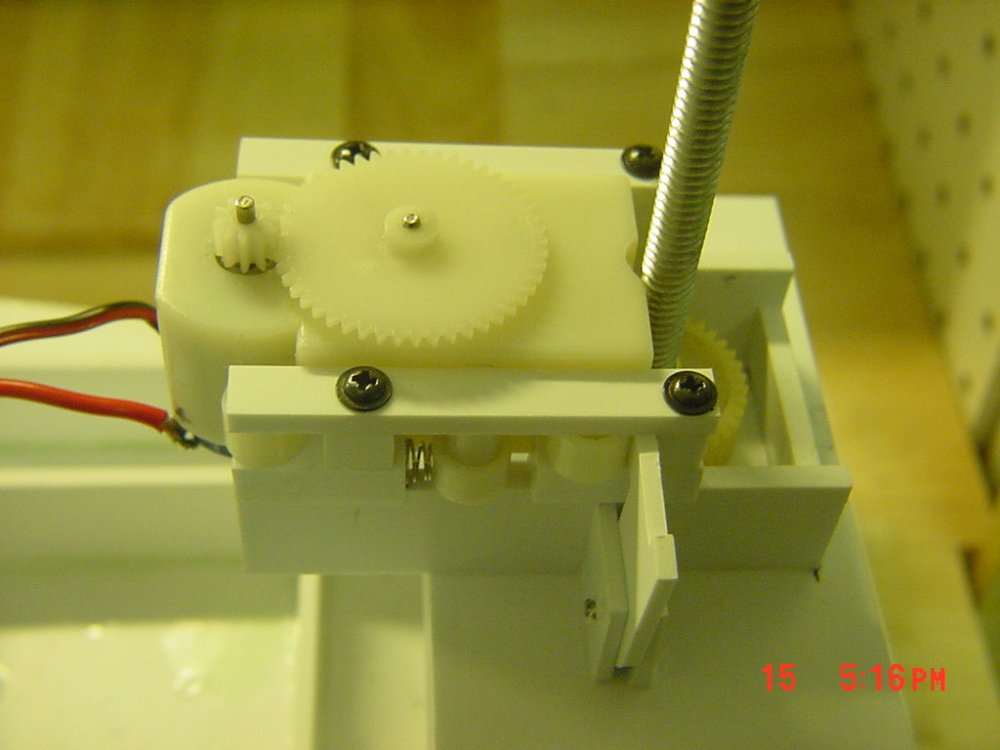
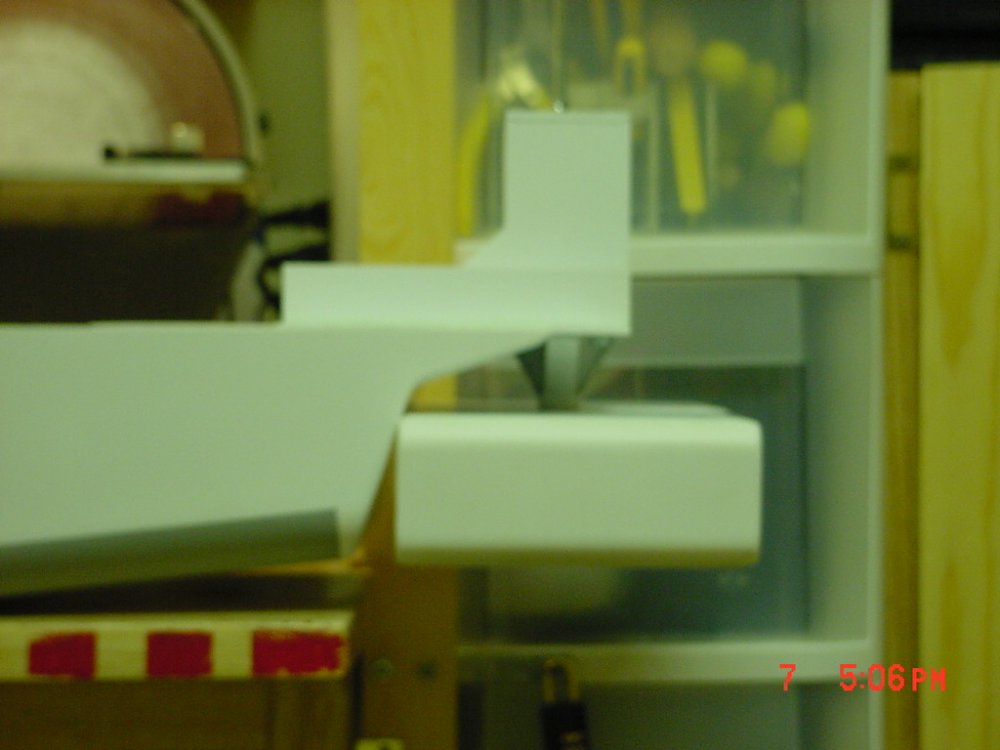
UPDATE 15 NOV 06 Thank you to everyone for your comments. It helps keep me motivated for what is dragging on longer than expected, but worth it! FINALLY finished the gearcase to raise and lower the pod assembly. It takes two minutes and is terribly slow to watch (turn on, go to the bathroom, come back and it's almost done). I used a small gearcase and motor to keep weight down since it sits high and I've gotta keep the center of gravity as low as possible. The video would put you to sleep if I took some . [attachmentid=38183] Here's the gearcase from the side, it came from an old toy tank (don't tell HWR). It sits in rails (under the black screws) and slides a litlle to engage or dis-engage from the main gear/thrust bearing assembly. There is a spring on either side (under the left hand screw) that keeps it pushed up into the gears normally. When the pod is either fully up or fully down this gives it a safety ratchet so it won't strip any gears. [attachmentid=38184] From the stern you can see drive gear better. The threaded rod goes through a nut and bushing in the center of the gear. The gear sits on a thrust bearing that makes gear rotation and steering smoother. The funny looking part on the left side of the box engages or dis-engages the gearcase. The gearcase is dis-engaged to make steering smoother after lowering. [attachmentid=38185] How heavy is the motor assembly? Yeah, a picture's worth a thousand words! It only takes one of the 6 volt gell cells to counter balance it though. On to hooking up the motors and steering... - MT

-
As somebody who owns a lot of 1/100th stuff, the 1/100 variables with strike cannon on the box come with the strike cannon packs (which are larger and molded in a green color) and slightly smaller standard booster packs. They also come with the box DYRL missile packs and heavy missiles. The kit of course comes with the standard missiles. Honneamise is right. Not bad for the average prices they go for. - MT
-
I have a friend in the Navy who always keeps a knife on him just in case the lights go out! He says you gotta be wary of the "ether bunny." - MT
-
Color matching everything the same is near impossible. There are so many variables that affect it. I've been doing it for years and only to cut back on coats of paint and help reveal seams and flaws better. Excellent work by the way. If I just didn't blow $100.00 on propellers, I'd be in. I miss my GBP set . - MT
-
Thanks! Still working on the gearcase. The best combination of gearcase and motors equals two minutes exactly to raise or lower the motor assembly. But it's lightweight and small. I'm working out the clutch mechanism too so it won't strip gears. - MT
-
Looks great! So is it tough to build models on board ship? Especially with heavy swells/waves?
-
Yep, old news. But great work. I know that took a long time to do! I wanna know how they did the cloak - MT
-
Heh, heh. Picked one up for $9.95! Never too early to get my 2 year old started! He loves Macross and robots in general! One warning, the leg joint snap socket and tab are too deep so you almost rip it apart trying to transform it. You have to pull the leg out a bit and then roatate the joint. - MT
-
I saw that when it was going for $29.00! I'm not a toy guy, but you can't beat the classics! I thought it would excellerate to way more than that! Kicking self in butt... - MT
-
Don't forget http://www.plastruct.com/ they have everything for architecture (battle diorama building) and then some. - MT
-
SHhhhhh, don't tell anyone . I'm building the raising/lowering gear case today. - MT
-
So far so good! - MT
-
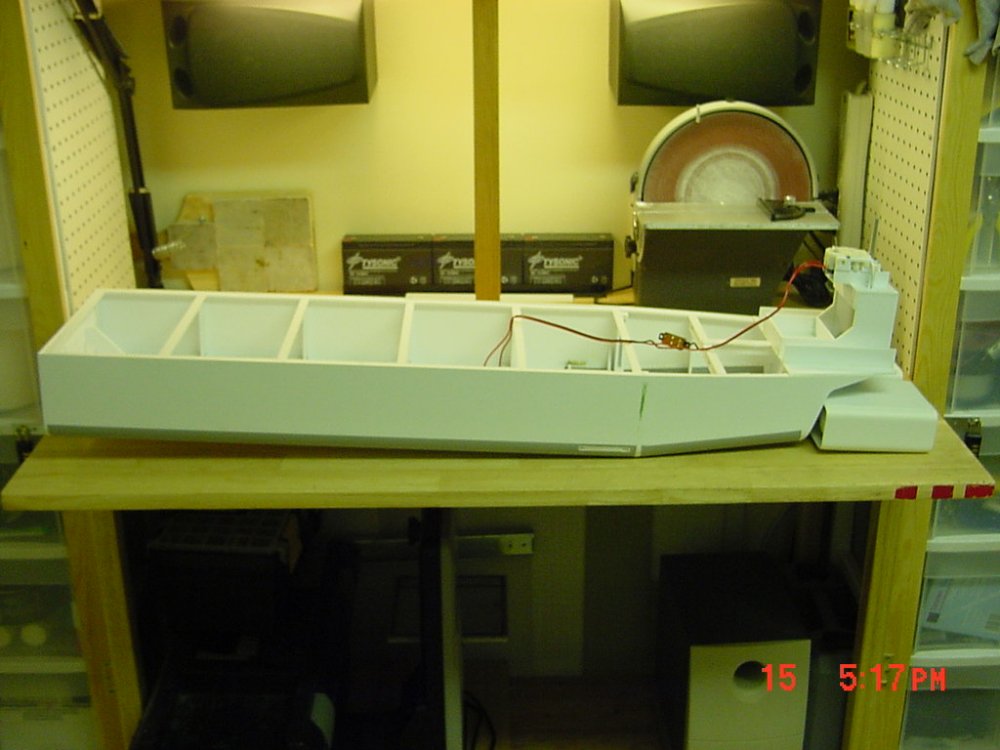
Thanks guys. The upper part won't be for at least another month or two. I HAVE to keep my workbench clean or my two little ones will destroy or misuse what;s on top! The mounting point is made of HEAVY DUTY brass parts soldered together (earlier posts show some of it) with eight bolts holding it in place. All of the plastic around it is 3mm thick styrene and some carefull engineering to increase it's strength and placement efficientcy. In this case, more is better! The motors are so heavy, it does a "wheelie." I photographed this with one of three batteries in the hull. So far, so good... - -MT
-
Great weathering Kylwell. It doesn't look "PC gamey" anymore. Neptunesurvey, another trick (if I'm picturing your description right) is to scribe the base of the hatch with a fine scribe until it seperates. It takes a while, but you'll have less sanding. - MT
-
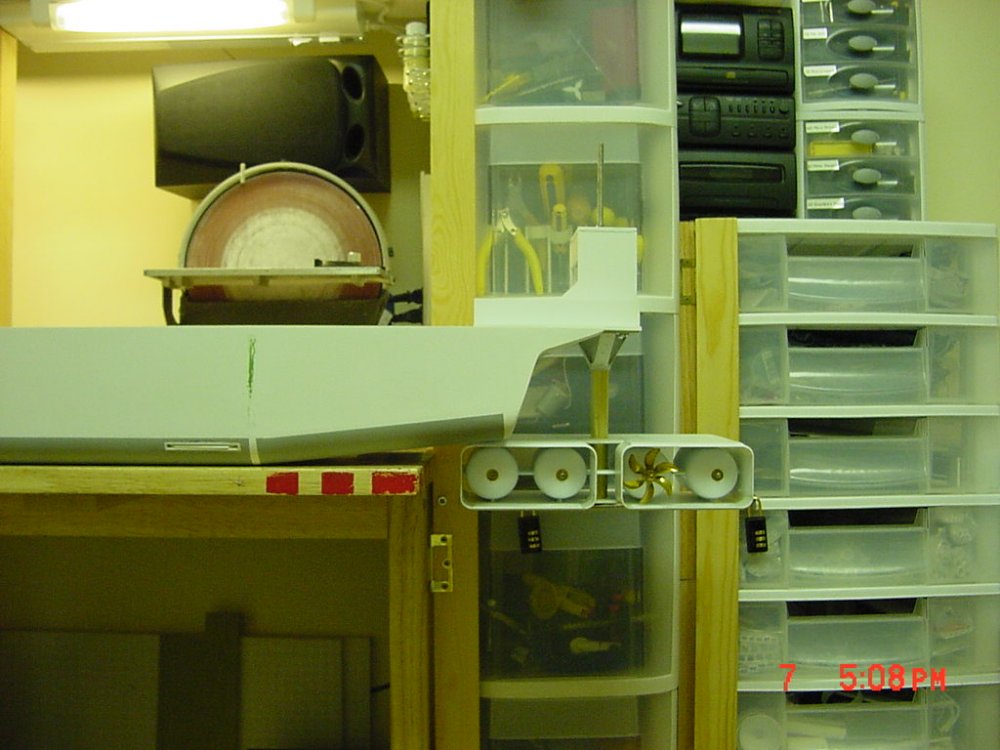
UPDATE 8 Nov 06 These are some ROUGH pictures showing the parts assembled but still not completed yet. I figured out my battery needed charging so the focus was off in the first two . [attachmentid=37871] Motors UP. [attachmentid=37872] Motors Down. [attachmentid=37873] Motors turned 90 degrees for parallel parking (hopefully it won't capsize lilke this either ). I still have a lot to do on these parts, but here they are test fitted. - MT

-
It looks good! What's the big box section? - MT
-
There's several vendor's, but yeah, they make them (they make EVERYTHING - figure wise in 1/144)! http://www.reynaulds.com/preiser/temp.asp?item=77100 - MT
-
Since 1/200 stuff is SOoooo much harder to find... For those who haven't seen yet, Herpa Models (Germany) has some great MILITARY accessories and aircraft that are new. Here's the 1/200 link for their homepage in English: http://www.herpa.de/collect/(2dwvru451q1se...serie_e=Fighter I'm getting the ground sets when they are in stores. There are several retailers in the States and UK that carry/will carry this line. Preiser also makes an extensive line of 1/200 figures. Here's some examples (note the mechanics are already in the Macross colored overals - like in my avatar ): http://www.hobbylinc.com/diecast/preiser-diecast.htm Hopefully this helps somebody! - MT