wm cheng
-
Posts
4311 -
Joined
-
Last visited
Content Type
Profiles
Forums
Events
Gallery
Everything posted by wm cheng
-
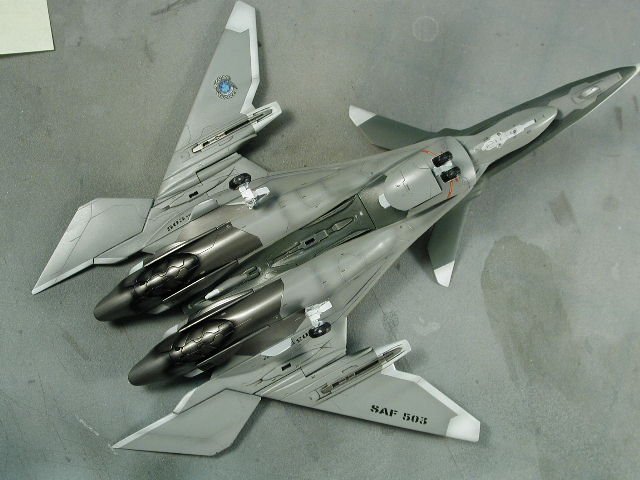
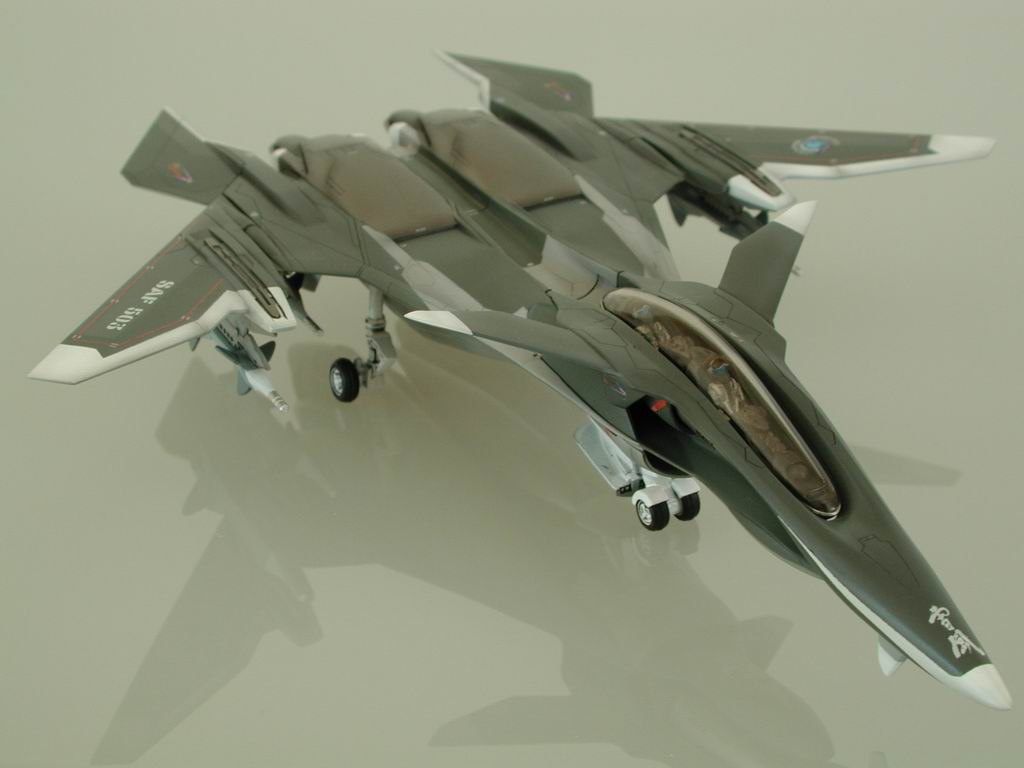
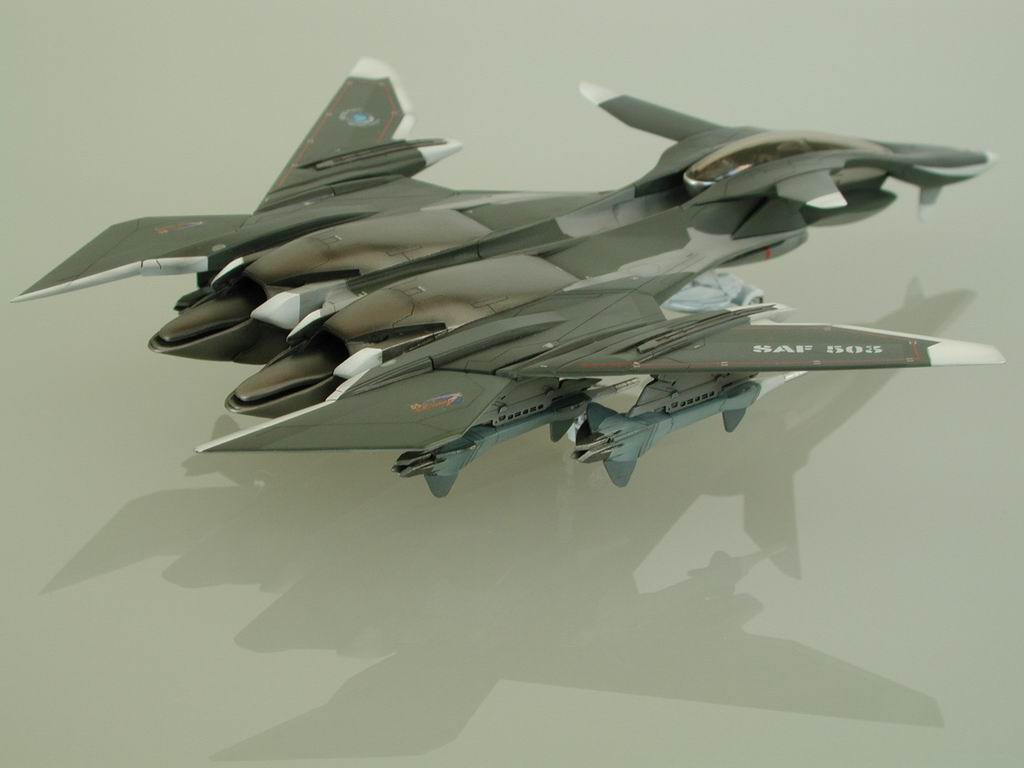
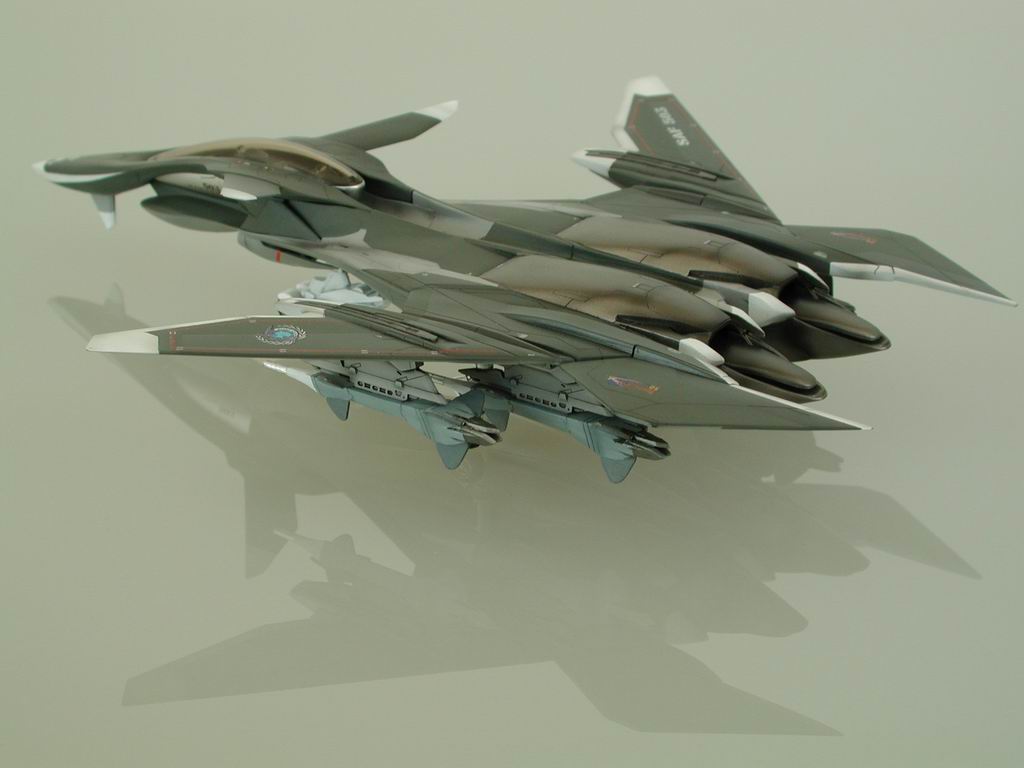
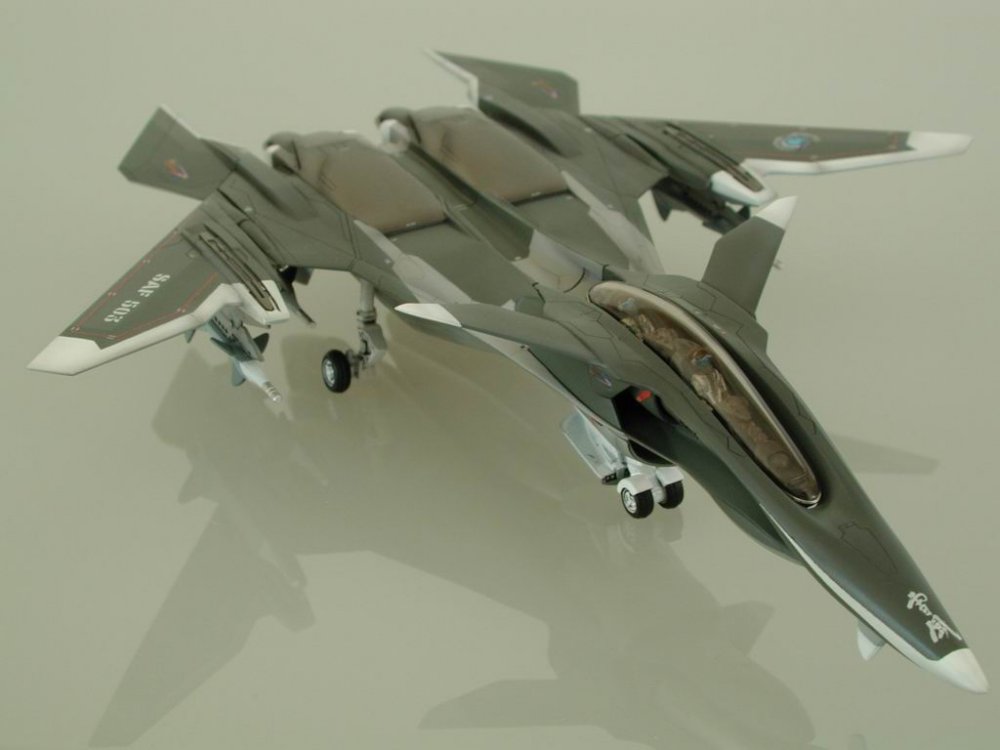
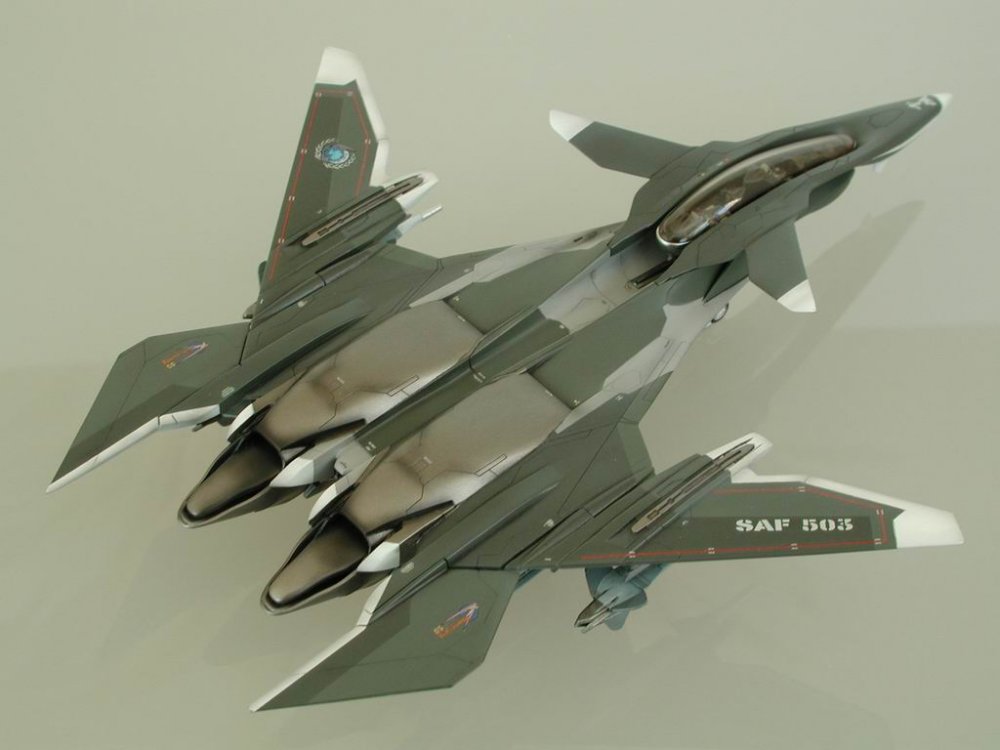
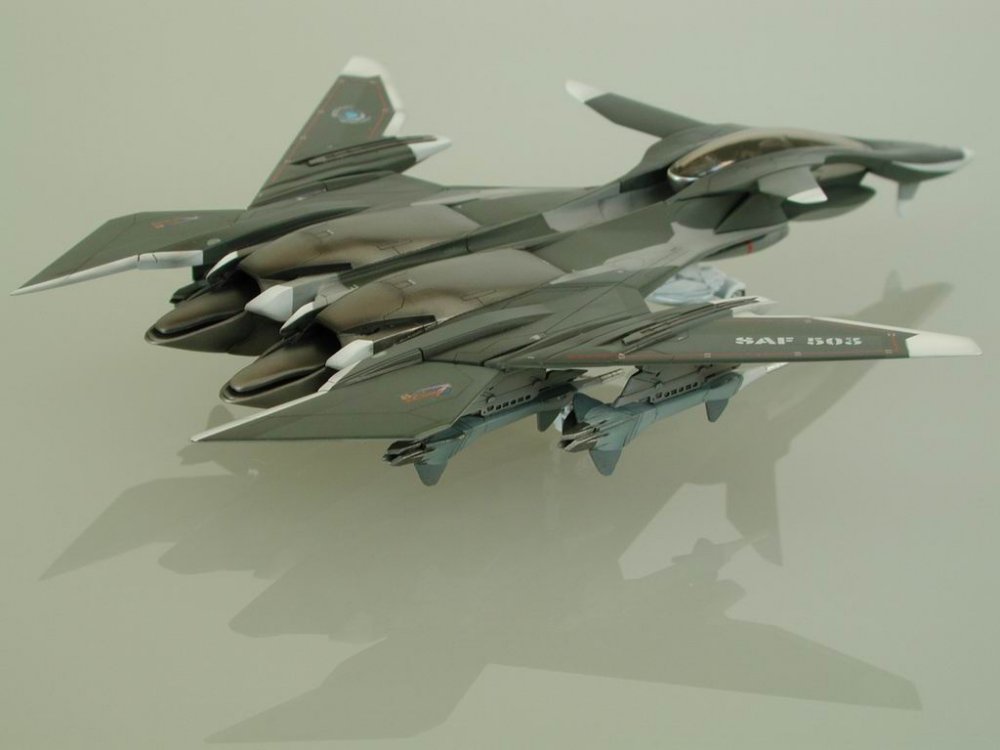
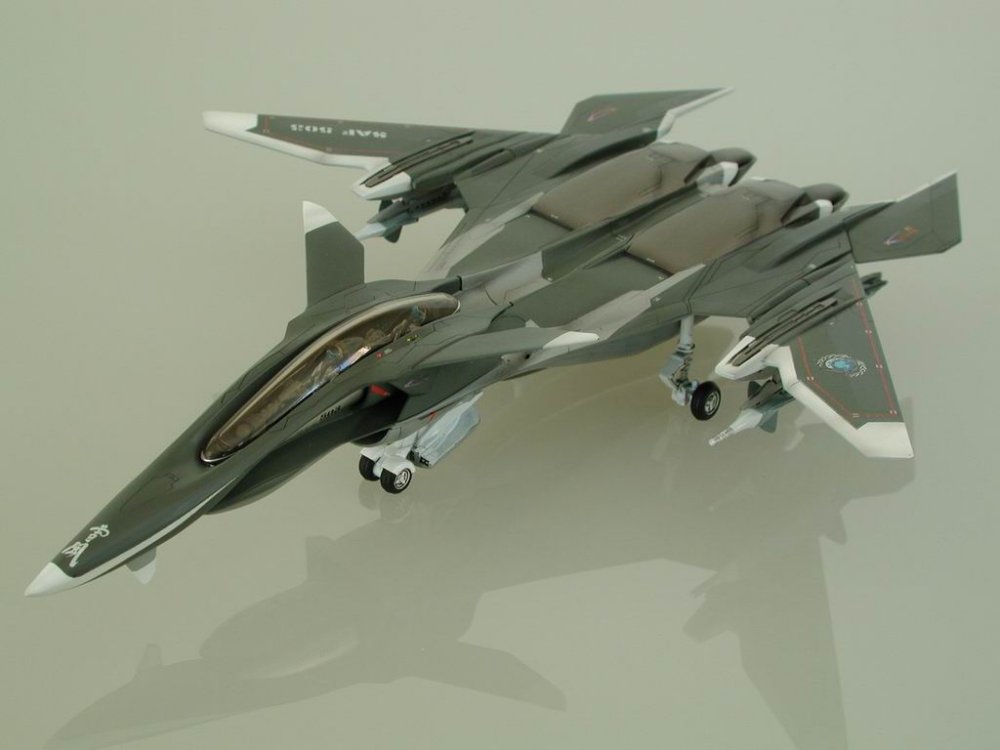
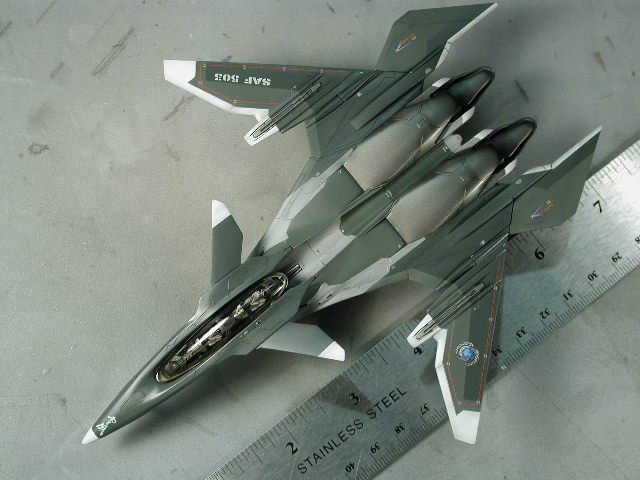
Walkaround... funny how the two tone green/grey blends under certain lighting conditions.
-
-
-
-
The missile launch arms are really detailed, and the wash really picks out the recesses - thanks for all the missile colour information.

-
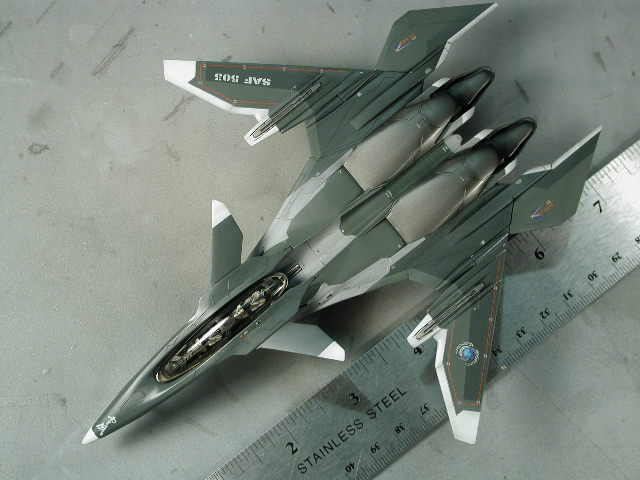
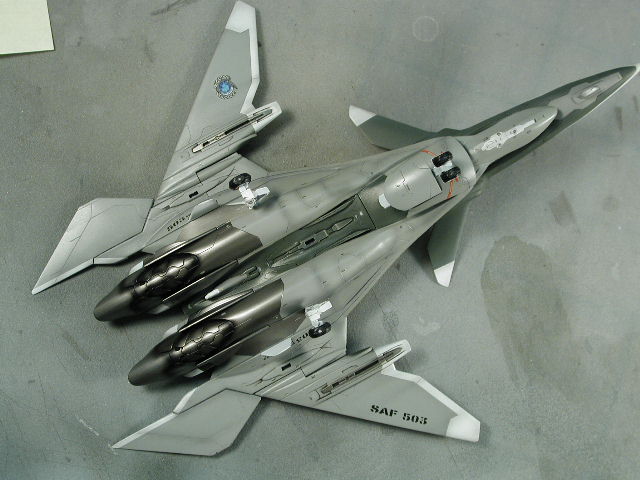
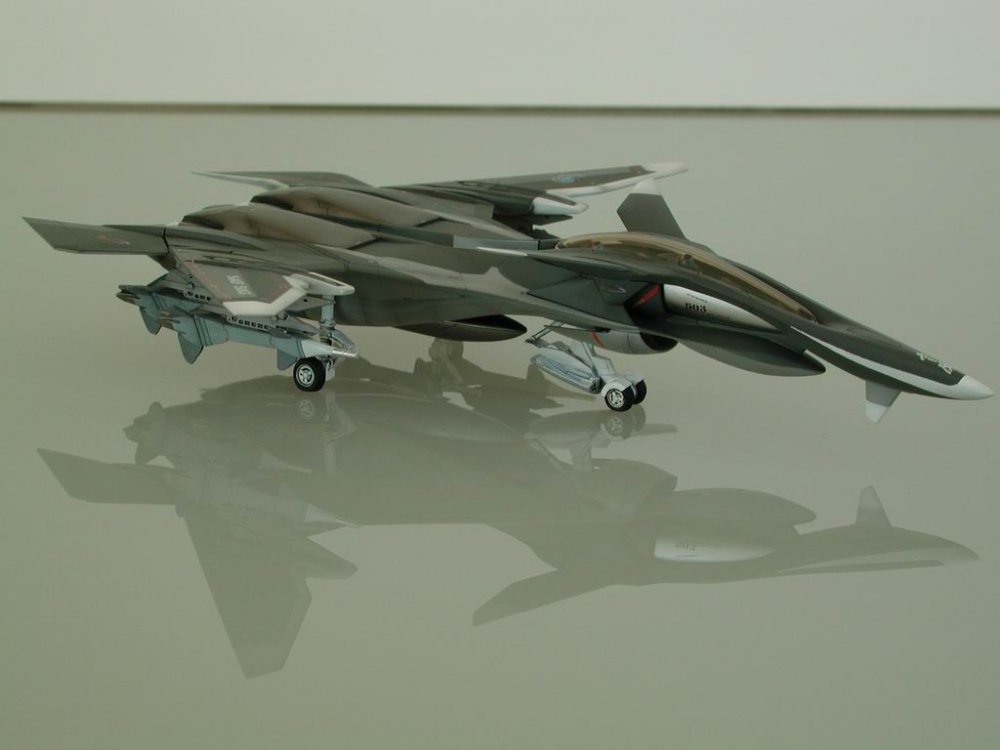
A top view

-
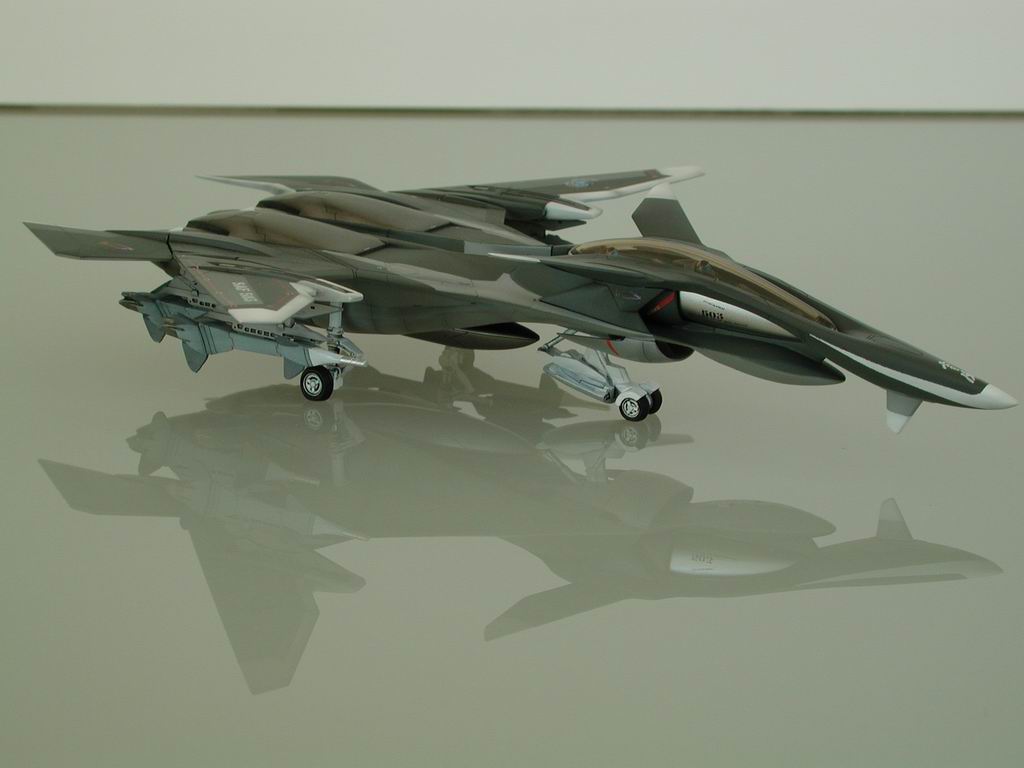
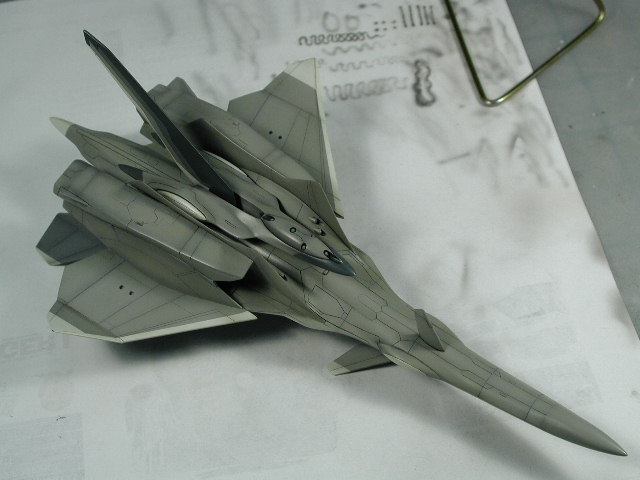
Hey all, Well, here are the completed photos of the Mave from: http://www.macrossworld.com/mwf/index.php?...t=ST&f=23&t=208 Hope you all enjoy (Sorry, the lighting still isn't the greatest - a bit dark)
-
Hey all, Thanks for all the kudos... maybe this could be pinned 1/72 Hasegawa VF-1A Super* 1st link recovered http://www.macrossworld.com/cgi-bin/mwfarc...t=ST;f=8;t=6006 http://www.macrossworld.com/cgi-bin/mwf/ik...t=ST;f=8;t=3263 http://www.macrossworld.com/cgi-bin/mwf/ik...t=ST;f=8;t=3497 1/72 Hasegawa YF-19* recovered mostly http://www.macrossworld.com/cgi-bin/mwfarc...ST;f=20;t=19632 http://www.macrossworld.com/cgi-bin/mwfarc...t=ST;f=8;t=8793 http://www.macrossworld.com/cgi-bin/mwfarc...t=ST;f=8;t=9483 1/72 Hasegawa VE-1 Elintseeker* recovered http://www.macrossworld.com/cgi-bin/mwfarc...ST;f=20;t=19645 http://www.macrossworld.com/cgi-bin/mwfarc...=ST;f=8;t=10218 1/100 Bandai Yukikaze Supersylph* recovered http://www.macrossworld.com/cgi-bin/mwfarc...ST;f=17;t=18946 1/100 Bandai Yukikaze FRX-00 Mave http://www.macrossworld.com/mwf/index.php?...;f=23&t=208 http://www.macrossworld.com/mwf/index.php?...p;f=3&t=697 1/72 Hasegawa YF-21 http://www.macrossworld.com/mwf/index.php?...f=23&t=1457 http://www.macrossworld.com/mwf/index.php?...;f=3&t=2069 1/72 Hasegawa VF-0S http://www.macrossworld.com/mwf/index.php?showtopic=5881 http://www.macrossworld.com/mwf/index.php?showtopic=7956 1/72 Hasegawa VF-1S + Atmospheric Booster http://www.macrossworld.com/mwf/index.php?showtopic=11976 1/72 Resin Launch Arm & Base http://www.macrossworld.com/mwf/index.php?...t=0#entry341193 http://www.macrossworld.com/mwf/index.php?showtopic=17626 1/72 Resin Atmospheric Booster Launch Rail http://macrossworld.com/mwf/index.php?showtopic=23678 1/72 Bandai VF-25F Messiah build-up step-by-step http://www.macrossworld.com/mwf/index.php?showtopic=28142 1/3000 Yamato SDF-1 modification and paint up... http://www.macrossworld.com/mwf/index.php?showtopic=34450&page=5 1/72 Bandai VF-25S Armored Messiah (initial finished photos - better to follow some day...) http://www.macrossworld.com/mwf/index.php?showtopic=38780&hl= October 2006 Update: Partial recovery of old threads. YF-19 and Superslyph now available. Please note that old links won't work, even if you have the original thread and post numbers saved--everything's been renumbered. If you find any more, let me know and I'll incorporate them here. Thanks David so much for all your hard work - its great for me to look back on these too! Wm. Another update: Shawn has recovered a bit more of the database, and Jinnai found the Elintseeker threads. September 2007 Update: Unfortunately since the last time MW crashed, we have not re-recovered the initial older links (*) that were originally found - I hope that somebody can re-find them again. I've uploaded my toy collection to my gallery: http://www.macrossworld.com/mwf/index.php?app=gallery&user=244 Toy weathering and clear coat photos individually: 1/60 Arcadia VF-0D weathered... (Aircraft mode) http://www.macrossworld.com/mwf/index.php?showtopic=35120&p=1203668 -some WIP photos (but not enough to warrant its own step-by-step thread) http://www.macrossworld.com/mwf/index.php?showtopic=35120&p=1201717 http://www.macrossworld.com/mwf/index.php?showtopic=35120&p=1201265 http://www.macrossworld.com/mwf/index.php?showtopic=35120&p=1201185 1/60 Arcadia YF-19 weathered... (Aircraft mode) http://www.macrossworld.com/mwf/index.php?showtopic=35120&p=1198988 1/60 Bandai YF-30 weathered... (Aircraft mode) http://www.macrossworld.com/mwf/index.php?showtopic=37897&p=1150247 1/60 Bandai VF-25F w/Tornado+Armored Pack weathered... (Gerwalk mode) http://www.macrossworld.com/mwf/index.php?showtopic=40722&p=1150246 1/60 Bandai VF-25G w/Super Pack weathered... (Battroid mode) http://www.macrossworld.com/mwf/index.php?showtopic=35121&p=1150935 1/60 Bandai RVF-25 w/Super Pack weathered... (Aircraft mode) http://www.macrossworld.com/mwf/index.php?showtopic=35121&p=1153232 1/60 Bandai VF-171CF w/Super Pack weathered... (Aircraft mode) http://www.macrossworld.com/mwf/index.php?showtopic=35121&p=1153242 1/60 Bandai VF-27 (v1.5) w/Super Pack weathered... (Aircraft mode) http://www.macrossworld.com/mwf/index.php?showtopic=35121&p=1153727 1/60 Yamato VF-4G weathered... (Aircraft mode) http://www.macrossworld.com/mwf/index.php?showtopic=35121&p=1154652 1/3000 Yamato SDF-1 DRYL decaled & weathered... http://www.macrossworld.com/mwf/index.php?showtopic=35121&p=1154894
-
Fantastic model David!! Where did you get such a complete decal sheet for this starship. I remember masking every blue line on my old Excelsior when I did it about 10 years ago!! Arrgh!! So are the windows drilled out or are they a decal sheet too? Great work - love to see more!
-
Hye Lucifer, try this old thread: http://www.macrossworld.com/cgi-bin/mwf/ik...f=8;t=4555;st=0 scroll to page 2 about half way down, there's a bit on washing for the panel lines.
-
Hey good tips!! I'll try it on my next models, lots of MicroSET you say - hmm, maybe I haven't been putting enough or letting enough time for it to sit. I would warn about MicroSOL, its pretty powerful stuff and has ruined a few of my decals in the past. Good point about using it only where you need it to conform to a panel line or something - I also brush it around the edges to dessolve away some the the carrier film so it doesn't step up as much, more of a slope up. I do find that a smooth glossy surface does wonders for decals than a flat matte one - plus you can't really do an oil wash on flat paints anyways. Hey everybody, David, Grayson, Gerwalker, lets see some of your models!! Post pics!
-
Yes Grayson, its a higher thinner to paint than I would use normally to cover a model. You get a more viscous mixture - easier to control to make fine lines with - and you want it to be subtle more transparent. Just becareful you are not spraying thinner though - you want it to be fairly dry when it hits the model especially when you are an inch or two away - otherwise it may run, and you don't want run lines. Good Luck.
-
Hey guys, No sun yet, but I'll try for that family shot when it comes out, maybe Tuesday. Hey IIymij, maybe you could start a new thread and post pictures of your decals (closeups) so I can what the bubbles look like. The decal solvents and setting solutions are a bit tricky, I would only recommend after mastering regular decal placement do you move up to these, because they have ruined a few precious decals for me in the past. The solvents and setting solutions softens the decals so much so that they confirm to highly irregular surfaces, corners and panel lines, but in the process, they become extremely fragile to the point of "printed goo" as one modeller pointed out to me. Lets take a look at your decals first and see if we can solve it without the solvent and solution. There really is no need to use this stuff when you just want the decal to lie flat - and the Hasegawa decals are one of the best quality ones I have had the pleasure of working with, unlike old revel or monogram stuff. You should dip them in room temp water for about 6-8sec, then take out - they should easily slide off with a wet/damp brush. Put the decal with the decal paper backing on your model and nudge it off with a wet brush. Keep the model and decal wet at all times while you re-position the decal into the final position. Once its where you want it, take a damp cloth or paper towel (prefereably lintless) and dab gently at the decal to push any water and air bubbles out from underneath the decal. Then let dry Good Luck
-
Hey LTSO, Don't get discouraged. Try it on a piece of white paper or cardboard. Thin some light grey paint down (better on the brown side than blue - warm grey looks dirtier than cool greys) and play with your airbrush at different trigger flowrates and different air pressures. Grayson is exactly correct, the PSI affects the atomization of the paint so much. Play on the paper to get some lines and see how fine you can get it (also notice the size of the dots in the spray pattern). You don't have to do it to this VF-4 baby, but just try it out on a piece of paper. Usually, to get a really fine line, I hold it quite close to the model around an inch. You can see my piece of practice paper in the background - the lines should seem like a soft pencil - you shouldn't see any dots in it. Good luck - just practice and experiement

-
Its not the tool Cmd McBride - just practice, pressure and paint consistency (plus a clean head and needle - preferably one that is straight and true) Make sure the needle is not bent or have any debris stuck on it. Totally dissassemble the airbrush and clean every part again - make sure there is no debris. I've been using my crappy cheap Badger 150 single action for the last 15 years! and its great. Sometimes the more expensive ones can be a bit more complicated and clog up more frequently. I really recommend siphon feeds since you can use a cup or a bottle - the gravity feed ones have the reservior intergrated into the body of the airbrush - its small, will not cover a lot of area in one go, awkward for mixing, and you cannot spray inverted without the paint falling out or spilling onto the model.
-
HEy all, I would love to see some cool poses the 1/48 can get into - I thought I saw some pretty cool pictures a while ago, but I tried to do a search and came up with nothing. Sorry if this has been done - if so, could you direct me to a link to the old thread. If not, lets see your stuff!
-
Here's how I do it. I spray the entire tire in gloss white and let dry. Then I use the gundam black marker to trace around the hub/tire crease to get a straight line (sometimes if the crease is really small - I just let the wash pick it out). I then do a little wash to pick out the hub details which also fills in the crevice between the hub and tire. Then I use a flat black and brush paint the tire around - I don't have to get it perfect since the gundam marker line is sufficiently fat enough to give me a little lee-way so I paint the flat black a little away from the actual white hub, but make sure its on the gundam black marker line. Then I rub the flat black a bit with my fingers to get some finger grease on it - this makes the flat black look really rubber like in sheen. Good luck.
-

Any tips for brush painting with acrylics?
wm cheng replied to David Hingtgen's topic in The Workshop!
Hey Cmd McBride, I don't think Windex works for ModelMaster Acryls. They do have a specific thinner and a specific solvent for the Acryl line. Although I haven't used any of their "real" paints, the thinner works really well for the clear-coats - like the Tamiya thinner, there is some flow agent that makes the paint really viscous (it could be just a simple detergent to break the surface tension) but I don't know. However the Solvent, is really good a cleaning/flushing your airbrush out - they may be a bit expensive, but they really go a long way - I think it will last me years. -
Hey thanks for the kudos everyone. I am glad the flat thing restored the two grey/green tones - whew! that was a close one - and the post-it notes didn't even pull off a single decal! Well there's no sun today, so I'll try to finish off the missiles before I take any beauty shots of this new addition to the family. Thanks for all the great info on the missiles, I think I will follow it with a grey/blue shaft, white nose cone and silver fins - its a bit like the anime as well - I'll do a comprimise between the two styles. I'll do a yellow stripe for the live warhead, but maybe a red stripe instead of the brown to match the Yukikaze Superslyph's white missles with the red strips. we'll see. Yes Cmd. McBride, I almost use Tamiya acrylics exclusively now (too bad I had to mix all the custom colours). There are the minor exceptions of the ModelMaster clear-coats, and the Alclad metallizers. See you soon with some pics hopefully!
-
I see its a double action if I'm not mistaken (you press the trigger for air pressure and pull back for paint flow?) They are a little hard to master at first. I would invest in Tamiya thinner - I know its a bit expensive, but if you use Windex to clean the airbrush and only use the thinner to thin the paint then it will go a long way (mine has lasted me for over 4 years). You can thin Tamiya paints with water, but the thinner has some flow additives that aid in airbrushing, and might be able to help atomize the paint pegments while still inside the airbrush barrel producing a finer mist. 3:1 paint to thinner is a good ratio (I don't know if its the same with water though). You could try a little more thinner when doing the pre/post shading than you would normally to just cover the plane. I might try a higher PSI around 20-25 when I usually paint, unless the stuff specifies a lower PSI like metallics or heavier stuff like the Alclad. Try practicing on a piece of paper or card for a while first to get the hang of the line - you should be able to get a pretty smooth line that is 2-3 mm thick without problems, then practice to get a 1mm line around the thickness of a fat "B" pencil. Its just practice. I usually still practice on a piece of cardboard just before I spray on the model everytime to check paint consistency and get my hands into the practice. It's like warm-up whenever you play any sports
-
Wow, great work Kurt, I love those little weeds growing out of the tarmac!! Great product, I did a little search for them, and they have a carrier pattern, I'd love to set one of those underneath a Valk!! Thanks again for sharing great work!!
-
Hey there, Enamels are much harder/tougher paints, they wear pretty well. However, as Cmd McBride as mentioned they require a spirit based solvent (to clean but can be used straight out of the bottle to paint) which the vapours are unpleasant and requires ventilation to use. Additionally they require a bit longer to dry, 5-6 hrs for the glossy stuff or 3-4 hrs for the flat stuff. Generally they are more toxic. Acrylics are easier to handle paints, but they tend to scratch more easily. Acrylics also use thinners to clean but they are designed to be used straight out of the bottle to paint with. The thinners are usually some alcohol base and are not as toxic as spirit based solvents for the enamels. These paints do dry quicker, 3-4 hrs for glossy or 1-2 hours for flat depending on the thickness of the coat you apply. I would definitely recommend acyrlics especially to beginners since they can clean up with just water. However, that being said, after all my years in modelling, I use Tamiya Acylics almost exclusively now (after trying just about everything in the market). Good luck.
-
Hey LTSO, Great start - man I love this plane!! I can't wait to see more. Don't hesitate to start on anything just because I've built it - hey its posted to encourage people to try it or build it - please do what you want and I'll be watching Just an observation (don't take it the wrong way) but your grey lines seem a little coarse - like I can see the spray pattern or lots of little dots that make up your line. What type of airbrush do you have and what tip or spray pattern are you using? This could also be affected by the amount of pressure you are spraying with and the type of paint. You should get a fine line with no real visible dots - you should try to get a finer spray - the goal is to make it not look like its spray painted on. I also didn't get what you mean by dusting it after the white coat on top. Please don't worry about deviating from my techniques - they are just my trial and errors with my particular equipment - everybody has a different working style and haddicap (mine is that I suck at hand painting - I can't get rid of the brush marks) so I airbrush everything. But I want to learn from everyone here too - so please feel free to experiement so we can all learn!!
-
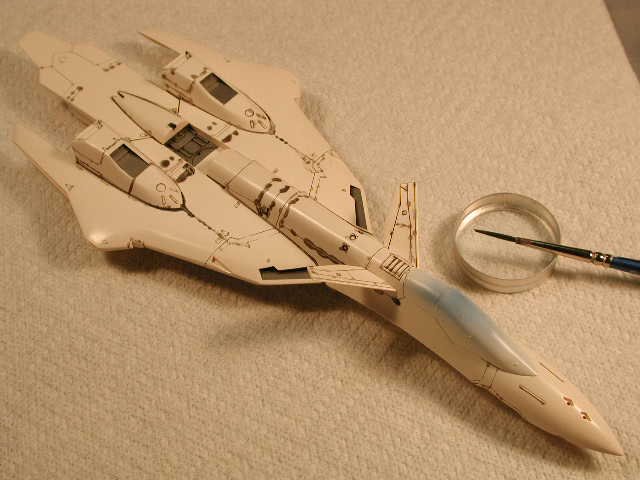
In these pictures you might forget how small this model kit really is. It makes the Hasegawa Valkyries roomy by comparison. I'll wait till tomorrow when there is sun in my dining room to take some proper pictures of this new baby. I still haven't got a real clue on how to paint the missiles - any suggestions other than the instructions pale purple would be helpful. Till tomorrow...
-
I left the underside that semi-gloss.