wm cheng
-
Posts
4311 -
Joined
-
Last visited
Content Type
Profiles
Forums
Events
Gallery
Everything posted by wm cheng
-
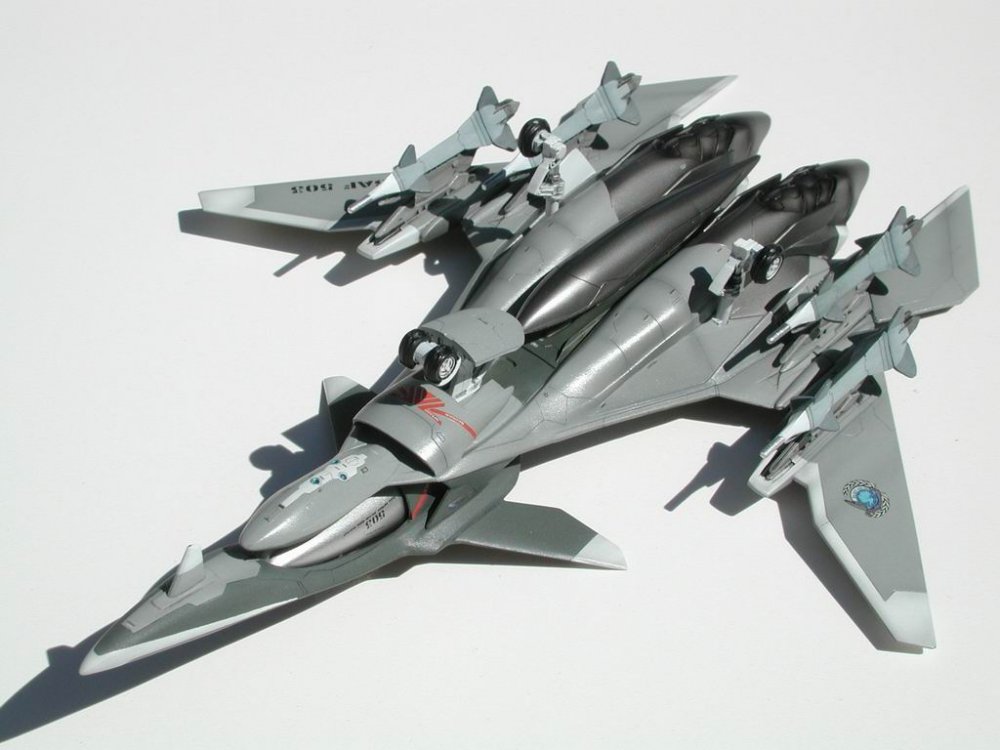
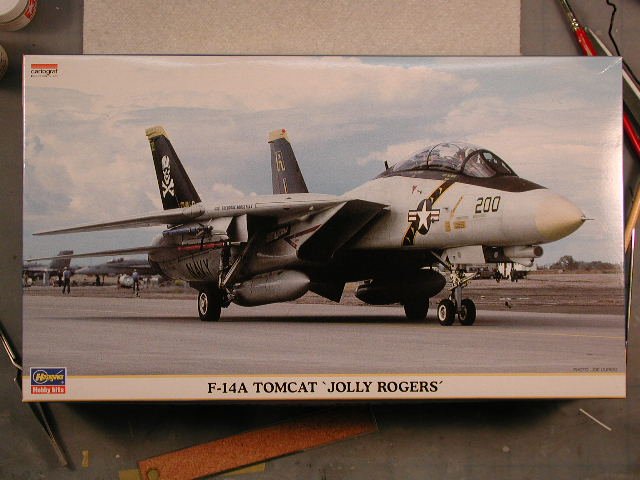
Hey there, I too agree that I believe that its a F-14D, the shots of the tail-cone shows the newer engines, unlike the traditional distinctive bell-shaped cones of the older F-14 engines. Yes, I know the old Hasegawa kit is really bad - to that end I did a bunch of research and opened a bunch of boxes at the local hobby store and ended up with what I think of as the best F-14 kit in 1/72 scale that I have come across. This is a limited edition Hasegawa kit - additionally, I was looking for the jolly rogers squadron to eventrually place this model next to Roy Focker's VF-0 whenever I get these things completed. This kit had all recessed moldings and bolts whenever approporate in true Hasegawa form. It comes with very clean and crisp decals by Cartograf (very high quality) and photo-etched parts for the canopy rails, cockpit interior and afterburner cans. I know there are some companies that list 1/72 scale photo-etched parts, but if you try to purchase them, they are very rare and hard to come by - this kit includes them! The up side, the wings are molded in separate pieces so that the forward slats can be built extended and the rear flaps can be built lowered - now the down side is that because the wings are so over-engineered, they do not sweep forward or back - you have to choose to have it fully forward or swept back. Unfortunately its an A variant, but with the optional parts to make it B and if you can get the proper tailcones, it might even become a D, since I see the proper gunport vents on the supplied sprue. Unfortunately, there are no missiles just the underside tanks, you need the Hasegawa missile set to complete this bird. Overall, the detail is excellent - more in keeping with a 1/48 than such a deminuitive 1/72 scale and I would recommend this kit highly to anyone looking for a F-14 kit especially if you can find it.
-
I love my recast of the VF-2SS in 1/72 scale and would highly recommend it. Although, the canopy that comes with it is really thick, and is foggy - not totally transparent and the fast-packs are meant to be built with it on or off, it would take a bit of modification to get them to be removeable. Overall, the lines are excellent, and follow the line-art quite accurately - although serious structural pinning is required as some of the attachment points are quite small and delicate.
-
Wow, it looks great!! Now I know what I'll be doing to ignore the relatives this Christmas!! Can't wait.
-
I found that wriggling it worked best - just becareful that you always hold the backpack in place to relieve any strain off those two precious hinges. The first time I removed the right side pack, the metal pin stayed with the backpack, and I had to take a pair of pliers and wriggle it out that way. I have since crazy glued the metal pin portion to the right fast pack - but I don't think I'll be removing it on a daily basis. (Maybe its Yamato's plan to get us to buy another set to play with without the fastpacks ) Try a little white glue on the micro missiles, its non-permanent, it you ever want them off again, you just pull them, and the white glue just peels off the plastic. I did a dark oil wash on the missiles and fastpack internals, and it really picked out all the details - they look great! I can't wait for the decals!! Thanks, I'm glad I'm not the only one with these problems - misery loves company No really, I love these toys, and I am so glad/thankful to have them - its just a little realism injected into an otherwise awsome experience.
-
Looking great!!
-
Hey Gubaba, I did a VE-1 some time ago where the gears are up and outlined the steps to modify the Hasegawa kit to have the gear doors closed - its the same steps for all the Hasegawa Valkyries. The forward gears are on the bottom of page 1 and the rear gears are somewhere down on page 7. Good luck. http://www.macrossworld.com/cgi-bin/mwf/ik...ct=ST;f=20;t=33
-
Hey guys, the original (reduced) pictures of my model is here: http://www.macrossworld.com/mwf/index.php?...ct=ST&f=3&t=697 Scroll midway down to the second page, there are some better shots when the sun came out. This is the Yukikaze series, but its not the Superslyph, there is a shot of it with the Superslyph in the background on the top of page 2. This is the replacement aircraft for the Superslyph called the FRX-00 Mave. Enjoy! (p.s. - let me know if anyone Photoshops this into a more realistic background)
-
Yah, the gun handle is completely collapsed, and the gun is tight to the underside of the arm missile packs - its the downward angle of the entire Valk that tips the forward part of the gun down. The leg connection peg to the arm is just a shallow disk, and the new connection point with the arm missile launchers are really just a half-circular depression in the pack. Nothing really clicks in - unless I'm missing something. Its just tat I usually display the Valk with the gears down sitting on a surface - and the dragging gun pod looks wierd.
-
Way Cool starship!! Back to the decal stuff for a second, a good friend Recon recently asked some very good questions that I hope to provide some light on my personal way of applying decals I hope might benefit any of you here that might need tips for applying decals. I used to, but with good decals like Hasegawa - I don't think you need to. Make sure that it is lying on a glossy surface first. Then if you want, you could put down some MicroSET first (avoid using MicroSOL - its really powerful stuff - only as a last resort) - MicroSET is so much weaker and its safer to put down. If I need it afterwards - after the decal position is finalized, I might very gently brush a little MicroSOL on the edges or any problem areas, but leave it alone at this point. I haven't encounted the curling before, but if they float, then I would put a bit of paper towel to soak up or "wick" some of the excess water from underneath the decal. However, the decal must be wet or at least moist when you are moving it around into final position - keep brushing water on it to move it around. The curling might be solved by putting it in the water for longer - try putting in for 10-12sec for the larger pieces, they should move slightly while in the water. MicroSET and MicroSOL does not get rid of bubbles, all they do is soften the decal to lay flatter and confirm to irregular surfaces or allow detail from underneath the decal to "telegraph" through. No, they work best when the decals are still wet, and that there is water underneath to "wick" the MicroSET or MicroSOL underneath for a more even coverage. I would say feel free to put brush some MicroSET on before or during decal placement and repositioning if you like, but only use a little MicroSOL after the final position has been achieved - and leave it alone after the MicroSOL. Yes, as soon as they are in position, I would "wick" away any water to prevent them from "floating" and use a tissue to "press" down on them tight to the surface. I usually fold the tissue a few times to get a softer cushion and press down hard to get some of the details to read through. I may paint some MicroSET or MicroSOL on them again but just around the edges and the recessed panel lines they cover. Remember, the setting solutions only soften the decal, they do not "sink" the decals - for that you have to press down on them with a tissue. I have noticed that flat/matte finishes tend to trap more bubbles underneath the decals too - causing a silvering to occur - make sure you give the model a clear-coat of gloss (I used semi-gloss because of experience - but gloss works better) before you apply decals. You don't have to wait to blot out excess water - just as long as you are satisfied with the final positioning. But complete each individual decal at a time. Yes again, I think you've got it! I only panel wash on top of the decals to reveal again what they cover, you don't have to do the entire plane again. I usually do semi-gloss coat to help even out the edges of the carrier film but I think I will try a gloss coat now - the glossier the clear-coat the heavier/thicker it is and more able to cover this slight bump. Then finish it in whatever final sheen you want the whole thing to take on. I find semi-gloss to be good with planes - flat seems more appropriate for armours - or mix the two, like semi-gloss for the Valkryie and flat for the fast packs or even the two finishes on the same plane like my FRX-00 Mave thread.
-
Hi all, Woohoo, I just got my fast packs today and have been playing with them for the last few hours and I have a few question to fellow owners and Graham. 1/ The arms with the missile packs on them - is there a more rigid way for them to lock together - they just tuck inside the leg engines (in the fighter mode), and I see the half-round circular indentations on the missile packs to indicate where the old pegs go - but they do not "click" in - it just kind of sits there, and occassionally flops down, especially with the gun in place. However, when I hold the heavy sucker, I usually hold it by the leg armours and that presses the legs together to hold up the arms. Am I missing some peg or click that locks the arms up - everything else seems so well designed to lock together so well, it seems odd that the arms are just left to dangle? 2/ That brings me to the second question, with the gun pod in place and the landing gear fully extended, the gun pod red beacon light just barely touches the ground - I mean its only less than 1mm from the surface - doesn't that strike anyone as being too close to the ground? Or am I not positioning the arms correctly to tuck itself up higher - I think I have the shoulders as high as they will go? 3/ My VF-1S has always had a bit of a loose nose gear problem - but with these heavy packs, when I roll it, they sometimes (not always) push back a bit, in fact one of my rear gears also push back a bit - its just a tiny bit, but noticable. Has anyone else encountered this? I guess cracking open the nose and filing down that plastic bump to close the diagonal gap in the nose section is definitely out now. Is there any suggestions to make the forward gear click down more rigidly to support the increased wieght with the fast packs - plus the newer nose down angle of attack (which I love the meaner look) doesn't help things either. 4/ I'm not sure about this - I must watch DYRL again, especially the opening scene where you see the Valkyries head on when they are hauled out on the launch arms - the front of the missile packs - is there a right and a left? As indicated by the little red dot on the lower right. Both my missile packs have the little red dot on the lower right hand side when viewed from the front. Are there supposed to be a left and right mirrors of each pack, did I get two right hand pack fronts or did Yamato never bother to sculpt a left hand mirror replacement for the twin barrelled gun? Now don't get me wrong - you might get the idea that I'm not absolutely thrilled with the fast pack add-ons - nothing could be further from the truth, I really love them!! It would be great if someone could do a little translation on the instruciton booklet especially step 10 on page 6 the little photo (to the right of the bigger one with the arrows) that highlight or outline in black the bump in the hinge - what's that about? The metal connecting pin went into my Valkyrie backpack so stiffly that when I removed one side of the fast pack, the metal piece pulled right out of the fast pack - it stayed behind with the backpack! I'm sure with a pair of pliers and I can yank that sucker out, but I am a bit worried that this is a friction fit lock especially when we are attaching them perpendicular to the direction of the fast-pack hinges (shear is our worst enemy) - but we're adults here right and we won't treat our $300+ (cdn) toys too roughly I do love the porportions of these packs - I can't believe how much heft and substance it adds to the Valkyrie. It makes the 1/60 looks so puny! Of course, the detail, ah, what can I say (for a toy) - I plan on doing a dark wash to pick out all the nice machinery details, and a lighter dry brush to pick up the raised details - I don't want to re-paint them - they are a toy and not a model - but it won't take too much to make them look spectacular. Now it doesn't make me feel too bad about not getting Blackaces 1/48 re-cast (believe me, I was really distraught when I couldn't justify to myself $450 (cdn) for that model). This toy does make me feel better about it though I love the fact that the forward section of the missile packs have vents that go though to the internal workings and are matched with vents inside at that locaiton too - same with the leg packs - really nice touch Yamato! The supplied missiles seemed a bit long - especially at the rear after the "break". Unfortunately, to get the loadout to be like the opening scene in DYRL, the double missiles are awfully close if not touching the rectangular micro missile launchers - depending on the sweep of the wings. I tend not to like it when they are swept out too far. I'm sure I'll come up with more comments later as I play with them more - oh man! can they add anymore plastic to connect these little micro missiles to the sprue/tree - the connection is so thick!! - it will take some careful cutting and sanding to re-shape them circular. Oh, could you tell me where the "budwiser can" stickers go, do they go on the micro missiles? I would love to hear if anyone agrees or thinks I'm too nitpicky - or can answer any of my questions. Just my two cents... thanks for tuning in
-
I just did it right on the bare plastic and wiped off. The only thing was that a bit of the yellow or black did come off on my cloth/towel when I wiped down, but I couldn't tell on the toy itself. So I would suggest using very little varsol (remember low odour or odourless since its weaker) and being careful when you are panelling over the black or coloured lines - but everything else went great. Yes, I do intend to clear-coat the toy to protect the decals when I am done - but I am still waiting for the set from our friend Anasazi I haven't decided whether to do a light post-shading on the toy yet before I seal it in with the clear coat. It is a toy after all - I haven't decided yet - where would I stop - I don't want to start filling all the seams now
-
Fantastic work GunnerX!! Great to see all the modellers starting to come out of the woodworks! The cockpit is lookng great. I also put some photoetched instrumentations on the side panels when I did my first cockpit form left over spare photo-etched parts - but later found out that the actual TV version of the cockpit had olive green smooth arm-rest on the side panels!! Wierd eh.
-
Yes, oil canvas paints - in a very thin mixture so that if would run very easily. I'd say more varsol than paint.
-
I did mine the same way I do my models - I used a thinned oil wash. I mixed a light grey thinned down mixture of artist oil paints and odourless/low odour varsol (its weaker) and let it flow into the lines. I wiped away any excess. I find this light grey to be more subtle. Sorry old photo from another thread - I'll take photos of the 1/48 after I get Anasazi37's water slide decals.

-
I am not sure what the "Max" style is - maybe you could post a picture. I try to not go overboard, but because it is an anime subject - I find that you can get away with it sometimes. What I do is that I would use a shade darker of whatever the base colour is (ie: for a white valkyrie, I would use sky grey to post-shade). Basically I paint the model the way I want as though its brand spanking new, then I protect it in an different solvent clear-coat. For Example, I would paint the Valkyrie in Tamiya white (acrylic) and I would clear coat it in ModelMaster Acryl Semi-Gloss (laquer). This is why future would not work in this case - since both the Tamiya and Future can both be wipped off with alcohol or ammonia. This step is key, since it allows you to "erase" mistakes or re-do the post shading if you don't like it. Unlike what LTSO said about this method - I find that its very forgiving and allows a greater degree of control and redoing if you have done any mistakes. The theory is that the undercoat is sealed in by the clear coat, so any subsequent light spray of a darker shade to trace over the panel lines can be wiped off by a bit of windex on a q-tip without disturbing the paint under the clear-coat. The clear coat laquer doesn't react to the ammonia in the regular blue windex - which is a weaker solvent for Tamiya paints than alcohol - which their thinner is based on. So I usually thin down the mixture (ie: sky grey) so its more viscous 2:1 paint:thinner and try to set the airbrush to as thin of a line as possible. I then trace over all the panel lines, contours and crevices of the model - occasionally I would follow the air-flow direction over the aircraft as though it was flying as well. Where the post shading goes I find is more of a taste question - or artistic decision. Aside from picking out the panel seams, I tend to do it more heavily around the exhaust tail cones, and moveable surfaces. Sometimes I might mask a panel line with masking tape and just spray one side of it - it gives the impression that the masked side is newer and have just been recently replaced. Lastly, I treat the whole process kind of like a drawing, its like shading in a 3-D sculpture. BUT I NEED TO EMPHASIZE SUBTLETY HERE. I find it always more effective to under do it than over do it - I find that its too cartoony or "Gundamy" if there is too much shading. Plus you can always add more - but its a bit more difficult to take it away. Lastly, when you are happy with the post shading, I would again clear-coat protect this layer. Since its a very fine layer of paint you just traced on - it is very delicate and can scratch very easily. As soon as you can - you need to sandwich it in another layer of clear-coat laquer. I would even do a light dustng of the "weathering" effect on after the decals as well. Just keep in mind to always clear-coat laquer between stages that you might want to protect or "undo" to.
-
Hey IIymij, I visited your directory - Man, you've got to focus - set the camera to macro or something - its just too blurry to make out any details that would tell me what happened.
-
Well, here's my two cents. I've been using a Badger 200 Single action siphon/bottom feeding airbrush for 18 years now (with a university break in between) and it has been great. It was supposed to be my cheap beginner airbrush - but I never saw the need to upgrade it yet. In all these years, all I have done is clean it and get a new needle and head assembly. Not that the old one was broken, I just ran across a sale 7 years ago on a "fine" head/needle assembly, and wanted to replace my "medium" head/needle assembly that came with the airbrush. I would highly recommend this simple airbrush - its extremely easy to clean and the simplicity helps prevent clogging of heavier types of paint. This is the same airbrush I do all my painting today on and have absolutely no intentions of upgrading yet. The thing I did splurge on is a decent compressor. I used to use an old refridgerator compressor I got at the junkyard for $5 - with a proper moisture tap and regulator it did the trick for 10 yrs. But I pampered myself with a SIL-AIR silent compressor now and man does it make a difference.
-
Hey IIymij I logged in using your name and pass but there were no images. Why don't you start your own thread in this How To section and post the images to the thread - then PM me so I know when they are up - I will be glad to help if I can. Never heard of Painters touch - but becareful with primers not meant for styrene plastics - it may also adversly affect subsequent layers of paint on top of that. The sandpaper is to eliminate the center seam on the Valkyrie's canopy - there is no center seam on a YF-19's canopy only the VF-1 - and I woudl suggest higher than a 1000, up to 2000 would be better. Good Luck.
-
Yeah, you're right - ah, I don't feel so bad about the made up scheme afterall. I really like the way the look in this colour. I might add the yellow/brown stripes afterwards though. Thanks
-
Hey IIymij, GLad to hear you've got the future, for the clear parts at least, alll I do is find a part of the canopy that I won't see (like a peg or frame) and use a pair of pliers and dunk the entire thing in the future. I then take it out, and angle it to let it drip off the excess, sometimes if I see excess pooling up around the edges, I would dab it with a paper towel (look for lint!) but pretty much leave it alone for a few hours and let it harden. I would paint the canopy frame on afterwards, since you probably don't want the frame to have the same glossy sheen as the clear portion of the canopy anyways. Word of caution, the future doesn't do well with Microscale liquid mask - I think there is either alcohol or ammonia in it that will eat away at the future finish. Hence if you goof up (and I have many times) you can strip the future off with regular blue windex (it has ammonia) and try again. Good Luck. I don't know about your decals at the moment - maybe if we could see pictures.
-
Hey that looks great!! Where did you snap it - you can't tell at all - keep it up
-
I can't wait - when I get this little beauty, it will push all my other projects down behind it!!
-
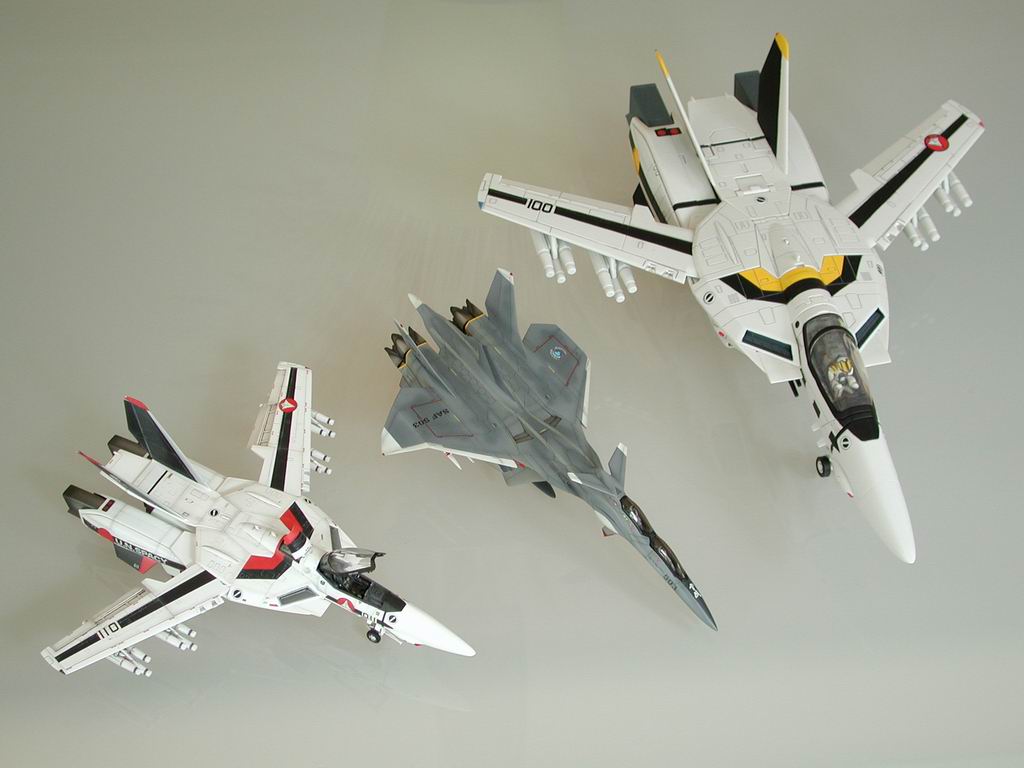
Thanks everyone Grayson72 - I tend to shade the longer panel lines (easier ) and ones that are closer to the moveable surfaces - however on the top, the dark colour of the plane makes the panel shading hard to see (I must work on this since my next model might be the YF-21 and its dark blue, so I don't quite know yet how to do the post shading on that bird for it to show up against the dark background - I might alternate flat and semi-gloss like this one a bit). If anyone has examples of this - I would love to see some. Hellohikaru - the model above the X-29 is an old Crusher Joe kit, one of the Minerva's fighters - I can't remember what its called - it was built while I was still in high school. Yes that Skull VF-1S is a model on the second shelf closer to us - its an old ARII 1/100 fighter mode only kit also built in the eighties. The farther Skull with the fastpacks on is a Yamato 1/60 VF-1S toy though. Firefox - sure no probs - I would love to see them though, maybe get a copy. By the way - where is Tober? He made some excellent photoshop images of my past work - I'd love to see him or anyone do that to my pictures - all I ask is to send me a copy. Lightning06 - I wish these kits were 1/72 - I love that scale (although its a bit small - but I just don't have the room) unfortunately, these are made by Bandai part of their EX collection (which are snap fit kits that require painting - unlike their Gundam kits) and are in 1/100 scale.
-
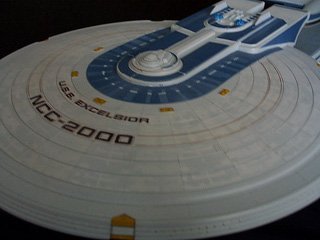
Omigod!! It looks great - can't wait to see it lit up. Man I wish we had decals like those 10 years ago - arrgh I had to mask everything back then all the blue patterns were masked - I even created a template in CAD and masked the aztec pattern on the saucer in a different shade as well as different panels for the hull and nacelles for my Excelsior. I drilled out all the windows back then too! Just too crazy - I'll never do that again especially to such a crappy kit!
-
The metal gleams in the sunlight...