Chronocidal
-
Posts
11077 -
Joined
-
Last visited
Content Type
Profiles
Forums
Events
Gallery
Everything posted by Chronocidal
-

STAR WARS Merchandise Episode - 2
Chronocidal replied to Black Valkyrie's topic in Anime or Science Fiction
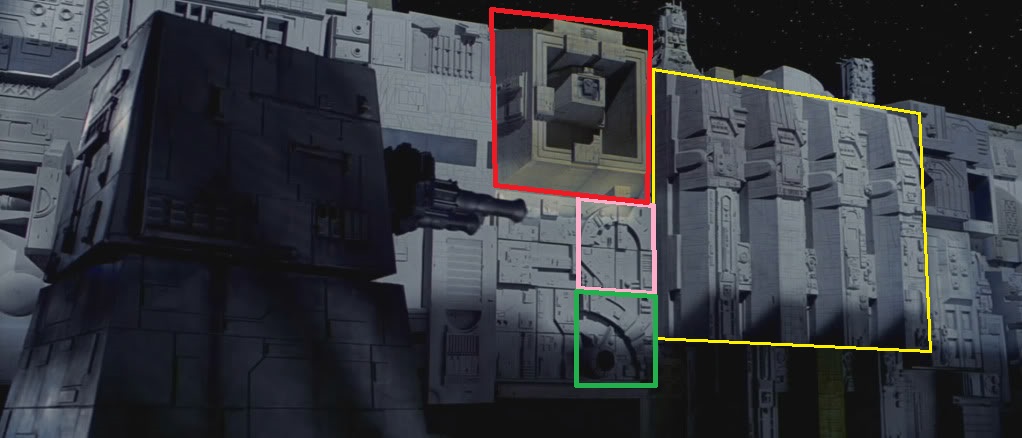
Found a topic on a modeling forum about someone building a studio scale replica turret, and whether the turret was meant to be the same size as the parts used suggest, a lot of the greeblies slapped onto its surface were some of the same parts used to detail up the surfaces of other ships. This was the one used in close-ups (I think only one was built), so minus any fancy camera work, it probably is the correct size compared with the studio-scaled fighters. http://www.therpf.com/showthread.php?t=136082 I love reading these types of articles though, they go into a detailed breakdown of where all the identifiable parts came from, down to which kits to buy to make your own. The gun barrels are apparently 1/32 MiG-21 engines. Anyway, the only thing I can find consistent about the death star surface details is their inconsistency. They were assembled in whatever shape or form worked for filming, so there's really no rhyme or reason to how big or small they appear. This shot from inside the trench has several sections outlined, all of which were used for Bandai's stand tiles. The big section outlined in yellow is the base included in the Y-wing kit, the pink and green sections are the tiles used for the tie fighter and tie advanced kits, and the red section is roughly one quarter of the base included for the x-wing, with the other 3/4 coming from other details that I can't find a screen capture of. Suffice to say, keeping in any kind of scale when dealing with the death star may be a good way to go crazy.
-
STAR WARS Merchandise Episode - 2
Chronocidal replied to Black Valkyrie's topic in Anime or Science Fiction
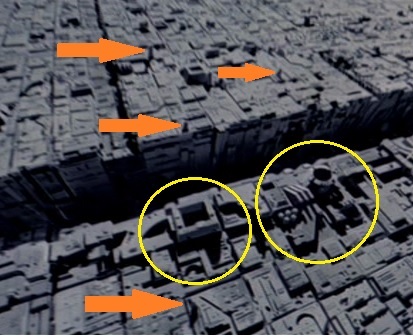
Looks like it's way too small based on what I remember, but I'll have to find some comparison shots. I know there's concept art showing the proper scale. A-wing looks really pretty though, I can't wait to build up a few. What I'd love to see are a few pure death star tile sets of different styles, mainly the under construction types from the second death star, with cranes and support structures all over. Edit: After a little research, Bandai may have worked themselves into a corner with the turrets. The version they're trying to replicate is supposed to be pretty huge. It goes further than that though... you kind of have to forget scale entirely when replicating bits of the death star, since nothing was actually constructed in the same scale, and I don't know if canon dimensions for things we've seen even exist. Here's a shot of the trench, with a few things highlighted. Those circled elements are bits of the surface that have been replicated in the tiles included in the X-Wing and Tie fighter kits. The tiny pegs with the orange arrows pointing to them? THOSE are the turbolaser turrets. Basically, the stand tiles are nowhere near 1/72 scale. If the turbolasers were molded into those tiles, they'd be so tiny the 1/72 pilots could hop out of their cockpits, and kick them over. I think the best option would be for them to only model the top-most section of the turret design they have, and scale it to the same footprint as a single tile. That would get the turret itself in about the proper scale to the fighters at least, but it would also make the turret big enough to be its own kit.
-
STAR WARS Merchandise Episode - 2
Chronocidal replied to Black Valkyrie's topic in Anime or Science Fiction
I doubt it would be too hard to splice a few more lights in, or just repurpose the ramp or cockpit ones to run some fiber optic strands. The lighting from those big lights is a little much for the interior. Also, just out of curiosity, does the Bandai kit include the original style rounded sensor dish? -
STAR WARS Merchandise Episode - 2
Chronocidal replied to Black Valkyrie's topic in Anime or Science Fiction
If I remember sizes correctly, the B-wing's about the same size as a Y-wing, at least in terms of longest dimension. Shouldn't need to go to 1/144 for that. But... yeah. A-wings are a bit smaller, but not as small as I remembered (about 3/4 the size of an X-wing), so pretty small, but not bad. Just means I can buy more of them. Fortunately, once you get rid of the sprue, these kits are all really compact with a little disassembly, and you can easily fit 4 or more of the kits in a single box. The turbolaser's a nice addition too, so I'll probably pick up a few of them, and I'm going to have to grab a bunch of Interceptors and bombers. Any release dates listed? -
There have been a few seen here in the past, but they were an extremely limited kit made of higher density plastic, and priced beyond what a lot of people would want to pay for a kit, even if they had been readily available at online retailers. As of this morning, AmiAmi still had some in their shop, but I'm not sure if I actually want to double dip on the Regult yet. My passion for Macross merchandise generally comes from fancy transforming aircraft, and this doesn't really qualify as either, so having one to pose with the Glaug might be plenty.
-
Hard to tell if they're actually detachable, or it's just an assembly point, because the back end of the back plate above the pod is so blunt and un-streamlined.
-
I don't know about the ankle joint itself being stiff, but on my VF-0D, extending the foot out of the leg from fighter mode is a massive undertaking. I generally wind up removing any pointy, fragile, or scratch-prone piece prior to doing it, just because I have to get such a death grip on the leg to yank the thing loose. Have to agree though, I miss the original gear door design, they just looked and functioned better in general. They were easier to open, but more than that, they didn't fall out, and the old hinge design actually resembled the types you see on real aircraft gear doors, with the pivot being buried inside, and the hooked pivot moving the door out and away from the opening.
-
Evolution Toy - VF-2SS Valkyrie I 《MACROSS II ~LOVERS AGAIN~
Chronocidal replied to joppewo's topic in Toys
Wow, the color on that Alto is baaaaaaaaaad. Makes me sorta almost glad that the one I got was the blue-tinted "movie" release. The 2SS is looking good there though, I admit it's sort of refreshing to see a truly battroid focused take on a valk, even if the fighter mode suffers from it. -
Evolution Toy - VF-2SS Valkyrie I 《MACROSS II ~LOVERS AGAIN~
Chronocidal replied to joppewo's topic in Toys
If you can't get a replacement part, it might be entirely possible to make a replacement yourself. I don't know what size the tires are (they look really tiny to me), but you might be able to get some sort of rubber O-ring to replace it. -
Evolution Toy - VF-2SS Valkyrie I 《MACROSS II ~LOVERS AGAIN~
Chronocidal replied to joppewo's topic in Toys
This kind of comparison is always going to happen, especially if you're dealing in highly niche items that only appeal to a small crowd. Worse yet, this is a design that itself is in a niche little corner of an already niche fanbase, and the level of expectations for such things tend to go up exponentially, because the only people who care about the design really care about the design, or else they wouldn't be interested at all. Arguably, Bandai was in the same boat with the first DX VF-25. But in that case, it was more market ignorance, or just not caring about producing anything of quality to compete with similar products from Yamato. Everyone knew Bandai was far more capable than they were showing. Heck, they even regressed back to pre-chunky monkey levels of quality in some ways. Fortunately, they went back and started over. Evolution Toys though... from what I've read about them, this seems to be about what people expect from them. Does that make it a good competitive product in a market full of high end collectible toys? Not really. It's not at the level of production quality you can expect from either Bandai or Arcadia, yet it's more expensive than a lot of the competing products. Note, I'm talking purely from a production quality standpoint, not how accurate it is to the source material. The engineering just isn't as polished as other products in that price range, and that's pretty much what you're going to get with a small company who's trying to produce a product for such a small target audience. Does that make it a bad product altogether though? Not really. Again, not judging the design on accuracy, it does what it needs to do. Really, this is the kind of product I'd expect to come from a company who mostly does robots, since the focus seems to be on the battroid mode, and it doesn't look bad at all in that mode. It kind of falls apart in gerwalk and fighter mode, but it's an awkward design that's going to have problems anyway, and you're not going to get someone new to designing valk toys to knock it out of the park on the first try. That being said, the toy design and engineering really don't look very impressive in a lot of ways, and that does detract from it. There are a lot of ways that this product could have been improved in looks just by doing more research on other Macross products, and mimicking the techniques used on them, like ways to minimize bulky hinges, and methods for attaching parts securely. That's entirely on the Evolution Toys design team to accomplish though, and while it can take years of experience to develop good engineering design processes, the entire reason you do market research of that type is to boost your own level of engineering to stay competitive. -
I'd say the chances are much better if you just buy the D and A, and make the swap yourself, since Arcadia doesn't seem to be all that interested doing many obscure designs, especially ones that only exist in concept art, or Hasegawa kits. That may change in the future if they decide to milk their existing molds, but after the anniversary VF-1J wound up piled in discount bins, I think they're being more cautious of producing untested designs and paint schemes.
-
I think a lot of it can be attributed to how impractical it looks from a functionality point of view. The bulky construction, and the arrangement of the arms limits them pretty severely, when compared with most other Macross mecha. The arms are still perfectly functional for most things one could assume a battroid would need to do though, and the bulky look is intimidating. Really though, compared with mecha from many other universes, this thing still is impressive in its flexibility, and you have to consider that this one wasn't meant to go hand-to-hand, so as long as you can aim the arm guns where you need to, it's going to accomplish what it sets out to do. On the fighter-mode end of things though, this thing is just beautiful, and incredible. The fact that you can get an aircraft that slick to turn into a completely functional mech is like a slap in the face for nearly every single "airplane with a box underneath" transformer design. I still would love to see a transforming SR-71 design based on this transformation. You might actually get something that even looks airworthy.
-
I don't know of any direct replacements being made, but I did experiment a little with ways to make them stay on, without gluing them in permanently. In the end, I think I put a small strip of scotch tape around each of the missile tabs, and with that added thickness they're pretty solid. You might be able to do the same thing with a strip of paper, if having the tape's glue on the missiles is a concern. I think my actual biggest irritation with this design is that they designed the cockpit too long, and with the seat so far back, the pilot just flops around, and can't reach the instrument panel.
-
Evolution Toy - VF-2SS Valkyrie I 《MACROSS II ~LOVERS AGAIN~
Chronocidal replied to joppewo's topic in Toys
Glad to hear it's pretty solid in battroid, from the pics it looks to be its best mode all around. I might be tempted to grab one of the SAP versions later down the road, but I've never been that interested in this design to begin with. I'd probably grab it for the fighter mode anyway, but I think the loose assembly and proportions in that mode don't do the design justice. -
STAR WARS Merchandise Episode - 2
Chronocidal replied to Black Valkyrie's topic in Anime or Science Fiction
That would put them at about 1.5 inches, which I think is pretty close to the original Micro Machines from the mid 90s. The X-Wing game miniatures might be pretty close as well. In my case though, anything that small is below my personal "give a flying crap" threshold. See... part of me really wonders about whether Bandai's own strategy is skewing the numbers to make them think bigger kits won't sell. They released the only large scale kit as a super-deluxe, overly expensive, and overly complicated electronic motorized monstrosity. I don't know how well it's been selling, but at that price, I have to wonder if they're going to assume no one wants larger kits, when the real killing feature is that no one wants to pay for all the extra electronic crap they're probably going to strip out and throw away anyway. -
STAR WARS Merchandise Episode - 2
Chronocidal replied to Black Valkyrie's topic in Anime or Science Fiction
Yep, but I can't help shake the feeling that the Revell release of that massive kit is actually a lot more expensive than the Fine Molds one... Edit: Looked back at discontinued items, looks like HLJ had its list price as 19,000 yen, so about $160 at current exchange (HLJ was selling it for 15200, about $133). Anyone know what the list price of the new one is? I don't trust any prices I'm seeing, because I don't think the kit is well circulated yet. Amazon has listings for around $215 for the Revell version, but they also say the list price is $300, and some other hobby site has the MSRP at $350... So, really, wtf? -
STAR WARS Merchandise Episode - 2
Chronocidal replied to Black Valkyrie's topic in Anime or Science Fiction
Now, that is a good size for a snowspeeder. The Bandai kit isn't bad by any means, but it's just such a tiny vehicle. AT-ST looks good as well, but the posing is a bit wacky. -
STAR WARS Merchandise Episode - 2
Chronocidal replied to Black Valkyrie's topic in Anime or Science Fiction
Not a huge fan of th SD X-wing (what I like about the design to begin with is a proportional thing, I think) but that AT-AT is freaking adorable. -
I dunno, there was one scene where the 19 was shown pretty well trashed. It was going in for repairs, but I don't know if it was due to the prototype being that difficult to control, Isamu being a reckless maniac, or both.
-
So, I'm not sure which hemisphere they're thinking they're in, but if the show doesn't premier until later this spring, why are they selling the planes before the show is even on the air? And they're running out of winter fast. On the other hand, this could be a screwy marketing gimmick to prevent nit-pickers from going "that's not what it looks like!" If they sell the product before people actually know anything about what the plane looks like in the show, all the complaints will come too late, and Bandai can take the money and run.
-
STAR WARS Merchandise Episode - 2
Chronocidal replied to Black Valkyrie's topic in Anime or Science Fiction
Good grief, what is it with Bandai and their obsession with microscopic kits? Wasn't 1/72 small enough already? If I wanted micro machines, I'd just buy the stupid tabletop game miniatures, since they'd probably wind up cheaper once you add shipping. I've been waiting to see the main fighters in 1/48th for literally 25 years now, the least they could do is finish what they started, and make the non-electronic version of the X-wing. And I'm not going to be happy until they complete the full line of OT fighters in 1/48th. Honestly, the A-Wing is so tiny to begin with, I don't even know if I'd want to bother with one in 1/72. Also.. please. No one wants the prequel craft, least of all the random trade federation junk they have shown there. -
Bandai Macross Δ Mecha Collection Small Scale Plastic Model Kits
Chronocidal replied to IXTL's topic in Model kits
Interesting.. but couldn't they just pick a scale and stick to it? It's not like the 1/100 kits were any fancier. I would have actually bought them at that scale. -
STAR WARS Merchandise Episode - 2
Chronocidal replied to Black Valkyrie's topic in Anime or Science Fiction
I don't even collect figures, but I would love to see more illustrations of those characters in action, they really fit well. -
STAR WARS Merchandise Episode - 2
Chronocidal replied to Black Valkyrie's topic in Anime or Science Fiction
This ship really isn't a bad display, considering that the only other available mass produced version was some horribly mis-proportioned monstrosity with lights and sounds from years back. I've seen a couple comparisons to the original studio model, and it's not perfect by any means, since some bits are differently shaped, and the proportions are a little different. On the other hand, they did their research... the underside of the ship isn't symmetrical, and though you never saw it in the movies since it was only filmed from the other side, this ship still has the boarding ramp hatch they intended to use for when this ship was still meant to be the Millennium Falcon. My biggest pet peeve is that the upper and lower turret mounts look too big. I might do a little surgery and rework those so the bases are smaller, and allow the guns to pivot better. -
Evolution Toy - VF-2SS Valkyrie I 《MACROSS II ~LOVERS AGAIN~
Chronocidal replied to joppewo's topic in Toys
May be a silly question, but I can't tell for sure from the bits of lineart I've seen. Are guns in Macross II just sort of hollow on the bottom? Both the gunpod and shoulder cannon from the SAP look open underneath.