captain america
-
Posts
3561 -
Joined
-
Last visited
Content Type
Profiles
Forums
Events
Gallery
Everything posted by captain america
-

MOSCATO 1/2000 IKAZUCHI CARRIER?
captain america replied to captain america's topic in Anime or Science Fiction
14 in so far. Will we hit the MOQ to proceed in time? -
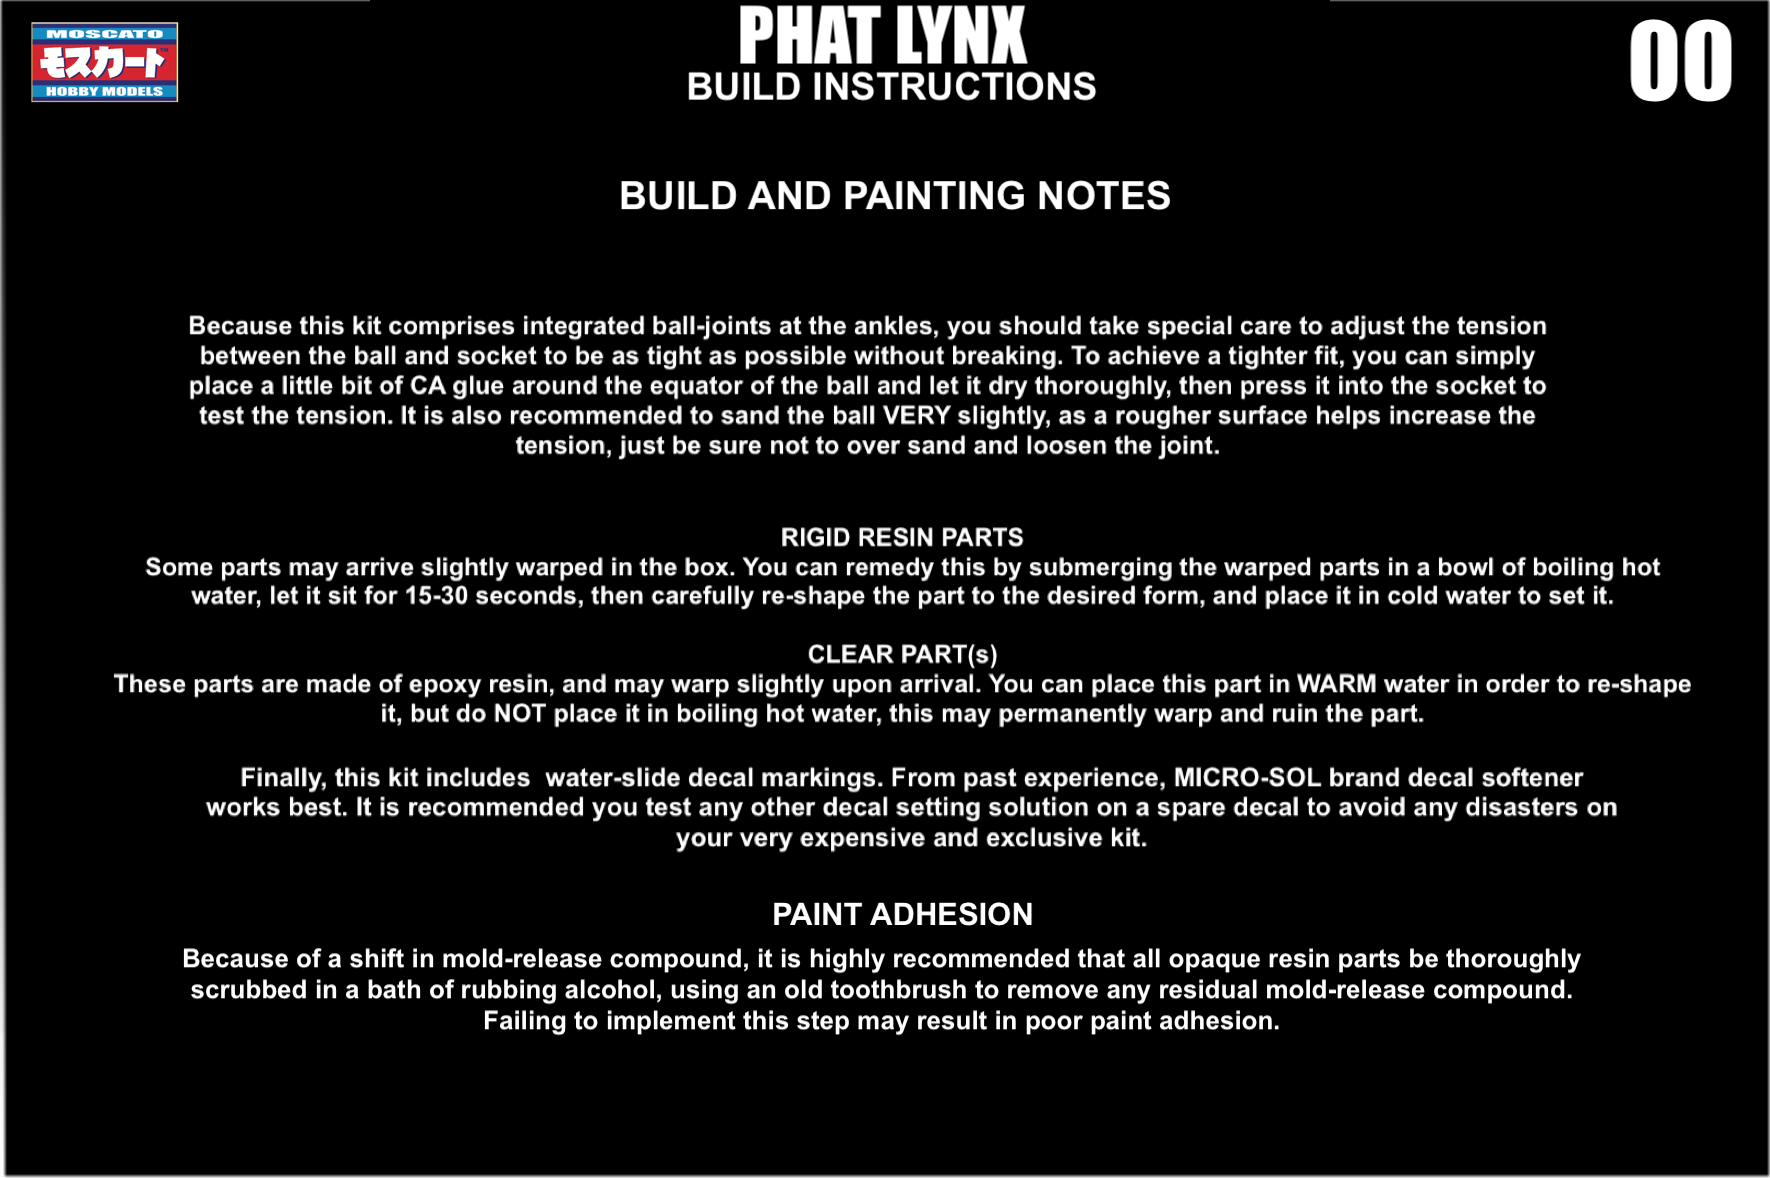
AAAAARGH!!! I hate when that happens! I recommend that my resin kits (heck, ANY resin kits) be scrubbed with an old toothbrush and rubbing alcohol prior to painting. Thoroughly. It's a very effective degreaser. Also, if I don't remove the masking right after painting, I will lightly run a sharp blade over the mask line and peel the tape diagonally to avoid it pulling up paint. I'm sure you know this Ted, but others may not, and if I can save them a few tears, so much the better.
-
Seriously! FWIW, I solved the "improved maneuverability" issue like 20 years ago by incorporating thruster nozzles (static and dynamic) in key locations so the Legioss would have full nose-authority even at zero airspeed. Peeps gotta try harder.
-
Kinda looks like something Rey would see in a dehydration-induced hallucination during a sandstorm. All it needs is a sword! Kidding aside, I get that they want to produce new merch, so they need "new" designs, but I'm really sorry, the design is stupid. The AWACS idea with a radar dish is a good idea, but the wings with the blasters don't fold-away neatly enough in Diver or Soldier mode, so they just hinder movement. The jousting lance looks ridiculously out of place (not to mention horribly balanced!) And those canards... yeah, let's put those in the most awkward location possible to create massive lateral blind spots for the pilot! They could have simply redesigned the LERX to make it different, be useful, stow away neatly in Soldier AND not hinder the pilot's visibility. Also, alot of you who've been around here long enough know I'm not just talking out my a$$, because I have a reputation for back-engineering a lot of those Anime chicken scratchings into functional, physical models. Whoever did this simply wasn't trying.
-
MOSCATO 1/2000 IKAZUCHI CARRIER?
captain america replied to captain america's topic in Anime or Science Fiction
11 so far! -
MOSCATO 1/2000 IKAZUCHI CARRIER?
captain america replied to captain america's topic in Anime or Science Fiction
Reply in blue. -
MOSCATO 1/2000 IKAZUCHI CARRIER?
captain america replied to captain america's topic in Anime or Science Fiction
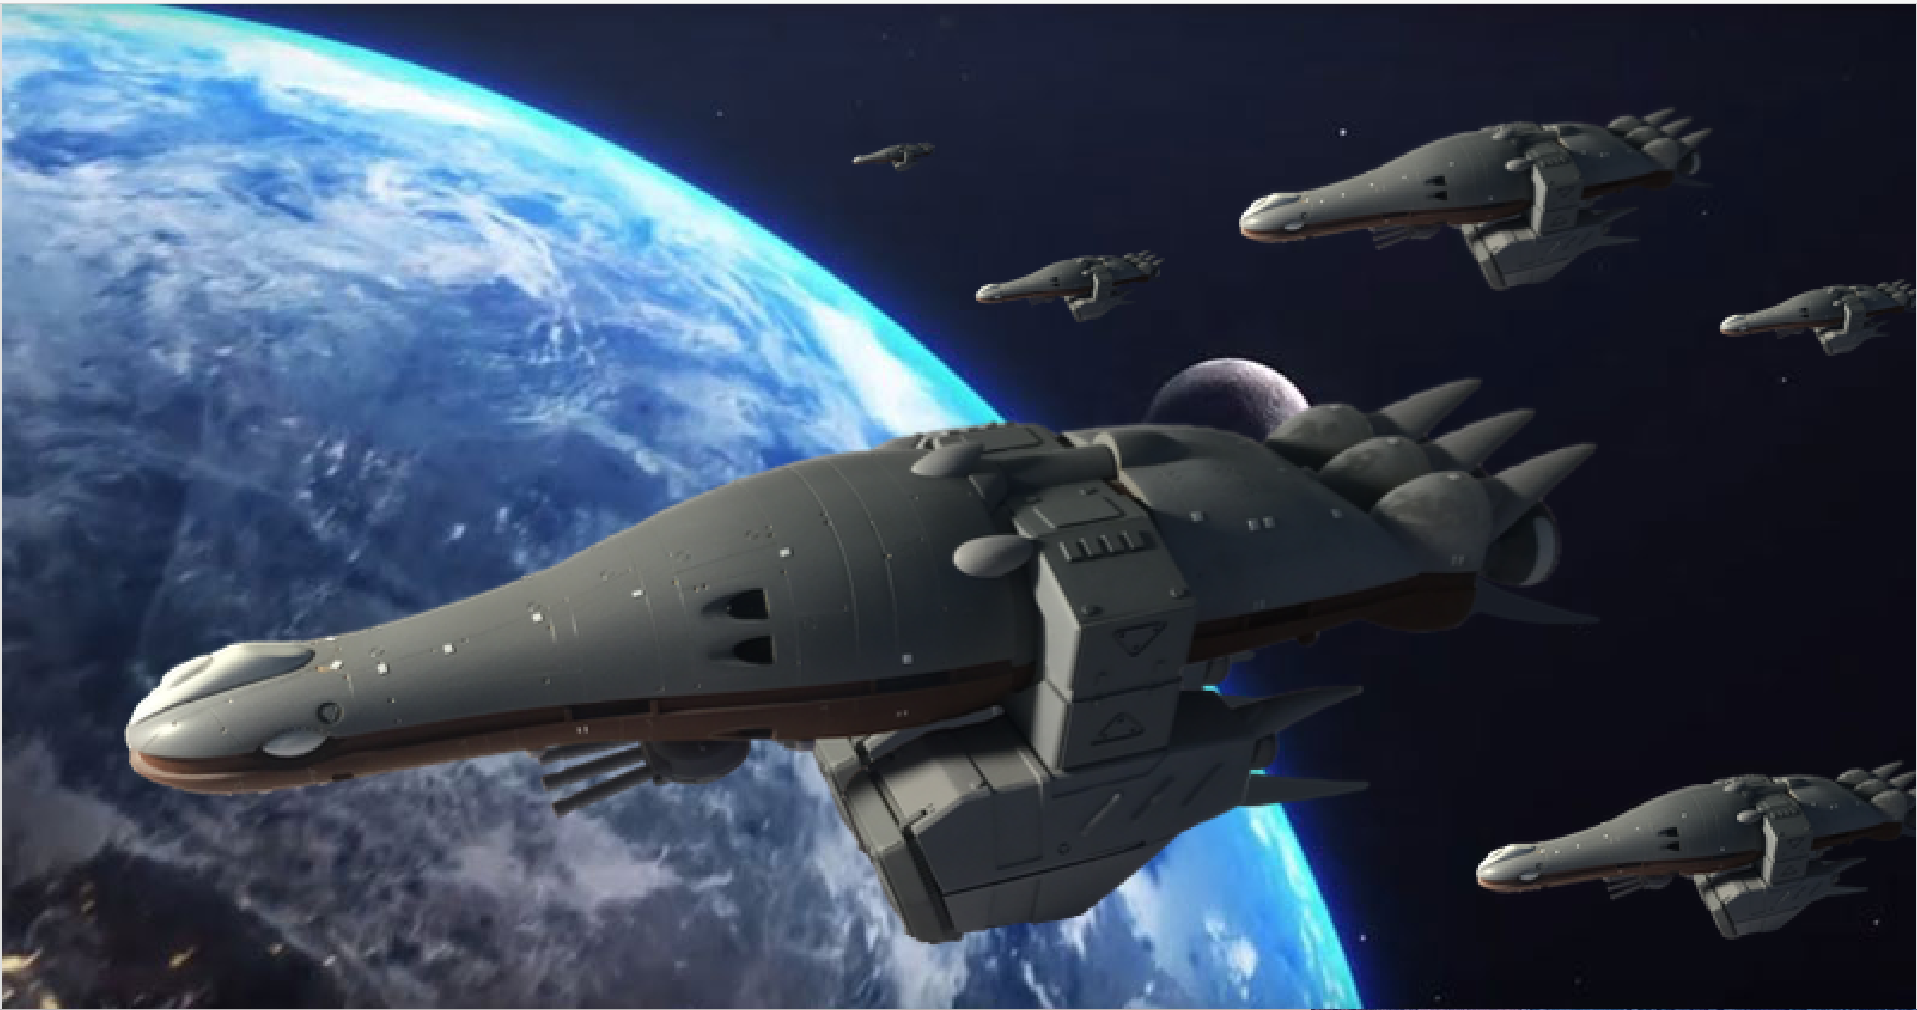
To make a long story slightly shorter, the Artmic stats don't align with the visual proportions of the line-art. Back when I made the Regults, I based the mecha size on a baseline, which is the Zentraedi soldier. If a soldier can't fit in the mech, the stated sizes are irrelevant. Similarly here, I had already made the Horizont and Garfish in 1/350, starting with the Legioss as the baseline. The fighter has to be able to fit in the Garfish hangars, and fit just so beneath the Horizont's lower hull and between the crew pods. Working from this line-art illustration, you can roughly make-out that one Ikazuchi launch bay holds 24 Armo-Soldiers. Now if you take this other animation style sheet shown below, you have a decent idea of the proportions of the carrier, based on the other mecha. Knowing that I have to cram 24 soldiers in one bay, a bay must be a minimum size, so either I must deform the ship, or upscale it to make it proportional. If you look at the image below, it shows you how big the Ikazuchi would be at 300m, and the bays are just way too small. Consequently, I have enlarged the ship because physics. I did goof though, the actual kit scale would be 1/1000 and not 1/2000. Fixed that.


-
Greetings all! I’d like to propose the next original Moscato Hobby Models resin kit: a 1/1000 IKE CAPITAL SHIP [MOSPEADA IKAZUCHI CARRIER].The kit would come in at a little over 35cm in length. Kit features: -positionable open or closed soldier launch bays (no removable soldiers!) -included decal markings for 3 different ships -positionable gun turrets -translucent resin thrusters and hollowed hull sectors for easier lighting Proposed kit price before shipping: $250 Canadian dollars Kit price with shipping to Canada/US contiguous: $290 Canadian dollars International shipping: please PM me for actual quote. I need a minimum of 20 orders to proceed with the project, so I’ll leave this up until January 23rd (inclusive). To voice your acceptance of the project, send me a private message telling me: -« I’m in! » -how many kits you’d like -if you’re not in the US or Canada, your shipping location, so I can calculate the shipping to you. Payment: if there’s sufficient interest, I will collect $200 CAD up front, with the remaining amount due when the masters are complete. I am also offering a 10% discount on any orders paid in Bitcoin. Posting in the thread/asking questions is fine, but will not be construed as intent to purchase. If I don’t get sufficient interest by then, I’ll simply move to another project. Aaaand we’re off!

-
And the horridly comical dilution of this once great Anime continues.
-
4 so far.
-
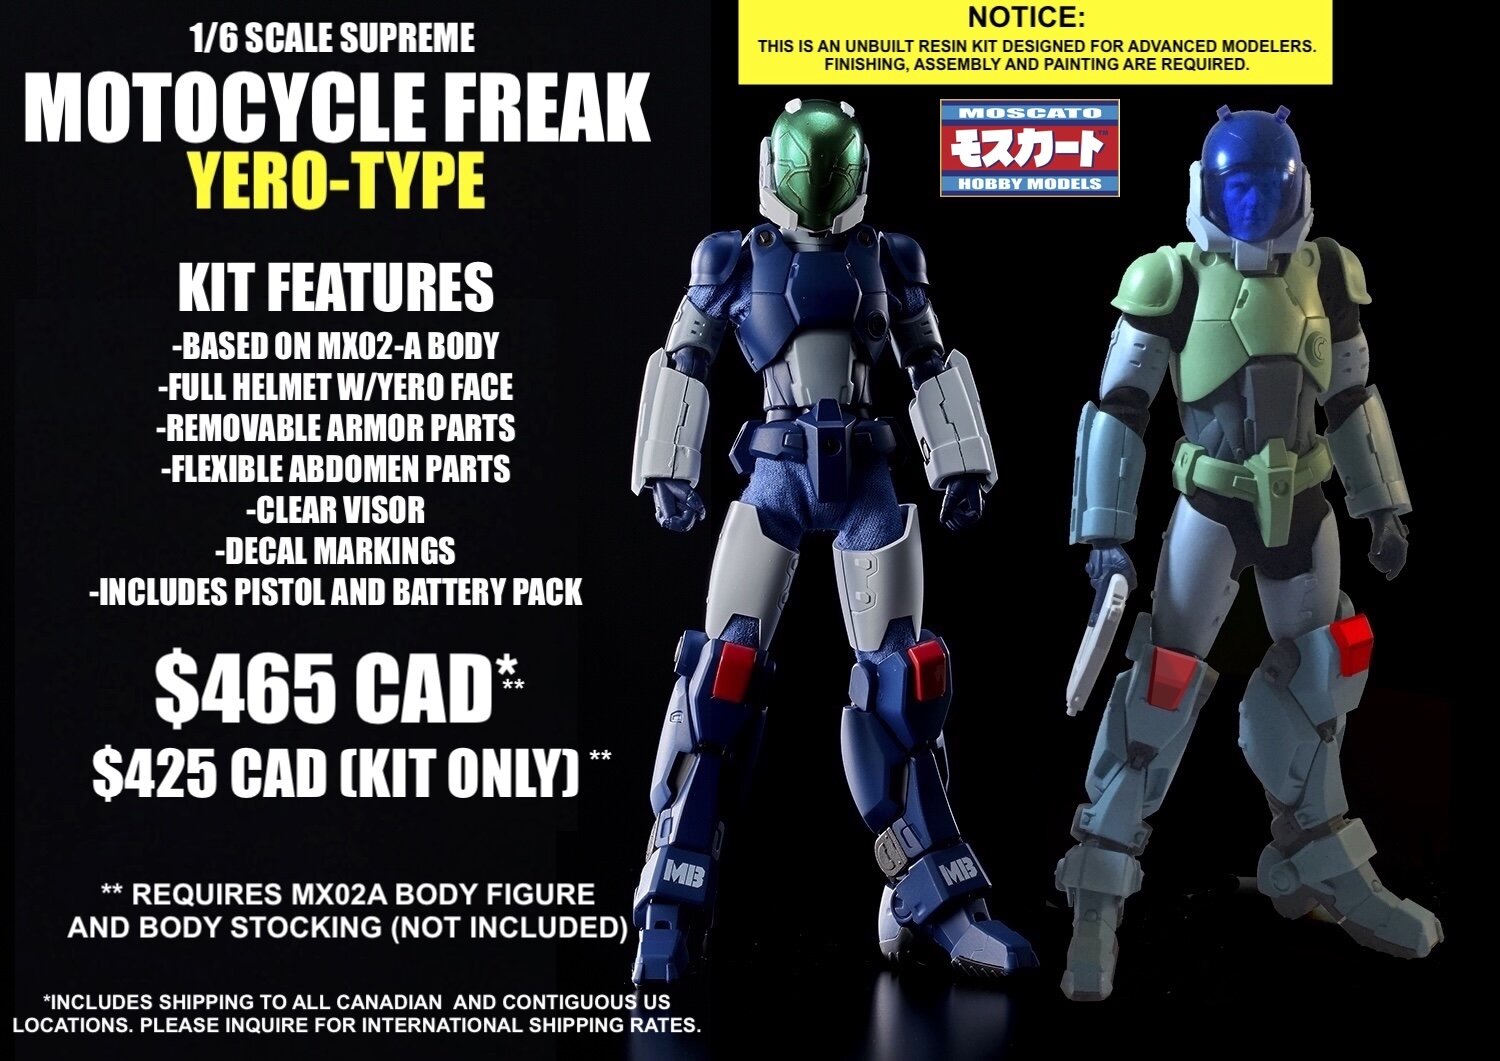
Greetings everyone, I need your help! As I teased on Facebook a few of days ago, I'd like to offer the following modelling project: a 1/6 MOTOCYCLE FREAK YERO-TYPE armor + accessories set. This would be similar to the original MOTOCYCLE FREAK released almost 3 years ago, but with the following detail revisions: -revised front helmet for the YERO-TYPE -green-tinted visor -new face sculpt to more accurately represent YERO -the carabine parts (stock. barrel, sling) replaced with a 4-battery (HBT) pack **Kindly note that an MX02-A body figure and body stocking will be required (not included) to complete this figure. ** To make this project happen, I need a MINIMUM of 12 orders (non-negotiable). If you're interested in obtaining a kit, you will need to PM me to let me know and I will compile a list. I will let the project run until January 3rd (inclusive) 2026, at which point IF I have enough interest, I will send out payment requests and start the project. If you can, please share about this project on other pages, and even other sites, just please be respectful of the rules where you post. Ready, set... go!!!
-
1/6 MOSPEADA Rider Project Proposal
captain america replied to captain america's topic in Anime or Science Fiction
Bumpers! Did anyone end up finishing their kits? -
The Official Moscato Hobby Models Thread
captain america replied to captain america's topic in Anime or Science Fiction
Currently being offered. Need to hit the MOQ of 12 before Nov. 10th.
-
No Love for Southern Cross?
captain america replied to blacklotus's topic in Anime or Science Fiction
Carlos has my blessing to back-engineer my Tanku-Robo model if it will help produce a faithful figure.- 1465 replies
-
- 1
-

-
- Southern Cross
- anime
- (and 8 more)
-
1/72 Scale Moscato Pattern Glaug
captain america replied to Return To Kit Form's topic in Model kits
Simply fantabulous!!! I do so enjoy seeing people bring out the best in my kits. -
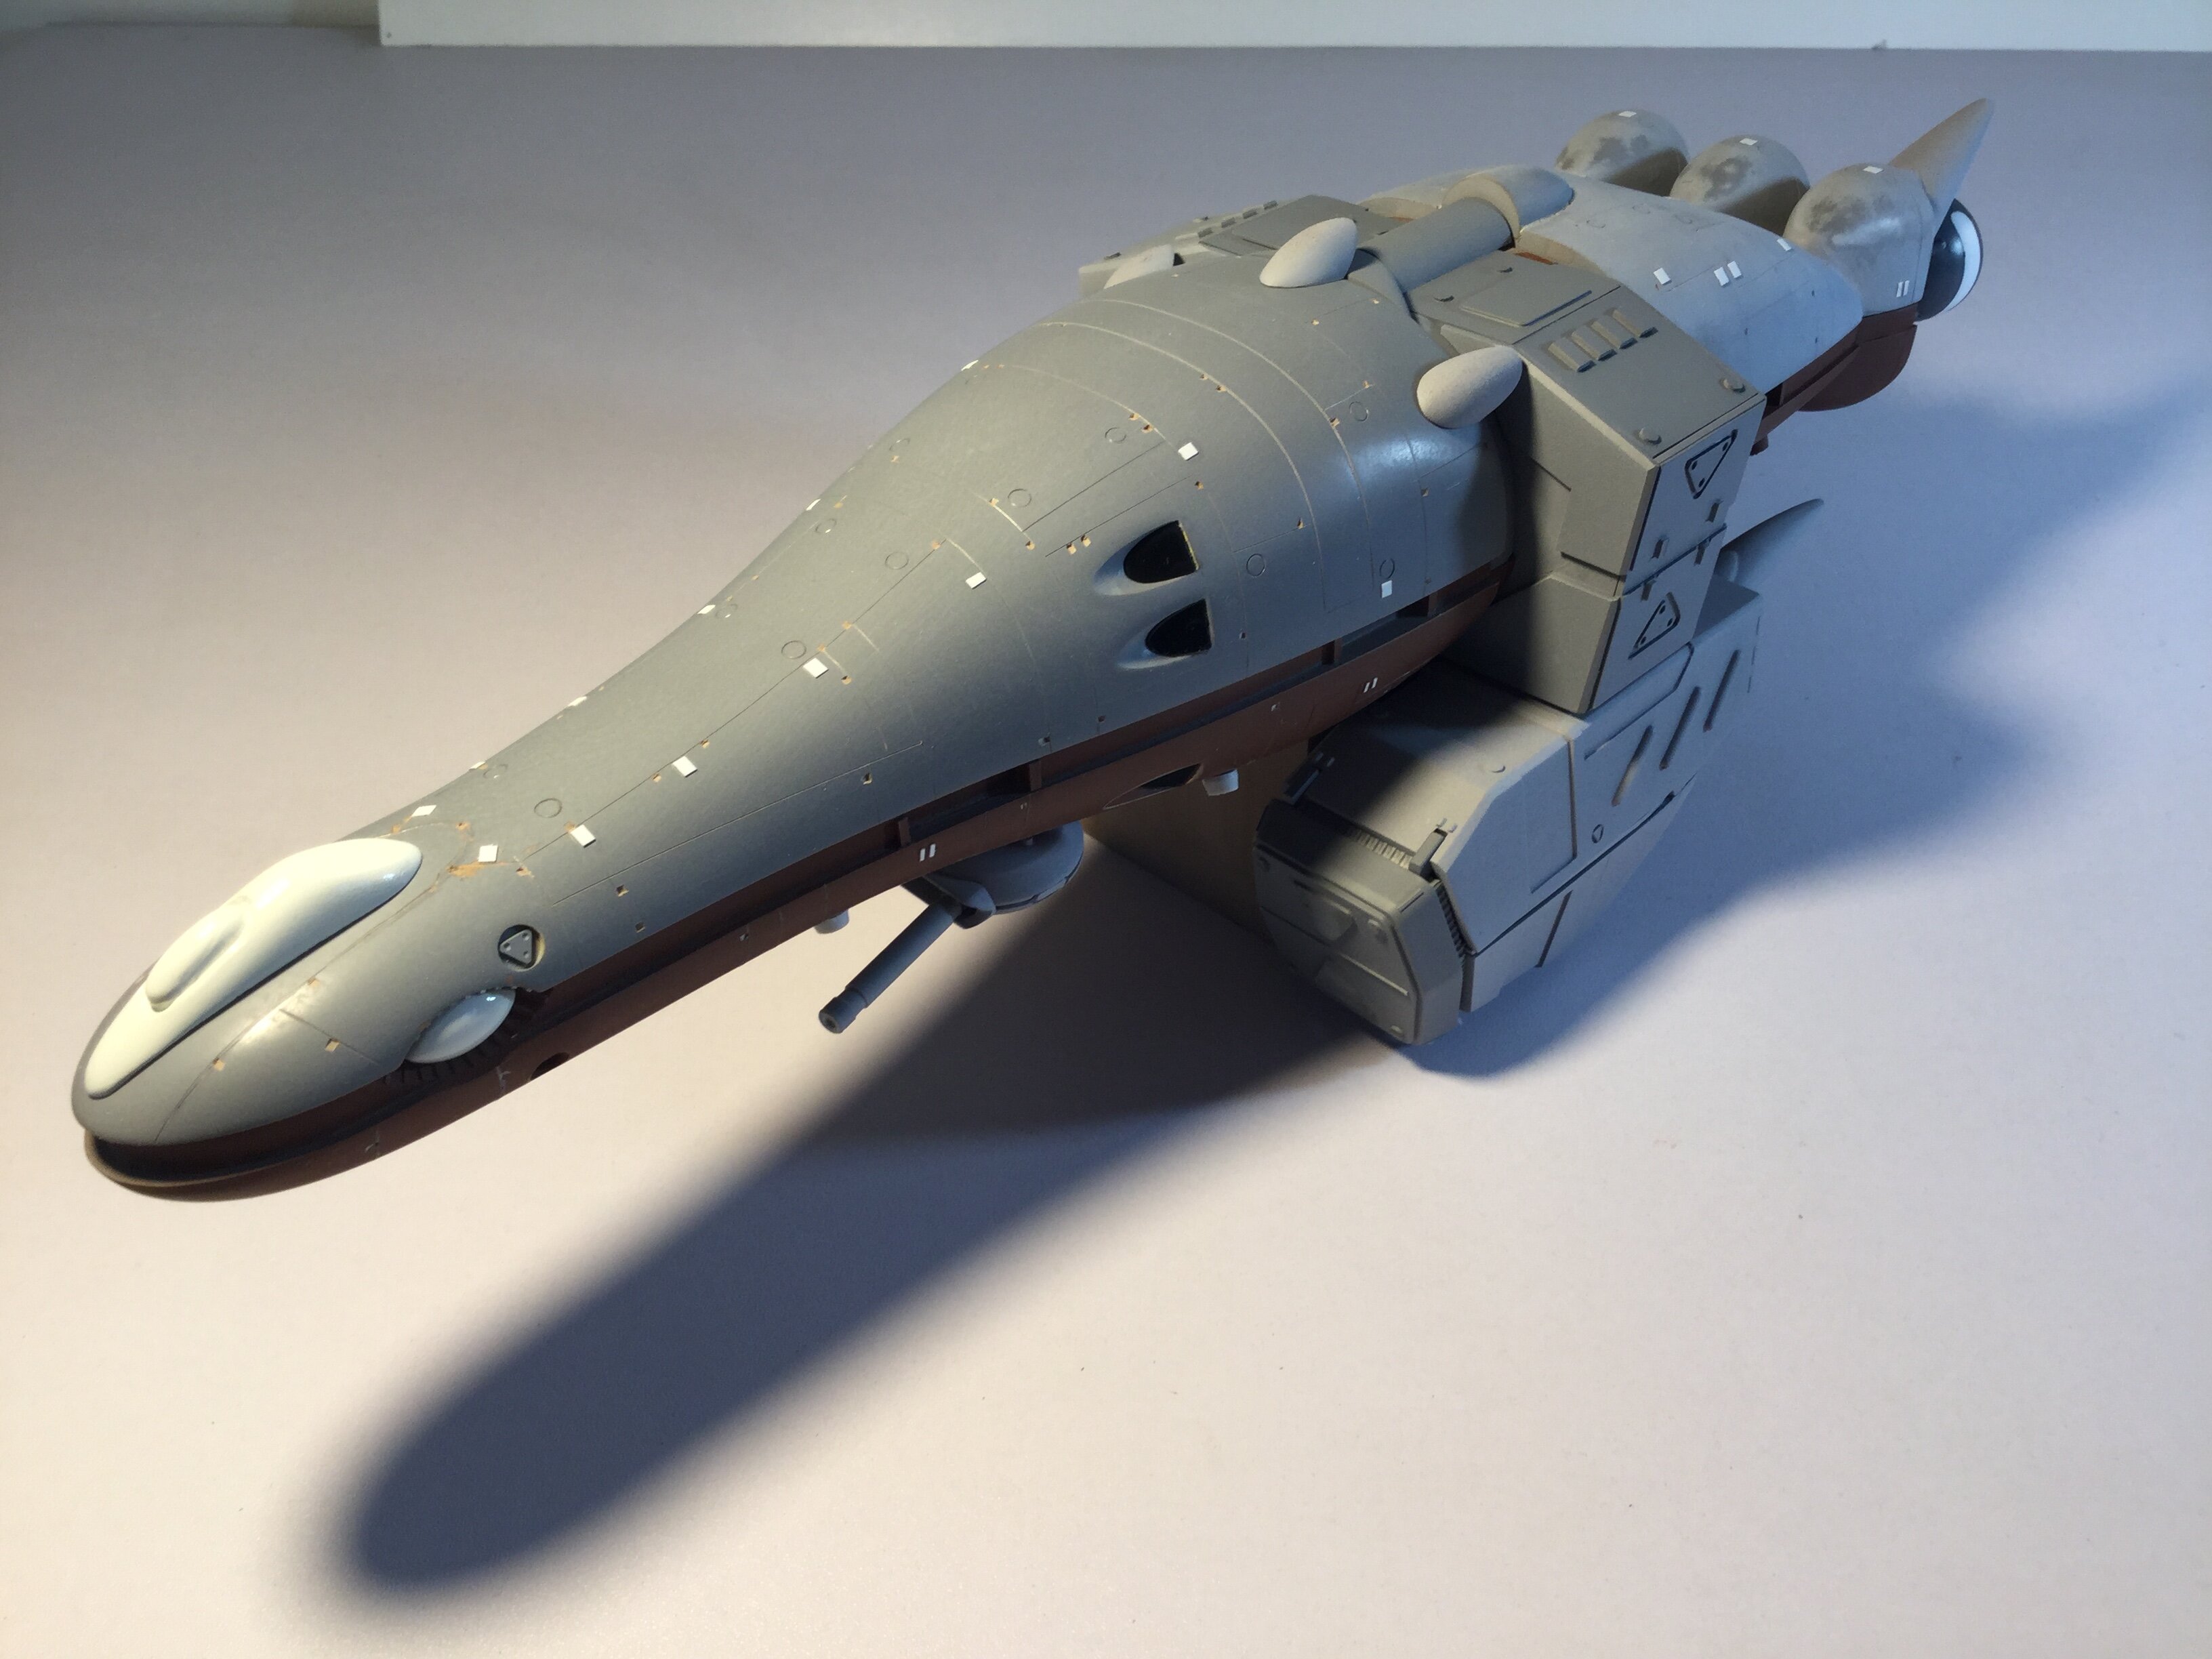
Greetings @everyone! Just wanted to let you all know that I'm planning a re-issue of the 1/350 STARFISH (MOSPEADA Garfish) kit. FEATURES: -waterslide markings -translucent parts (lenses, engine thrusters) -hollowed-construction for easy lighting -fighter bays with hatches that can be posed open or closed -a compliment of three in-scale fighter aircraft -glorious 35.5cm length in 1/350 scale Kit price: $330 Canadian dollars + shipping $369 CAD with shipping* *covers shipping to all Canadian and US contiguous destinations. Hawaii, Puerto Rico and international customers please inquire for exact quote. If interested, just PM me, thanks!
-
@tom do Just PM me.
-
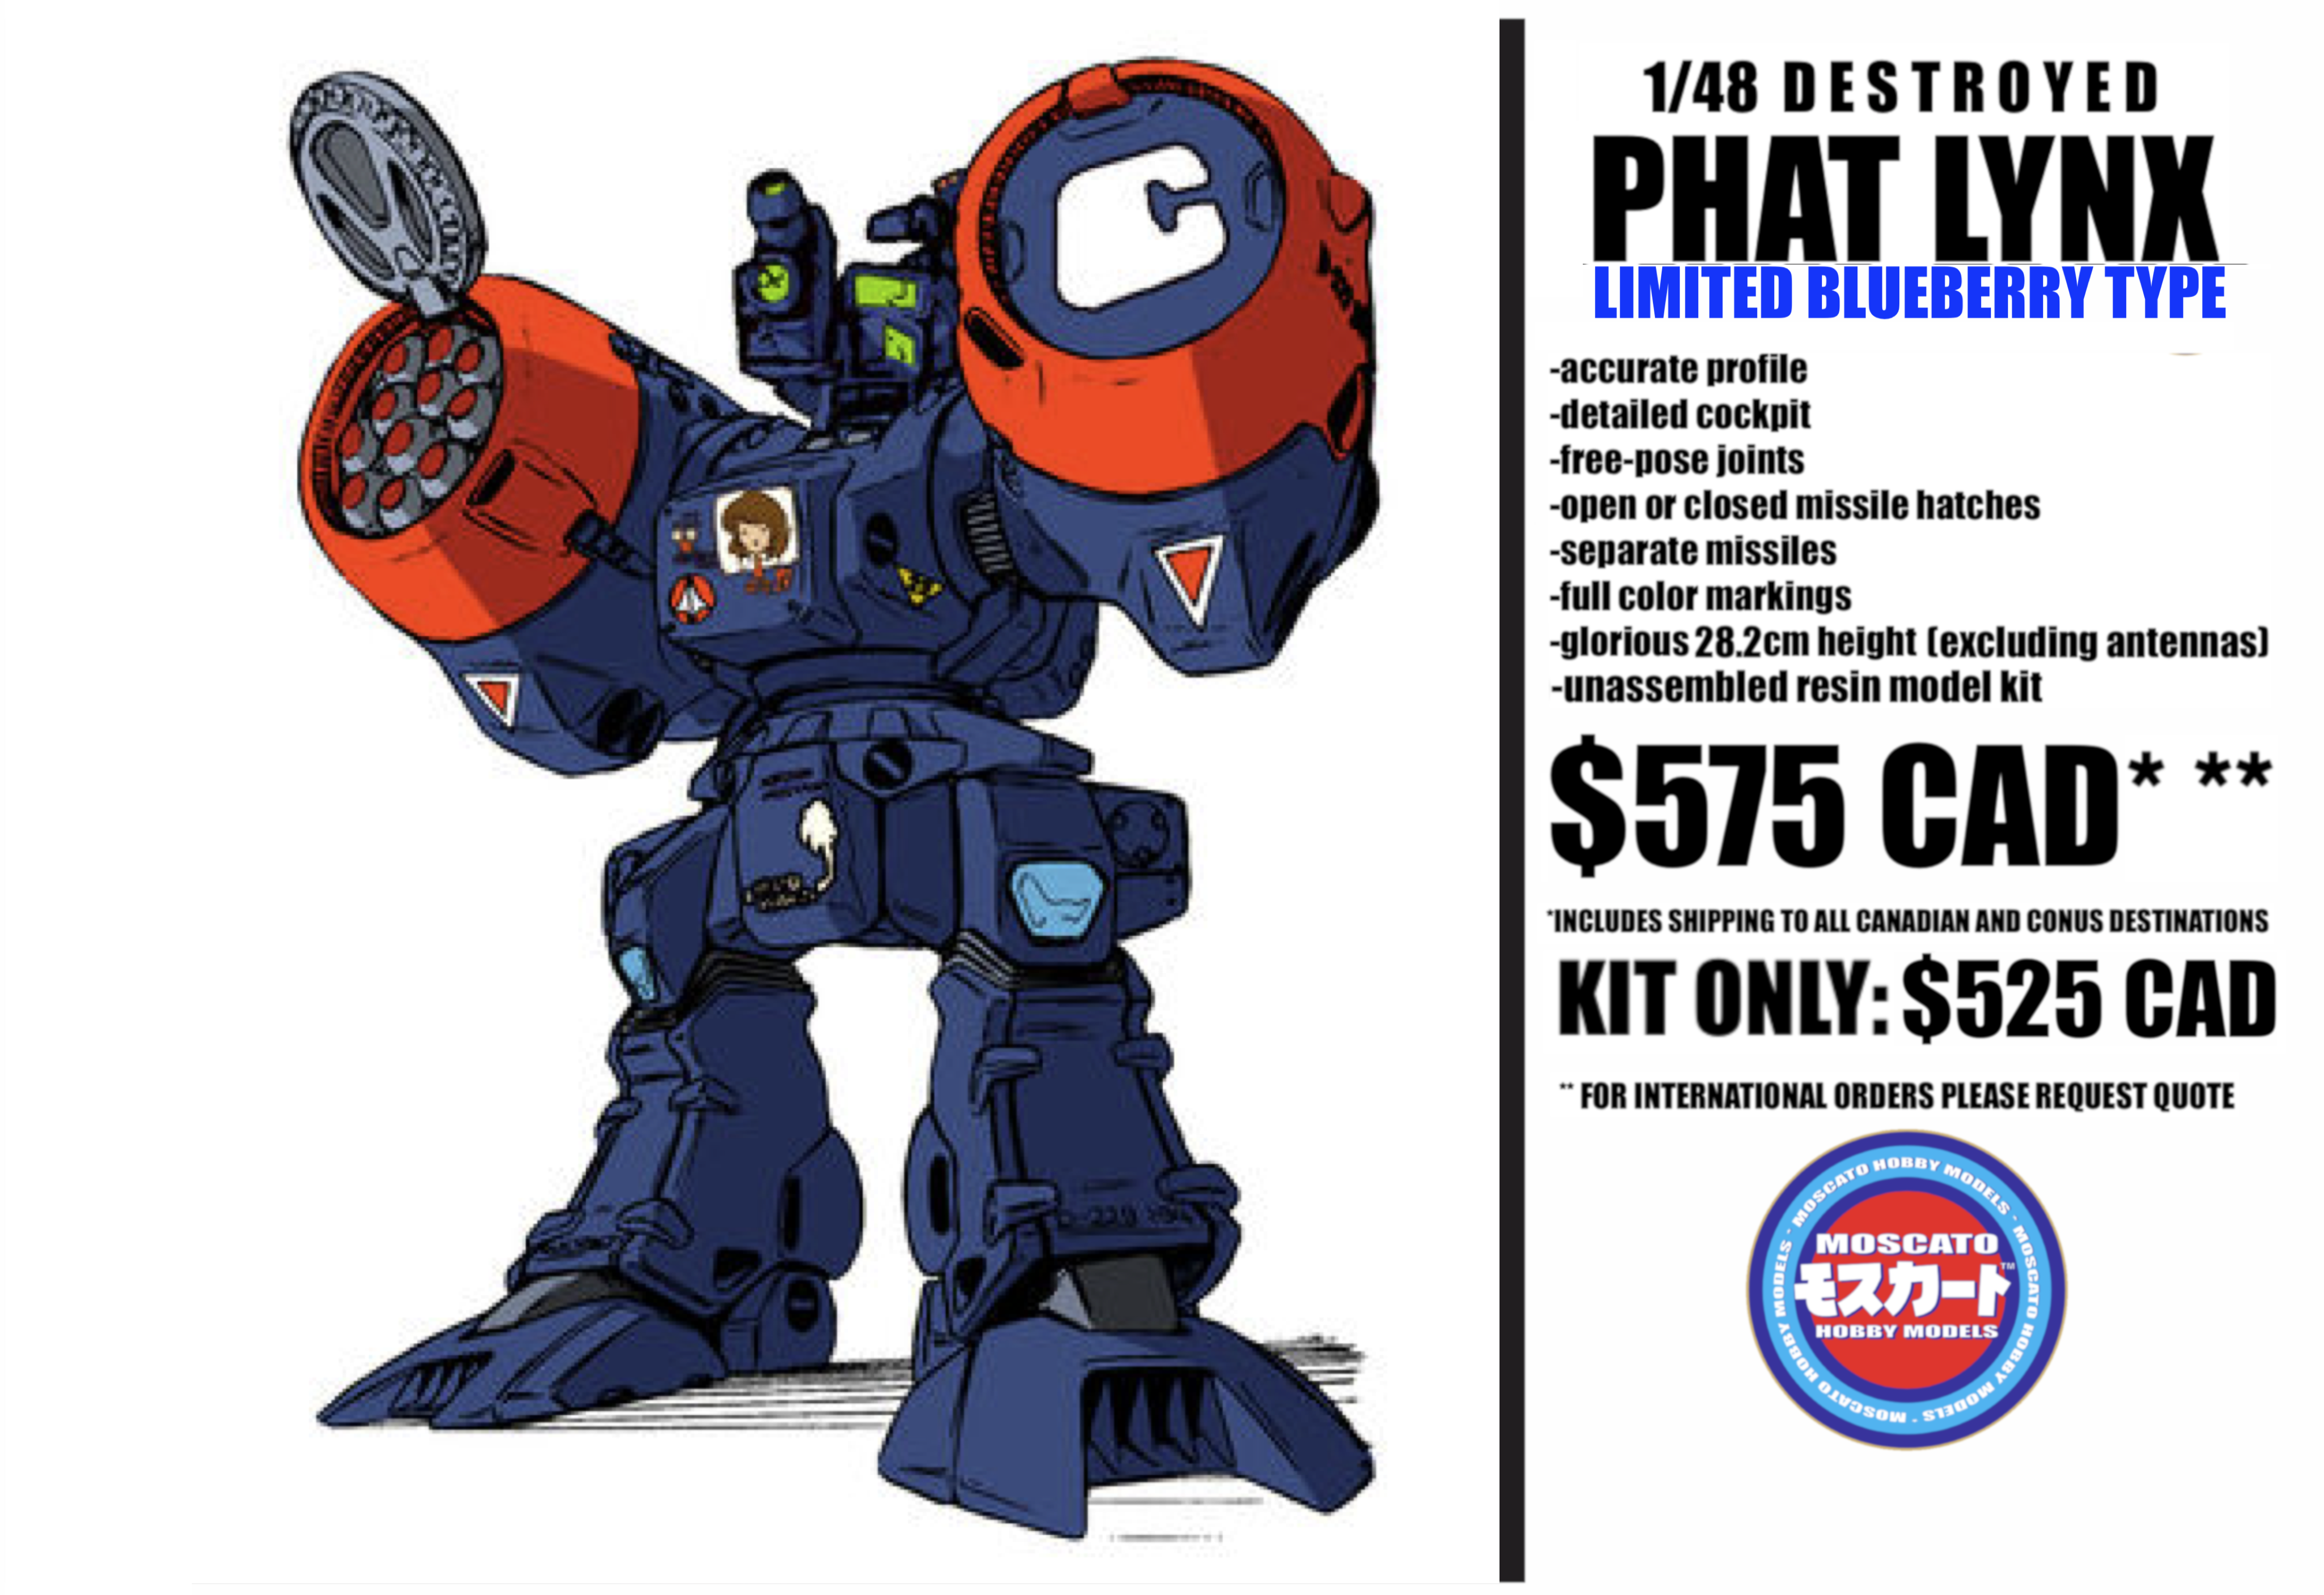
The Limited Blueberry Type is cancelled for lack of interest; the standard searchlight version will be shutting down production in the next week-10 days.
-
Destructions are ready to download! 08.HEIC 09.HEIC 11B.HEIC 12B.HEIC 13B.HEIC 14B.HEIC 15B.HEIC 16.HEIC 17.HEIC 18.HEIC 19.HEIC 20.HEIC 21.HEIC 22.HEIC 23.HEIC 24.HEIC 25.HEIC 26.HEIC


-
Greetings @everyone Now that most of the 1/48 PHAT LYNX orders have been shipped, I'd be curious to know if there would be sufficient interest to offer the (blue) PHAT LYNX variant with the alternate head seen in the anime? I would offer just a few examples of this kit (5-8 maximum) just enough to complete the mold cycle. It would consist of the same body parts/weapons load-out as the existing PHAT LYNX, but with the old head searchlight replaced with the alternate camera head. Please note that the new head is not being offered separately on its own, but as a complete kit only. Can I get 5-8 people out there to commit to this project? Please DM me to ket me know, thanks
-
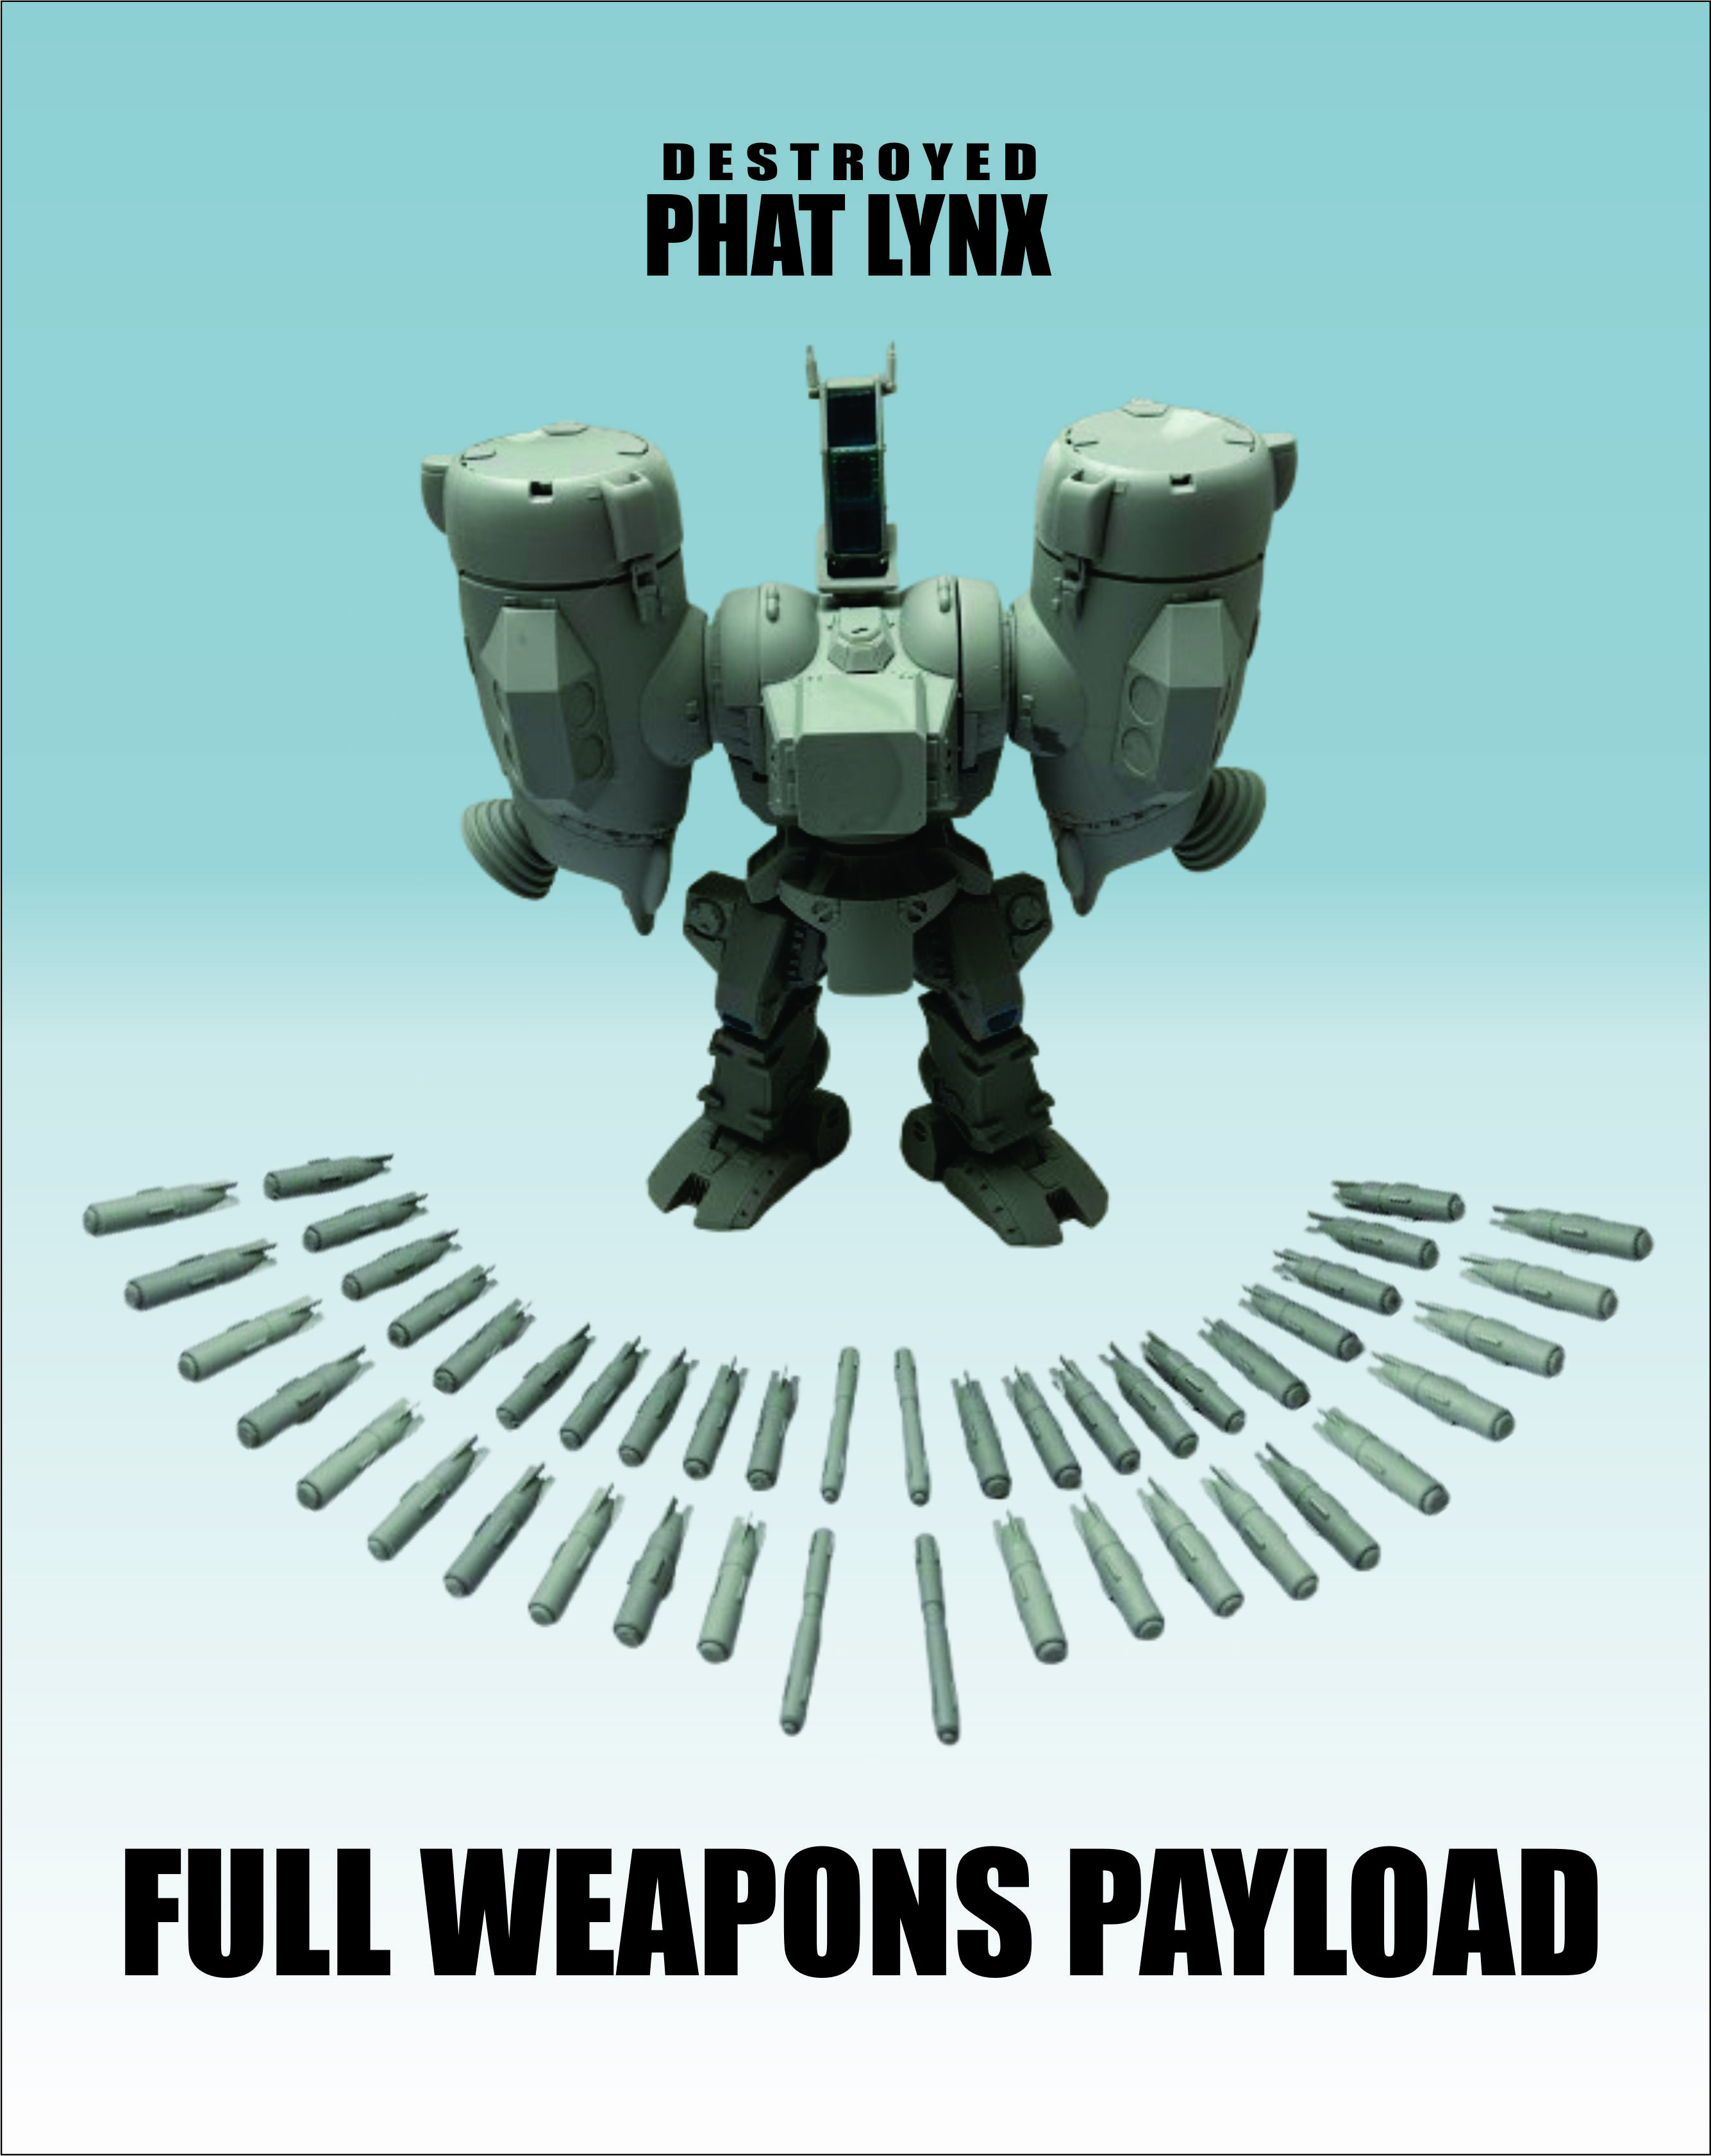
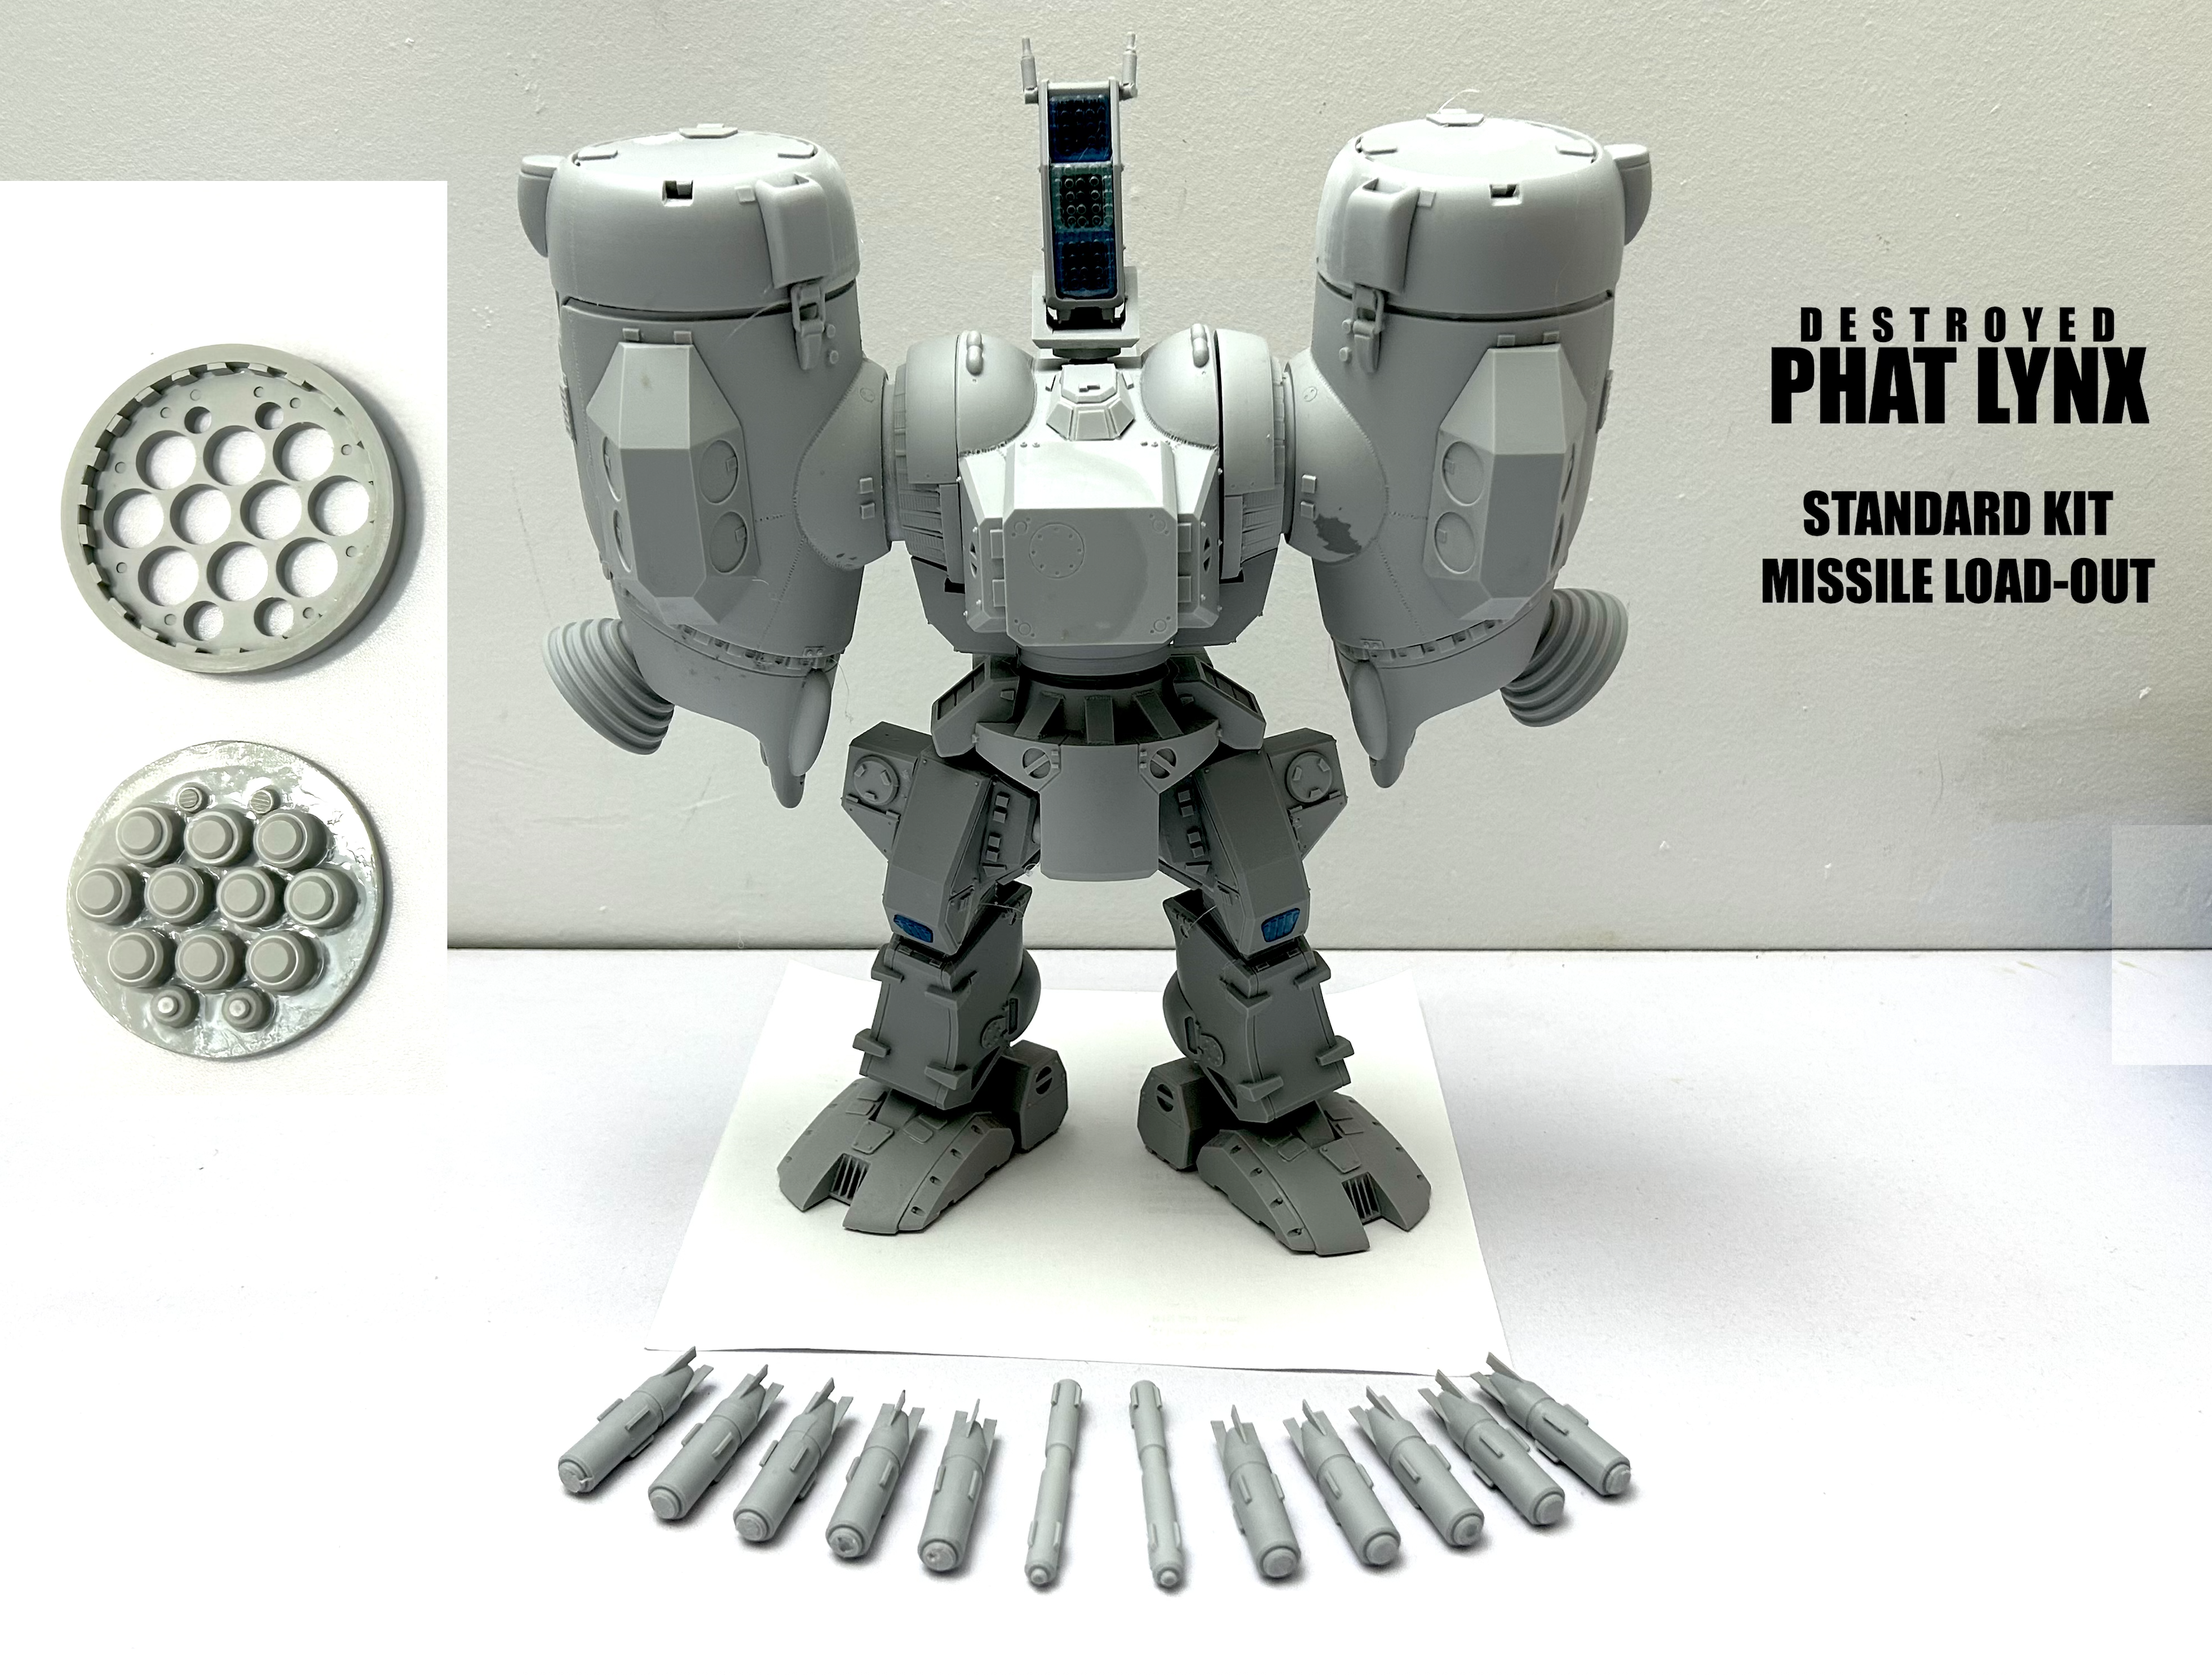
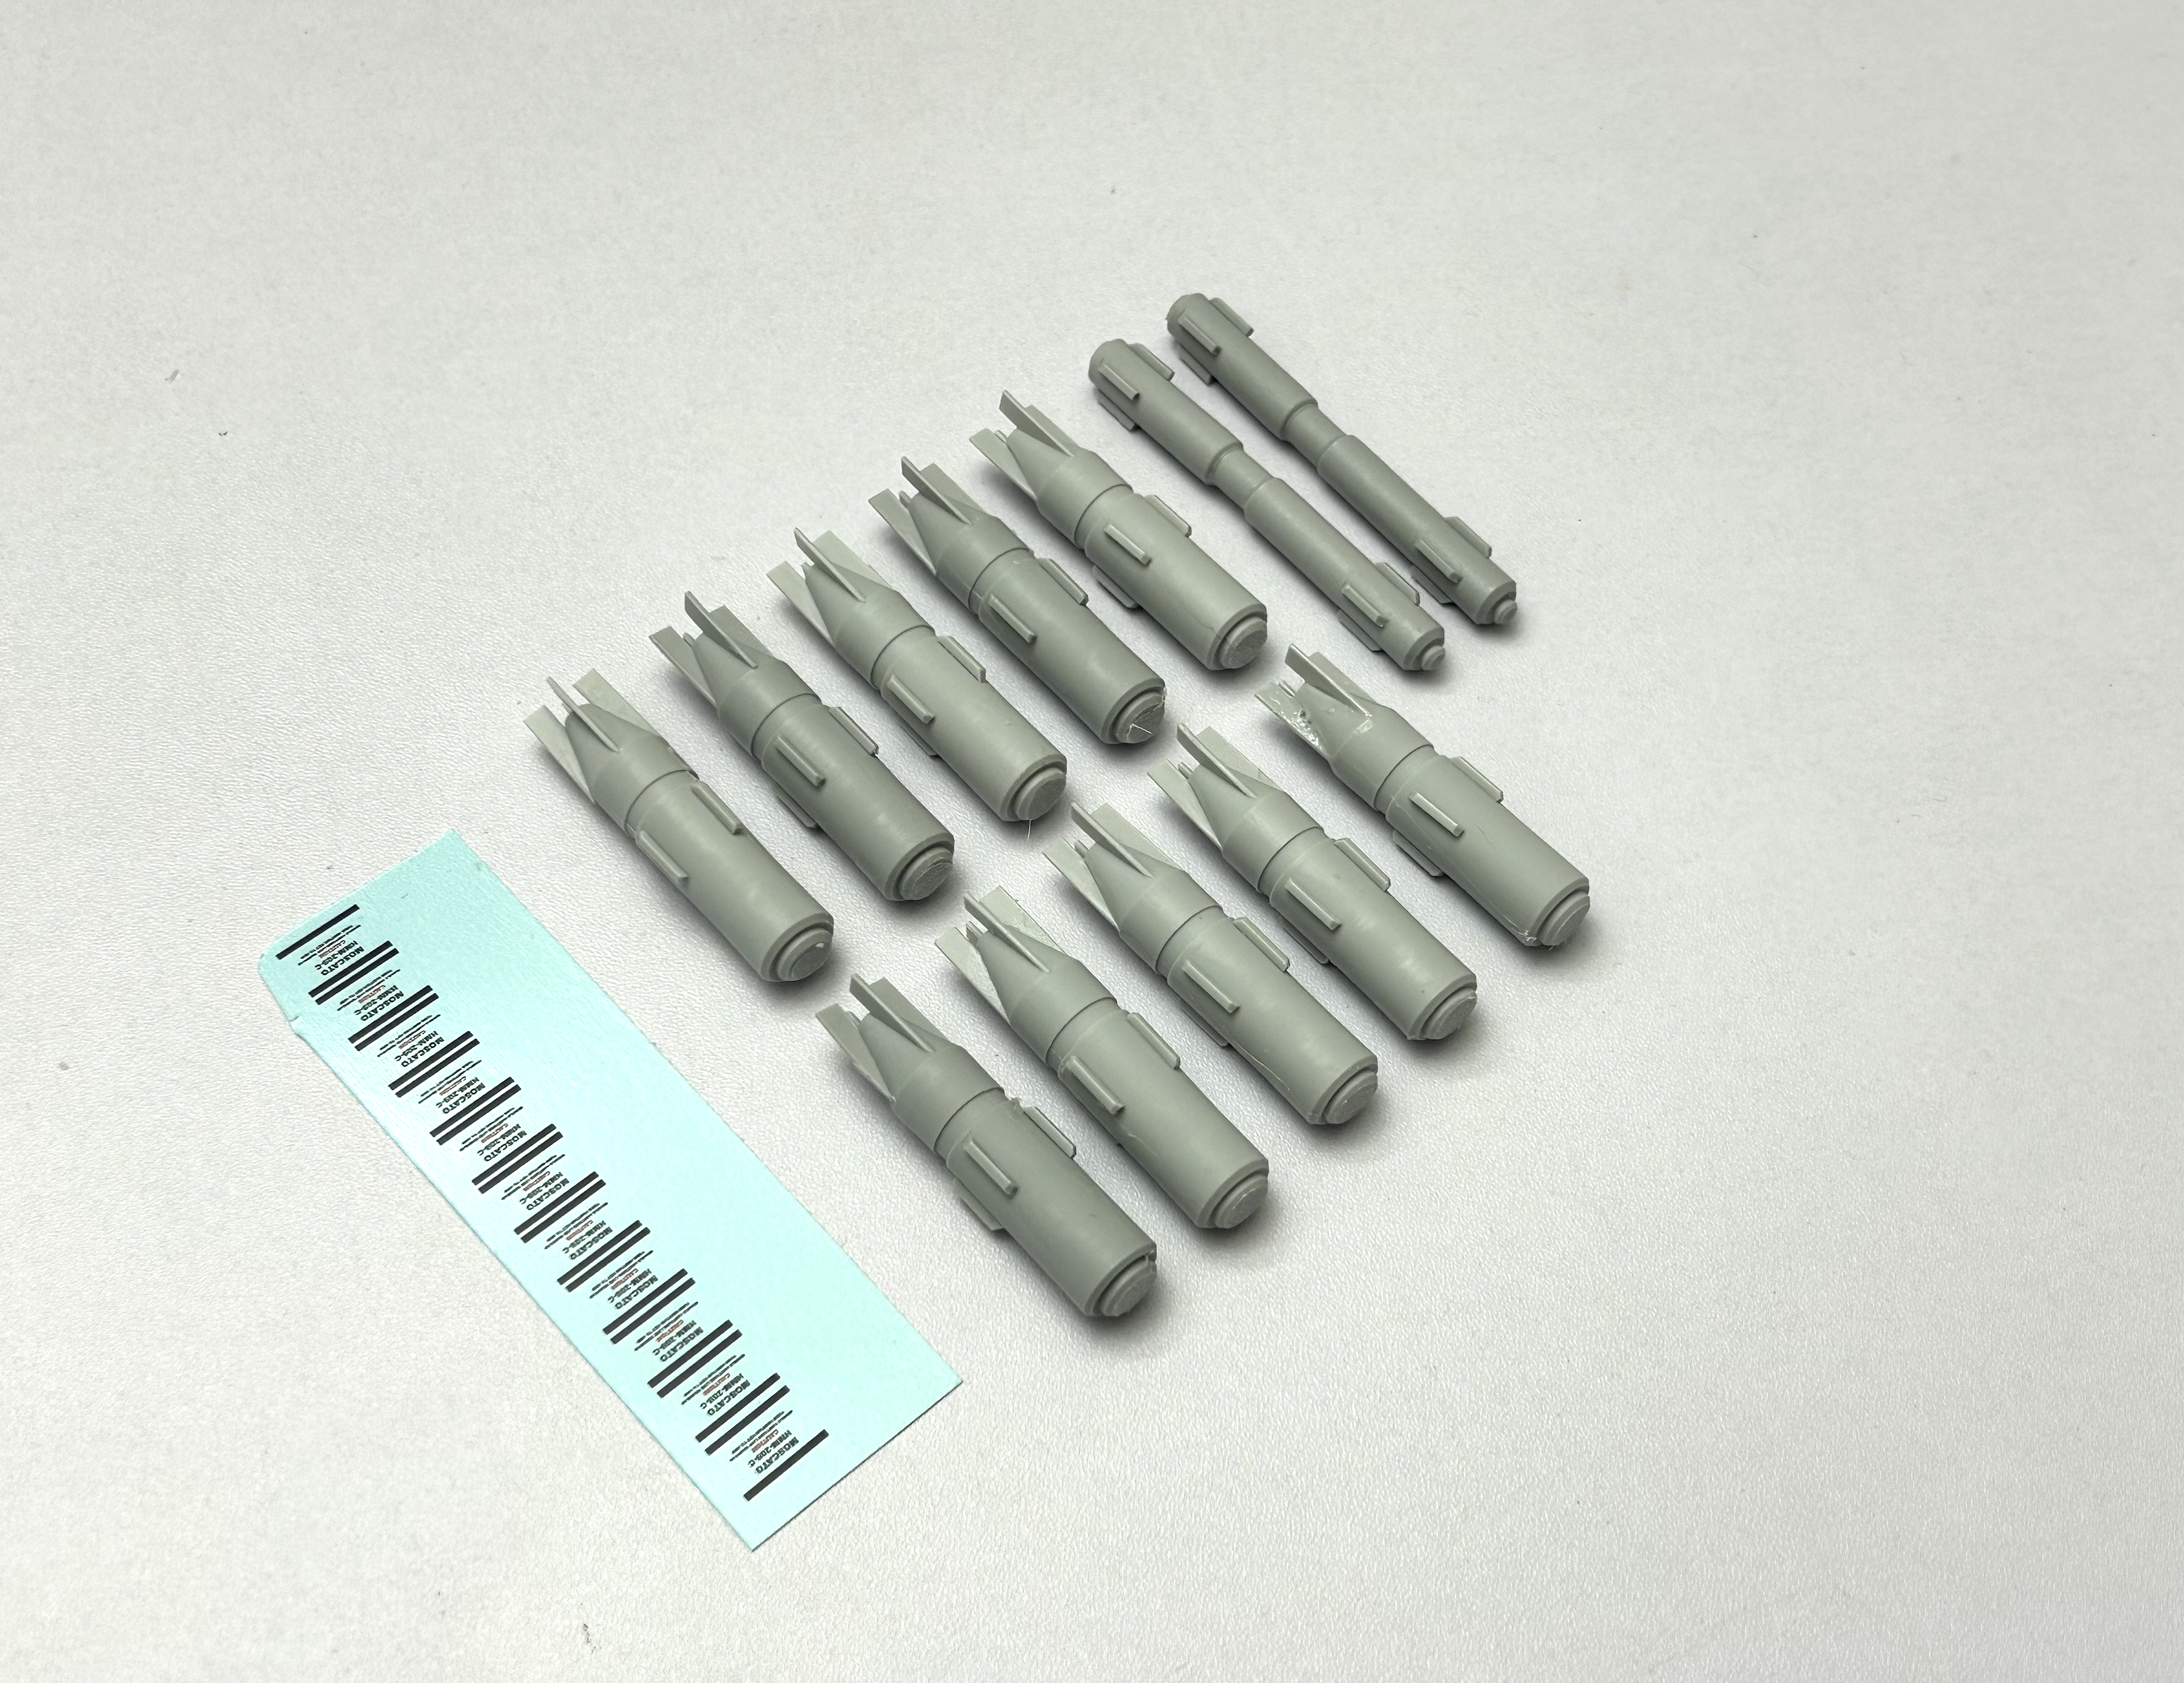
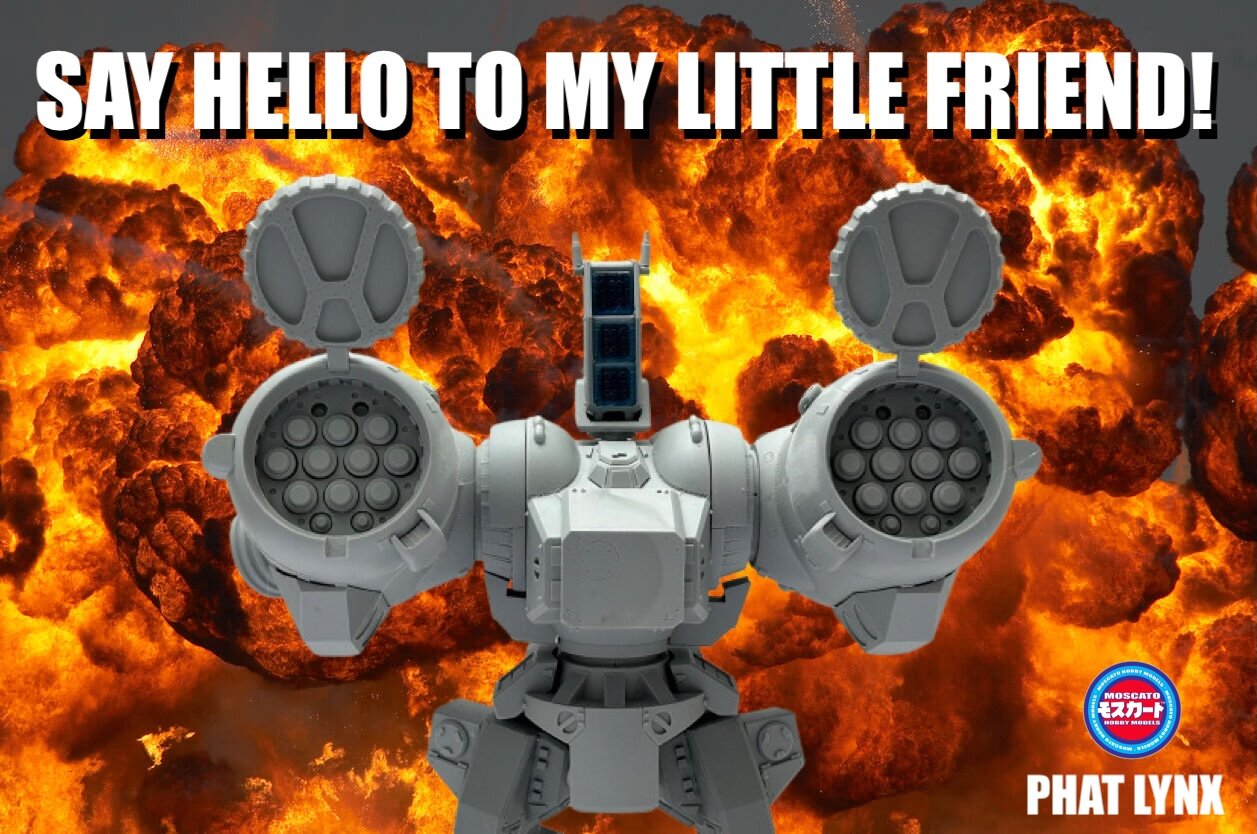
Hey guys! While your PHAT LYNX kit is equipped one full salvo of missiles (and the markings associated therewith) you also have the option to order extra missiles, should you require them, or just to show-off its massive 44 missile load-out! All paid orders have already shipped; will hold the ordering window open for a little while longer.
-
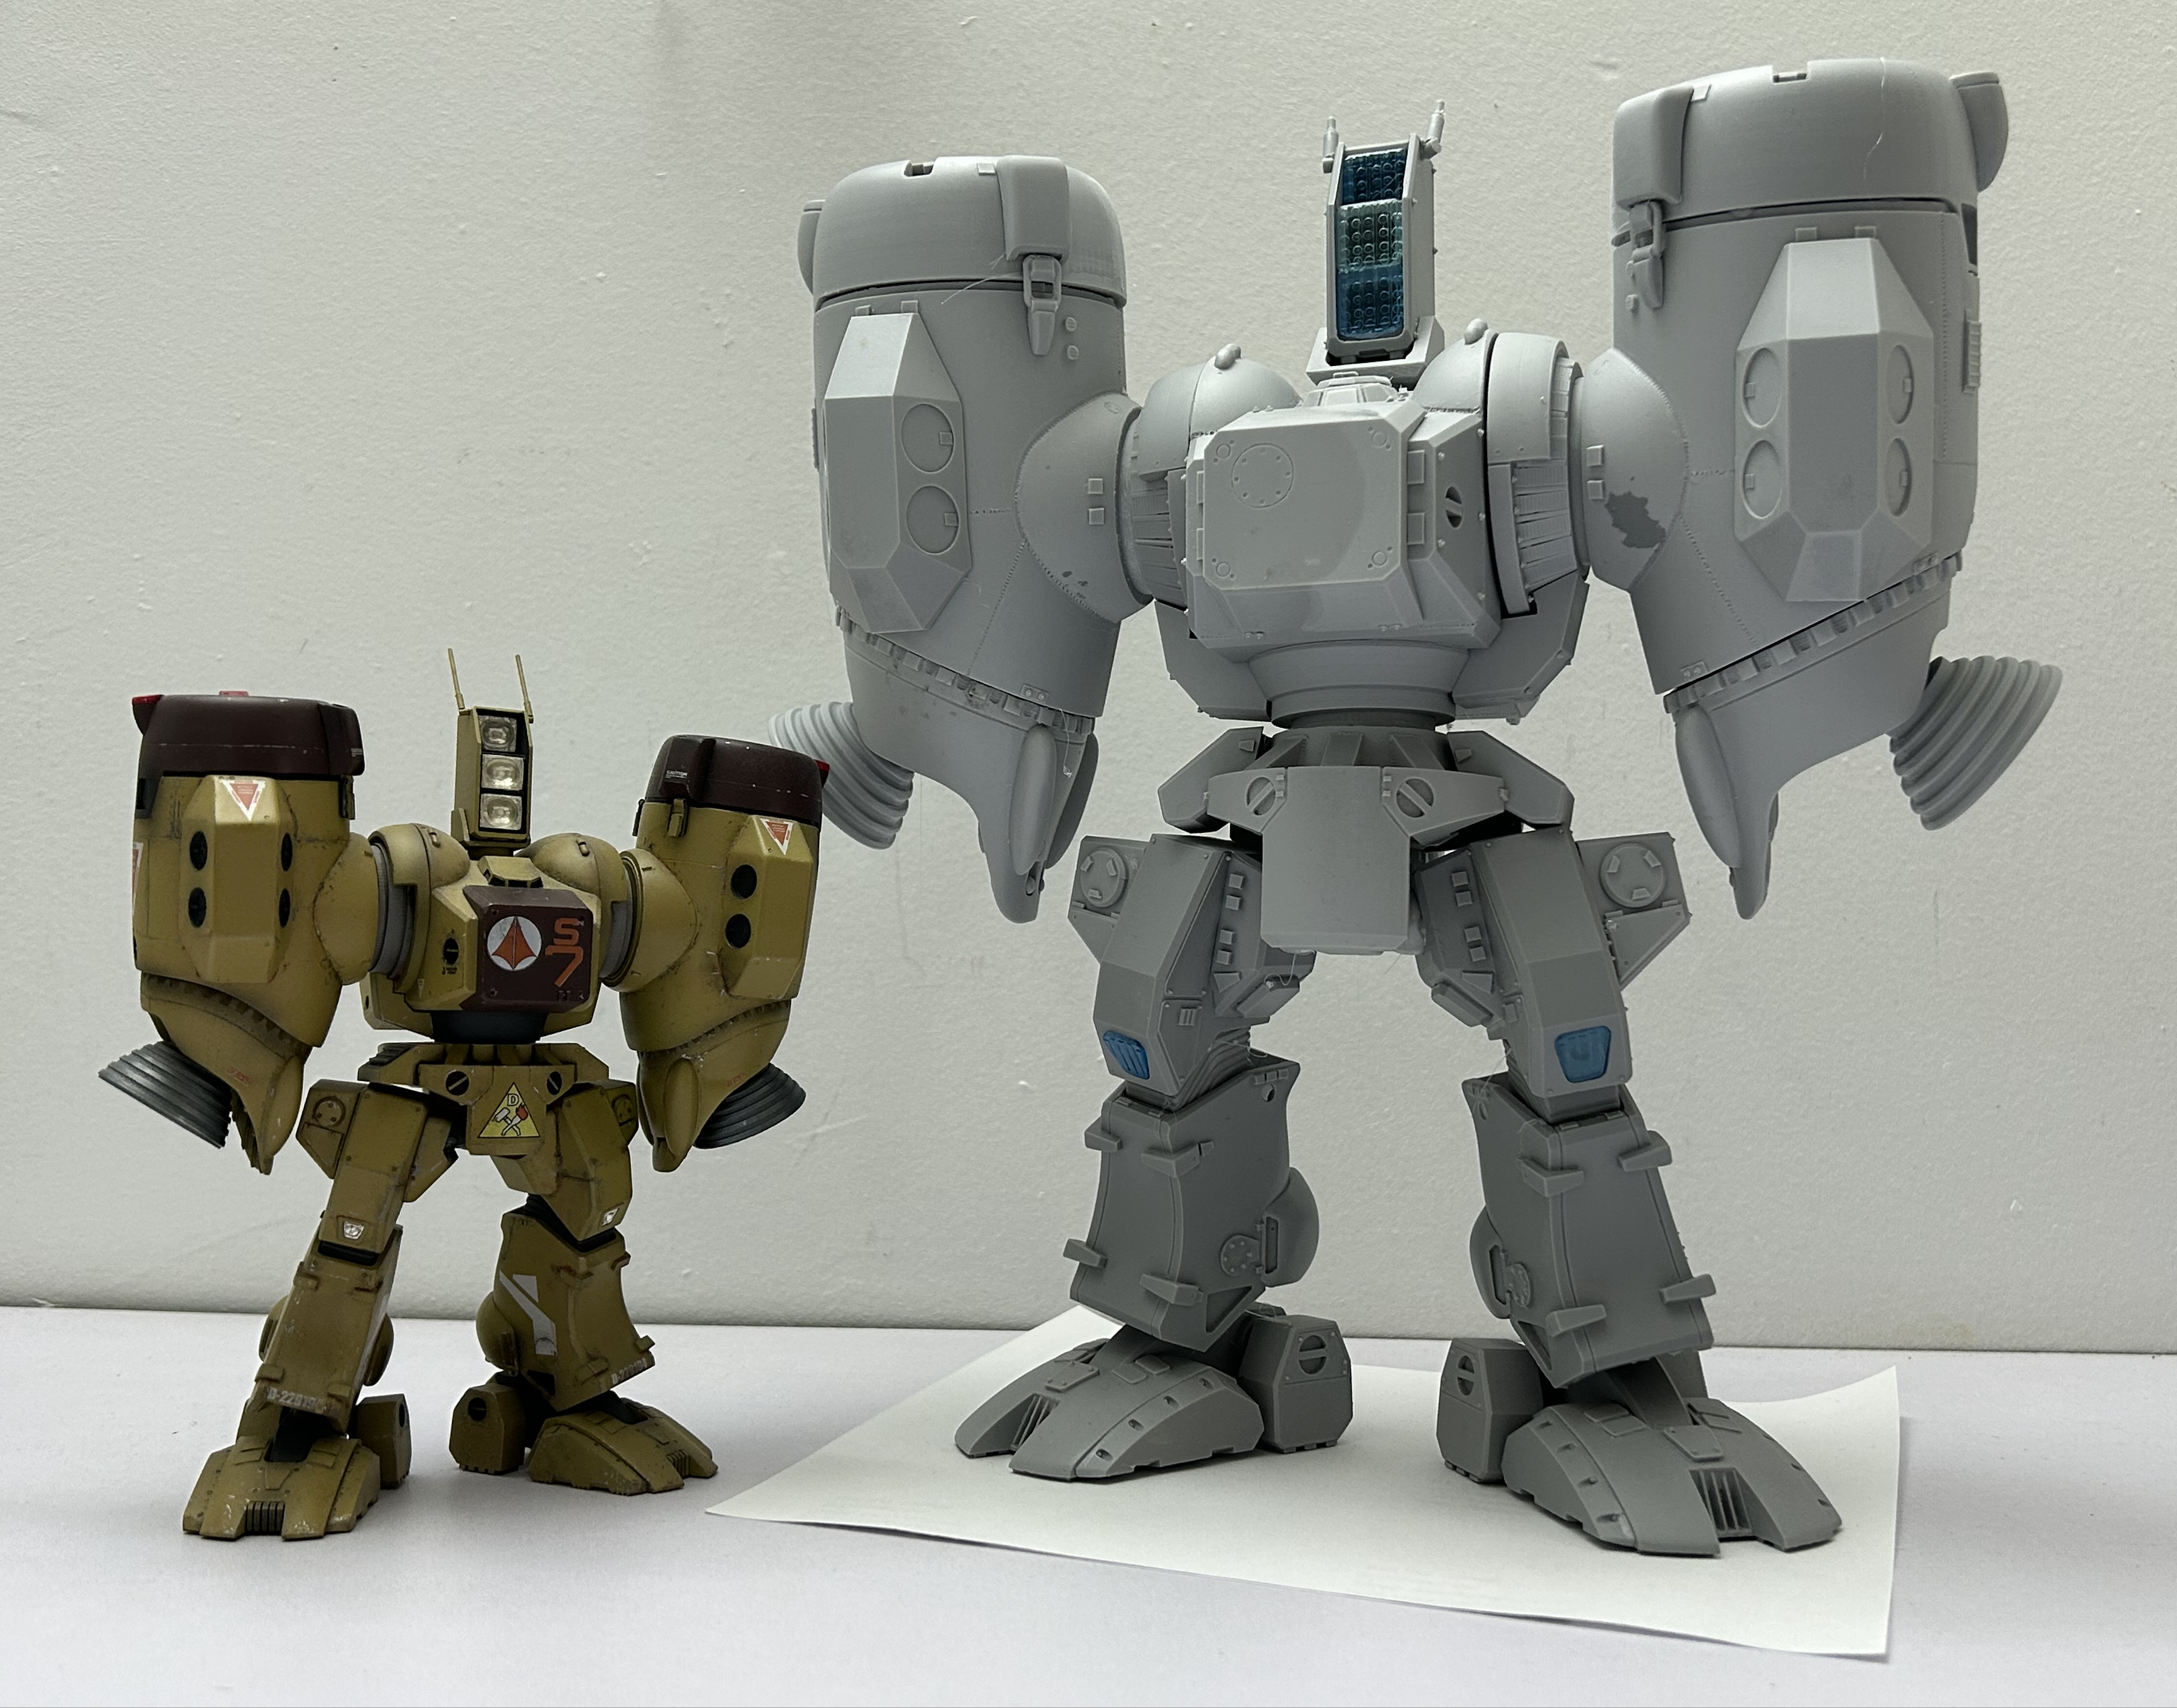
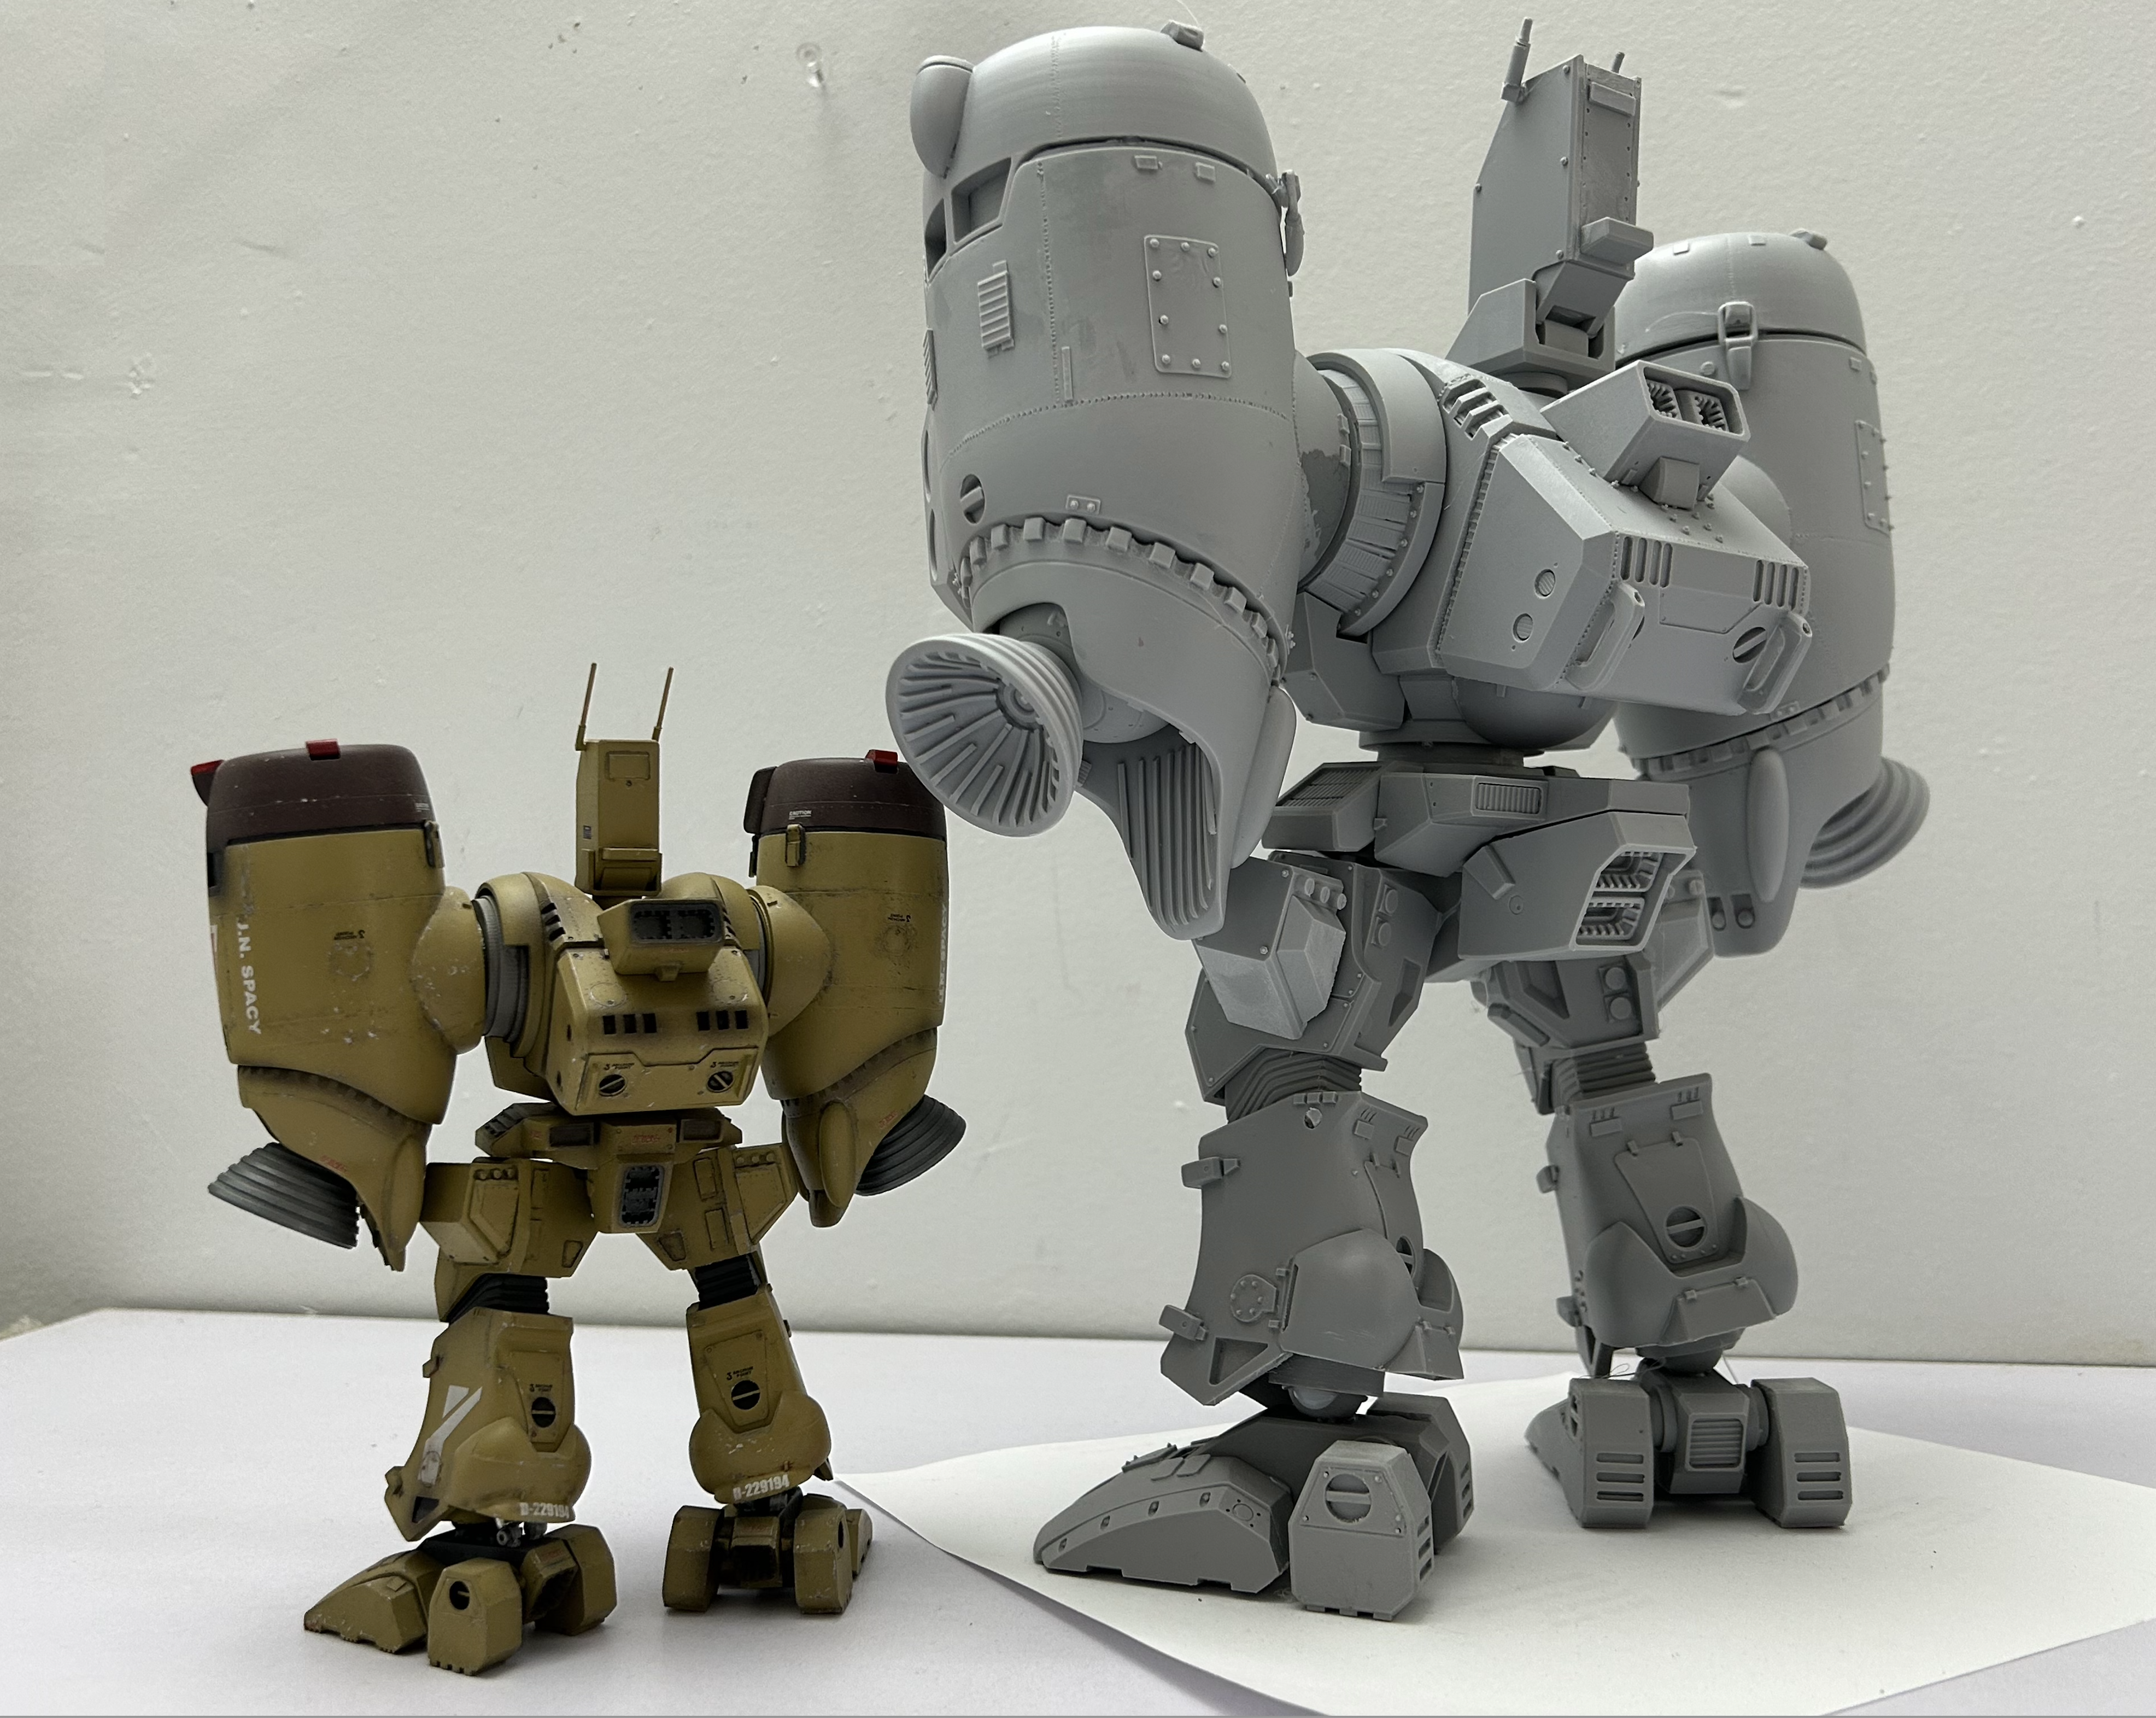
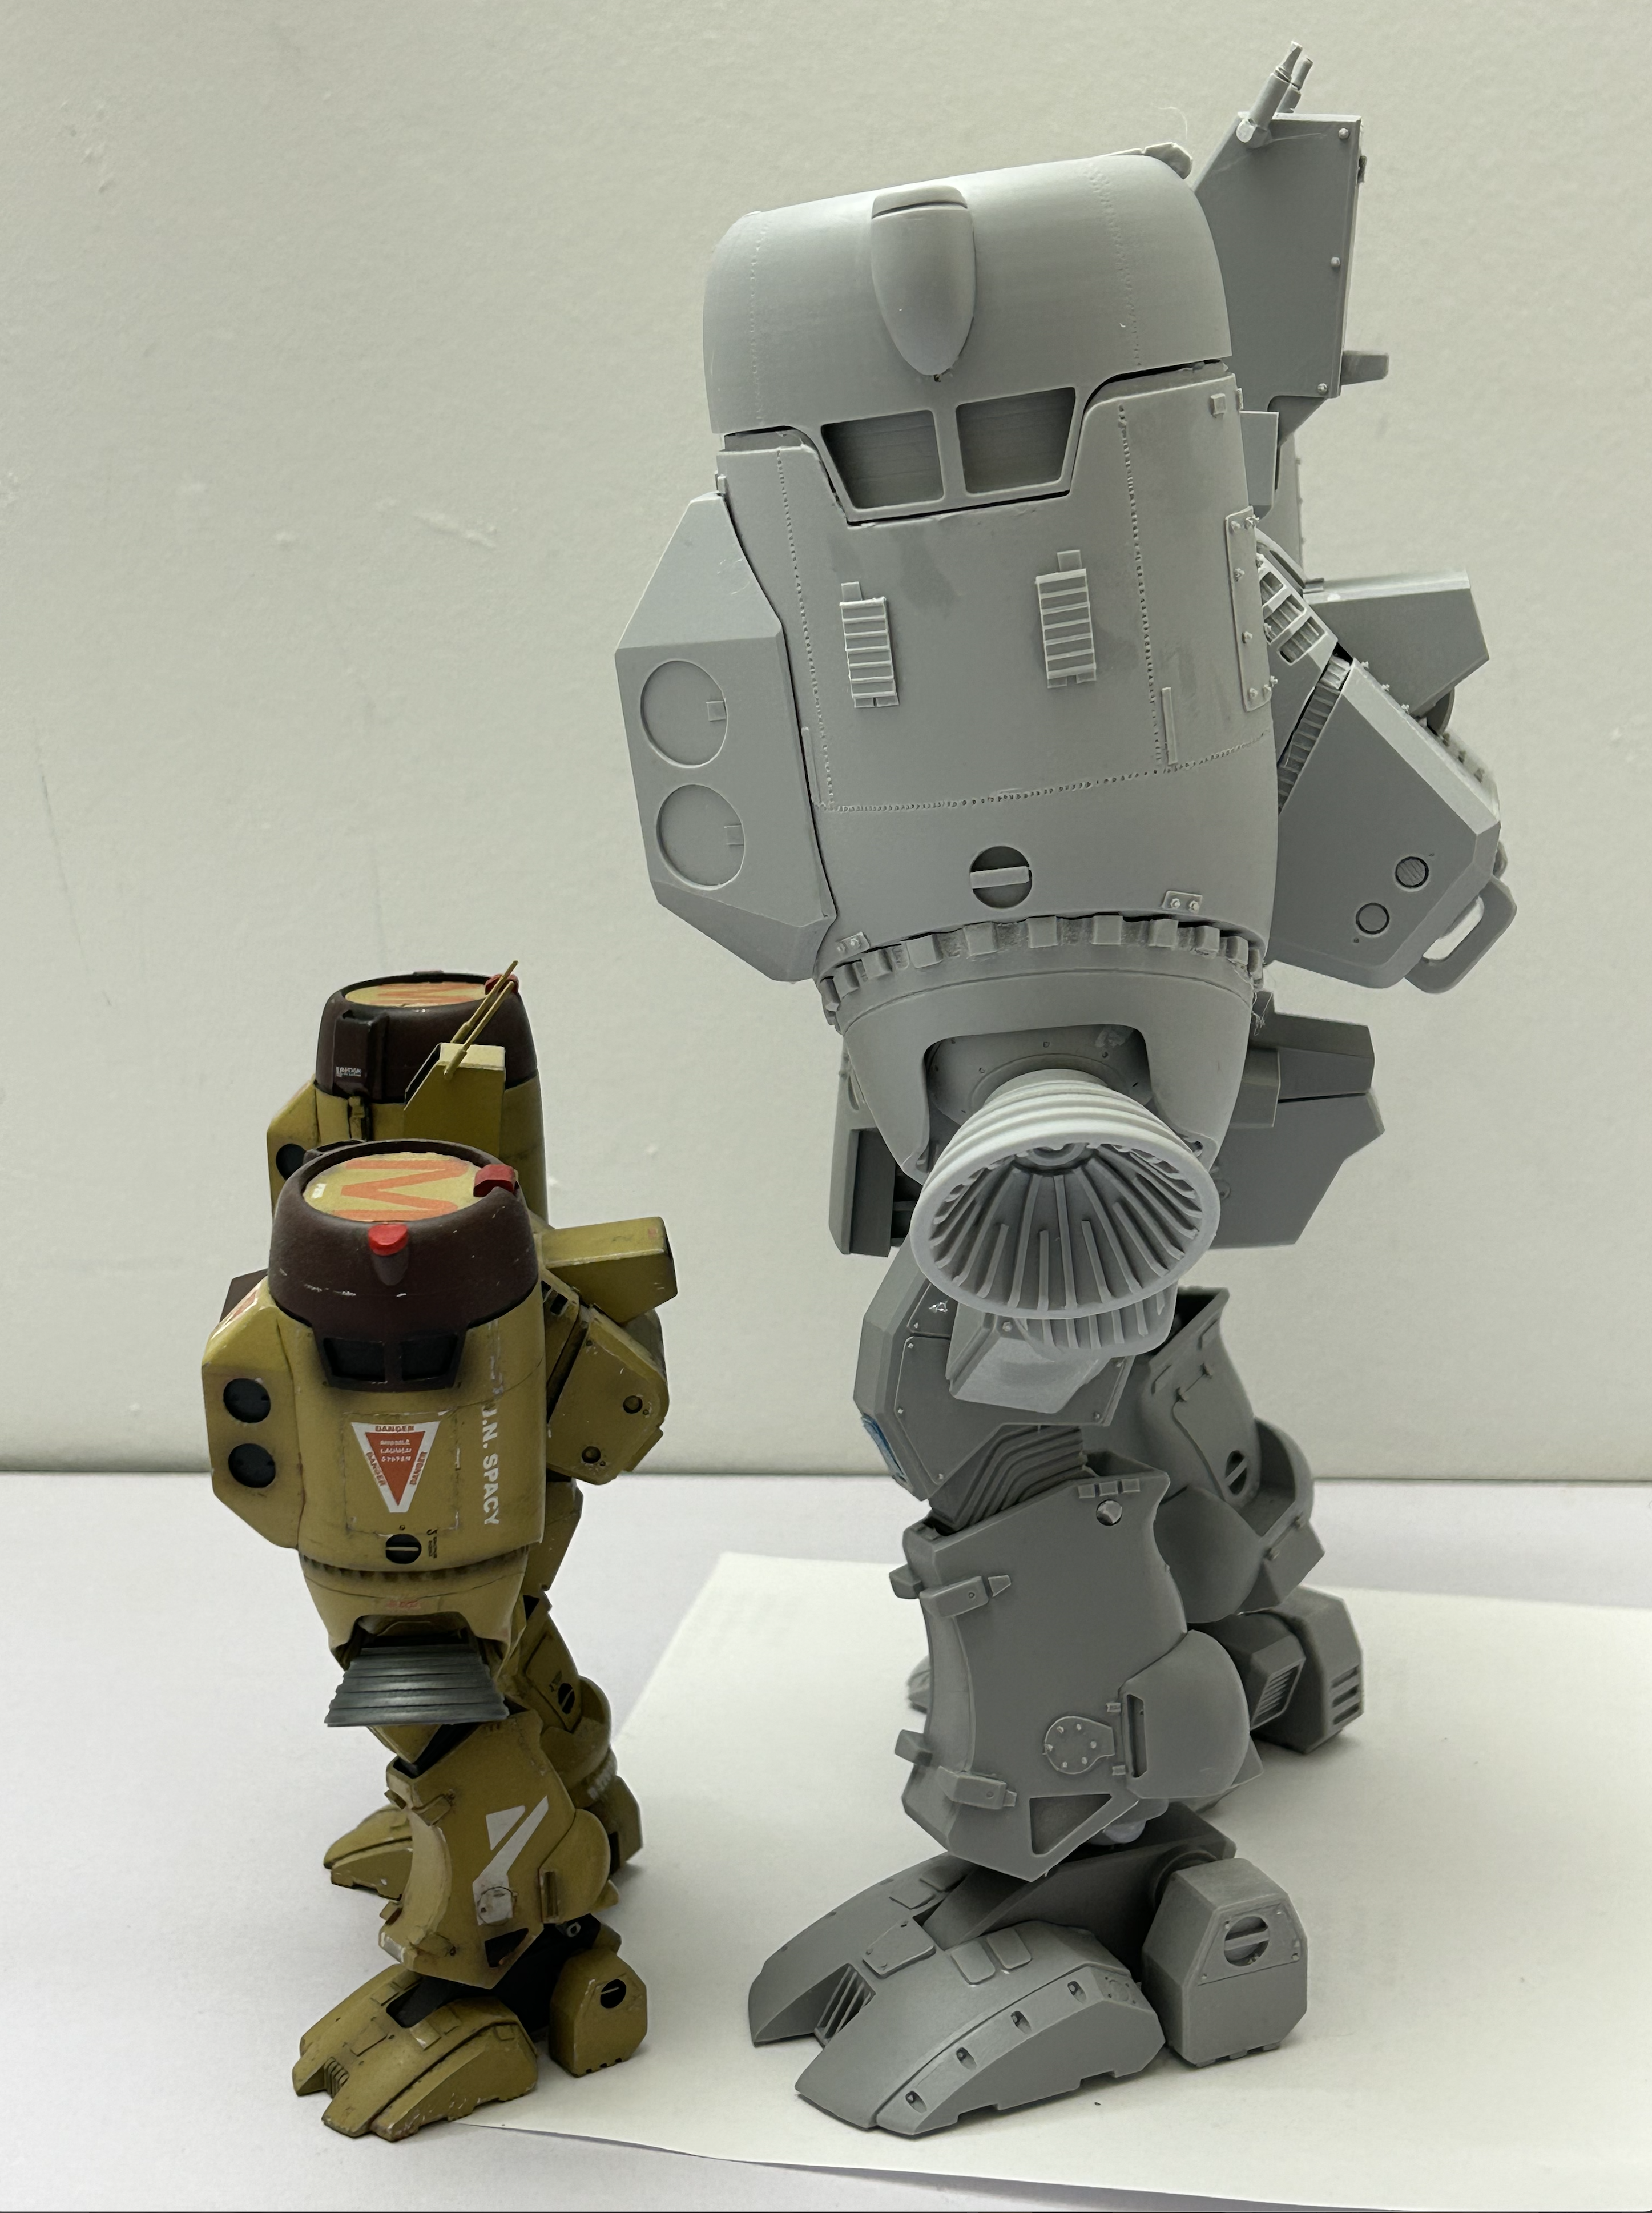
1/72 vs 1/48
-
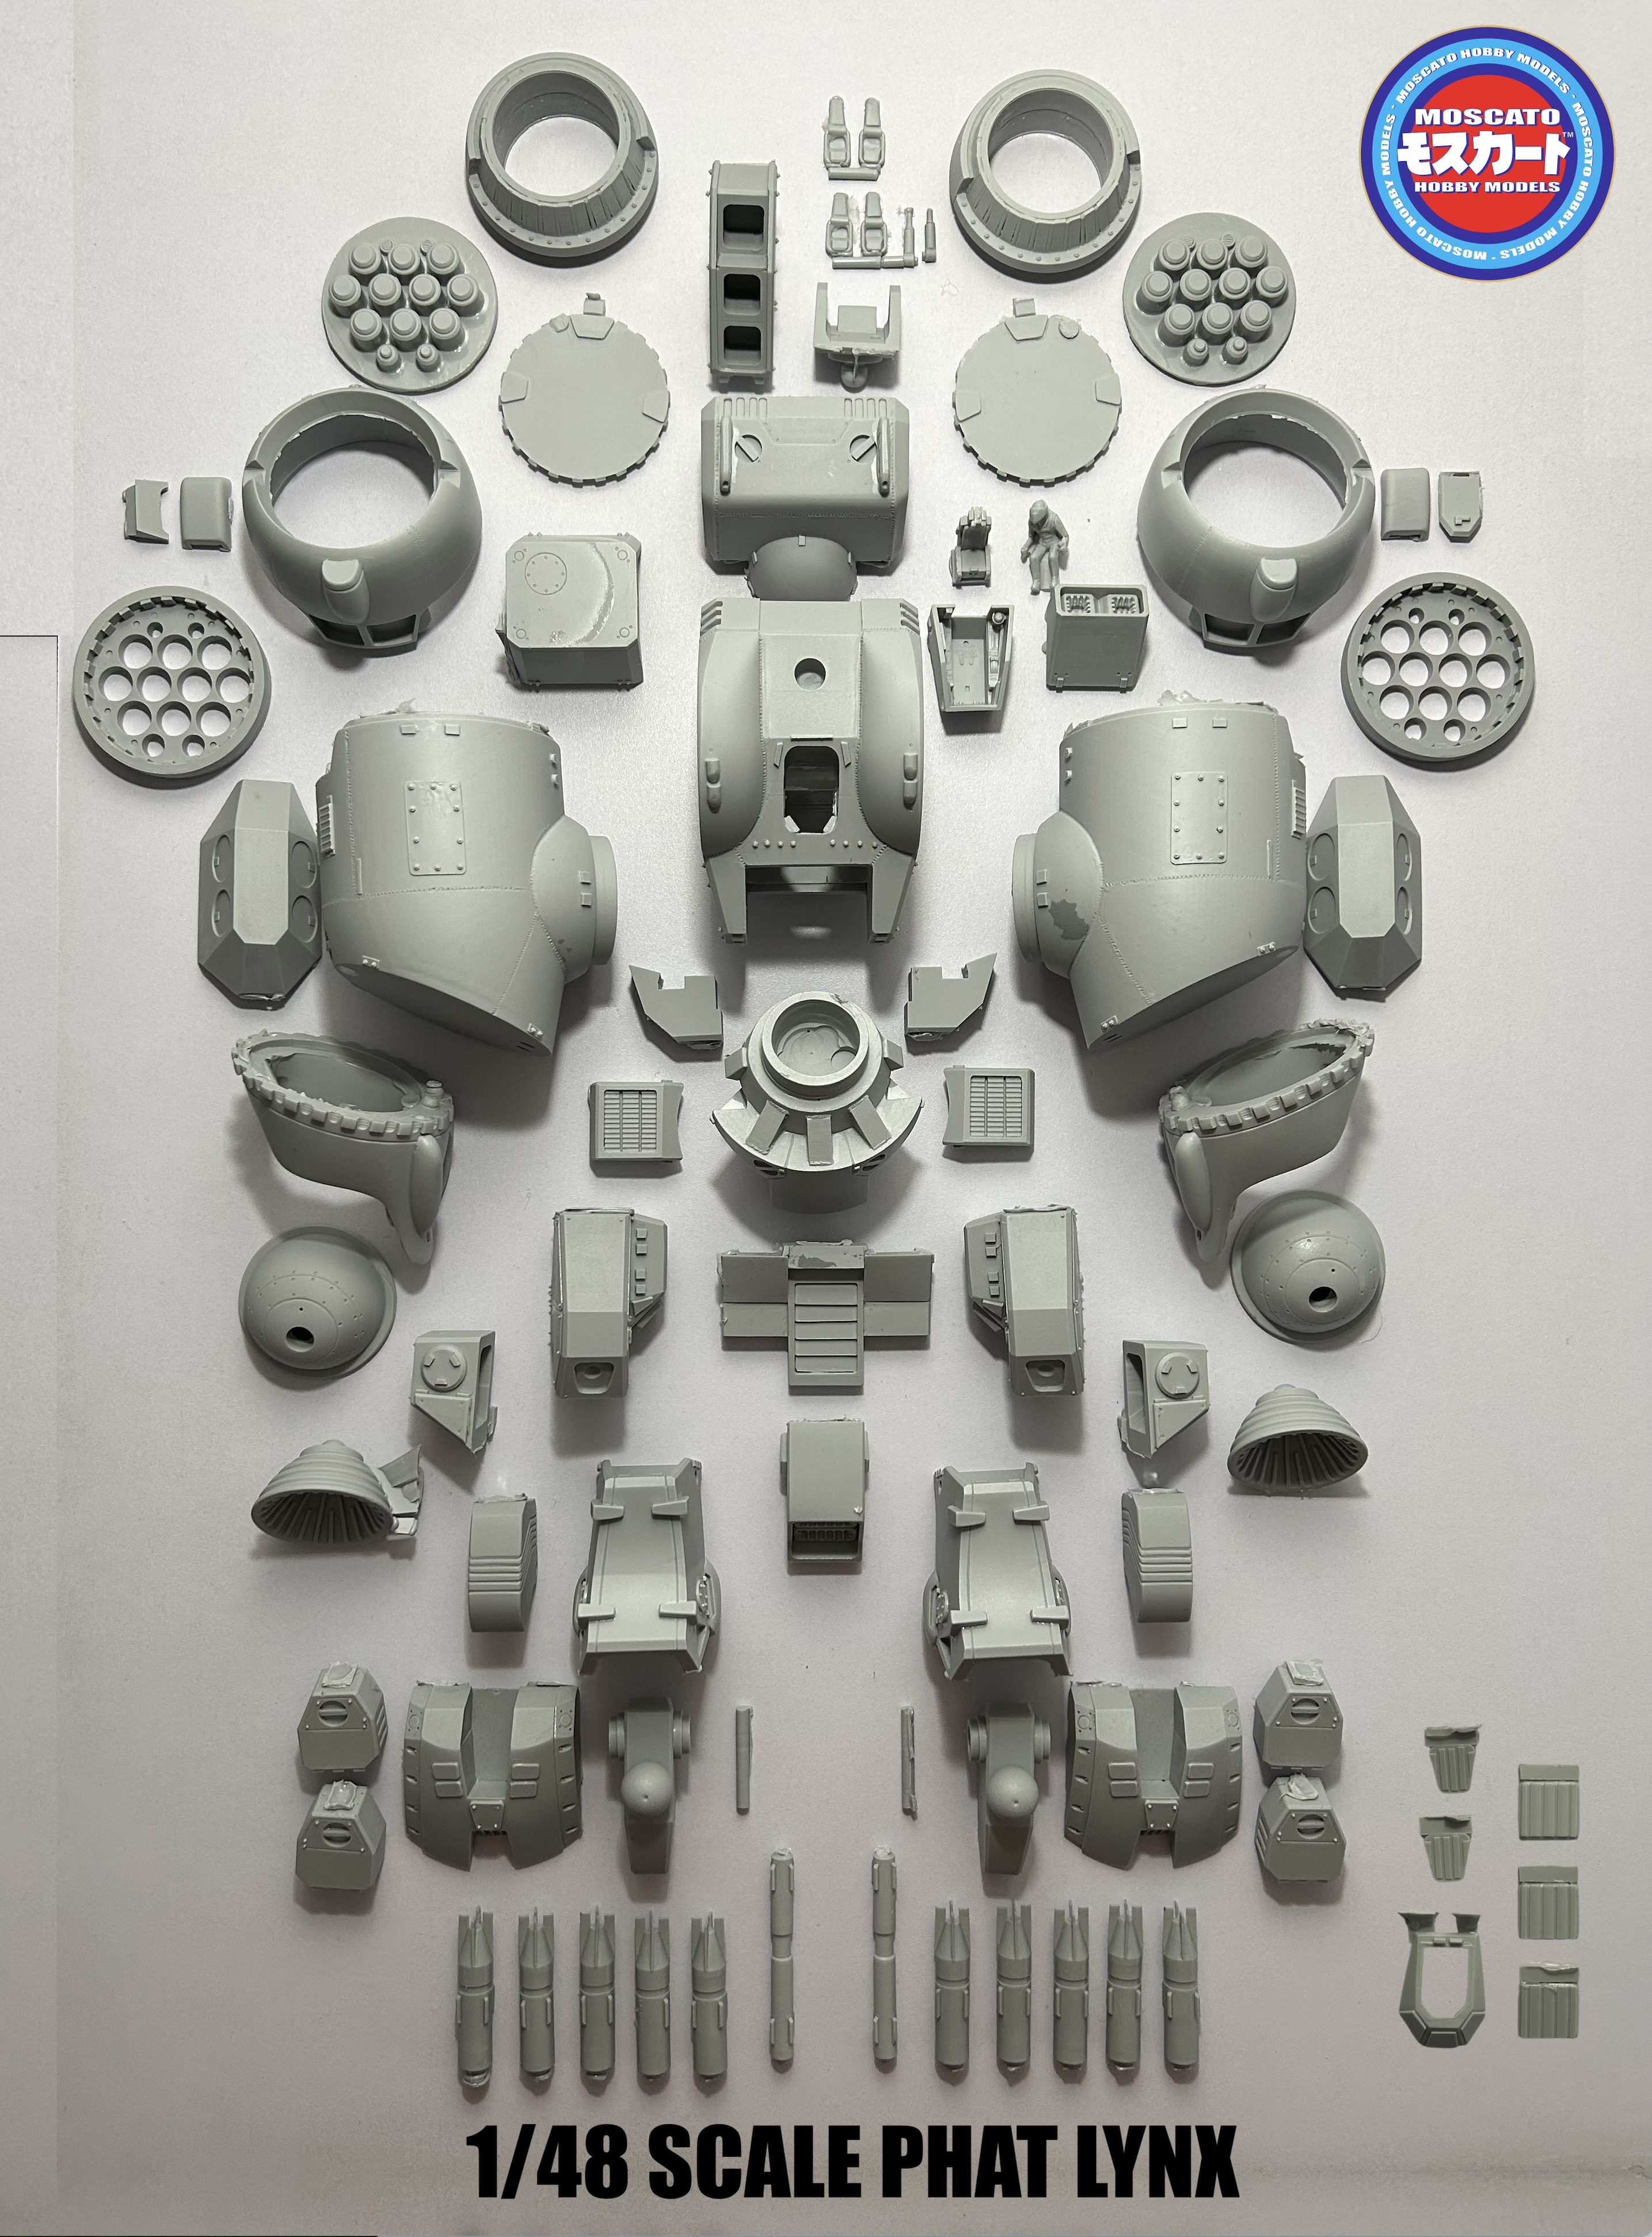
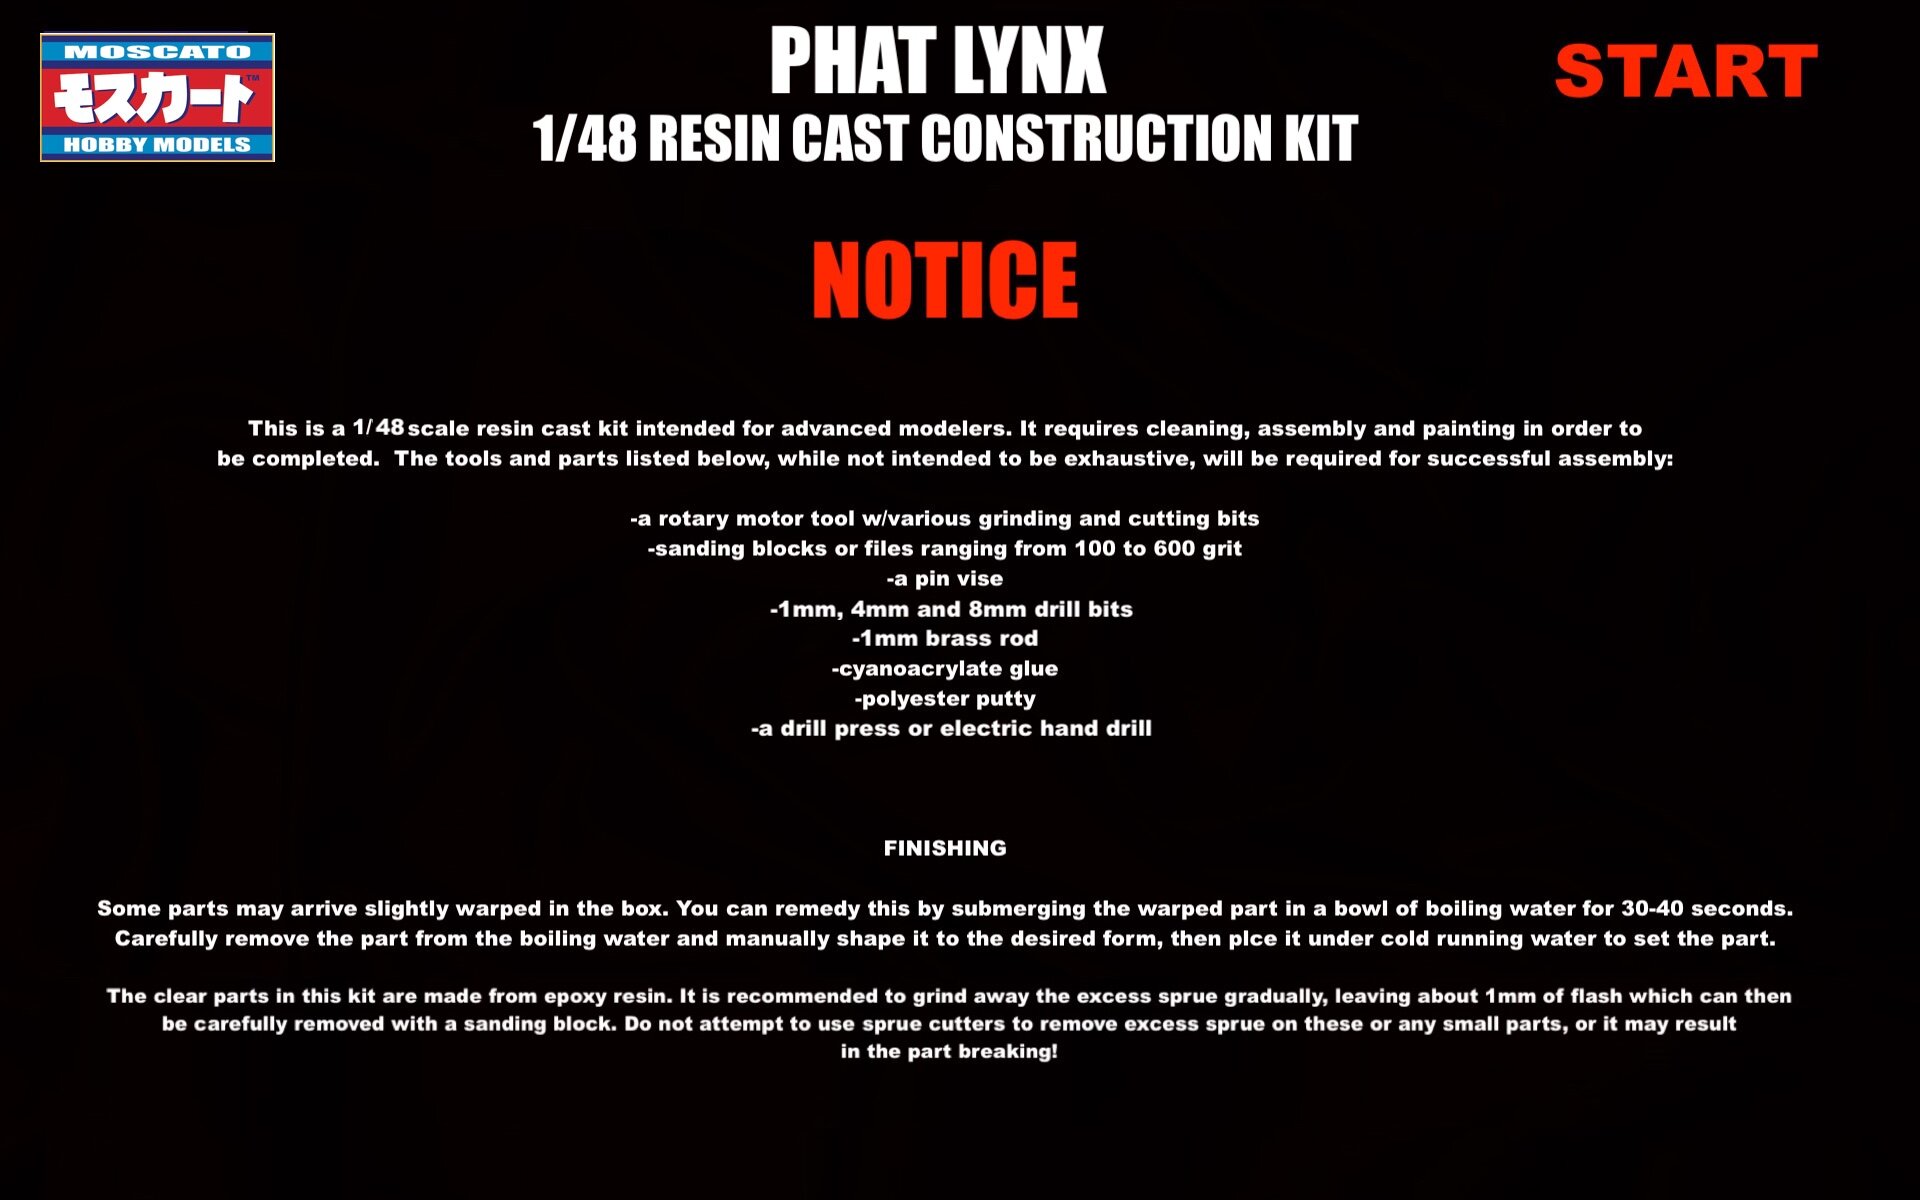
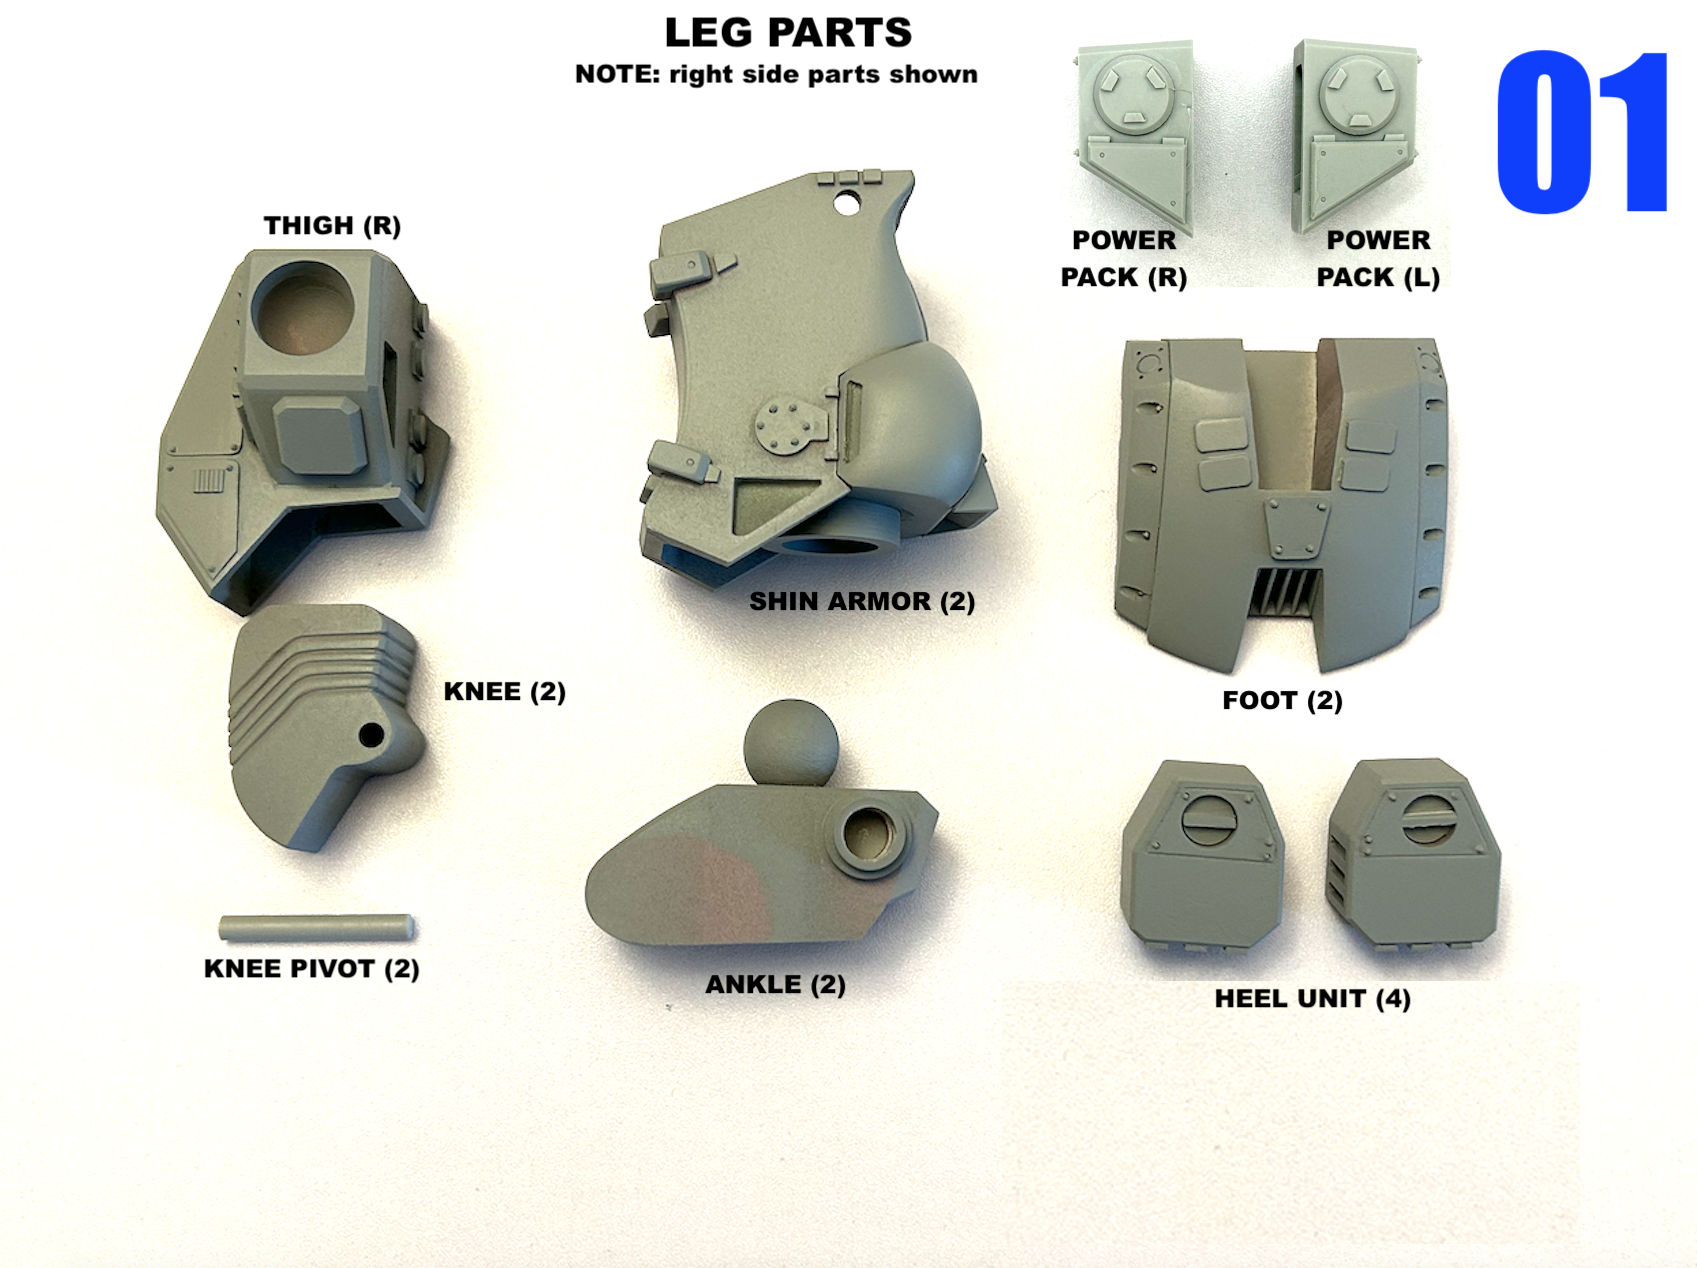
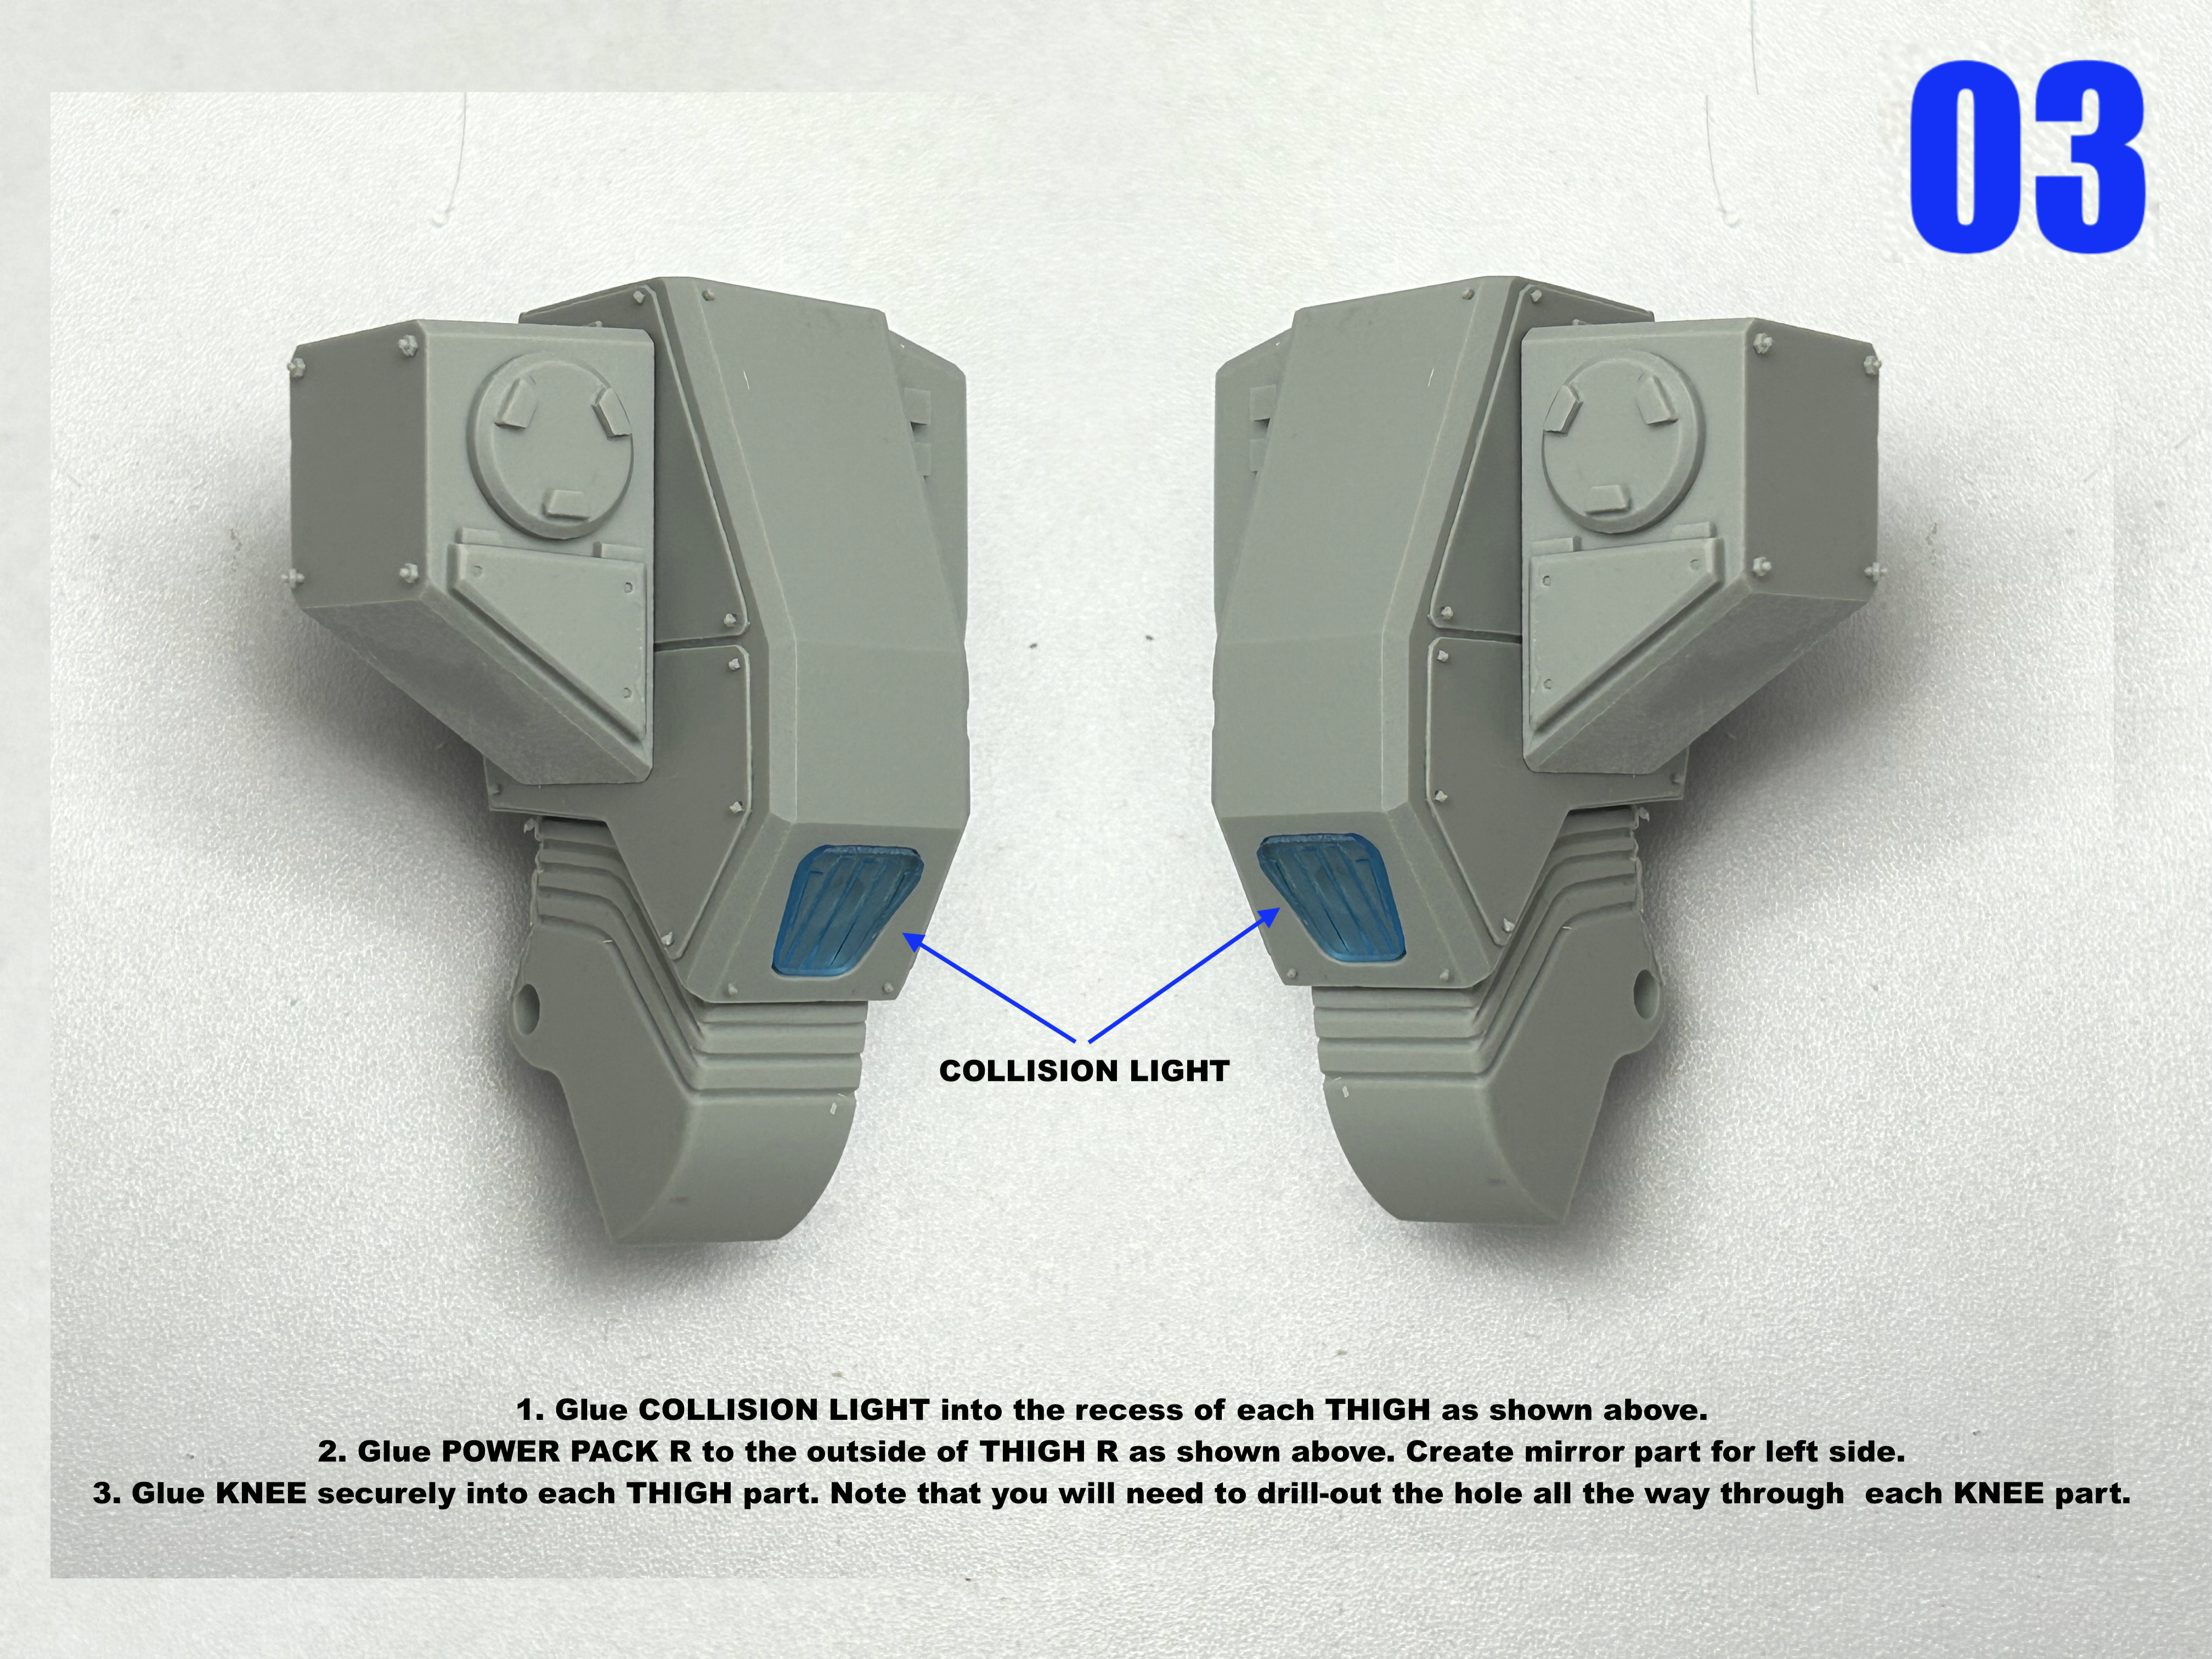
Hey @everyone say hello to my little friend... and he's not so little! At over 30cm tall even without the antenna extensions, this kit's shelf-presence is second only to the massive Graug. Behold the 1/48 PHAT LYNX in all its glory!!! The kit holds together pretty well, even with just hot glue, despite its 1.2kg of weight. Kits start shipping next week! IMG_3612.HEIC IMG_3614.HEIC IMG_3616.HEIC IMG_3617.HEIC IMG_3619.HEIC IMG_3622.HEIC IMG_3627.HEIC IMG_3628.HEIC IMG_3631.HEIC IMG_3634.HEIC
-
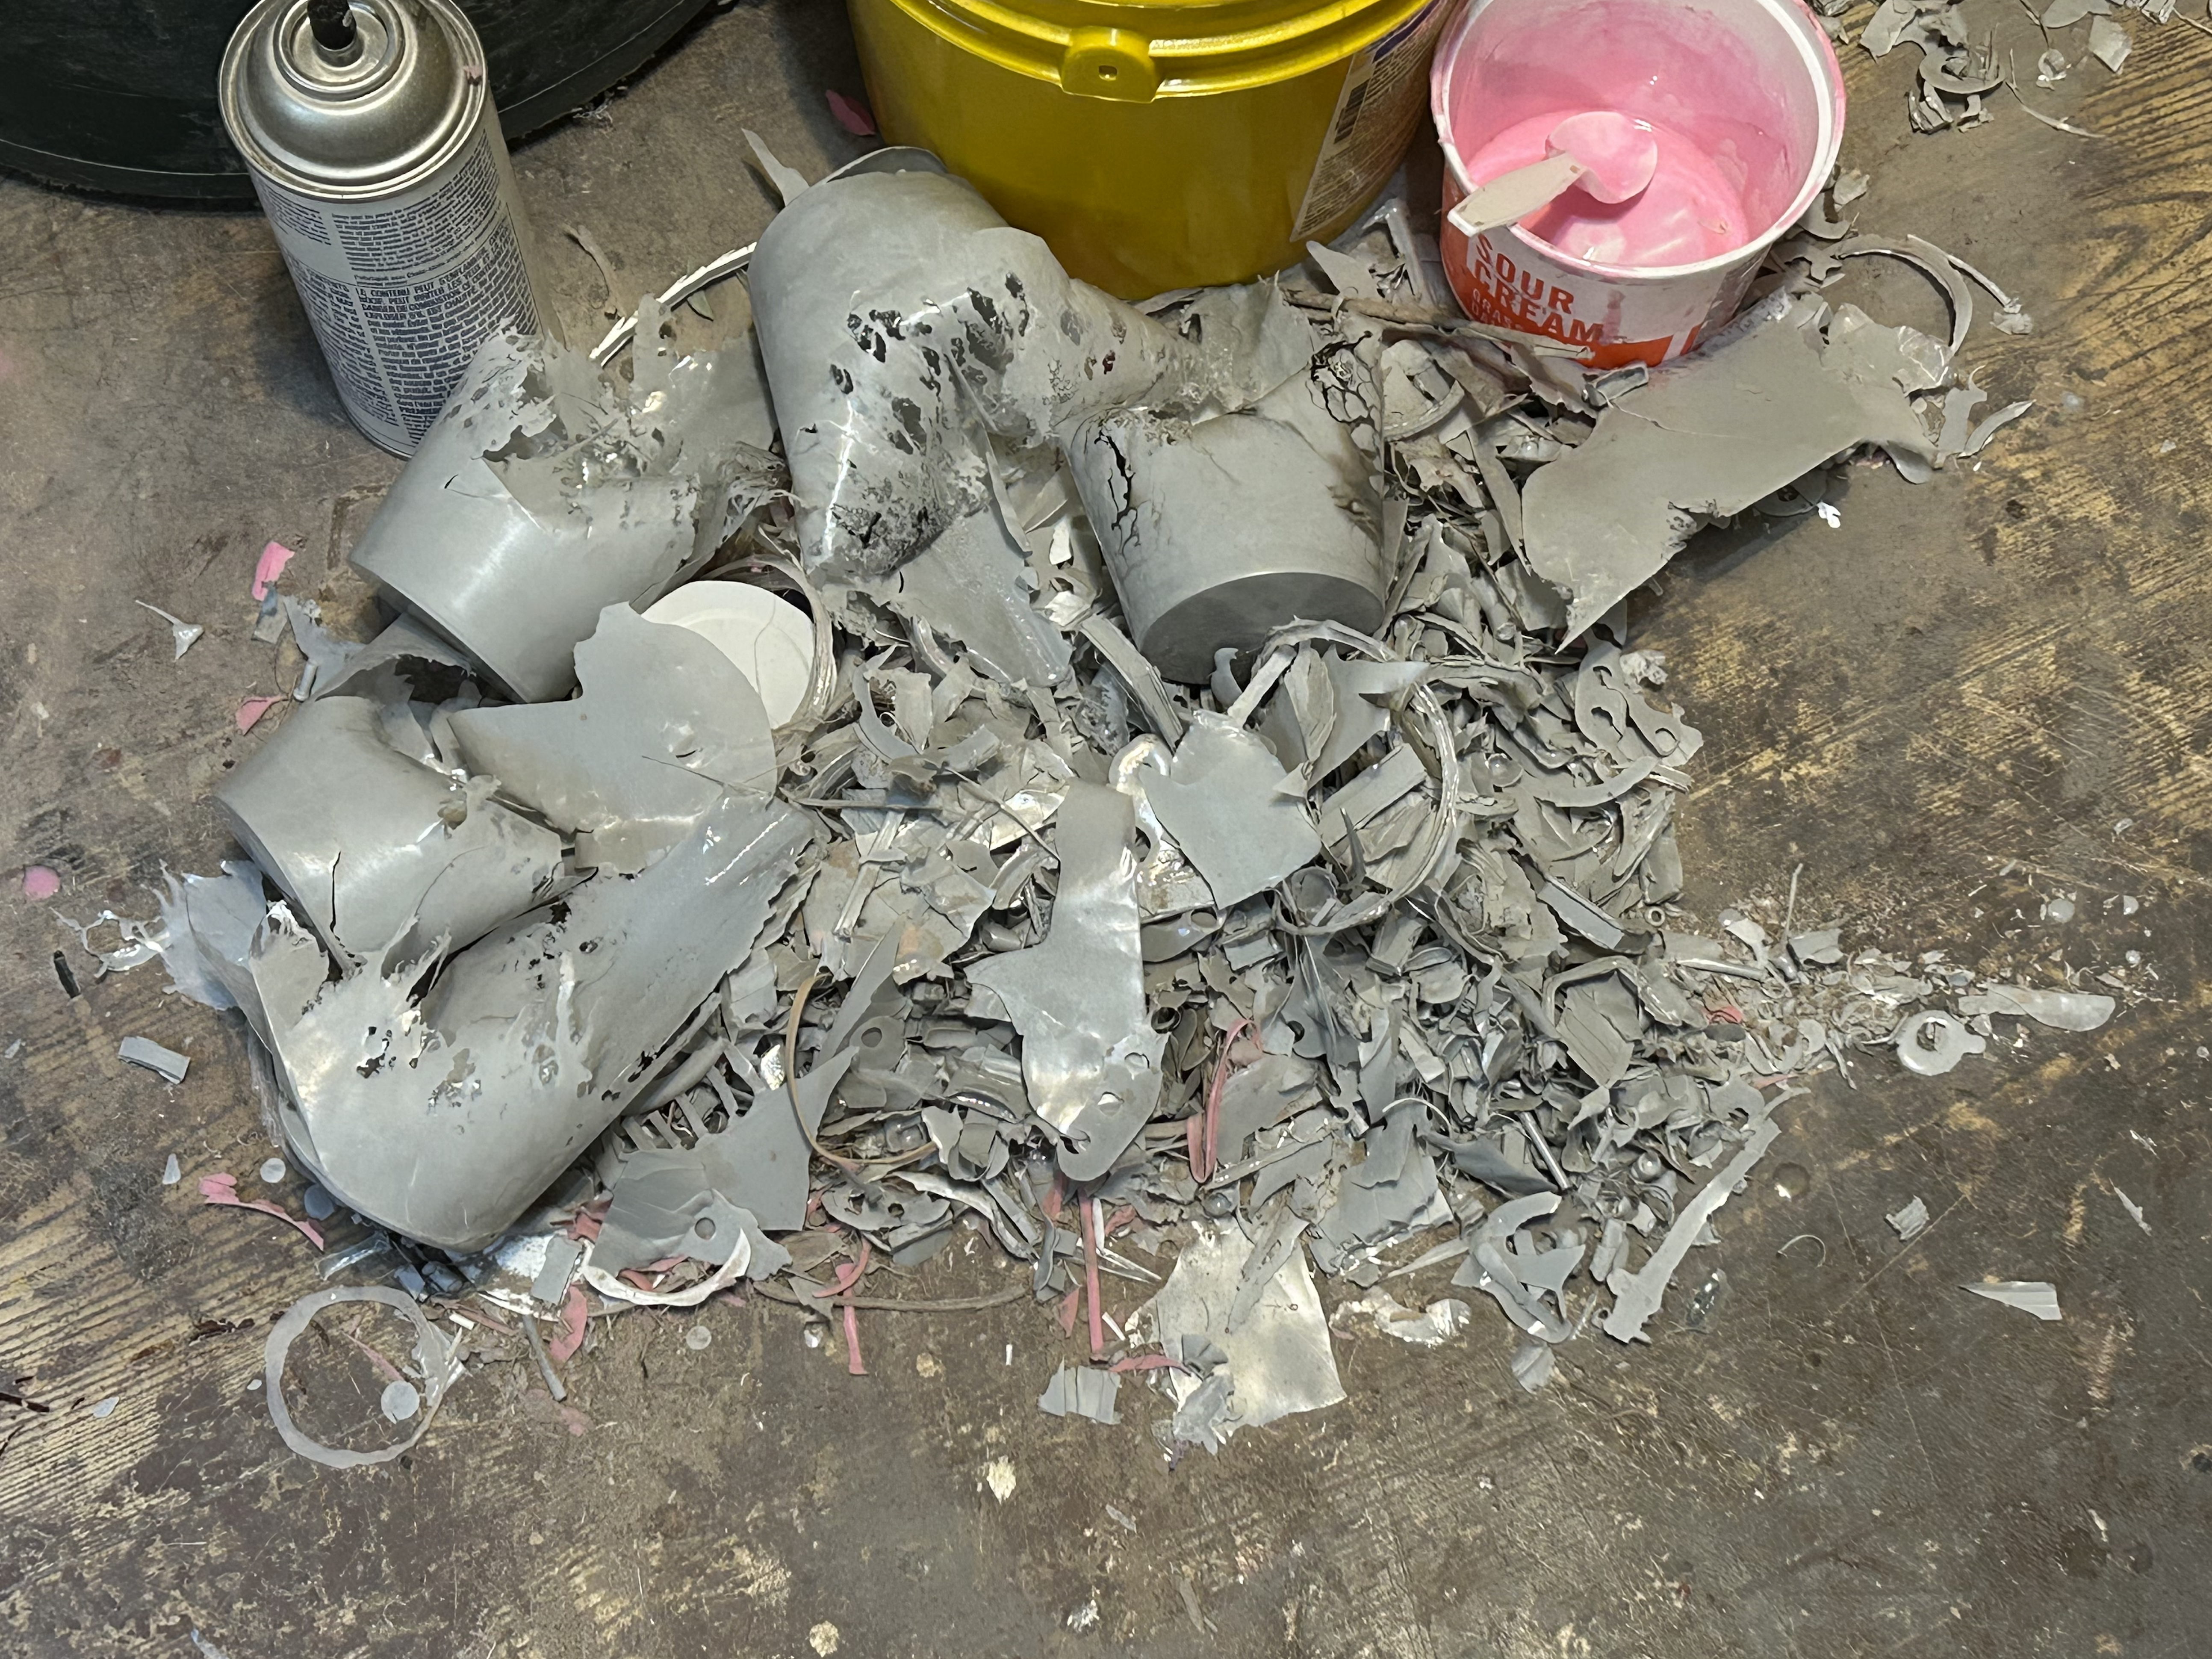
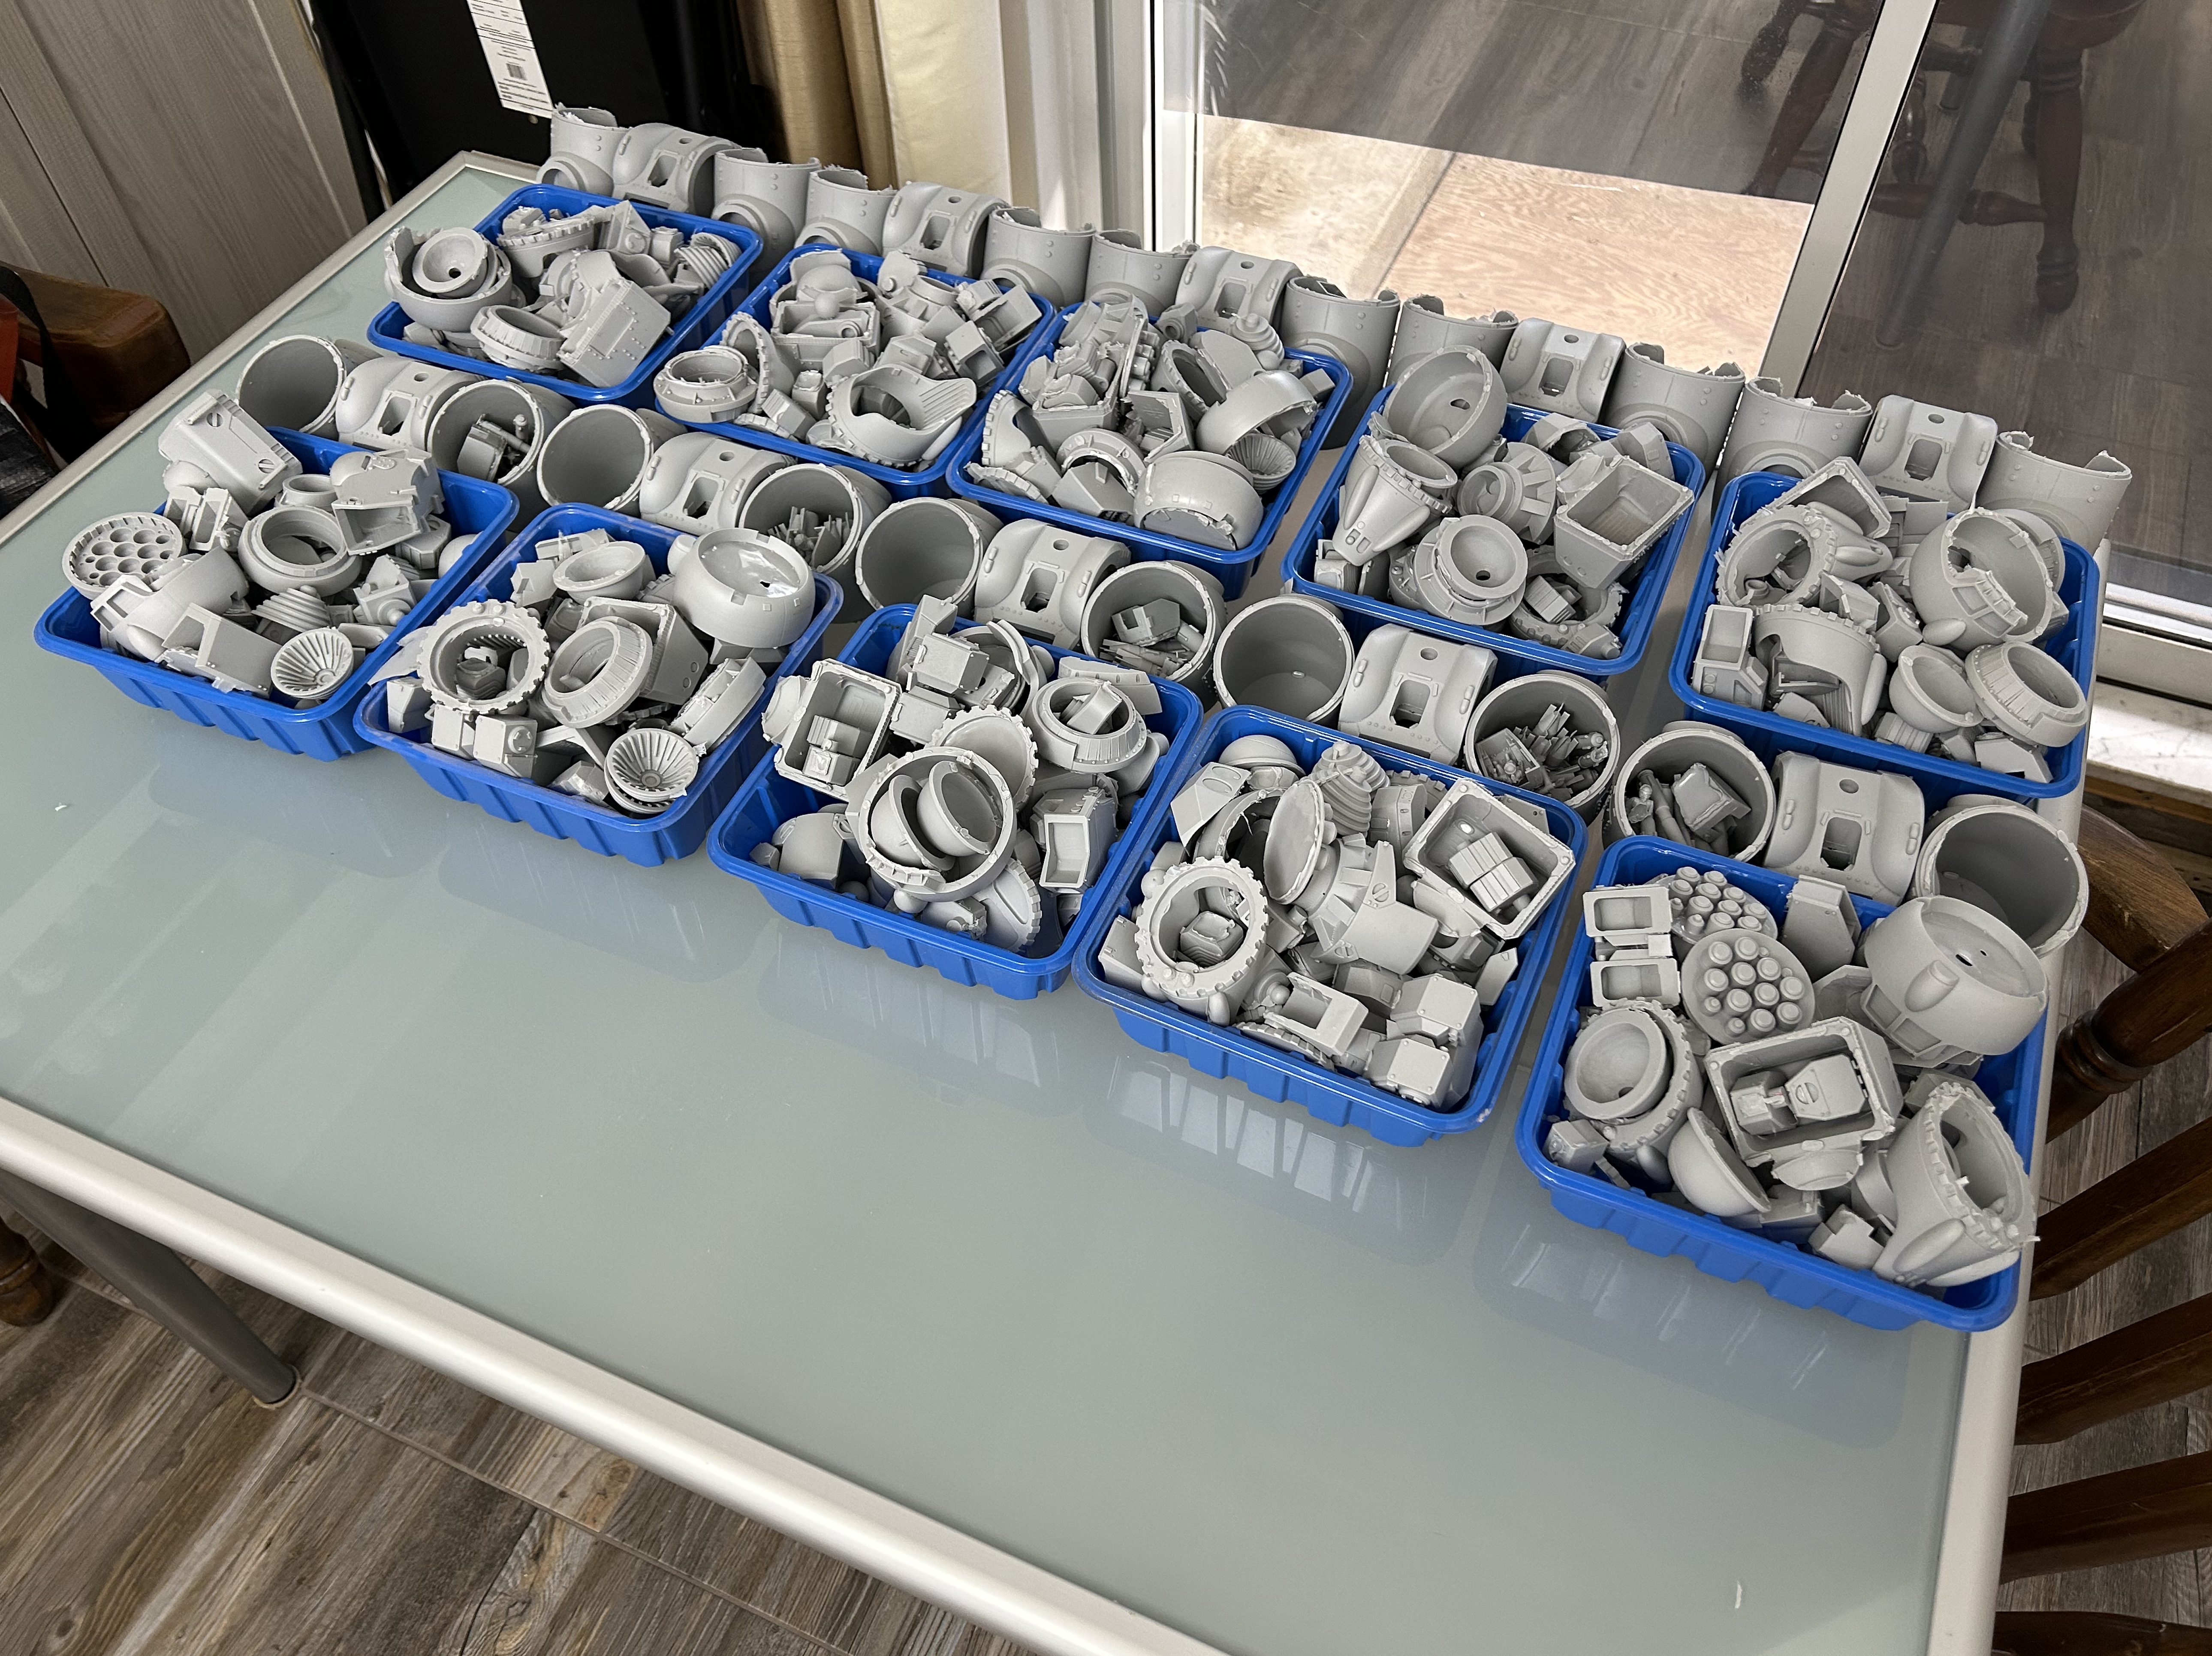
Hey @everyone production has begun in earnest and proceeding splendidly! Even the ballistic glass castings look great! The flip-side is that growing pile of discarded sprue gates, vents, and mixing cup residue which is all part of the casting process! The first kits are ready and should begin shipping in the next 10 days or so.
-
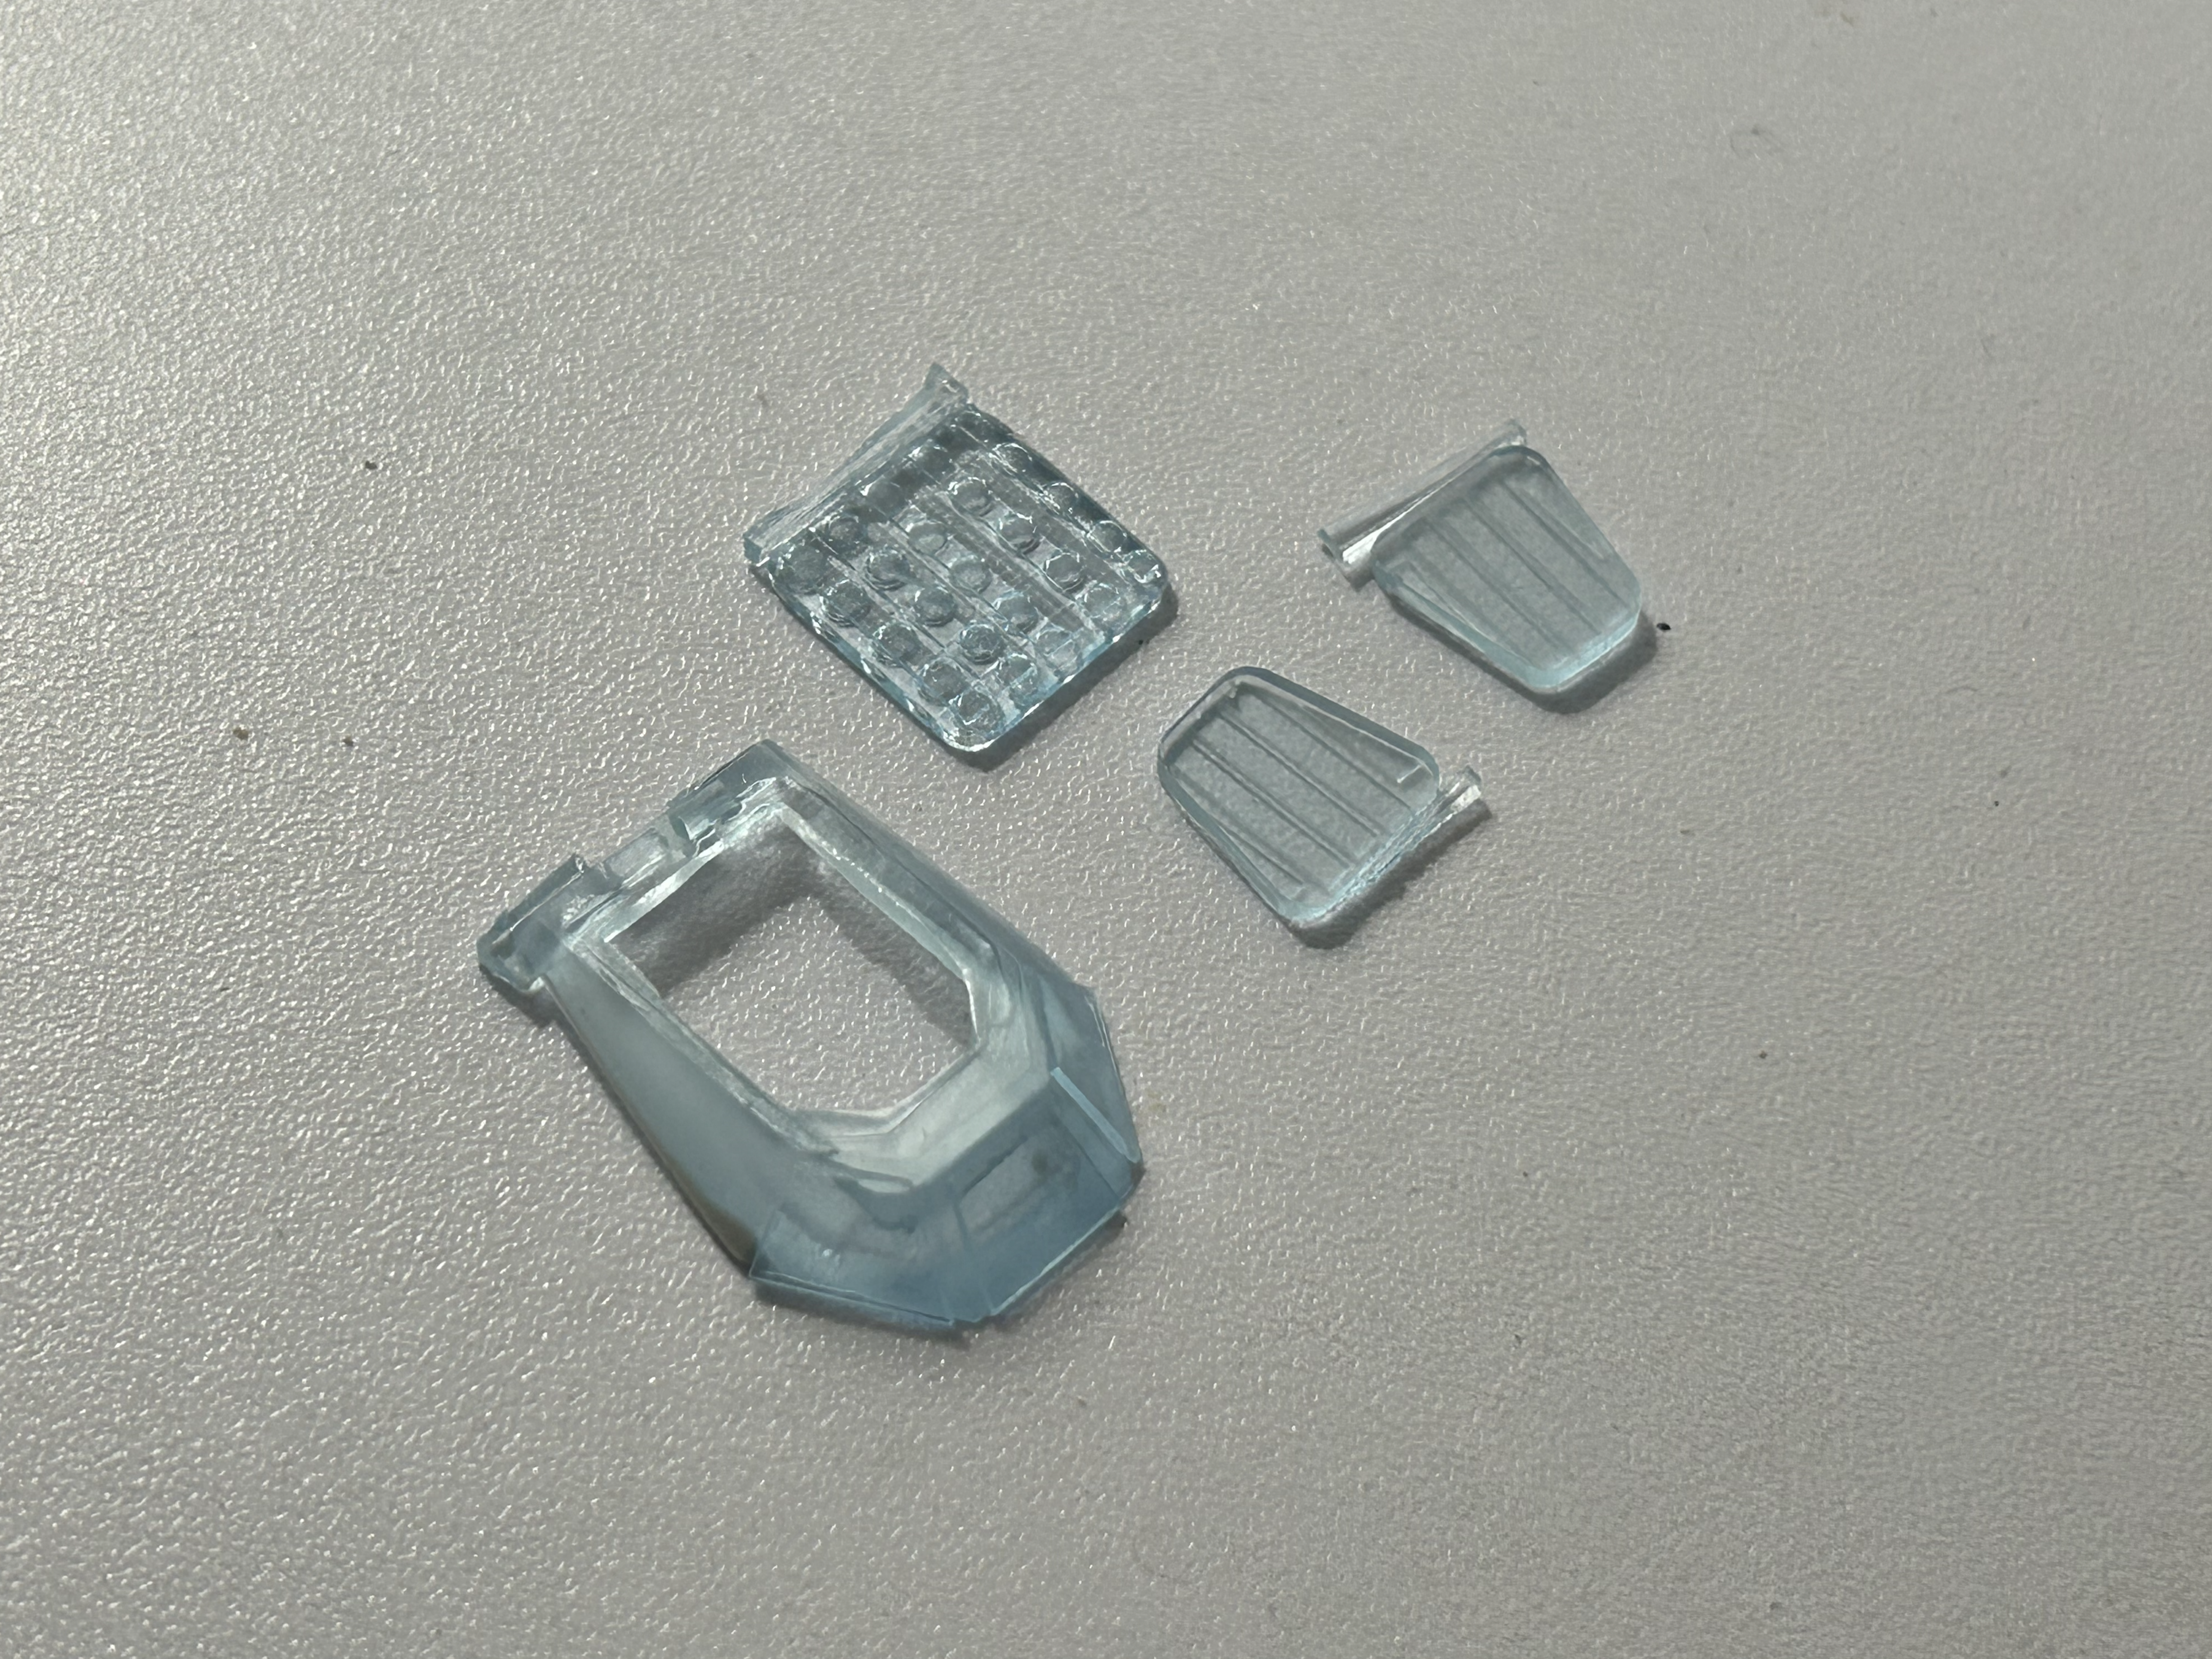
Thanks, Ted! I tried to make them look as organic as possible. The kit has a lot of parts, and they're casting beautifully!