cowie165
-
Posts
587 -
Joined
-
Last visited
Content Type
Profiles
Forums
Events
Gallery
Everything posted by cowie165
-
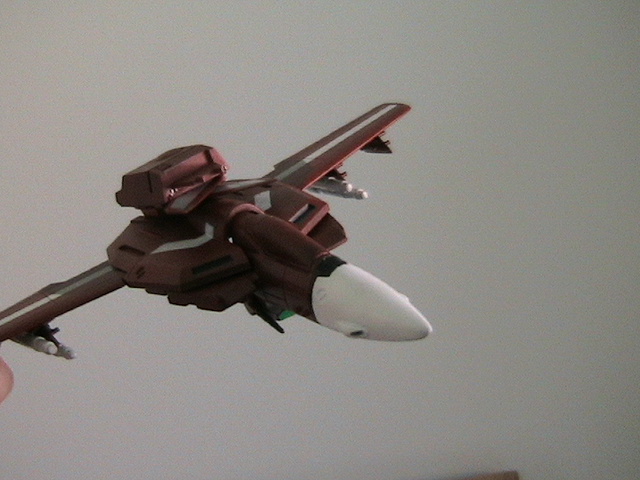
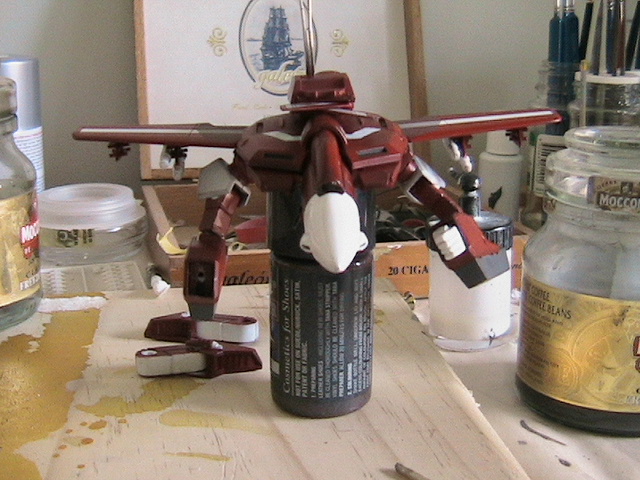
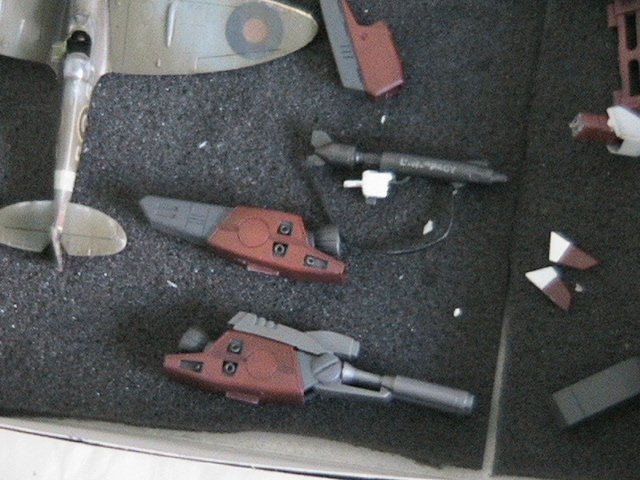
Cool, my first Macross kit is in the can. Also first time taking pics in direct sunlight - it is unforgiving (*cough* still visible seam line on left forearm *cough*)! Kinda bummed it makes the matte appear satin, I'll have to work on photography as I go. I felt the paintwork turned out alright but you can clearly make out spot like along the cockpit where the BMF masking didn't come away as nicely as hoped. The changes were to splay the legs, rework the bicep joints, reshape right hand to grasp the weapon, fit seatbelts and rifle sling and move the ejection seat forward as mentioned earlier. Boy o boy there is a lot of masking to do for this kit. I went a bit bezerk with weathering as I was trying chalk and other washes for the first time (I usually built 1/24 cars which are all high gloss weathering-free!). I like the end result as I tried to simulate a bit of battle damage here and there, using needle files, corrosive glues, and pastels. I like the difference between the UN SPACY rifle decal in the post near the top versus how it turned out in the end. I faded it and chipped at the decal with an exacto. I tried to colour the cockpit a slight gold hue. In the flesh, it looks reasonable, but it isn't quite strong (dark) enough and without the coat of future it makes the plastic seem like it was made in 1982. The rifle, tip of the booster cannon, and booster exhaust flanges are still gloss. I don't know if I'll leave them that way, but I wanted to see what it looked like. I left a few missles off the rails as though it was in the middle of something, rather than on its way to fight. I assumed the outboard weapons would be fired first. *shrug* All in all, I'm pleased with the finished kit. I was able to try new techniques and finally have a Macross kit on the shelf. I'd say the kit is an intermediate level, based on the instructions being almost useless and the amount of dry-fitting and planning you have to do. I would recommend it as I like the proportions of the gerwalk but you'll need to be patient with it. And hey thanks for taking a look, please hit me up with ways I can make it better next time. Honneamise I tried to tidy up the intake/hip joint as best I could, but ran out of patience and pressed on I put the last pic in just because it looks neat - kinda like a CGI VF-1, but also because you can see the splayed legs a little better. Disclaimer: For the rivet counters out there, I wasn't too stressed over making it match DYRL. The Bandai decal instructions were horrible. There were decals that weren't used and others that I needed but were absent, so I kinda guessed here and there using other references. If it makes you wince, I apologise
-
Is that from a sci-fi show or just a freehand scratchbuild?
-
Thanks Hurin!
-

1/72 Reactive Armored VF-0S Macross Zero
cowie165 replied to Less than Super Ostrich's topic in Model kits
My 2c are that it's the feet covers (whatever you want to call them) that puts the nail in the Gundam coffin. But thumbsup to Hase for pressing on with Macross -
Is there anywhere this DVD is still available? Valk-exchange has gone and yesasia advises the item is out of print. Any pointers please guys?
-
Awesome, thanks!
-
Mike what is the weapon mounted on the wall? It looks like a revolver with a low power scope, barrel extension and detachable butt? At first glance I thought it was some kind of blowdart/airgun?? Sorry it's OT but I'm intruiged. Cheers!
-
Any updates JFG? Looks great so far.
-
Thanks mate! Sounds like a plan. I'm still envious of your VF-1 with the boosters from CA. It looks awesome. And I'm sorry I haven't replied to your email yet. The two spares are both Quiltra-Queleual.
-
Thank you mate. As one of the people that first helped me out, your praise means a lot. Cheers. Far out. That was a forehead slapper. I completely forgot Thank you again. This is my first sci-fi kit ever and therefore my first Macross kit. The VF-1 and the Mk IX Spitfire in one of the pics are the only aircraft I've built that are >1/144 scale Suffice to say, I was shooting from the hip, so I appreciate the reassurance!
-
Thanks for the kind words. Re: Paint I was stuck for a colour I liked so I pre-shaded with enamel XF-63 (German Grey) then I lightly sprayed acrylic X-7 (regular, boring old Red) until I felt the shade matched some pictures I have. Pre-shading is such a great technique. First time I've tried it and I like the results. You can pre-shade to make it darker in areas where you'd expect shadow, etc. and (as the pics are awful res) the kit looks like it has a lot more 'depth' to it. Re: Legs The kit was purchased to be a gerwalk as I've slowly picked up the 'better' fixed pose kits (Arii 1/100 fighters, Imai/Bandai 1/100 Battroids). Once all the parts are assembled, I'll probably mount it on an acrylic rod and then glue the arms and legs into a realistc pose. I managed to file away enough plastic around the intakes to afford a noticeable splay on the legs and widen the stance. In the pic below hopefully you can see (once again, sorry about poor res, taken on handycam) where I rotated the intake mounting pic. I understand that the intakes don't actually move but I was stuck for ideas as the knee joints didn't have a nice place to make a pivot joint.

-
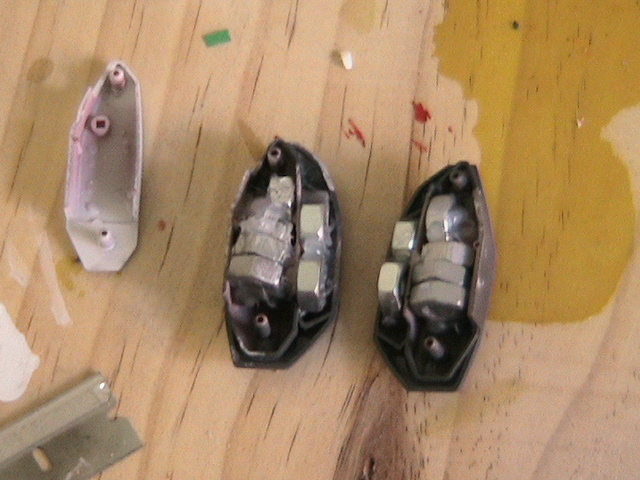
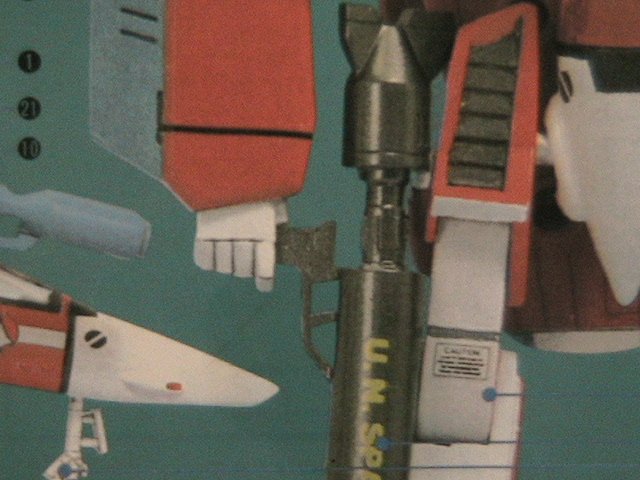
Being a dad makes for slow progress I'm still not sure if I'll mount the gerwalk on an acrylic rod or let it stand by itself. I added these nuts+silicon just in case I want it to stand. Regardless, it makes for a better 'feel' and isn't quite as plasticky. Here's some assorted parts that are just about ready to be fitted. I'm not 100% happy with the booster-cannon colours (cannon in metaliser, mount in german grey). Is it even called a booster? It has been a while. Assorted pics. honneamise I tried and tried to thin that area near the intakes but couldn't come up with a worthwhile solution. I'm hoping that filing it all back to a single smooth surface will make it less eye-catching. This pic hopefully highlights the difference between the out-of-box left arm (right of screen) and the right arm where I deliberately broke the bicep joint so I can rotate it. ...nearly there...


-
Macross Zero & Other Anime Boolegs?....
cowie165 replied to retroborg's topic in Movies and TV Series
*raises hand* One please! I though V-E e-store was closed? -
The pictures did say a thousand words! Thanks honneamise, we're on the same sheet of music now. I agree - that plate under the chest plate is causing the kit to look unrealistic. It's on the list for tidying up now! Leaving the polycaps out sounds like the way to go, I thought about that one the other day too. Not quite sure on how to fill the area thought. Perhaps I could putty that end of the knee joint and drill out new holes for the mounting pin? Unfortunately, I think I'm stuck with the shoulder plates as I modified that 'bicep' bracket but did not keep it poseable - if I make it 90' then the forearms will probably look a little goofy - have to dry assemble and see. Perhaps with a few more parts assembled I'll have a clearer idea on a way around this. Thanks again for the pointers guys, your advice has been very motivating!
-
edit: double post
-
Guys thanks very much for your input. I have a few Hasegawa kits but wanted to start with something 'easier'!? So I thought... well I bought it when HLJ was selling them at Y900 or whatever it was, rather than the US$30 they seem to sell for these days...! honneamise thanks for the pointers - I hadn't considered leaving out/replacing those parts. I think my next task should be a dry assembly by taping all the arms and legs together, just to help me clarify which parts you are talking about! big F I wish you hadn't said the 1/100 takes as long as the 1/72 Hase kits! The Bandai has been a real test of patience, with lots of masking etc. I'm not looking forward to assembling the arms and legs and taking the seam lines out... If you guys have any ideas on how I might be able to splay the legs out I'd appreciate it. There just doesn't seem to be any way to do it without either filing off a great deal from the top of the mounting pin or to scratchbuild something. Hrmmm. Cheers!
-
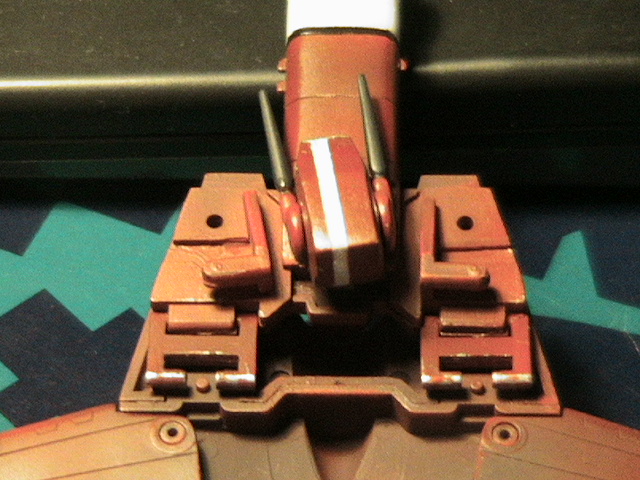
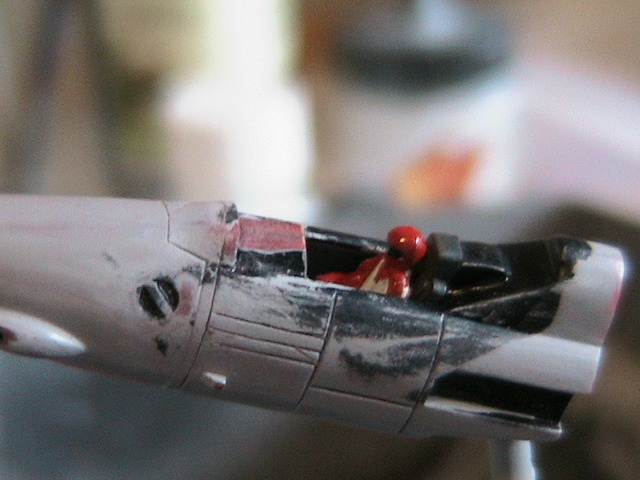
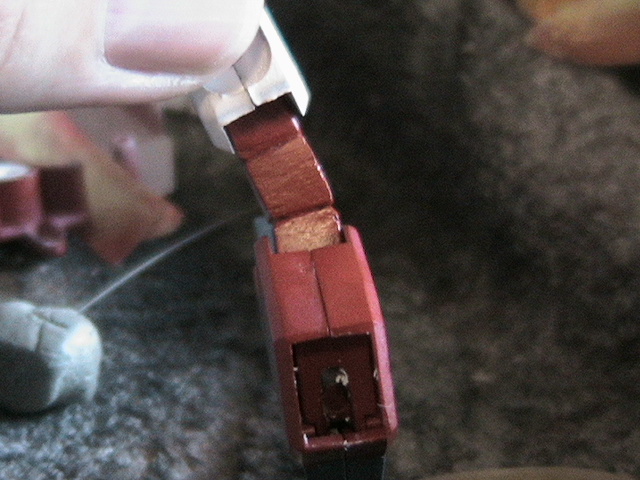
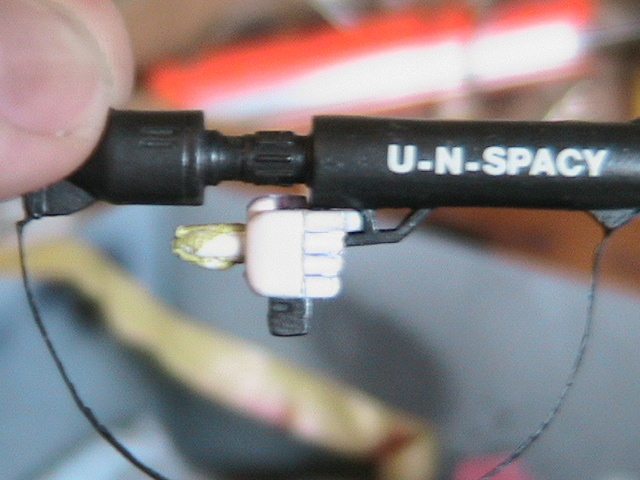
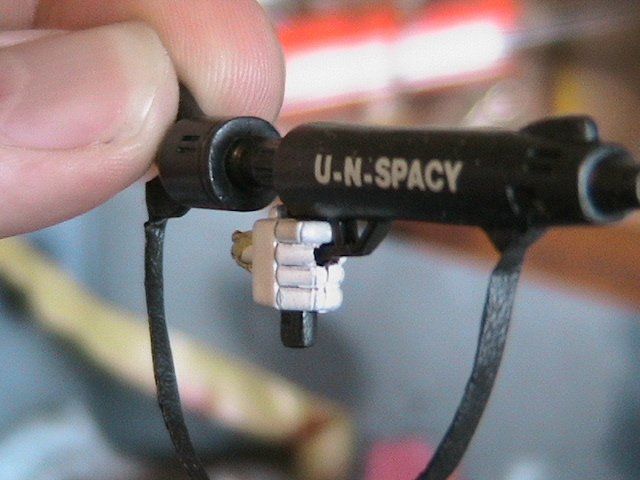
Hi guys I'm kinda new here and never saw the old MW so I don't know what was there and what wasn't. I'm building the above kit at the moment and thought I might pop a few pics on and hopefully will receive some feedback and produce a nice kit at the end of it all. The first pic should be what I am aiming for - using a variable kit to make a fixed pose gerwalk. We're picking things up in the 2nd quarter, with a bit of assembly and maybe half the painting already done. I'm not happy with some of the parts of this kit so I'm chopping and changing a little as I go. This pic is the business end of the valk. The original seat placement is so far back the pilot would be hard pressed to reach the instrument panel, so I insert a little piece of plastic card, puttied and sanded, and was able to move the seat forward just enough that she doesn't look like a toddler trying to drive a car. The panel lines are a little messy but I don't have a proper rescriber yet. It might end up adding to a weathered look, who knows. The bicep/shoulder-to-elbow joint is designed to look ok in battroid and gerwalk modes but it will make the forearms stick out at a weird angle, as you can prob see in the first picture. I decided to cut them up and create an angle instead. My 'razor saw' was actually the strip from the bottom of a Cling Wrap box. Once the part was cut, I filled the void with Tamiya putty, inserted a piece of bonsai training wire and superglued the next day. I am happy with the result but better tools would produce a better finish. Perhaps now should be a time to add this is the first aircraft kit I've painted that is bigger than 1/144 scale - I normally do 1/24 autos. Finally, I've modified the right hand to make it more realistic. This is what it would look like OOB: After a bit of filing, I came up with: The sling is made from the foil lid of a sour cream / yoghurt container. I spread some superglue, folded it in half, and once the glue set I cut a thin run of the foil. I'm pretty happy with how it turned out, plus I'll be able to pose the sling once the kit is all done (ie. allow the sling to sag forward). I'm planning on another very thin spray on the cannon, to help blend the 'UN SPACY'. The weapon looks like it is MIB - I've used a light respray before to help things look a little tired - simulating the paint wearing away from use. Anyways, that's about all I've got for now. I'm hoping that this thread will make me spend more time on the kit. If you have any pointers for me, please post as feedback is always welcome and I'd like to do the best job I can. Cheers MWers, cowie PS As the gallery seems locked, any pointers on linking images rather than using attachments would be great please. Does everyone here just have them hosted elsewhere?


-
Thanks boinger! With the new version of Azureus you can identify which parts you wish to download however some cannot be deselected. I've not created a .torrent before - is it fairly straightforward? If so, could I trouble you for a .torrent that just has VO(VOXP) add-ons please? Hopefully would be fairly small but would save a lot of running around via google. Thanks mate Mark
-
Thanks evirus I noted that the frozen-layer .torrent and boinger's .torrent were the same and have been downloading for a day or so now. I posted about the 2Gb file as I was interested in the other unlicenced titles he was seeding. I'm happy with daemon tools and have been using it for a while now. You're right, it sure is nifty! Great program there. Very simple to use. Thanks for the bittorrent info - I've been using that too and 60Gb later Azureus is still going strong Many thanks, once the image is complete I'll be seeding that one until further notice!
-
Hi boinger I hate to be a pain, but I couldn't find the .torrent on your ftp site. Could you please double check it is in that directory? I found an image (437Mb) for VO but couldn't find the 2Gb download. If it is there and I just can't see it, I apologise for the bother. Cheers!
-
Found this just now: Macross VO on eBay US I came to MW to post the link but then saw the torrent links! Cheers!
-
I registered with MW just to say that the kit looks brilliant, great job! I can relate to where you're coming from as I traditionally build 1/24 autos but I'm working on my first Macross kit at the moment. Thanks for taking the time to post the pics, very encouraging mate. I'm sure it has been said before but that kit looks so similar to the MiG-31 in the Clint Eastwood 'Firefox' film. Particularly the first pic of the cockpit taken from the rear. I wonder how it'd look in black! Cheers