
Boobytrap
-
Posts
528 -
Joined
-
Last visited
Content Type
Profiles
Forums
Events
Gallery
Everything posted by Boobytrap
-

MOSCATO HOBBY MODELLING CONTEST!!
Boobytrap replied to captain america's topic in Anime or Science Fiction
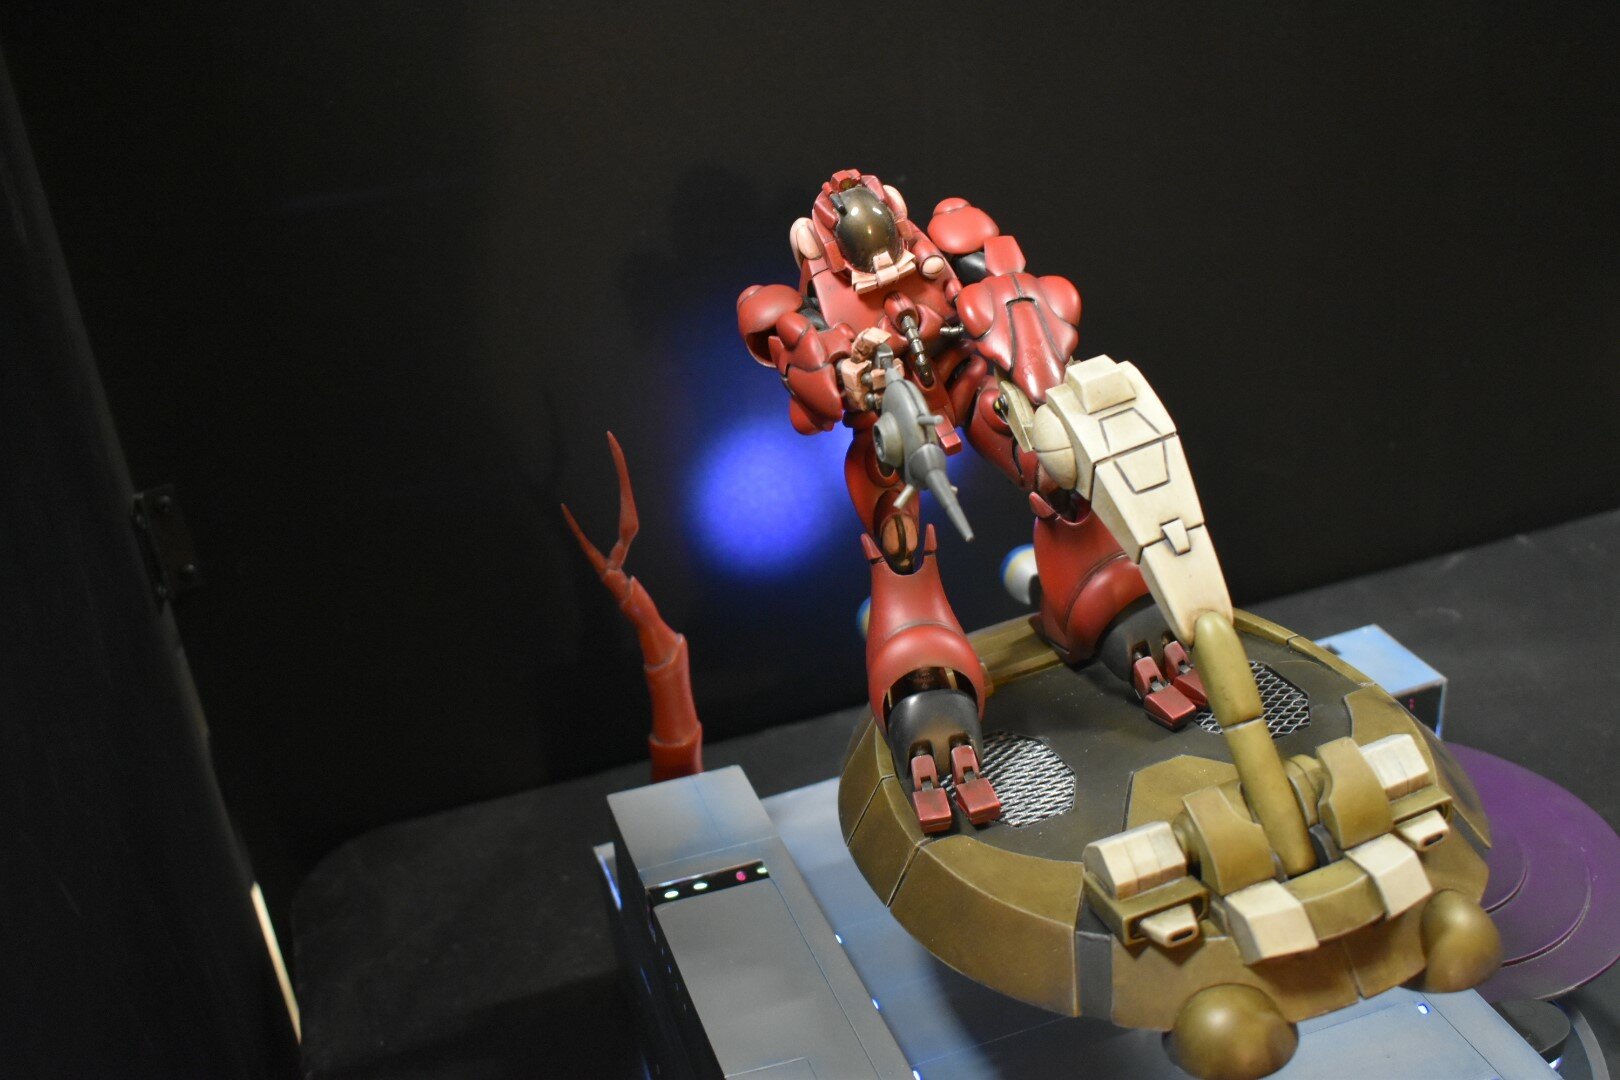
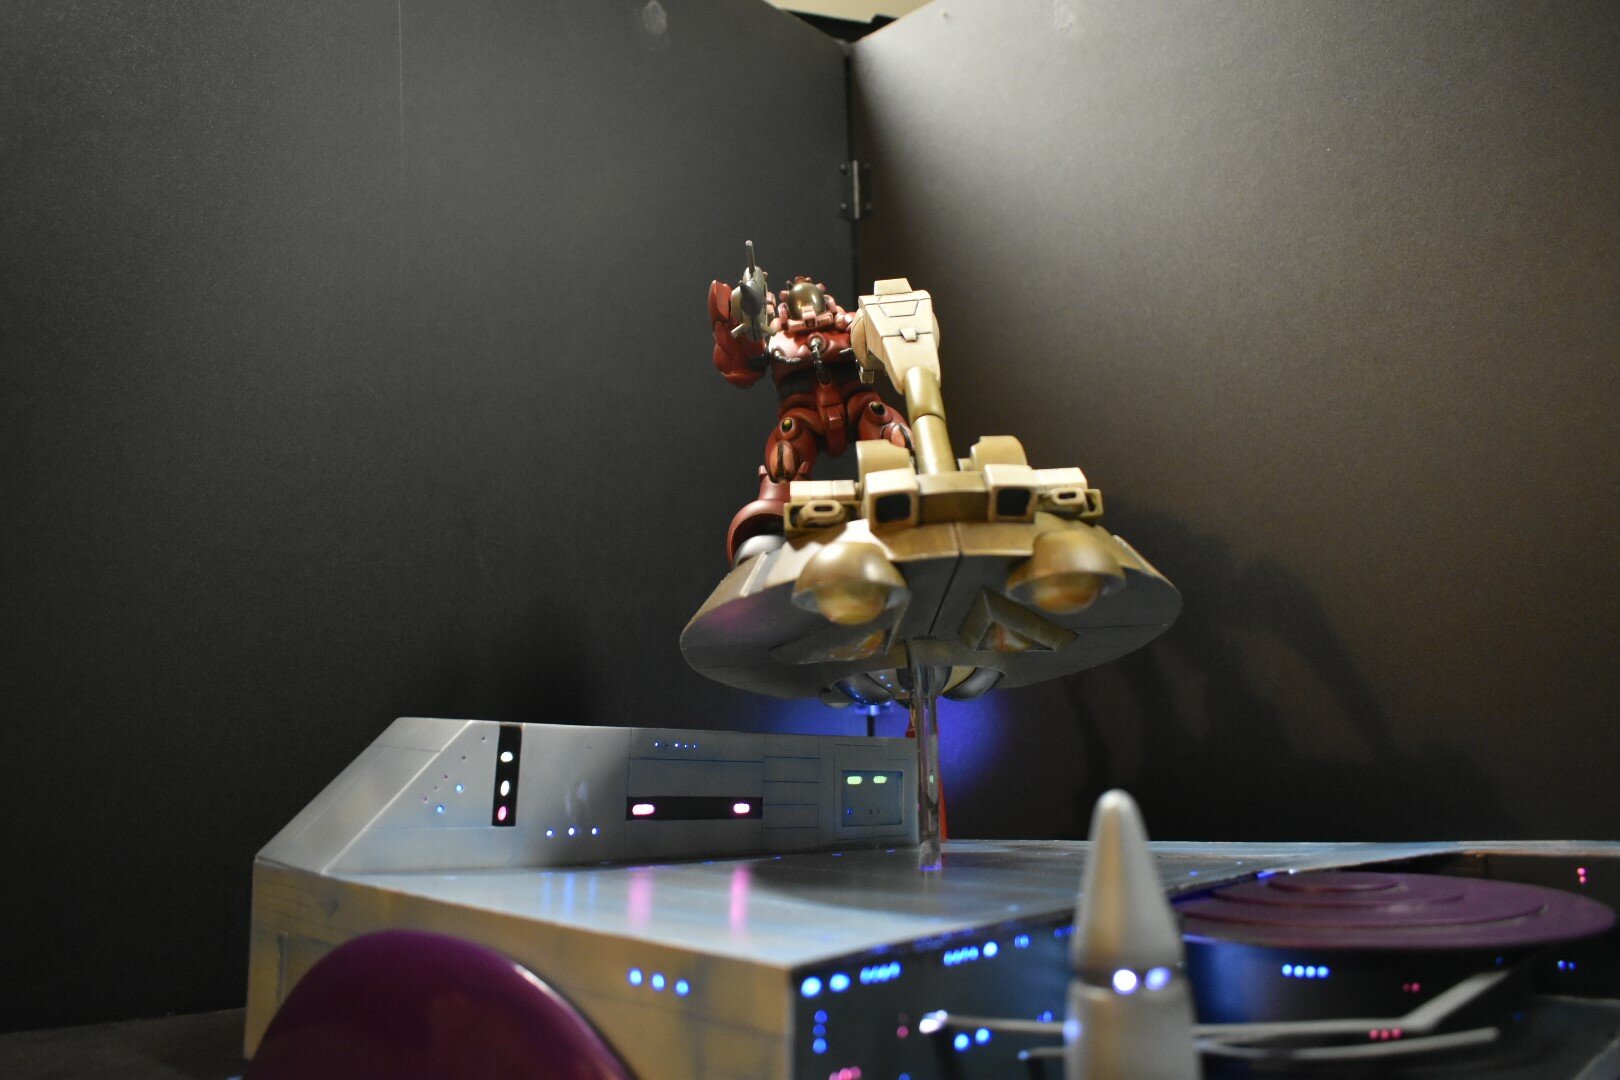
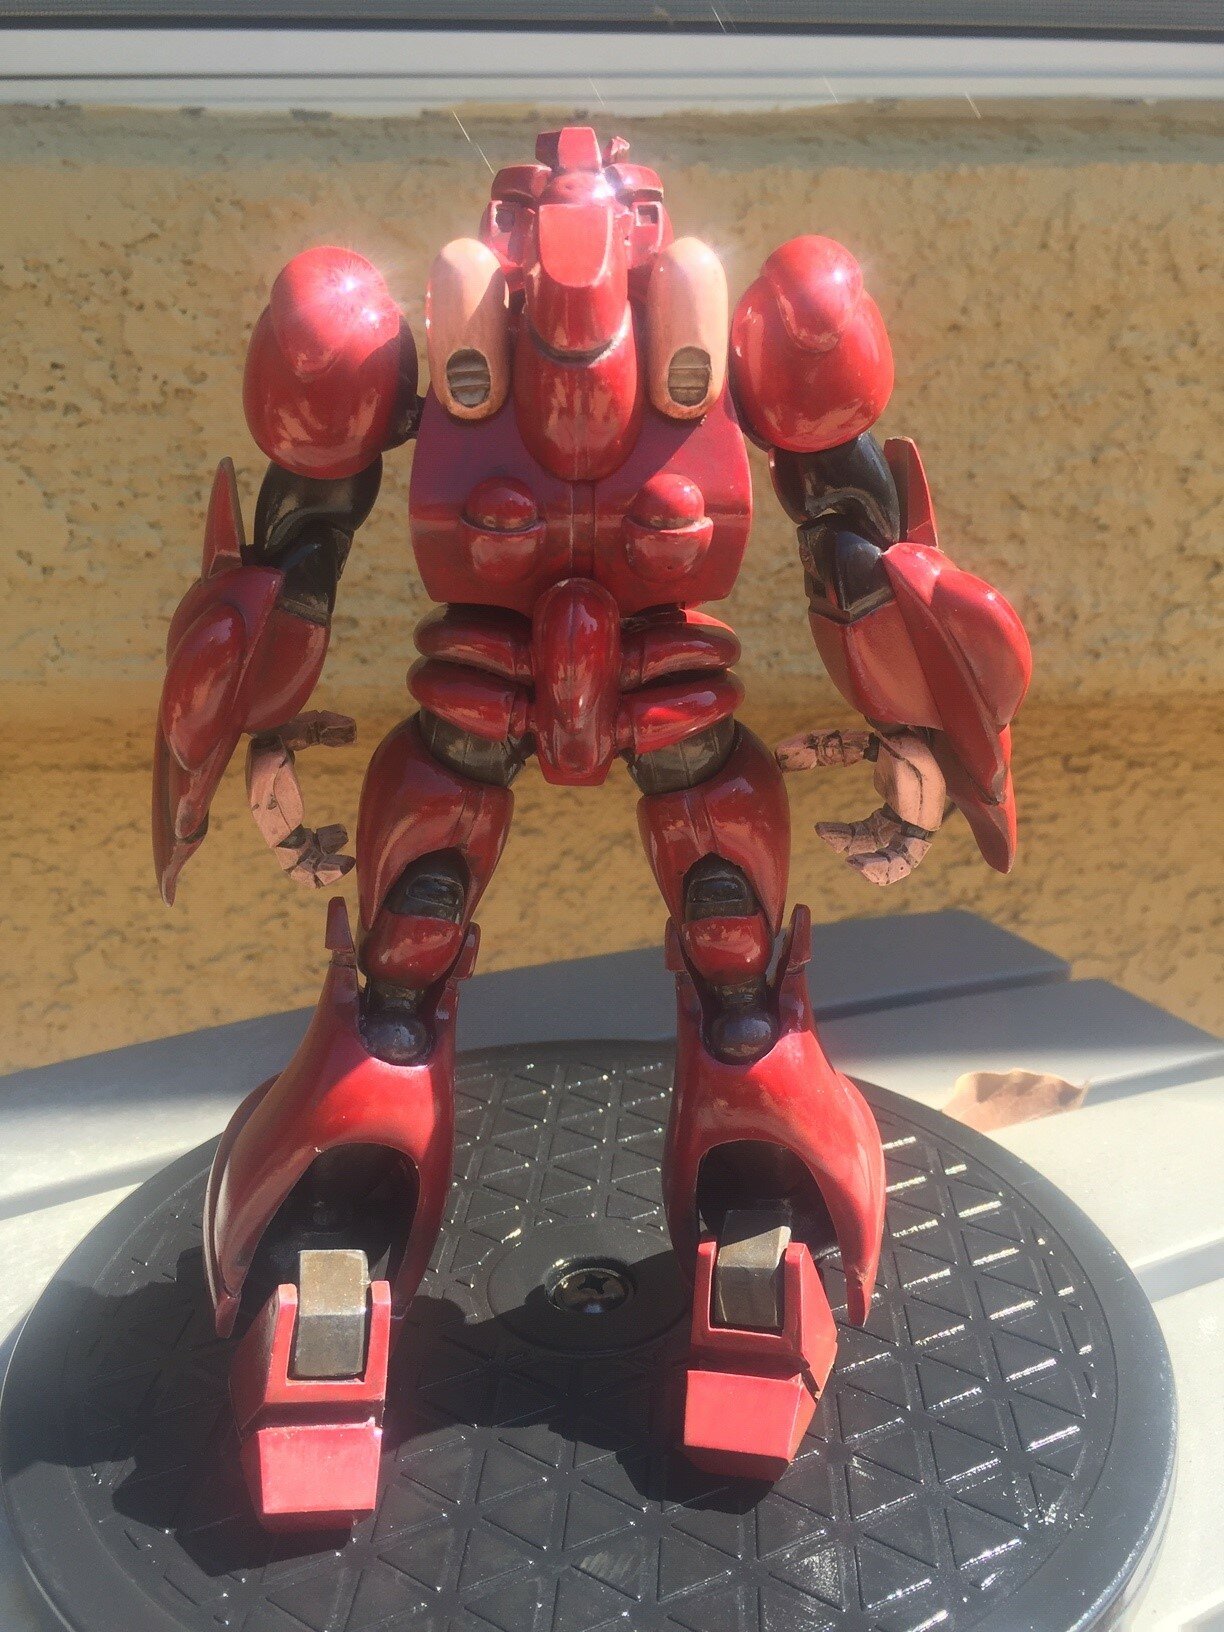
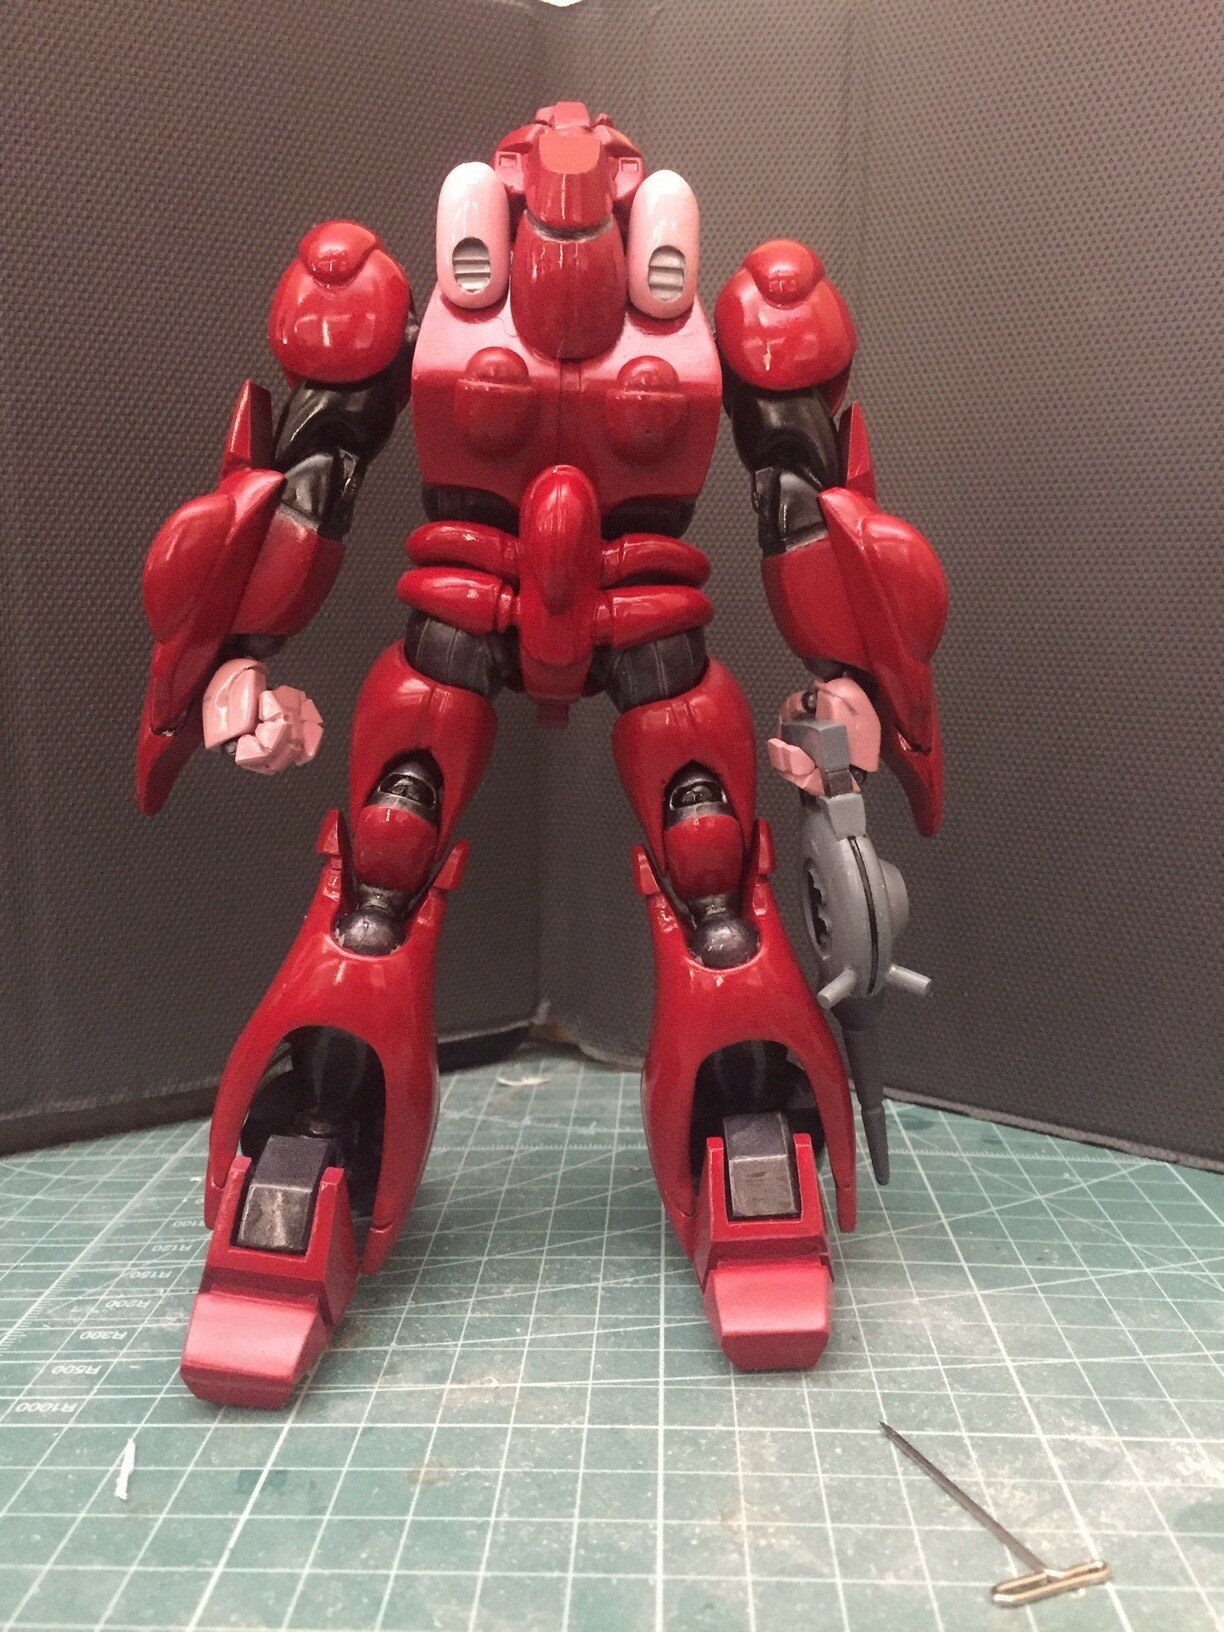
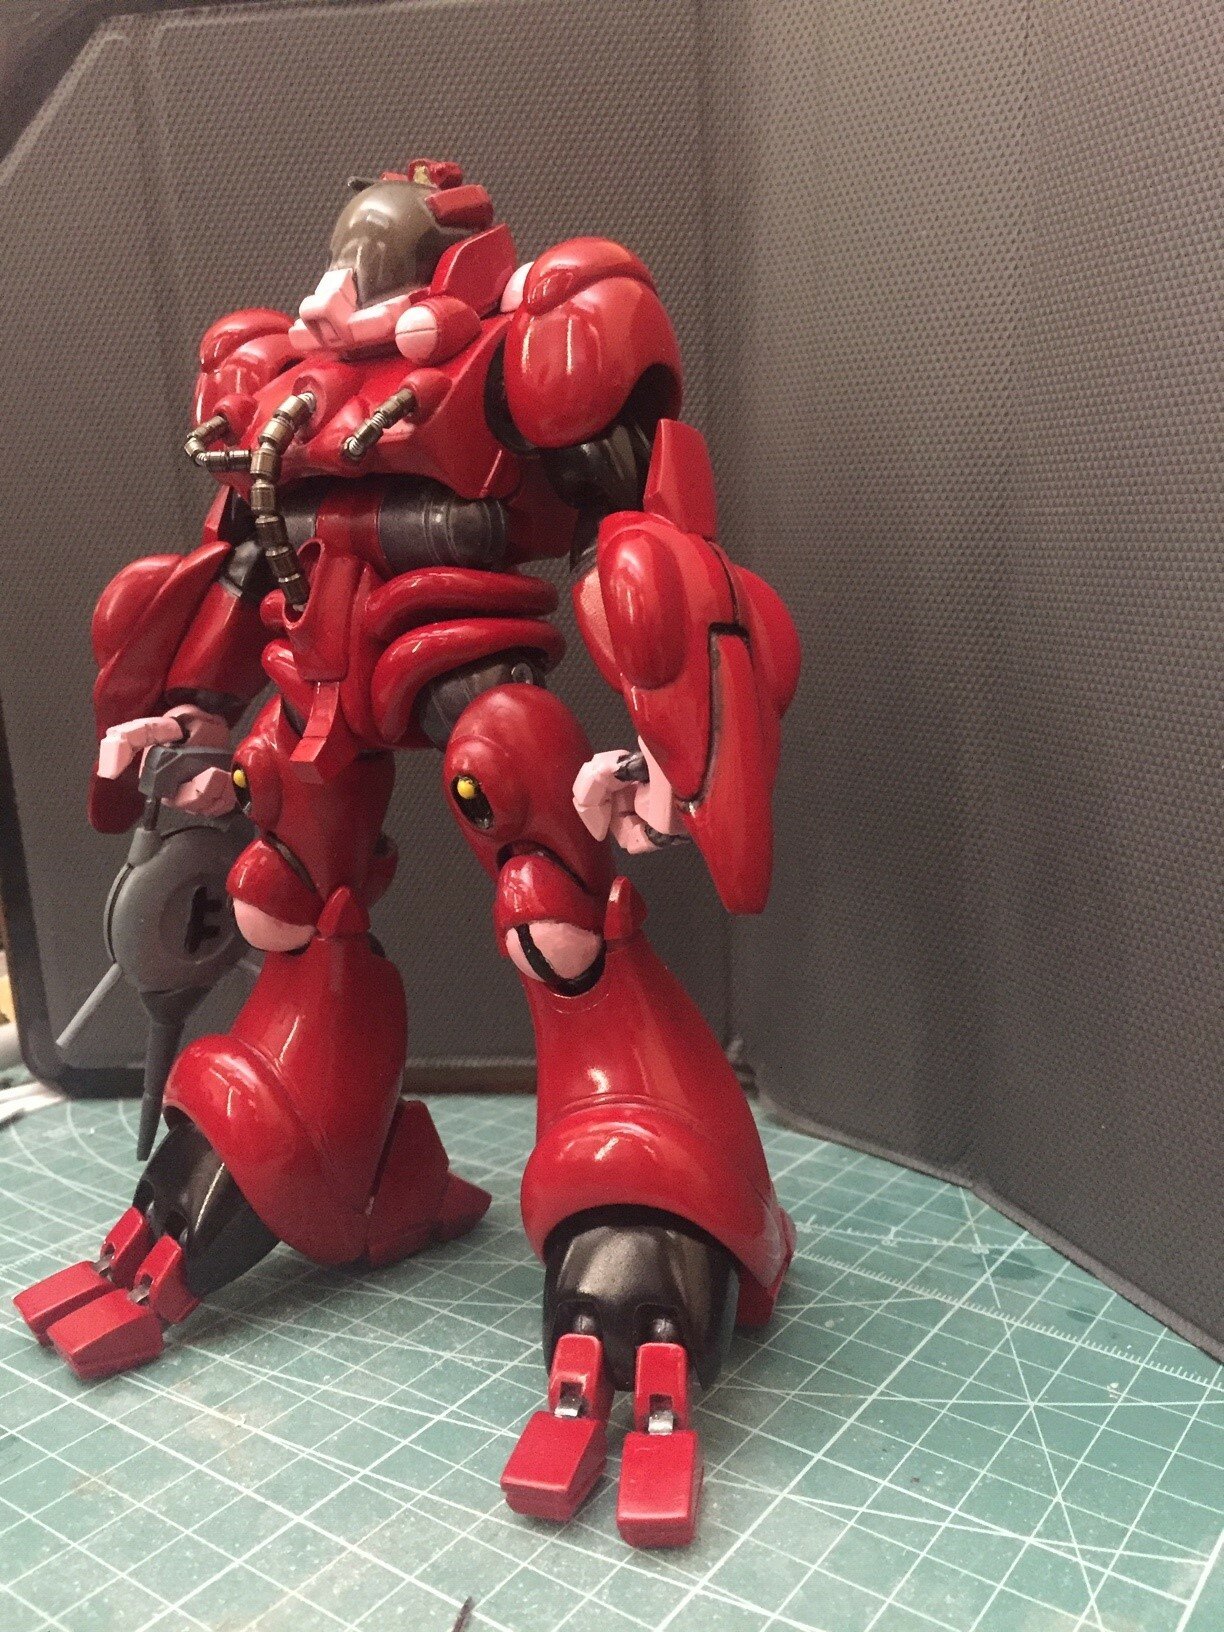
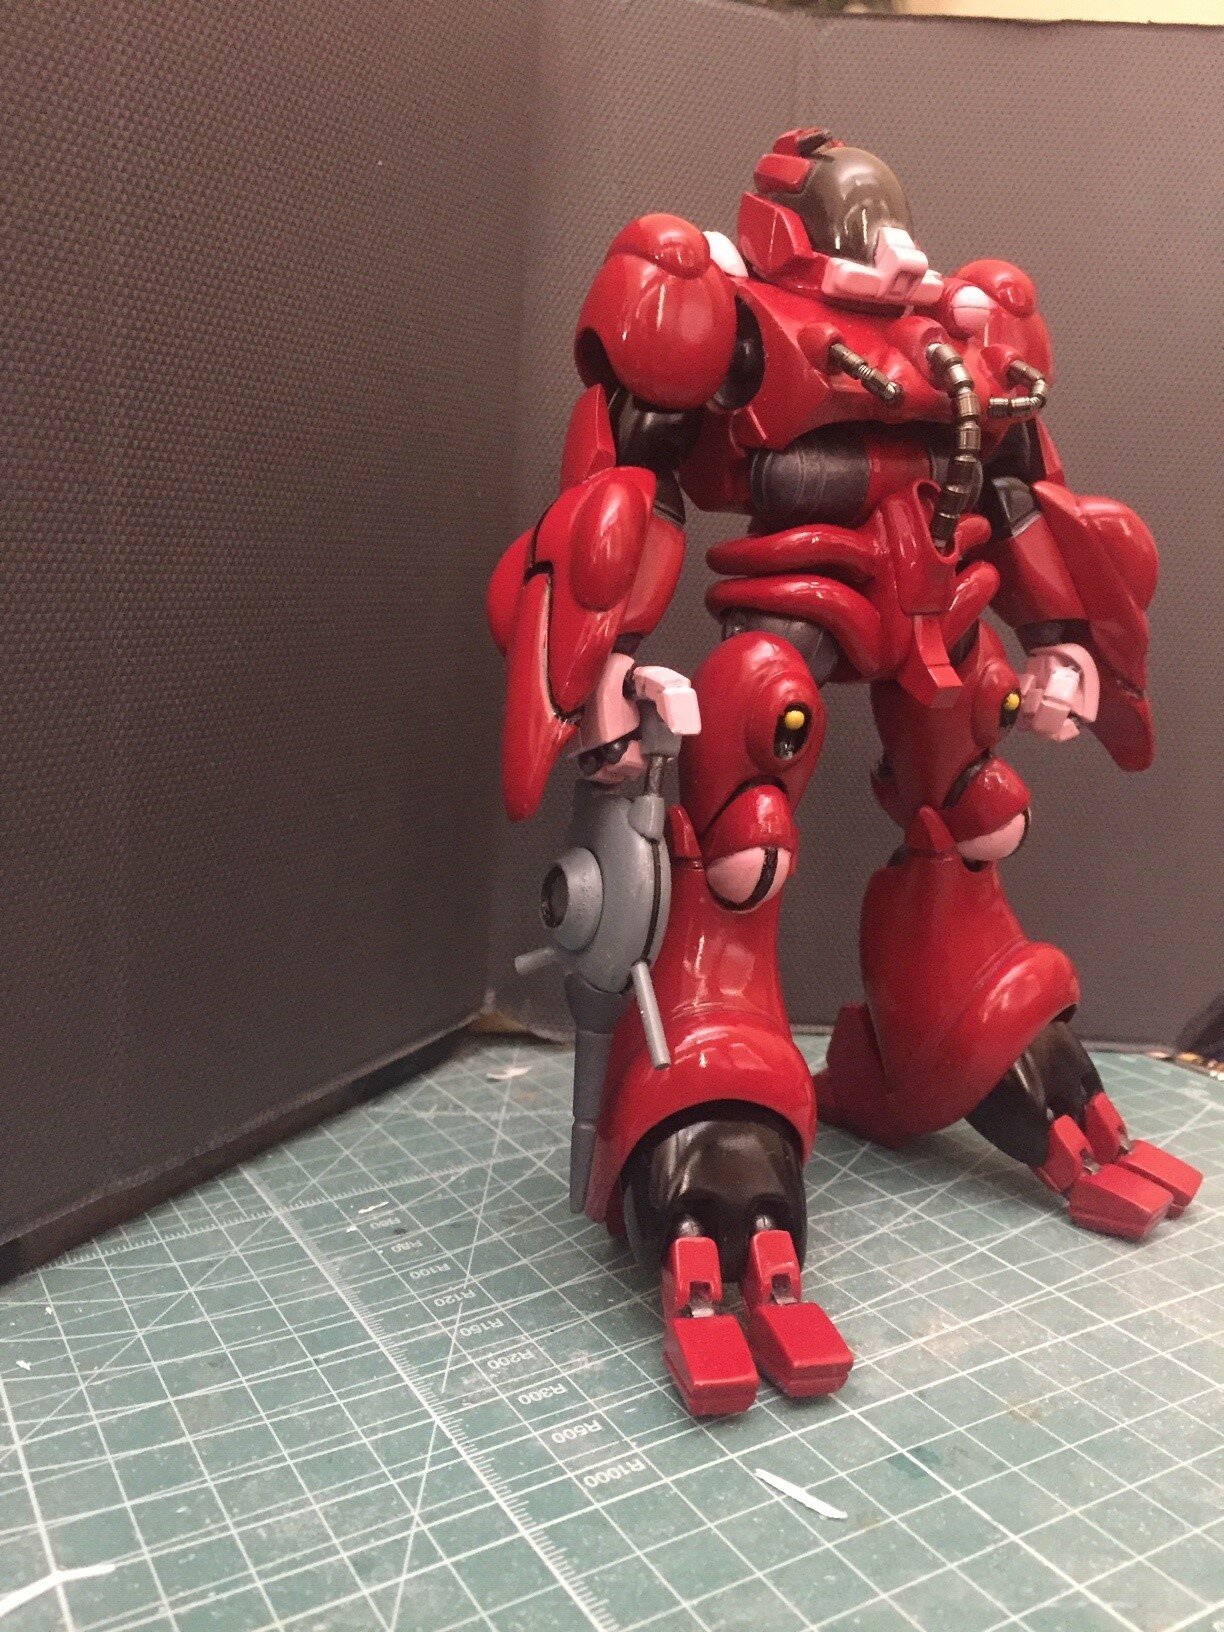
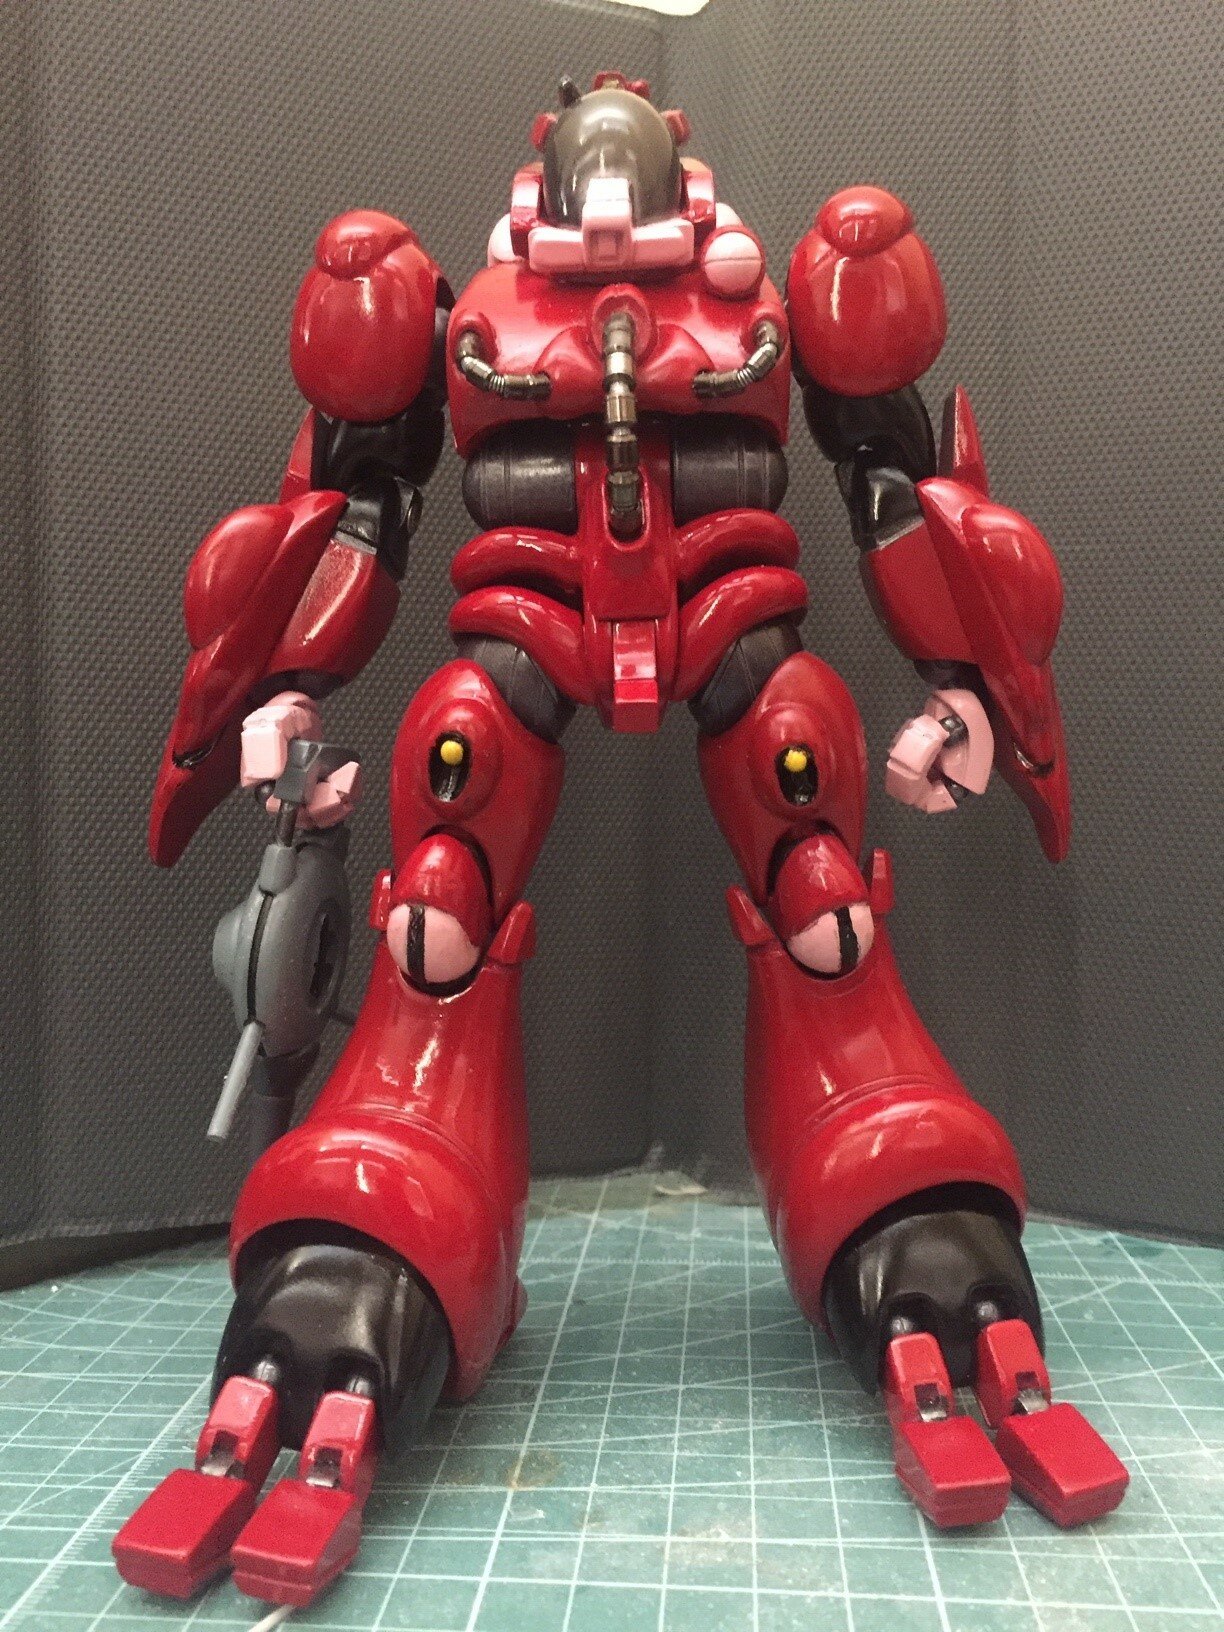
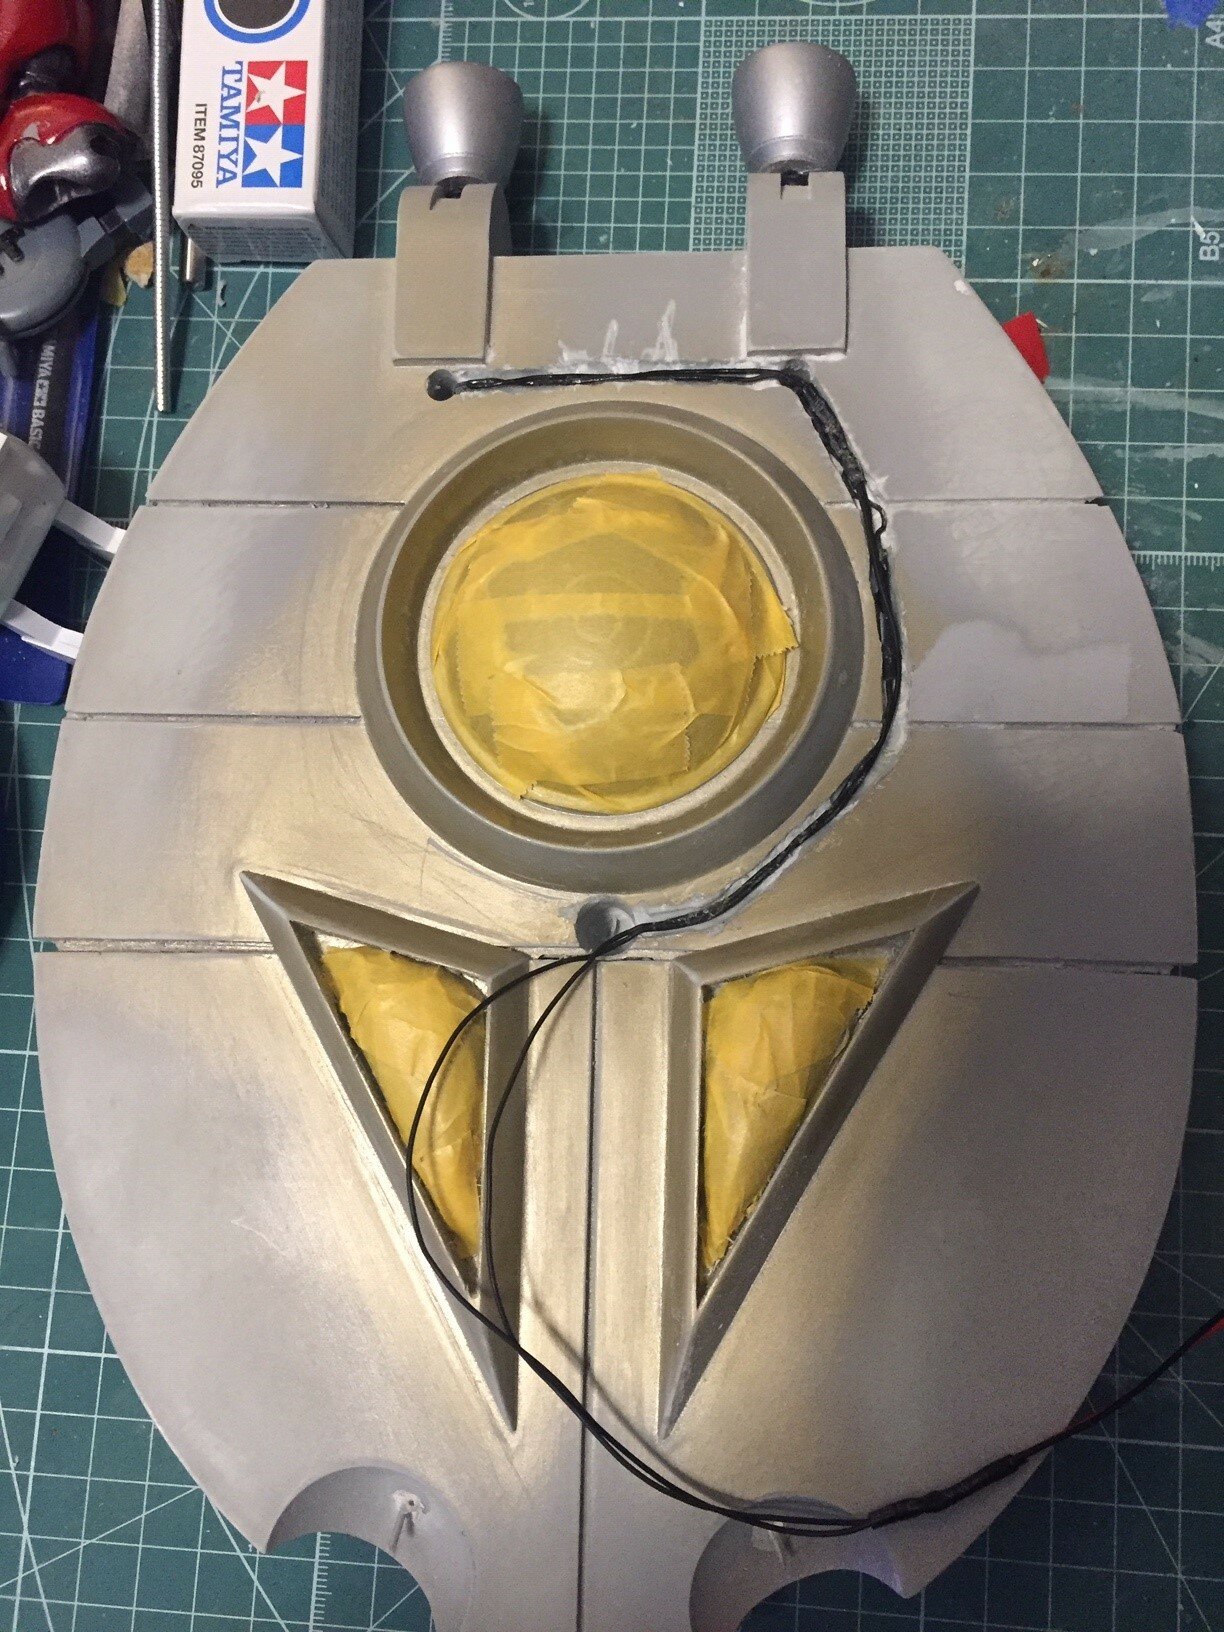
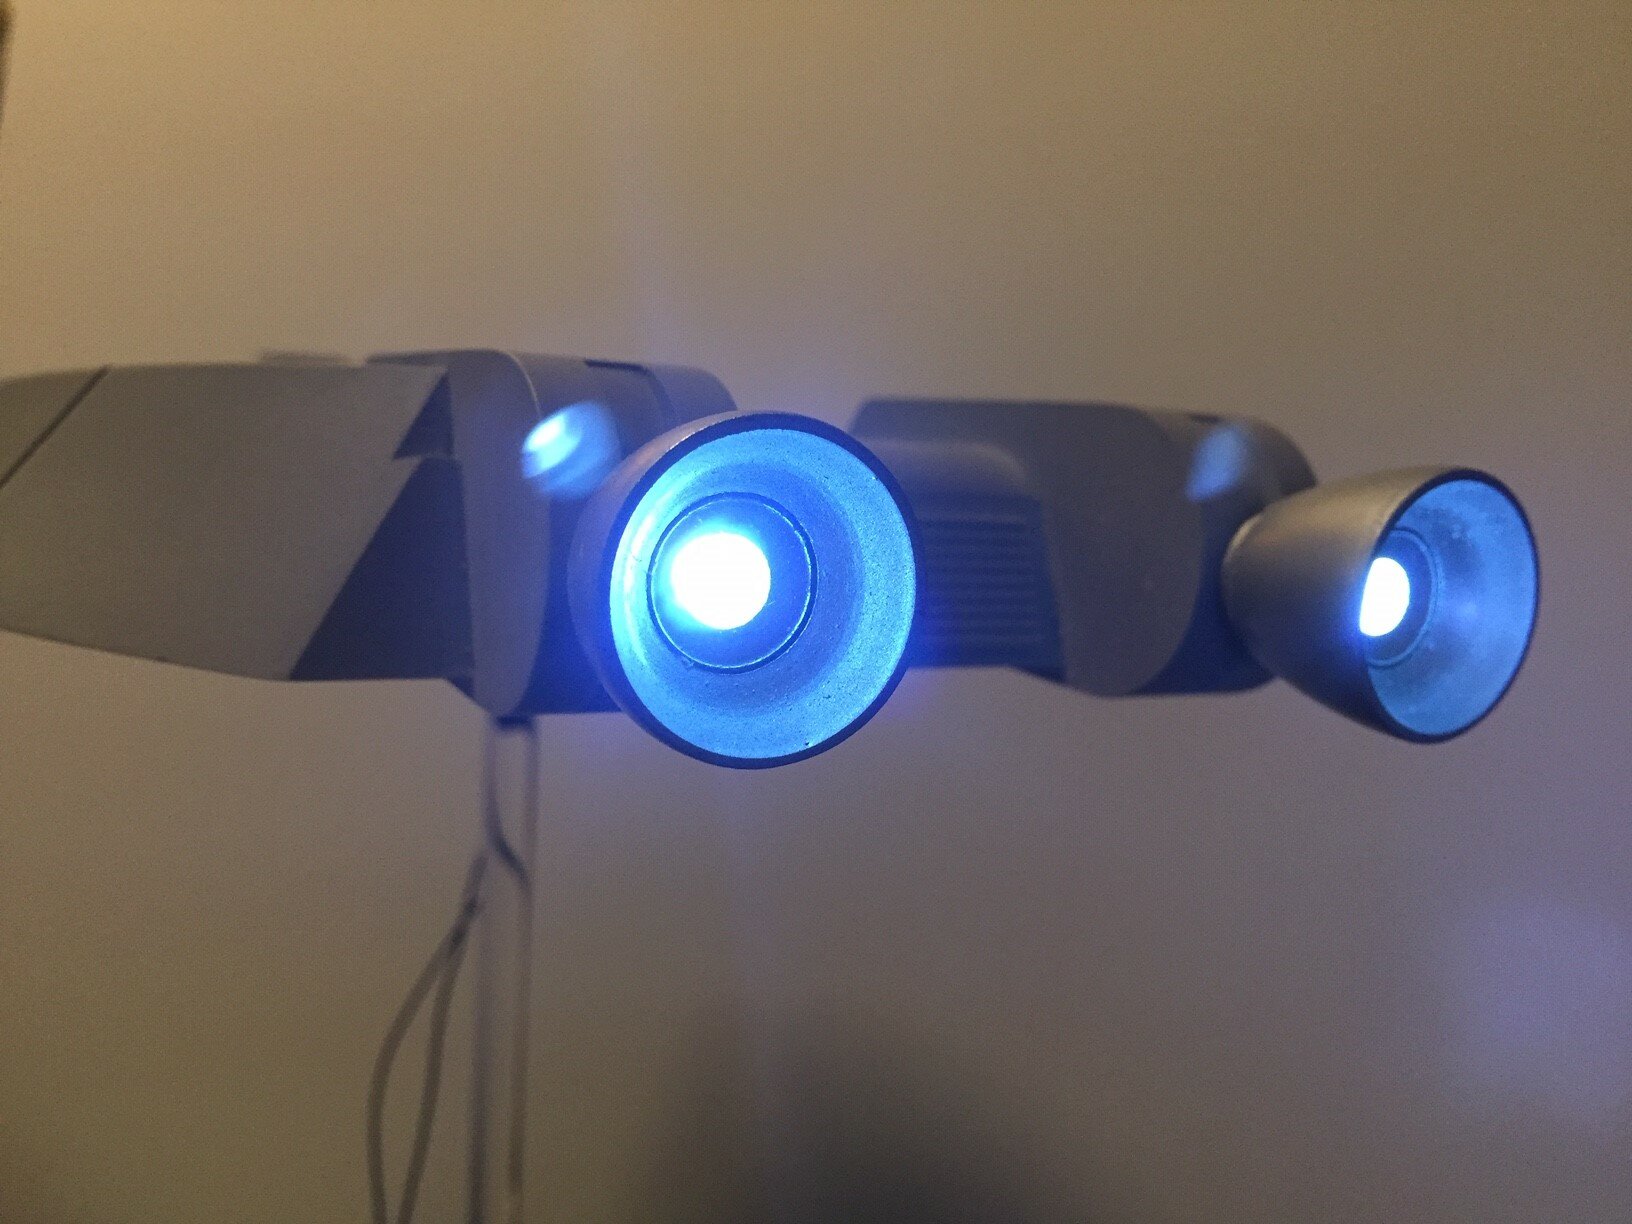
Whelp times up. Unfortunately I didn't get everything done that I wanted to. Definitely could have used some more time to take some better pictures too. Oh well. Road weary warrior heading back out to combat... Moscato Bioloyyd Commander and Sled. Painted with lacquer, weathered with enamels and powders. For the figure, customized articulation in the shoulders, wrists, fingers, hips, ankles, and toes. Magnets in the hands and modified the gun drum to be on the outside. For the sled added details for the front, yoke, interior sides, and foot pads. Wired LED's for the thrusters. Customized base made from wood, plasticard, and clay. Wired LED's throughout.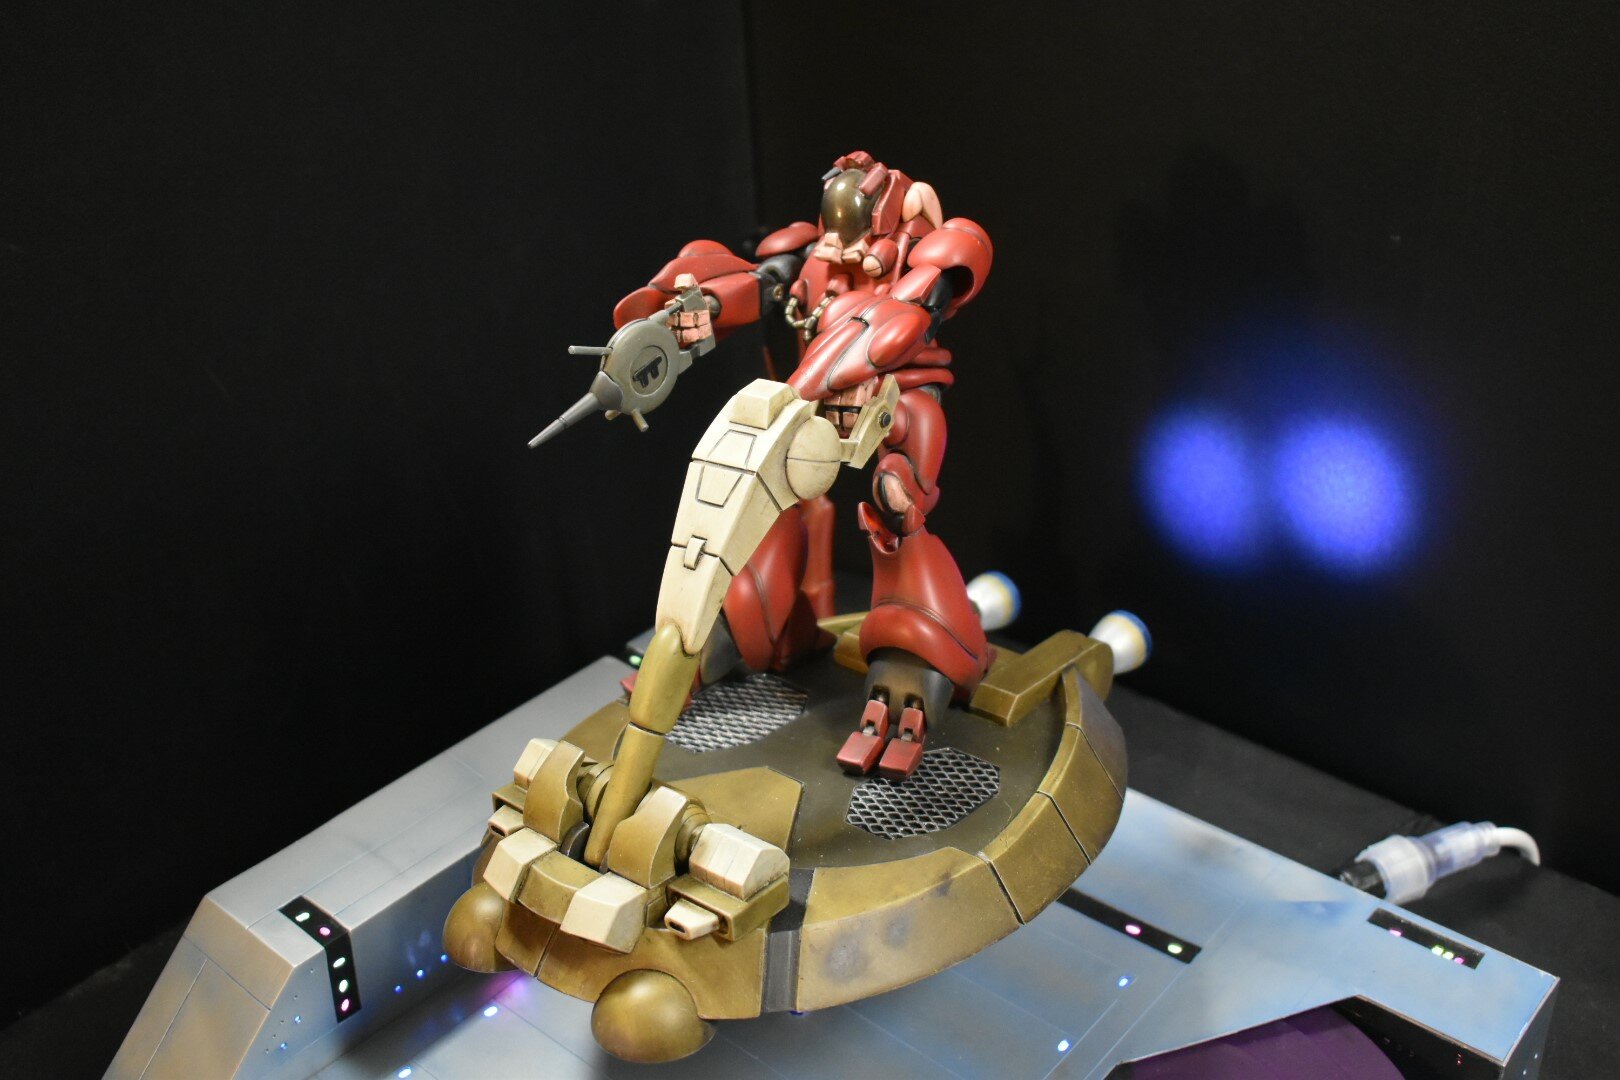
-
MOSCATO HOBBY MODELLING CONTEST!!
Boobytrap replied to captain america's topic in Anime or Science Fiction
@tekering I love the chipping effect on the first picture. Did you use the salt method? My heart goes out to you with the chipping effect on the second picture. -
MOSCATO HOBBY MODELLING CONTEST!!
Boobytrap replied to captain america's topic in Anime or Science Fiction
Man that sucks! I've personally never had an issue with Tamiya white primer. It has always functioned the same for me as the greys. Their gloss white runs as bad as your first picture though 🤢. Maybe it's a weather thing? I'm in So CA where there's always low humidity and moderate temps. All that being said I had an almost exact same thing happen this weekend. It was my final two pieces before I could finish assembly on a major part of the build. When I peeled off the Tamiya masking tape it took off a massive area of weathering and base color, basically down to the primer. I can't even describe how pissed I was. Normally I would start over but with the contest deadline looming there just isn't enough time for me to do it over from scratch. I'm left with no option but to streamline my process and try to blend it in as best as possible. Hopefully it won't be too noticeable and the rest of the work will make up for it. Good luck to you getting your issue resolved. I can't wait to see what you submit. -
MOSCATO HOBBY MODELLING CONTEST!!
Boobytrap replied to captain america's topic in Anime or Science Fiction
It's taking me longer than I thought but I am almost there. It will probably come down to the wire though. -
Awesome! Thanks for the links. Was able to get both of them along with the WWM VF-25F. I can breathe a sigh of relief now.
-
MOSCATO HOBBY MODELLING CONTEST!!
Boobytrap replied to captain america's topic in Anime or Science Fiction
Mine is still in the works. I think it will be ready some time in November. -
1/48 SOUTHERN CROSS BIOROID
Boobytrap replied to captain america's topic in Anime or Science Fiction
Excellent work! Assuming you go with these, I can't wait to see what you do with them for the contest. -
MOSCATO HOBBY MODELLING CONTEST!!
Boobytrap replied to captain america's topic in Anime or Science Fiction
Hot Damn! I thought that the entries were going to have to be submitted this month. Having until December is awesome. I should definitely be able to complete everything by then. I'm really looking forward to this. I can't wait to see all of the wonderful submissions that people have created of your works past and present. There should be some real beauties. Any chance we can send in photos through some other means other than Facebook? I don't have an account there and try to avoid it when at all possible. -
1/48 SOUTHERN CROSS BIOROID
Boobytrap replied to captain america's topic in Anime or Science Fiction
Yeah it does have that minty fresh sparkle 😁. I only wish I had the funds to get multiples when Cap originally offered these. I would definitely have kept one of them with the glossy shine. All the curves and angles are great for that. I plan to take a bunch of pictures under different lighting conditions before I apply the final flat coat to enjoy the gloss one last time. -
1/48 SOUTHERN CROSS BIOROID
Boobytrap replied to captain america's topic in Anime or Science Fiction
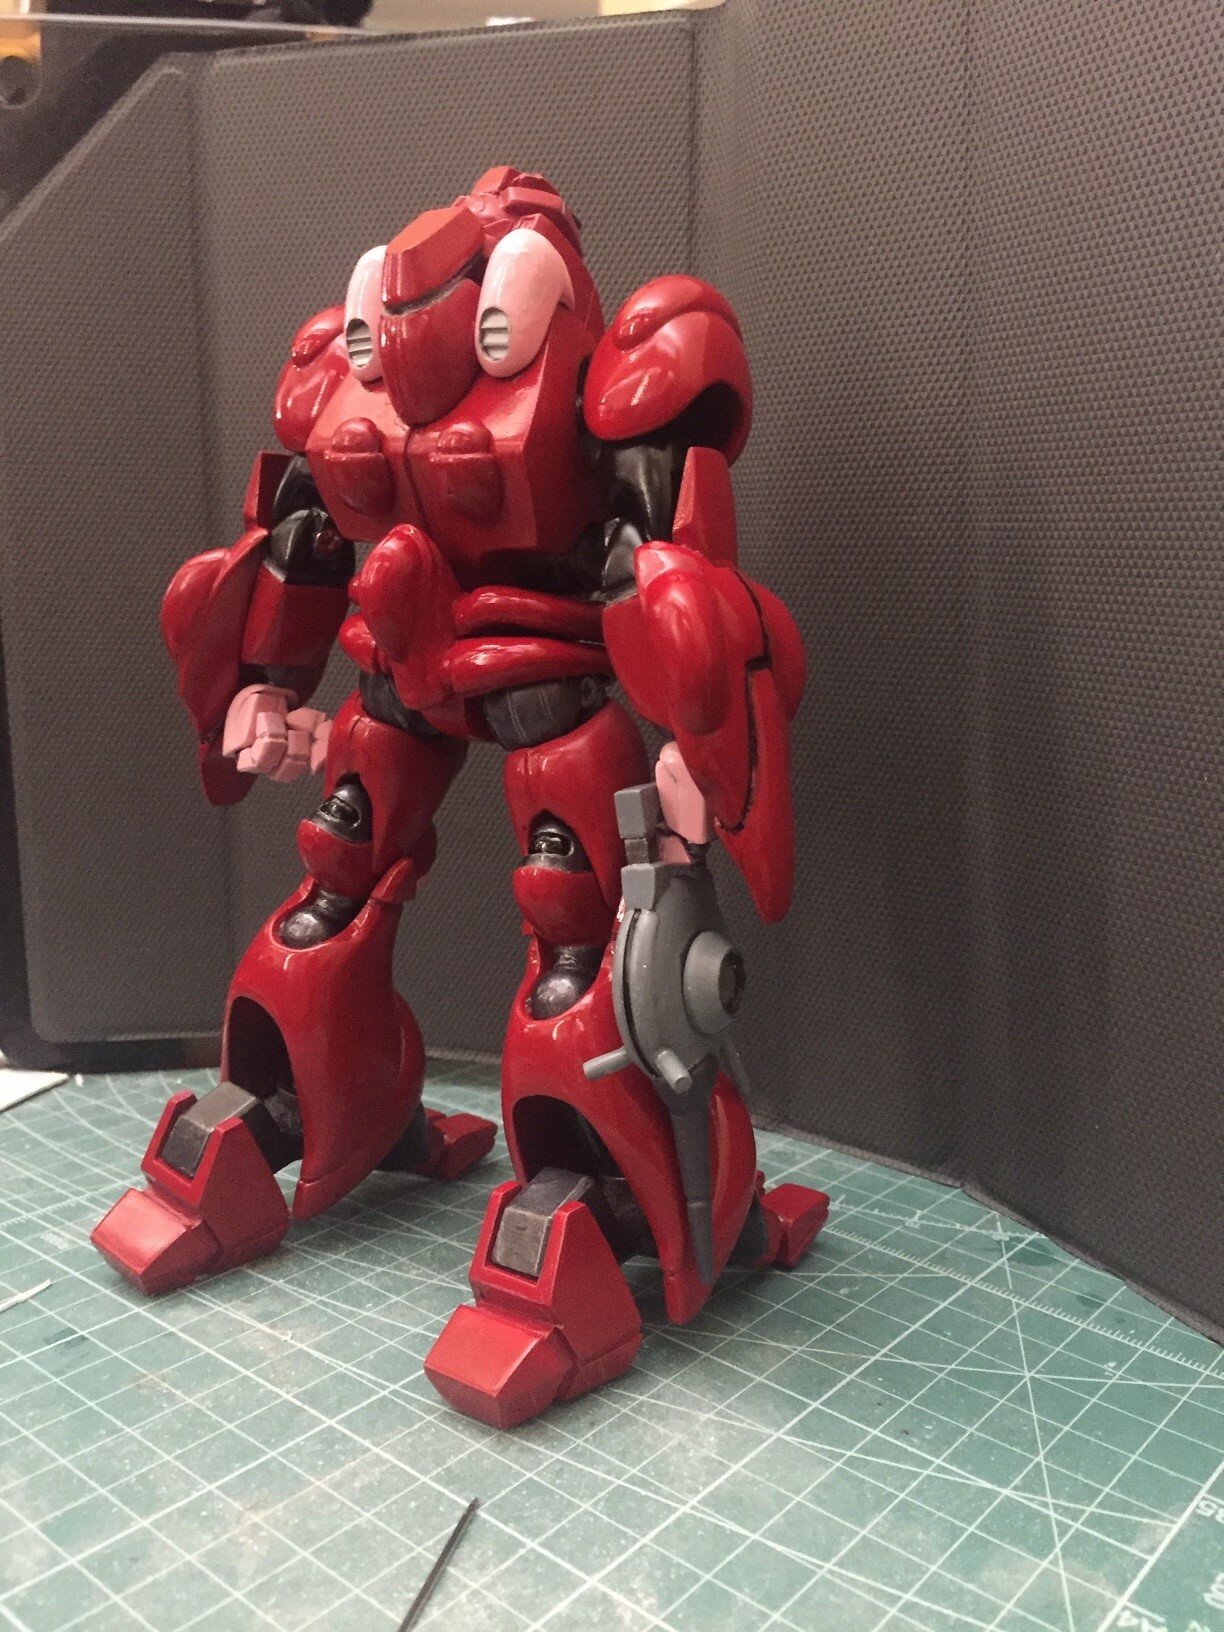
Weathering step 3 done. This step is a little more subtle (edge highlighting) so not too much different visually from the last pictures. On to step 4.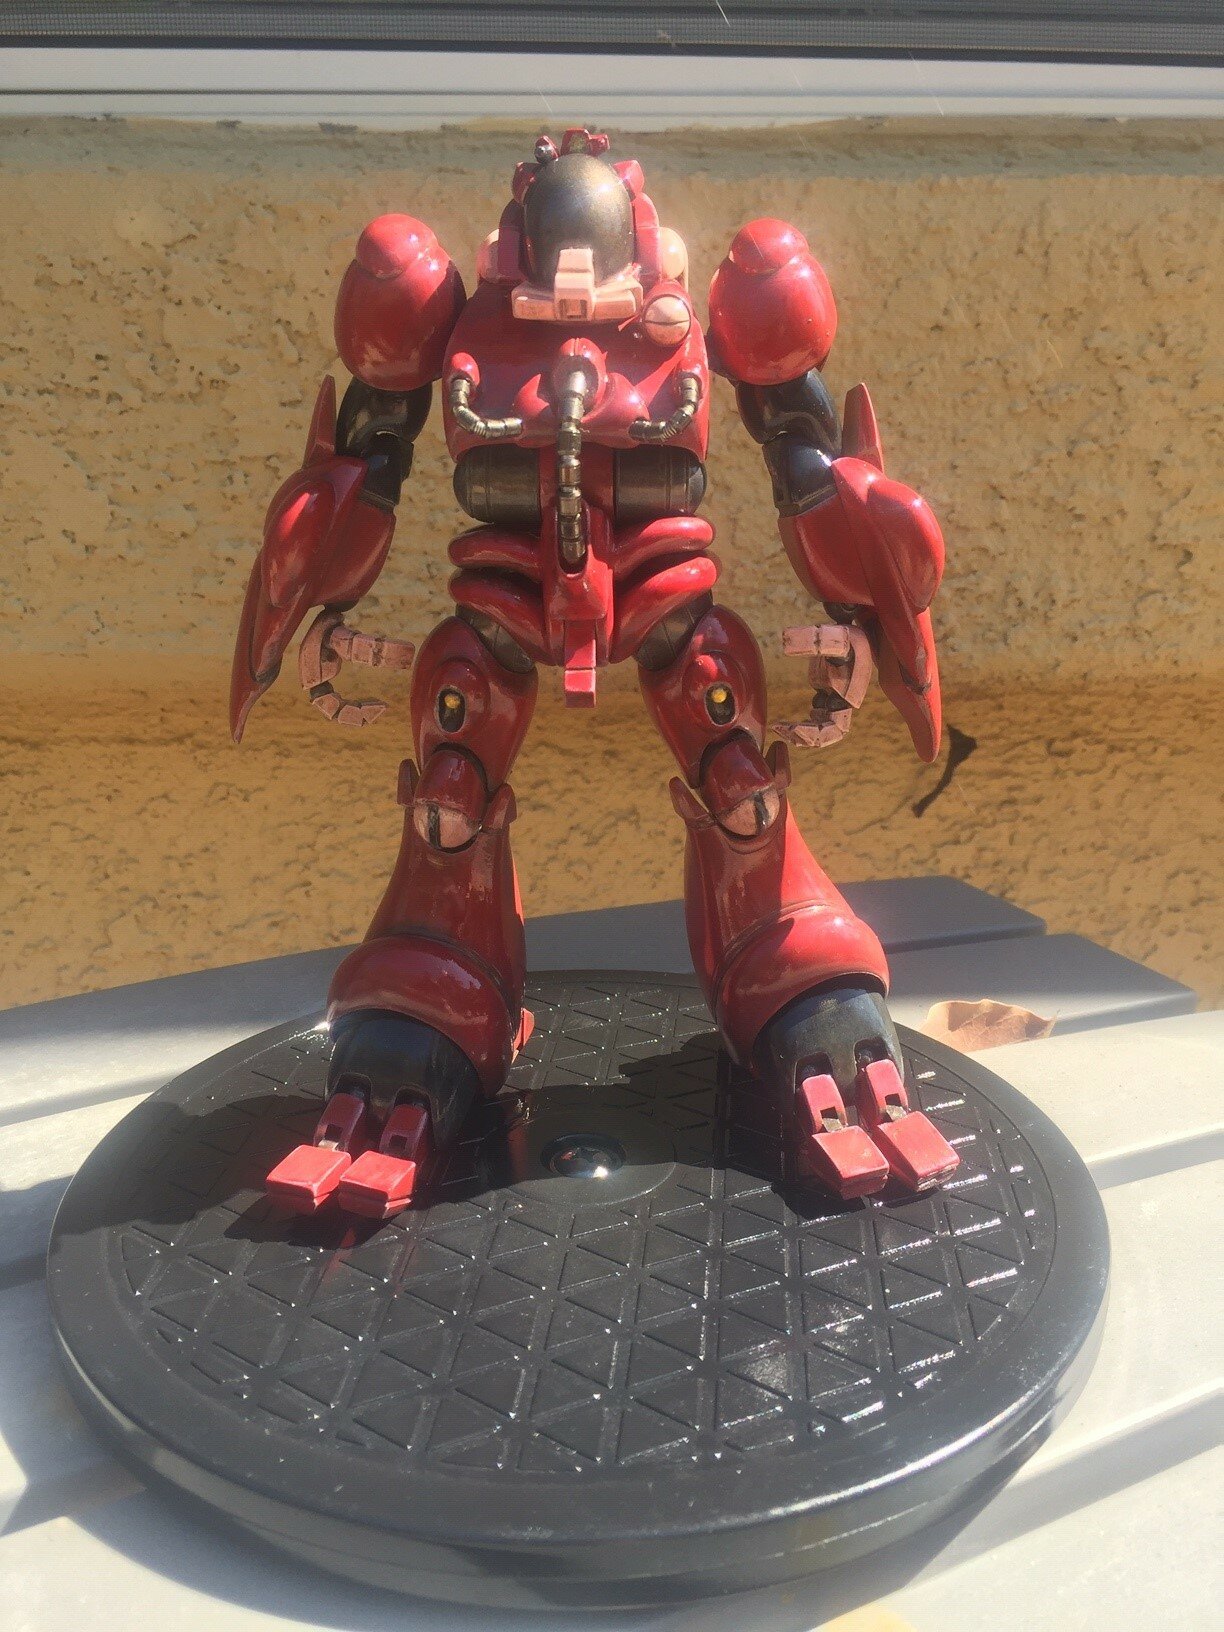
-
1/48 SOUTHERN CROSS BIOROID
Boobytrap replied to captain america's topic in Anime or Science Fiction
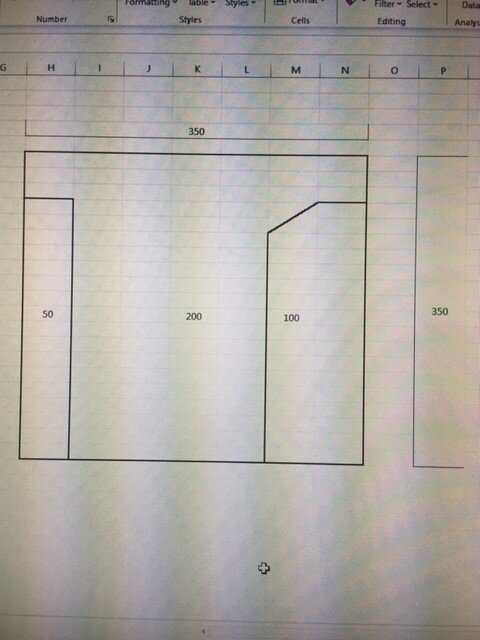
350mm * 350mm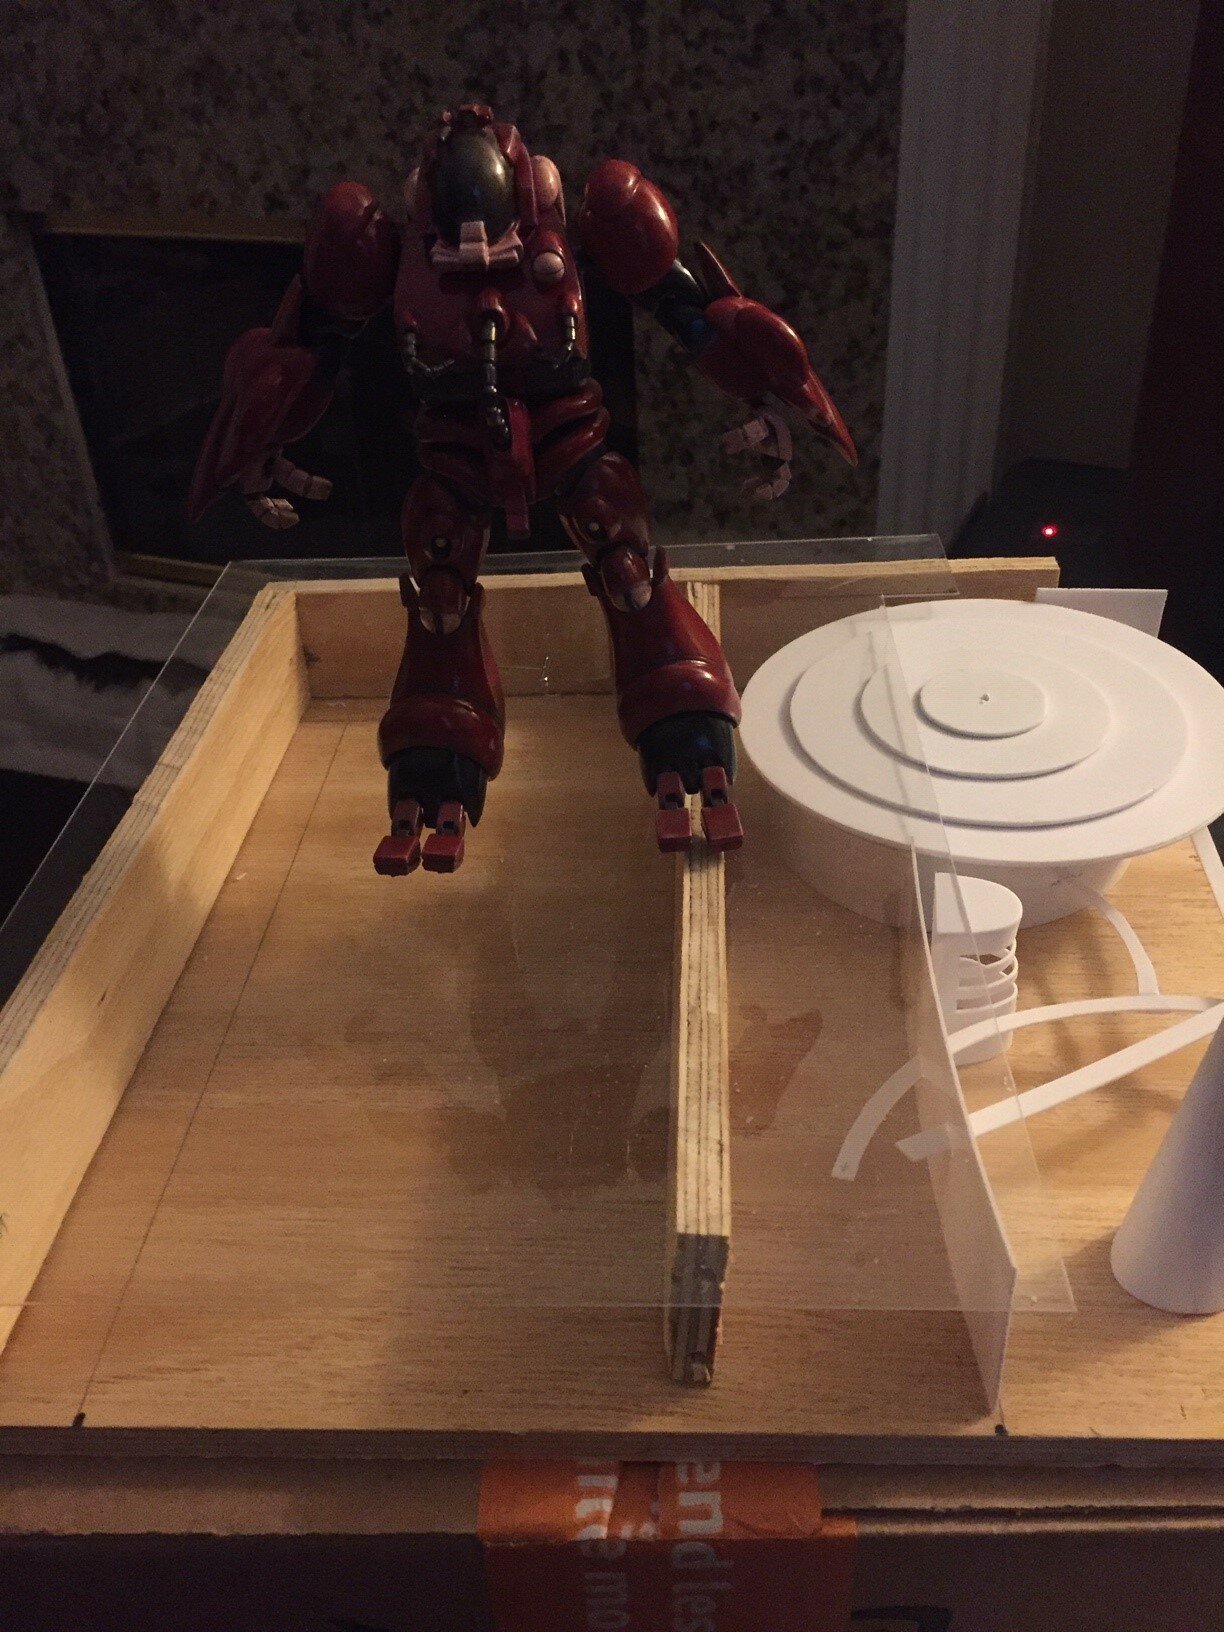
-
1/48 SOUTHERN CROSS BIOROID
Boobytrap replied to captain america's topic in Anime or Science Fiction
I agree with Captain. In addition, as you can see from my most recent pictures, the only time you see the gap is when viewed perfectly straight on at the waist. Looking at it from any other angle the gap disappears and (especially once painted) even appears to be black/dark in between the pieces. Since most. if not all, of the images I have seen from the anime are always at some kind of angle and not straight on I assume that Cap got it right... from a certain point of view . -
1/48 SOUTHERN CROSS BIOROID
Boobytrap replied to captain america's topic in Anime or Science Fiction
Part of why I did the repaint is that it was always my intention to have the two tone effect. If you try real hard you can kinda sorta see it in my original pictures. The colors were just too close to each other to be able to see it easily. Oh yeah I remember you mentioned you were going to do that before. Are you building a swing or a slide mechanism to do that? For me I have run out of some paint and enamels for weathering take a long time to cure. So while I wait on the postal service and for paint to dry I have started on the base. I have the footprint and rudimentary shapes for the city started. It has a long way to go.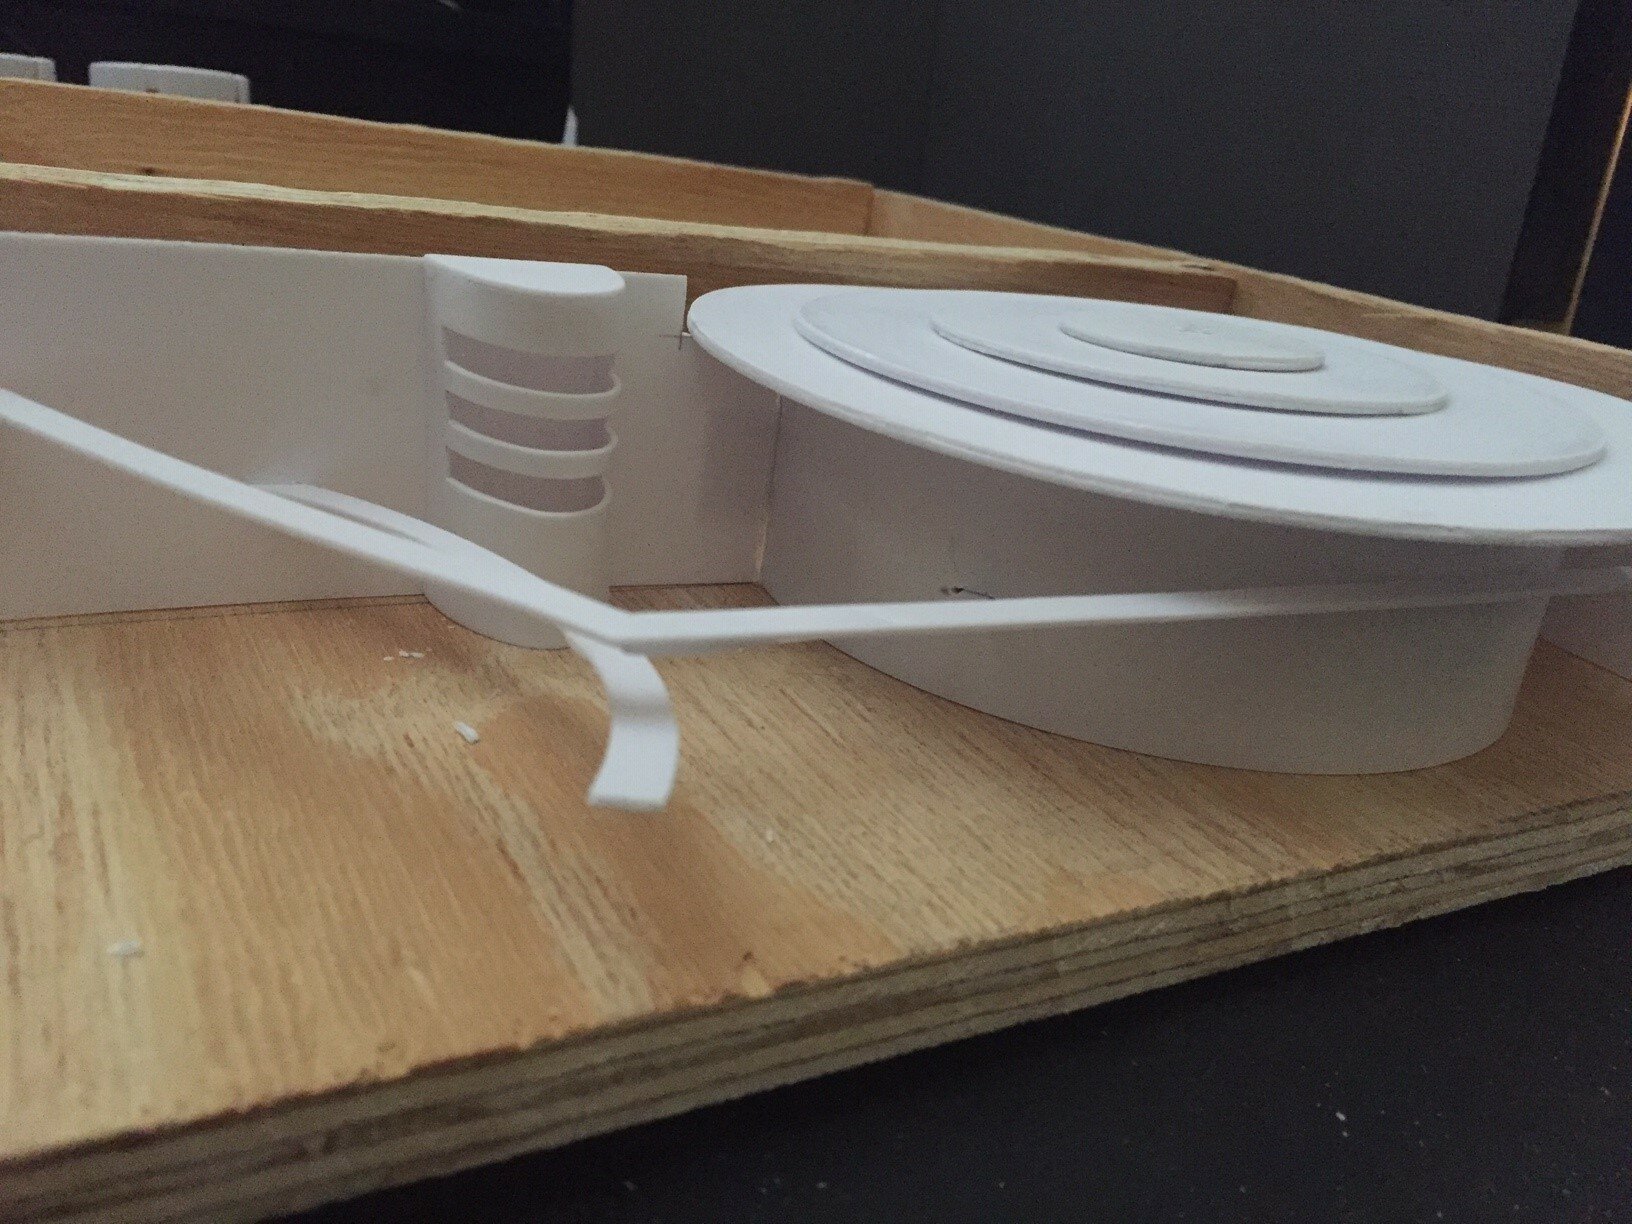
-
1/48 SOUTHERN CROSS BIOROID
Boobytrap replied to captain america's topic in Anime or Science Fiction
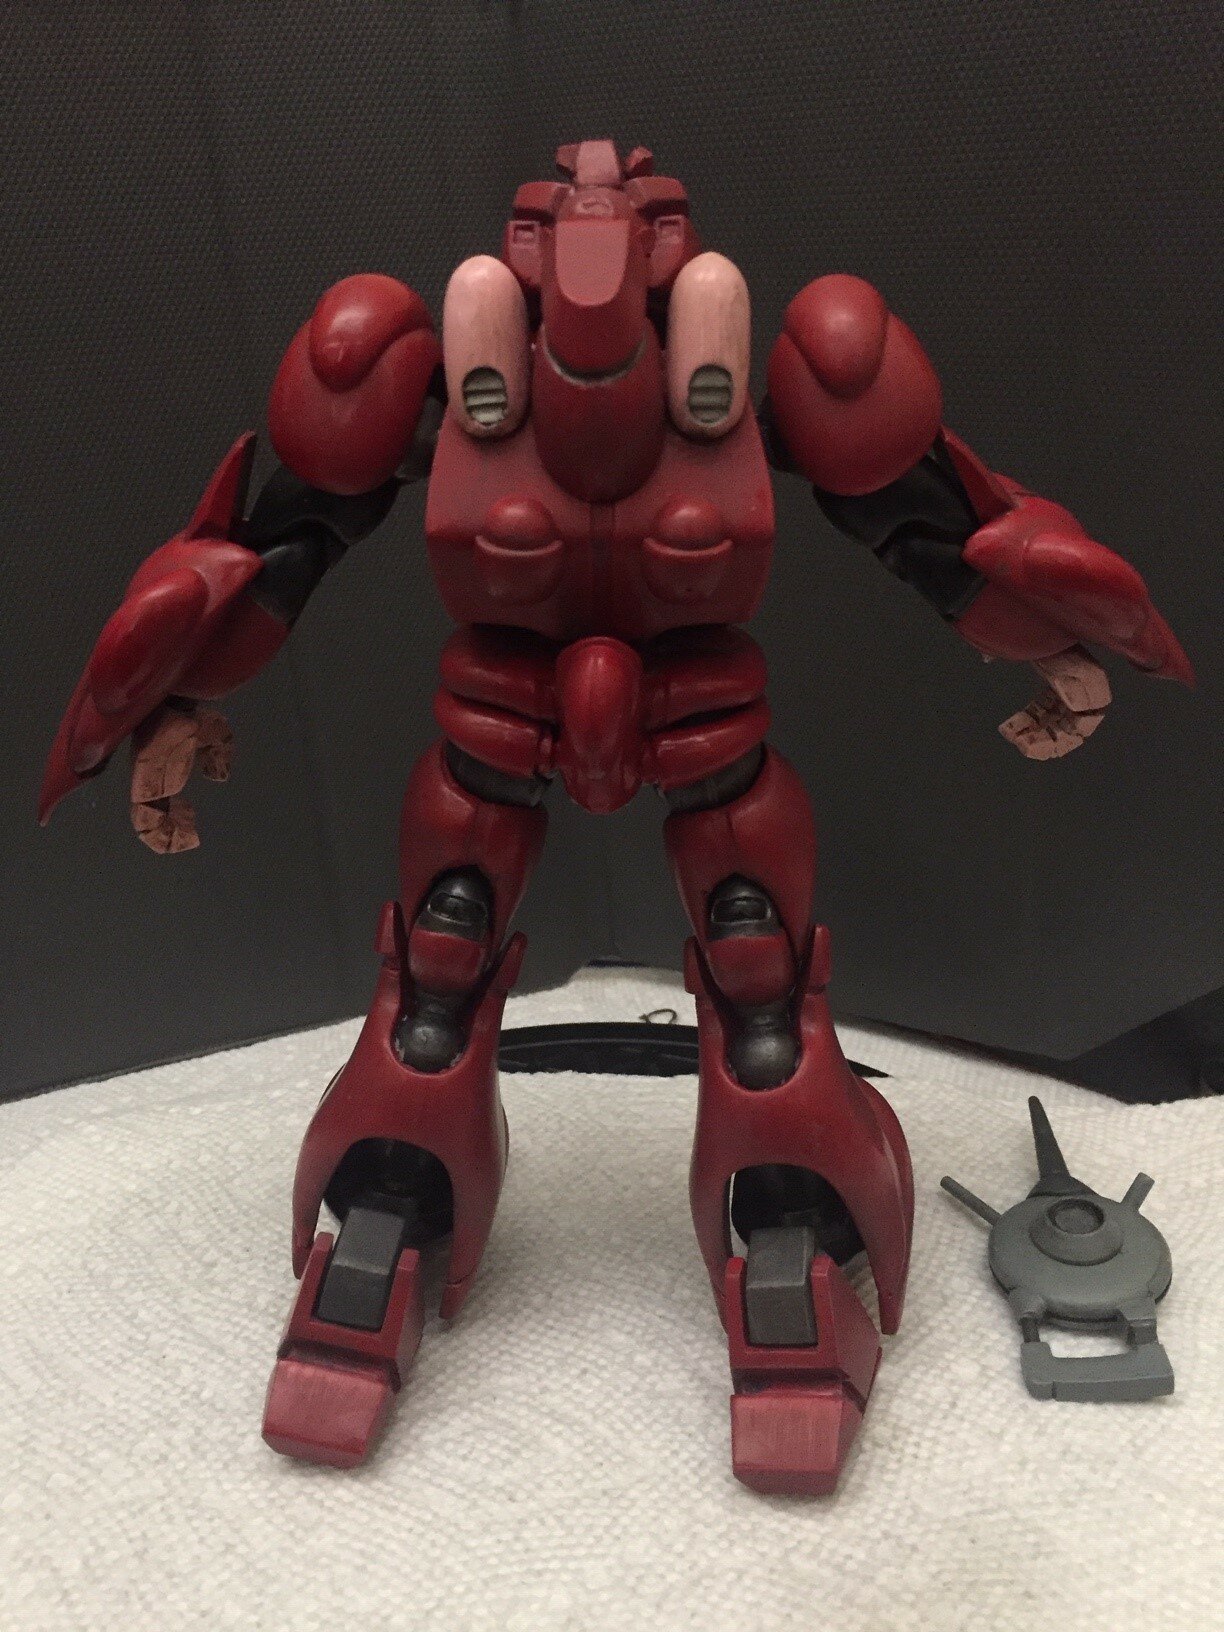
Aww man, that sucks. Been there done that. Having to go back to square one after getting so far in the process is one of the worst feelings in this hobby. Is the blaster glued to the sled yet? Hopefully not so you can at least preserve the rest of the work you did and focus on the two parts that need to be fixed. For me, I decided to proceed with the color change. I'm much happier with it. Unfortunately the Tamiya tape pulled off some white paint when I did it so I am going to have some extra clean up to do. I've also finished weathering step 2. Just need to seal it then on to step three.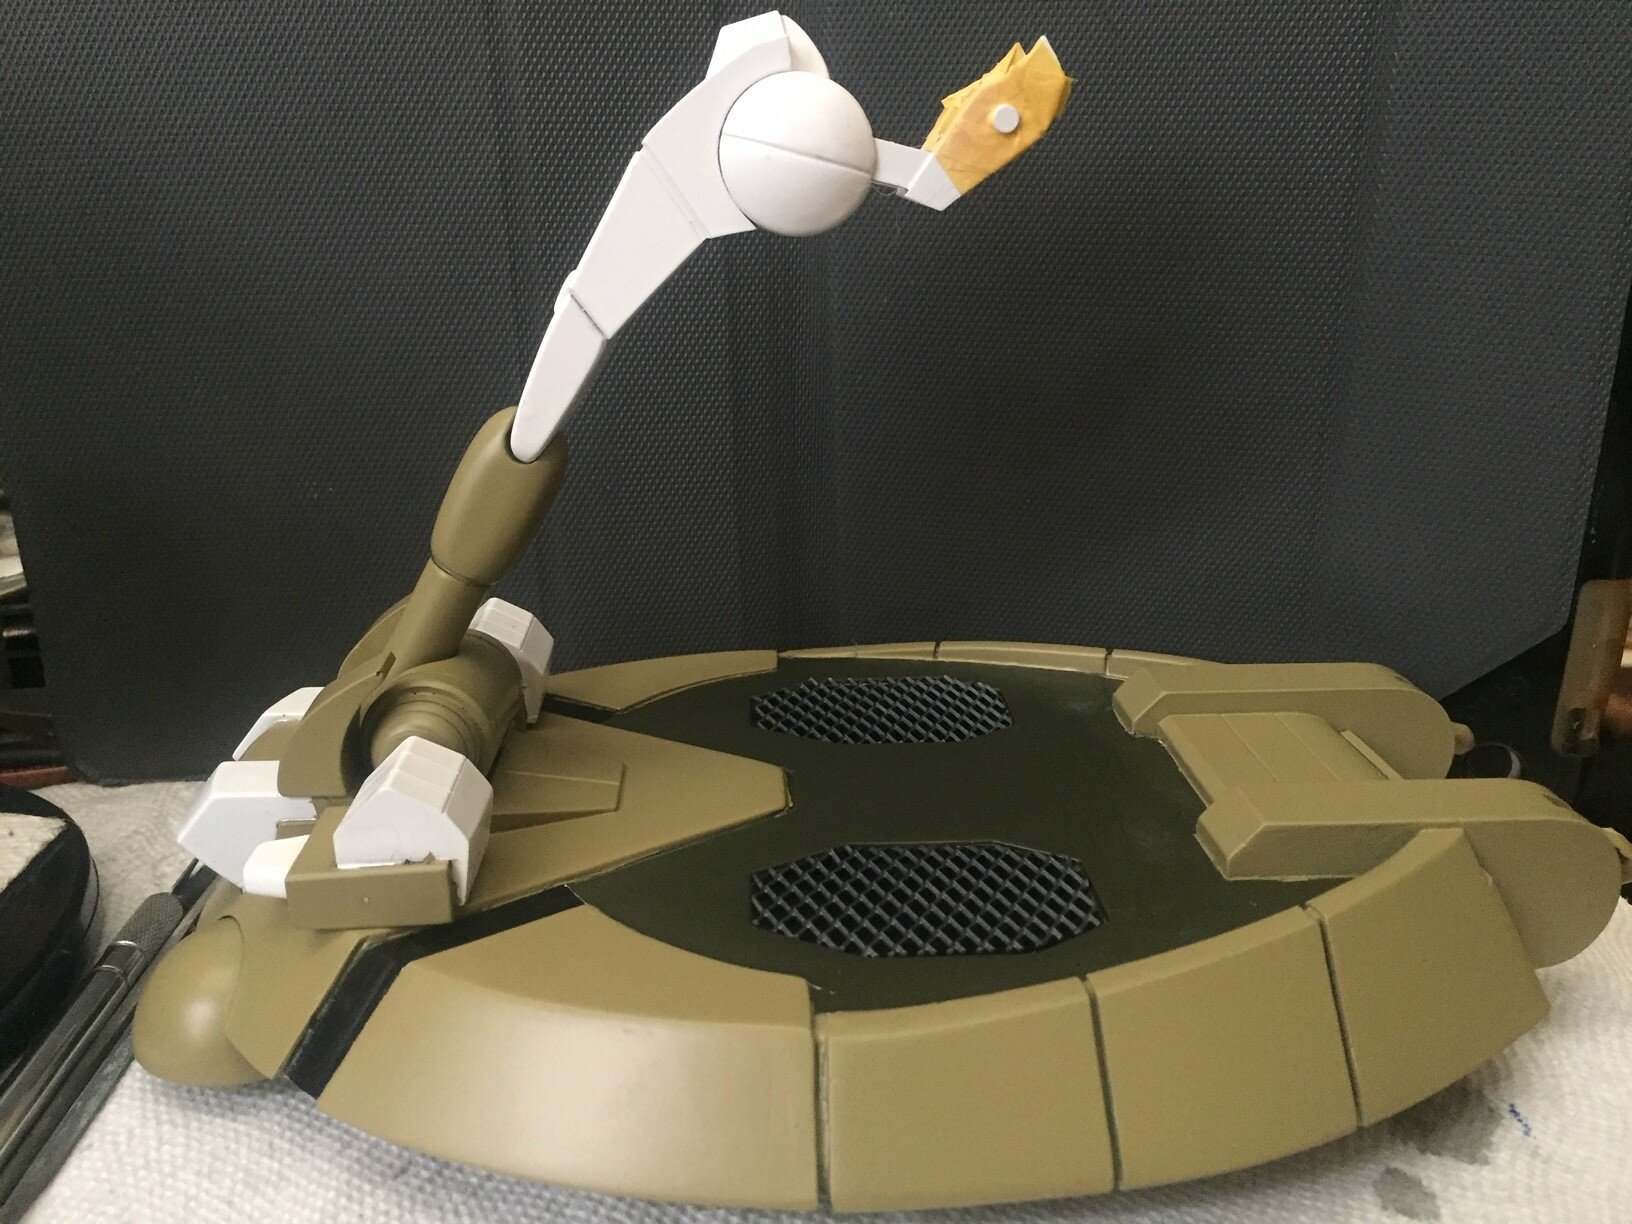
-
1/48 SOUTHERN CROSS BIOROID
Boobytrap replied to captain america's topic in Anime or Science Fiction
Yes and no. If it was a decent camera I'd agree with you (although with a decent camera there are ways to compensate for that). But when the light is increased, as with the last photo I posted, the whites get blown out. I don't think this phone has ever taken a decent indoor picture. Even getting it to properly focus is a pain. It does well enough outside during the day. I agree with you. I went with the lightest olive drab I could do. I keep trying to convince myself it is fine but in the end it really is too dark. I think I am going to have to re-do it. Otherwise it is always going to eat at me every time I look at it. -
1/48 SOUTHERN CROSS BIOROID
Boobytrap replied to captain america's topic in Anime or Science Fiction
Just for you, an early teaser pic. Look ma , no hands!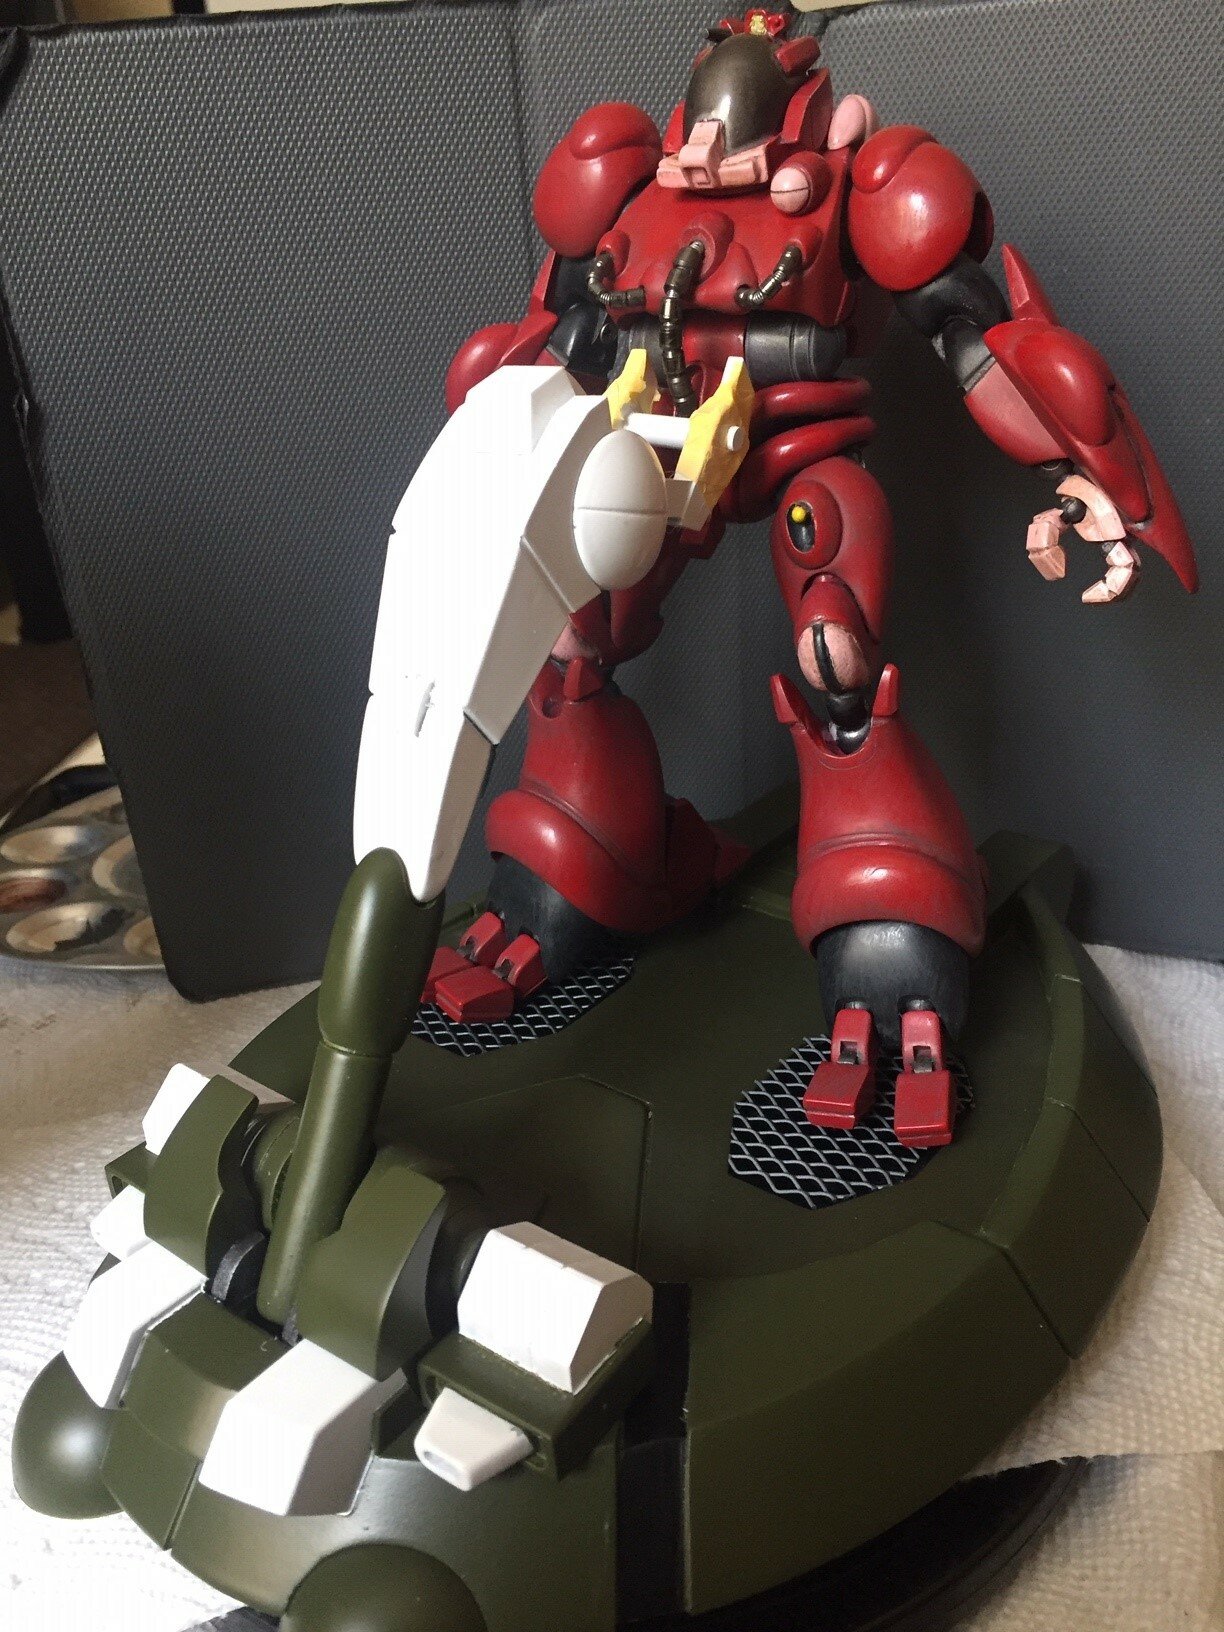
-
1/48 SOUTHERN CROSS BIOROID
Boobytrap replied to captain america's topic in Anime or Science Fiction
Weathering step one is done. Just need it to dry so I can seal it and move on to step two. Still have some work to do but the base colors for the sled are coming along. I really hate my phone camera. These all came out way too dark. Once the figure is closer to completion I'll take some better pictures with my DSLR.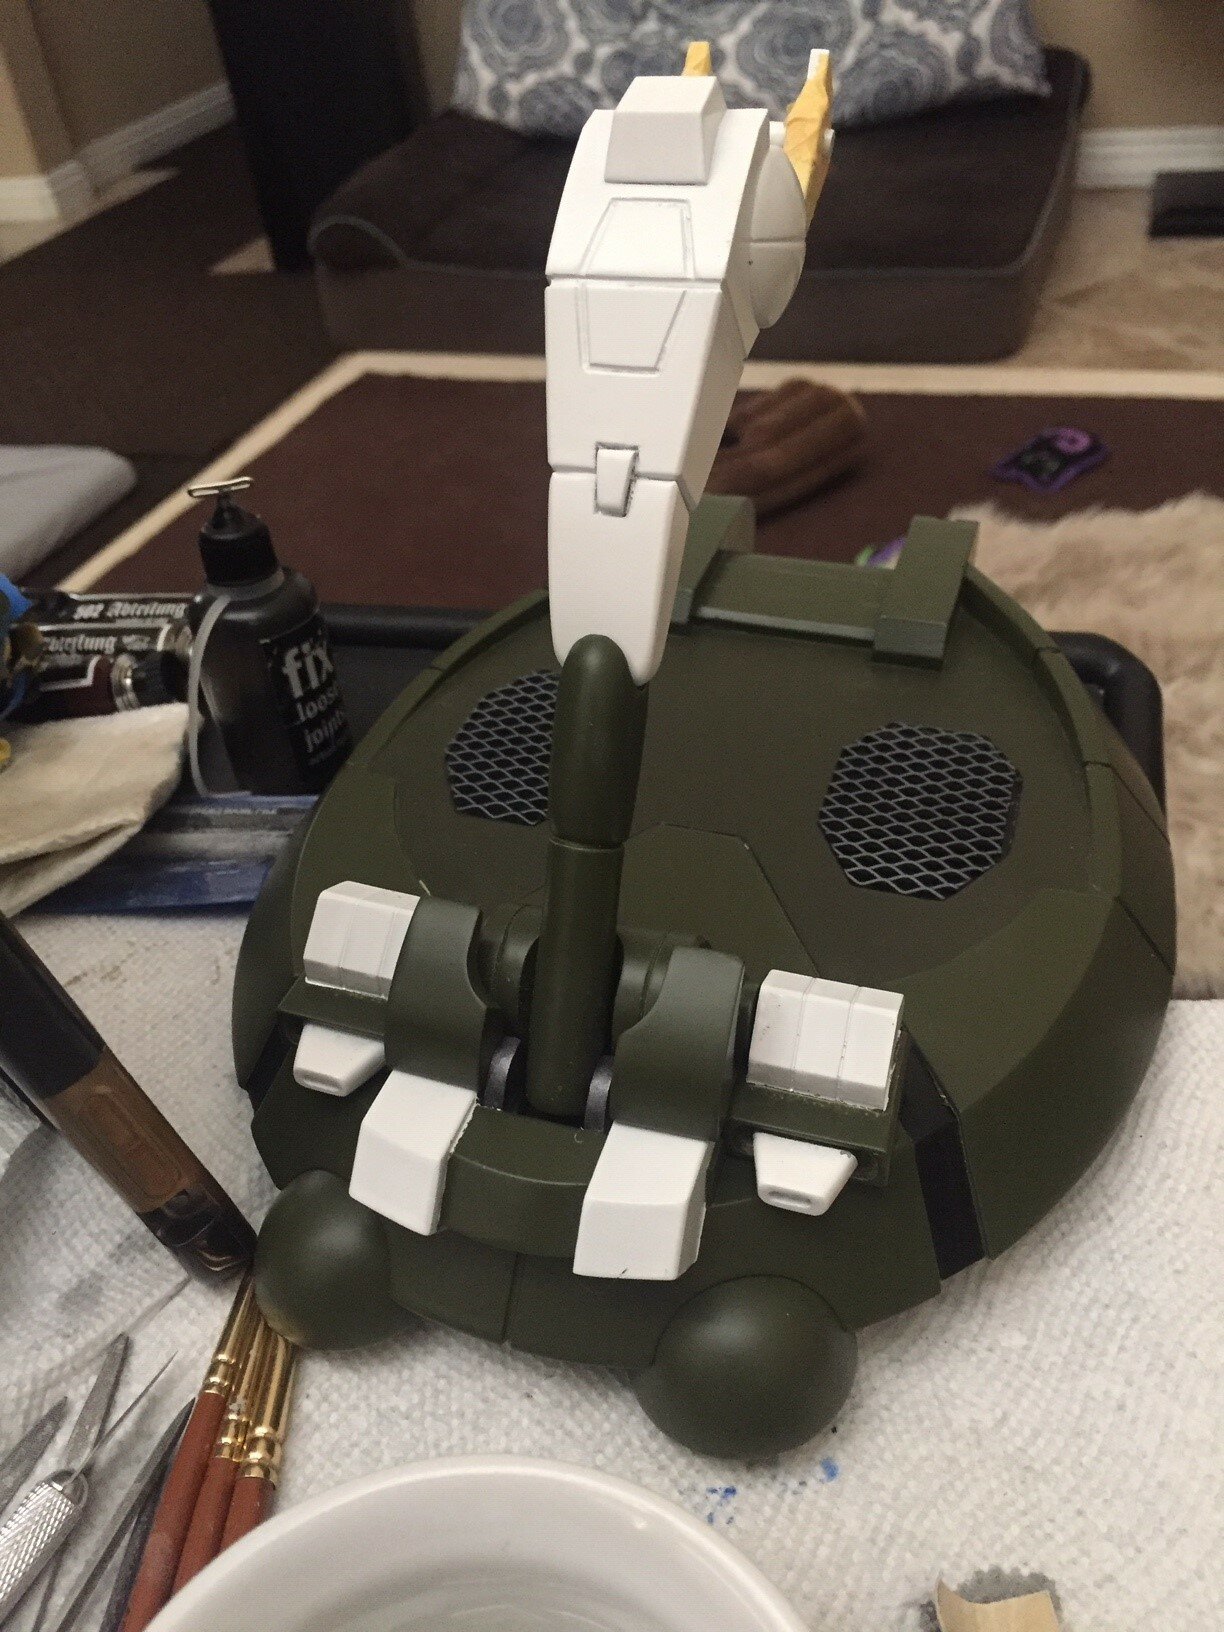

-
The Official Moscato Hobby Models Thread
Boobytrap replied to captain america's topic in Anime or Science Fiction
OOOOoooooo... Well I certainly would be interested. I'd try to swing three if you also included parts to make the grunt (blue) version as well. Would now be a good time to see the desire from others or do you have enough on your plate that it would be best to wait a little bit? -
1/48 SOUTHERN CROSS BIOROID
Boobytrap replied to captain america's topic in Anime or Science Fiction
Fantastic paint job. But, yeah, Captain would make that sculpt look like something you would get out of a dime store vending machine. I've derailed this thread enough though. If it gets made that will be awesome. If not, se la vie. Now let's get back to some more bioroids! Hopefully some other modelers out there will have some pics to share soon. I'd like to see how others are putting their spin on this work of art. -
1/48 SOUTHERN CROSS BIOROID
Boobytrap replied to captain america's topic in Anime or Science Fiction
That's fair but I was looking for 1/60 vs 1/100 (although I'd take any scale TBH). And while I haven't seen the model you are referring to (didn't even know it existed) I highly doubt it comes anywhere close to the level Captain can produce. Don't forget Captain's beautiful Legioss, so don't be so quick to squash my dreams 😁. -
1/48 SOUTHERN CROSS BIOROID
Boobytrap replied to captain america's topic in Anime or Science Fiction
You convinced me. I posted the suggestion in Cap's thread. Fingers crossed he can make yet another dream come true. -
The Official Moscato Hobby Models Thread
Boobytrap replied to captain america's topic in Anime or Science Fiction
Hey Captain, what would it take to get a gigmesh from Macross II? Is this something you would even consider? I think we have a few Macross fans around here so we could probably scrape together a few interested parties.
-
1/48 SOUTHERN CROSS BIOROID
Boobytrap replied to captain america's topic in Anime or Science Fiction
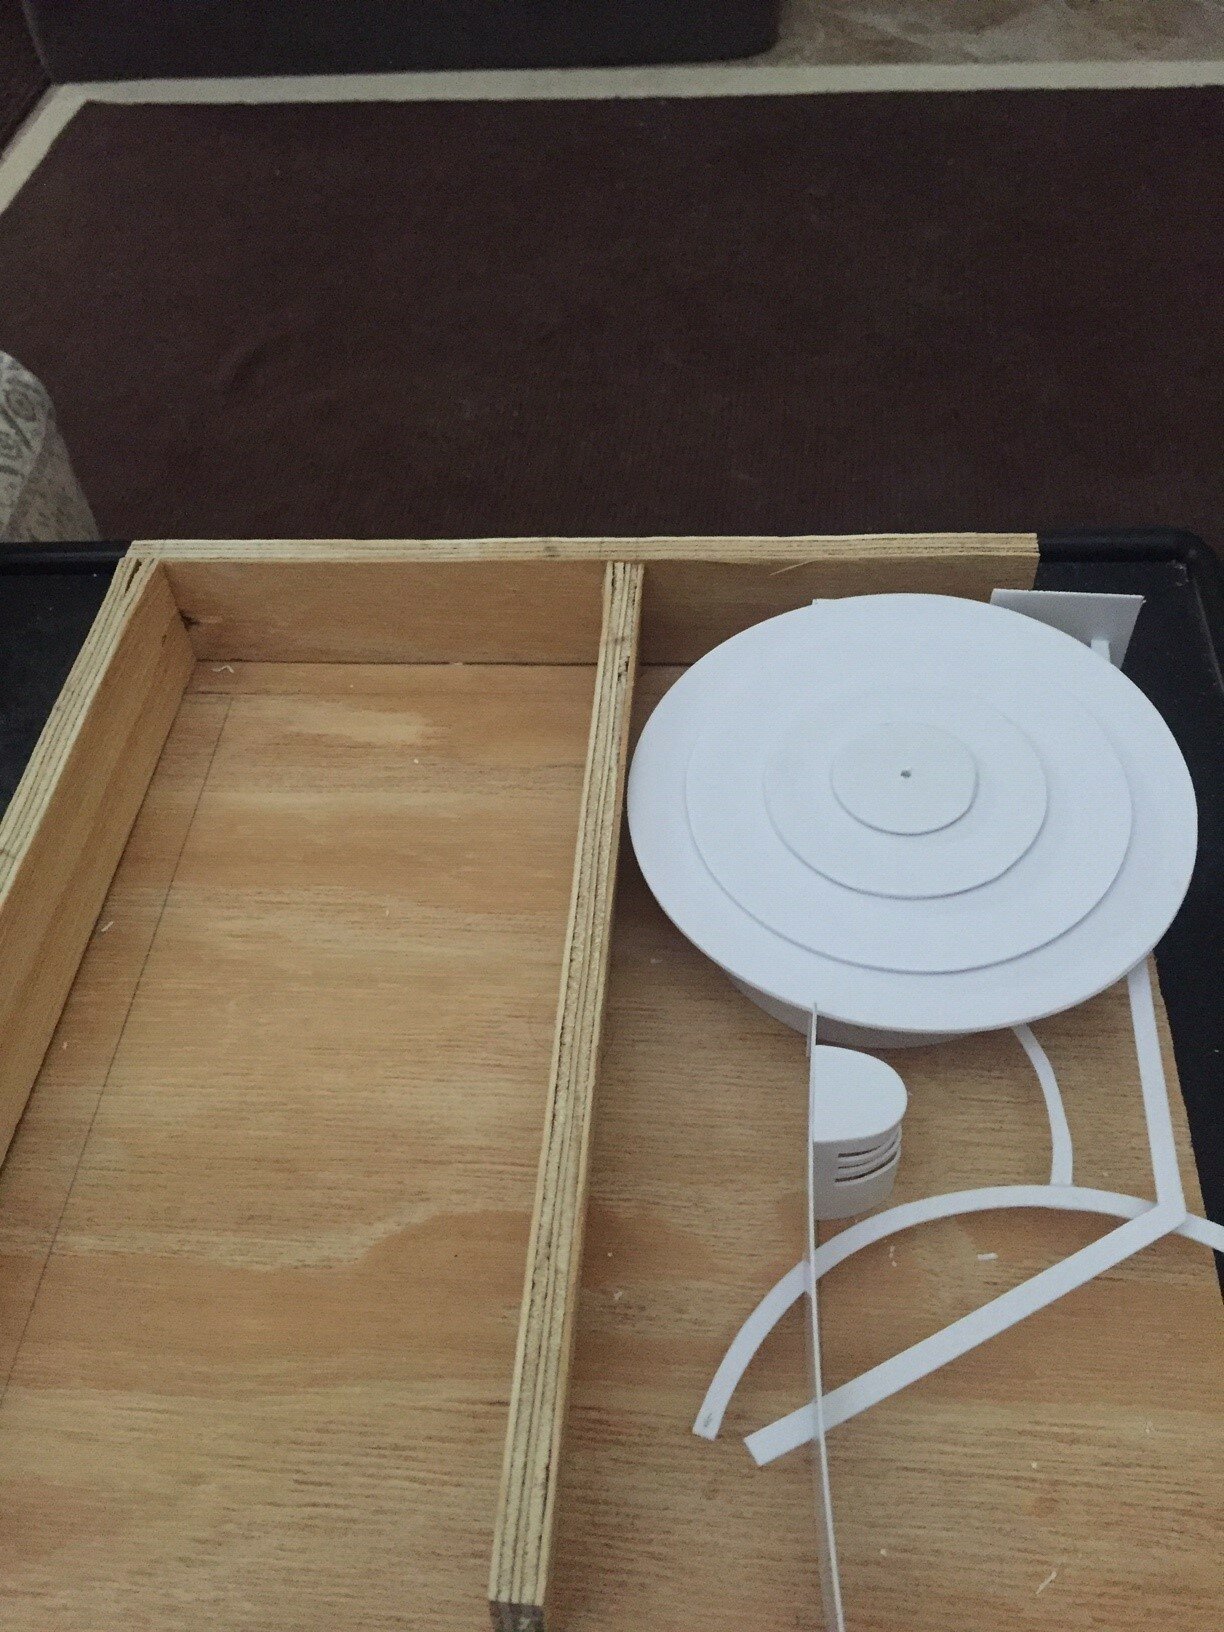
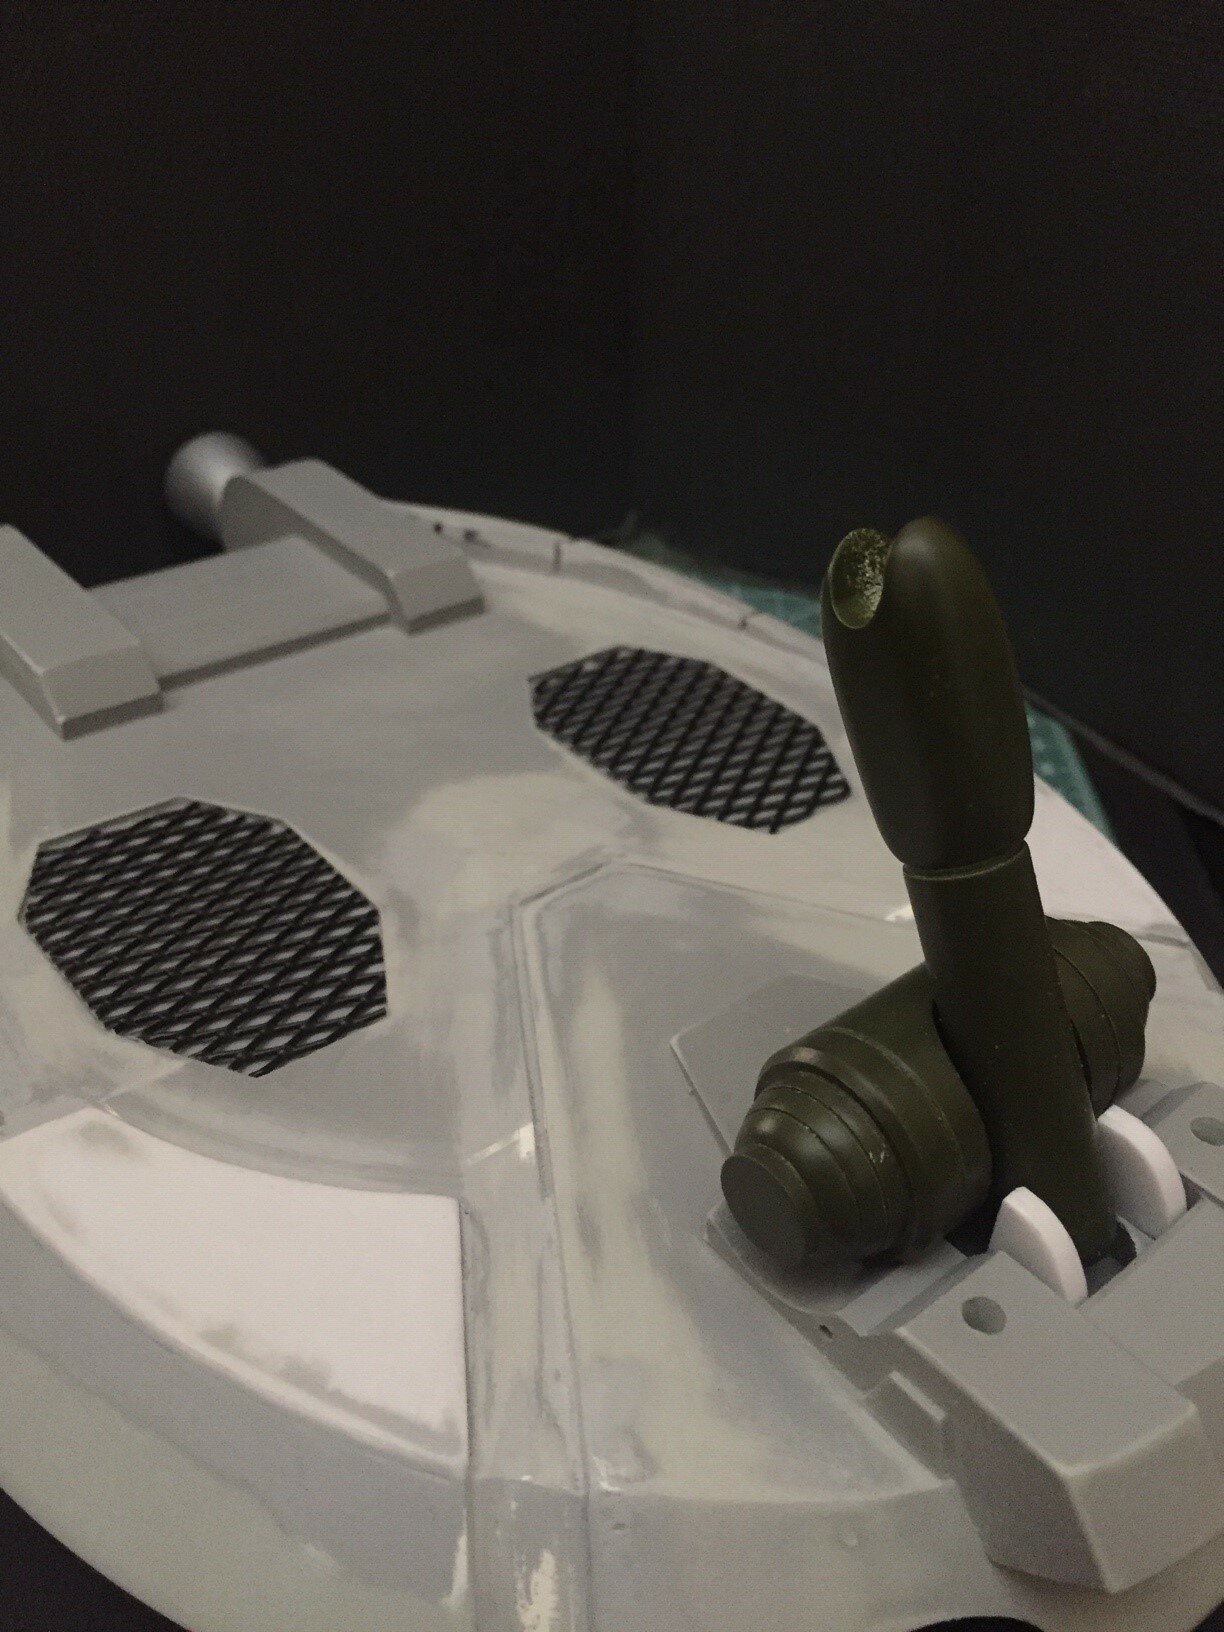
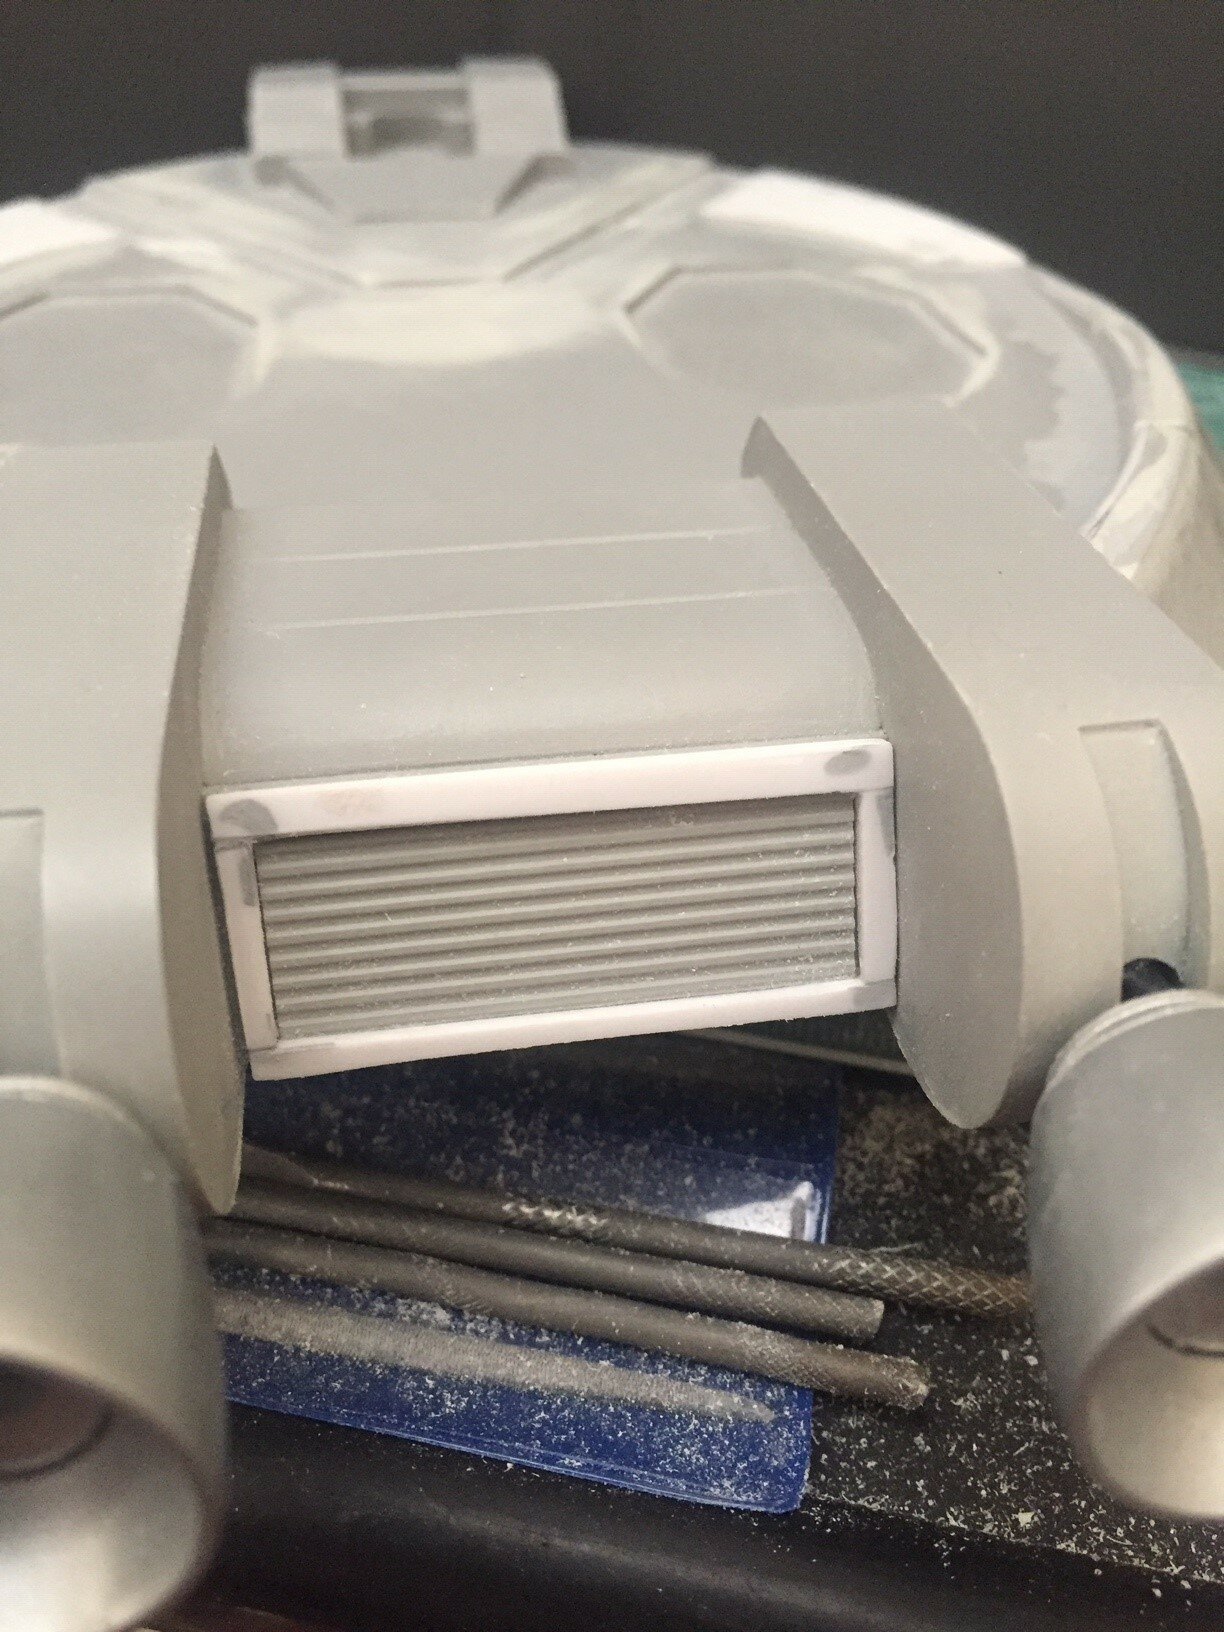
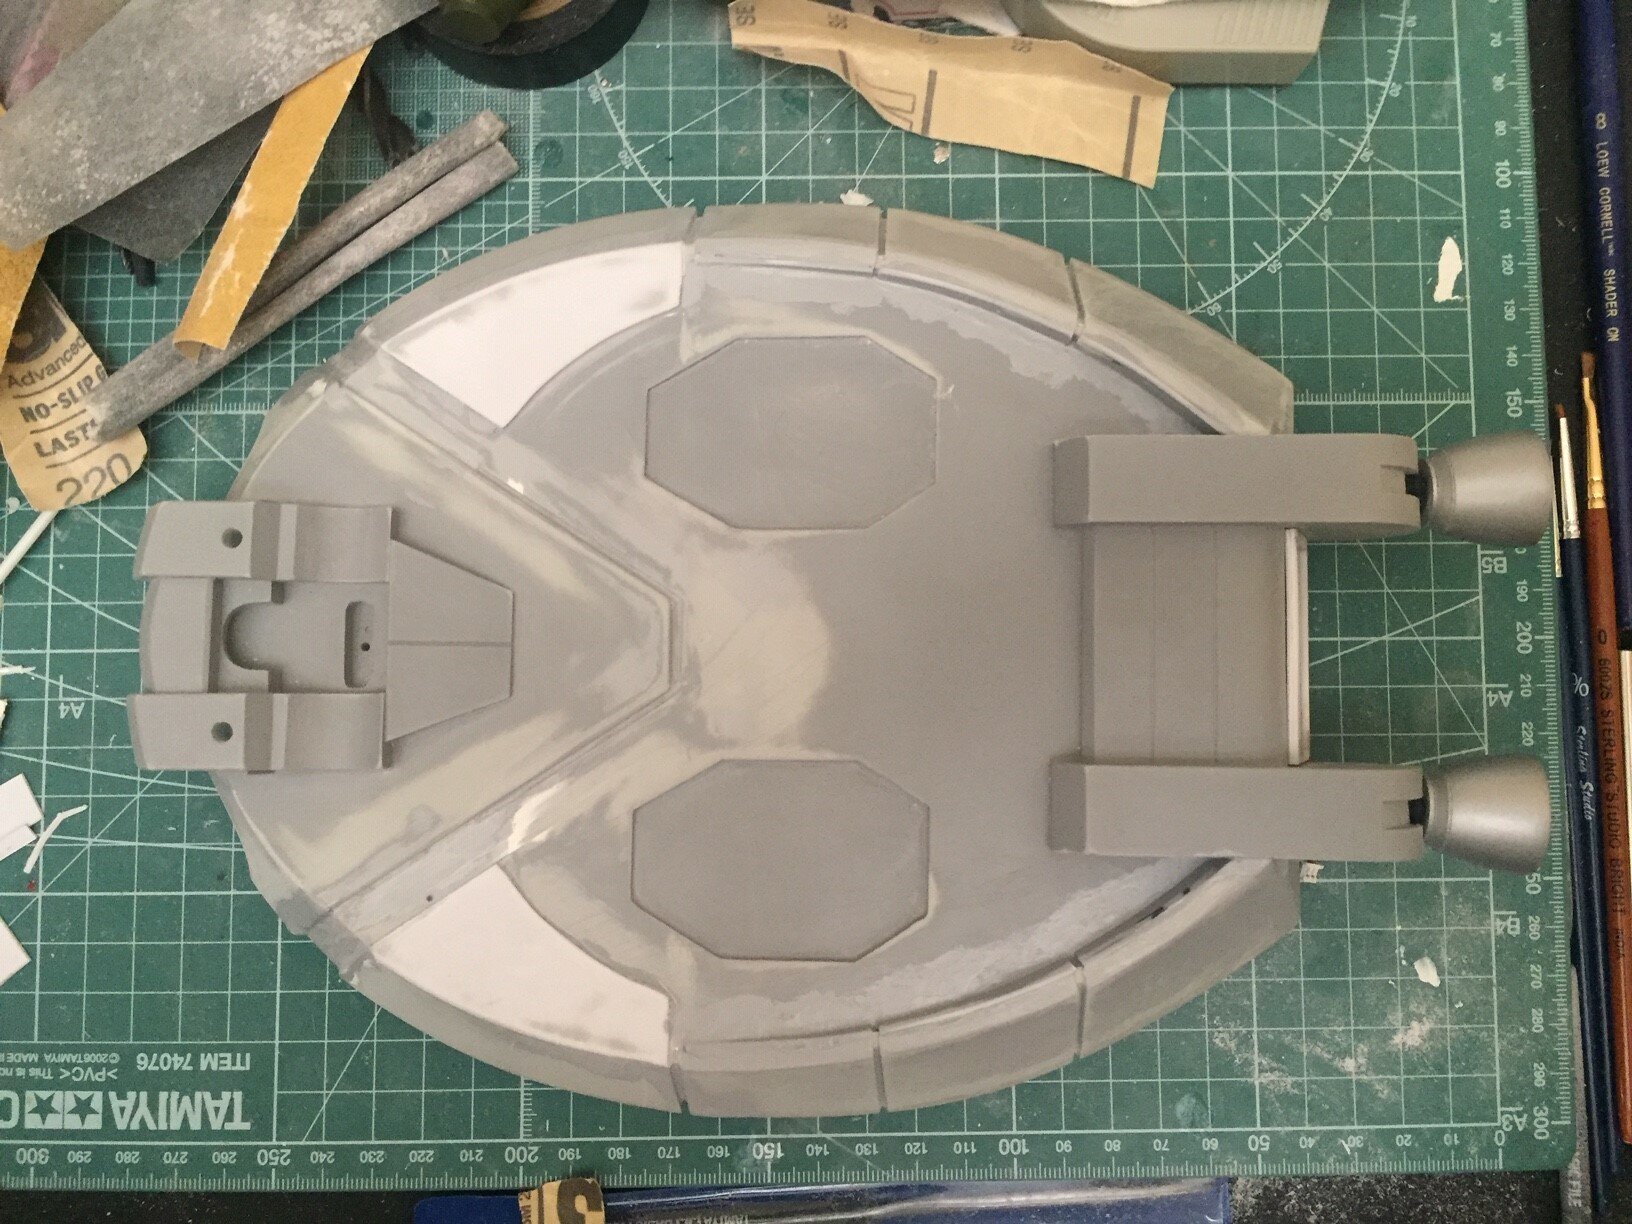
Let's not forget some other under represented series' that could sorely use the Captain's attention. If I had the funds to sponsor a project my number one all-time ultimate want would be the gigamesh from Macross II. But I know this isn't the Captain wish list thread so I'll just sigh in longing and move on. I have completed the modifications I intend to do for the sled. Nothing big for this update. I added some brackets at the base of the yoke to match some of the images I saw. I also added wire mesh to the foot pads. I think it will give a nice break to the solid colors (I'll be painting the base black and the mesh metallic) and add some visual interest. I just need to clean a few things up and it is ready for paint. Thank you very much for the pictures @tekering. I think the one in the upper left will be the perfect format. I've started my plans for it. There will be a raised section to the left, the main path with the sled in the middle, and a sunken section with a bit of the city (or whatever that is) on the right. I'll probably add a spire or two in the back. It will, of course, have lights throughout. It is going to be a pretty decent size at 350mm x 350mm but I don't want the sled to feel cramped. Hopefully I can have it done in time for the Captain's contest, but I doubt it, I also want to echo your point. I have never done a project concurrently with someone else as well. While I feel like I am constantly playing catch up (I work on this at least 2 hours a day every day so I have no idea how you manage to get 3 times the amount of work done faster than me. An army of Ted bear clones?!) it has been a blast collaborating with you.
-
1/48 SOUTHERN CROSS BIOROID
Boobytrap replied to captain america's topic in Anime or Science Fiction
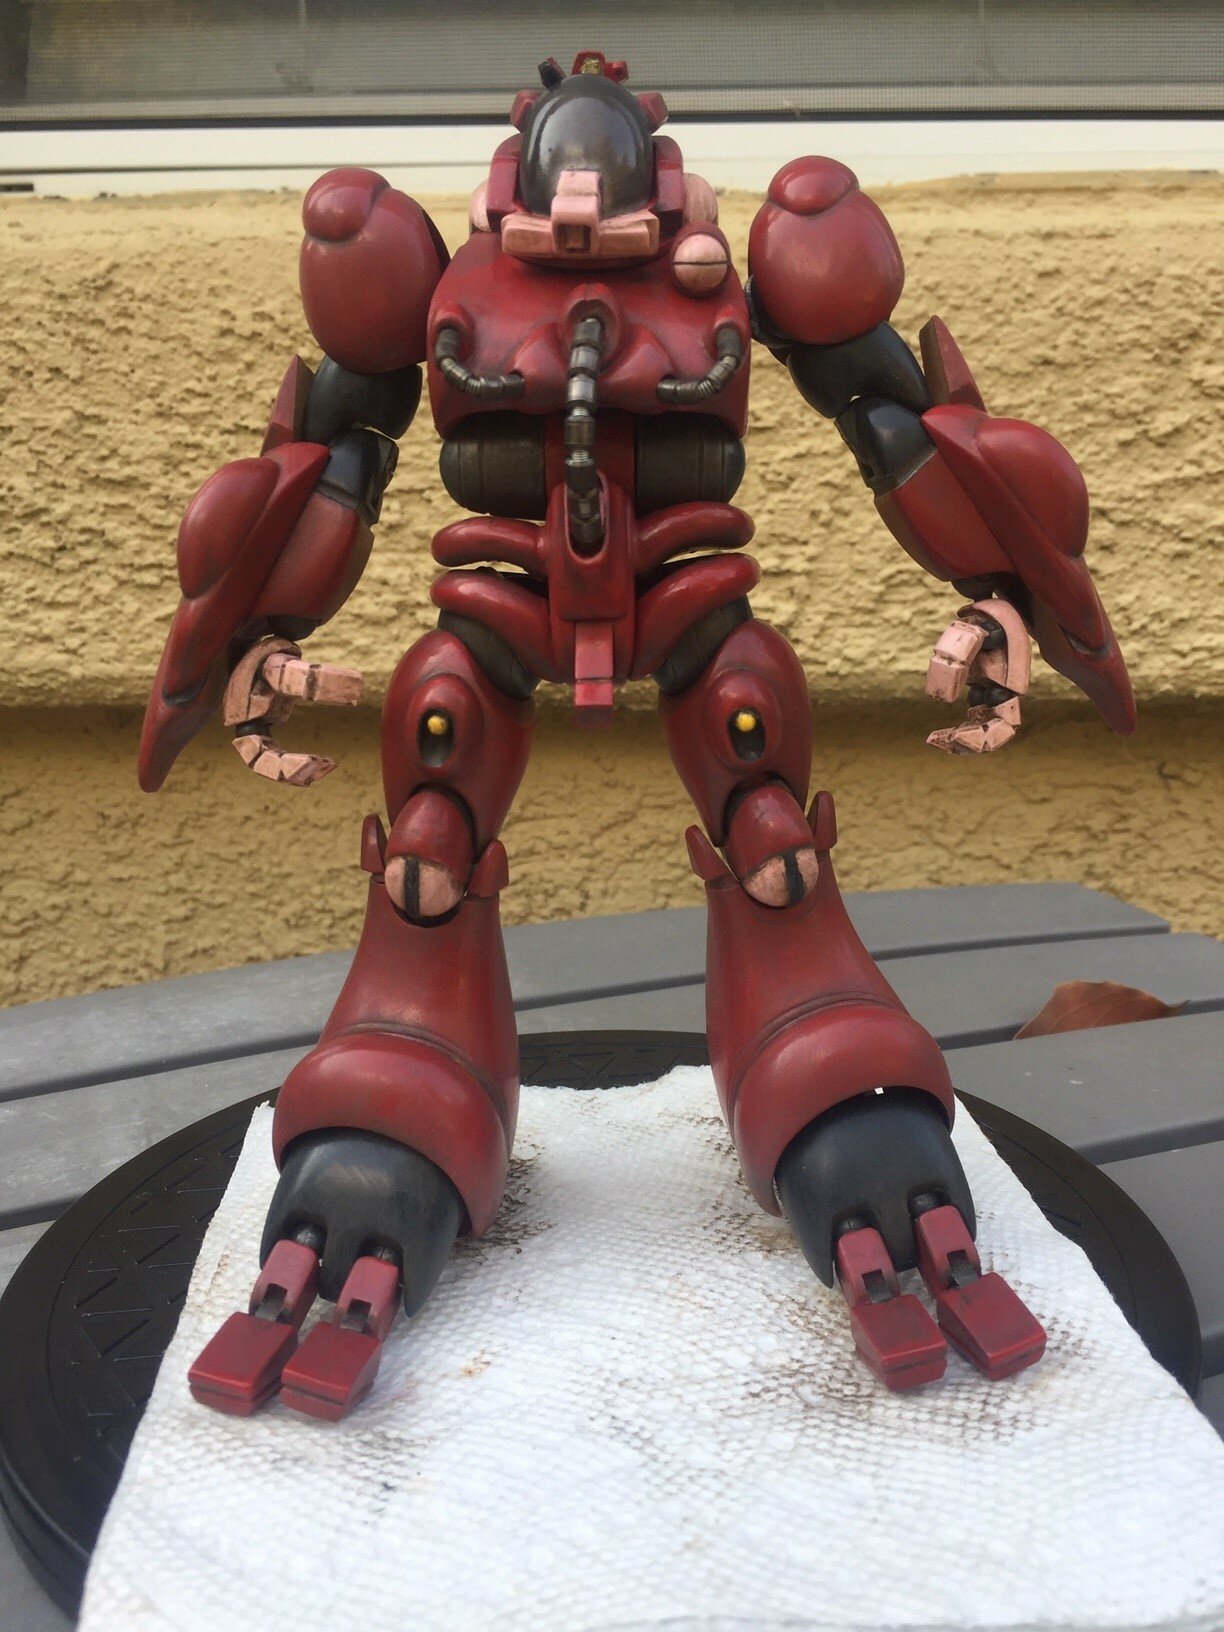
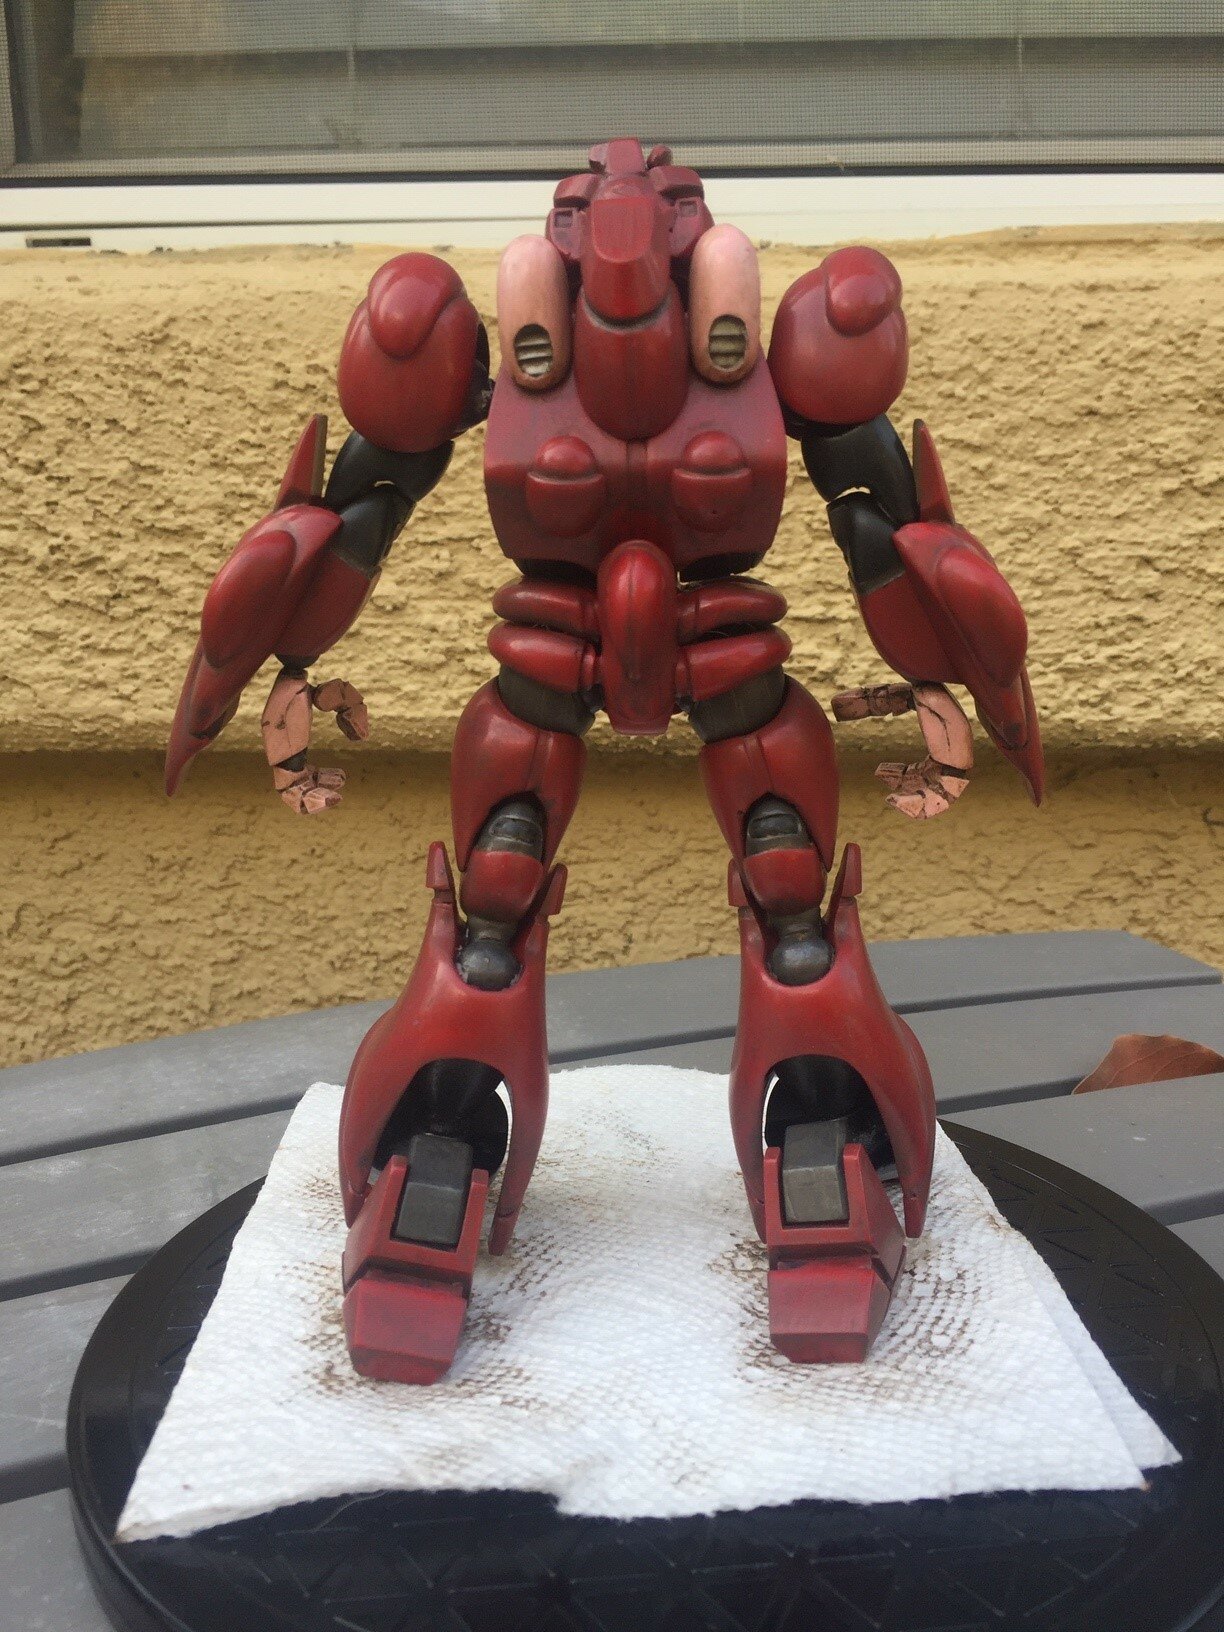
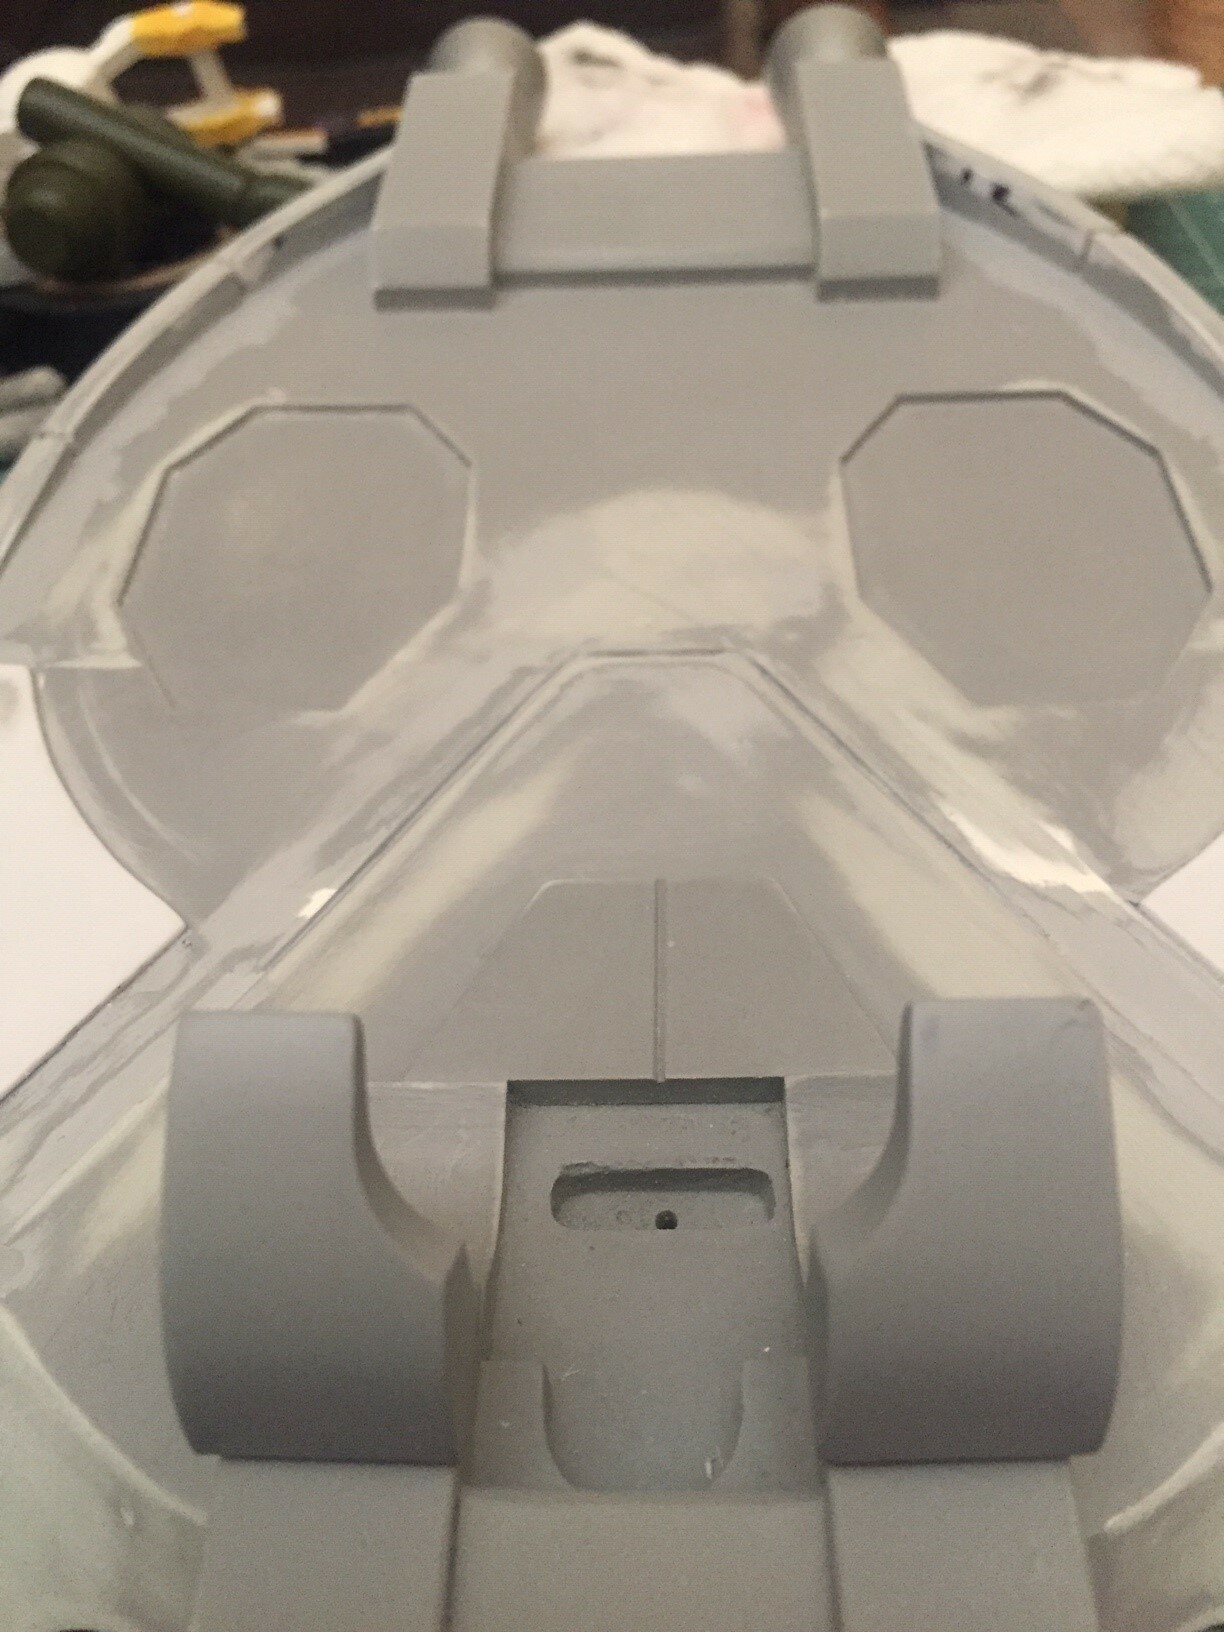
Looking good. Subtle but eye catching. I would say that the heaviest areas of shading should be where there is the most foot traffic along with engine and exhaust/thruster areas. In my opinion I would put less around the yoke area and more in between the foot pads. The front is also a little too clean. For my progress I've managed to complete the following: I've wired some LED's to the thrusters. I plan to have it mounted on an acrylic rod and a custom built base replicating the surface of the mothership. If you happen to have close up pictures of the mothership surface which you could share Ted it would be most appreciated . Based on Ted's images and pointing out some areas that could be improved I've made some modifications. I built a frame for the rear exhaust to make it look recessed. I carved out notches in the fairings. I added 1mm plate to the left and right front top to give a raised appearance for that outline rather than just the joint line (which I had erroneously removed). I also added plates to the inside rear sides to create recessed lines like those on the outside. For the figure I am satisfied enough with the base colors so that I can move on to washes and weathering. Some of the lines aren't as crisp as I would like them (my Tamiya tape was giving me all kinds of issues with this project) but I am expecting that the next steps will hide any of those faults. The red I chose is darker and not as saturated as it looks in the pictures.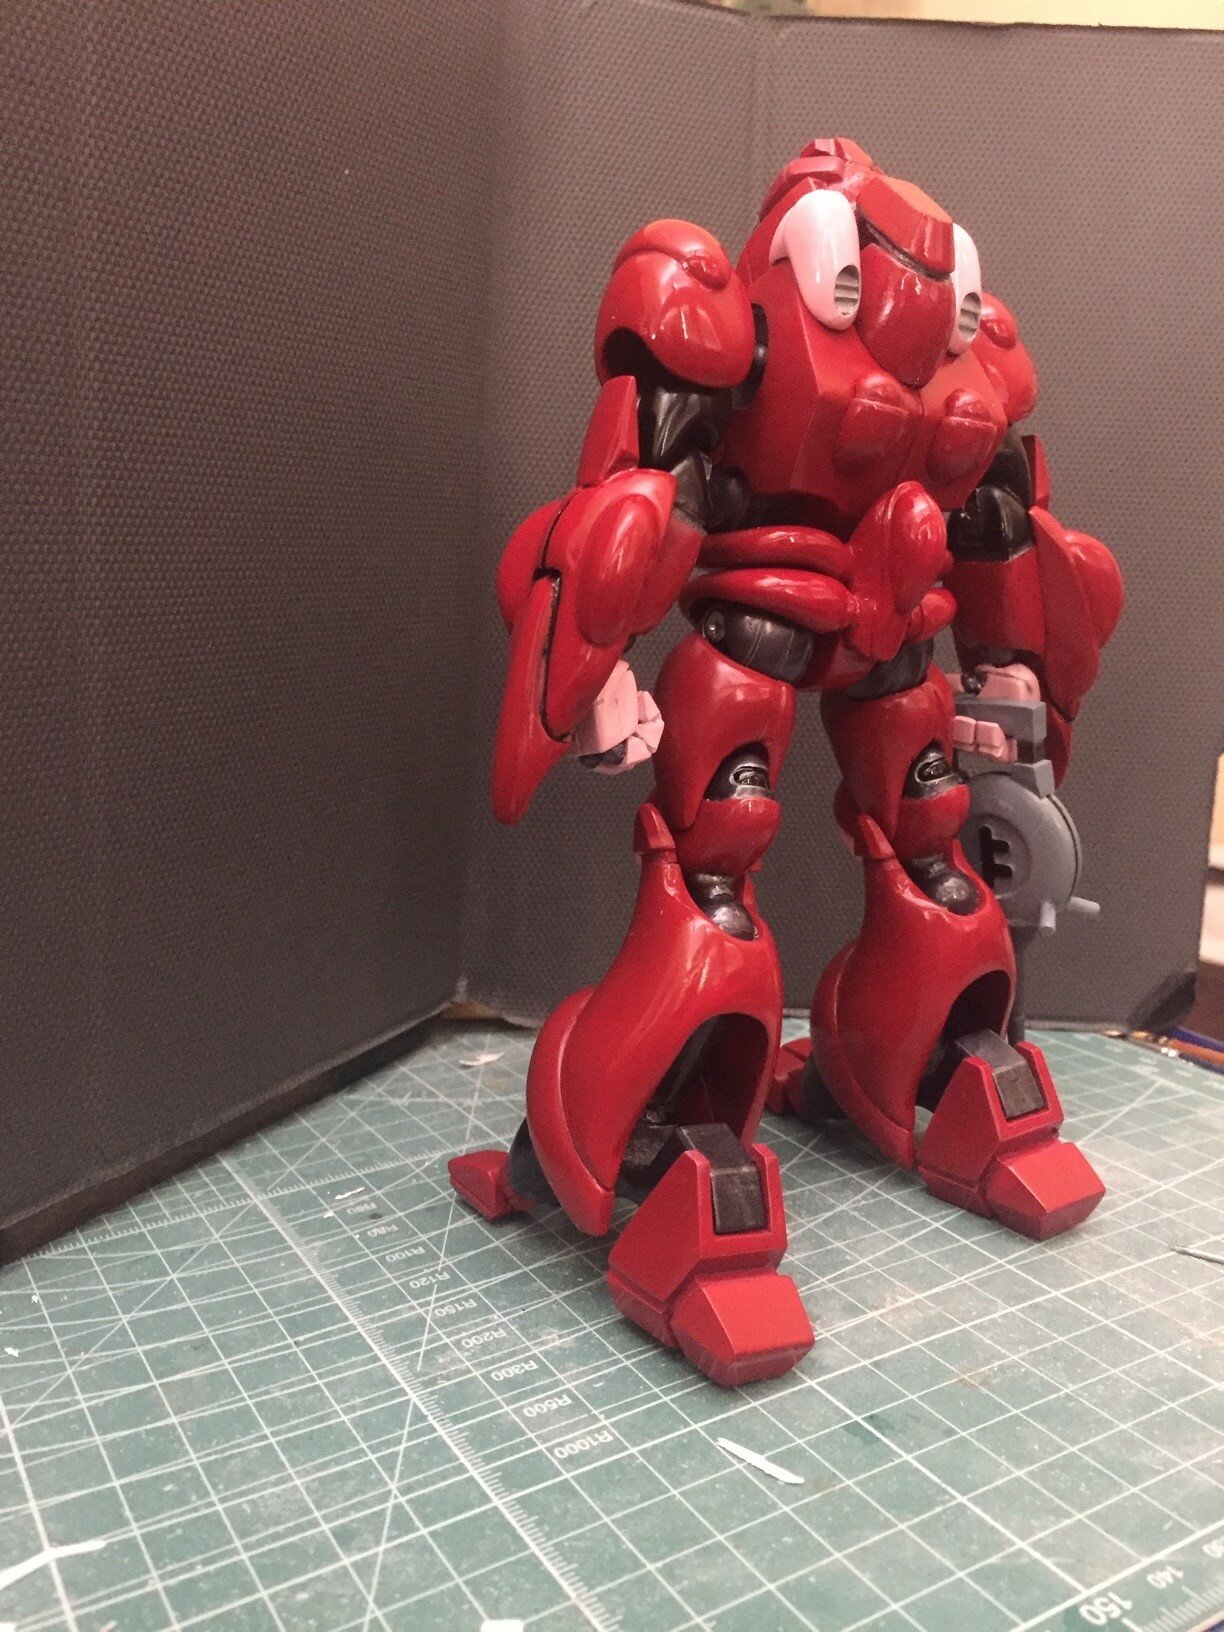
-
Got mine in at HLJ. fingers crossed for confirmation email. Edit - just received confirmation email. That was fast.
