-
Posts
4694 -
Joined
-
Last visited
Content Type
Profiles
Forums
Events
Gallery
Everything posted by MechTech
-
@pengbuzz Your Enterprise is looking good so far. Sorry about the decal 🥺 Can you reglue it back on with white glue and water? @electric indigo The paint looks GREAT on that. It looks like a Pilatus or Tucano, but the tail and canopy are wrong. - MT
-
@Papa Rat I think Laputa - Castle in the Sky is one of our favorite anime movies! I look forward to seeing the airship built! I LOVE using latex, especially for canopies. A toothpick will get it into the nooks and crannies perfectly. @derex3592 I'm sorry to see what happened! If you clear coated it for decals, you can skip that scary step. Just buff out the areas to a gloss/semi-gloss finish that will have decals on them. It will allow them to lay flat without risking your finish. One of our top award winning modelers does that. It also helps protect surface detail from being filled in with coatings. @tekering That's cool! Usually the model is big and the background is small. you blew that opposite out of the water!😁 @Rock That looks great so far! I'm working on the same thing in the RG kit. I love that model. The mechanics are wesome! - MT
-
GREAT builds guys! Sorry I haven't been on the boards more. Not much time to get on the internet for "fun", but I have been working behind the scenes a little. To give you an idea, I compeleted ONE whole model in 2025! The Bandai 1/100 MG Zeta Ver Ka - out of the box. Sad. But lots of components for other builds. I'm at least trying for two builds to go to show early this year. @Papa Rat OK, you have to convince me that you are NOT a Five Stars fan boy (even if you got the collection box).😁 More importantly, they all look GREAT! I think you were just sand bagging us with that "I haven't modeled in a long time" comment.😉 @505thAirborne You sir have your work cut out for you (see what I did there)😁 But I know you can do it! @tekering I think you need to see if Toho has any Godzilla movies they are planning on filming. Then you can profit off of it. If not, you have a new storage shed for the back yard😁 @derex3592 Your paint looks great! You are right. The colors change. For that reason, you may want to try some colored panels and shading. It builds depth. Our "Best Of" model two years ago was a also a battleship, 1/350th with insane detail. He also made extensive use of shading to build depth. Kinda like gaming pieces building depth and shade. I hope we all have a HAPPY NEW YEAR fellow styrene heads! - MT
-
@Cheese3 And the collection grows before our eyes! Cool! @electric indigo Great looking fix to the kit! @pengbuzz Cool! I look forward to seeing it get an update! @Thom The Sea Vixxen was all kinda funky! Even the poor radar operator had that "skylight" window. I look forward to the build! - MT
-
Thanks guys! @Thom I didn't know Trumpeter was doing kits like that now. They must have gotten smart and got on the band wagon! Yours came out great!!! @Papa Rat Your knight looks terrific! Finishes like that are a PAIN to pull off and yours looks great! @SteveTheFish WOW! BIGTIME FLASHBACKS! I had and built that kit back in the 80's! One of the advantages of living near Little Tokyo, LA. If any parts are warped, some hot water should make them pliable to shape. I loved that kit, but lost it over the years. It has GREAT detail on it too. - MT
-
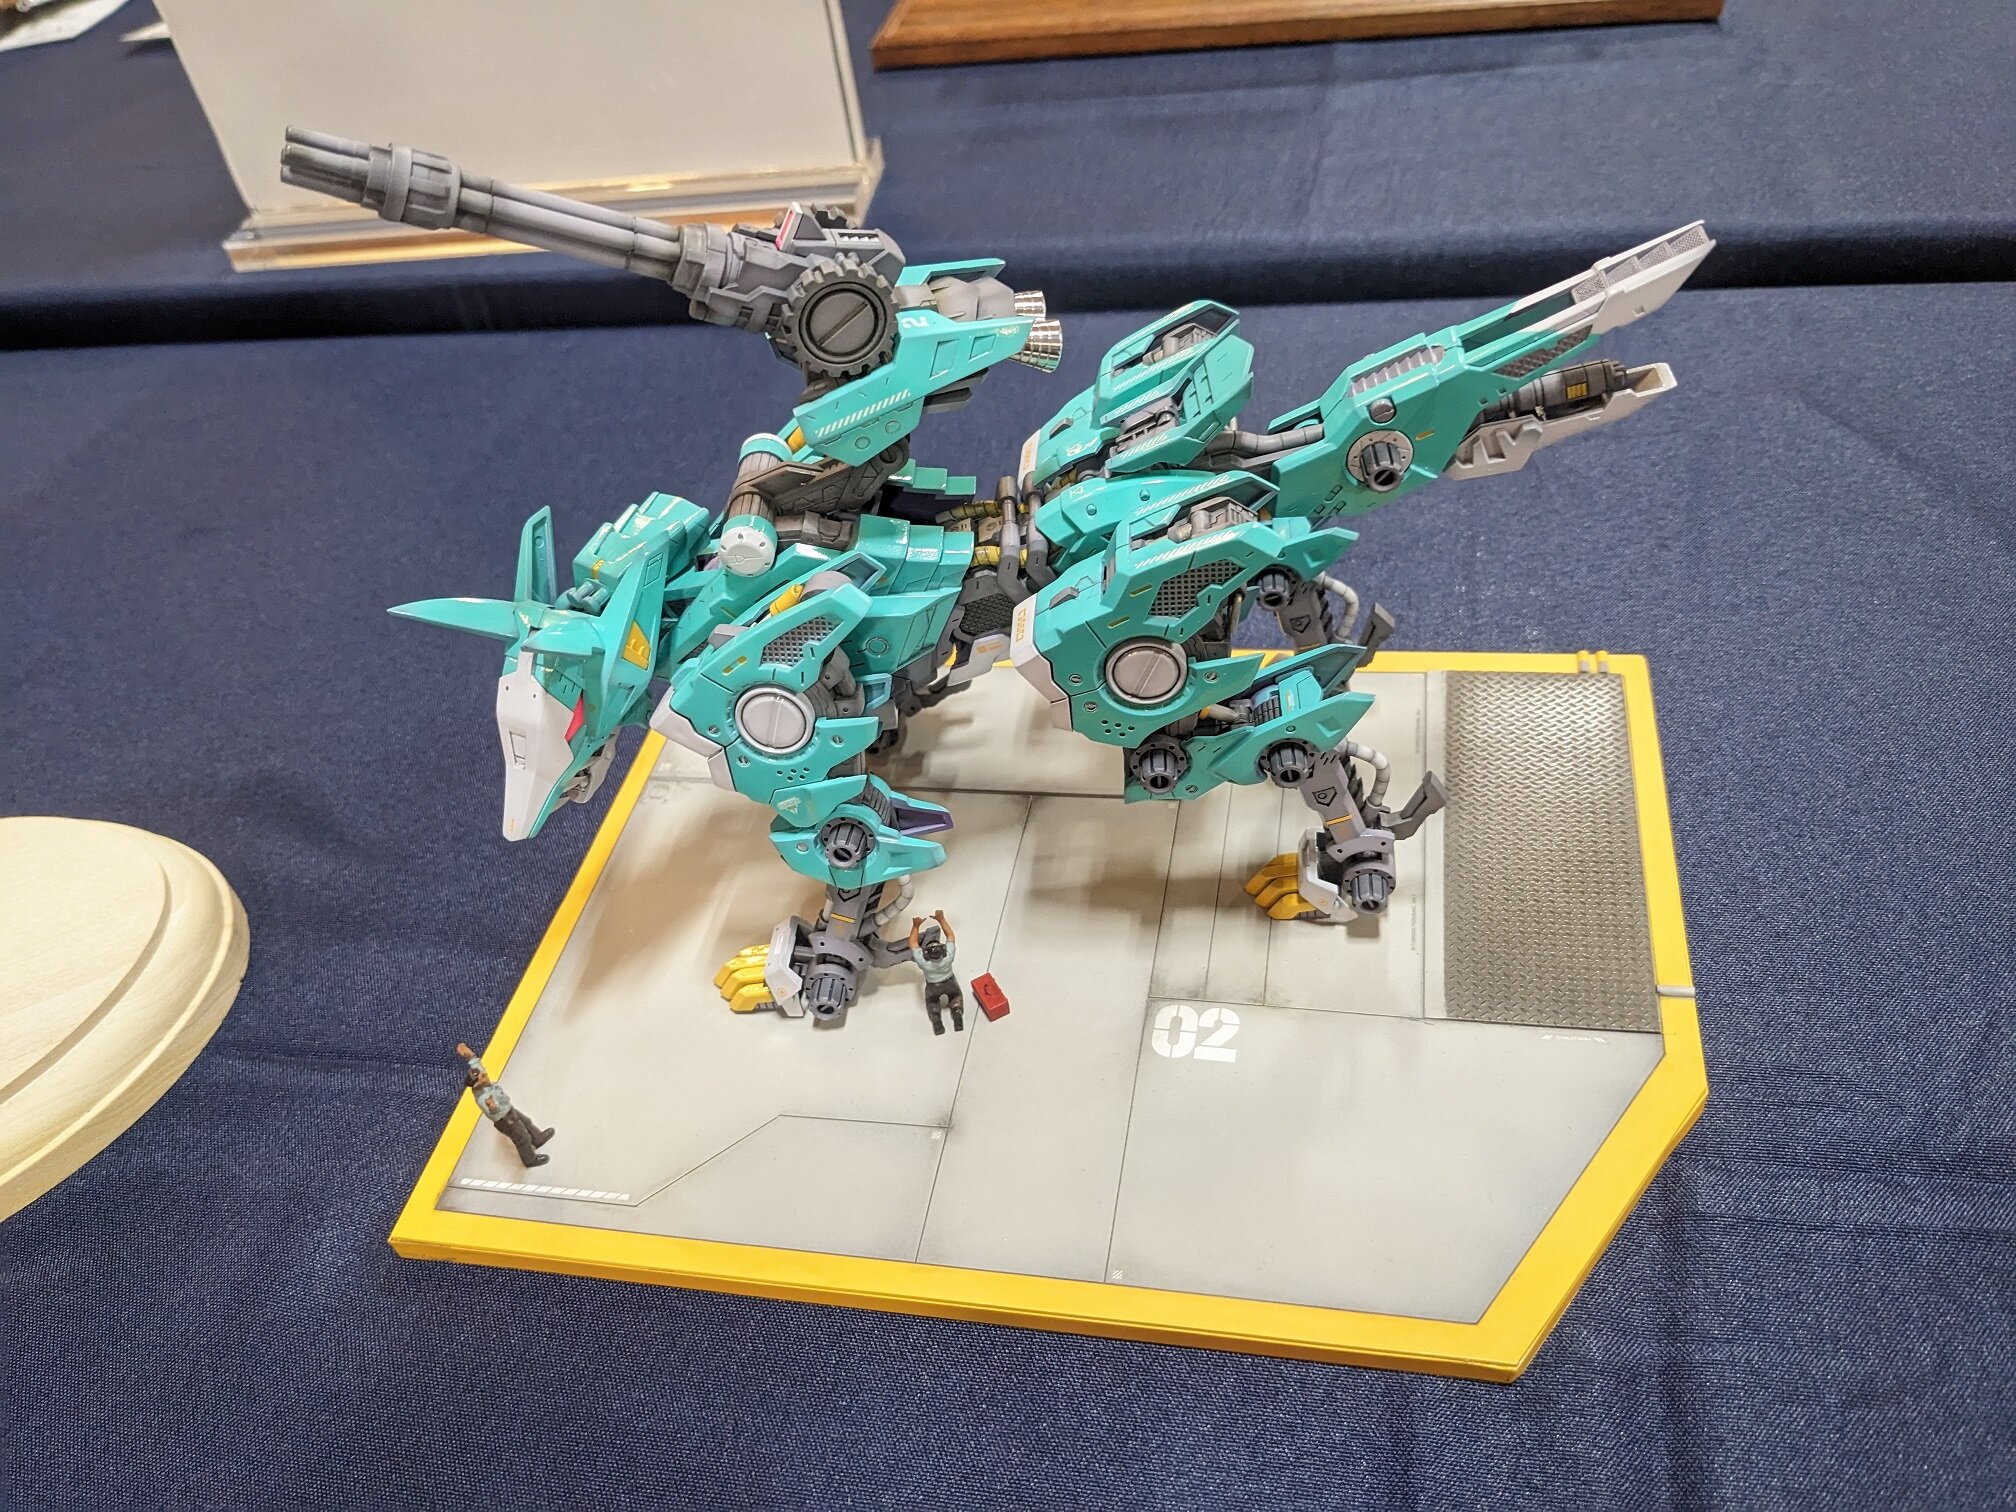
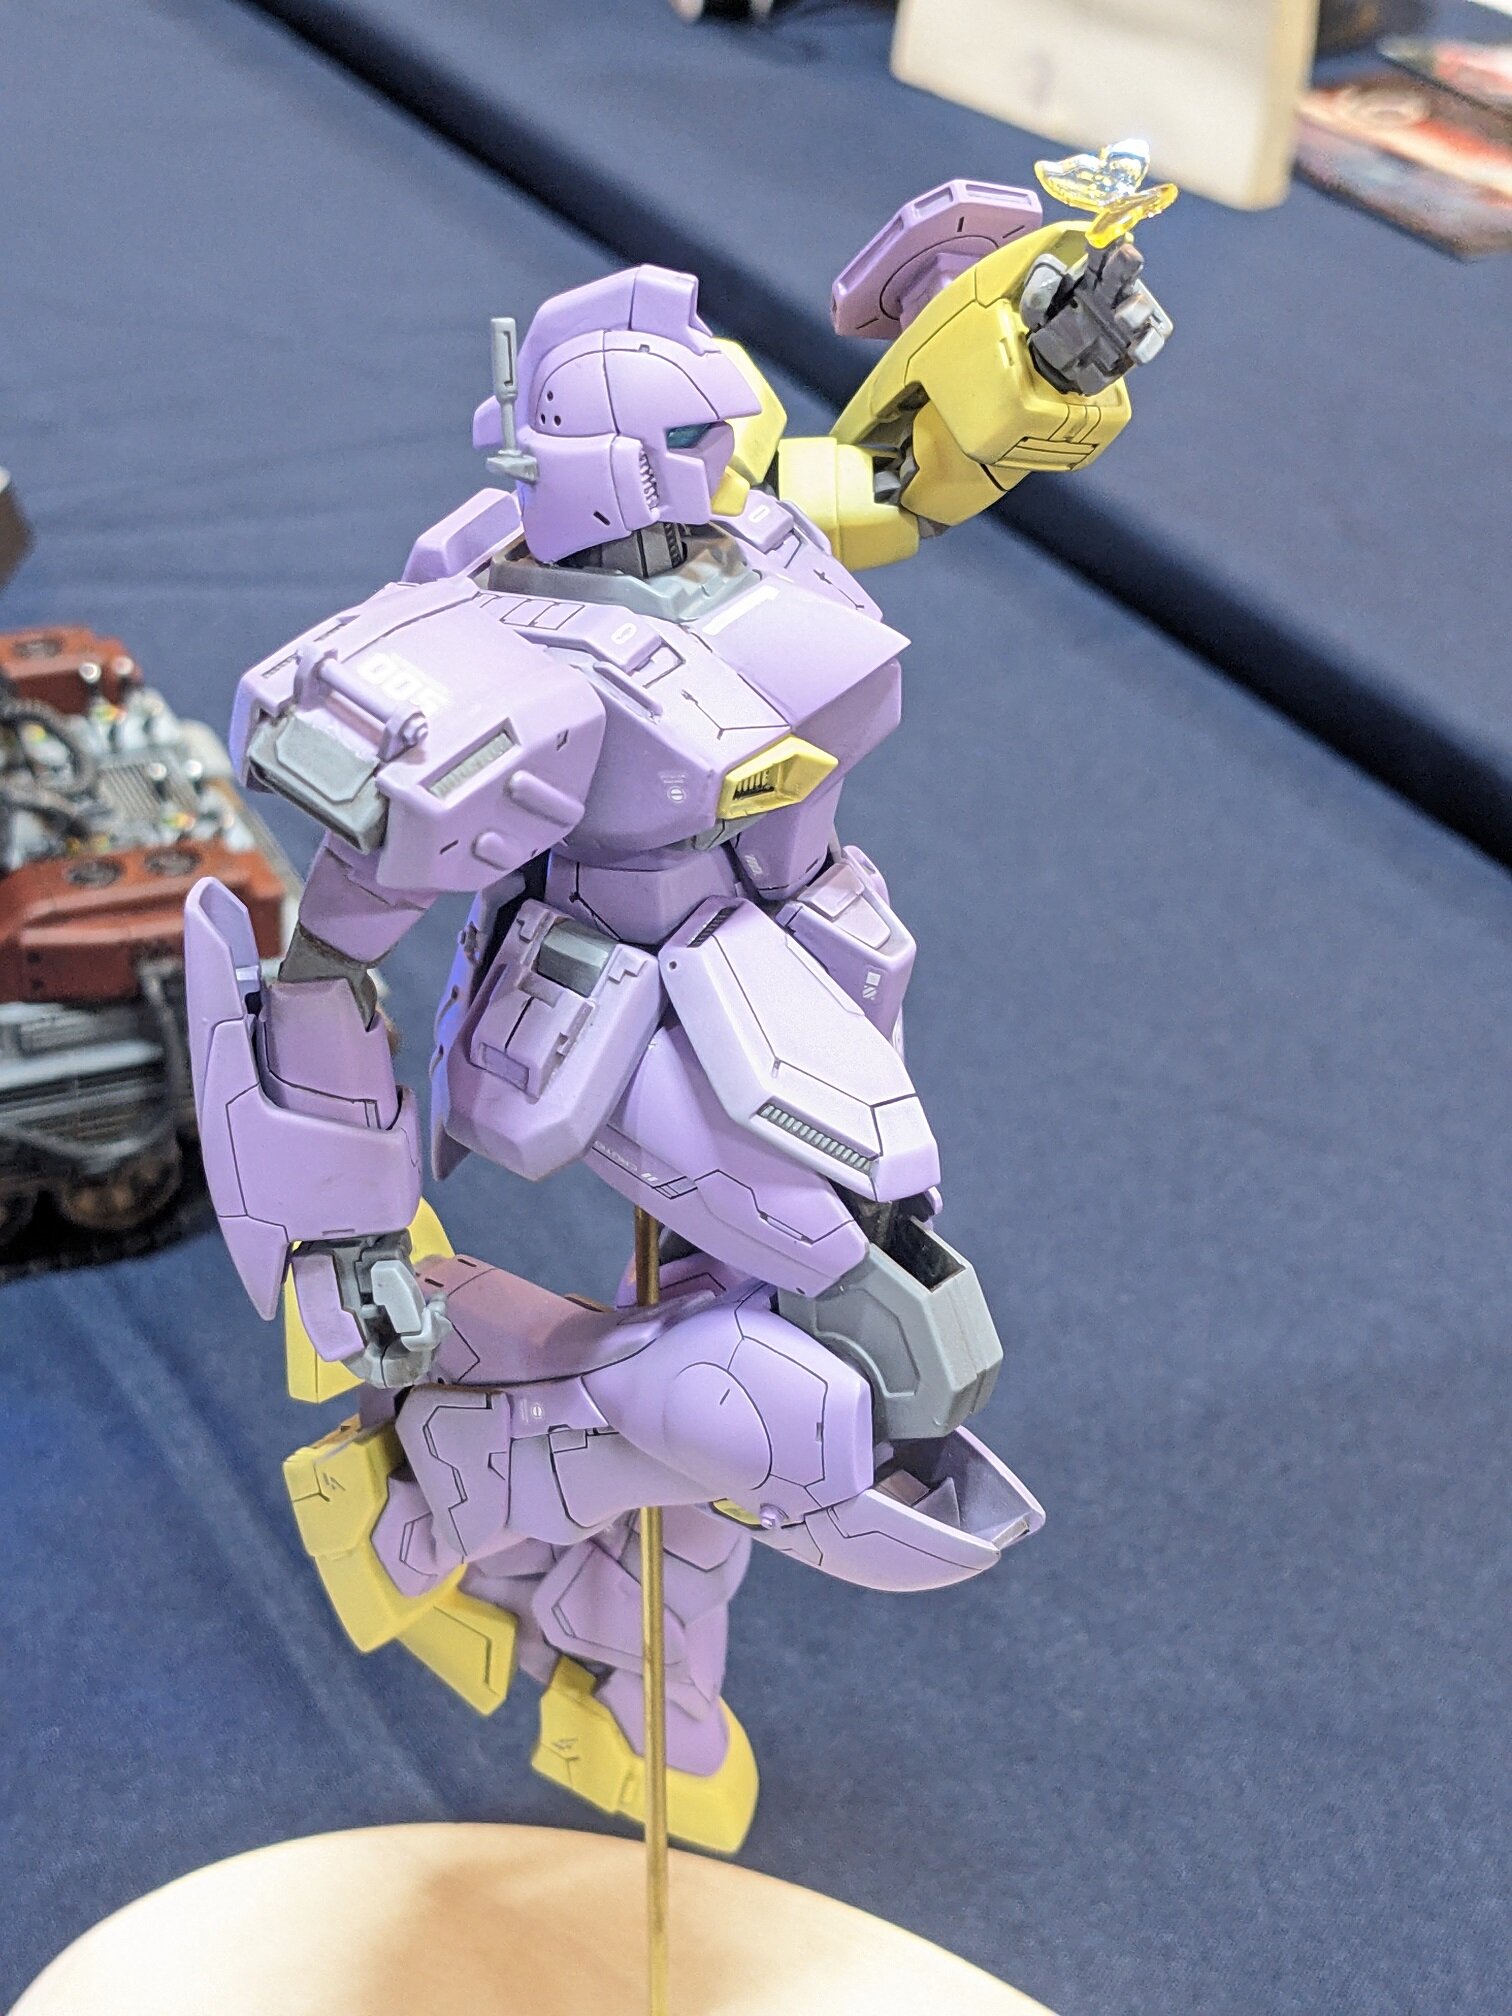
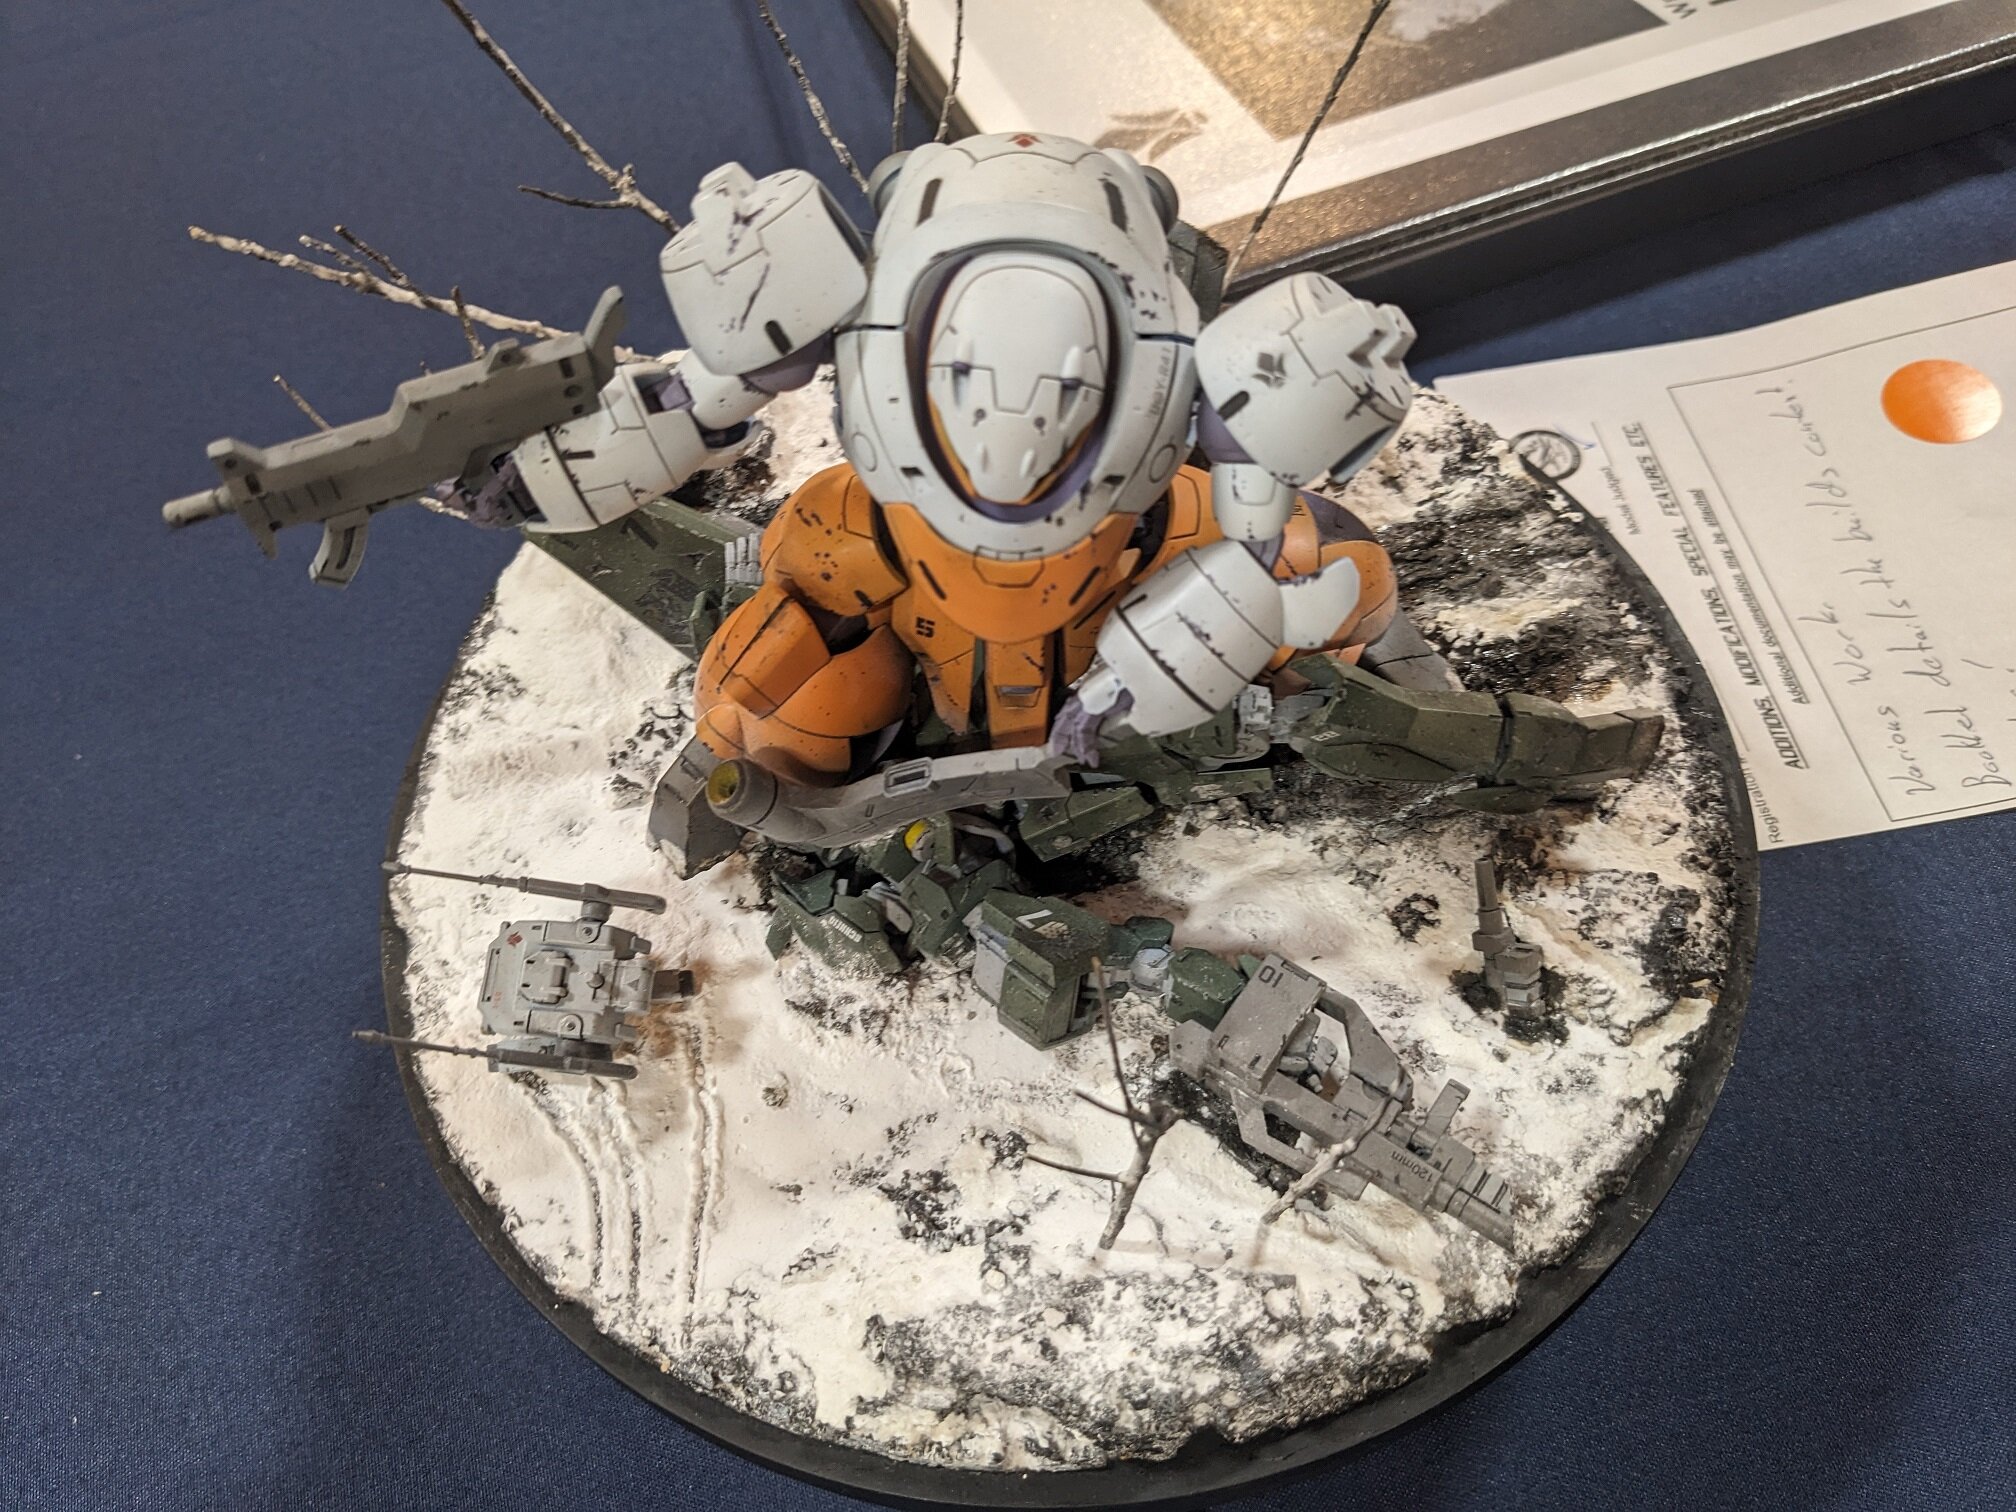
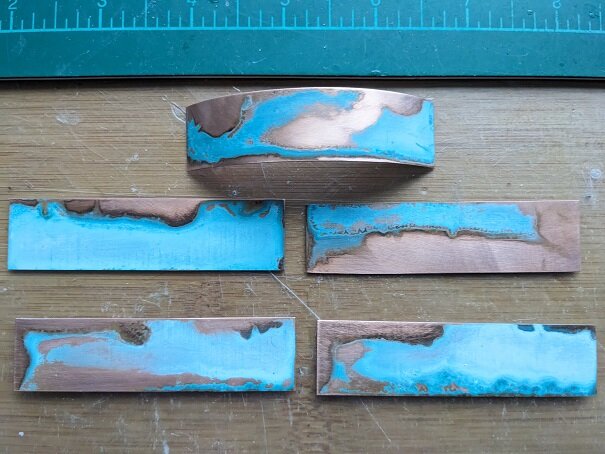
Sorry guys, life has been BUSY the last three weeks! I missed so many pages of AWESOME builds you have been working on! Two weeks ago we had our modeling convention. Here's a couple of highlights that were our better builds from the "Sci-Fi" category. TWO of these were by women! The Gundam diorama was actually entered in the "Diorama" category of judging. This Zoids build got gold and "Best Of" category for Sci-Fi. And for making trophies for our work golf tournament, I wanted patina copper placards. I found a good recipe! Three tablespoons apple cider or red wine vinegar and one tablespoon of Miracle Grow plant food. Let the copper sit in it for 30 minutes. Take it out wet and let it dry. When it dries, it looks like these: I gave it a LIGHT sanding to clean up the exposed copper. Thanks for checking in! - MT
-
@pengbuzz That mini diorama is a COOL idea! It has a nice 3rd dimesion to it. I think the curvature was good and forced persepctive on the subject. @Papa Rat It will be cool to see those built! I got a couple of the "newer" ones when they went down drastically in price. @Big s The Dunbine models drove me nuts too. It reminds me of the original Atari video game art. The cartridge shows two dudes battling it out on a tennis court. You get the game and its just two sticks and a ball. The "ball" wasn't even round! - MT
-
ego, 111@Cheese3 It's great to see that old variation set get some love! @505thAirborne That is a BEAUTIFUL mod to the TREAD AND the combo together! It would be cool if you could get or make the big disruptor cannon for it. @derex3592 Your photoetch is looking clean. At least it's not 1/700th scale!😁 @Thom I pray everything has been sorted out in your gut! - MT @pengbuzz So, how did the fair go? I saw an AWESOME P-3 some kid did in Lego, complete with interior operator's stations! The only unrealistic things were the skeleton and storm trooper headed pilots!🤣 Even the crew were in flight suits! - MT
-
Thank you guys! @Thom That's sad they made scoops without the scoop! @F18LEGIOSS2 "We can rebuild him, we have the technology"😁 Looking good! @tekering That diorama looks great! Nice details and layout too! @pengbuzz Here's praying for a first place ribbon!!! - MT
-
@nightmareB4macross It's coming along and looking good! @tekering That is a LARGE diorama! Sorry the 3D pritning came out rough, but it was a GREAT save! @Papa Rat The VF-1S came out great! Are you going to put a metallic finish like mica powders on your Mirage? @pengbuzz I'm sorry to hear about your arm and am praying that damage heals quickly! @505thAirborne I like your color choice. Thankfully Tamiya rattle cans are good. @Thom Those scoops look cool! Did the kit not have something like them on it. The Dougram will not be ready for our show in October. But since the Z'Gok is less involved, I'm giving it a shot. Gotta have that Zeon mono eye action. Got this idea from a guy on Youtube. It's a simple mechanism. Gearmotor, spur gear with ONLY 4 teeth, and two pinion gears driven by them in opposite directions as they come around. Next a pink lit eye will be made for it instead of the plastic placeholder. Thanks for checking in! - MT
-
Thank you guys for the positive feedback! @pengbuzz That cooment on putting a finish on your arm was funny! I'm glad to see your doing better - without a clear coat😁 I'm a little late to the dance, but cake airbrush compressors work too. In fact, I got a nebulizer froma thrift store and use that for mine. Works great too! There's also this: https://www.lowes.com/pd/PointZero-Cake-Airbrush-Decorating-Kit-Airbrush-Compressor/7148487?user=shopping&feed=yes&srsltid=AfmBOorjUp999F_Y2nwtA2jv-f1ZXAD83SMOoRqVKMD5Rt-qn-MtwH2HMSY I believe this one at HL (and other places) can be unthreaded and a hose used: https://www.hobbylobby.com/crafts-hobbies/model-kits/airbrushes/cordless-airbrush-kit/p/81182932 I hope that helps! - MT
-
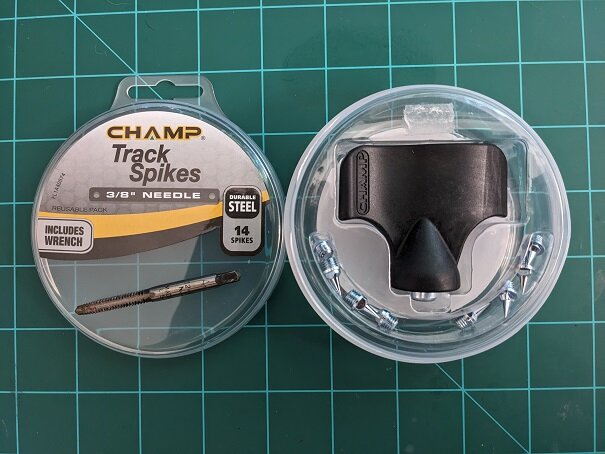
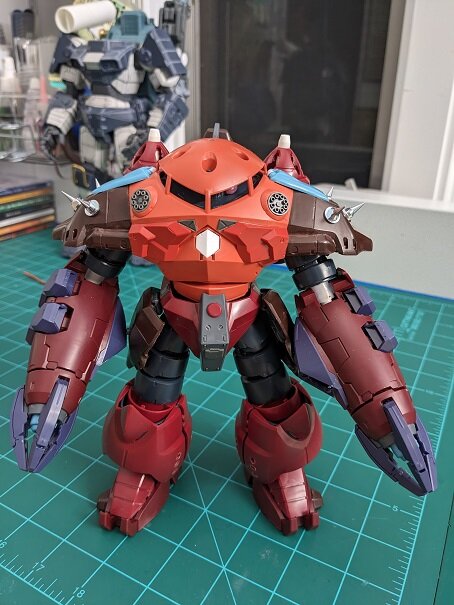
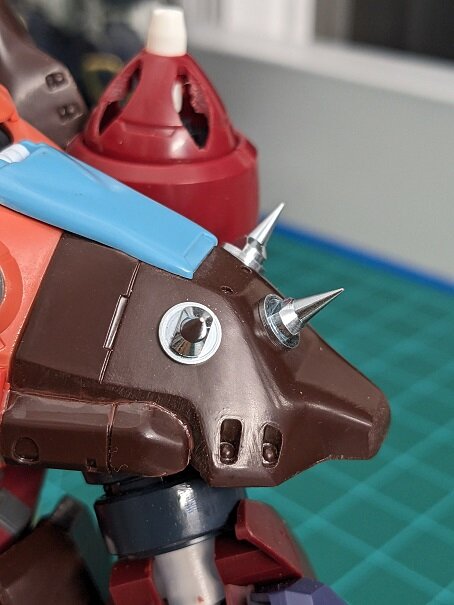
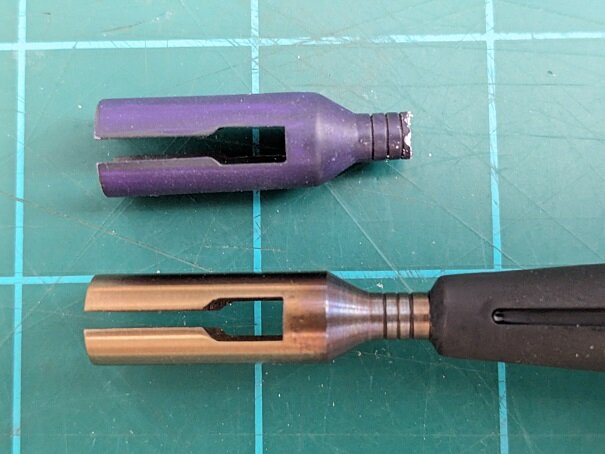
@Papa Rat That VE-1 is looking GREAT! Nice weathering! Great print work and designs too! I guess you're one of the few who still touches typesets? @505thAirborne Those helmets look VERY realistic and authentic (I can say that from experience😁). I had to do a replica of an old WWII M-3 aircraft flak helmet for a display one time. It's harder than people think! @Cheese3 No one will accuse you of not using your own original paint schemes - that's for sure! Cool designs and collection too! @LocusPocus Wow! There are A LOT of bias lines on that print. But like you said, good learning experience! Those joints you're installing will make it much better. @derex3592 You are going to have quite the 1/72nd Air Force! The paint is looking clean too. @nightmareB4macross Yeah, yours is MUCH better 😁 I'm predicting people are going to run out to their Dick's Sporting Goods, or local equivelent, this weekend and buy track shoe spikes. These were about $12.00 USD for 14 vs the same cost for just a couple from an aftermarket company. They are SHARP and DURABLE vs the aluminum ones that are aftermarket extras. You can use a 12-24 tap to make threads for them, or just use super glue! I saw these while my wife was looking for shoes. God gave me a great idea after seeing these😉 Oh, and this was supposed to be a simple 1/100 Z'Gok build to work on while sitting with my wife watching TV. I just couldn't get over that '70's look and thought it needed more "Machismo". I'll post more as I complete it. Thanks for checking in! - MT
-
@pengbuzz I'm sorry to hear about your arm! I pray you have a quick and thorough recovery! Thank you guys! Thank you @Papa Rat! @Big s Thank you and I believe you are right! I'm glad that she had the conversation though😁 - MT
-
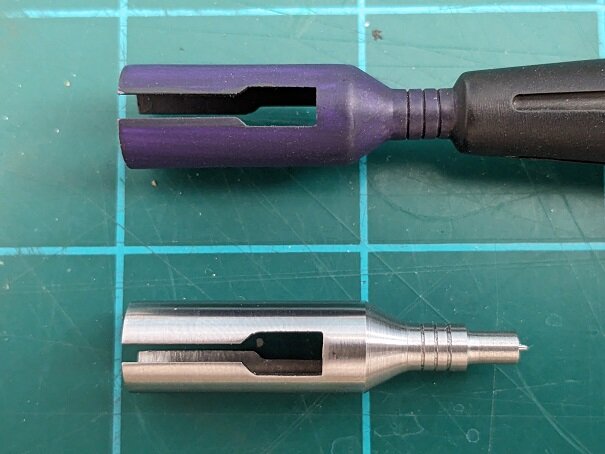
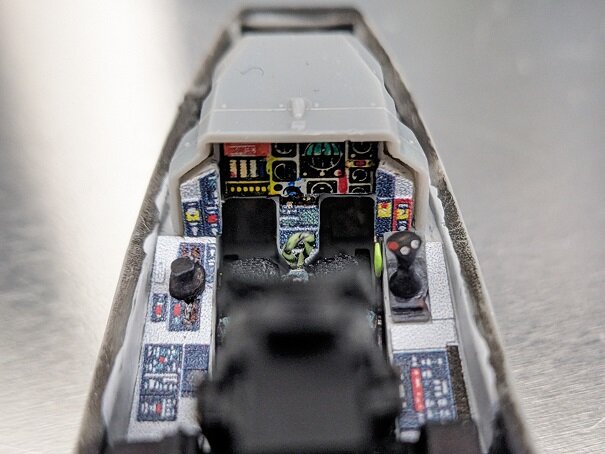
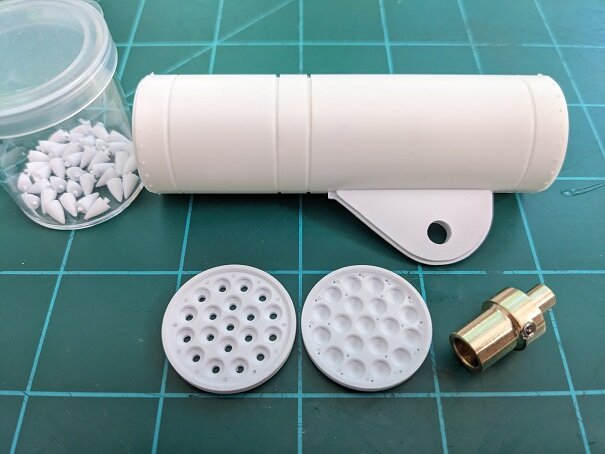
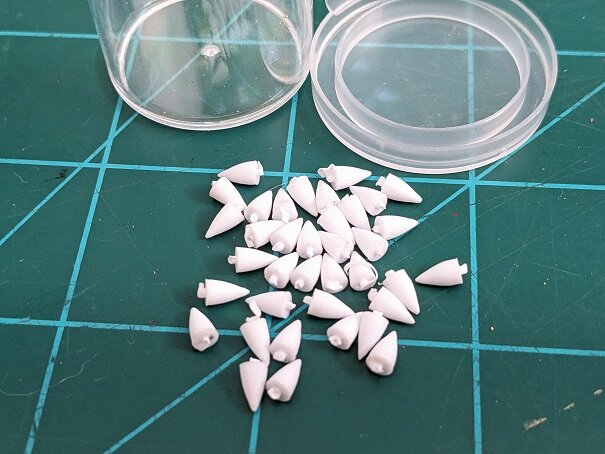
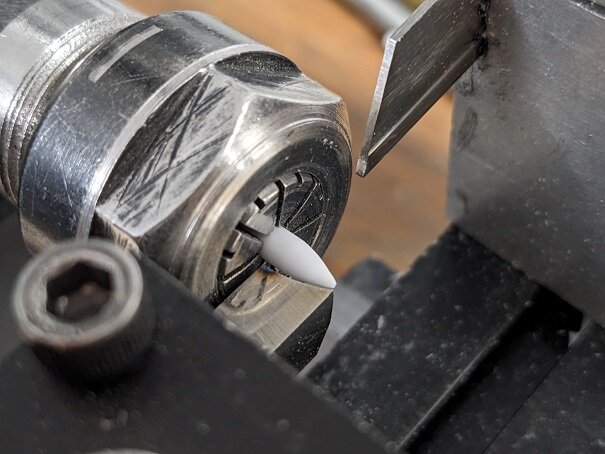
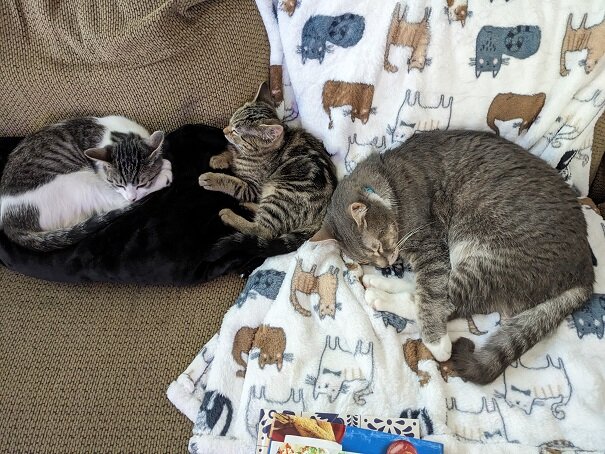
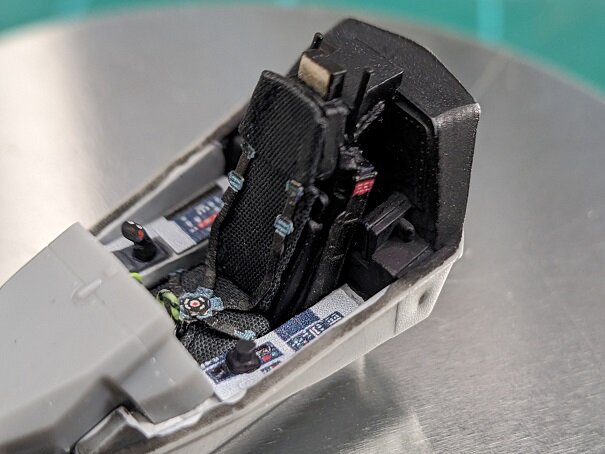
WOW! I can't believe how many AWESOME builds I have been missing! I had to go through several pages and don't have time to comment on everyone's beautiful work! What the heck; everything from phasers to chickens besides the usual suspects! My apologies, I'll try to get on more often. I have just been more busy and been spendingmore time with family than on the bench. First off, my main excuse. After losing our one cat, Shadow back in February, a friend of my wife's talked her into getting a couple of kittens - for multiple reasons. Mainly that our exhisitng cat would have friends while we're out at work. Cats ARE pack animals and prefer social settings than being alone. So, the latest edition to my workbench is Stormie and Tygra (L to R). And the whole gang chillin' on the couch. They were so tiny and young that they slept with us and always had to be with us. We lost A LOT of sleep! But they're getting used to everything now. It also means me backing off on the paint and glue while they'e around (which is A LOT too). Even now they'e up here with me😁 But I'm not a total slacker and did get some stuff done. The 1/35th Dougram DX comes with that GIANT backpack cannon and a tiny rocket pod! So I made a bigger rocket pod to "balance it" a bit better! Here's all the parts and making the rocket tips to glue into the pod. The tine holes in the non-drilled out end are for "stays" made of wire to get glued in place. And how they were made and cut-off on the lathe... The F-35B is on hold for sci-fi stuff. But the cockpit is getting there. The seat is UPHOLSTERED! It's covered with THIN fabric from tiny wire tape on top of thin brass sheets. Then it's all glued together. The panels are Eduard photetch and seatbelts. The kit and Eduard did not include a joystick on the right, so I had to make one. The ejection seat pull handle is made from yellow and black thread white-glued and twisted together on a Dremmel. The main panel is made from decal bits. The Eduard one looked like a newspaper and I messed it up with a clear coat. And finally, my old Takara Dougram Hasty Ironfoot gun muzzle wasn't looking so hot and getting nessed up on the seem (not visible). So I machined a new one in steel. Then heated it up to give it that burnt effect AND protect it from corrosion. That's it for now. Thank you for checking in and I'll do better getting on more often. You guys make SUCH AWESOME STUFF!!! - MT
-
Upscaling a classic: yet another massive 3D-printed SDF-1
MechTech replied to tekering's topic in The Workshop!
@tekering That looks BEAUTIFUL!!! It will look awesome with paint! Even with all those collector's items, now we know which series you are the BIGGEST fan of!🤣 - MT -
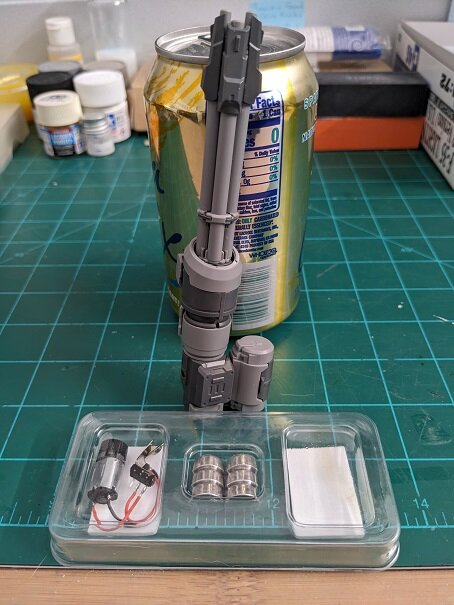
@pengbuzz That stand looks awesome, helps tell the story, and put the whole display together! I see a lot of good models that people just stick on a pole attached to an unsanded, ugly piece of unfinished timber. @Cheese3 I haven't seen one of those Nichimo kits actually attached to the suction "stand" in decades - I think. It's cool to see one done so nicely. The Gwazine came out great too! @Nyankodevice That Zenith print looks cool! I always loved how their designs are more realistic. ALCON, If anyone is interested, here's one of the roughly completed models of the Gatling cannon. I haven't added any of the handles on to it since I won't be using them. Also pictured is the motor, switch and batteries. The parts are molded in ABS according to the sprues. The good news, most parts are molded in undergated sprues, so cleanup is easy with little signs of nubs left over. I don't know if I did something wrong, but the battery fit is too tight. I've seen multiple videos where they were not, so maybe it was just me inserting the battery tabs wrong. I'm not worried because I'm not using them either. Here's one leaning against a standard 12oz American sized can. The COOL news, it runs awesome and the action is quiet! It doesn't sound like a servo running. The recoil looks cool, but of course, it's not "canon". Like I said earlier, those gear motors are awesome and compact. I got some more work done on the F-35B. The driveshaft connecting the LiftFan unit is to narrow, so I had to make a thicker one. Hasegawa completely left any detail out of the rear engine bay! It's totally visible too! So I had to find some decent photos (which was tough) and add some semi-accurate details in. Thanks for checking in! - MT
-
Hey everyone, quick post! I don't know if you have seen these before, but it is an AWESOME add-on to your mecha builds! This is a mechanical Gatling cannon that has ROTATION AND RECOIL action!!! TOTALLY COOL! They can be hard to find and sell out fast, but Hobby Search has them (at this time) for only $13.00 (plus about the same price for shipping registered mail to the U.S.). This version COMES WITH the motor, batteries and switch: https://www.1999.co.jp/eng/11182826 I just got mine in the mail and have yet to build it. If you're not familiar, Hobby Search is another great place to get stuff, especially if you're used to HLJ and them being out of stuff all the time. I've been buying from them for years. They seem to ship out faster than HLJ too. The motor is a compact gear motor and they are excellent for other projects too! I bought a bunch a while back. You'll see them in high end toys and kits. The small "ammo container" on the side holds three small 357 batteries - that come with the kit! I hear they don't last long, but adding in an external battery pack would be easy. The Hobby Mio logo is cool too, a cat with a wrench!😻 Here's a decent review minus the motor kit that the link above DOES have. The last video shows it in action. Enjoy! - MT https://www.youtube.com/watch?v=yV9pNTma73o
-
@SteveTheFish That's sad. Marking down for "not weathered enough" is not cool. That choice is up to the modeller. That can also be fixed by noting what you did on the judging sheet and why. A lot of people don't know that they SHOULD make special notes. The last contest I judged, someone did some Gundams with a wood finish to them. We didn't mark them down because that's not what a Gundam looks like, but the wood effect was very bad. Like @woodsider said, things are changing A LOT! VERY rarely are models made out of wood anymore. They are now plastic. That's a paradigm shift. Sci-fi becoming VERY popular is the latest shift. Allowing 3D printed models in Gundam competitions is the next one. 😉 @pengbuzz Judges Pengbuzz's model and notes, "Left masking tape on model." 🤣 - MT
-
@Papa Rat That Monster is looking good! Lots of love and attention. Some seams you may be able to fix before-hand. When you can, if you sand the edges flat, like on a piece of sand paper mounted to a board, they'll join better. Then use a ton of glue to make the seams "wet". Then put them together. It will take a day or two to dry, but you may be able to eliminate some puttying (which also requires waiting time). Plus the seam is stronger. @SteveTheFish and ALCON: Still to this day, a lot of the IPMS founders are stuck in their ways. I've heard fellow club members who read their literature complain about it. That includes techniques too. Don't get them started on 3D printing either! But like Big S said, there is a big group of Sci-fi modellers, mostly Gunpla modellers who are forcing them to change. Our last convention had A LOT of sci-fi kits. Even our die-hard aircraft guys are getting a Gundam just to see what they're all about and understand them better. The last two shows/conventions I was at even had a large group of Gunpla club members en force representing and taking photos together. The downside, the judges know how easy they can be made to look good. So they get more attention in judging now😉 - MT
-
@pengbuzz THE Masking Tape Master!!! @Cheese3 Cool to see those ole' tiny kits being built! I like the highlighting on the Defender. @woodsider That 1J looks beautiful! I think you'll win some medal with that one! ALCON - Here are International Plastic Modeler's Society (IPMS) judging guidelines (there is a Gundam section): - MT https://ipmsusa.org/about/competition-information/ipmsusa-competition-handbook-2024
-
@pengbuzz Your Shuttle looks GREAT! I love the protective coating on the lab module. It looks realistic! @Papa Rat No problem! Winning something at a con is cool too! Maybe fewer entrants? - MT
-
@Papa Rat Good call on the magnets for your Monster! By the way, if you're careful, they will still work just under the surface. That way you don't have to cover them with anything. Concerning your Talgeese: As a Sci-Fi judge for my club's last show, we dinged stuff like seam lines, rough paint, decals that were not blended well into the finish, or silvered decals (air gets underneath and it looks silvery). Stuff that will help you, adding detail bits, adding more scribing details/panel lines, and being consistent with your paint scheme (wear should be even across the model or rust, just not here and there). You should be able to get a a hold of the judging rules. If not, I'll see if I can find ours. Honestly, you should be able to walk into a show and have a good idea of where you stand. You know if you did a good job or not. At the very least, it's a lot of fun and a GREAT learning experience. You will see A LOT of awesome models and good ideas to borrow from. Who's hosting the show? If they are IPMS based, their rules are pretty much the same across the board. @Cheese3 Your paint shading looks good on that model and helps build size (for something so small). @derex3592 Good help is hard to find; I'm glad you got some! 😄 Sorry your Seymour-Johnson decal got jacked up. That squadron must of had a special deployment to Australia or something, maybe with a special paint scheme it sounds like? - MT
-
That's awesome she did that! I wanna say, "Sneaky wife, happy life" but that can go bad too.😁
-
@pengbuzz That's AWESOME man! Thank God for your wife and finding an ORIGINAL 80's kit! I remember that kit too - pretty cool! It's also great you got your starship nacelles sorted out too! Things are looking up! - MT
-
@Chas I think I used Super Lube (liquid) last time I stripped my old airbrush down. It has Teflon in it and coats nicely. @derex3592 Congrats on moving indoors! I lived in TX for a short bit and the heat and humidity can get bad! The Eagle looks good too! @Papa Rat Cool! Those will be a BIG improvement over the stock butcher block hands. - MT





.jpg.121c6ac869304fb8f3dfb2b8d24a2590.jpg)
.jpg.25883cb7640abd9ee2fd3e7374430f06.jpg)