HWR MKII Posted August 1, 2005 Share Posted August 1, 2005 I warned you at the beginning that the canopy would be a handfull. TOLD YA SO! Quote Link to comment Share on other sites More sharing options...
jadefalconguard Posted August 1, 2005 Author Share Posted August 1, 2005 (edited) I know, I was thinking all the time I was 'playing' with the hood.....I should have listen to HWR, I should have listen to HWR, I should have listen to HWR.... Anyhow, this is how it came out. Edit : the specles on there are actually some toothpaste residu Edited August 1, 2005 by jadefalconguard Quote Link to comment Share on other sites More sharing options...
jadefalconguard Posted August 8, 2005 Author Share Posted August 8, 2005 Finally the cockpit has been finished. I've took a leave on this project after the first part of the cockpit Tonight I've put up the back part. Glad that's over and done with. This weekend I'll get some new Future and make it a bright and shiny hood Already sprayed and weathered the armpacks. Still trying to find some extra colors to put on there, just a quick look Quote Link to comment Share on other sites More sharing options...
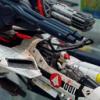
jadefalconguard Posted August 8, 2005 Author Share Posted August 8, 2005 Challenges, challenges. I started working on the weapons load out. The "Angels of Death" are quite nice, with some minor flash and only some minor repair works necessary on the nosecone The pods, however, are an entirelly different story. The 3 pieces that make up the pod are not quite the same. Yeah right. The front and end plate are smaller then the main body. In the pic you'll see my solution to all problems sheet styrene Quote Link to comment Share on other sites More sharing options...
nightmareB4macross Posted August 8, 2005 Share Posted August 8, 2005 Sean, thx for the tip, it seems to work, now on with the pictures :Frontview : still need to glue in the trusters inside the tailassembly (are drying right now ). Detail Fast Pack : The right Fast Pack will be left open to show off the inner parts wich are extra detailled 313034[/snapback] Great work jadefalcongaurd!!! I just happened to notice something, look the picture that shows the valk from the front to the back, with no wheels on it. The cockpit is crooked, it does not align properly. The seat is a dead giveaway. Quote Link to comment Share on other sites More sharing options...
jadefalconguard Posted August 9, 2005 Author Share Posted August 9, 2005 (edited) @nightmaerB4macross : you're right.... 2B honest the seat still needs some detailpainting so isn't glued on Cool to see you noticed. I've still haven't decided how I'll be painting some hoses on there. Edit : after looking more closely to the picture I'm afraid there's indeed something not quite right. Might be the fact that the wheelstruts are only temp. fixed. We'll I'll be looking to the model tonight and see Edited August 9, 2005 by jadefalconguard Quote Link to comment Share on other sites More sharing options...
jadefalconguard Posted August 9, 2005 Author Share Posted August 9, 2005 (edited) As I started to rework the launching pods I noticed I ran out of sheet styrene I'll need to go shopping this weekend So I started cleaning and updating the landinggear. I've decided from the beginning to use tie down chains I've still have lying around so I needed to add tie down points on the struts . I've got some stapling thread from my father in laws job. Instead of standard preshaped staples, this is a brass wire on a wheel and ideal for this kind of work. I started with drilling a little hole on the struts where the tie downs need to come. Once this is done I took a needle file and wrapped an end of brass wire around it. Coming to the desired shape I heated the brass wire with a candle and cut to shape : here's the result, quit nice if I say so myself All gears : the green 'hombre' is a 1/72scale I had laying around for comparison. Detail of the main gear : Nose Gear : EDIT : I added some 'things' around there just to fill it up. Might add some hoses, oillines and brakelines later on to give it a more realistic look. Edited August 9, 2005 by jadefalconguard Quote Link to comment Share on other sites More sharing options...
jadefalconguard Posted August 9, 2005 Author Share Posted August 9, 2005 @ Nightmare, man you had me running scared.... after I removed the seat and gears I took the time to examen the nose and........it's quite good. Not perfect, there is indeed a slight mistake in the allignement, but not noticeable. Anyway, thx for the remark I'll pay extra attention when placing the seat in there Quote Link to comment Share on other sites More sharing options...
HWR MKII Posted August 9, 2005 Share Posted August 9, 2005 Actually it isnt the nose thats crooked but the details on it. If you look closely the details are skewed to the right side of the nose. Both my kits have that problem. I just make sure the flat of the underside of the nose if flush and centered. The overall shape isnt symmetrical. Quote Link to comment Share on other sites More sharing options...
jadefalconguard Posted August 9, 2005 Author Share Posted August 9, 2005 Jeez, I'll need to get my contacts cleanend....you guys see things I missed in this model I'm spending my evenings with Quote Link to comment Share on other sites More sharing options...
jadefalconguard Posted August 16, 2005 Author Share Posted August 16, 2005 (edited) Made some time to paint the wheelstruts and the gearbays on the VF1. After this dryed I detailpainted the different hoses on the gears and made the wheels. Now these are a b#"ch to make. The resin and the white metal are different diameters and to much force will bend the metal...as can be seen on the first pic Anyhow, tomorrow I'll be washing the landinggear and putting it on the V1. Normally will have some pictures... Edited August 16, 2005 by jadefalconguard Quote Link to comment Share on other sites More sharing options...
jadefalconguard Posted August 18, 2005 Author Share Posted August 18, 2005 Alright, we're experiencing some major problems.... one of the legs broke of while installing the landinggear. It broke right behind the airintake on the place where the model takes the most force from the strange angle of the legs. So I'll have to add some reinforcement to this leg in order to get it in the right angle again. I needed to take off the FP's from the arm to be able to get the leg back in place.... Keep your fingers crossed I'll be able to repair it without to much visible damage. Quote Link to comment Share on other sites More sharing options...
HWR MKII Posted August 18, 2005 Share Posted August 18, 2005 You shouldnt have been flying it around the room now should you Nail polish remover/acetone is a good superglue debonder, Just be careful as this can also strip your paint as most superglue debonders will Quote Link to comment Share on other sites More sharing options...
jadefalconguard Posted August 18, 2005 Author Share Posted August 18, 2005 It wasn't the flying that was the problem.....but the landing Anyway I use a small needlefile to remove the CAglue. To bad the plastic part between the airduct and the kneepart of the leg is broken, so I'll strenghtend it by putting a brass rod in there. Holds up for now so I'll see what happens next Quote Link to comment Share on other sites More sharing options...
Ishimaru Posted August 21, 2005 Share Posted August 21, 2005 I want to see this kit finished show us more Jade Quote Link to comment Share on other sites More sharing options...
jadefalconguard Posted August 21, 2005 Author Share Posted August 21, 2005 By request some updates. She stands on her own feet Never tought this would be a mile stone, but it is. I was finally able to let her stand secure on her wheels : The little setback was bigger today as one of my twinboys got his tiny hands on the backpacks The dual canon broke off as where all the thrusters on there. Luckily it was easily solved, but took some time However, this is a close up of the fracture on the leg...almost invisble The white specs on the wing are actually some residu from grinding in the resin to enter two metal pins in the leg (the red lines on the second pic). I filled the intakepart with putty so the pins could get a good grip. The resin was drilled out with a fine drillbit on my dremel and, after inserting the metal pin, filled with salt and 2 drups of crazy glue. Quote Link to comment Share on other sites More sharing options...
jadefalconguard Posted August 21, 2005 Author Share Posted August 21, 2005 (edited) I aslo started with the auxillary equipment for the diorama. Hasegawa has a nice serie of extra equipment in 1/48th scale, the us ground crew set A and a combat support group from Italeri. I'll go in detail over them when I start the diorama, but the Italeri kit is very basic and quit devoied from details, anyway, the serve as 'secondaries' on the dio, so I'll be updating them a bit. The yellow vehicle is from Verlinden, prob, no introduction needed for this. If I have time this week I'll be adding the wheeldoors (drying right now) and the cockpit hood (boy, have I've got a suprise ). There are a few nice movies this week, Remember the Titans, Sleepy Hollow and Wing Commander, so I'll have to squeeze in some modelling time EDIT : If somebody has some clear prints from an A-10A power loader I might scratchbuild one for loading the GU11 gun. The powerloader basicly reloads the monster gun from the A10A in the field and is spec. build for the A10. The only prints I have don't really show details so any help would be appreciated. G. Edited August 21, 2005 by jadefalconguard Quote Link to comment Share on other sites More sharing options...
Ishimaru Posted August 22, 2005 Share Posted August 22, 2005 This is going to look nice What kind of custom valkrie are you making again Jade Quote Link to comment Share on other sites More sharing options...
jadefalconguard Posted August 22, 2005 Author Share Posted August 22, 2005 Basicly it's a VF1S Strike version. I've worked out an idea in my head where I'll be placing this aircraft in the former Zentradi Repair Sattelite. Main mision of the VFA 86 Sidewinders is the protection of the sattelite and to deter any possible attacks from Zentradi Forces I'm still working on the pilot for this bird, but it's going to be a lady for sure Quote Link to comment Share on other sites More sharing options...
Ishimaru Posted August 22, 2005 Share Posted August 22, 2005 O I ment by the design Quote Link to comment Share on other sites More sharing options...
HWR MKII Posted August 22, 2005 Share Posted August 22, 2005 Excellent work Jade. heres a quick glimpse of mine with 2 closeups of the cockpit. I hope to hit this up during the week and this weekend. Quote Link to comment Share on other sites More sharing options...
Ishimaru Posted August 23, 2005 Share Posted August 23, 2005 Wow I can see you put alot of detail into your cockpit it looks nice but a better veiw would be good. How come your not painting it yet? Quote Link to comment Share on other sites More sharing options...
jadefalconguard Posted August 23, 2005 Author Share Posted August 23, 2005 @ HWR, oh boy someone hijacked my post Great to see you started the build, nice work..... Just one point of warning though, dryfit your legs to the body to get a good fit so you don't mess up the paintscheme. You might want to add the reinforcements I had to do to the legs. Maybe we can make a digital collage from the models or hook up and get a group shot @Logan, subassemblies make it easier to get a coherent paintsheme and makes weathering much easier. Quote Link to comment Share on other sites More sharing options...
HWR MKII Posted August 23, 2005 Share Posted August 23, 2005 Im not hijacking it I just thought you might want to see what i had done so far. It actually wont take me very long to get it finished from this point. Quote Link to comment Share on other sites More sharing options...
jadefalconguard Posted August 23, 2005 Author Share Posted August 23, 2005 I know, no offence intended Sean Just a little try at humor. Man amazing how you get all that work done on such a short time. Nah, I guess it's me who's getting old Quote Link to comment Share on other sites More sharing options...
HWR MKII Posted August 23, 2005 Share Posted August 23, 2005 No offense taken Were both getting old i think I have been building models since i was 5, Im 29 now. Think i have enough experience Quote Link to comment Share on other sites More sharing options...
Ishimaru Posted August 23, 2005 Share Posted August 23, 2005 I'm too young being 15 sucks Quote Link to comment Share on other sites More sharing options...
Viceland Posted August 23, 2005 Share Posted August 23, 2005 Im not hijacking it I just thought you might want to see what i had done so far. It actually wont take me very long to get it finished from this point. 322488[/snapback] huh huh, right ... You get your butt finishing REX (and make mold, and make kits, and make happy MW members!! )... THEN come and highjack Jade's 1/48 recast thread Quote Link to comment Share on other sites More sharing options...
HWR MKII Posted August 23, 2005 Share Posted August 23, 2005 Rex will be finished soon enough. I was working on him one day and turned around to see a closet of kits that needed completion so im clearing out a few of those. This rex is a test to see what i would have to do to to make it. The one ill be making for casting purposes wont be finished until early february. I have to go visit a waterless beach for 4 months first Jade when will you be puting the finishig touches on your valk? Quote Link to comment Share on other sites More sharing options...
jadefalconguard Posted August 23, 2005 Author Share Posted August 23, 2005 Let's make a deal....you finish the the molds for the Rex and I'll post pics with the finishing touches BTW if you're on a waterless beach for 4 months you have plenty of time to finish the Rex Seriously, finishing touches....I hope to finish her to the point where the diroama has to start by the end of this week (that is if my work doesn't interfere ). I only need to : 1/ add the geardoors, slats and part of the weapon pylons (part will be on a loading vehicle). All painted, drybrushed and sealed 2/ decide wath to do with the gun and finish it 3/ finish the cockpit and reveal the hood So let's say, before the first of september I'll have her finished Took my only 9 months to finish this bird Quote Link to comment Share on other sites More sharing options...
HWR MKII Posted August 23, 2005 Share Posted August 23, 2005 Being in the military "waterless beach" is slang for desert. I wont have much time for scratchbuilding the masters for rex there if you know what i mean. but in the meantime check out the whats on our workbench thread ive done more for the prototype rex. Quote Link to comment Share on other sites More sharing options...
Ishimaru Posted August 23, 2005 Share Posted August 23, 2005 Rex from MGS1 OMG that is going to look nice Sorry for if HWR MKII hijacked the thread again Jade but you can get this thread back if ya showed us more of your VF-1 Quote Link to comment Share on other sites More sharing options...
jadefalconguard Posted August 29, 2005 Author Share Posted August 29, 2005 (edited) It's indeed a sad moment.... may I ask for 1 minute silence as I close the box where my parts from the VF1 were placed I've finished her up to the point where I can before the diorama is completely set up So here are some pics from the cockpit : As soon as the pictures are resized I'll post some of the total view edit : forgot one Edited August 29, 2005 by jadefalconguard Quote Link to comment Share on other sites More sharing options...
jadefalconguard Posted August 29, 2005 Author Share Posted August 29, 2005 This my UD VF1S Strike version. All I need to do is putting on some smaller details like the boarding ladder, access hatches on the wing roots and maybe some postshading. Thanks to HWR who scanned some drawnings I have a general idea on how the diroama will look. Still need some time to get everything figured out. Once this is all done I'll put on the smaller details and look wich weapons will be attached to the wings and wich will be on loading tables. Please feel free to give comments, feedback and remarks (good or bad). I would like to know what you guys think Quote Link to comment Share on other sites More sharing options...
HWR MKII Posted August 29, 2005 Share Posted August 29, 2005 Looks great! But look out Valk #2 is nearing completion My hikkie version will sport the DYRL finish with the full loadout of UUM-7 missile pods. I like the fact you took a chance on doing a custom finish and squadron. Now get moving on the dio I work weapons in the airforce so if you need advice on storage setups just ask. Quote Link to comment Share on other sites More sharing options...
Recommended Posts
Join the conversation
You can post now and register later. If you have an account, sign in now to post with your account.