jadefalconguard Posted June 13, 2005 Author Share Posted June 13, 2005 Why thank you good man..... I always loved the 'stang' had two P-51D's and 1 B in radio controlled when I was younger, but that's an entirely different story. Anyway, back on track : finished the detailpainting on the boosters. Normally I'll be adding the wash and final drybrush tomorrow. This pic shows of the detailled booster Quote Link to comment Share on other sites More sharing options...
jadefalconguard Posted June 13, 2005 Author Share Posted June 13, 2005 I even finished the two leg packs and dryfitted them in place. This changes the bird alot : Quote Link to comment Share on other sites More sharing options...
jadefalconguard Posted June 13, 2005 Author Share Posted June 13, 2005 Sideview Quote Link to comment Share on other sites More sharing options...
jadefalconguard Posted June 13, 2005 Author Share Posted June 13, 2005 (edited) Finished of the tailcolors. I decided to use Silver Metallic do give a nice contrast to the dull gray edit : I still need to do the yellow night lights. Revell Germany had a line of 'ghostships' with a fluorescent paint. I'll try to get a hold of a bottle and do the lights with this. Anyhow, the flash from my camera got the silver paint kind of blurry and not straight Edited June 13, 2005 by jadefalconguard Quote Link to comment Share on other sites More sharing options...
jadefalconguard Posted June 14, 2005 Author Share Posted June 14, 2005 (edited) Now I've had a strange thing happening here. I'd finished airbrushing the fowler flaps and slat inside when I saw I had some overspray on my wing. OK, this happens almost always while I'm airbrushing but anyhow, I noticed some wite crackling on my wing Edited June 14, 2005 by jadefalconguard Quote Link to comment Share on other sites More sharing options...
jadefalconguard Posted June 14, 2005 Author Share Posted June 14, 2005 (edited) I let the red dry while I cleaned my airbrush and noticed that the crackling started to vanish . I took out my wifes make up brush and started 'drybrushing' it gently. To my surprise the crackling simply vanished completely. Did any one ever got this if so does this mean I have to strip the paint and restart all over (please say no) but more important, what the h#ll was this. Any help would be greatly appreciated. Edit : the pic is somewhat blurry, but I checked again and it's still gone Edited June 14, 2005 by jadefalconguard Quote Link to comment Share on other sites More sharing options...
jadefalconguard Posted June 14, 2005 Author Share Posted June 14, 2005 Wonderbrush maybe ? some info, I used Testors Dull Coat and sprayed it two months ago on a warm sunny day (about 20°C). I sprayed the red paint this evening at a temp. of about 18°C and humidity was typical for Belgium so no problem there. I used an acrylic thinner to thin the Tamiya Paint wich sprayed normally. Thanks for helping me out Quote Link to comment Share on other sites More sharing options...
jadefalconguard Posted June 14, 2005 Author Share Posted June 14, 2005 Almost forgot, the end result 1 Quote Link to comment Share on other sites More sharing options...
jadefalconguard Posted June 14, 2005 Author Share Posted June 14, 2005 Back view Quote Link to comment Share on other sites More sharing options...
HWR MKII Posted July 13, 2005 Share Posted July 13, 2005 Anymore work done? Quote Link to comment Share on other sites More sharing options...
jadefalconguard Posted July 13, 2005 Author Share Posted July 13, 2005 Great back on line. Now for some quick update : Fast Packs : I sprayed the legboosters with Tamiya German Grey and weathered them with black oil paint. Once I pieced together all the decals from spareparts I'll finish this off with Dull Coat (it'll be a new bottle this time ) and spray paint the insides from the thrusterparts. Tail assembly : Finally painted the camo part and inside from the tailthruster. Detailpainted the fuellines. Back Fast Packs : Almost finished with the insides Here goes the pics : Quote Link to comment Share on other sites More sharing options...
jadefalconguard Posted July 13, 2005 Author Share Posted July 13, 2005 next one : sideview Quote Link to comment Share on other sites More sharing options...
jadefalconguard Posted July 13, 2005 Author Share Posted July 13, 2005 view of the tailbooster Quote Link to comment Share on other sites More sharing options...
jadefalconguard Posted July 13, 2005 Author Share Posted July 13, 2005 Last one for now : topview of the Fastpacks Quote Link to comment Share on other sites More sharing options...
HWR MKII Posted July 13, 2005 Share Posted July 13, 2005 Looks great man. Mine are on hold for now big project on the way. Got a favor to ask though but it all depends on how far from Vimoutiers you live Quote Link to comment Share on other sites More sharing options...
jadefalconguard Posted July 19, 2005 Author Share Posted July 19, 2005 Finished paintinjg, weathering and decalling the boosters. Detailpainting the tailassembly is on it's way but will take some more time when I feel like it. Anyhow, this is the end ersult prior to painitng : Quote Link to comment Share on other sites More sharing options...
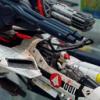
jadefalconguard Posted July 19, 2005 Author Share Posted July 19, 2005 The Fast Packs where painted again using German grey and the details where handpainted. Here's the dual beam gun Quote Link to comment Share on other sites More sharing options...
jadefalconguard Posted July 19, 2005 Author Share Posted July 19, 2005 another one, top view Quote Link to comment Share on other sites More sharing options...
jadefalconguard Posted July 19, 2005 Author Share Posted July 19, 2005 Once this was dry I washed the FP's with thinned lamp black oil paint. The darkening is drastic and gives, to my feel, the exact shade to stand ou from the rest of the fighter : Quote Link to comment Share on other sites More sharing options...
jadefalconguard Posted July 19, 2005 Author Share Posted July 19, 2005 Groupshot, decalled, drybrushed and varnished fast packs next to the VF1. Note the dayglo details on the tailassembly Quote Link to comment Share on other sites More sharing options...
jadefalconguard Posted July 19, 2005 Author Share Posted July 19, 2005 another angle Quote Link to comment Share on other sites More sharing options...
jadefalconguard Posted July 19, 2005 Author Share Posted July 19, 2005 Some close ups from the fastpacks : Quote Link to comment Share on other sites More sharing options...
jadefalconguard Posted July 19, 2005 Author Share Posted July 19, 2005 (edited) Beam canon, note the 'nose art' on the nozzle of the canon. I couldn't resist putting this one on there EDIT : should read the manual, I can now add more then 1 pic Edited July 19, 2005 by jadefalconguard Quote Link to comment Share on other sites More sharing options...
jadefalconguard Posted July 19, 2005 Author Share Posted July 19, 2005 On the menu for tonight, detailpainting the thrusterparts and touching up here and there. If I feel like it detailpainting the insides of the tailassembly and fastpacks. Till then, G. Quote Link to comment Share on other sites More sharing options...
jadefalconguard Posted July 21, 2005 Author Share Posted July 21, 2005 (edited) After the detailpainting of the boosters and the tailassembly I finally could add the packs to the tailassembly. The only minor issues was the fit of the fastpacks. There are two indents on the packs for a piece of resin. These idnents are to large, so I added some sheet styrene to get a better grip Edit, can't seem to get any pics uploaded will try again later Edited July 21, 2005 by jadefalconguard Quote Link to comment Share on other sites More sharing options...
HWR MKII Posted July 21, 2005 Share Posted July 21, 2005 Your pic size is too big. Try resizing it and it should work. Quote Link to comment Share on other sites More sharing options...
jadefalconguard Posted July 21, 2005 Author Share Posted July 21, 2005 Sean, thx for the tip, it seems to work, now on with the pictures : Frontview : still need to glue in the trusters inside the tailassembly (are drying right now ). Detail Fast Pack : The right Fast Pack will be left open to show off the inner parts wich are extra detailled Quote Link to comment Share on other sites More sharing options...
jadefalconguard Posted July 21, 2005 Author Share Posted July 21, 2005 Another angle : sideview. You can see the fuellines and other parts inside the legpack Backview Quote Link to comment Share on other sites More sharing options...
zeo-mare Posted July 22, 2005 Share Posted July 22, 2005 looking good, i cannot wait to see the finished version Quote Link to comment Share on other sites More sharing options...
HWR MKII Posted July 22, 2005 Share Posted July 22, 2005 Now i think i will dig one of mine out this weekend and finish it Quote Link to comment Share on other sites More sharing options...
Less than Super Ostrich Posted July 29, 2005 Share Posted July 29, 2005 Jade, Man, I missed this thread. Thanks for the progress pics. The kit is looking great! Here's a little recommendation on your picture taking... use the Macro button on your digital camera (it's the one with the flower on it)... it will help immensely when photographing small things close up. Quote Link to comment Share on other sites More sharing options...
HWR MKII Posted July 29, 2005 Share Posted July 29, 2005 Thanks for that tip LTSO i totally forgot about MACRO too. Solves alot of prblems. Quote Link to comment Share on other sites More sharing options...
jadefalconguard Posted July 30, 2005 Author Share Posted July 30, 2005 LtSO, thx for the feedback and the tip Should read the manual some day. I'll take some macro shots tonight and see what it gives. HWR, did you already restarted working on yours ? On the website from G-system I saw that the VF1 is anounced to be coming out again Unless they mean the pictures for it Quote Link to comment Share on other sites More sharing options...
HWR MKII Posted July 30, 2005 Share Posted July 30, 2005 No i havnt ive been busy with a scratch building project for the past week. Should be done with the project in aother week. Quote Link to comment Share on other sites More sharing options...
jadefalconguard Posted August 1, 2005 Author Share Posted August 1, 2005 I've been playing around this weekend with the clear plastic pieces...... I think I've lost about 2/3 of my hair and all my nails Pff, this was kind of stressy. Cockpit : basicly I trimmed down the cockpit stills and placed the clear plastic inside the canopy. After that I rebuild the stills with white plastic (still needs some filling and touching up here and there, but it's quit good. After this abuse I used an old trick I learned : toothpaste . Put some toothpaste on your finger/piece of cloth and start polishing the hood. It'll remove the little glue you've spilled and remove the white film from CA glue. The end result is a nearly shining cockpit. I still need to do the back piece. Landing Lights : I gave up trying to get the clear plastic t conform. I'll be trying to form a piece of clear acrylic rod shaped and sanded in place. Only prob. I already sealed the wings, so I'll have to be carefull. Sorry I'm at work right now so no picture, but I'll post one tonight when I get home G. Quote Link to comment Share on other sites More sharing options...
Recommended Posts
Join the conversation
You can post now and register later. If you have an account, sign in now to post with your account.