
kyekye
-
Posts
619 -
Joined
-
Last visited
Content Type
Profiles
Forums
Events
Gallery
Posts posted by kyekye
-
-
Bastos naman.
Wait a sec. Are you running the Hobbyfan by any chance?

-
But I chose the EMS option.
Hmmm.. I don't think I had that option back then.
Anyways, Good luck!~
-
HobbyFan is in Emeryville?

Last time I checked, they had a shipping station in California, but they get their product from HK with cheap/slow mail.
So takes about 4-6 weeks for them to get it + shipping to you (another 1-2 weeks)
I stopped using them a while ago when they failed to fulfill my pre-orders. Only go back once in a while to check rare garage kit copy reissues.
-
O.K. I guess it's leaning towards the 1S Roy Strike, but I'll still wait until the end for final decision.
BTW, I checked the Duracoat paint Nghia mentioned earlier. Here is some info I got from them.
It's basically resin based paint which is similar to what I had in mind. My solution was clear resin coating on top of regular paint, but these guys actually sell pre-colored spray-able resin version.
I guess there are ups and downs for this.
- Resin based paint must be sprayed (no brush paint)
- Can't do much weathering/oil wash if you want top coat with resin on top of resin
- It will be add thickness more than regular paint.
- Takes 4-6 weeks to fully cure the paint
- delicate masking will be very hard for multiple colors. Probably requires a lot of experience with using this material..
Either way the key is to clean the surface very well before paint. I'll do some test and update later.
-
Just by looking at the image, it's 3d printed/gray primed. but the design is identical to the old one.
So I guess you're right. But then again, why don't they upgrade a little here and there and make a new mold if they gonna do it any ways? v.2 is nice and all, but it still has some room to improve.
-
ordered only Luca super pack with Ghosts.
Sorry Michel Blanc, My October toy budget is already gone..

-
'Dual Reaction Missile -Completed test output.'
I don't get it thou. Isn't it the same mold?
-
I'm also using 3V LEDs on most of my custom mods.
It gets complicated if you are doing chain of LEDs from single power source. Then you need to figure out battery voltage and probably resistor ..etc. There are many web site covering the calculation method. Many recommends using resistor for even single LED set up, but I guess that's debatable. I've tried a couple of 3V LED + 3V battery set up without problem.
-
LOL
 . you guys are not a big help here.. Those arguments are same as the fight in my head for choices.
Please don't turn this into who's better character debate.
Just cast your vote and I'll put a stop right before I get to paint the color.
-
Added poll -red or yellow!
I've been swing between 2 like 6 times a day. Please help me decide!!
-
I wasn't able to spend much time this weekend thanks to family trip to garden/park.. You gotta make them happy to maintain this hobby life, you know
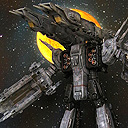
Whenever I see Tenjin's Valkyrie illustrations, I thought his foot thrust was cool and sexy! It's that look of coated brushed metal look.
So I decided to try that.
First, I sanded off 0.5mm of the foot thrust surface and cut out the 0.5mm brass sheet to fit the parts. This will be treated with chemical later to give them burned metal look.
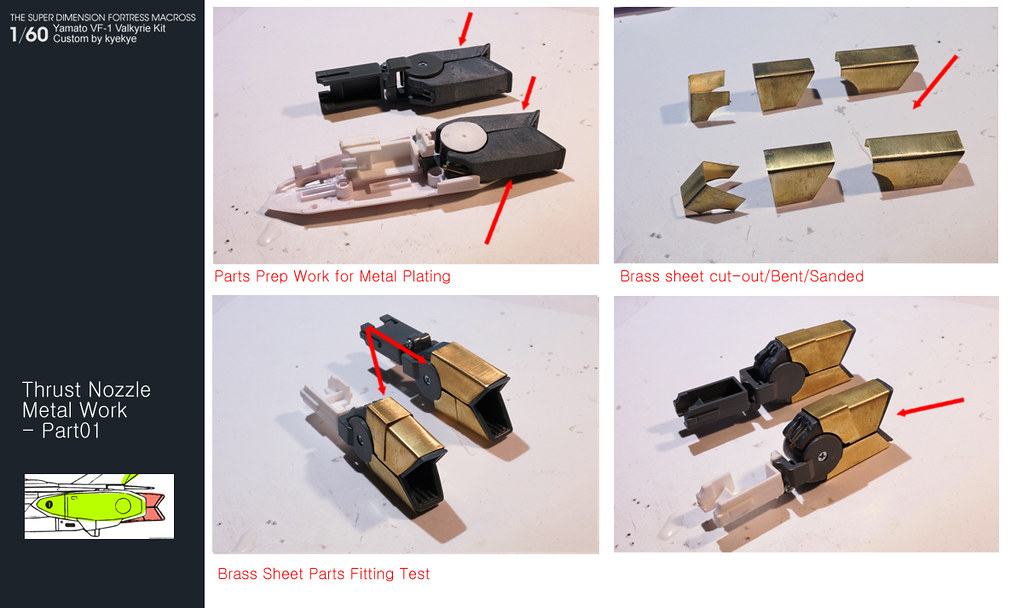
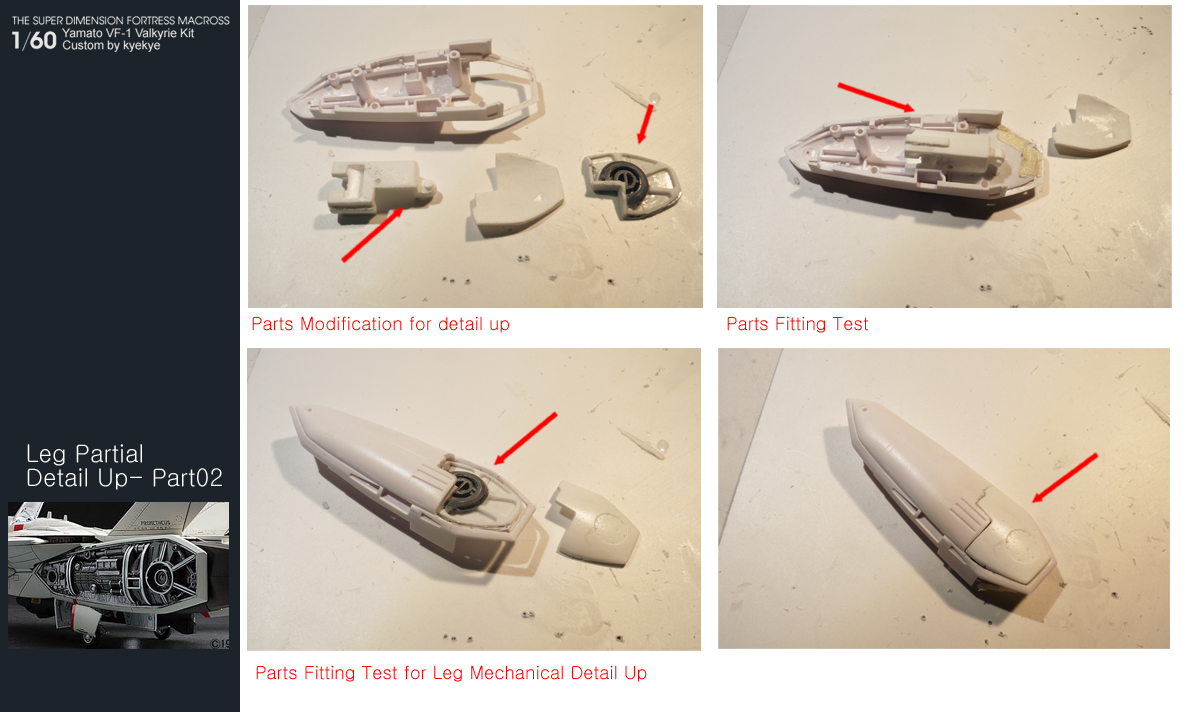
Last Joint/Space checking/Fitting test for partial mechanical panel on the left leg.
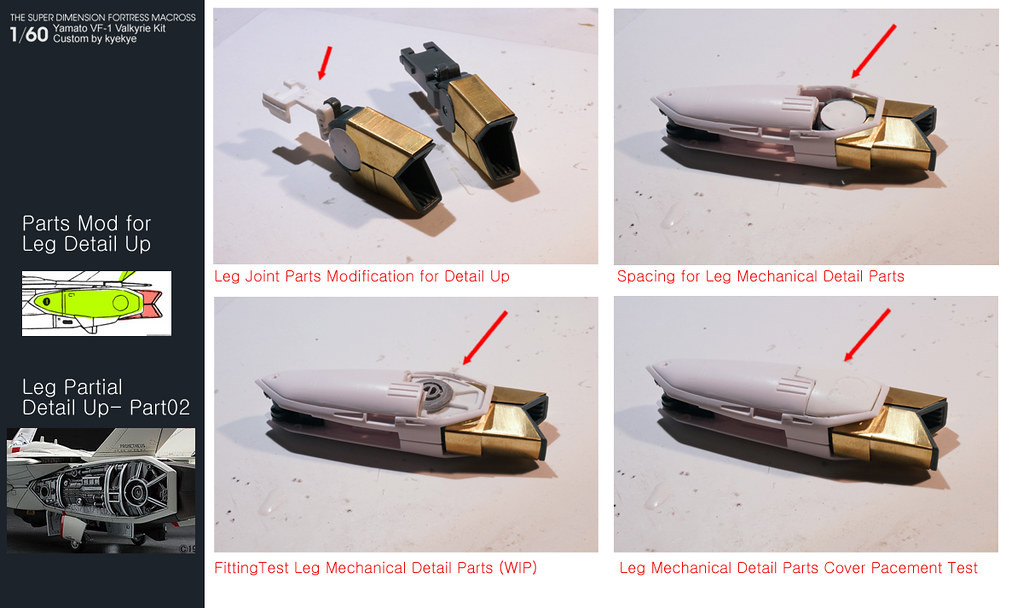
Finally started working on battery box that can fit in small space. It's about 11mm and can barely fit in areas I'm trying to fit them in. Still need to cut-out some areas thou. The Yamato 1/60 VF-1 really doesn't have much room inside the parts. Good engineering overall. Makes me admire their skill!
Also started working on the rear landing gear. I cut out the original cylinder and replaced with custom actuator. I still need to figure out what to do with gearbox side attachment. It will be bad if the landing gear falls apart after I put the leg together.

That's all for this weekend.
-
My jaw just hit the floor and broke you bastard, great work
I saw a new thread about 'what glue to use' Maybe crazy glue can help you with broken jaw
Wow. I was bouncing up and down just because this is going to look just perfect. Really nice job Kyekye!!!!!
Thanks!
I'm not sure what I find more amazing, your skill at design and fabrication or how fast you can work. Truly amazing stuff!
Man, this is not fast at all, really...
This is the most epic custom I've ever seen...
I think I love you...
Hmmm... Thanks, but I'm married
The beauty of engineering !
Superb engineering!! You've done all the details so well!
Hardly engineering! More like headbutting on metal wall!
my new favorite thread!!
 :D
:D Thanks for checking out
yes! Brilliant work!
Just trying this and that.
Awesome work. Those intakes are glorious.
Have you thought about using EL tape for the feet/thrusters?
Didn't think about that! but it seems like EL tape requires inverter which is somewhat big for this one. I can use it for the custom Launch Arm/Base after this and the Strike Pack mod is done. so it will be much later.
I can't believe it.
How about just adding a small communication for the light of the neighboring LCD's to light up the area?
I could try that.
You know with the upper and lower parts of the foot lit up it looks pretty good like that really. Considering none of the rest of us on the planet have a 1/60 Yammie with feet that light up at all you're already way ahead of the curve.
Thanks for saying that. I might be able to do something there thou.
-
Gaijin, Nihonjin, Uchujin, Kyojin..
Dudes stop arguing about language and help me understand some stuff..
#1 (question for modelers) This is close up image of latest mock-up used for product promotion. Probably they used sticker decal.
My question is that the logos are 'white-backing' on black paint. Don't they usually use 2 layers to do this with water-slide decal?

(image borrowed from master file blog)
#2nd question (for Japanese readers)
This is from group 'try-out(?)' with new Arcadia VF-1. I think highlighted comment implies the '30th Anniversary' logo is indeed decal? Can someone else confirm?

#3rd question (also for Japanese readers)
From production diary, It says 'Mr-K'. but also says '2nd generation Mr.-K' (or 2nd Mr.-K). Also, he mentions about 'previous person in charge of this project getting license.
Is this Mr.-K the same 'Mr-K' from Yamato?

That's all for my questions. Let's do some healthy discussion here.
Lastly, here is a photo someone mentioned on Volks display today. Looks fine for prototype mock-up.

-
I'm one of many who's a little confused by various web pages and magazine scans.
To sum up my earlier translations, here's my understanding..
*30th Logo and title logos are not painted/printed and will be 'sticker decals' and 'water-slide decals' (I guess 1 sheet each)
*includes simple U shape stand
One magazine said some 'high-play value gimmicks' , but I guess there is nothing new about the mold itself or parts. I guess the reporter/writer was a newb and never seen Yamato Macross toys..
I'm still wishing for some minor improvement on the mold/parts for other VF-1 to come from Arcadia (like fixed shoulder joint..  )
)
-
This weekend's summary.
* Continued with Leg partial detail modification. The space is a lot tighter than I thought, so I'm modifying inside foot parts for retracting mechanism. 1 more part to change and I'll add magnet slot for the cover parts. Actual partial mechanical parts are still WIP. I'll add little more details and clean up, and make a resin copy.
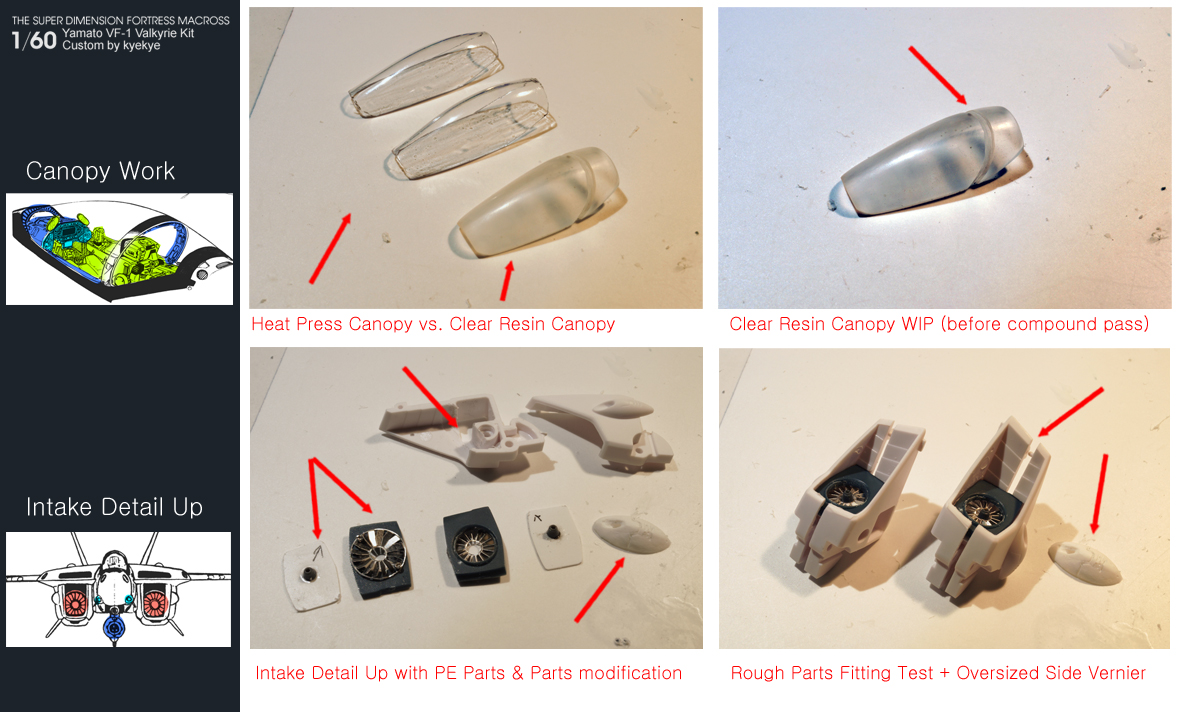
I tried heat press for the canopy, but it doesn't have enough thickness to handle the transformation. Just too flimsy... So I ended up making a clear resin copy and modifying the shape. Still WIP (fine compound and infamous 'Future' treatment!)
My fingers are all tired after long sanding, so I jumped to the Intake parts detail up. I used PE parts and custom backing for extra detail. Again, there was no room behind the original parts, so I had to cut away some portion to fit them in.
Also, I'm cutting away the side vernier nozzle and replacing them with slightly over-sized one that I'm making.
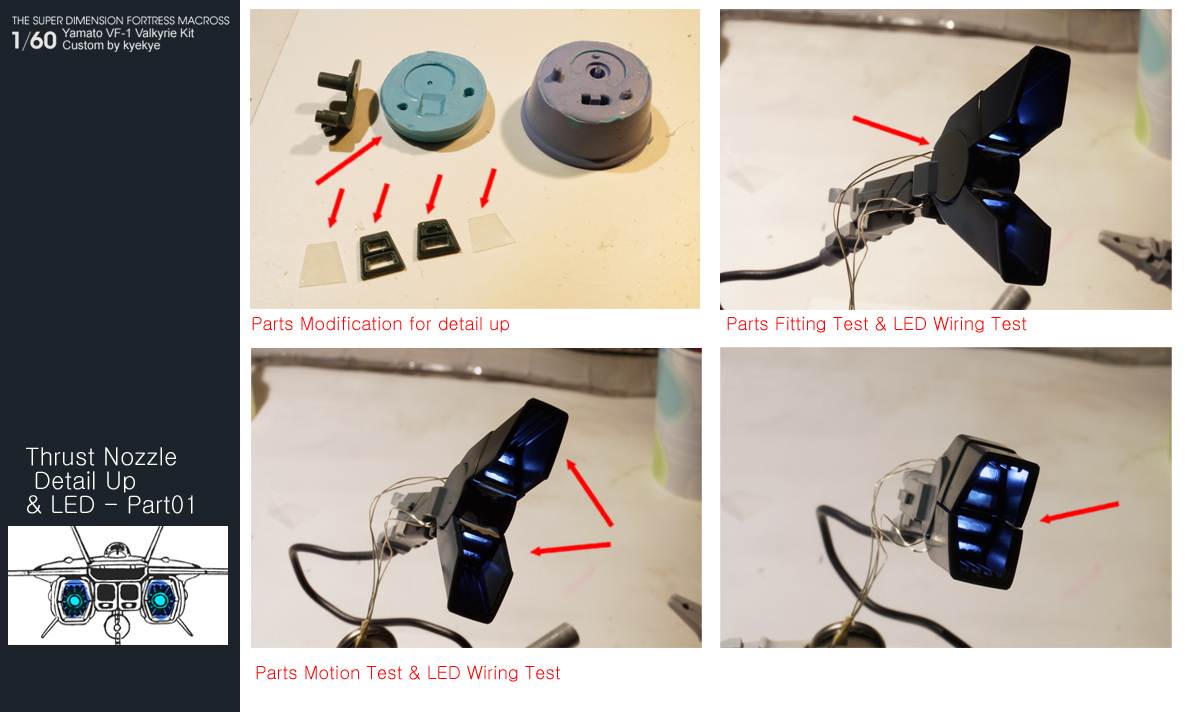
Next is Main Foot Thrust Nozzle. I need to modify one of ankle parts to fit leg detail. There is no space behind the foot nozzle either, so I had to cut out some portion of inside parts as well. The problem is the center part between the heel and toe (?). The part is filled with gears and spring, and no room at all for LED or circular nozzle I was going to put in.. This needs more thinking..
Anyways, I managed to install LEDs and wiring for top and bottom parts at least.
That's all for this weekend! Thanks for following and checking. Ideas are always welcome!
-
WOW!!! How could I have missed this... finally saw it posted on facebook which is what led me here. I will follow your amazing thread with baited breath. This is simply too awesome, I can't believe the tiny work you can accomplish. I wish you all the luck and smooth sailing till the end of this fantastic project. I can't wait till you tell us how you solved the paint issue with scraping and transformation!
It looks so good so far.
Keep up the great work!
You my friend are my inspiration.
Thanks for your comment! I would need all the luck I can get for this project (specially for the painting department..)
BTW, This is on Facebook?
Wow, now that's a compliment. No pressure.
Yup. No kidding... I think i work better under pressure...I think..
Having always thought the cockpit was just awfully done on these, I am glad someone finally put forth the effort to put the pilot and seat in the right place, proving that it CAN be done.
This is just too awesome.
For the Movie VF-1, the cockpit design is quite different. I'm trying to get closer to the design.
This is going to be a true masterpiece for sure!!!!!!!!!!!!
Thanks for saying!
Jesus. I wish Arcadia would hire you to design their VF models. Sick.
Then their price will go up! Way up!! so not a good idea
Hey Kye. You might want to try this paint called Duracoat. It's made for guns in the combat field and is scratch proof. Works through an airbrush.
http://www.houtsenterprises.net/index.html
- Nghia
Oh Nice find! I gotta try this and compare with my solution before painting pass. Thanks Nghia!
-
Does this come with a Jeff Gordon pilot?
No, but this transforms into him in racing uniform..
-
Ah hem http://www.hlj.com/product/ACA82001/Sci
PREORDERED!
Done. Thanks, Usagiz!
Arcadia, Now you can show me the pic without decals..
-
「超時空要塞マクロス」より、マクロスTV放映30周年を記念した「VF-1記念機体」を商品化。30周年特別マーキングデザインを天神英貴氏に依頼。監
修は河森正治氏。機体はTVシリーズにちなみ、主人公機でもある「VF-1J」での商品化になり、記念デザインの特徴として、機体全体も斬新なトリコロー
ル調で鮮やかに施してあり、さらに歴代マクロスタイトルロゴをあしらえるデザイン。尚、プラモデルの「ハセガワ」との共同企画。30周年として特別に「専
用簡易スタンド」を同梱。*本商品には、商品イメージの様なマーキングは施されておりません。付属のマーキングステッカー、又はデカールを貼った作例にな
ります、あらかじめご注意ください。
[セット内容]ガンポッド、ミサイルポッド、3連式対空ミサイル、搭乗用パイロットフィギュア、TV版ポージング用ハンドパーツ、専用簡易スタンド、スタンド用アタッチメント、マーキングステッカー、水転写デカール、取扱説明書-comes with gun-pod, missile pod, triple anti-air missile, pilot figure, TV hand parts, simple stand, attachements for stand, marking sticker, water-slide decal, manual..
-
Today! I'll order it when the pre-order opens and worry about its design later.
Arcadia! I'm making this exception only once this time!!
Cdisdope; I didn't want you to feel like I hijacked your thread by putting random translation, but I guess that's not the case. I'm bad at reading mood
 All good. let's go on with Arcadia' new journey and stuff..
 -
Looking more and more awesome by the week.

I don't know how complicated it might get, or how well it might work from an electrical standpoint, but it could be fun to have a couple master switches in hidden places, and then rig several lights to go on or off during various stages of transformation.
The easiest ones I can think of would be the tails, where you could probably rig contacts into the pivots so the lights only go on when the tails are unfolded. You might be able to do something similar for the wings, depending on how your plan to have them extend/collapse works.
The head, you could probably make a contact in the back of the nose section that would power it when folded into battroid position. Same for the nose gear once it's extended.
I dont know if little metal contacts would be easier than wires, but I think they might simplify the process of getting power shared amongst all the moving parts, plus help deactivate lights that you might not want turned on if they're hidden.
This! I gotta try! Fixing contacts on locations and Soldering on the contacts might be problem than laying out wires, but I like the idea.
Aaawww!!!
You made an eye for the head and you even drilled holes in the antennas, not mentioning the sticks, pedals, verniers and articulation points
Man, what's wrong with you???
This update was really worth the wait

Head detail wasn't part of my plan, but I got carried away, I guess..
Awesome, now can we get some custom commission work =)
Hmmm.. That...
As always, looking good so far Kye!
The little detail are more time consuming, for me at least.
Yeah. little parts fly off the pin-set and hides in the carpet.. Spent an hour looking for it...Very time consuming indeed
-
C'mon guys. It's first Macross item by a new company whose current flagship item is sexy doll figures.
While the design is colorful anniversary theme with 100 water decal logos and it (might) comes with cheap looking display base, we still gotta support if we can.
Cdisdope and Mommar; I never intend to argue whose Japanese is better, and I'm not a native Japanese speaker either. I just studied it for a couple of months a while ago. I just kept reading Japanese books and manga to improve it. I'll shut up now and never put translation again.
-
Doubt posable head lasers is feasible. Probably swappable "ear" parts for battroid posing like the Hi-Metal 100.
Well, if that's the case, that ruins the whole concept of transformation!
It's same as landing gear parts swap!
-
Exactly.
That's word to word translation, Good job for that. but you gotta get the meaning of the sentence!
Do you think they will sell that 'cut-out and bent piece of clear acrylic board' separately?
Or do you think they will include it in the box?
That's all that matters in that line.
Yamato 1/60 VF-1 Kit Custom/Detailing by Kye
in The Workshop!
Posted · Edited by kyekye
Oh! Thanks for the info!
I also received a test color and clear coat for testing, but haven't tried it yet. Will do a test next week and post the result here.
Just a little bit of oil and fuel stain here and there+ minor paint scratches. Not like Yamato weathering version.
---------------------
This weekend's summary.. Well I watched 2 movies! How about that..
For the project, it's slow as usual.
I'll just post the images now and edit/add description tomorrow..(now added )
)
--------------------
This side thrust nozzle design and size doesn't seem set in stone. Sometimes it's smaller and placed under the wing base, but sometimes it's larger and overlaps with the wing base. For the design, I think it looks better when it's larger and overlapped. So, I copied the original part and added wider base + some detailing. Now I'll need to cut out the underside wing-base to fit this in.
Also re-worked the top side of foot metal parts for better fit and smoother motion.
This took me a whole day.. I tried 2 different method i thought would work, but the rotation and the actuator cylinder length didn't work out. So I ended up adding a shift on the top. Now it works with piston action and all! Also added circle marks on the wheel side. I had to loose the torque links thou. I'll find a way to put them back.
I've been thinking about how to strengthen the weak shoulder hinge. Well, nothing works better than metal for this! Added metal backing inside the weak hinge cover and fixed it with 4 screws! Also added metal rod inside the ball joint connection. I think it's good now. I only need to make 3 more to fix my other broken shoulders...
That's all for this weekend.