
kyekye
-
Posts
619 -
Joined
-
Last visited
Content Type
Profiles
Forums
Events
Gallery
Posts posted by kyekye
-
-
This is great. Looking forward to this. Will you be planning on adding the full armour parts eventually? You will need to be careful which parts you glue.
Eventually, yes. Ozma VF-25S will look better with Armored Pack which is not announced yet. So I'll wait for that and prepare the kit for it.

For my VF-25F, I didn't glue most of parts yet for super pack which will come out sometime next month. Also I left some parts un-modified (such as gaps between parts) because I was afraid those might needed for Super pack.
We will see.

-
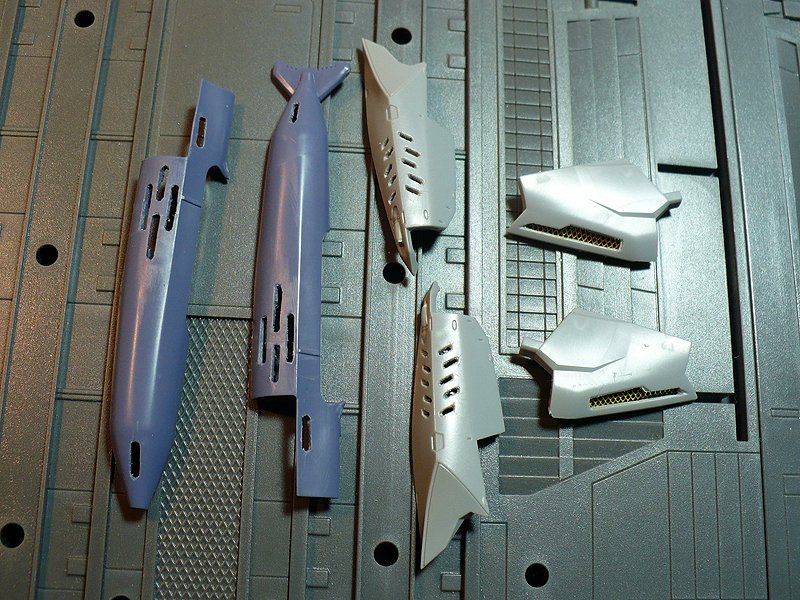
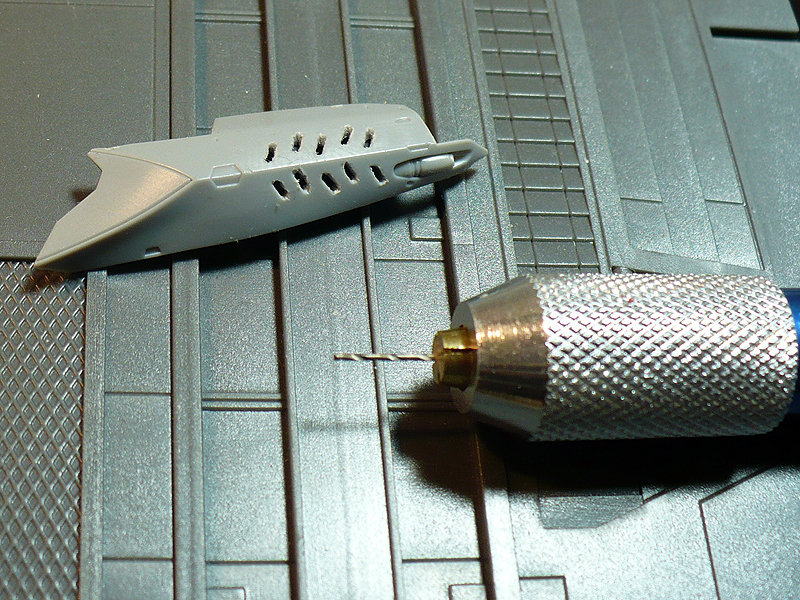
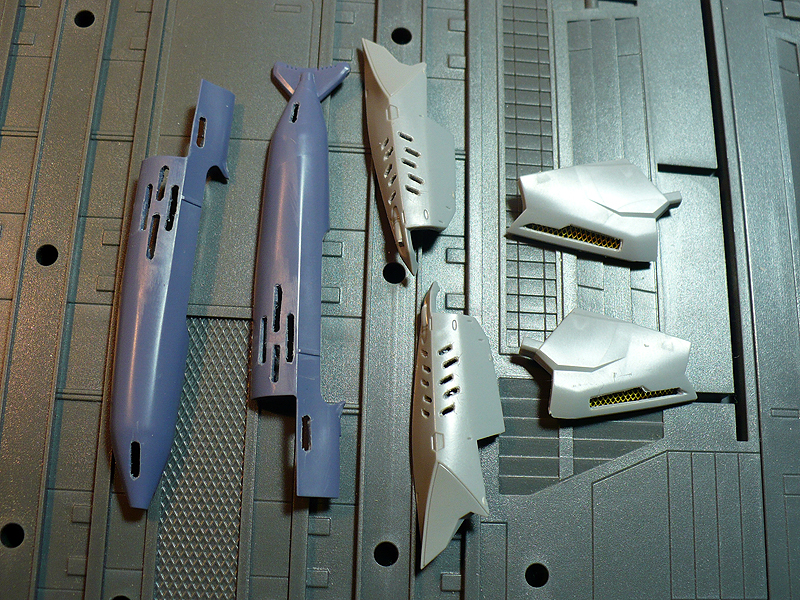
Actually I already spent a couple of days on this kit. So I took some pictures of my progress.
Using the pinvice, I made the machinegun grill holes. These are angled, so you need to make holes at the each end and cut in between. I still need to sand them and make them clean, but these are quite small to sand nicely. I'll see what i can do..
I'm also going to replace the gun with metal parts. (I need some suggestion here. My last attempt with metal tube layers didn't look good enough)
With the same method, continue with gunpod parts and chest intake parts. For the chest intake, I'm using the same photo etching parts i used on my VF-25F (Alto's). It's already primed with metal primer.

-
As I commented in my earlier topic, I'll post my progress as I go this time.
Almost finished VF-25F - Basic mod
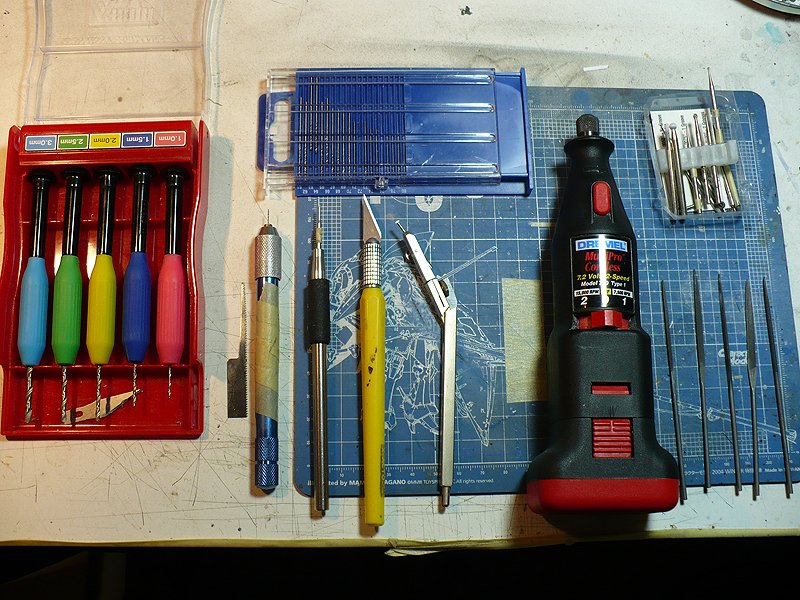
First of all, I'll introduce my frequently used tools.
- Mr. Hobby basic Pinvice set
- Pinvice for Smaller size drill bits
- Mini Drill bits
- Engraver/puncher
- Exacto Knife
- Line Engraver
- Dremel Motor tool
- Various Dremel bits
- mini file set
-
i want to but i am building both hands at the same time and i only have time after putting my 8 month old son to bed. so at best i have 2 hours of working time a night and 1 finger takes about 1.5 hours to build. if you want i can show every one the design drawnings so you can try build it yourself too.
right now i have 2 2/3 fingers completed. it's been a hard week for my wife and me.
but because of your comment about the chest intake i am going to give that mod a try too.
Haha No pressure
 . I know how it's like to work on hobby at night . I'm in the same boat.
 -
is there any progress pic on how you did all your mods? love the work you did man

I don't have WIP images for this one (Alto's VF-25F), but I can do a WIP for Ozma which I'm making now. Give me some time to take pictures
-
All the details make it look much better! That's where building gets separated from art. Great job! - MT
Nah. nothing beats your 6'-0" Daedalus.
That's some serious stuff. If you happen to know any source for tapered metal head lasergun replacement parts, please let me know.
-
Any update yet on the fingers? Show me your hand!
-
Just the mods to the landing gear are IMO great that was one area I think that Bandai needed to get better.
Overall a Great set of enhancements to an already good kit.
Bravo!!
Thanks! I'll update the images as I find solutions to some of my problems I mentioned on the top. I found a solution for hip gun pieces, so I'm working on that now.
Your VF-25 Alto looks amazing!! So does the hangar bay you have it displayed in too and my favorite mode of the VF-25 has to be its Gerwalk mode, super sleek & Sexy!!!
Thanks. The hanger bay is just Kotobukiya build bases I use for photo shooting. Usually I use Hasegawa Macross stand for Valkyrie fighters display. but I can't use it for this one since the wings are folding. Gerwalk is also my favorite form as well.
 Thats looking really good. I gotta get back onto my Ozma soon. But im suck into a 1/32 flanker at the moment.
Su 27B? That's awesome. I heard it has serious mold details. I started my Ozma basic mode. I'm thinking about running a WIP if anybody is interested.
rock on......this kit surely kick a$$.....details are great and painting is a winner!!!Thanks. Actually I now see some mistakes (like some edges need more sanding..etc) I need to be more careful on cleaning parts. It's just hard to see those when I only work at nights....
-
WoW! Absolutely fantastic build, definitely one of the better builds I've seen - really great work, especially those tiny nozzle replacements and the clear lenses for the lights, it really adds a lot to the overall impact!
What were the tiny nozzles used? They look really great.
So did you paint it white? or did you just clear coat the white plastic, couldn't really tell as there were some seams, but the finish was just too good to be bare plastic... great job!
The chipping on the decals really worries me, seeing yours doesn't bode well for my build - I really don't think there is any way around it... just transform it less and get multiples to leave in the various modes. I plan on hand brushing additional coats of clearcoats over the edges of the really problematic areas before I transform it, but it would just delay the inevitable.
Great warning stenciling decals peppered throughout the aircraft - really good placement too, very realistic. Keep it up, can't wait to see more!
I love that you etched/engraved a panel line within the thickness of the chestpiece to reduce the monolithic thickness of the part, it really adds to the realism, I'm too chicken to do that to mine, that's one mode I wished I really did but when it came down to it, I just good cold feet. Kudos to you! and it turned out great! Another area that you did that turned out awesome was the chest intakes, another thing I was too chicken to do (these Gundam models seem so foreign to me - I've never built one before and the transformation process seems so complicated with all the moving parts, that I was intimidated to do much modding).
Wow! Lots of compliments from wm cheng. Thanks!
For the metal nozzle parts, I used metal tube beads and Stainless Steel Balls. I get them from 'Mechaskunk' and also a Korean site called 'modelup'. They have many metal and glass option parts. modelup's metal tubes actually have better edge cut. That's the one i used on front top and wing edges.
For the paint, It's actually lots of layers. The photo just came out a bit too bright under sunlight from window. The actual color has blue-ish grey under tone.
The Base layer was lacqer blue grey (Mr. Hobby Navy blue + Medium Blue + SuperWhite) same color as the joints basically.
And I did different layers of superwhite (Mr. Hobby) on top. Most parts are 2-coat, but the nose and front bottom I did 3 coats. So they look more ivory white (kinda like old Phantom F-4). And then Lacqer Clear coat, and then lining with enamel (dark earth for joints and dirty brown for whites) + decals. And then Top coat (Mr. Hobby Acrylic).
Yeah. the chipping on the decal.... If I do 1-2 more acrylic top coat, maybe it will protect it better. currently I didn't glue all the parts yet (that's why you can see some seams) I need to figure out a couple of things before I finalize this kit and move onto Ozma's.
The warning decals are mostly leftover from hasegawa VF-1 kits. They always come in handy
The photo etching on chest was actually my second choice. Originally i planned to use strip with straight lines, but I just couldn't fit them correctly at an odd angle..
Thanks for your kind comments. I'm also following your step by step mod. It's always great to see other people's different approach!
P.S.: My magnet positions are slightly different from yours but pretty close
. Originally I pushed them in and cover the surface with putty, but it half the magnet power, so I ended up exposing them. (I did paint them with metal primer and super white -
Great build! I like how you painted the colours for the chest and shoulder area even round the edges of the piece. I think I really improves the look of the Valk!
Yeah. The decal only covers the top of those puzzle pieces. So when you put it in Fighter form, it shows white edges. I hated it, so made a lines around them and painted the sides. The pieces are tiny thou. I poked my fingers a couple of times with engraver....

-
then i think my mod will come to late, because right now i am working on a hand mod. my vf25 will have fully articulated hands.
Oh well, then.
Bandai is putting out the rest of VF-25s and also Super Packs around Feb - March, and I'll be building them all one at a time. You are more of a 'focused on one model' type, so I'll check out your 'simpler landing gear mod' whenever you're done with it. Maybe I can apply it to Ruka's VF-25 later
-
great build, looks great
i am also thinking about doing a landinggear mod. if i get it to work then i will only need to cut the white part out of the landingbay. if you'r interrested i can tell and maybe show you how i want to do it.
Thanks.
The reason I gave up on landing gear mod was mostly due to the article from Dengeki Hobby Magazine January issue. The mod was too much to make it work, the modeler had to cut out a big section and extend some parts. I thought that was too much on 'already complicated' transforming mechanism'.
If you find out simpler way of doing the landing gear mod, I will certainly use it for my next Ozma VF-25S which I already started
-
That is pretty awesome what you did, especially the chest's intakes and clear parts. But by the way, you did mention paint chipping but is that what it is on the left shoulder area?
Still, I really like this one. (takes some notes.)
That's the most wearing area so far. You need to put shoulder together and shove them in the tight back armor area. Lots of friction. Top coating (Acrylic) doesn't protect it either. I was seriously thinking about using Urethan coating.
But again, I'll fix whatever damage it gets before putting it into my display case. So i don't worry about it too much
Some clear parts also need more trimming. Some of them are so tiny, and I only noticed it while taking pictures.
-
Wasn't disgraceful, I kind of got what he's doing. That part he's showing off looks like it's for the neck joint. I dunno what's so different about it other than the fact it's a little more blocky looking compared to Bandai's mold of the neck joint.
The image name says it's fingers. So I'm guessing it's articulating finger mod. The fingers are tiny, so camera can't get too close even with MACRO, i guess.
-
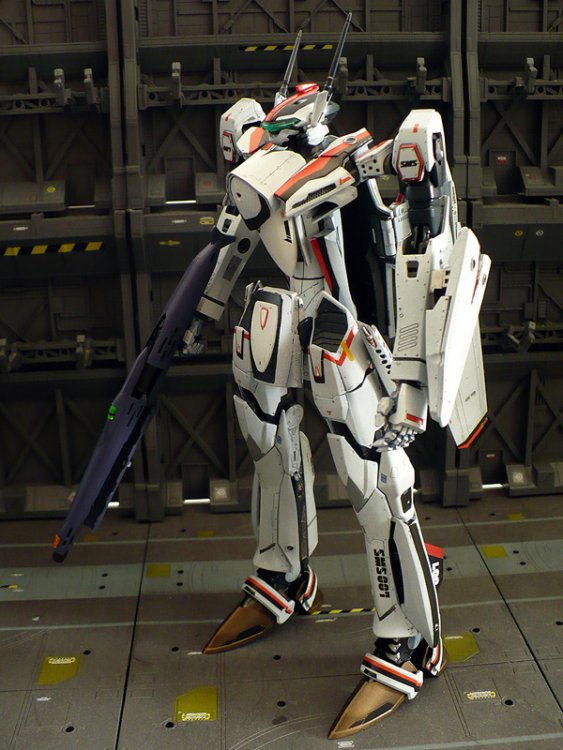
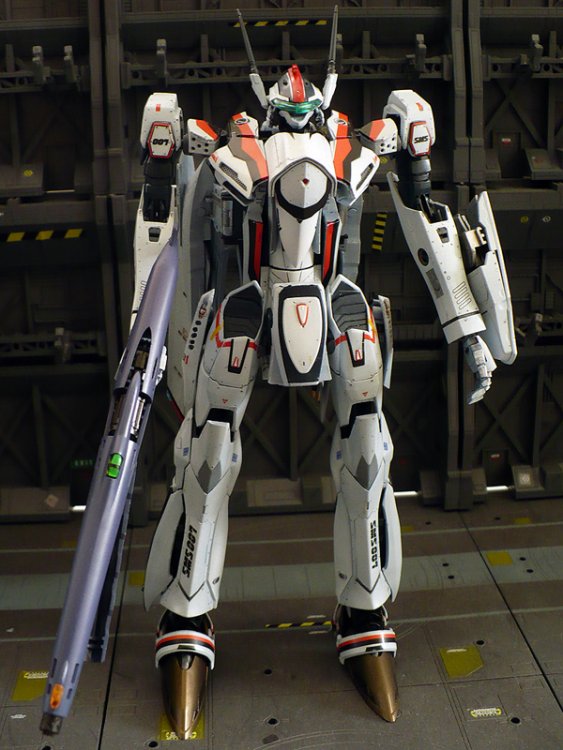
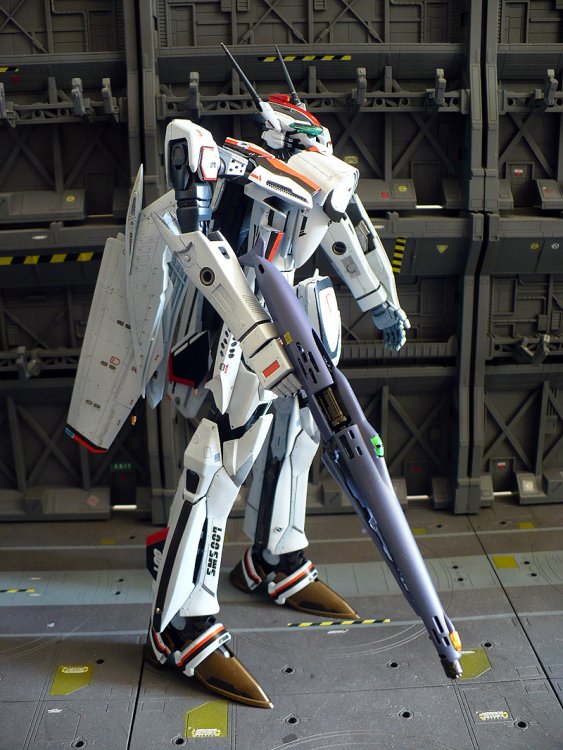
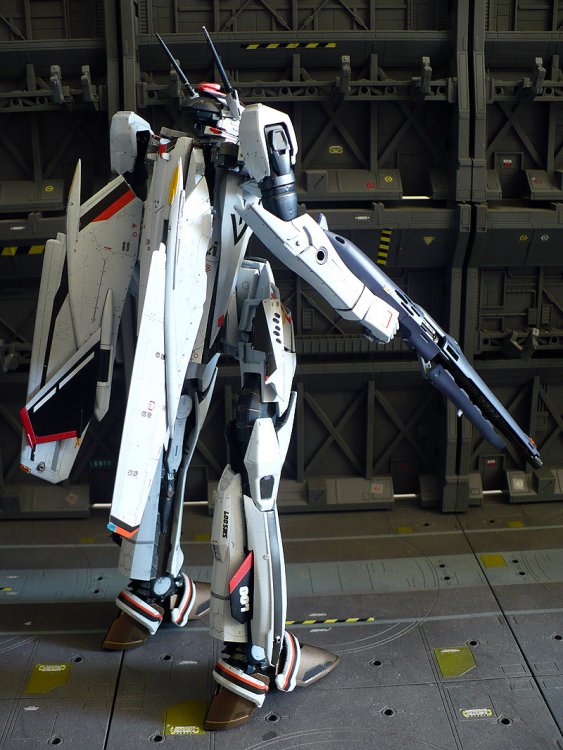
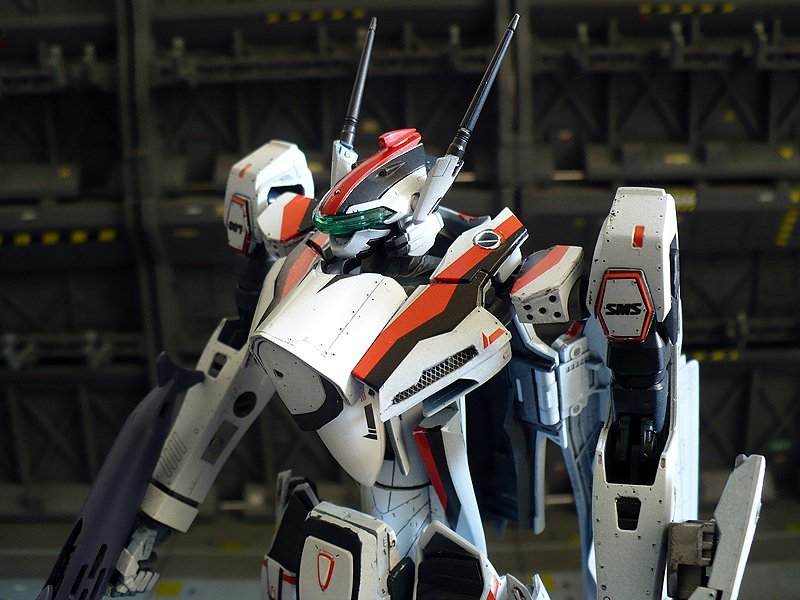
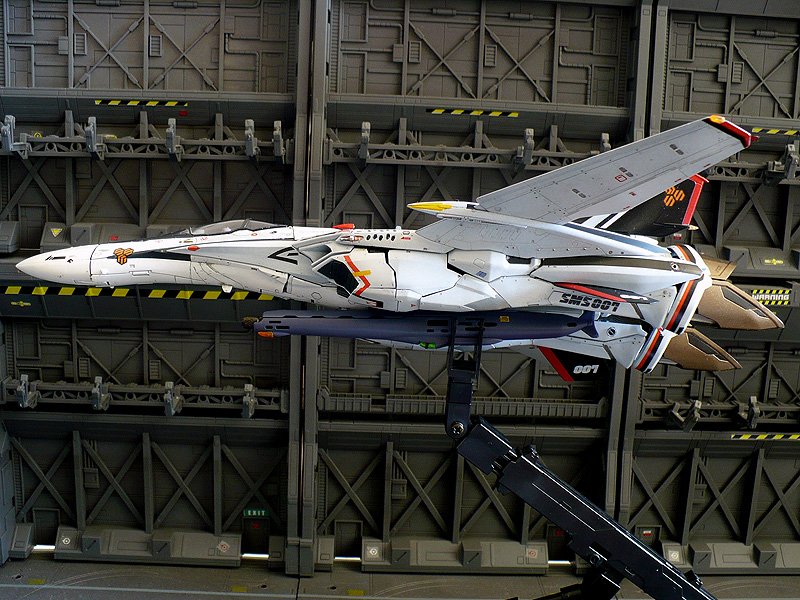
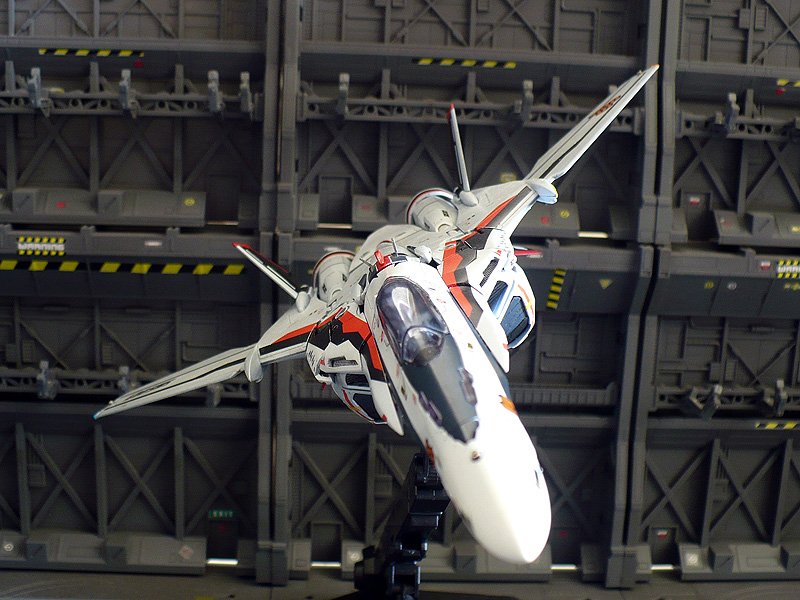
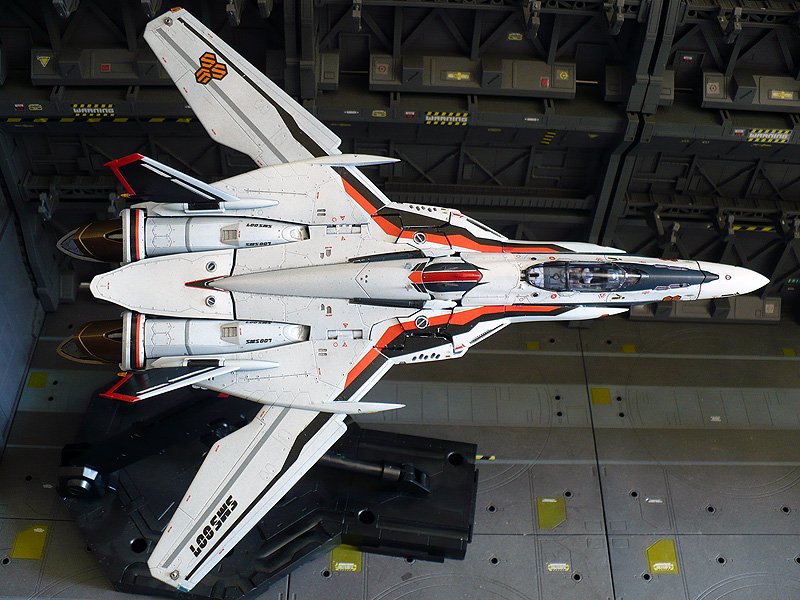
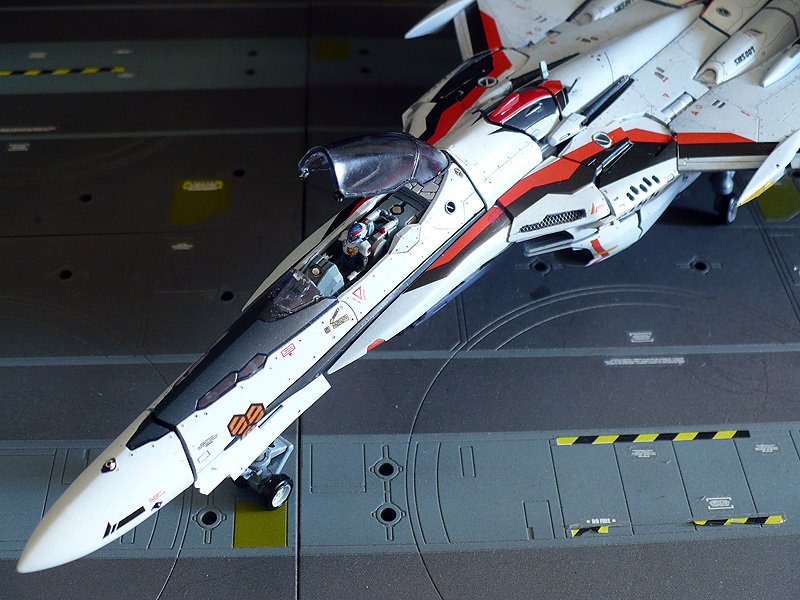
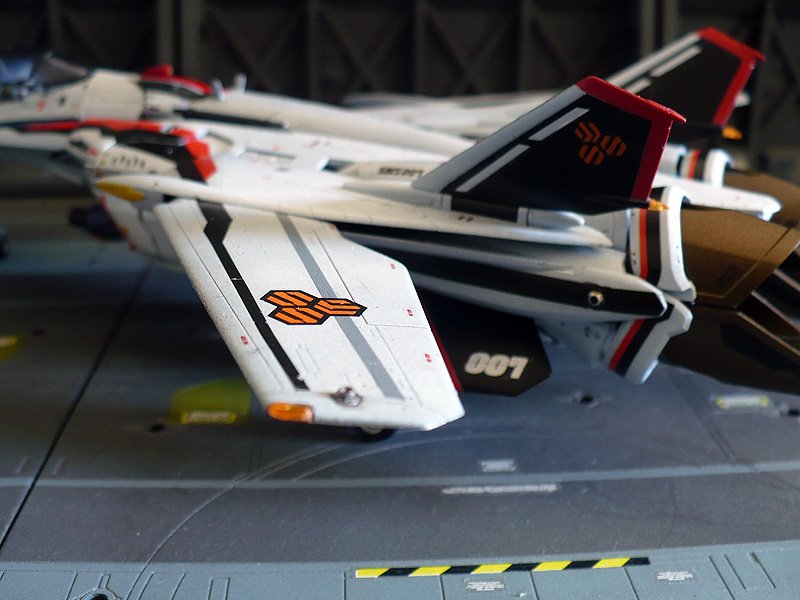
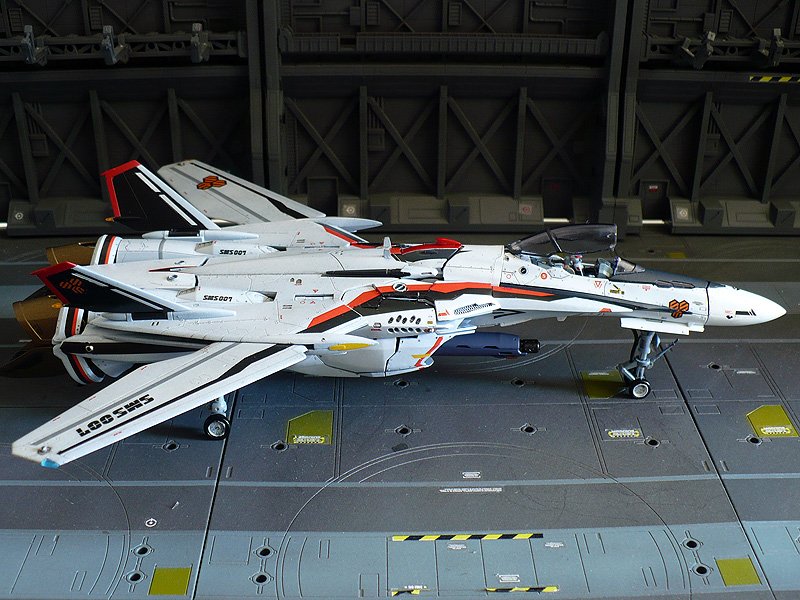
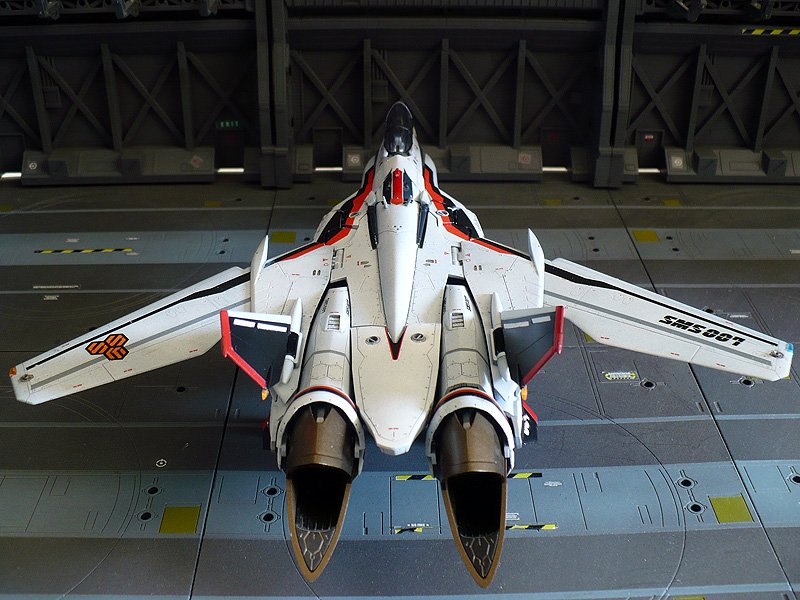
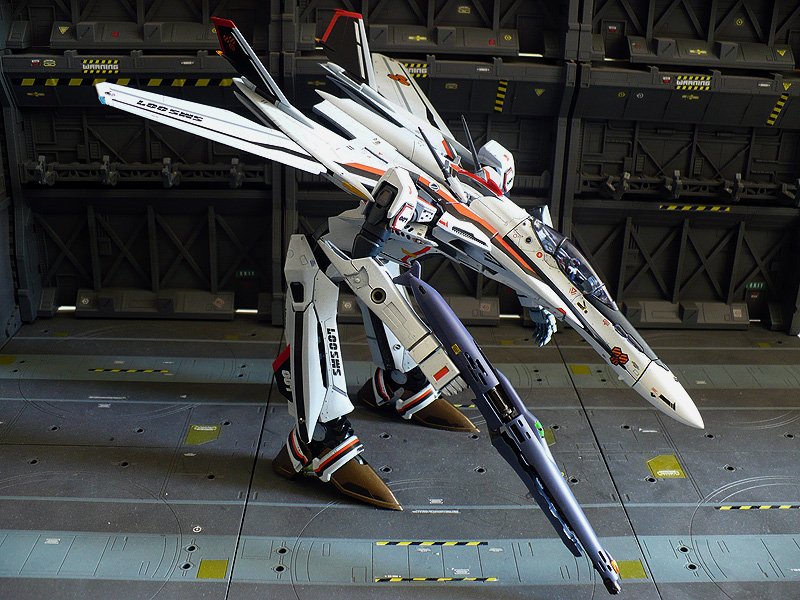
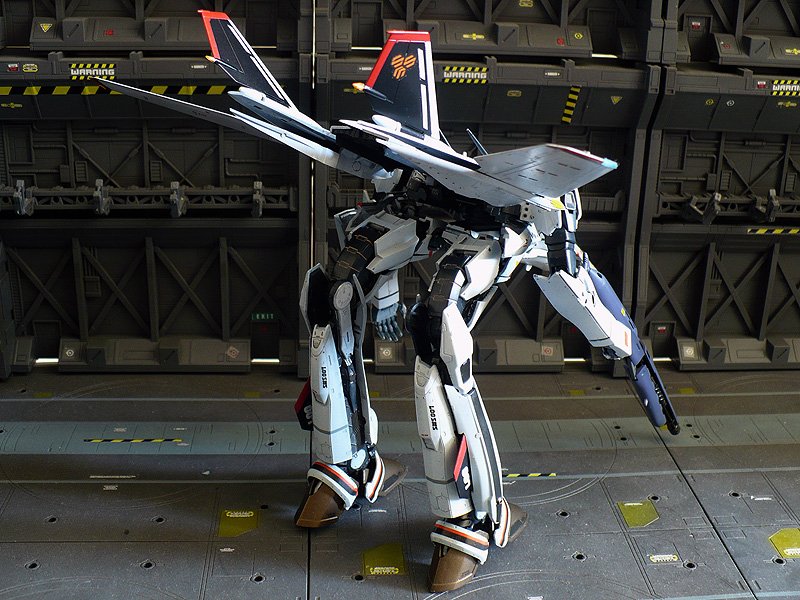
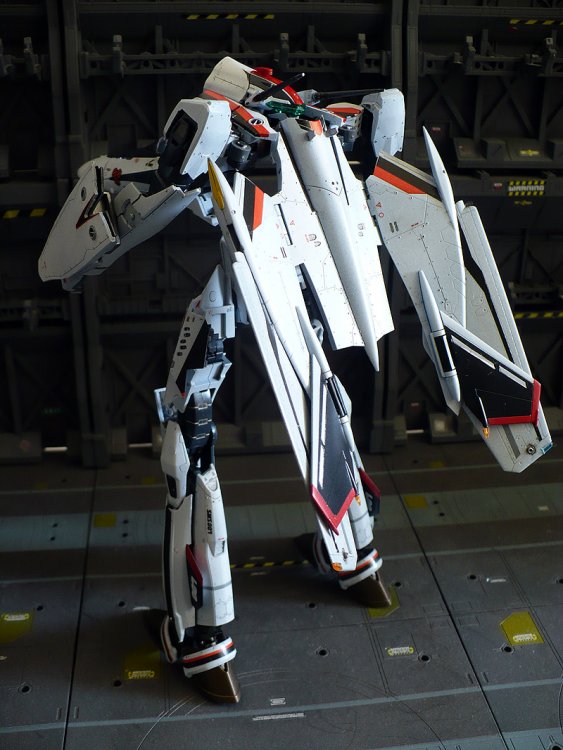
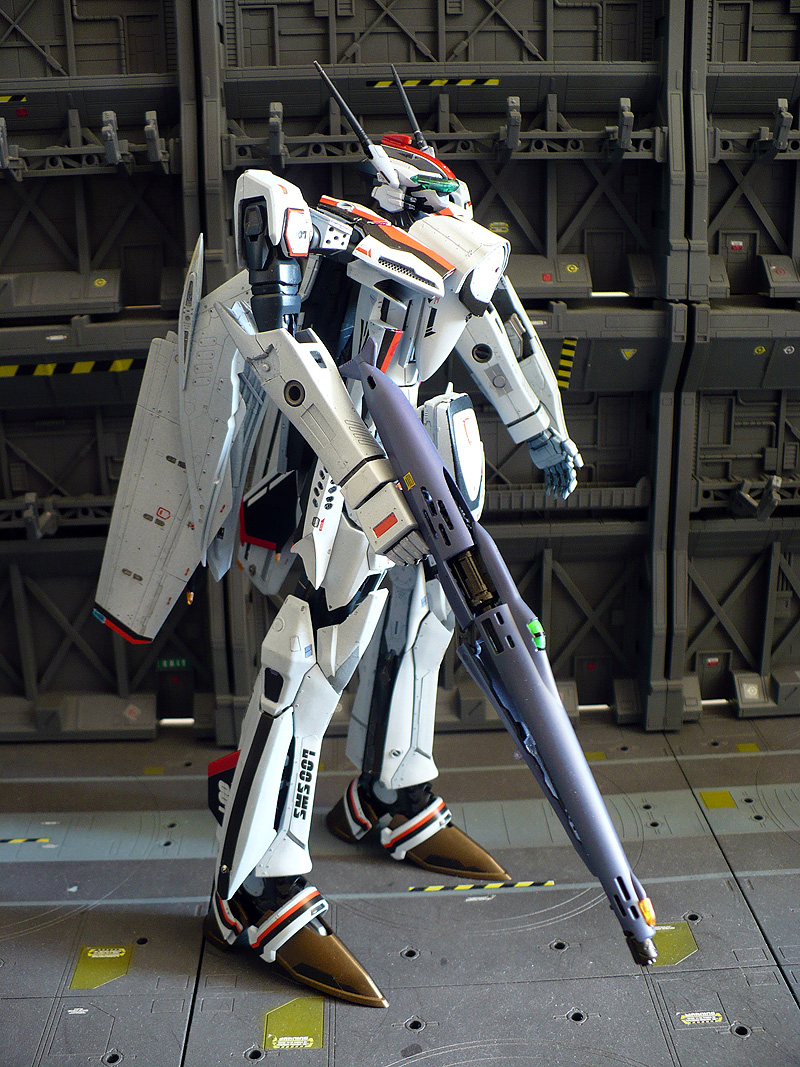
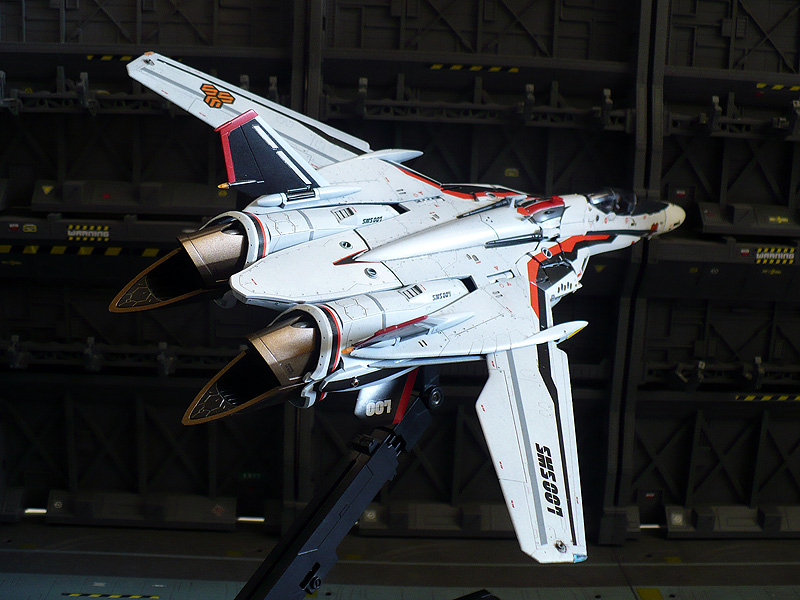
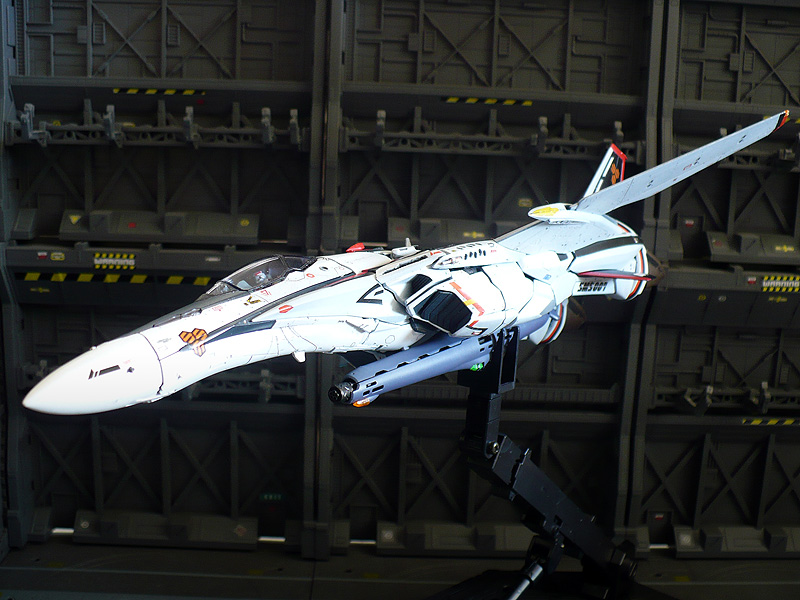
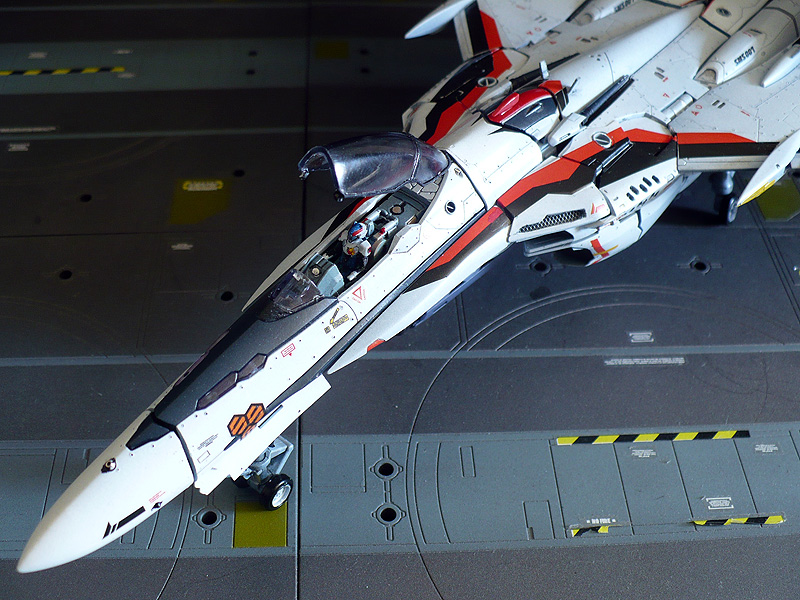
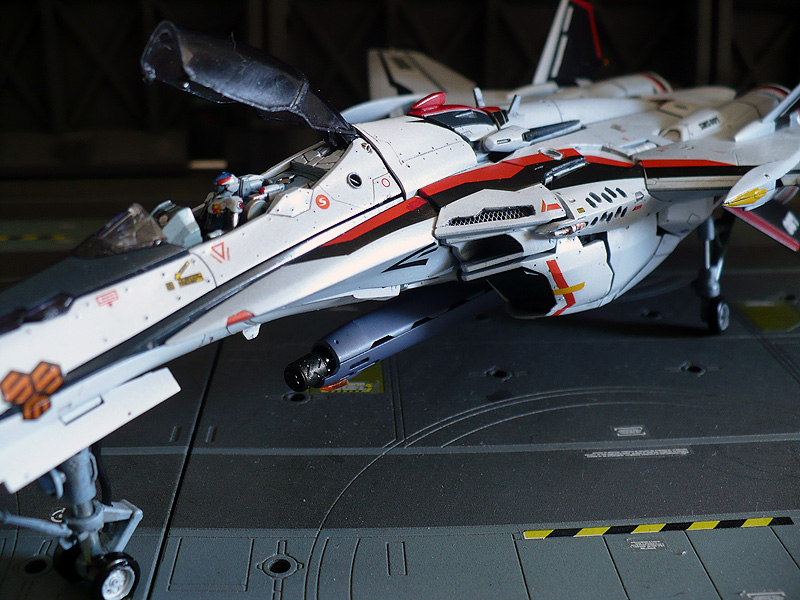
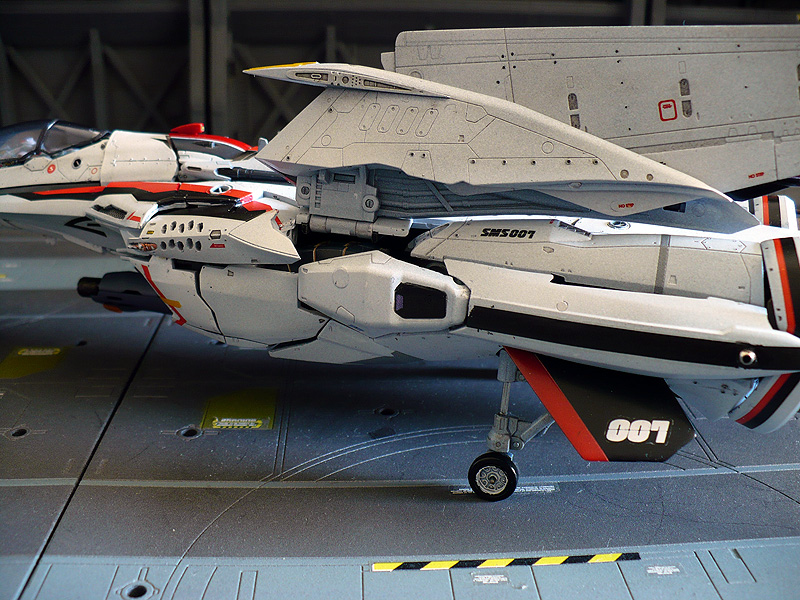
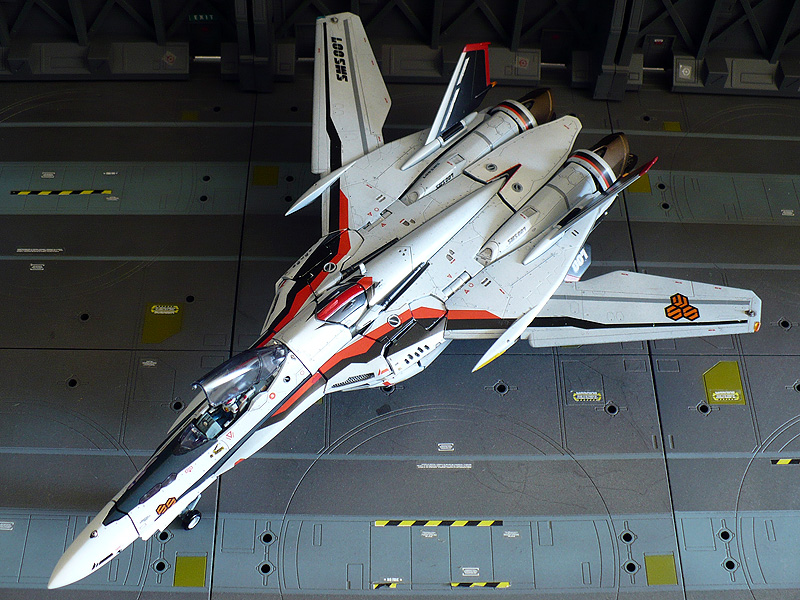
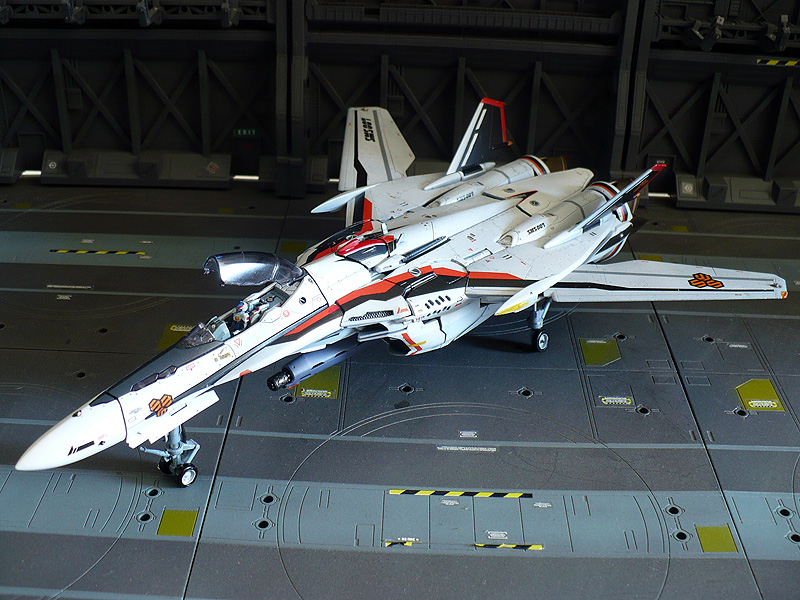
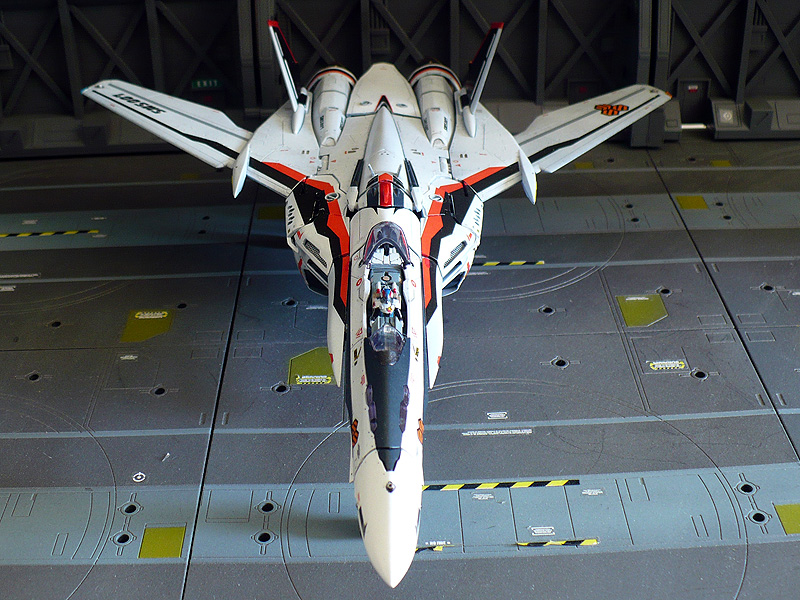
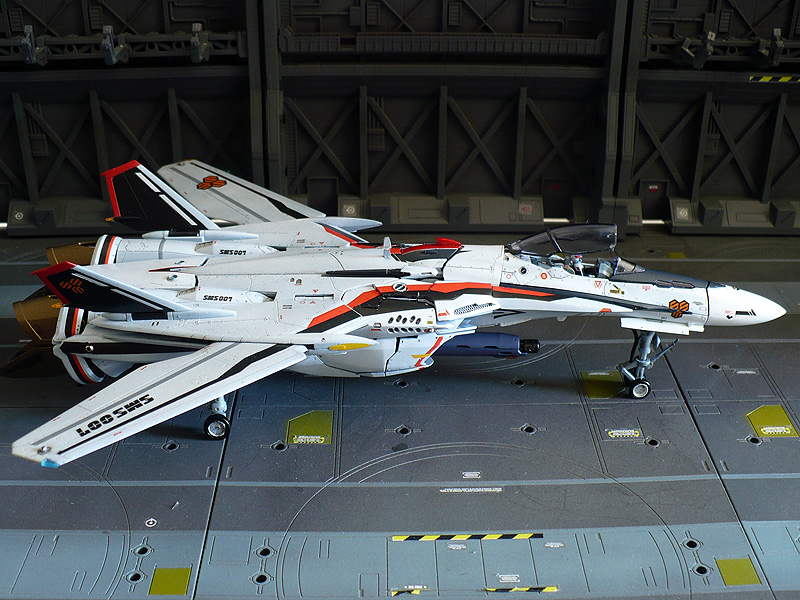
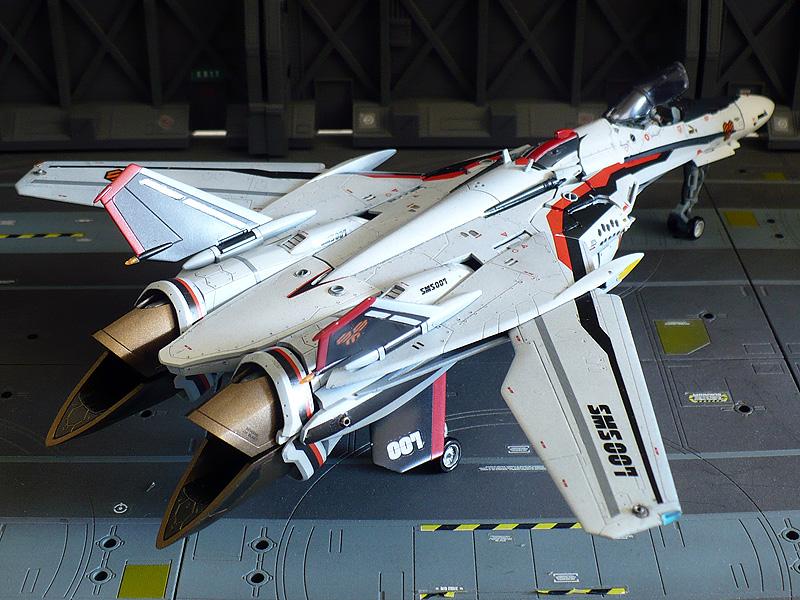
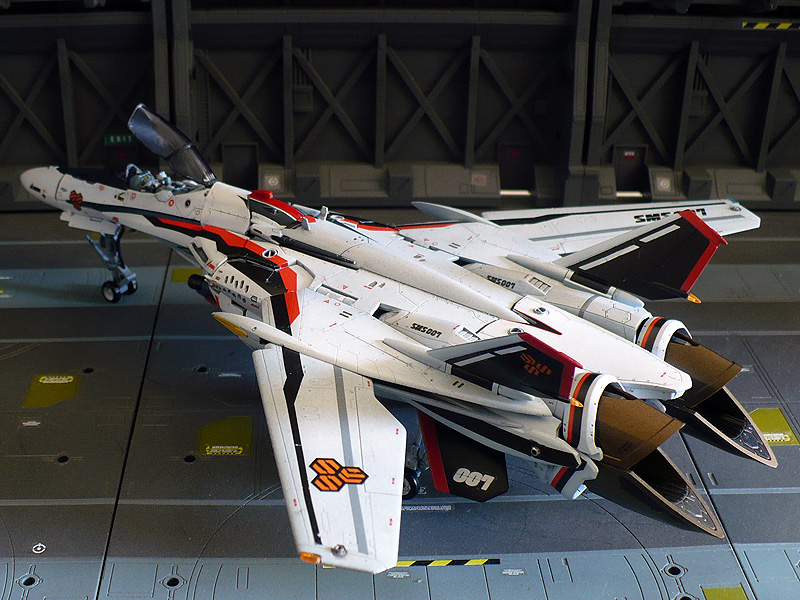
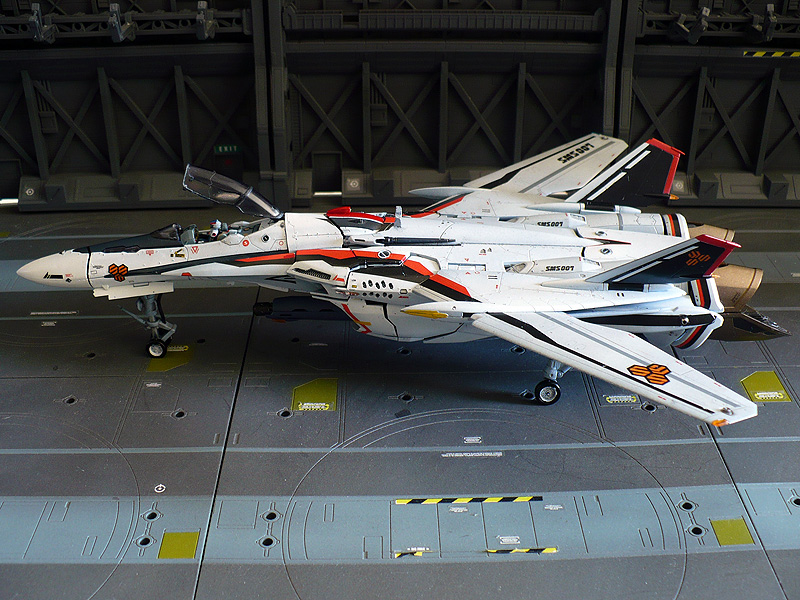
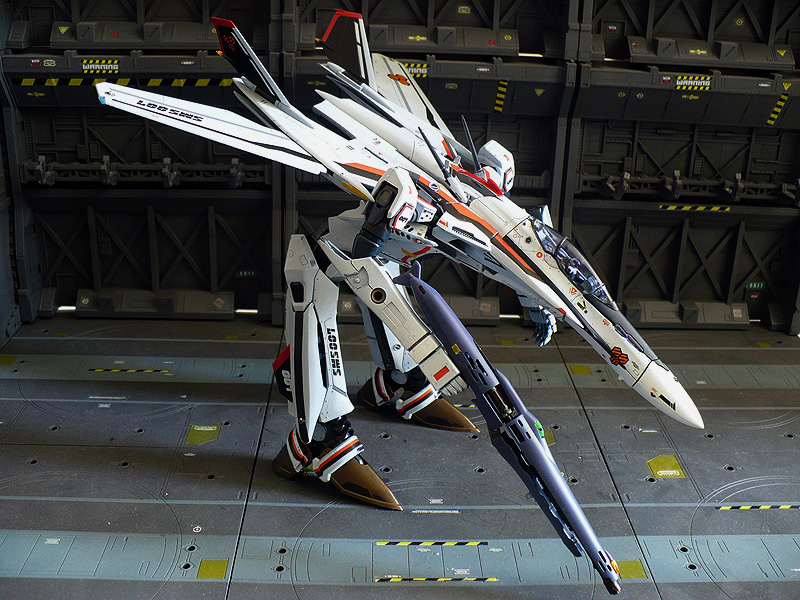
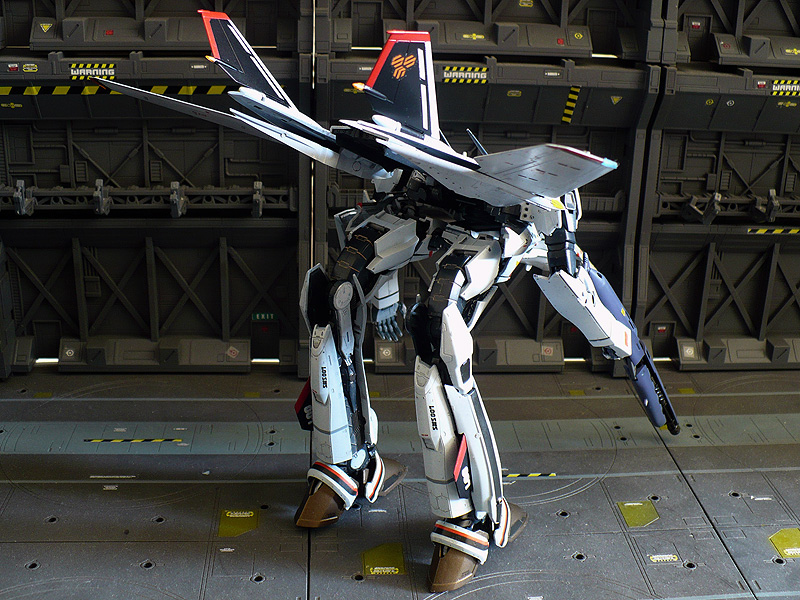
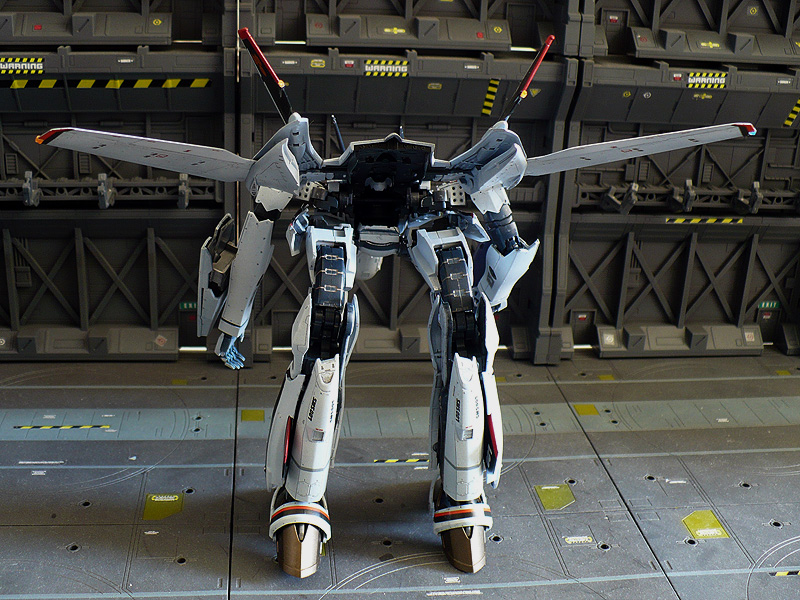
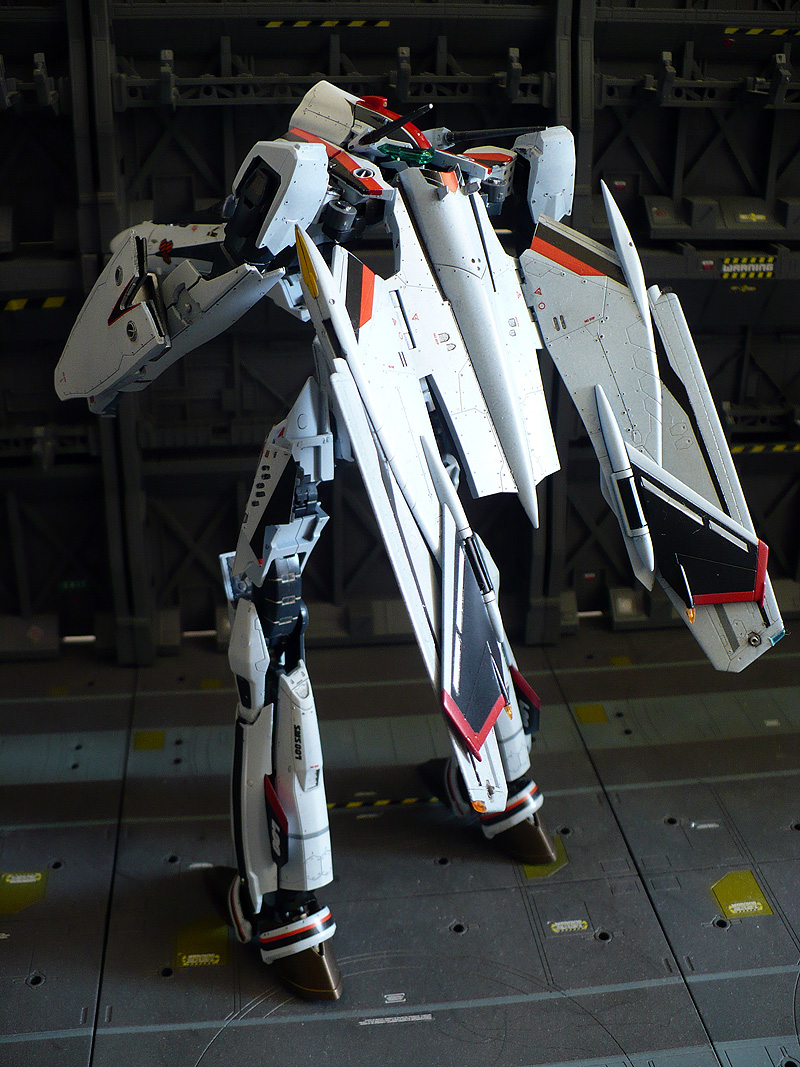
Since wm cheng is already doing a fantastic WIP, I guess I can just post my almost finished VF-25F Bandai Model kit images.
So far, i put in about 3 weeks (just nights holidays and weekends).
1st week was spent for parts cleaning/cutting, making clear parts, punching holes and fitting custom parts.2nd week was spent for adding magnets and other metal parts/etching parts3rd week was all painting!I really wanted to do the landing gear mod, but I just couldn't find room to fit them in without sacrificing some other stuff. So I gave up on that.
Here are the stuff I modified so far. Most of modification idea came from various magazines (mostly HJ Nov issue) and other build samples.
I've transformed it back and forth many times already. so some paint and decal got scratched off.. I will fix it later along with canopy future treatment when I'm almost done playing with it
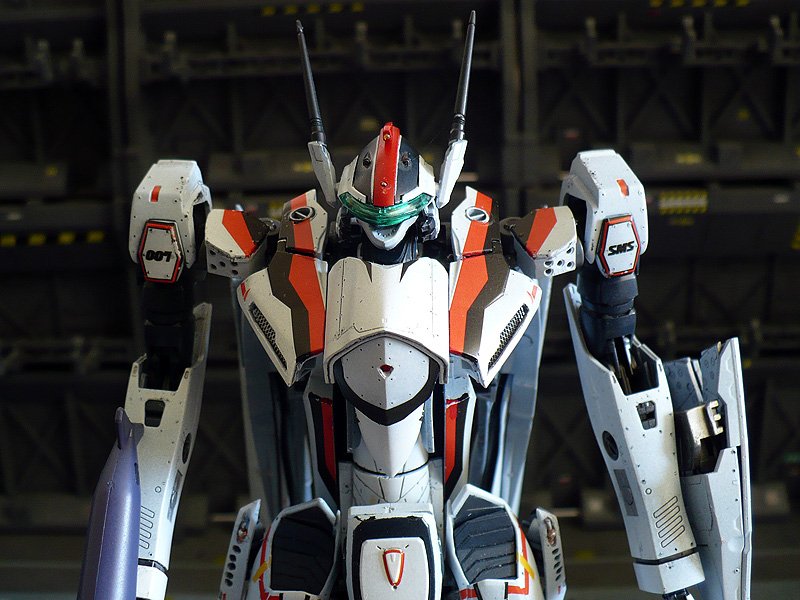
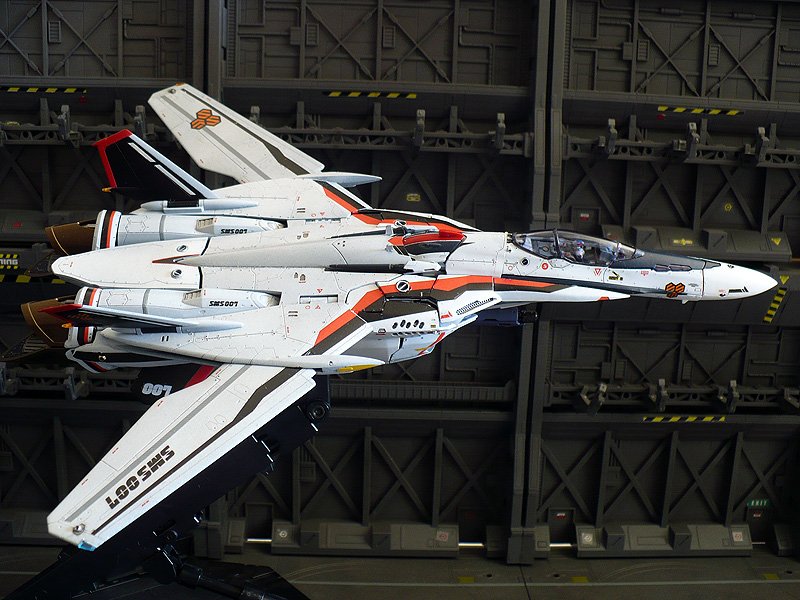
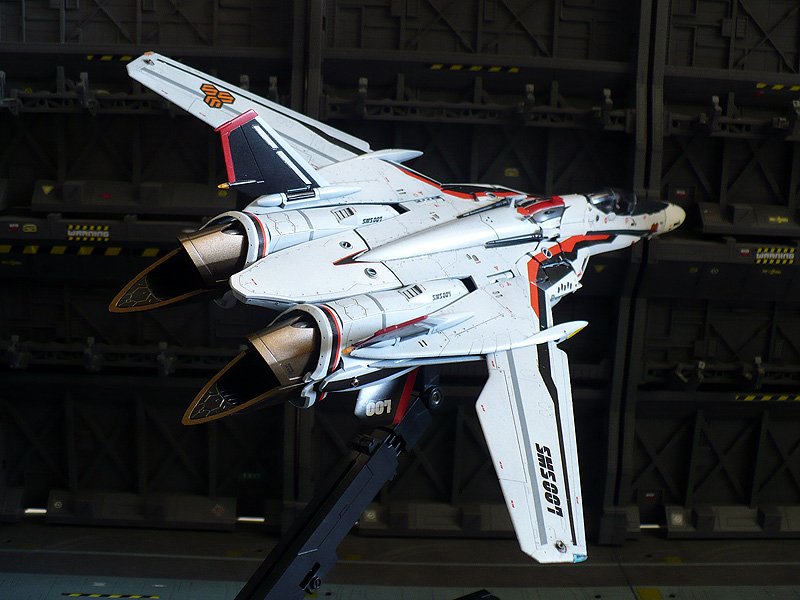
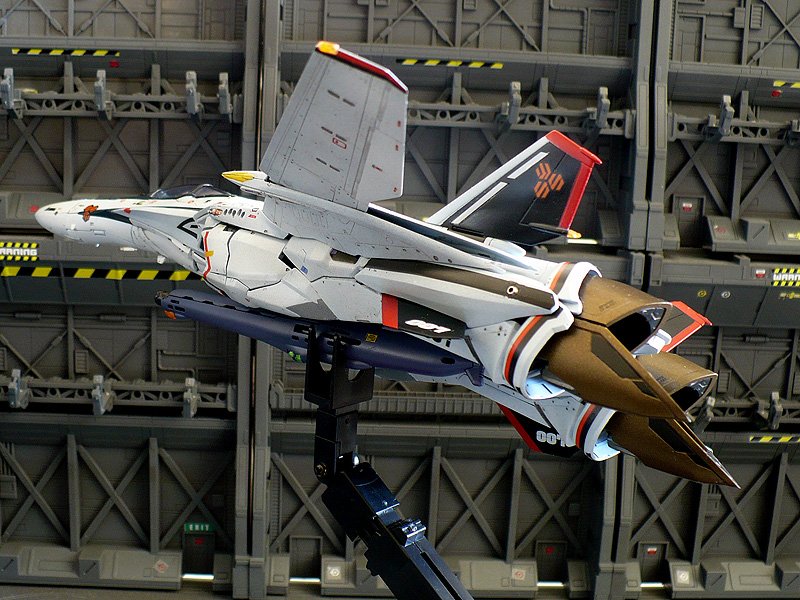
*Overall: rivet holes. All circle 'Maruichi' molds are replaced with option parts
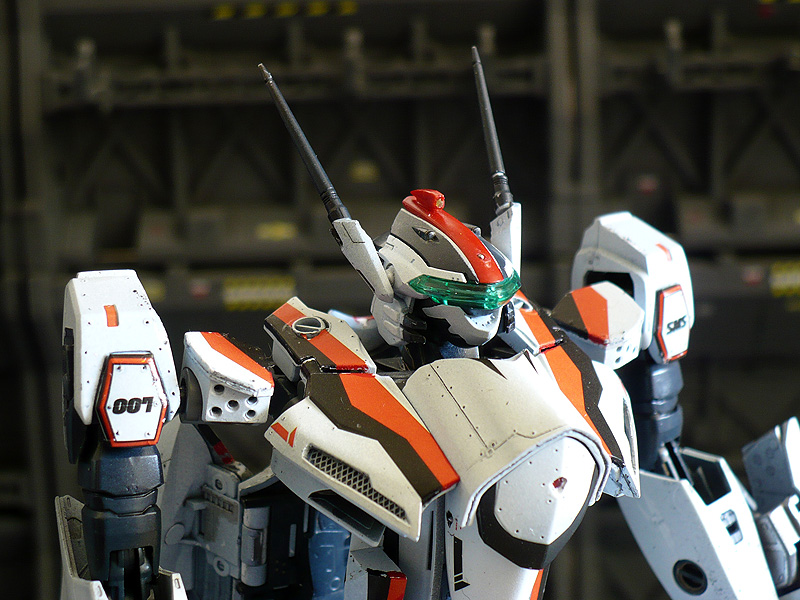
*Head: metal ball sensor. glear green lens on top duct.
*Chest: intake hole/metal etching grill. center red glass lens, pieces side lines engraving
*Arms : Lower arm mod to hold gunpod. Magnet mod. shoulder-holes punched
*Legs/wings : metal option nozzle parts. clear lamp parts, metal machine gun parts. puch through machine gun grill parts. Major Magnet mod.
*Cockpit: added hinge and small pin for canopy opening.
*Gunpod : all gas grill holes punch through. clear lens replacements. Barrel tip mod. Grip mod for under-mounting. Mini-peg for under-mounting.
*Landing gears : option tube/metal parts and lens replacements.
Stuff left to do and fix....
*First of all, I need to find a way to fit the last puzzle piece in right position. That's the machinegun side panel. It's always loose in different ways.
*Head laser metal mod. (one of them broke when i was transforming/turning) I temporarily fixed it by inserting metal rod, but I want to find a metal option parts to replace them.
*Side machinegun mod. I made them with metal rod and tube, but was never happy with them. I need some suggestion.
*The shield circular option part I used was too thick. I'll need to sand them a little or find parts with less thickness.
Anyways, here are the images from today.


-
That guy glued the shield parts with knife in it!! LOL!
No knife for him
He also says the hands are a bit loose and hard to pose with legs open.. I'll have to see it myself.
Ozma is planned for November....
-
Just got mine, and transformed it back and forth.
a couple of things to be careful! (and not described in manual..)
1. sliding engine pack foward is fine, but sliding it back to original position is pain in the %^7#
 !! There is small pin holding it in position, but it just won't let go when you pull it back. lift it a little and slide back. (need some force. i thought i was breaking mine..
  )
)2. attaching the fastpack is also painful process. Specially with stand attachment. It just doesn't make sense logically
 . So, you need some wiggling back and forth to make it fit.
3. Also, it's very hard to put legs back in for Fighter mode. Legs have to in exact rotation angle to fit the bottom cover in good lock position. This needs some practice
Overall, it's very solid piece of work.
-
Man, I'm already at about step 10.
I feel like the fat girl crying in the shower while eating donuts.
:wacko: :wacko:I'm between Step 5 and 6...


Bandai 1/72 VF-25S Ozma WIP
in The Workshop!
Posted
My next mod is 'red lens' parts.
For Alto's, I only used it for chest piece, but Ozma's VF-25s, I used on 2 places.
One is the same chest piece, and the sencond is the head sensor.
First I cut out the shape and make a place for it from back of the parts using round dremel tip. It should be just enough for the lens to sit in but must not break the cut-out shape from outside.
I found this mini red glass parts at the craft shop. (ones that's used for decorating dolls and other girly stuff , i guess..)
Also this time, I added chest piece section detail with rivet holes (vs. edge line i had on my Alto's VF-25F ). I think this makes it more like airplane.
Head canon (or sensor?) is also drilled out and replaced with metal bead. All the parts are not glued yet since I gotta paint the parts sepaartely.