-
Posts
619 -
Joined
-
Last visited
Content Type
Profiles
Forums
Events
Gallery
Posts posted by kyekye
-
-
waw really love the mods

i aslo have this kit, and i might try the mods shown here

anyway any upd8s for this

I put a hold on this because....
A: Bandai screwed up super pack by making it parts swap, not add-on. and this leads to my 2nd problem...
B: If they do the same for Armored pack, then most of my mod will be replaced by add-on/swap parts pack...
So, no progress until more details are announced for armored pack. Ozma gotta have his armored pack! Some of the new prototype images look bi#ching!!!
Also maybe some hobby magazine will show a super pack mod that can be added-on instead of parts swap. Maybe that will enlighten me!

BTW, I'm starting on my VF-25G Michael Custom with Super pack, so I'll start posting the WIP for that for the time being.
Sorry about that folks...

-
I'm sorry but I don't speak english very well

Did you use this method to do your panel lines? http://www.gamerabaenre.com/panel_line_wash.htm
Did you use black paint or maybe grey?
I really like that we can barely see your panel lines. Mine are really big

Thanks for your reply!
Oh so you meant the actual model images. Yeah. I do primer-> sanding->laquer paint->laquer clear coat-> enamel panel lines.
I use dark brown (earth tone+little bit of black) enamel for panel lines. I use enamel thinner to wash it.
For the dark color parts (like knee joints), i use lighter brown.
-
Lots of pics from the original sculpting contract company Heavy_Gauge
I have some problem with Sheryl's lipline and eyebrowse, but the others look pretty good.

-
Can you explain me how do you make your panel lines so thin?
Thanks
If you are asking about the actual kit, i didn't do anything special. There are some new panel lines I made with engraver, but I'm not sure if you meant that. other lines, I guess, got thinner after layers of paints.
If you're talking about the lines on the painting, that's just brush lines
 I use Cintiq, so I can draw on minitor with thin brushes in Photoshop.
I hope this answers your question?
-
You are a true artist.
If i may ask, what software did you use?
All Photoshop. With layers and my custom brushes
 I was using painter for a while, but switched to Photoshop a while ago.
I heard Painter is pretty good nowadays.
-
I can never find anyone on Yahoo Japan auctions that is willing to ship outside of Japan. I also have to register my old japanese address. Does anyone else have the same problems?
I've been using this service for a while now.
They chatge you some fees and shipping (both domestic - ship to them- and international ship to you) So, Only use it when you think it's worth it.
-
Go here
http://auctions.yahoo.co.jp/jp/0-category.html
Use the following key words to search in
マクロス : Macross
ステッカー : Sticker
シール : Seal
デカール : Decal
You might find something interesting.
Good luck hunting.

-
For the Macross pin ups, top 3 are for...
-Spartan Destroid personal markings with squadron and name ranks. (like sylvester stalion
 , Afred Watkins..etc)
-Armored Valkyrie personal markings with squadron and name ranks.
-Monster personal markings with squadron and name ranks.
-

Holy crap! That's awesome, kyekye! Did you use your model as a reference for the perspective, or paint on top of a photo? if it's the former, I can't even put my admiration into words. If it's the latter, what an awesome way to make use of a real prop and achieve great results! Either way, incredible work!
Thanks for comment!
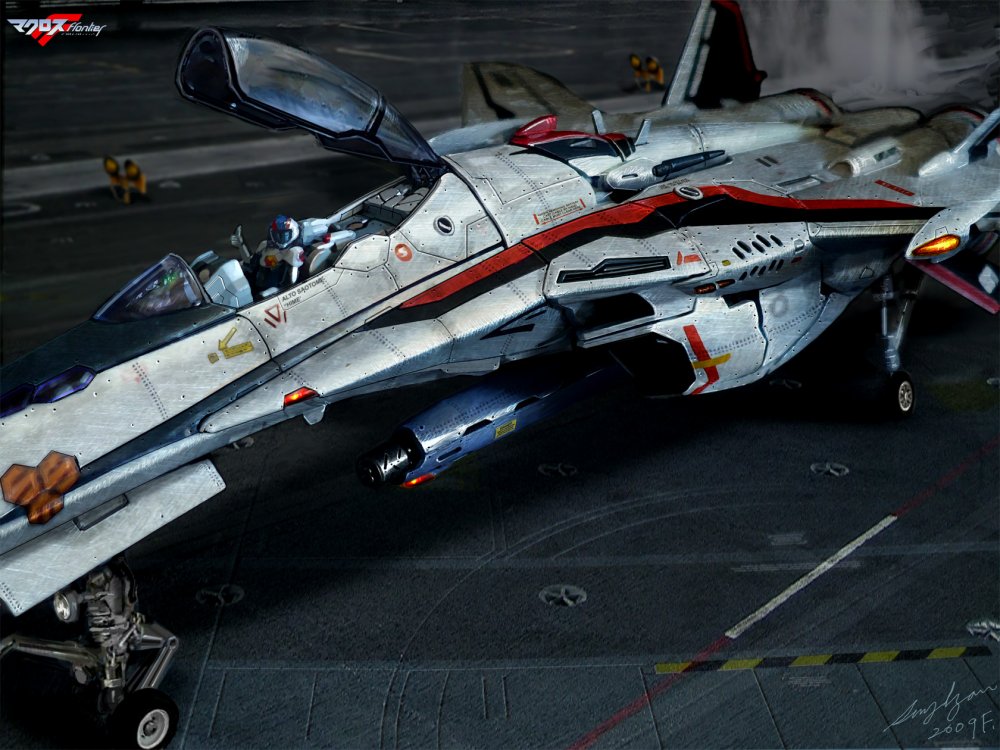
I've used one of my VF-25 picture (one from the 1st page of this thread) as a template, but this is complete paint-over. I left some of the background (front circle and panel details) because I got lazy and circles are hard to do with correct perspective.

-
-
Just a quick check on the magnet you are getting is it D201-N52 - D201-N521/8" dia. x 1/32" thick? There are a lot of types on this and not too sure on 1/8" you are mentioning..
plan to get those magnet back in Malaysia and have a try on my kits...it's going cost a bomb getting it deliver back to Malaysia

I'm using 'D21B-N52' for the most of parts.
-
here is my design of the main landingear for the vf25. it has a depth of about 4mm inside the leg. i have’t build most of the parts yet since i got sick befor i could even finish my hands.
been sick with the flu and neumonia.
hope to have pictures of the real parts soon.
Looks nice. What kind of material are you planning to use? 4mm is kinda almost touching the extension frame inside. You are planning to cut through 2 part pieces, but you will have to cap it with plastic sheet. The sample in model Graphix magazine shows a big surgery on the extension part to get enough space for landing gear and the cap sheet.
Real challenge is though the front landing gear, I guess.
I'd like to see the hands mod and landing gear mod. So get well and take some photos.
I'll be done with my afterhour project in 3 days, so I can continue on Ozma from this weekend. Yay!!

It is very discouraging though that the parts I moded will be replaecd by add-on parts from Super Pack
 (or Armored, if Bandai announce it
  )
)I'm pretty sure there will be some people to mod those replacement parts to be clip-on parts!

-
I am starting to question the same thing. The decal seems to be included on several auctions on yahoo.co.jp, but it is never seen in the box. Could it be that it is given separately with the kit? See attached picture. In that case unscrupulous sellers might sell it off separately.

On a positive note, here are some pictures I found on an auction and from Gespenst.
I believe it was 'store front' give away 'pack-in' deals. So it was NOT in the box, but you get it at the store.
-
One thing about the DX is that the parts actually lock together-- Maybe you could make similar peg and hole locks or use magnets in those positions? For example, I think the peg locking the lower legs to the wings would really help for the model kit.
Hmmm. The pegs might help locking parts in position , but it feels like it will fall into 'toy' category as soon as I add them. Magnets are better choice for models in my opinion. DX does have some small panel line fitting idea which I'm going to use.
Anyways, right now, I'm crazy busy with work, so I'll have to take 2 weeks break. Sorry about delay...

-
Nope, I didn't prime the parts with gloss black, however, they do look a lot better if you did that. Not even onto primer (which is recommended too) - I was in too much of a rush, it still turned out okay. With the Chrome or Polished Aluminum you must prime with gloss black first, but these darker colours (Steel & Dark Alumn.) you can get away with it if you're as lazy as me ;-)
Yeah, I was thinking of the canopy and going that route, but it will be so much more sanding (I hate sanding more than anything else!) and polishing, I haven't decided yet.
I originally planned to open up the cannon exhaust ports, but I got cold feet, I wanted to see if it would affect transformation first, then I got lazy... The biggest deal breaker for me is that I would have to thin the plastic down around the port openings so it would look like an aircraft skin in scale, the holes is easy, its thinning the surrounding openings evenly that is the trick to making it look "real". Its whenever you can see the thickness of the plastic that throws you out of the illusion of scale. Its not out of the question yet.
Thanks for the vote of confidence on the decals, my painting skills aren't THAT good - plus I'm just not into self torture! ;-) I LOVE decals, and I would use decals for everything if I could (I used decals for the Hasegawa VF-1's tailfins, that's how lazy I am!). I wished we had decals for the canopy frames - Hasegawa spoiled me!
Lastly, I don't think it's a vent in the picture, just some panel detail that I wanted to make silver (personal preference license). With all the metallic details hidden in the aircraft mode, I thought this was a good opportunity to liven the upper surface up a bit.
Sorry, no update this weekend... Happy Chinese New Year!!
Yay! Happy New Year!
-
i mean like this sorry only a picture in paint i don't have a better drawing program at work.
 ;
;Oh, i see now. That will require drilling through the aluminum rod. Sadly i don't have tool for that. Also I don't want to lock it in position yet. That will definitely improve the strength though. On the other hand, it is pretty solid on my mod so far, so I don't feel the need for extra lock.

-
kyekye have you thought about drilling a second 0.5mm hole in and locking it with a 0.5mm rod at right angle to the aluminium rod? may work better then just fitting it together like you did.
Hmmm. I don't understand what you mean. Give me some visual images. It currently works and fits, but anything that can improve better fitting will be welcome.
I just got DX toy version of Ozma. Man! the landing gears hurts my eyes... Well it's a toy, so I can transform it back and forth without worry too much about it

There are a couple of things i can learn form it thou. the puzzle parts fitting IS much nicer on DX version.

-
You know, I was kind of thinking maybe I should cut the ball joints that go onto the hip guns and then a small chunk of one of the remaining plastic trees I got, use a bit of the super glue junk and see if that fixes the placement...if it did I'd do it to my Ozma too. But I'm also kind of scared I'd completely ruin the joints and can't fix it...but kind of wanting to take the risk so I can buy a new Alto and make it even better than my first one.
As they always say, you're first can be good, your second even better, your third will kick ass.
Hmmm it kind of worked, the piece was just maybe a lil bit to large cause the leg was forced down a bit showing off to much of a gap between the two intakes the leg and the body, but it DID make the piece fit better!
However the gap was to geh for me so I took off the piece to sand it down some more and ended up loosing it. Almost even lost the ball! So I gave up, crazy glued it back together and put the joint back on the leg and considered it off limits.
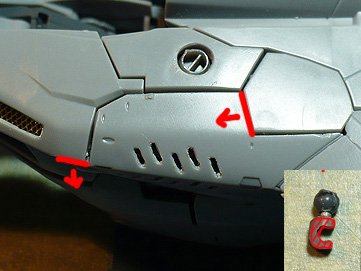
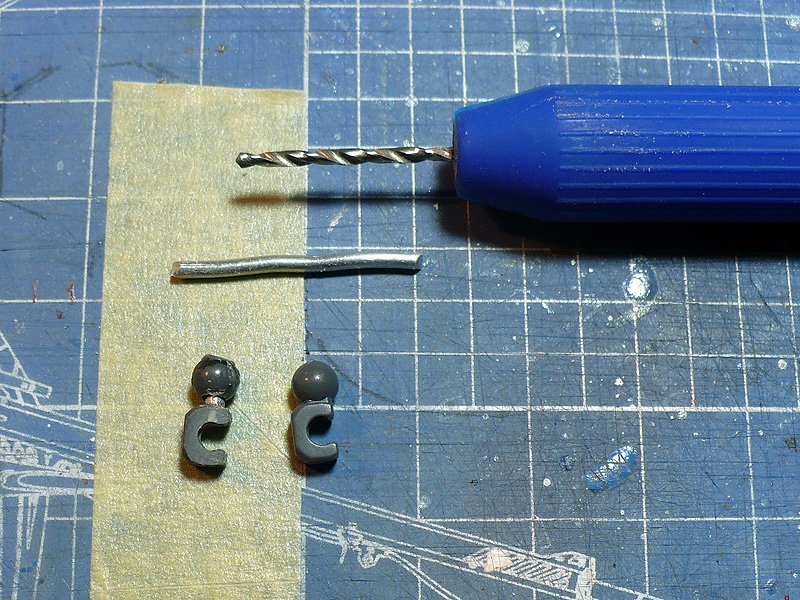
Man! I'm sorry to hear that.... Maybe i should have put more detail into the process. This is what I did.
1. With 1.5mm pinvice, I drill through completely.
2. Insert the 1.5mm aluminum rod. very tight fit. I don't trust glue/crazy glue on any small part with stress/force.
3. cut the rod at the tip of ball side and sand it clean. If you have a small hammer, you can flatten it like rivet head. This will prevent the ball from coming off.
4. sand a little bit on the C shape from the ball joint (image is for the left side)
5. sand 2 parts from the hipgun. (see image)
The parts are small and slippery. Be extra careful... (too late i guess......
 )
) -
I love K&J... I plan on getting some D-601s for a Nerf project. (Gears of War with a Longshot. Pull 'em off my back and start shooting
 )
)How'd you adhere the magnets to the model?
Man, some of these magnet type can actually hurt you....

Anyways, the best way to me is to drill the hole very tight using acurate size pinvice drill bits. All the magnet I put in places can stay without any use of glue. I might use 1/2 drop of crazy glue before painting.
dremel holes the size of the magnets and glue them I suppose.WM Cheng inspired this method I think:
http://www.macrossworld.com/mwf/index.php?...28142&st=20
I'm actually considering getting 3/16 x 1/32 and 1/8 x 1/32 magnets. But I haven't built my kit yet so I don't know for sure if the 3/16's will fit or not....
I only use dremel tool to increase the size of the hole just a little bit to fit magnet. In my opinion, actual hole should be drilled with manual pinvice very slowly. Also I use a small pinvice first to get the position right and move onto the bigger bits. I've been doing that for my other models and it's been error free so far.

-
great work dude...wondering if the kit is kinda flimsy once transformed to batroid?
Suprisingly no.
 Joints and transform parts are quite tight. Only place (I think) needs some attention is the fin on the bottom. This part fits into the 'I' shape hole to form the pelvis. Whatever you do, DO NOT try to sand it to make it look like sharp fin. It needs to be that dumb shape.
 -
Hmm... the hip guns are still out of position though... I think its just a problem with the kit.
It seems like partially it IS due to the problem with the kit (specially Alto's). However, the thickness of the paint layers worsen the issue with that particular part piece. The joint mod I'm trying should fix the major fitting problem thou.
Even in the pro modeler builds that are photographed they're still slightly out of place on the hips, but they're not nearly as bad as what many of us have seen particularly with Alto's VF-25.So what kyekye's got going on is a really good way of balancing the kit out and making it look very nice.
And all the added features just make the kit stand out even more, very cool mods.
Thanks for commenting on my defense
 Most pro-built hobby magazine images also show that particular problem. During multiple transform test I DID get the piece in right position a couple of times when the other pieces are perfectly fit in position. It happens somewhat random. The biggest issue i found was the length of hipgun joint. It's just 0.2-0.5mm short. The second problem (specially with Alto's) was that the joint pushes the part forward. Another 0.2-0.5mm.
So I sanded the the parts in 2 places (the edge right above the gun and another edge where meets the shoulder diamond part) and extended out the joint using aluminum rod and pinvice drill (1.5mm).
It does look like it can solve the problem
 . For now, I'll leave it un-glued so that the piece can slide a little bit up and down until I finish the pieces with decal and painting later.
 -
O.K. I'm taking some WIP pictures and the topic is up now.
-
Ahhh! So those are those Kotobukiya option parts!
Anyway, how's the pull force on the magnets? Particularly the smaller set? Is it almost the same?
The neodymium magnets have grade numbers which represents their strength.
Here is quick info from the vender I buy from.
Neodymium Magnet Physical Properties
N50 and 52 are pretty strong and should be enough to hold the macross parts. They need to be aligned correctly (position-wise) to maximize the pull force. I recommend using 1/8" ones for the most parts. small ones (1/16") are only used for supporting.
I've used them for my VF-25F (same position as VF-25S), and they worked great.

-
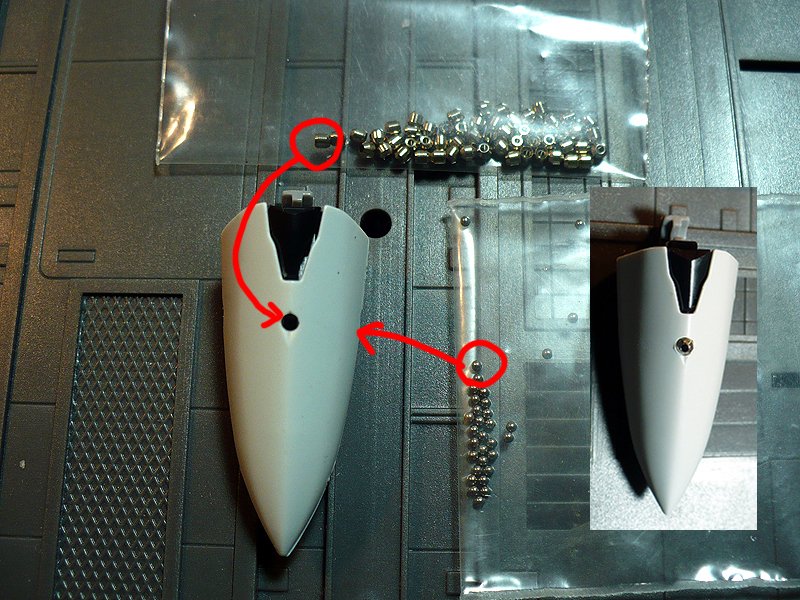
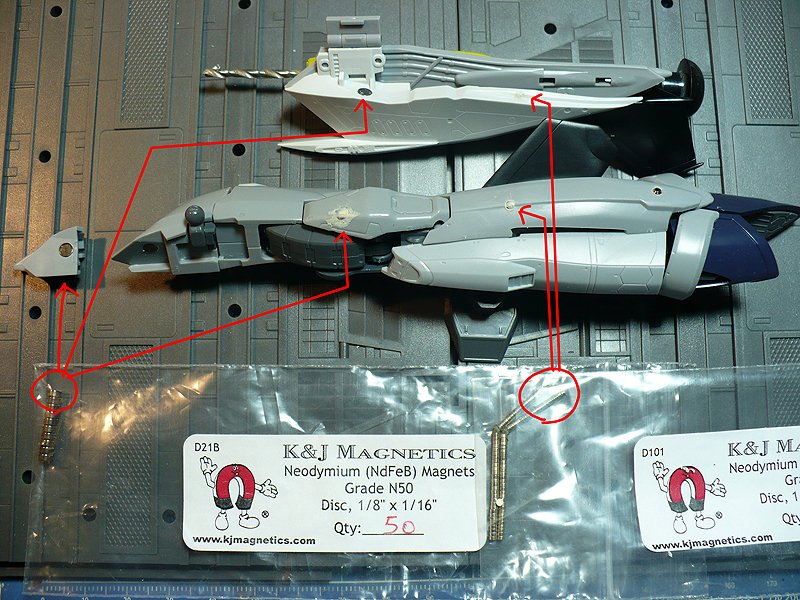
Adding nose sensor details with metal bead (for top) and metal balls (for the side).
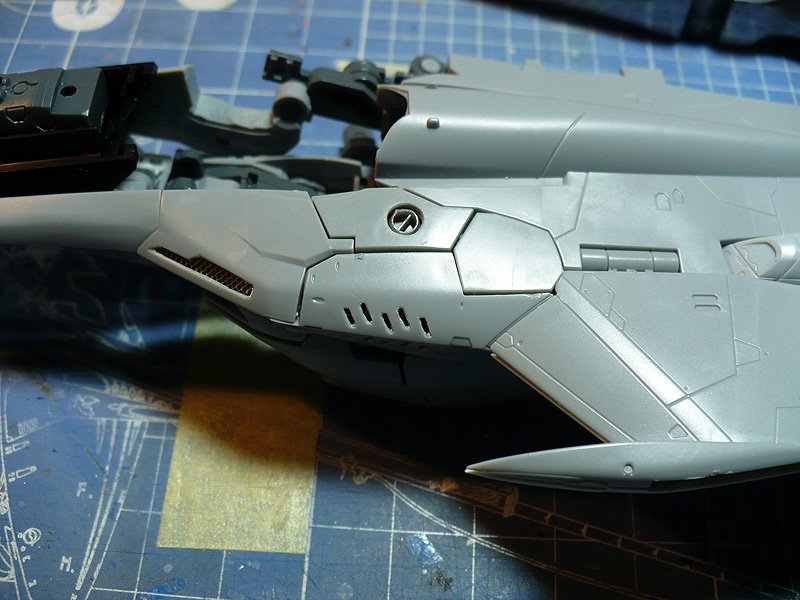
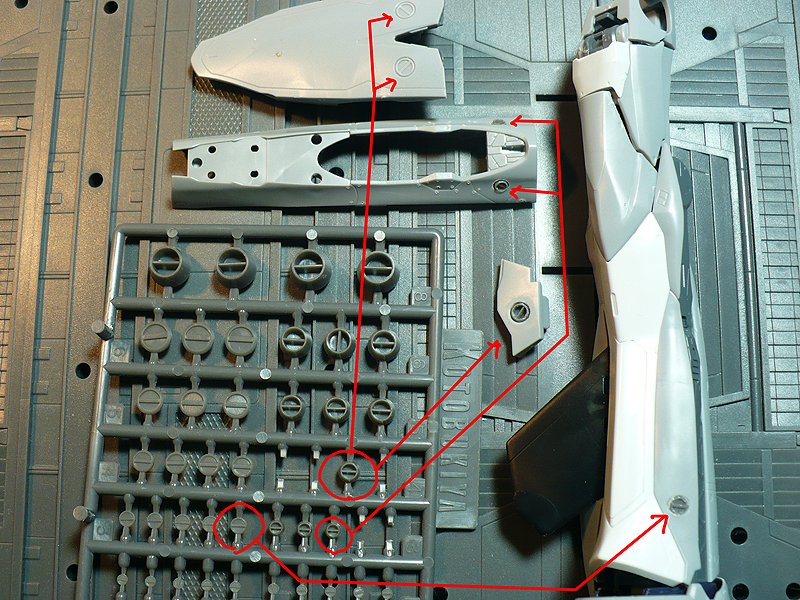
Cut holes for round Q parts detail upgrades and replace them with Kotobukiya option detail parts for deeper mold.
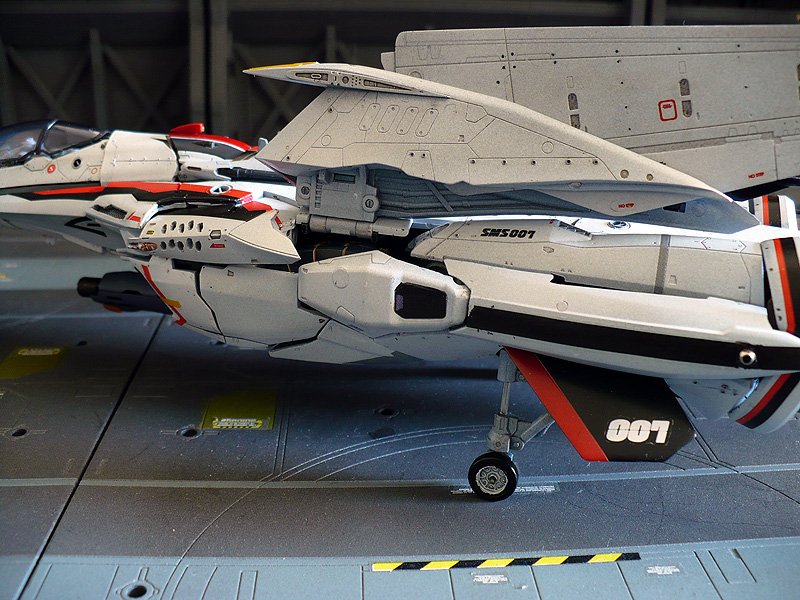
Adding magnets for tighter transform in fighter mode. I still need to do the other side of legs to lock them with arms.

1:48 Hasegawa YF-19
in Model kits
Posted
Now HLJ has it listed for early bird, but link seems to be broken.
Hasegawa 1/48 YF-19
So I guess it will come out in July!!