captain america
-
Posts
3549 -
Joined
-
Last visited
Content Type
Profiles
Forums
Events
Gallery
Everything posted by captain america
-

1/48 SOUTHERN CROSS BIOROID
captain america replied to captain america's topic in Anime or Science Fiction
Not everyone will think it's good, but it's certainly fair considering the work necessary to bring the model to fruition. The second run would make not only my casting life a lot simpler, but also allow customers to taylor the kit to their budget, as they can forego the sled. -
1/48 SOUTHERN CROSS BIOROID
captain america replied to captain america's topic in Anime or Science Fiction
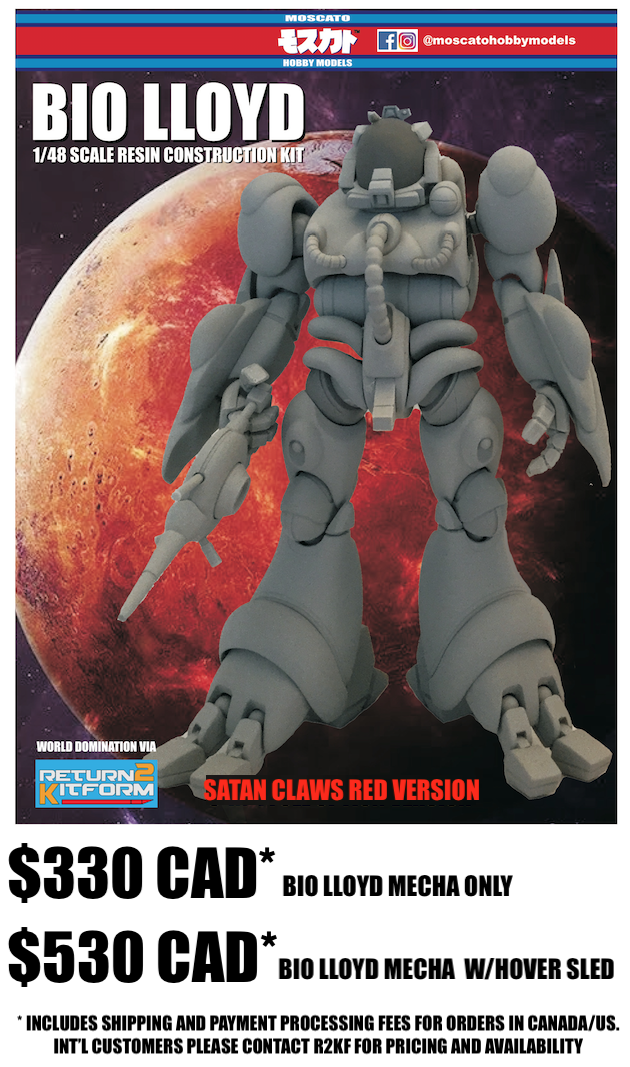
Hey y'all! Just wanted to let you all know that the first kits will be shipping some time next week. My next point of focus will be to finalize and publish the kit destructions, wich should be done in the next 2 weeks. I would like to thank all those who decided to make this kit possible, and special thanks to Podtastic for his zealous devotion to the project: without him, I don't think that this project would have ever seen the light of day. Second run of kits: stll a possibility, provided I can get 12 orders. There will be a substantial price correction, however. The first run tooling was bankrolled by Podtastic, which helped to greatly reduce the final kit price. The second run will be entirely financed by the customers, and as you've seen throughout the build tutorial, both the tooling process and material resources are substantial. Therefore, the new price is listed below, and it will be for the red (SATAN CLAWS) version only.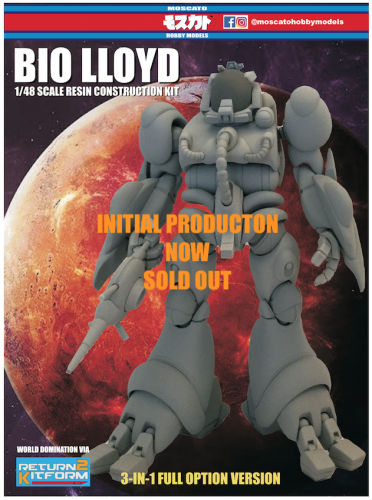

-
1/48 SOUTHERN CROSS BIOROID
captain america replied to captain america's topic in Anime or Science Fiction
The last silicone mold I'd made that was roughly this size was for a 1/6 E.T. toy prototype I did circa 2002-2003. I only needed 2-3 castings, so I made the mold box from MDF. I would have liked to make the saucer from several smaller, interconnecting segments, but I thought that two large, main hull parts was the sturdier option. -
1/48 SOUTHERN CROSS BIOROID
captain america replied to captain america's topic in Anime or Science Fiction
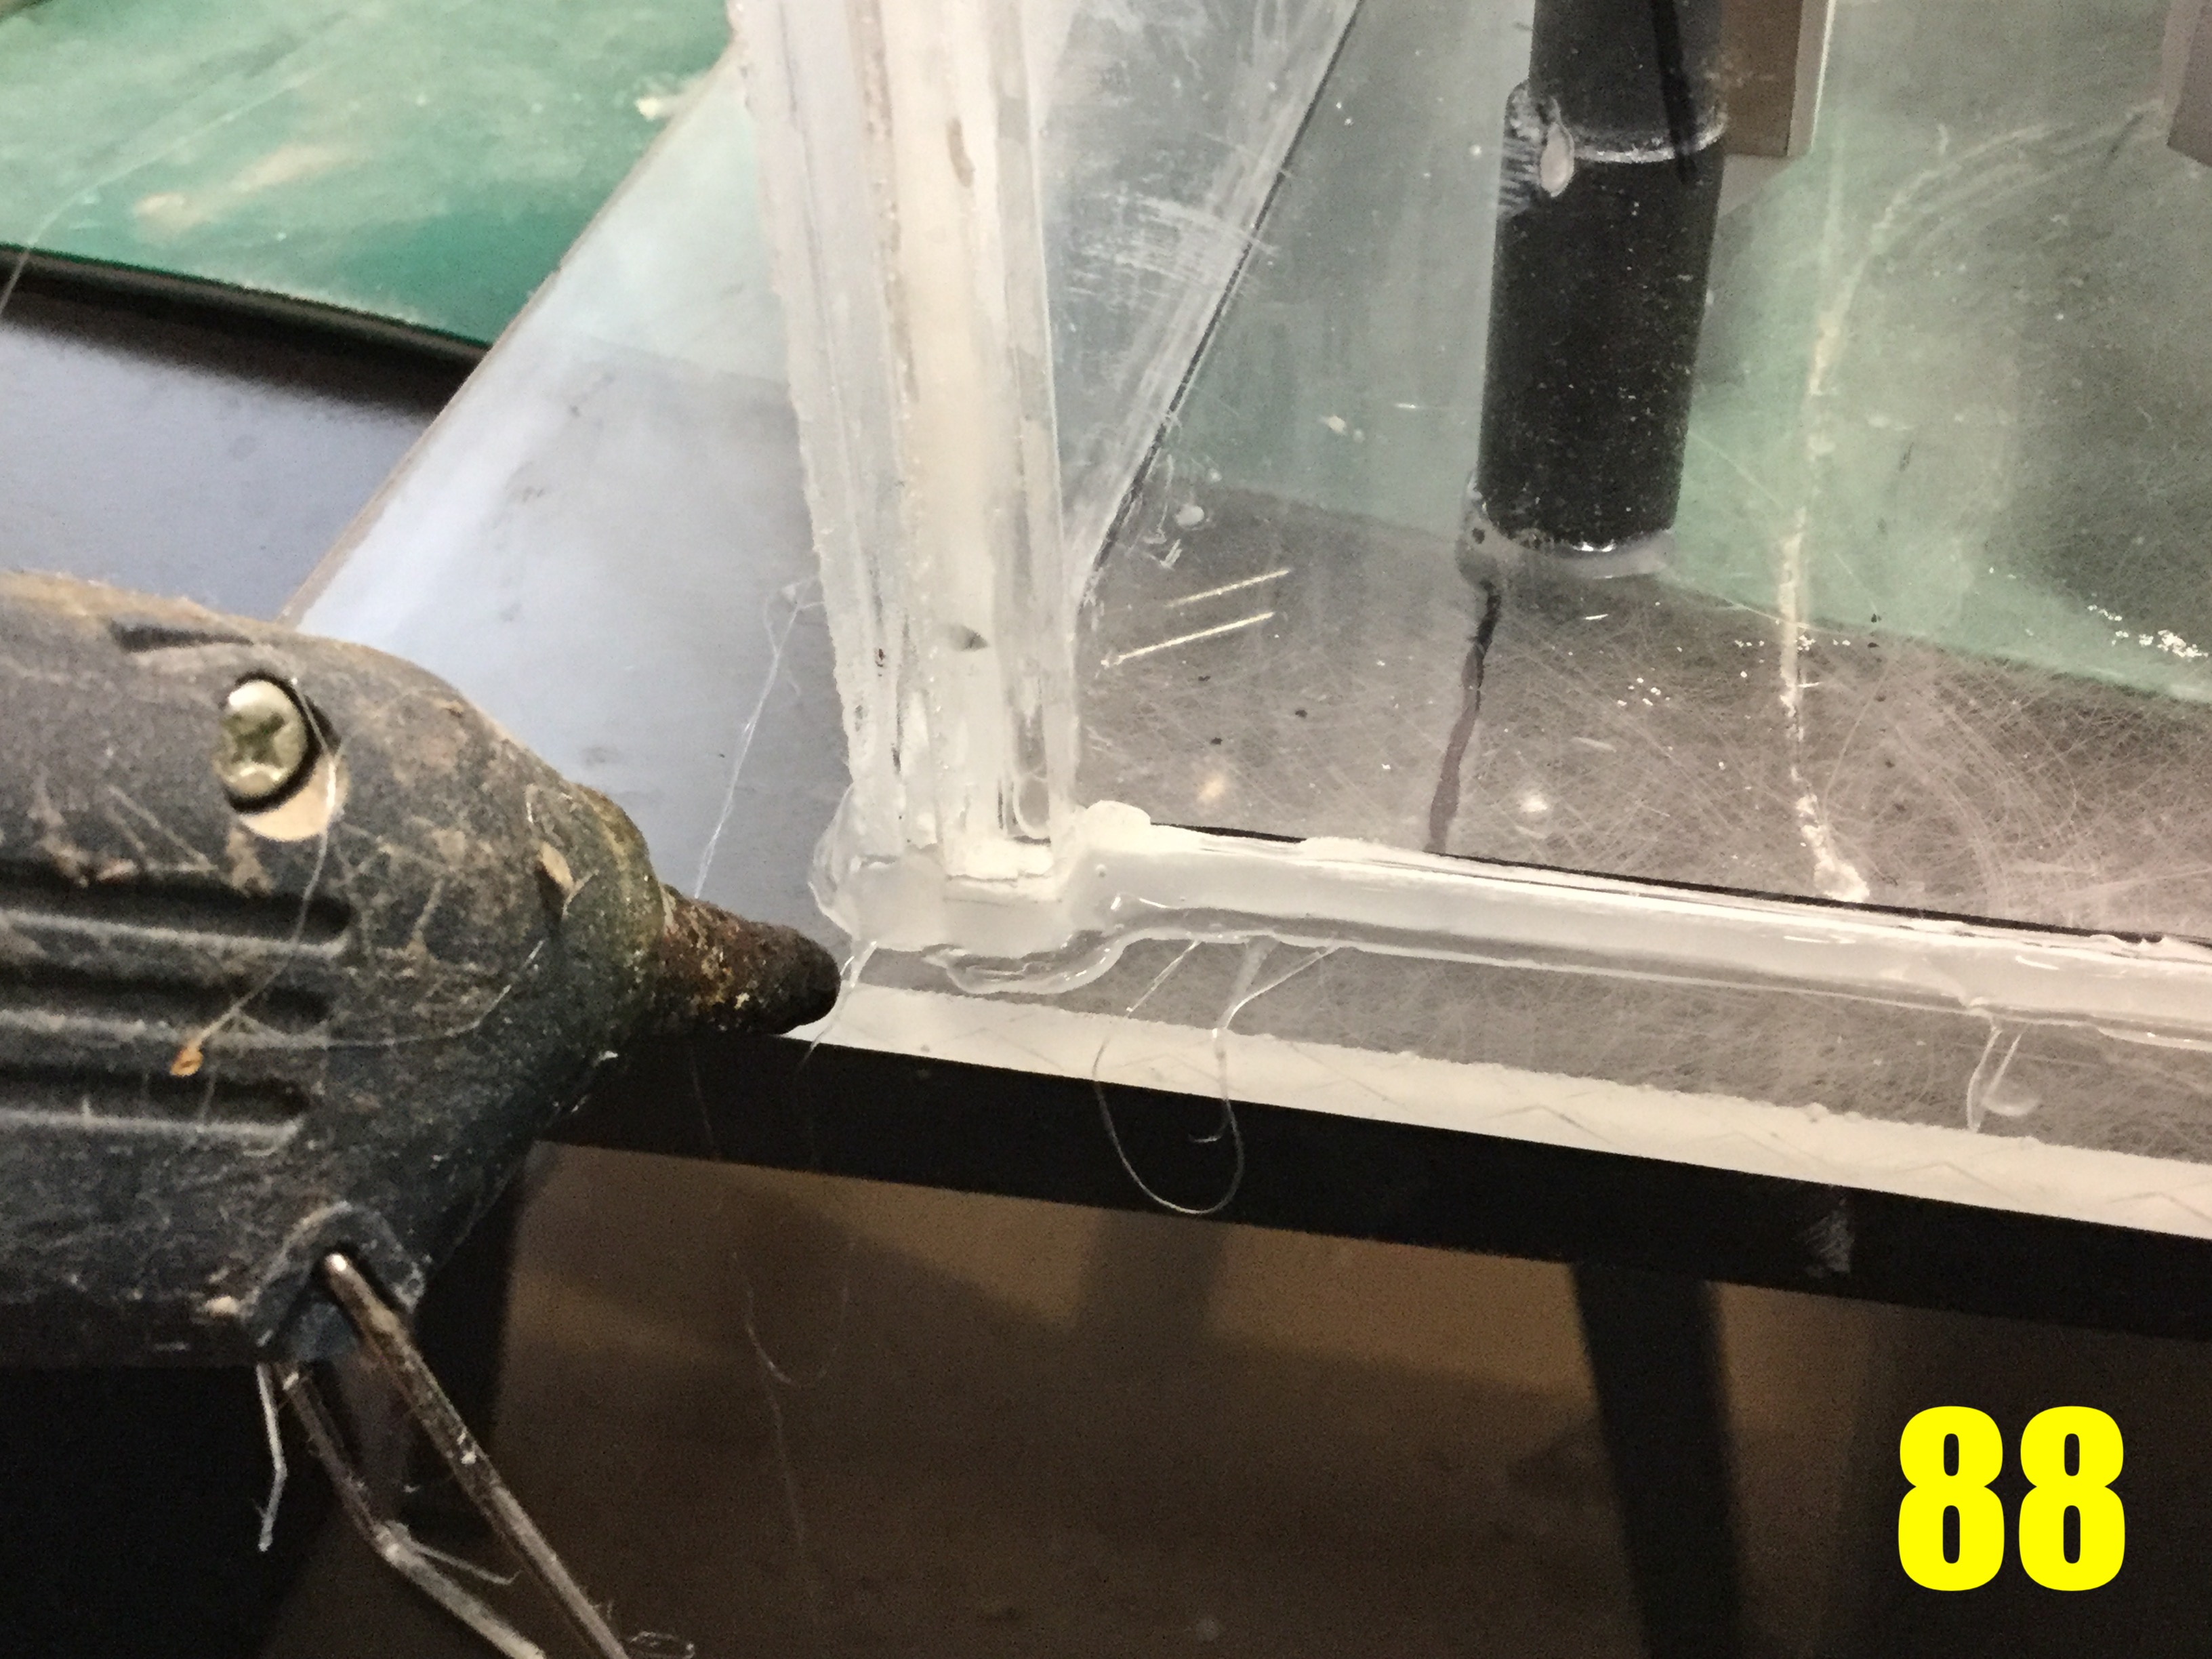
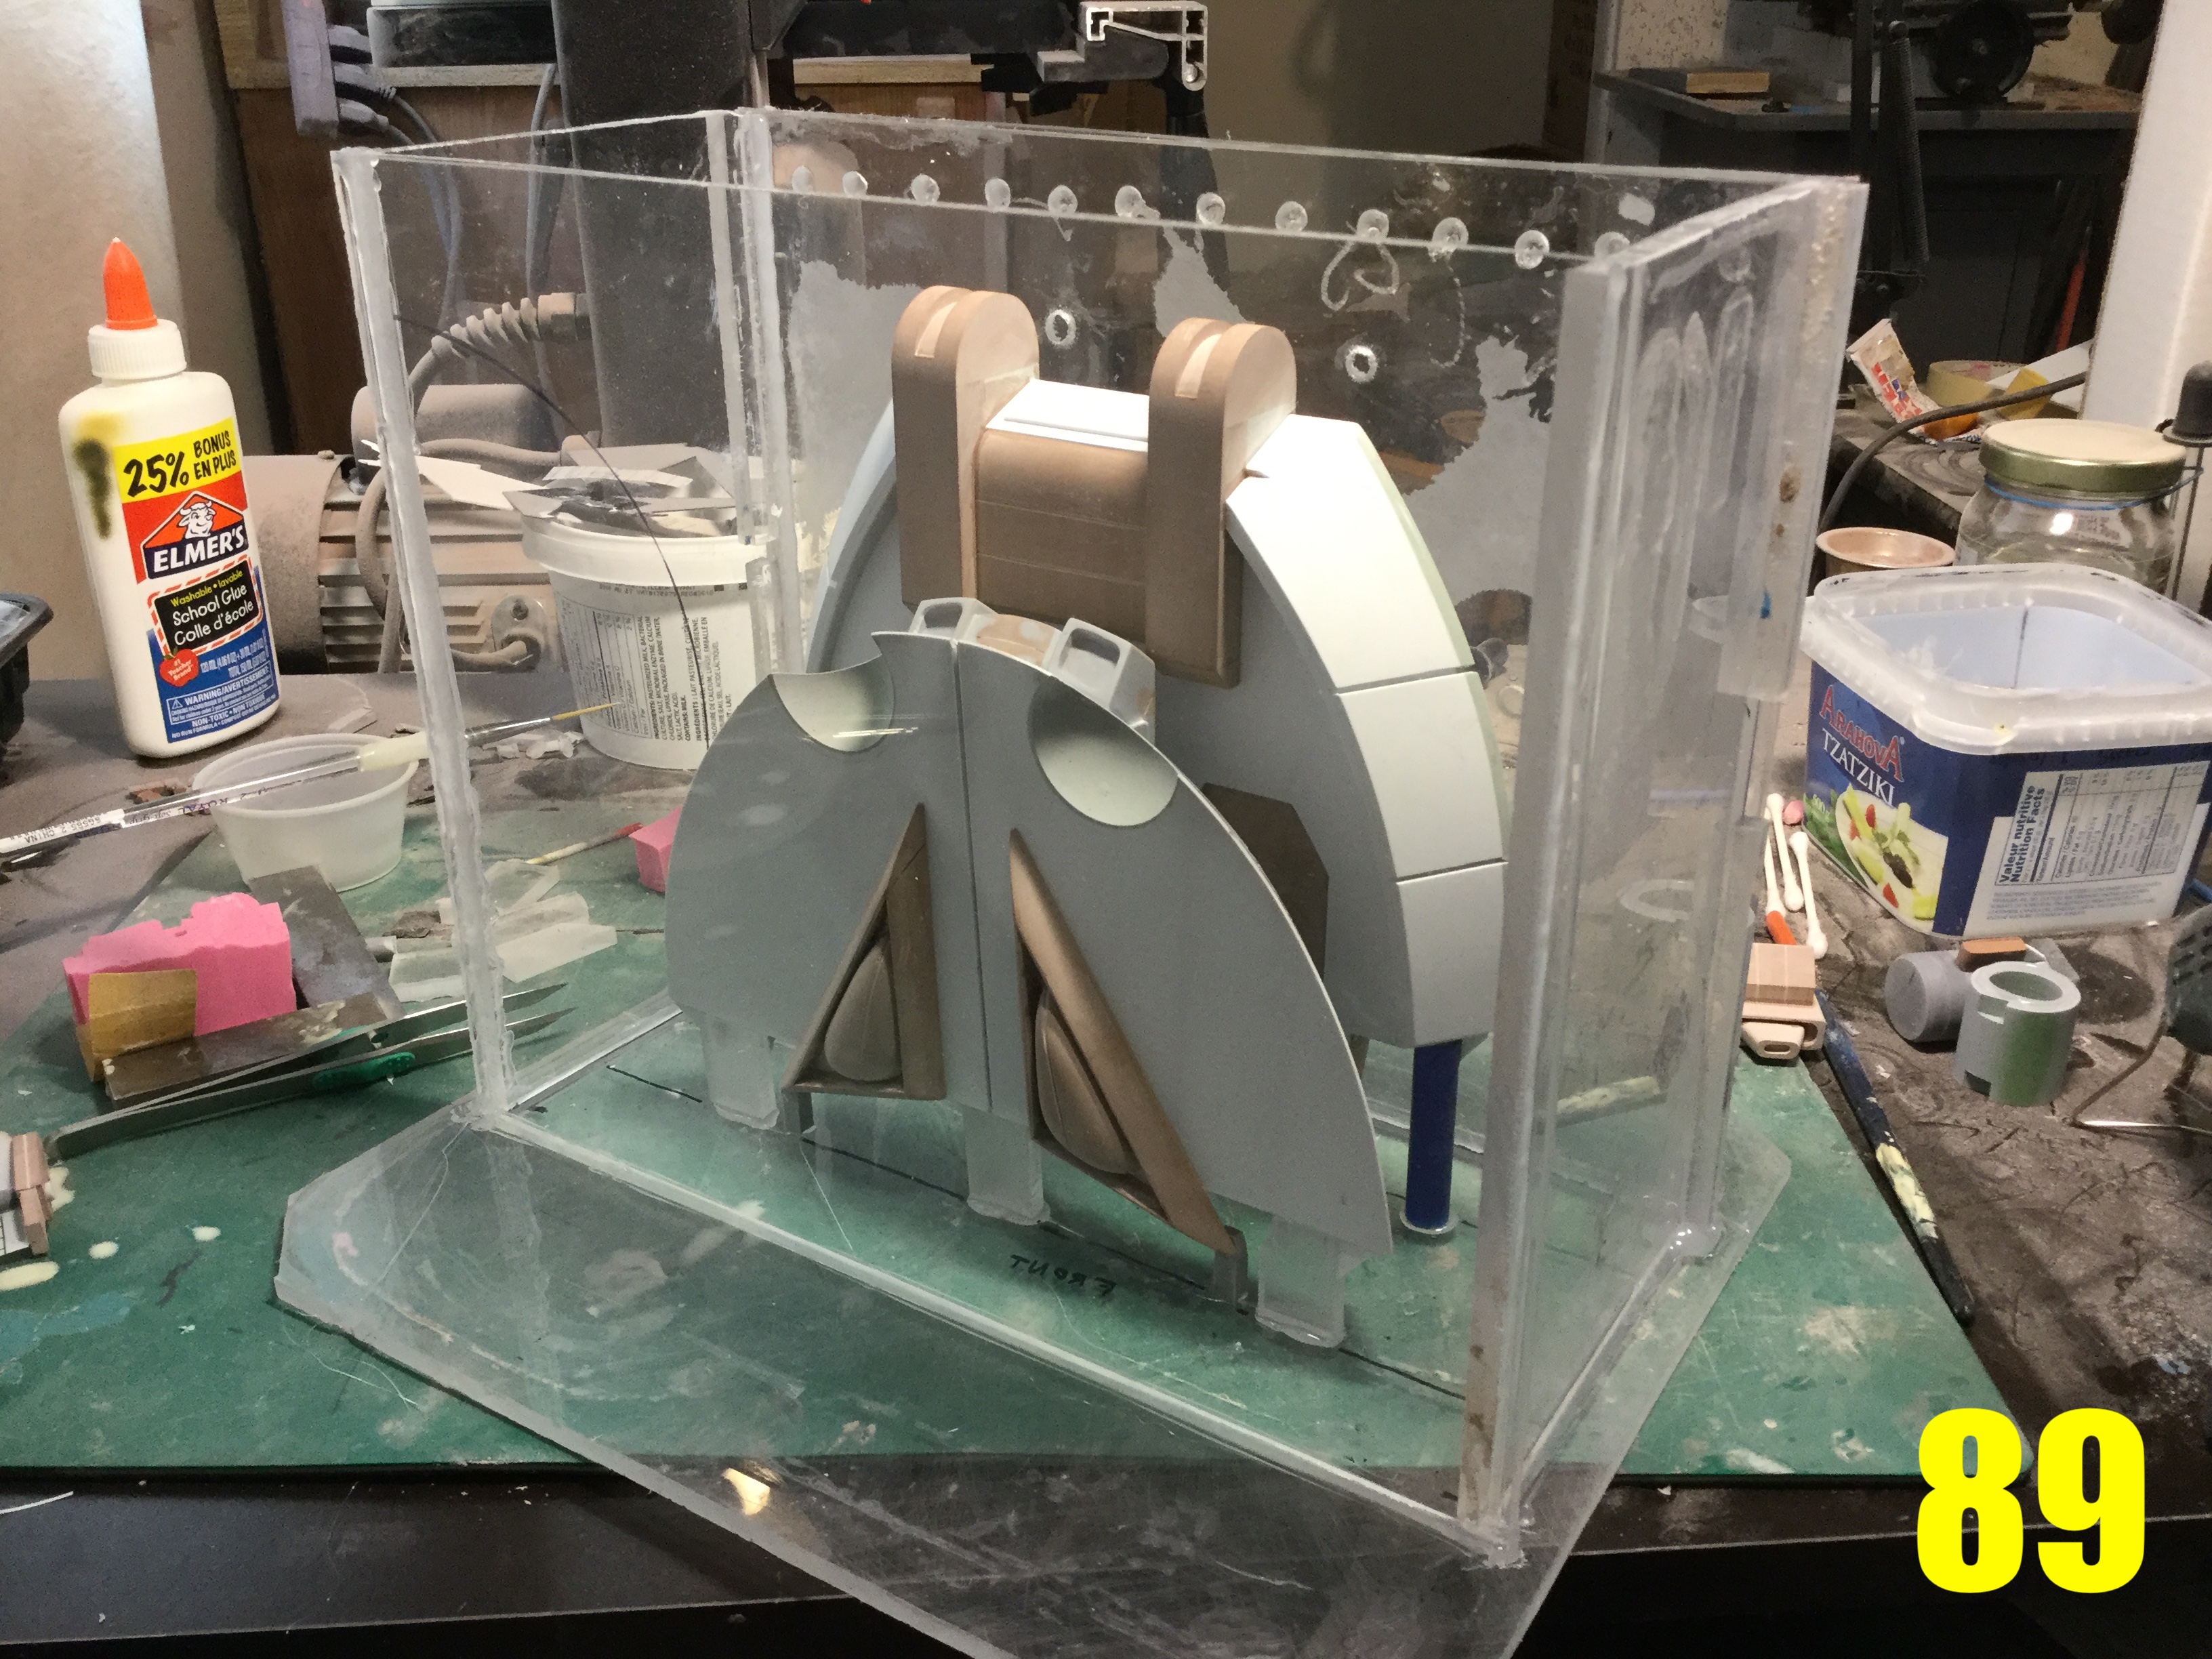
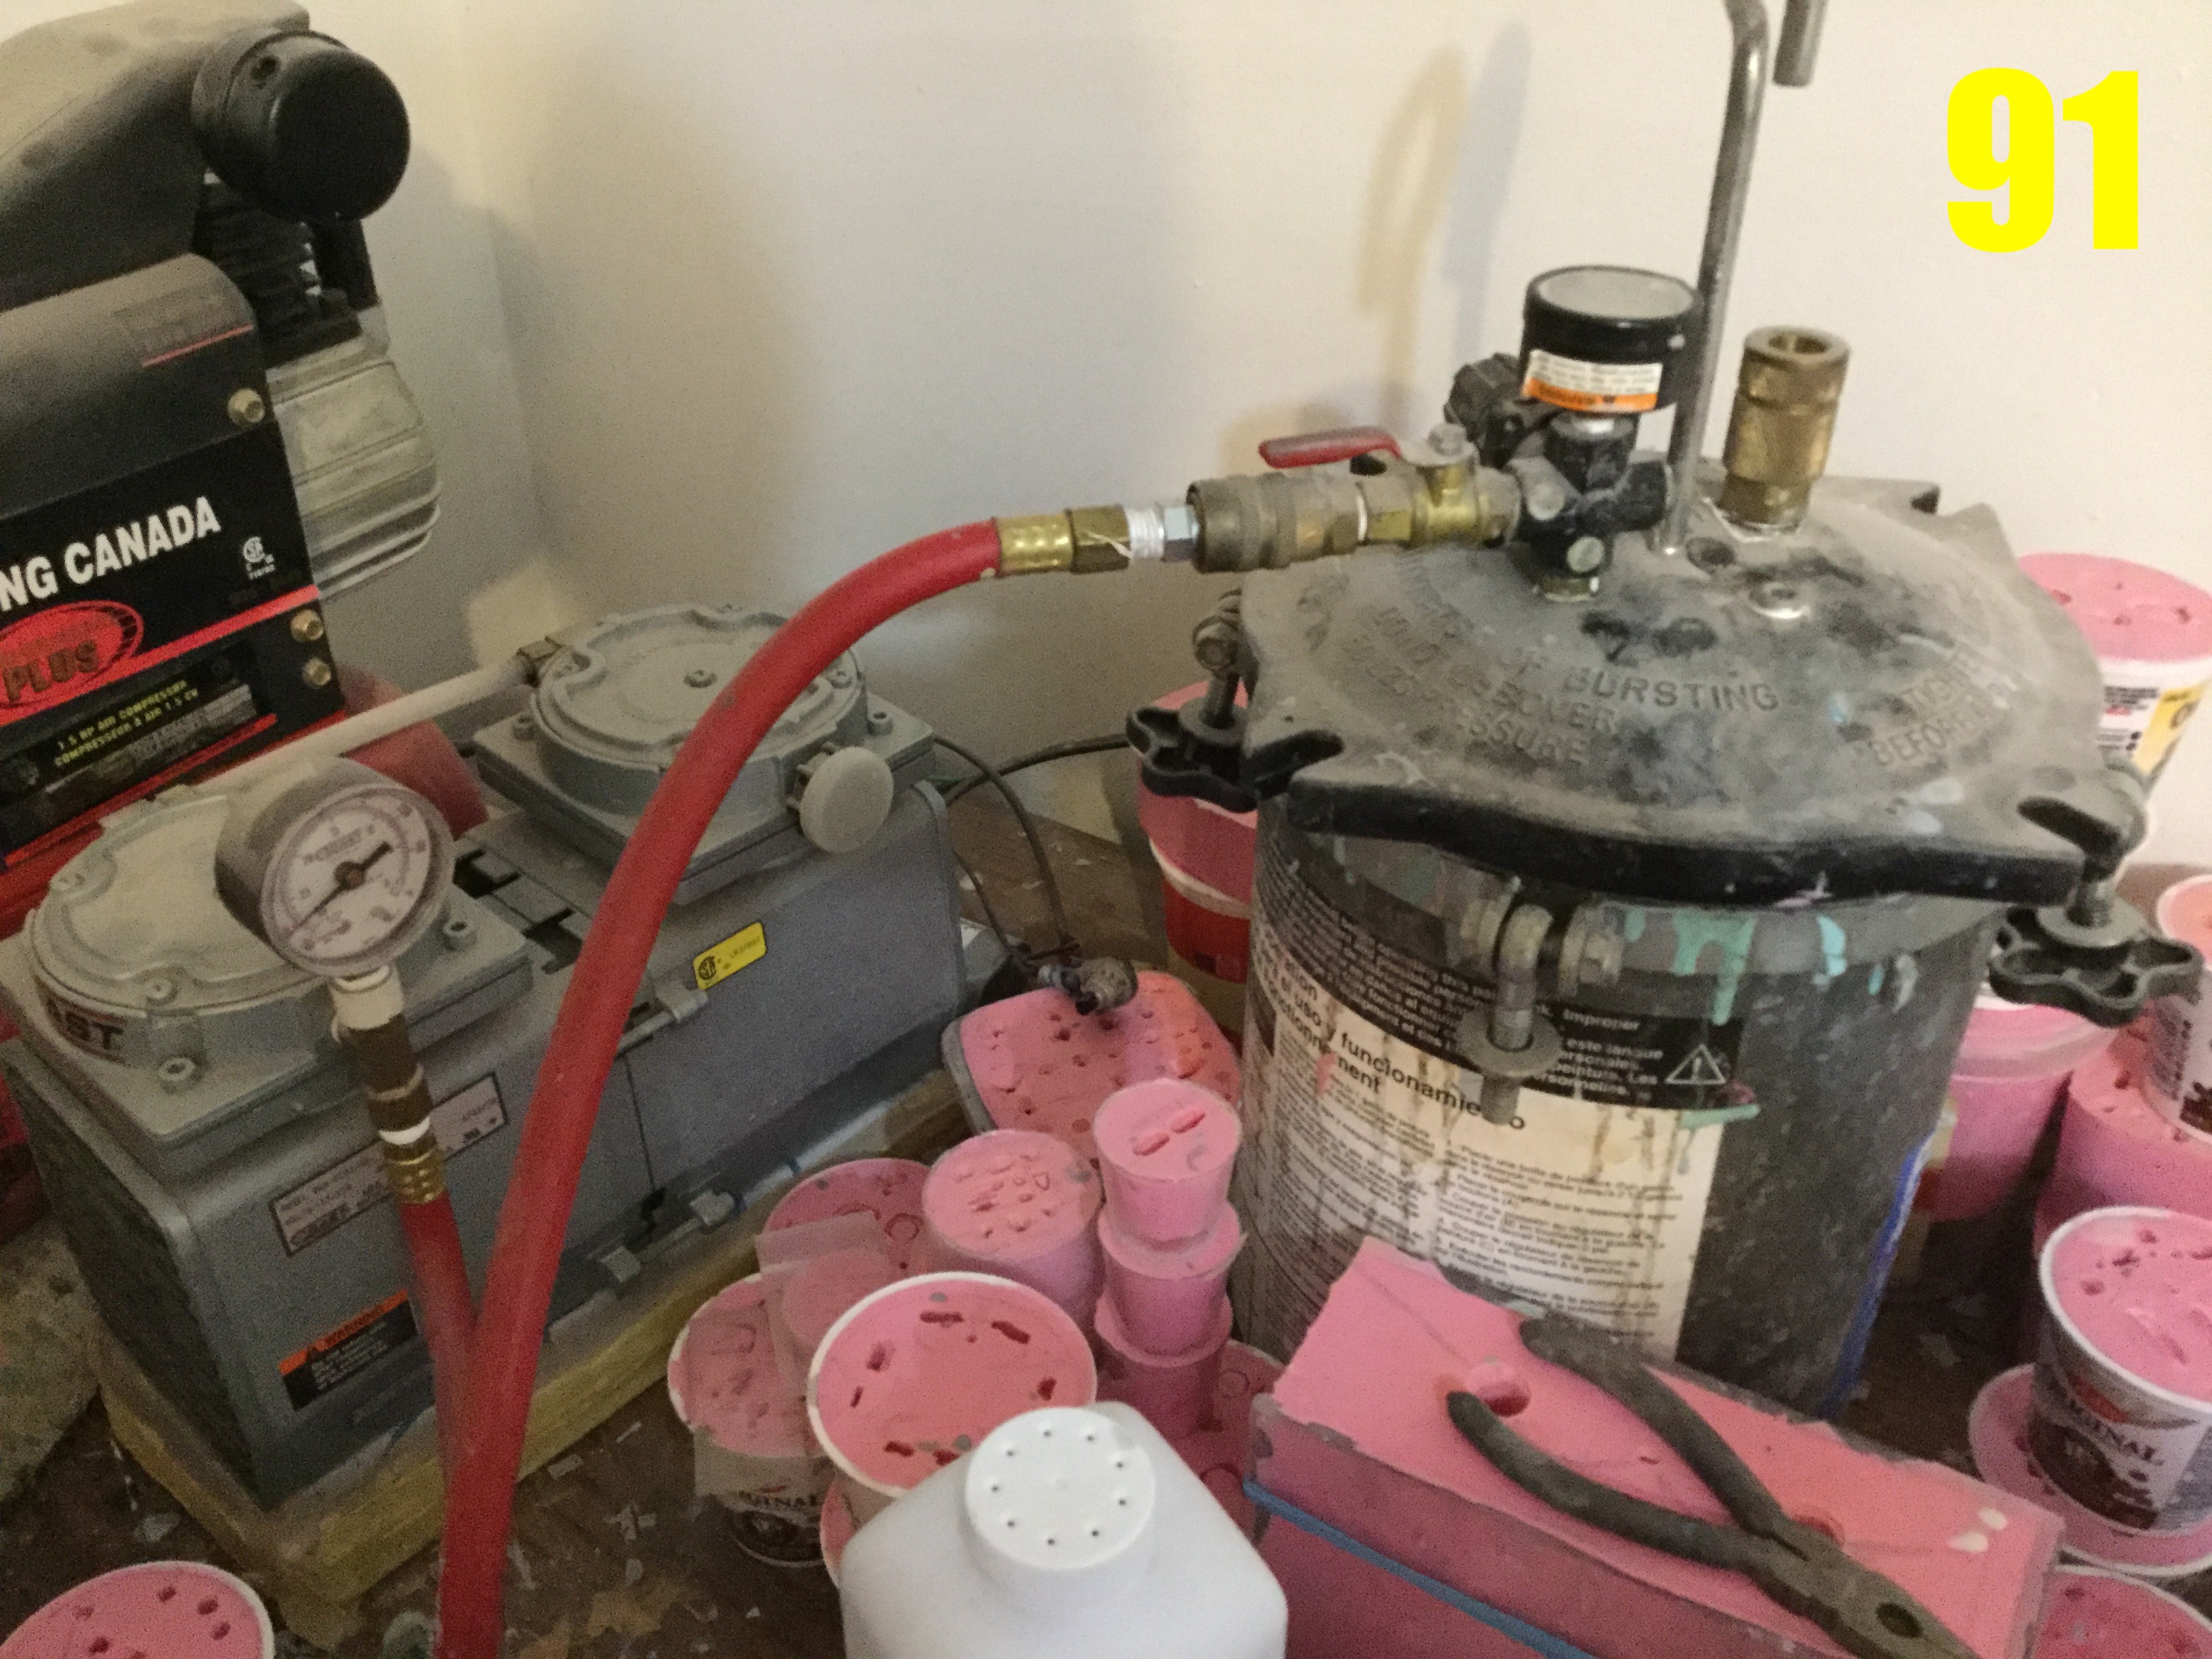
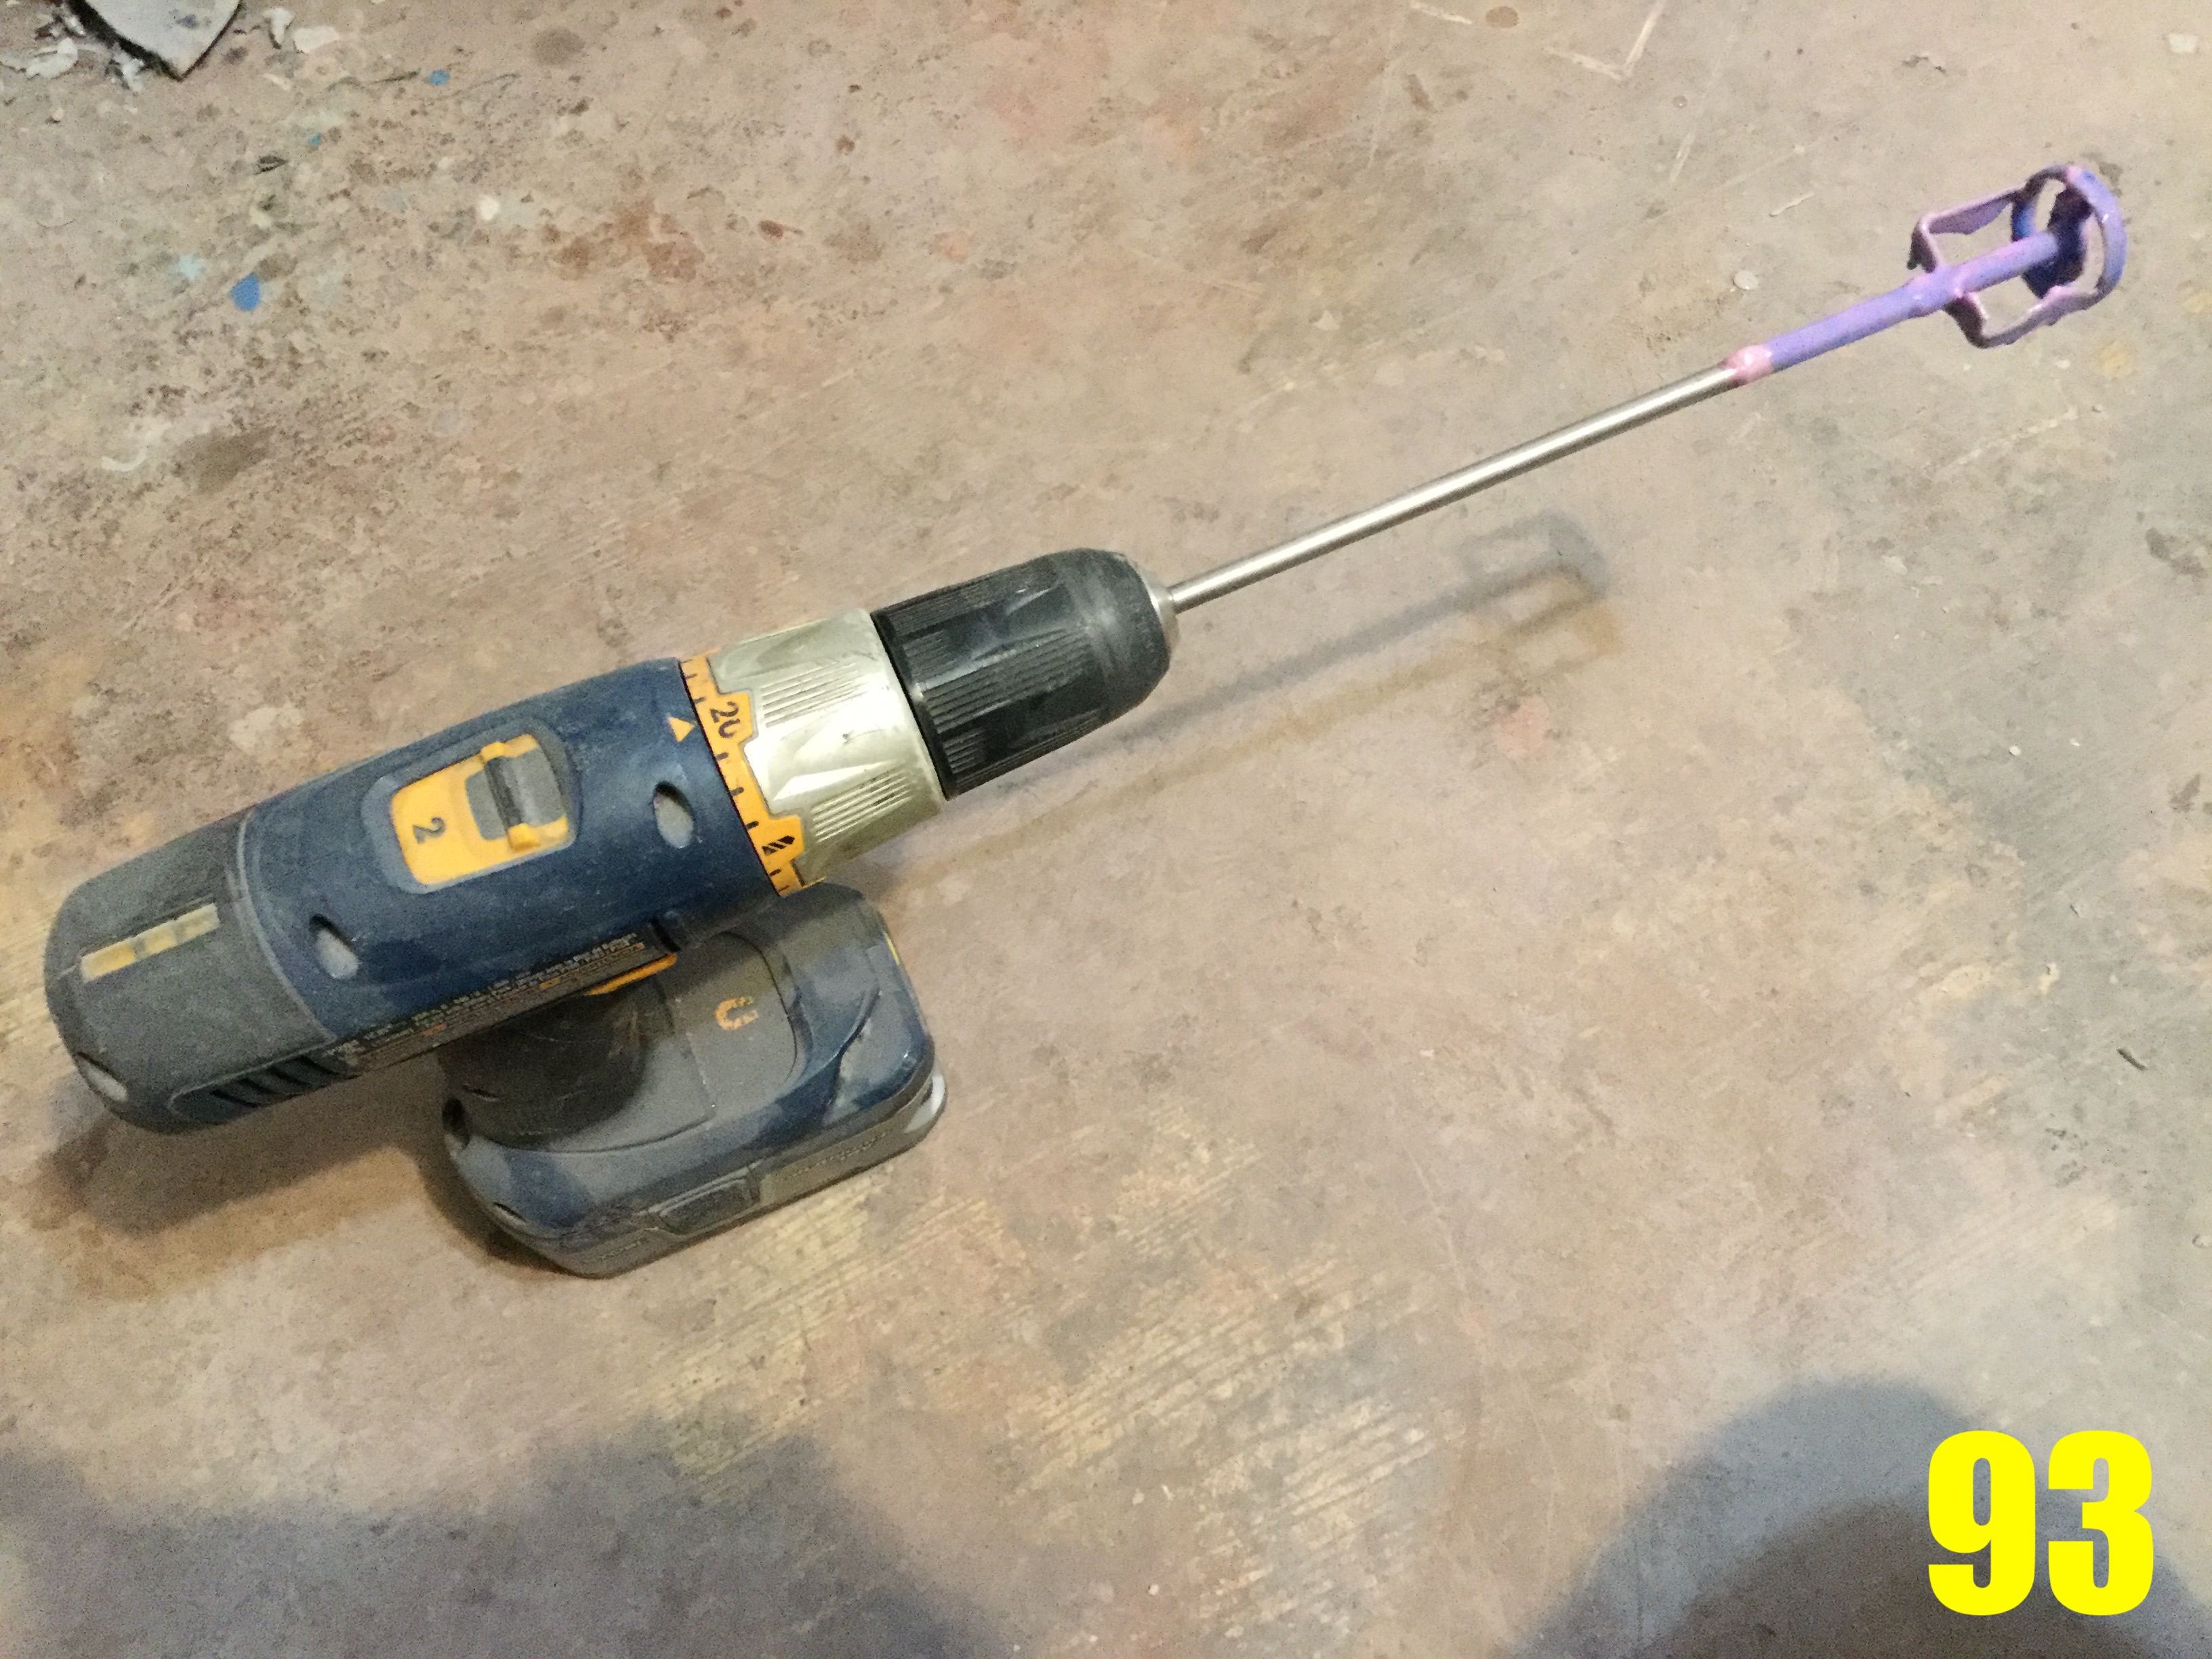
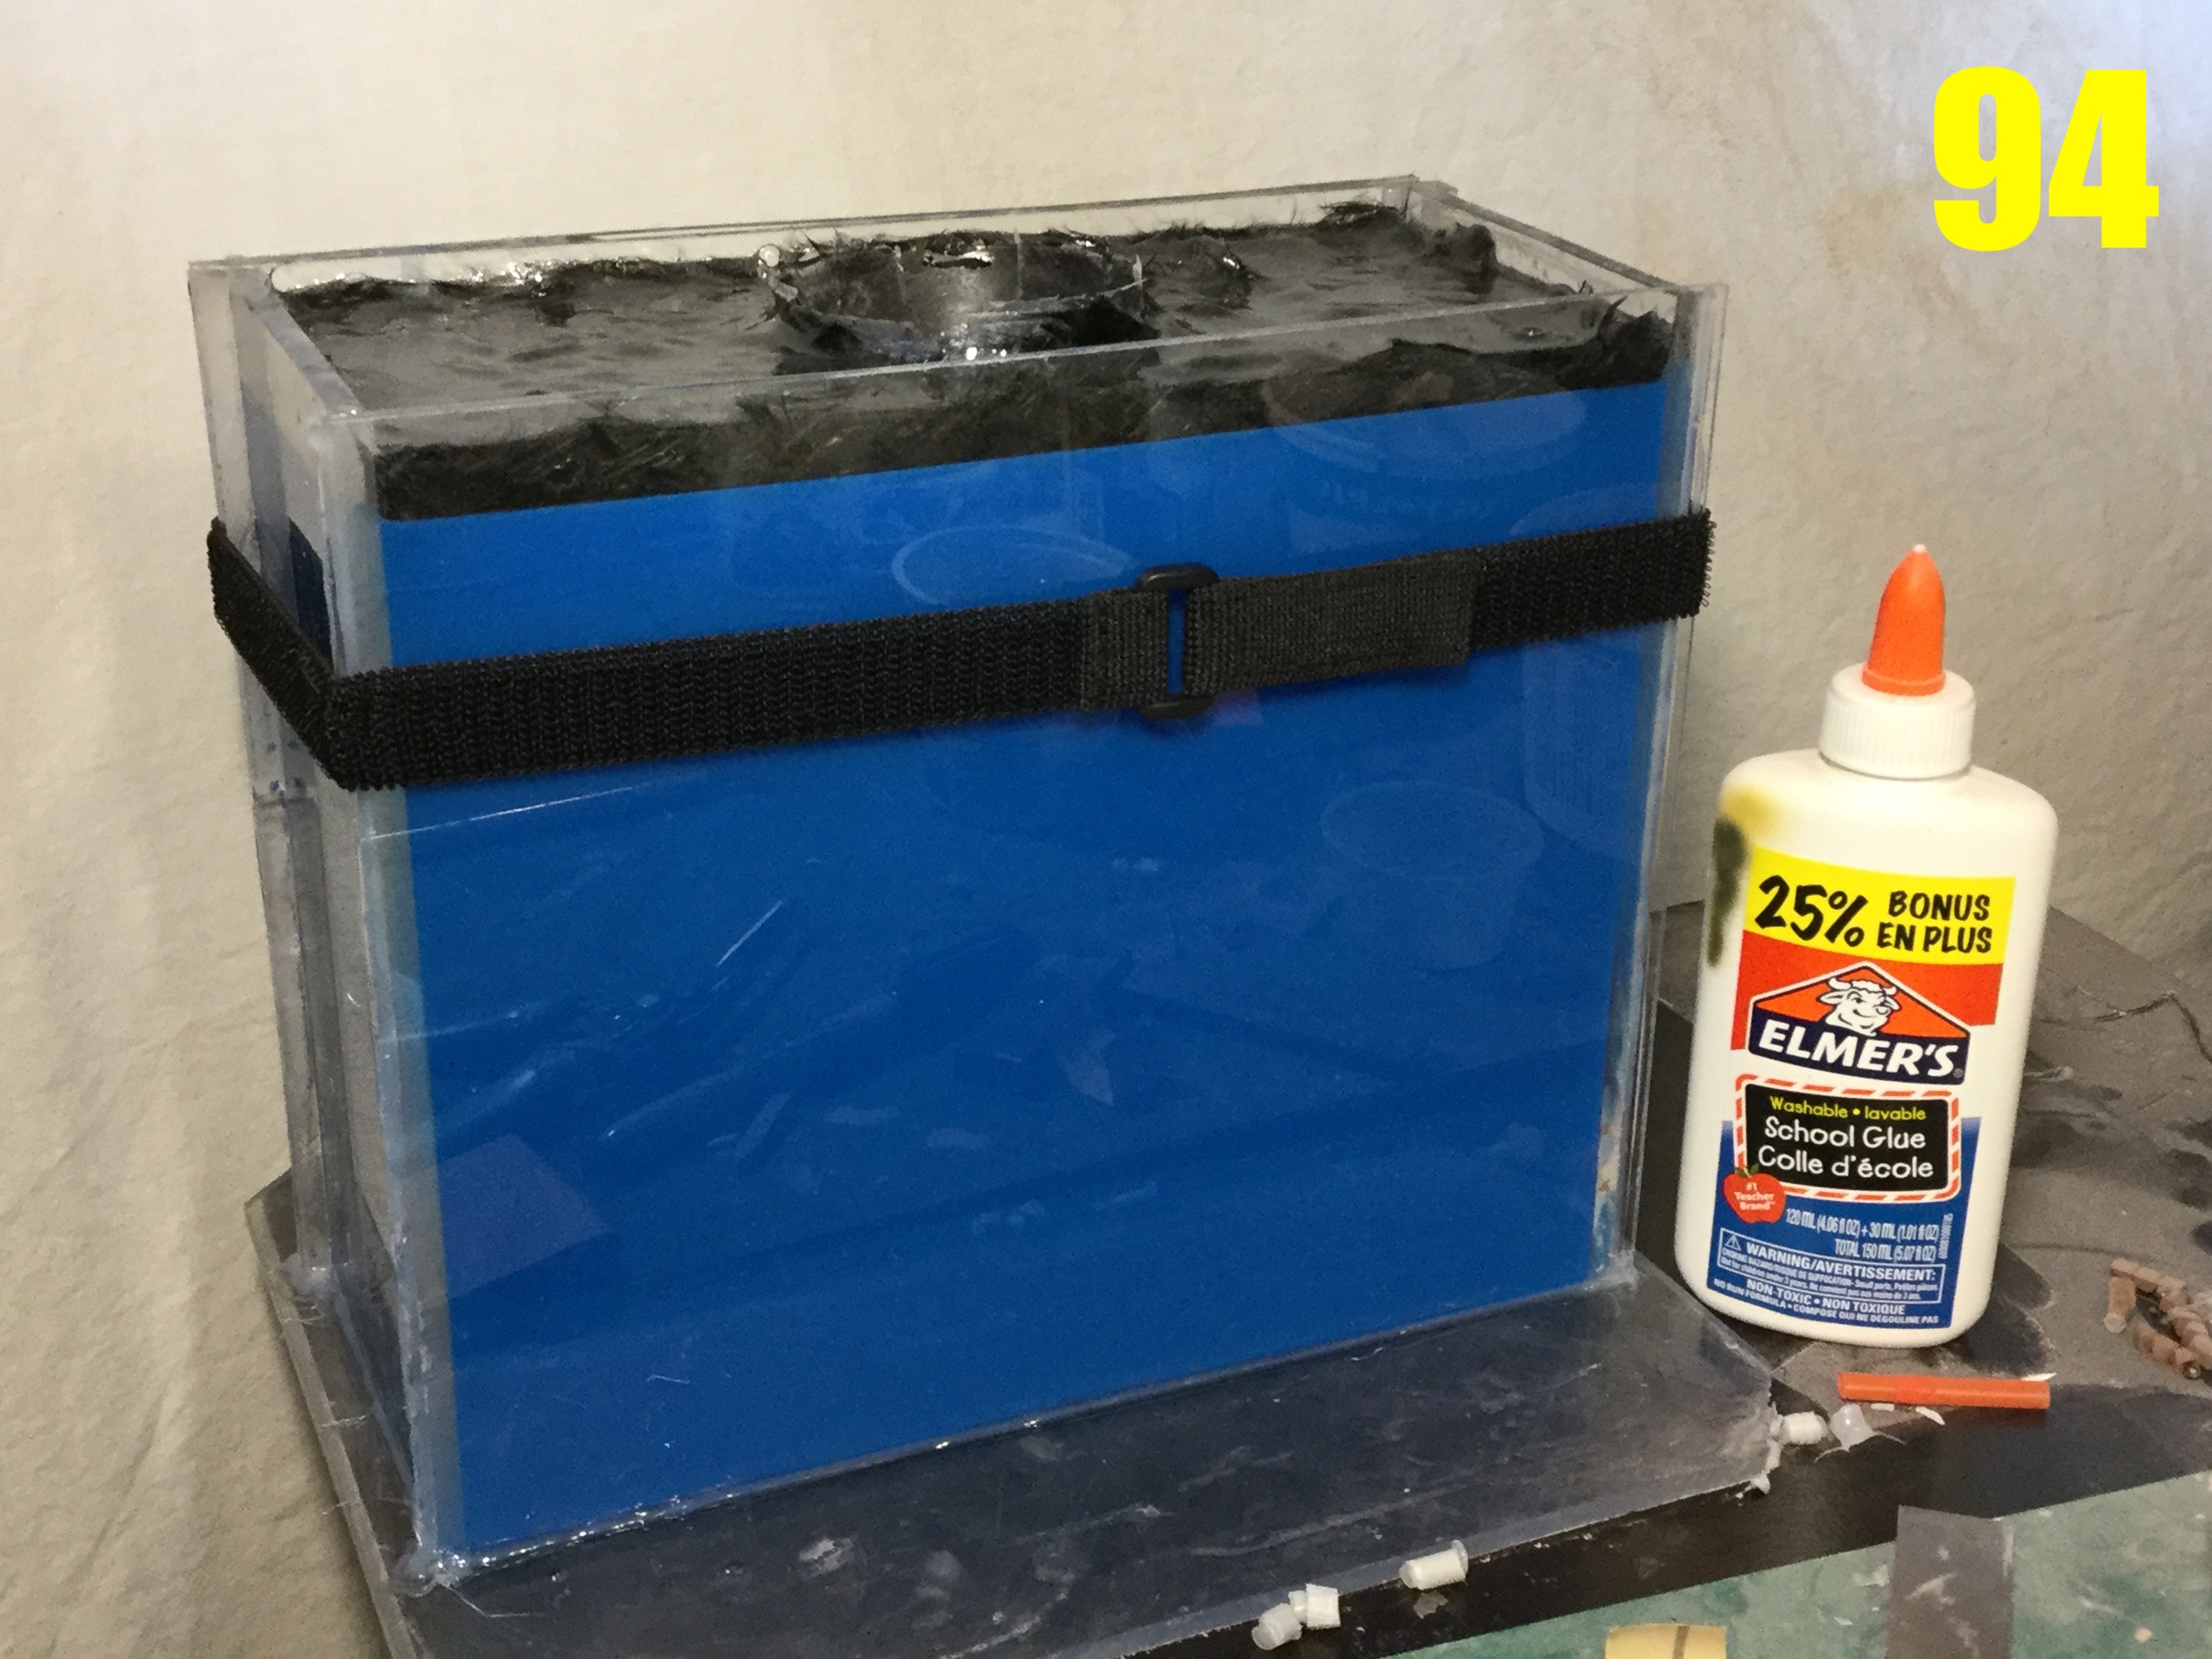
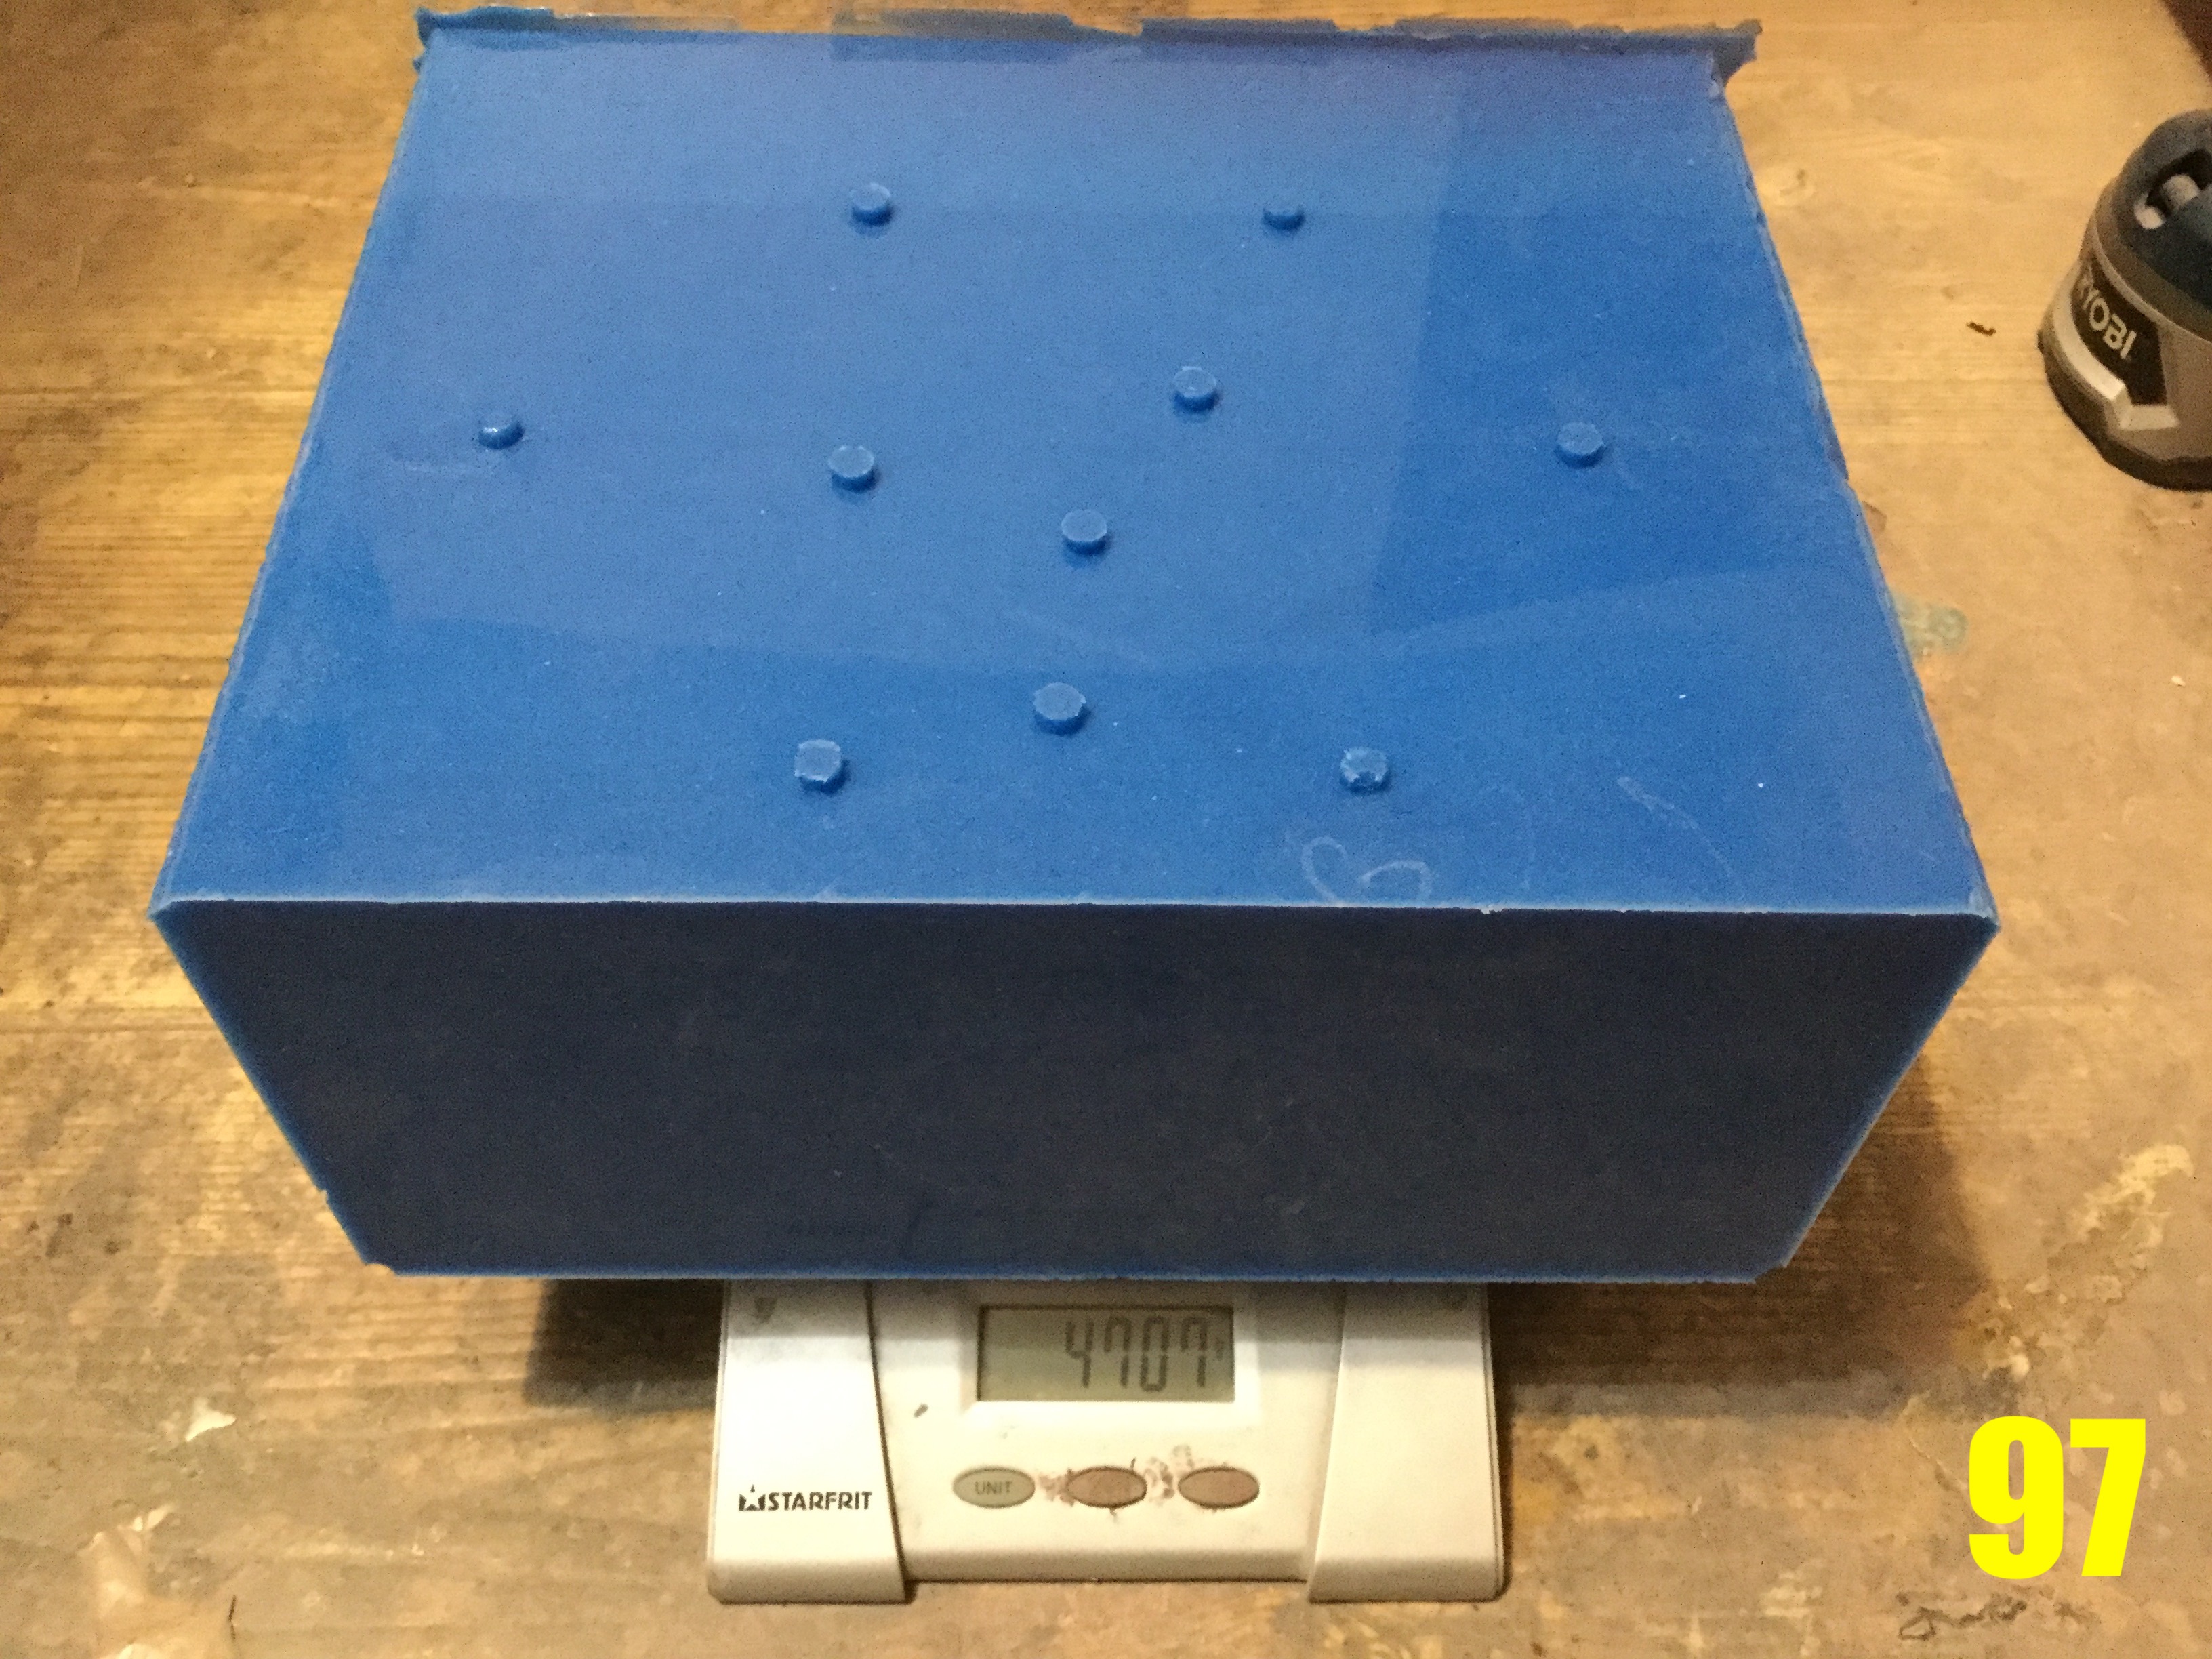
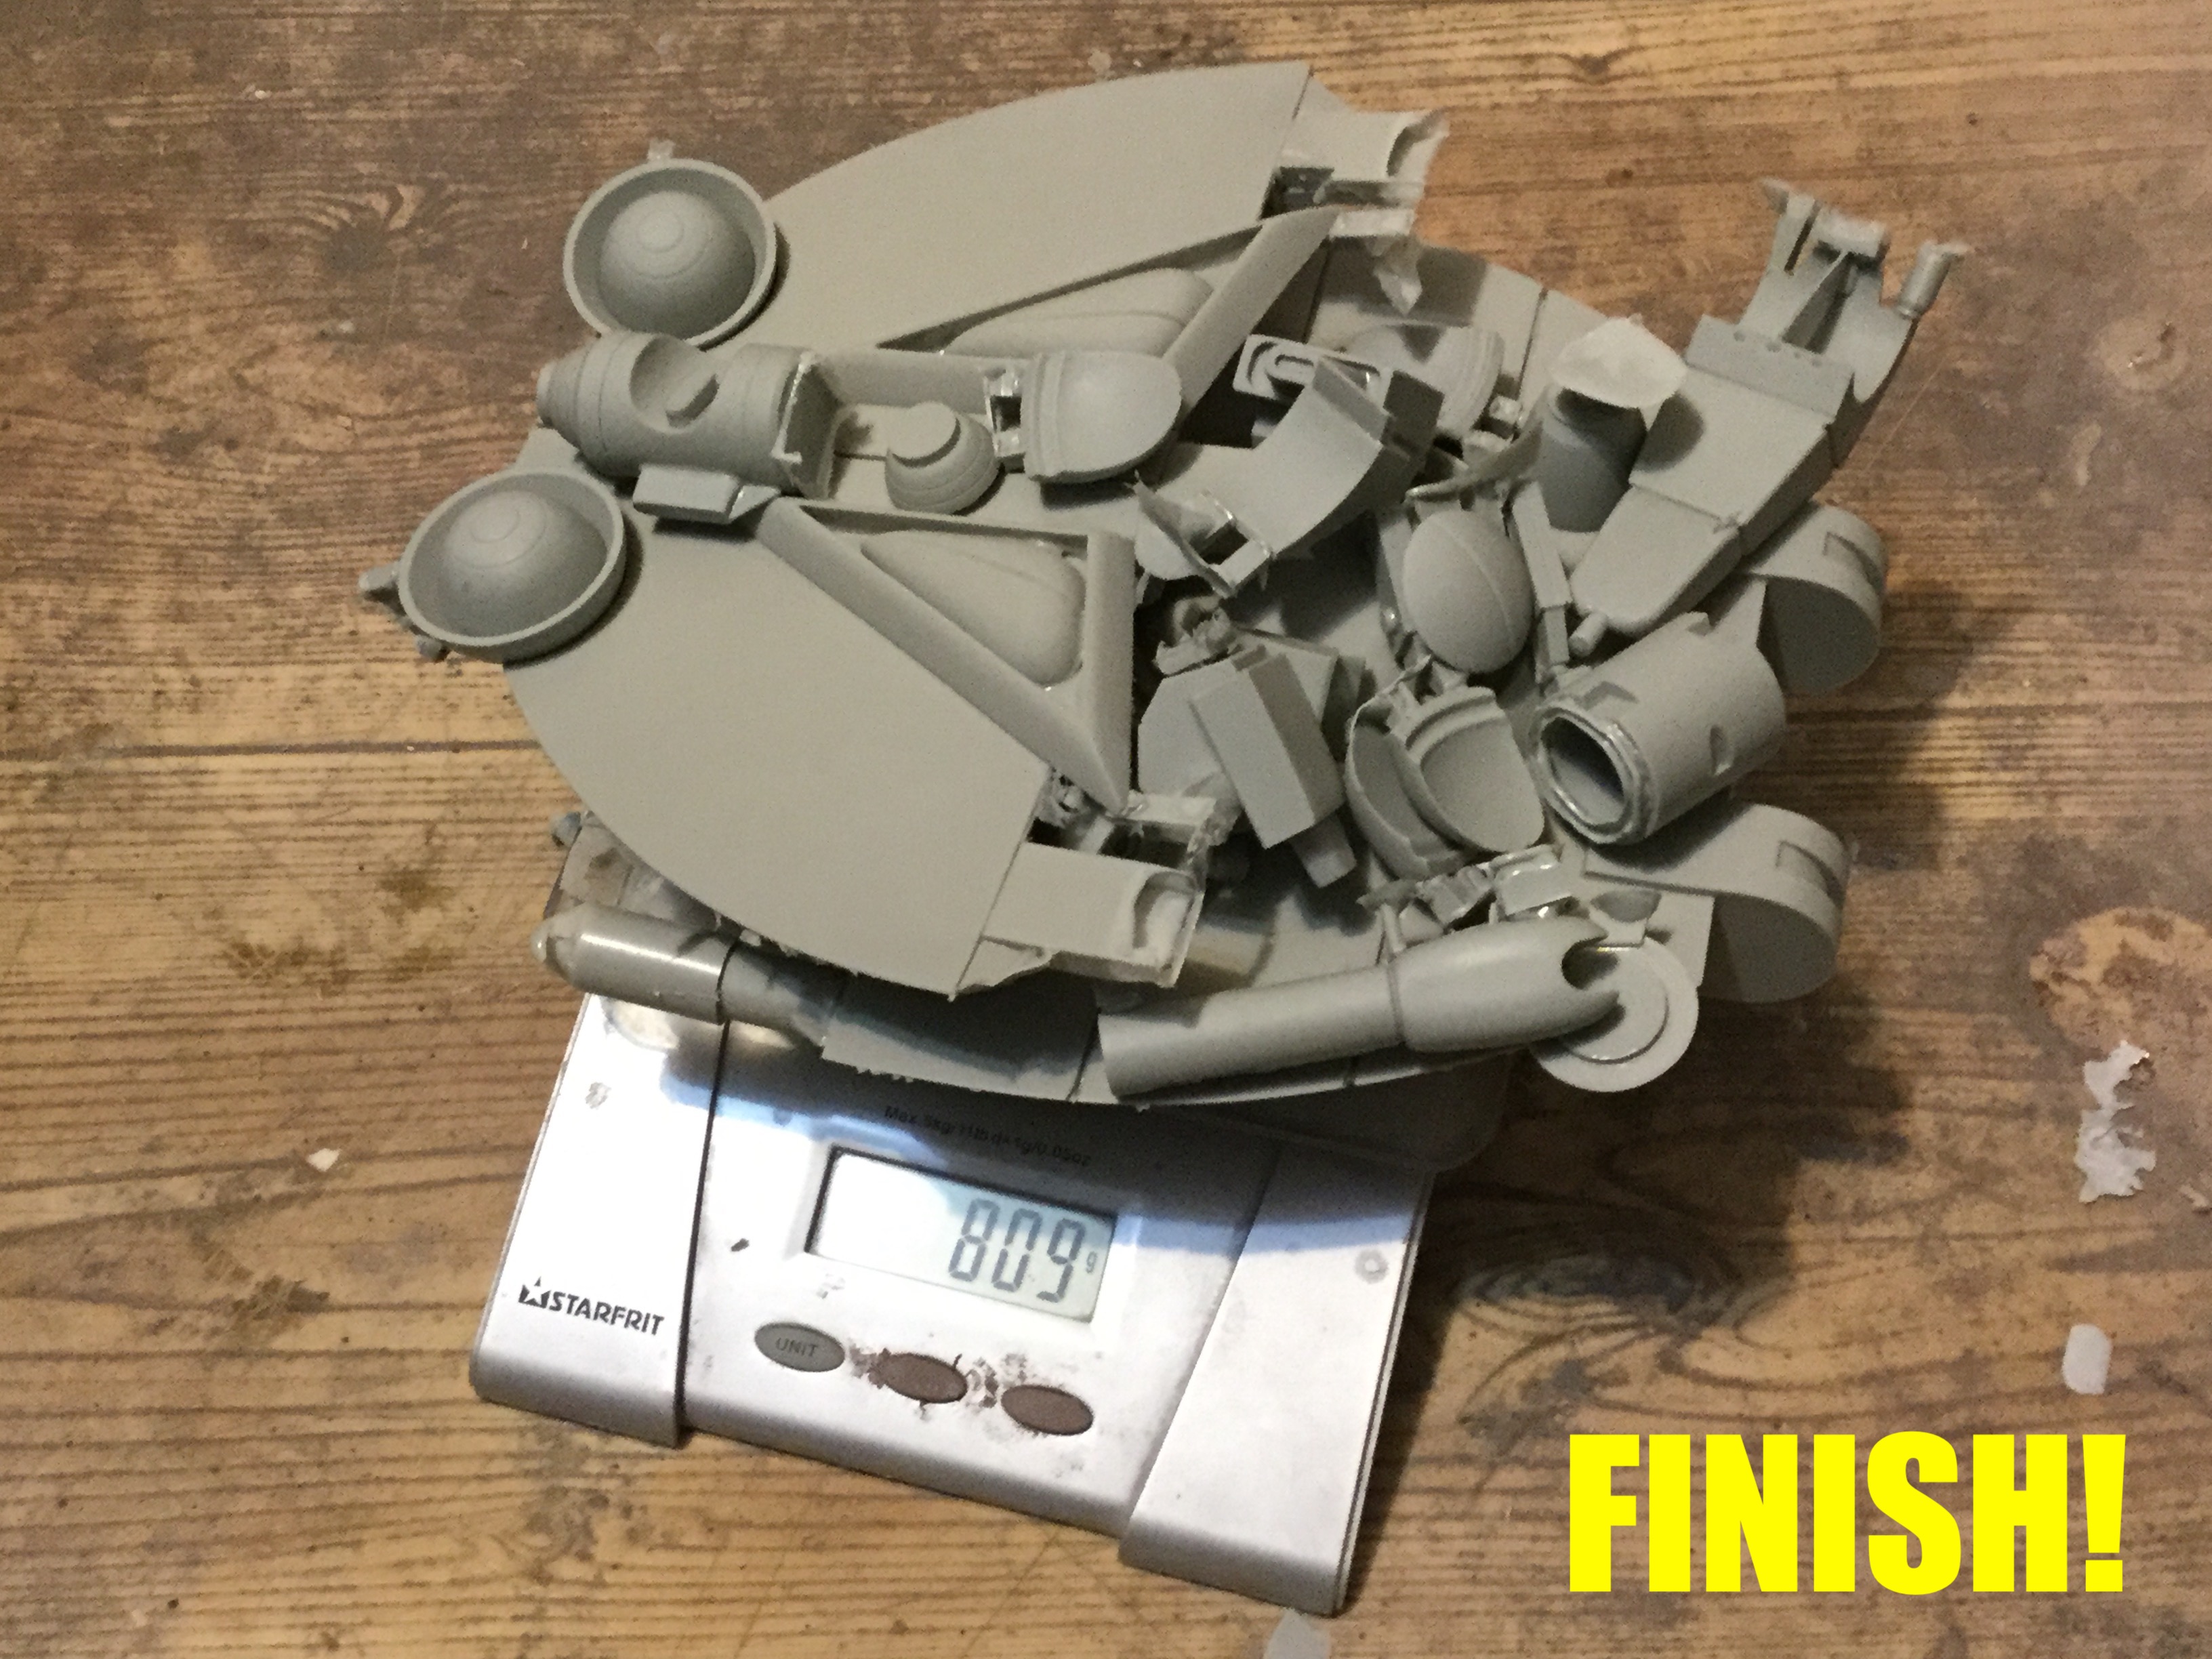
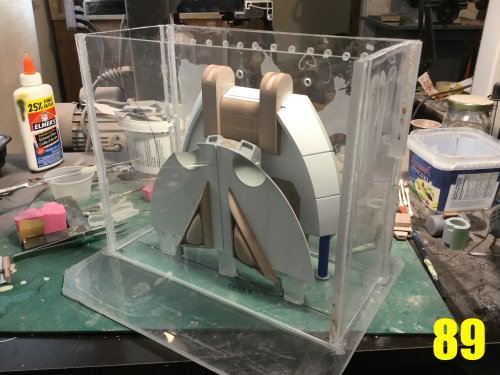
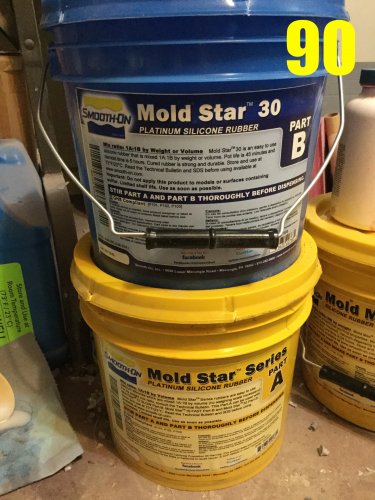
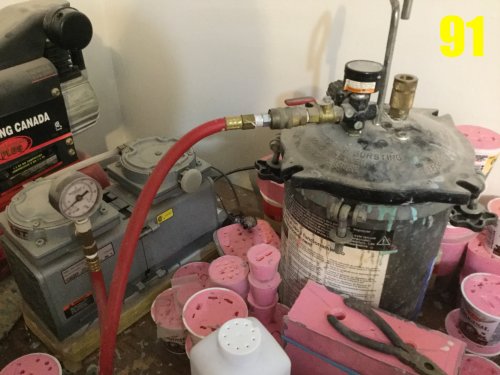
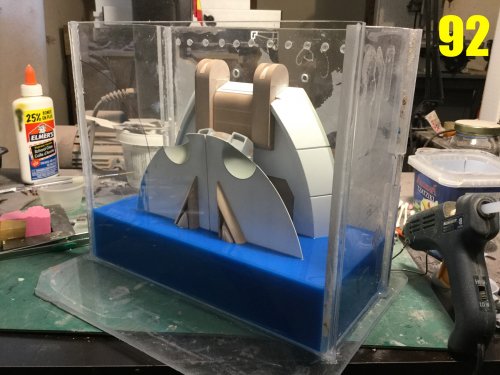
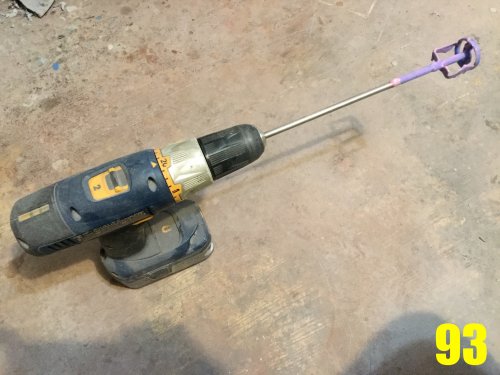
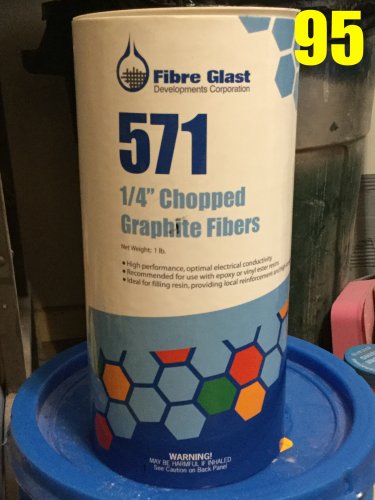
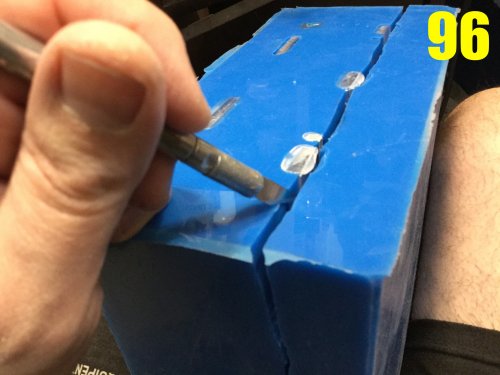
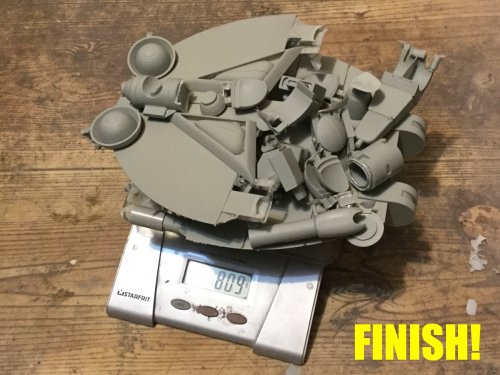
Captain’s log: April 14th, 2021. Because the hover-sled for the Bio-Lloyd is comprised of some of the biggest parts I’ve cast in the last 15 years, I had to take some exceptional steps for the molding of the hulls. Last week you saw the adding of the gates and sprues, as well as the construction of the mold box. Understand that these are some of the more extreme procedures needed for large parts, but can easily be transposed to smaller parts as needed. In pic 87, you can see that the whole part is hot-glued down to a 5mm acrylic base. You want to have a base thick enough to not flex under the weight of the box and then the silicone when poured, otherwise the part can detach and shift in the liquid silicone and ruin the whole mold. Pic 88: once the parts are attached to the base, the mold box is carefully placed and it too is hot glued to the base. You have to be very careful with this step; make sure the entire perimiter is sealed, otherwise the smallest gap will cause the mold to spring a leak! Pic 89: the whole box is sealed and now ready to accept the silicone rubber. You may notice that there’s lots of room inside the box, and this is by design: the bigger the part, the more resin it requires, and thus the more heat produced by the resin. Over time, the exothermic reaction will slowly cook the silicone and break it down, but the more mold material there is, the more the heat can be dissipated and thus preserve the mold. Pic 90: I worked-out some of the bugs in using the Mold Star silicone, so this is what I’ll be using. One distinct advantage is the very short cure time: a scant 8 hours as compared to the 24 hours needed for MOLD MAX, and because it’s platinum based and contains no ammonia, I don’t have to let the mold air-out for the next 2-3 days. Pic 91: even though Mold Star 30 is low viscosity, it still needs to be degassed before pouring, so after I mix the two parts thoroughly, they go into the vacuum chamber for a few minutes. Pic 92: another critical trick you need to use with large molds like these is to pour it in 3-4 parts. The idea being that you pour the first part a quarter of the way and let it partly cure: in doing so, the silicone will gel and help seal the bottom of the mold. You have to remember that the sheer weight of the silicone will push against the mold box and if it’s not properly braced, can cause it to burs open. Ask me how I know… Once that first part turns relatively tacky, I can pour the rest of the mold (still in stages) until the parts are fully submerged. Pic 93: an important tool when mixing silicone rubber is a squirrel cage mixer, which you see attached to my drill. Hand mixing, particularly for anything over 500ml, is neither fast nor thorough enough, so a good mixer will ensure a uniform mix, and no uncured surprises. Pic 94: the mold is now cured! Before demolding, I need to create a reinforced bottom to support the mold, and since this is one heavy mold, I didn’t want to take the chance of just using resin and have it fail, so I mixed the resin with some chopped carbon fiber for added reinforcement; I’m just extreme like that. The exact product I used is shown in pic 95. Pic 96: now that the reinforcement has also fully cured, I can proceed to the extraction of the masters. Using my trusty hobby knife and a new blade, I carefully cut the mold open and extract the masters. Pic 97: 4.7 kilos, baby!! That’s a little over 10lbs for you Imperialists, and this is without the box, and he masters extracted. Now the real test will be the castings themselves. The molds are a success: 850ml of resin just for the sled parts, and another 400 for the Bio Lloyd mecha, so 1250g of resin for one kit, excluding the rubber parts. As I type this, production is already underway, and this brings my 1/48 BIO LLOYD tutorial to a close. I sincerely hope that even if you never get around to using any of these techniques, that you still learned a few things, and come away with an appreciation of old-school model making, as well as all the time, effort and planning that goes into making a model like this.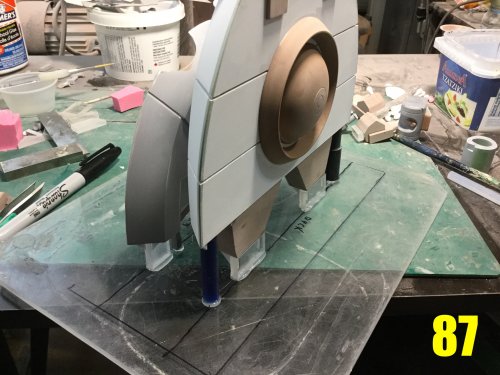


-
1/48 SOUTHERN CROSS BIOROID
captain america replied to captain america's topic in Anime or Science Fiction
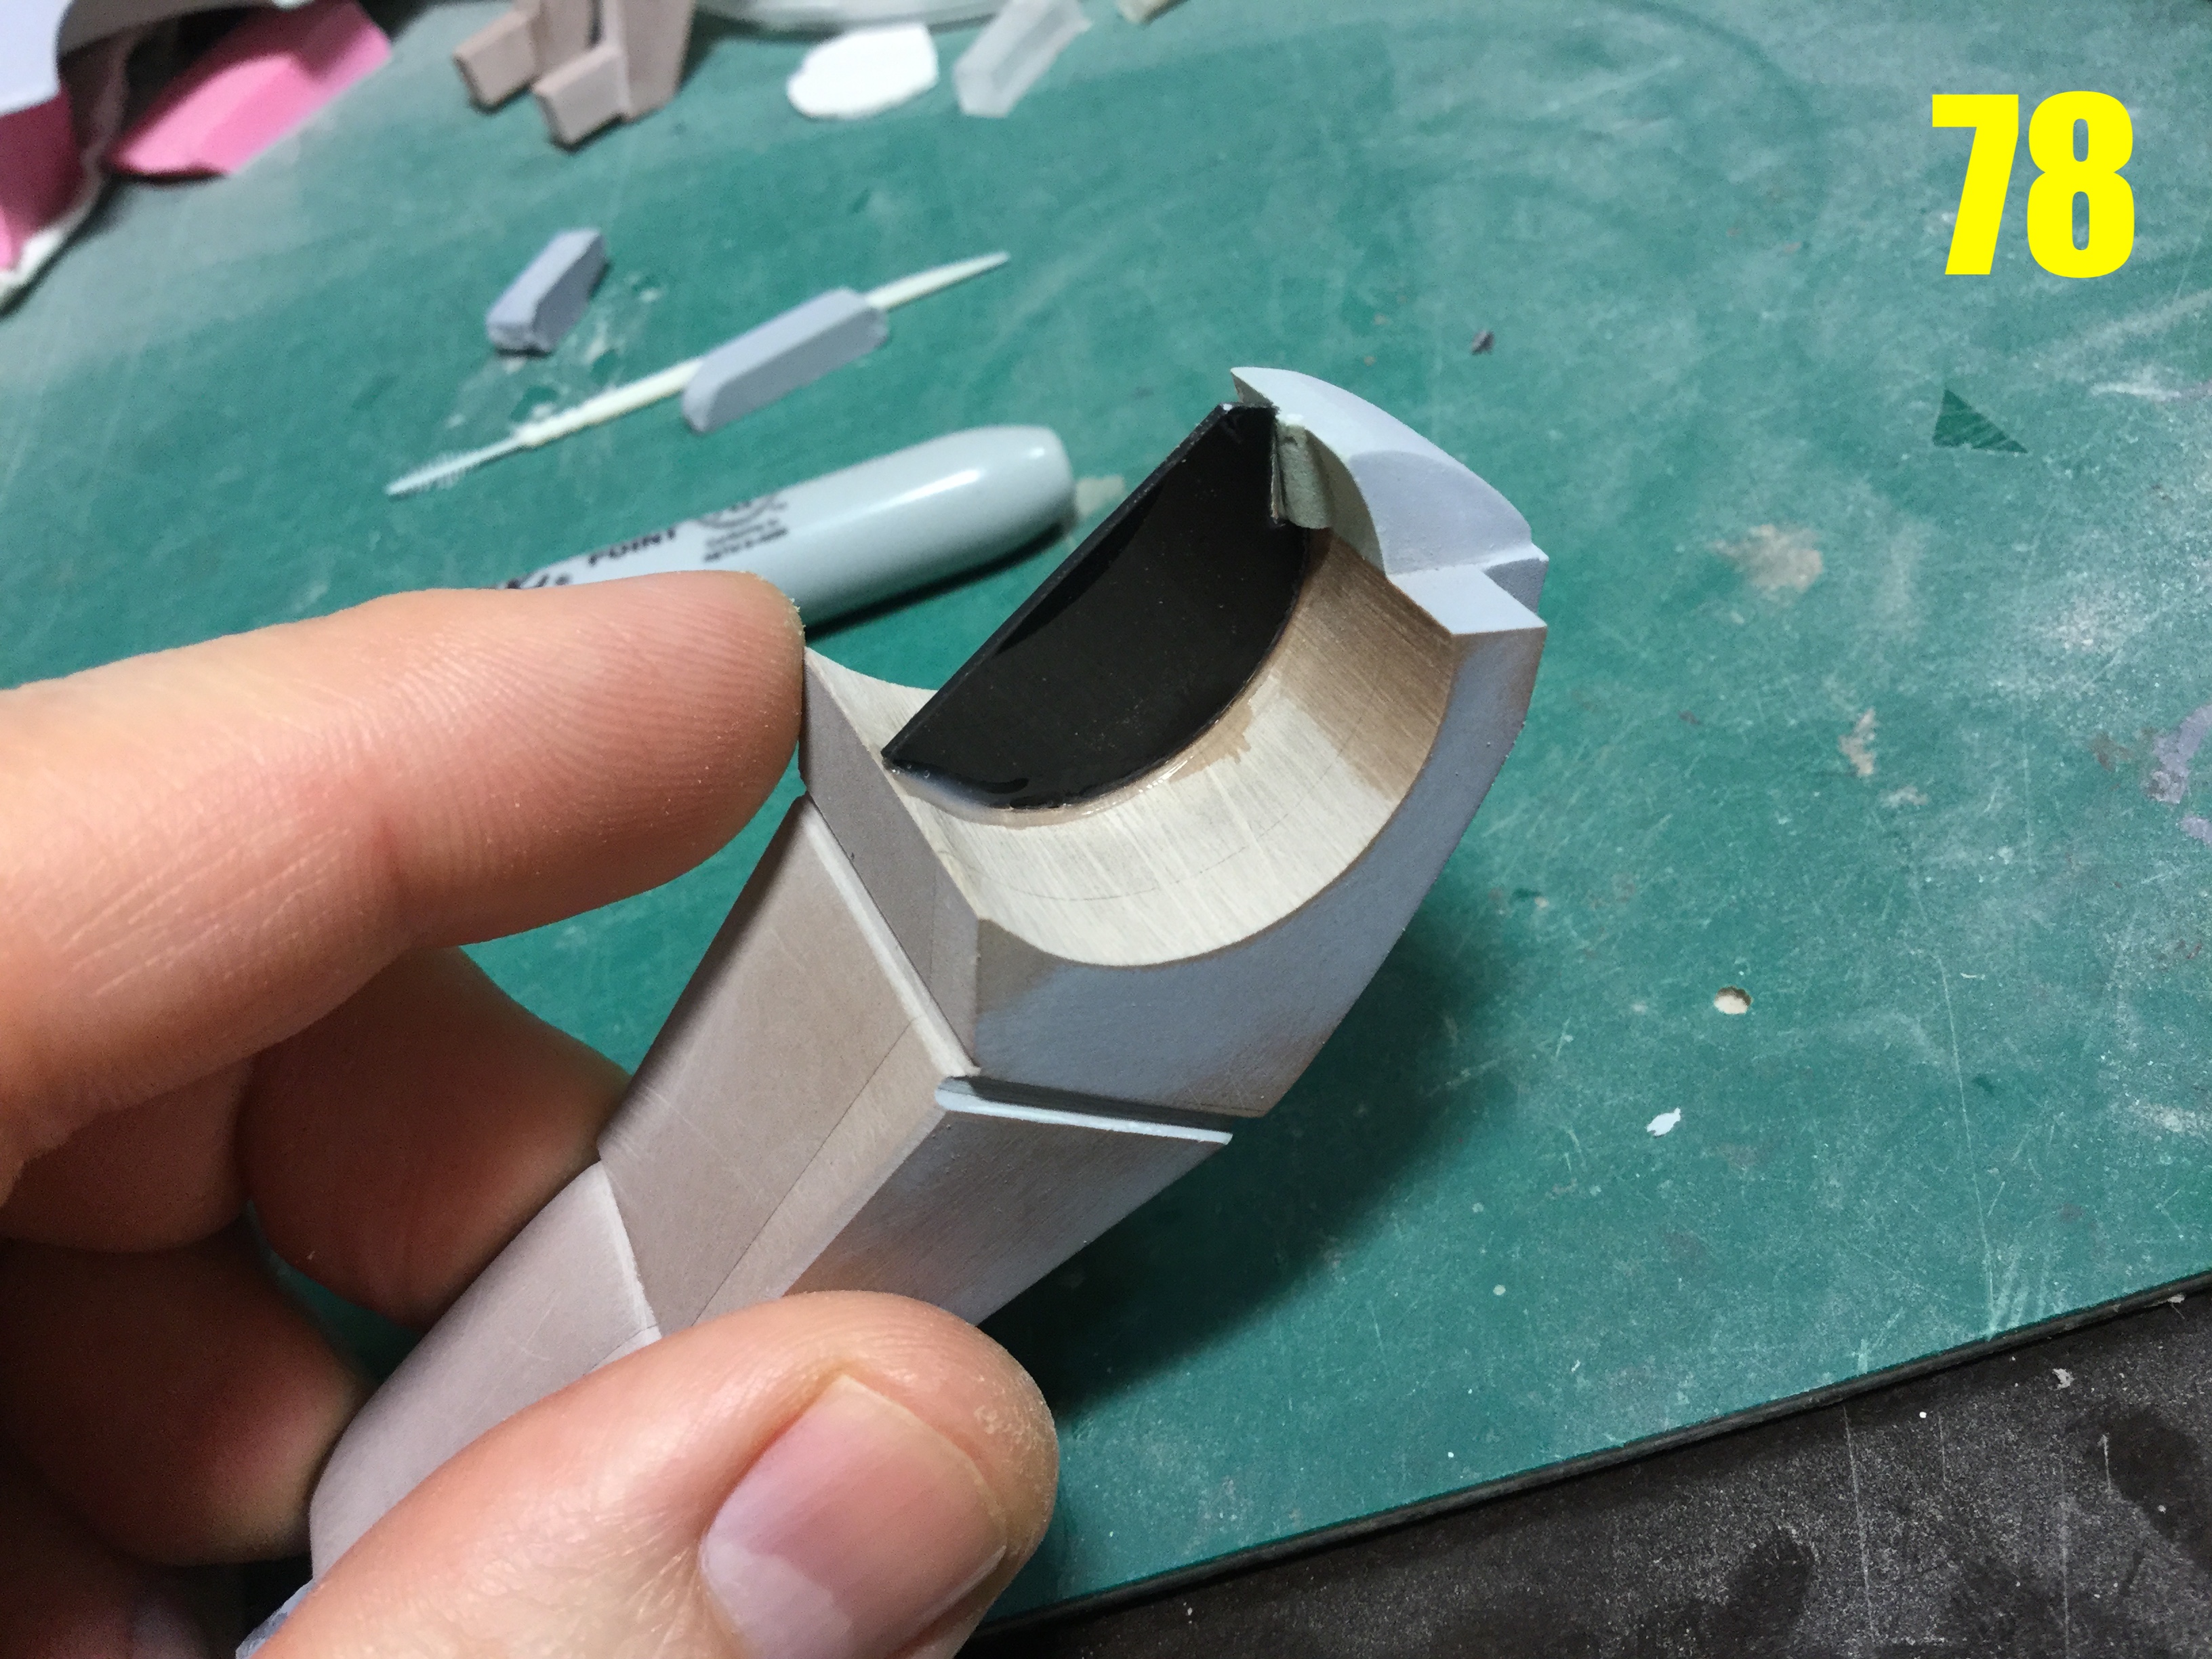
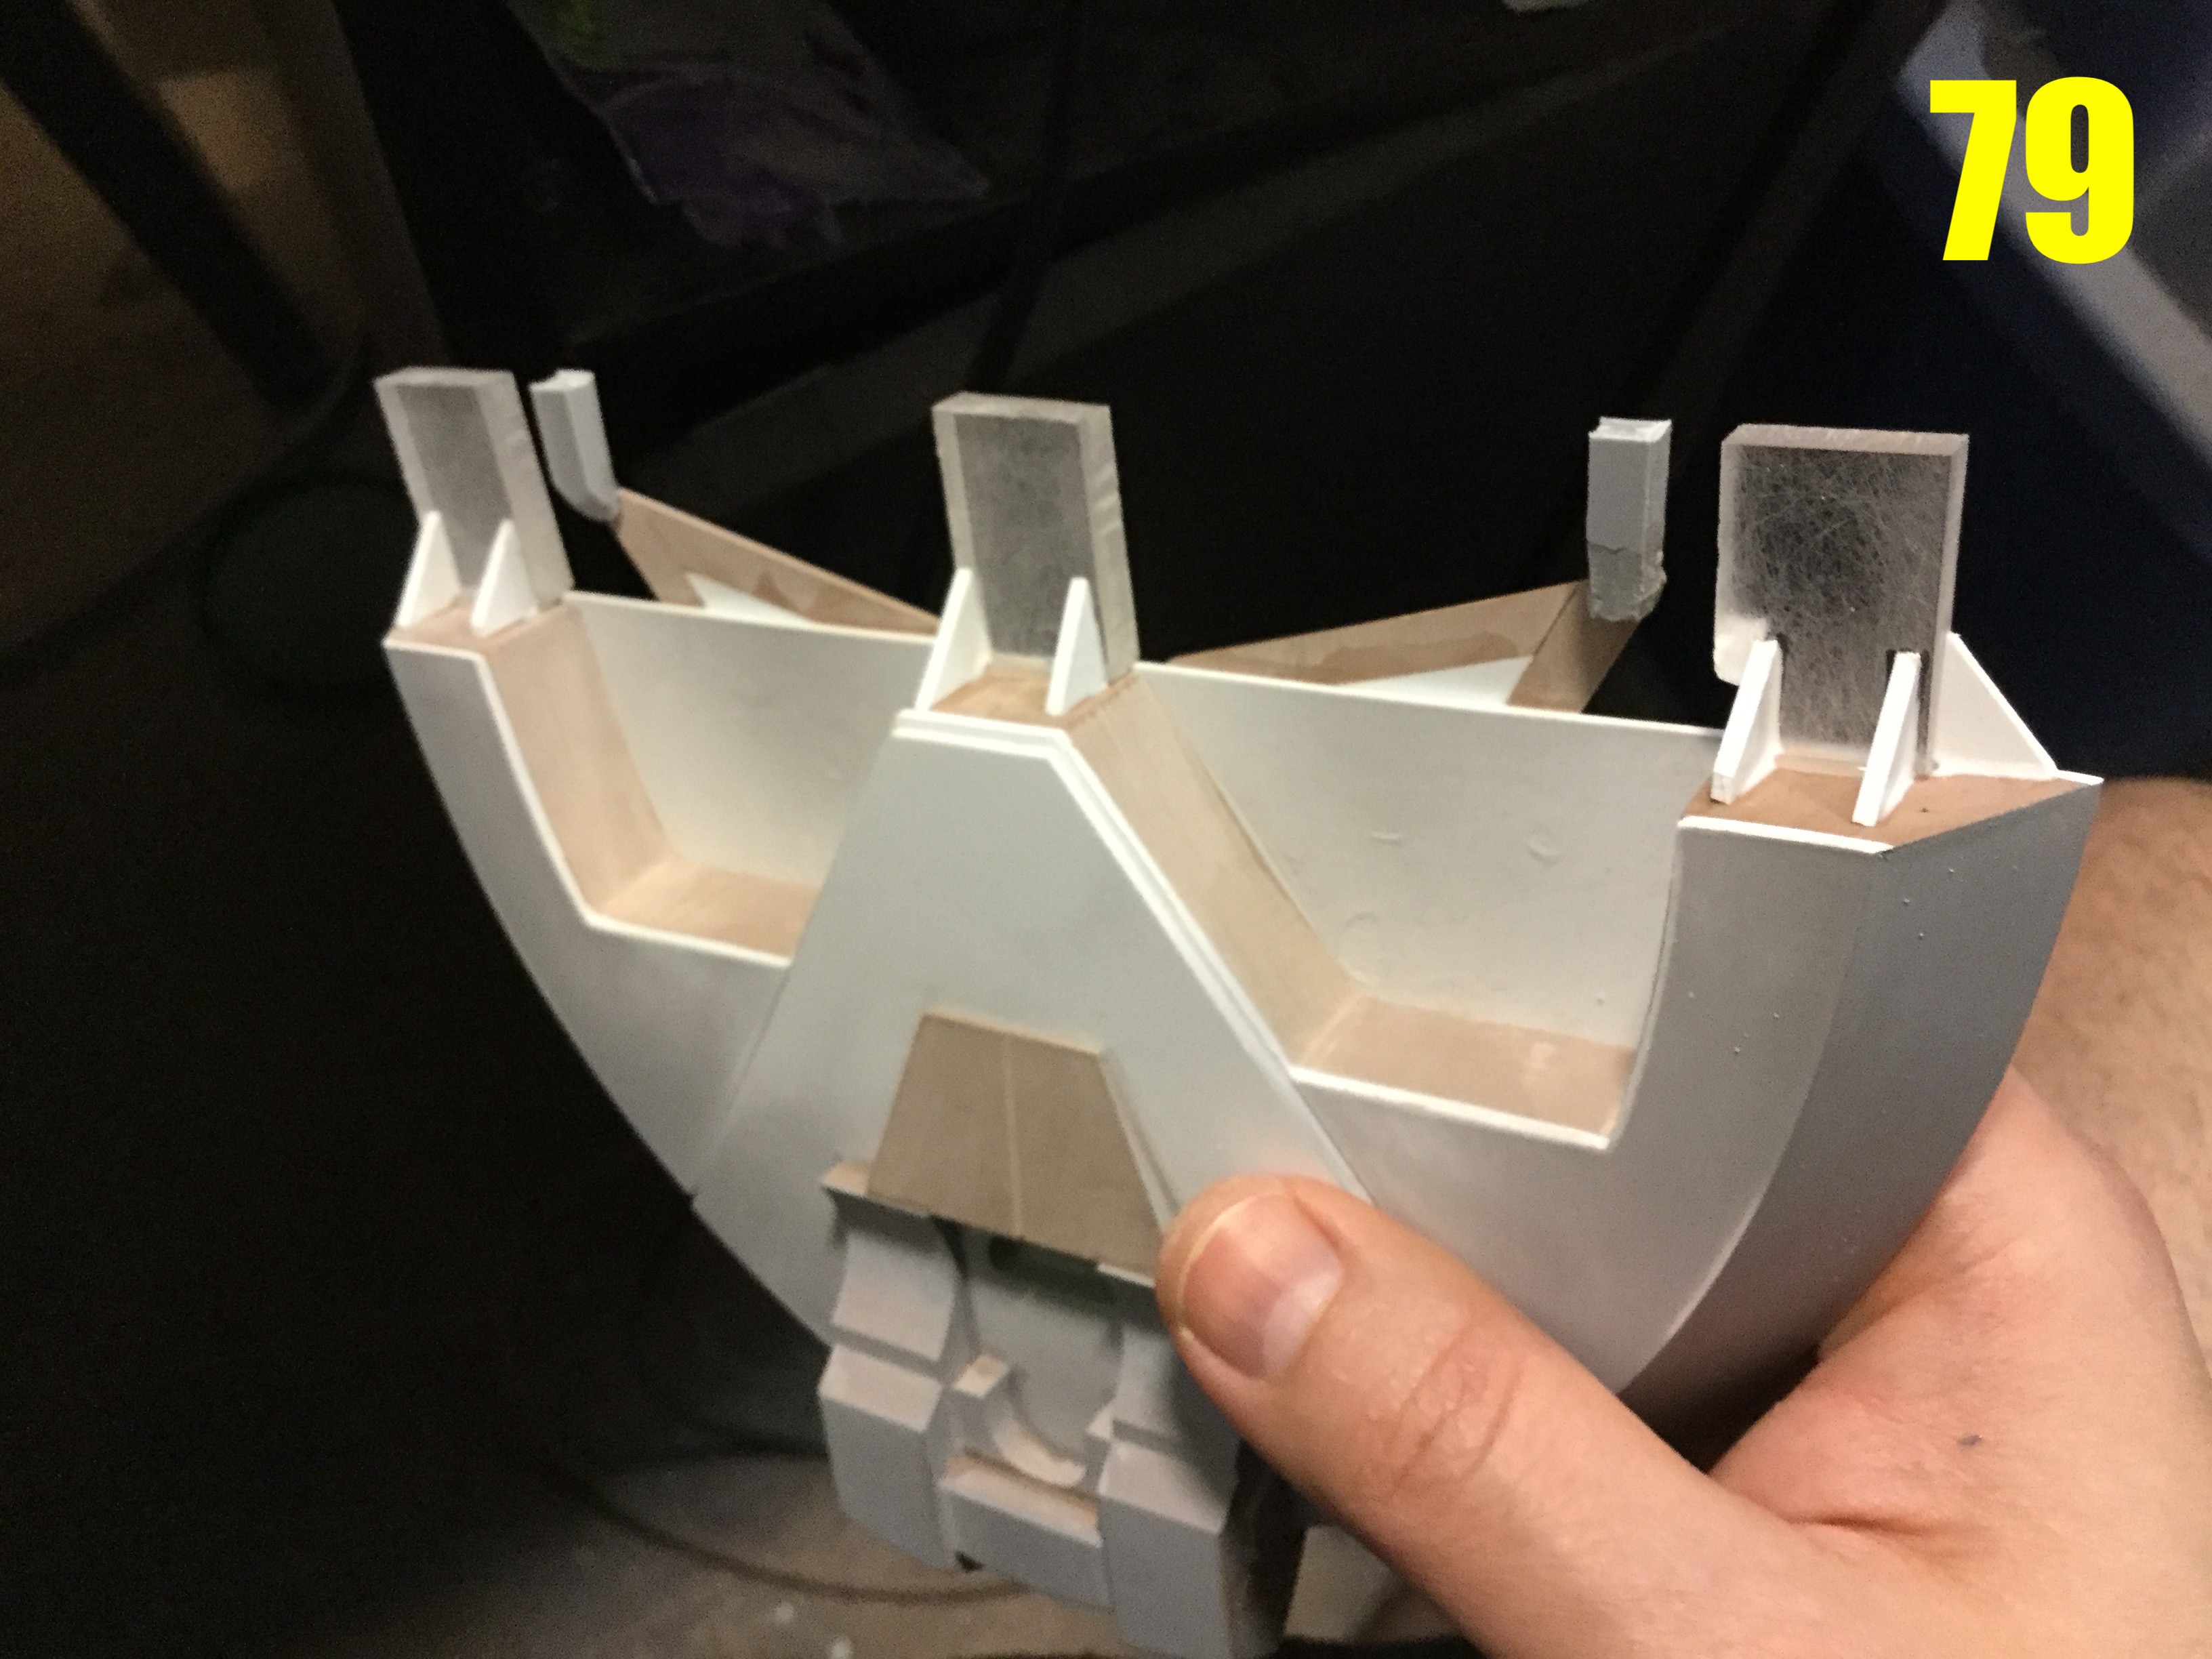
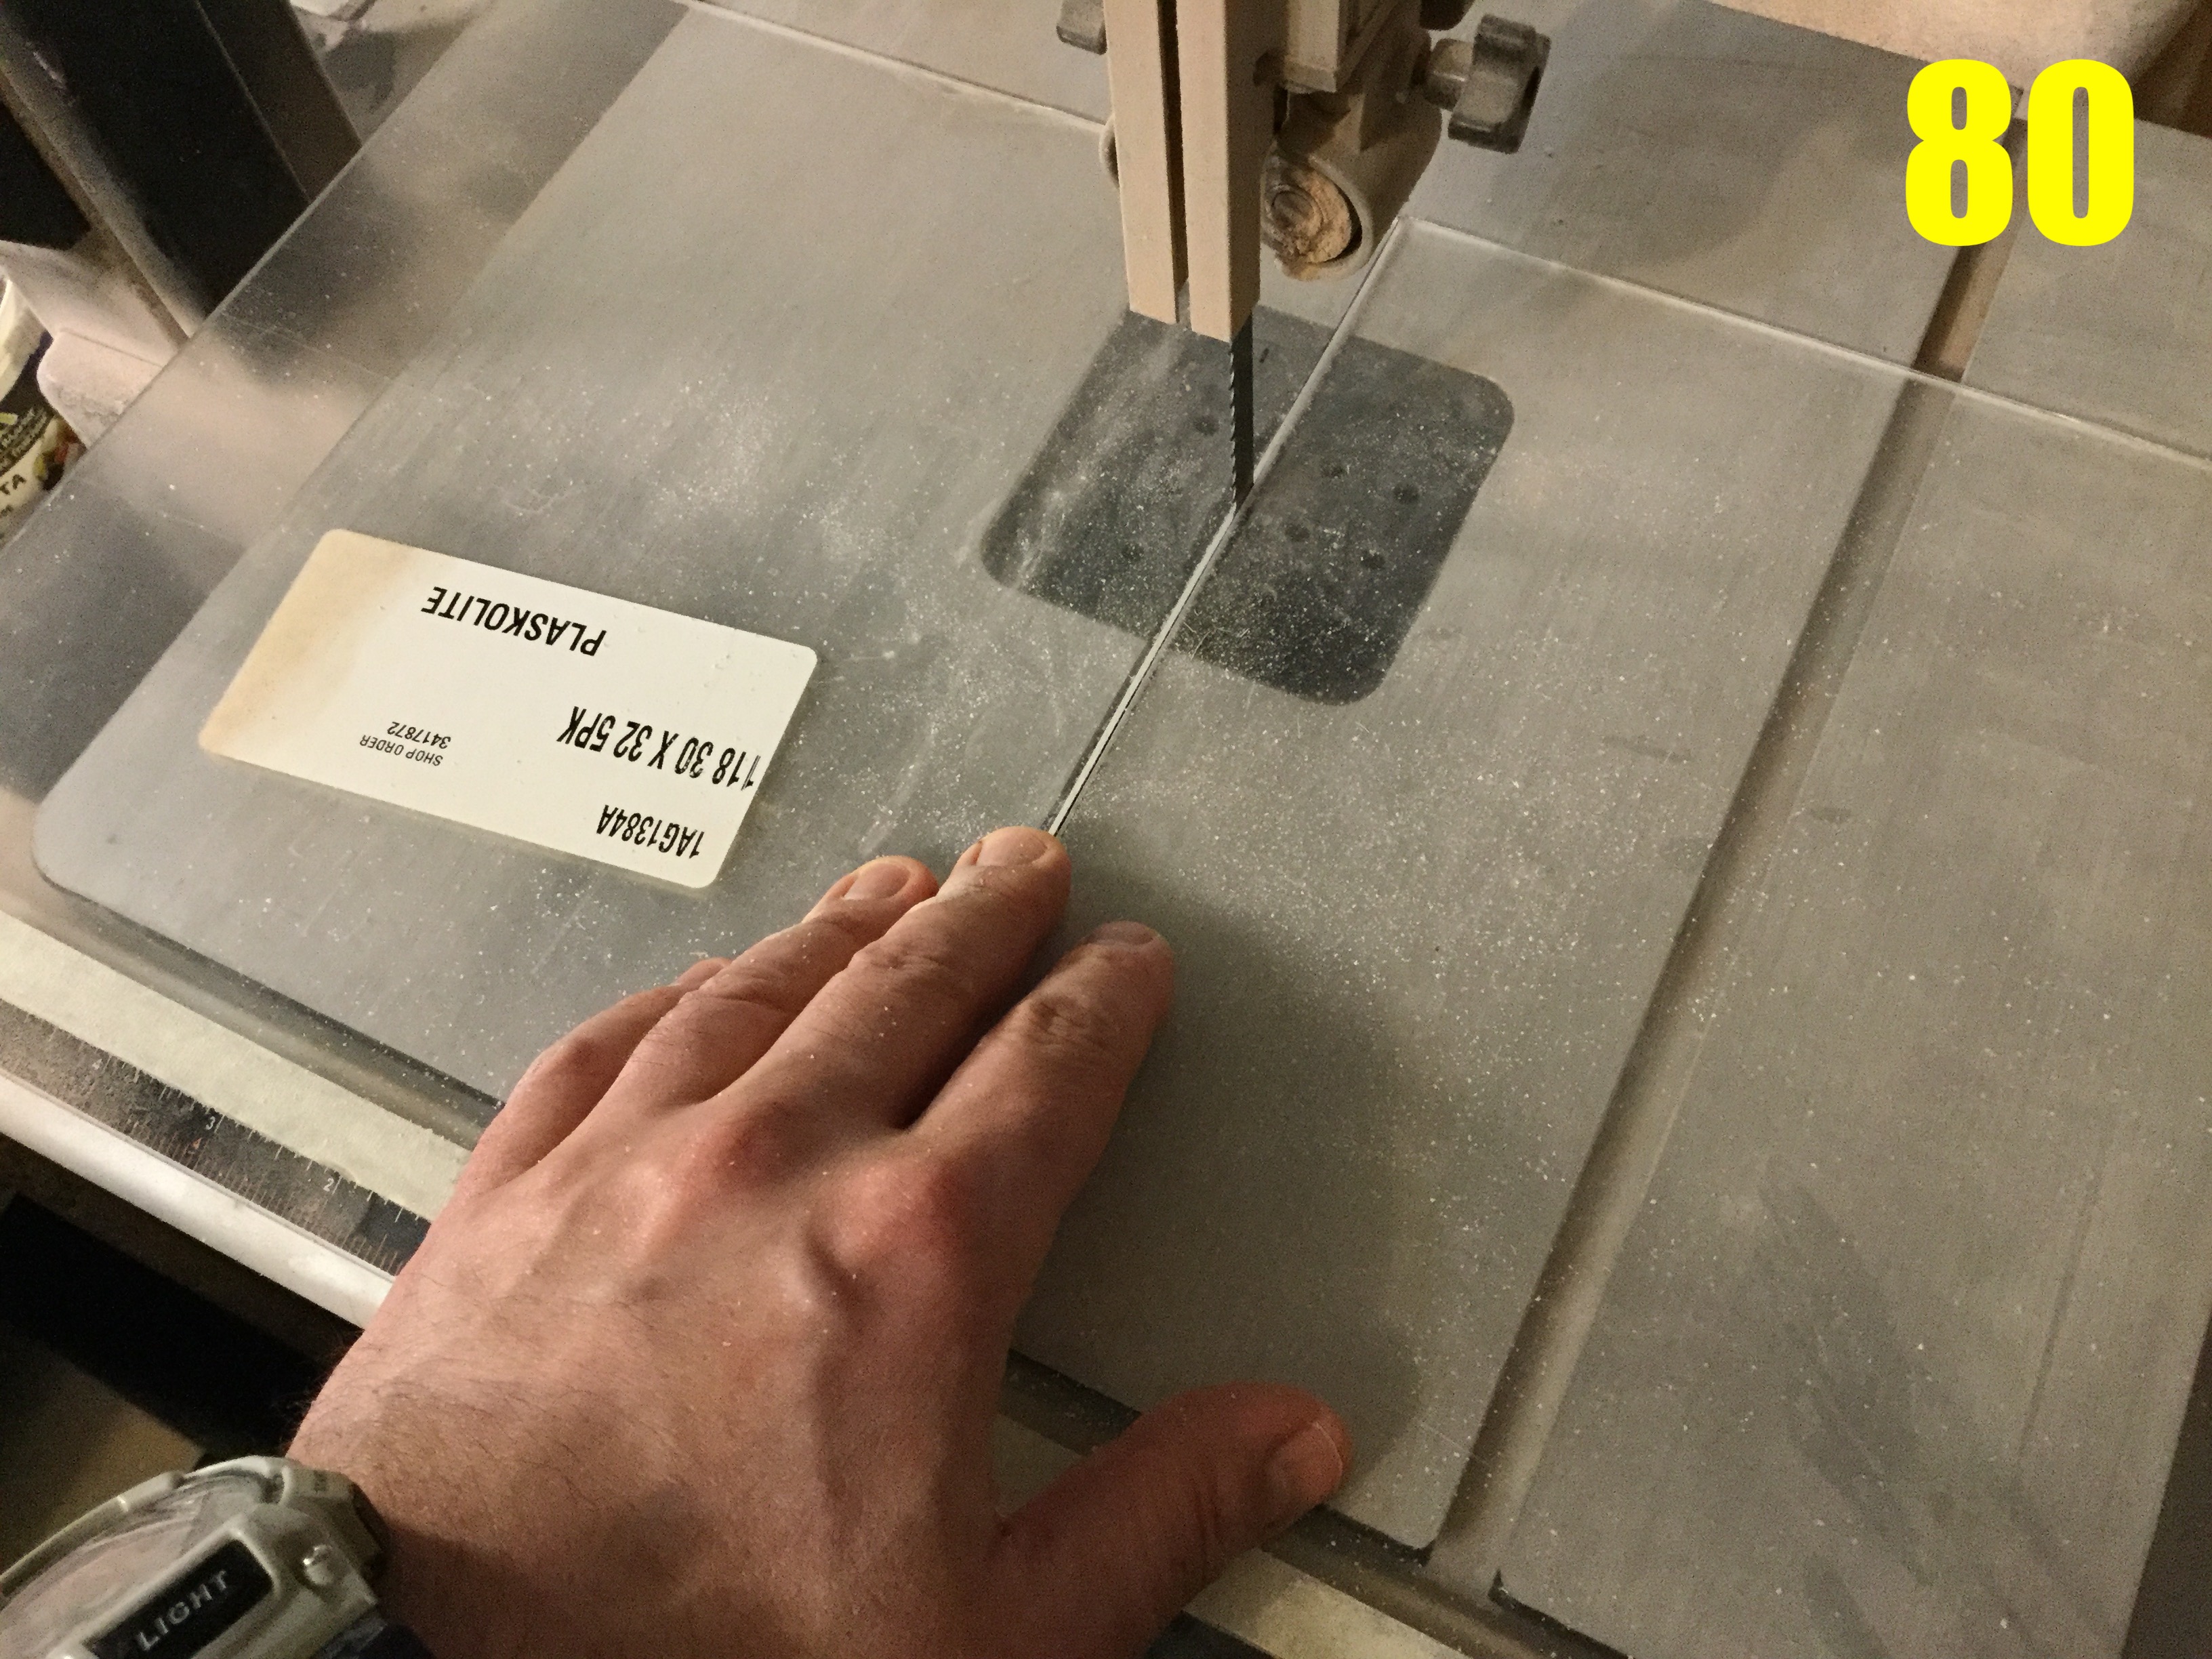
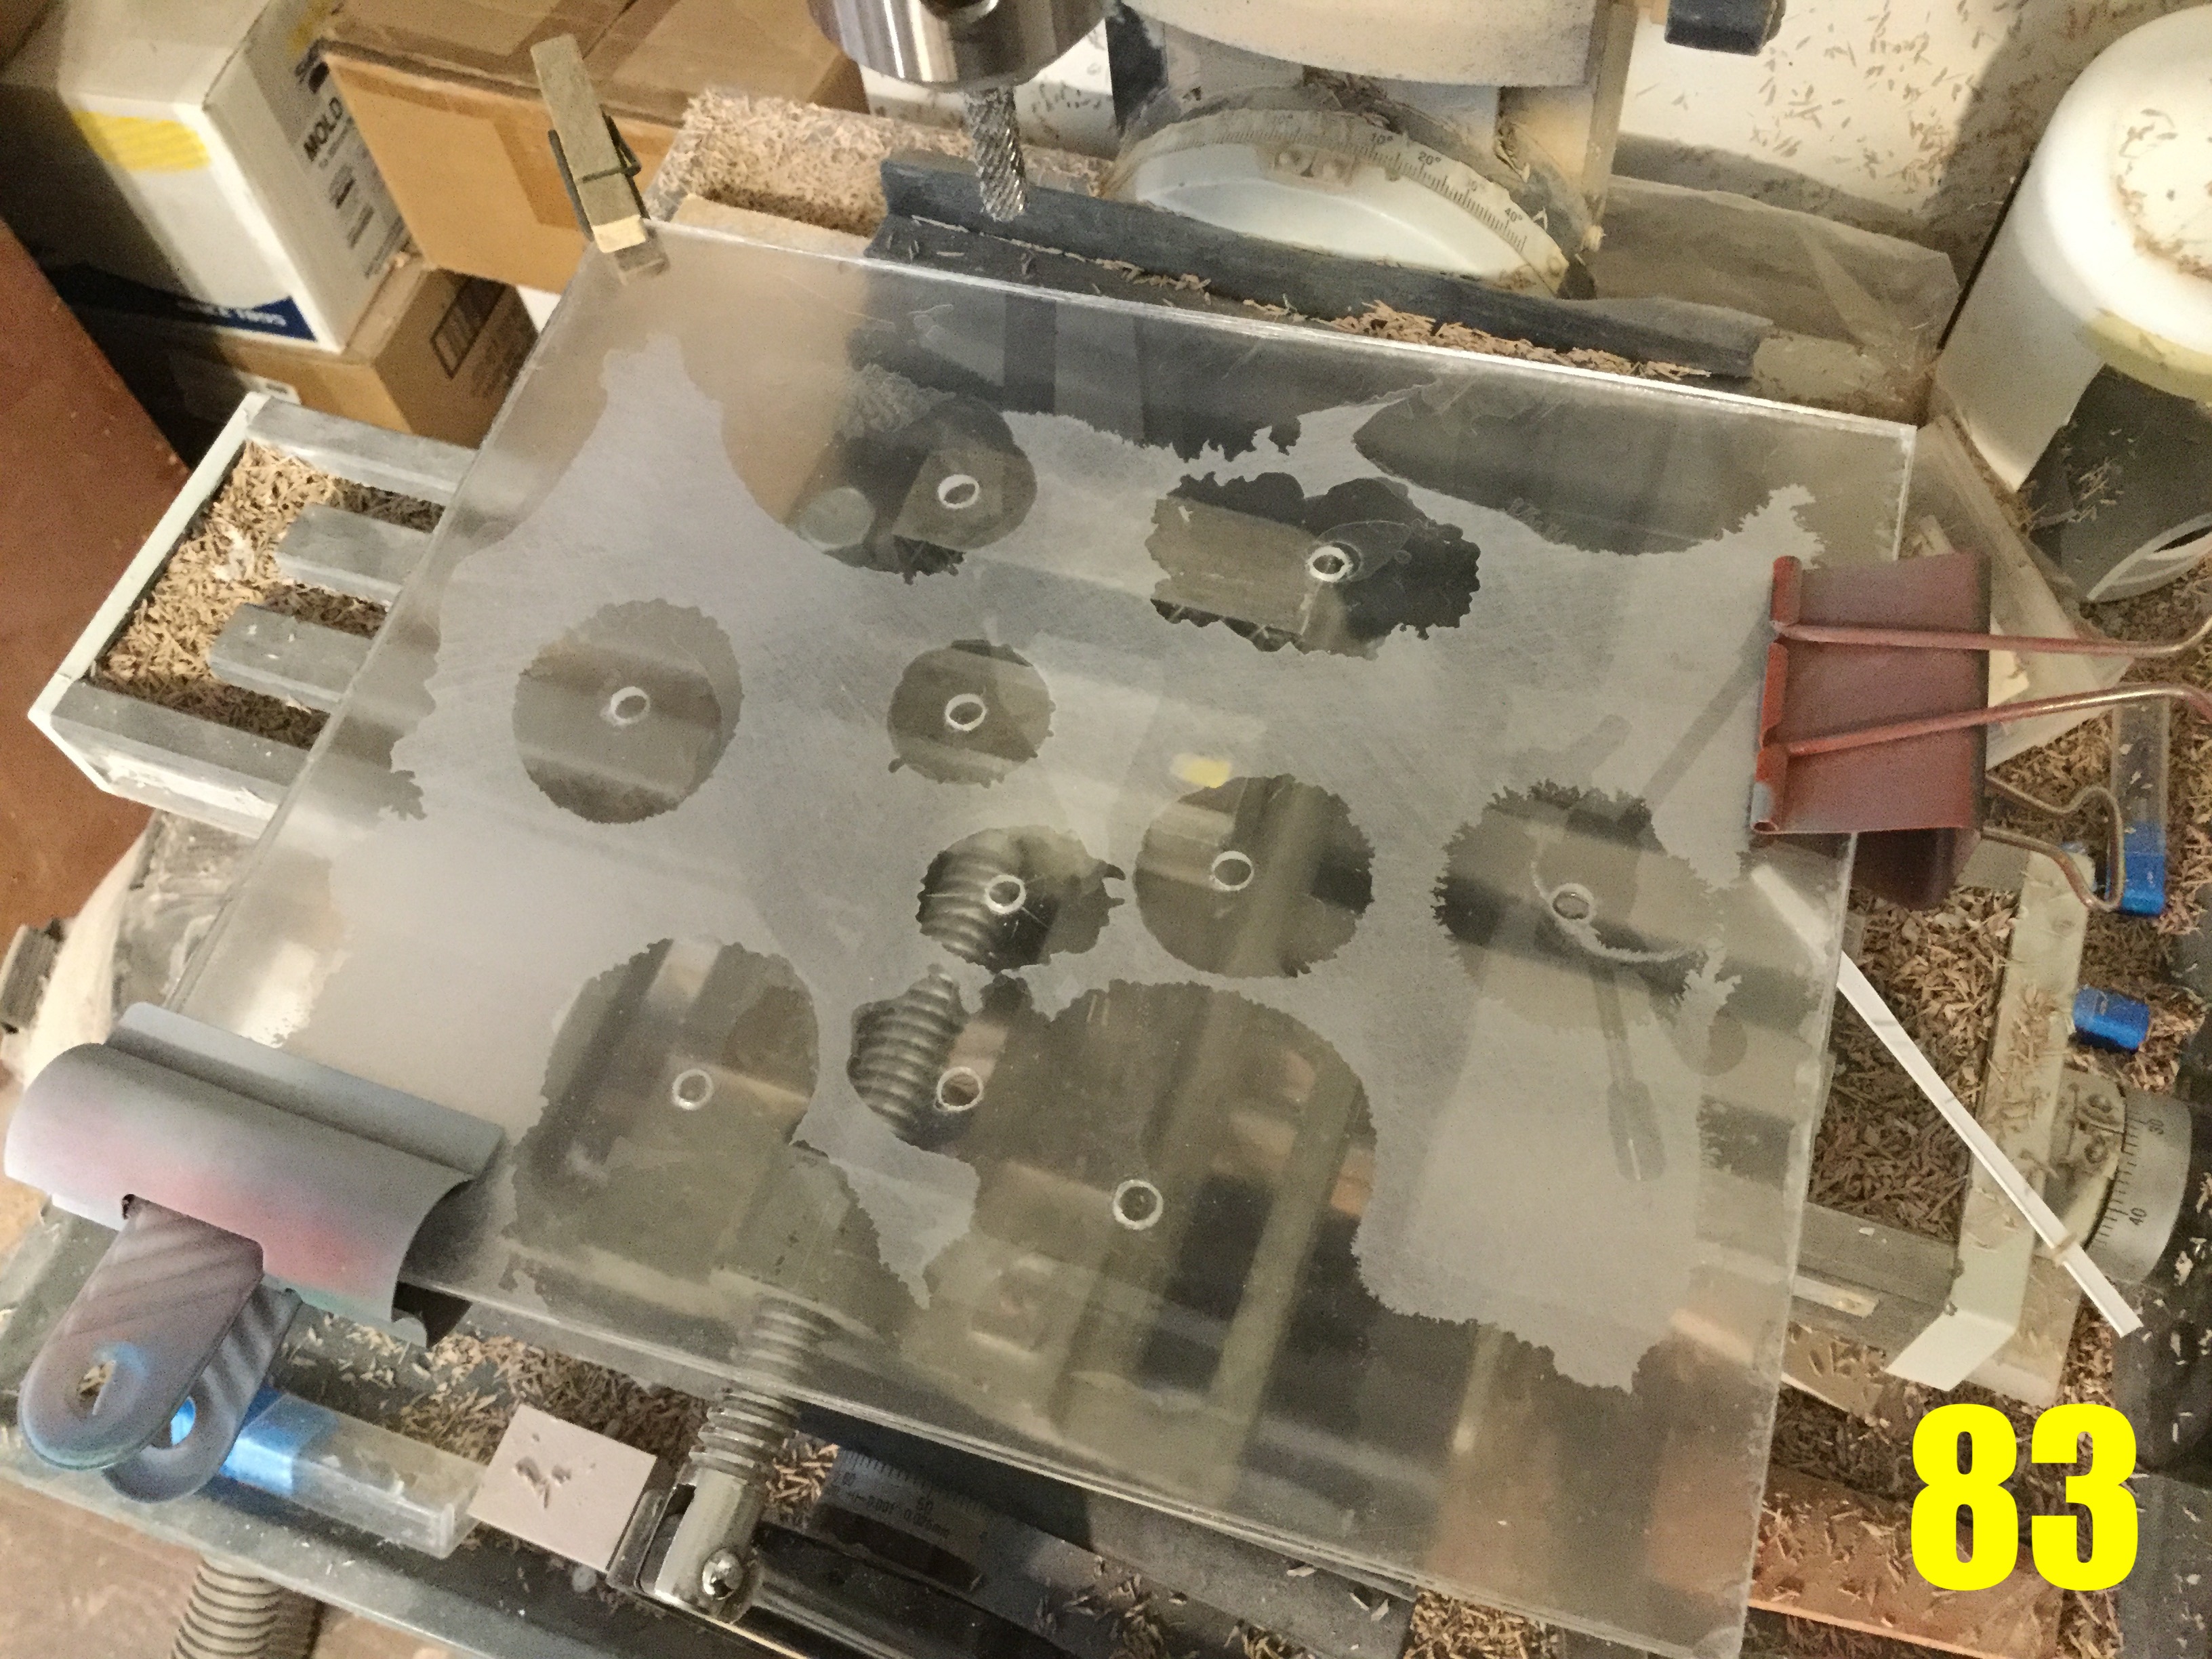
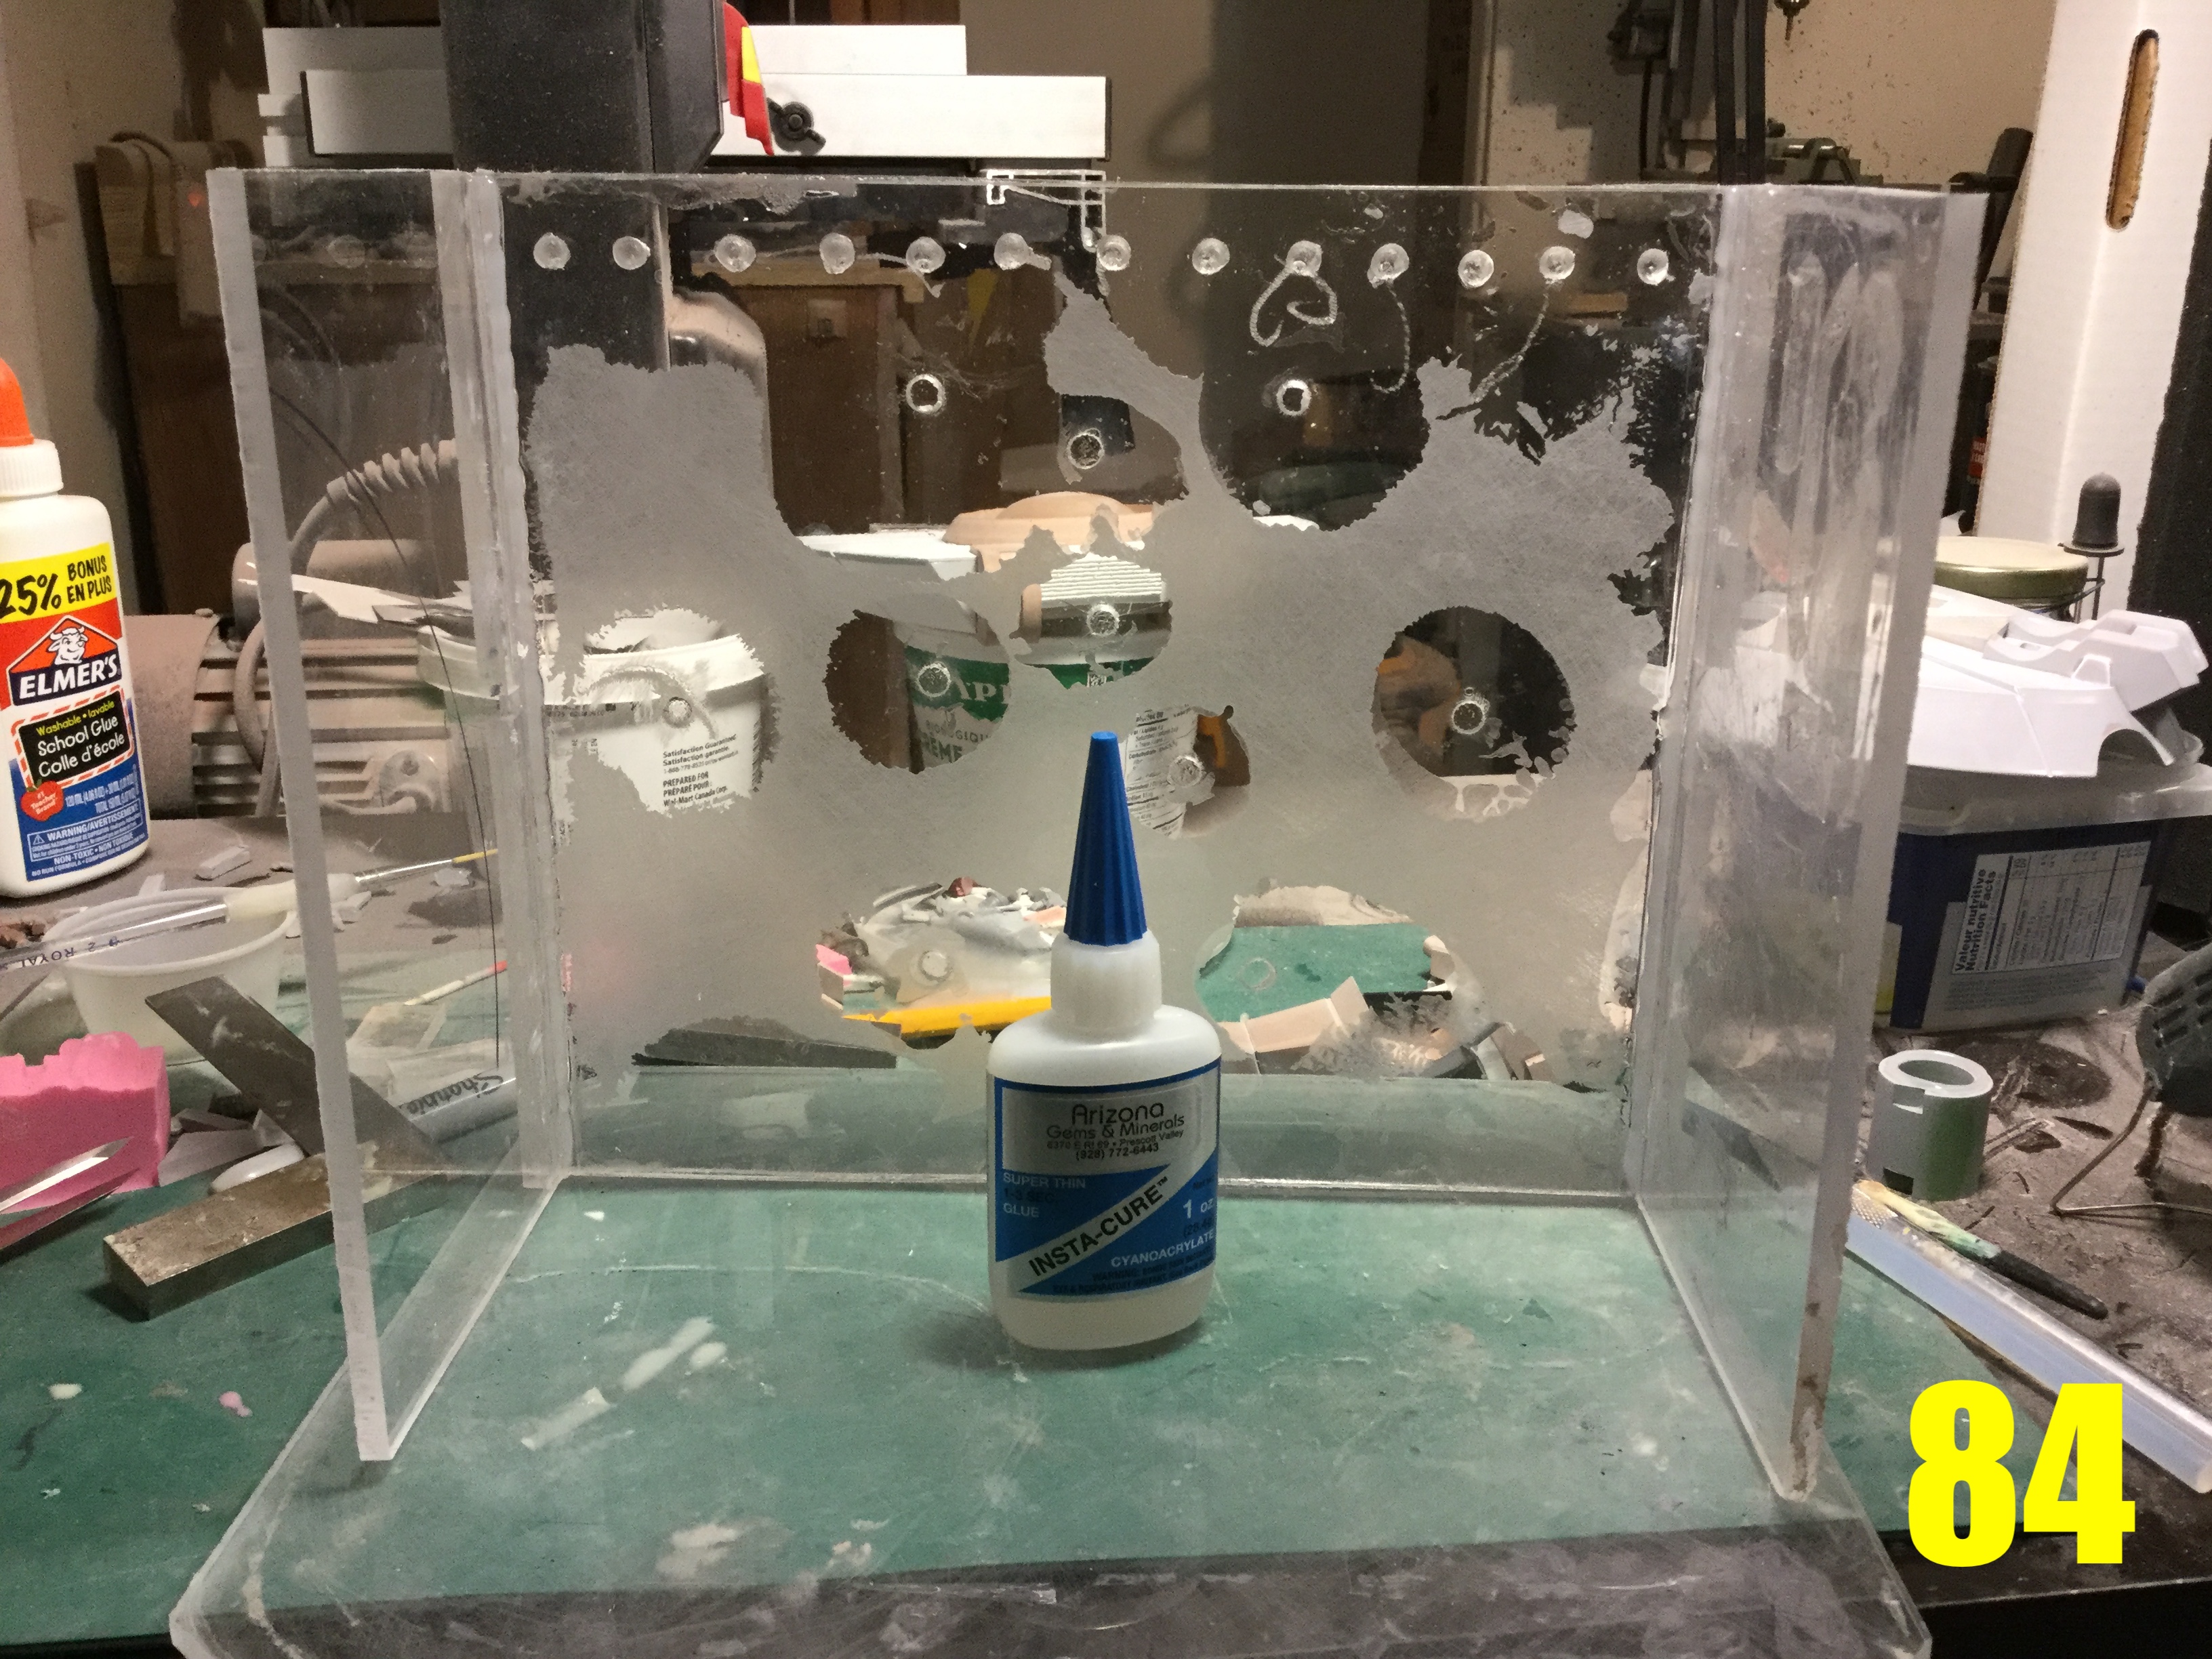
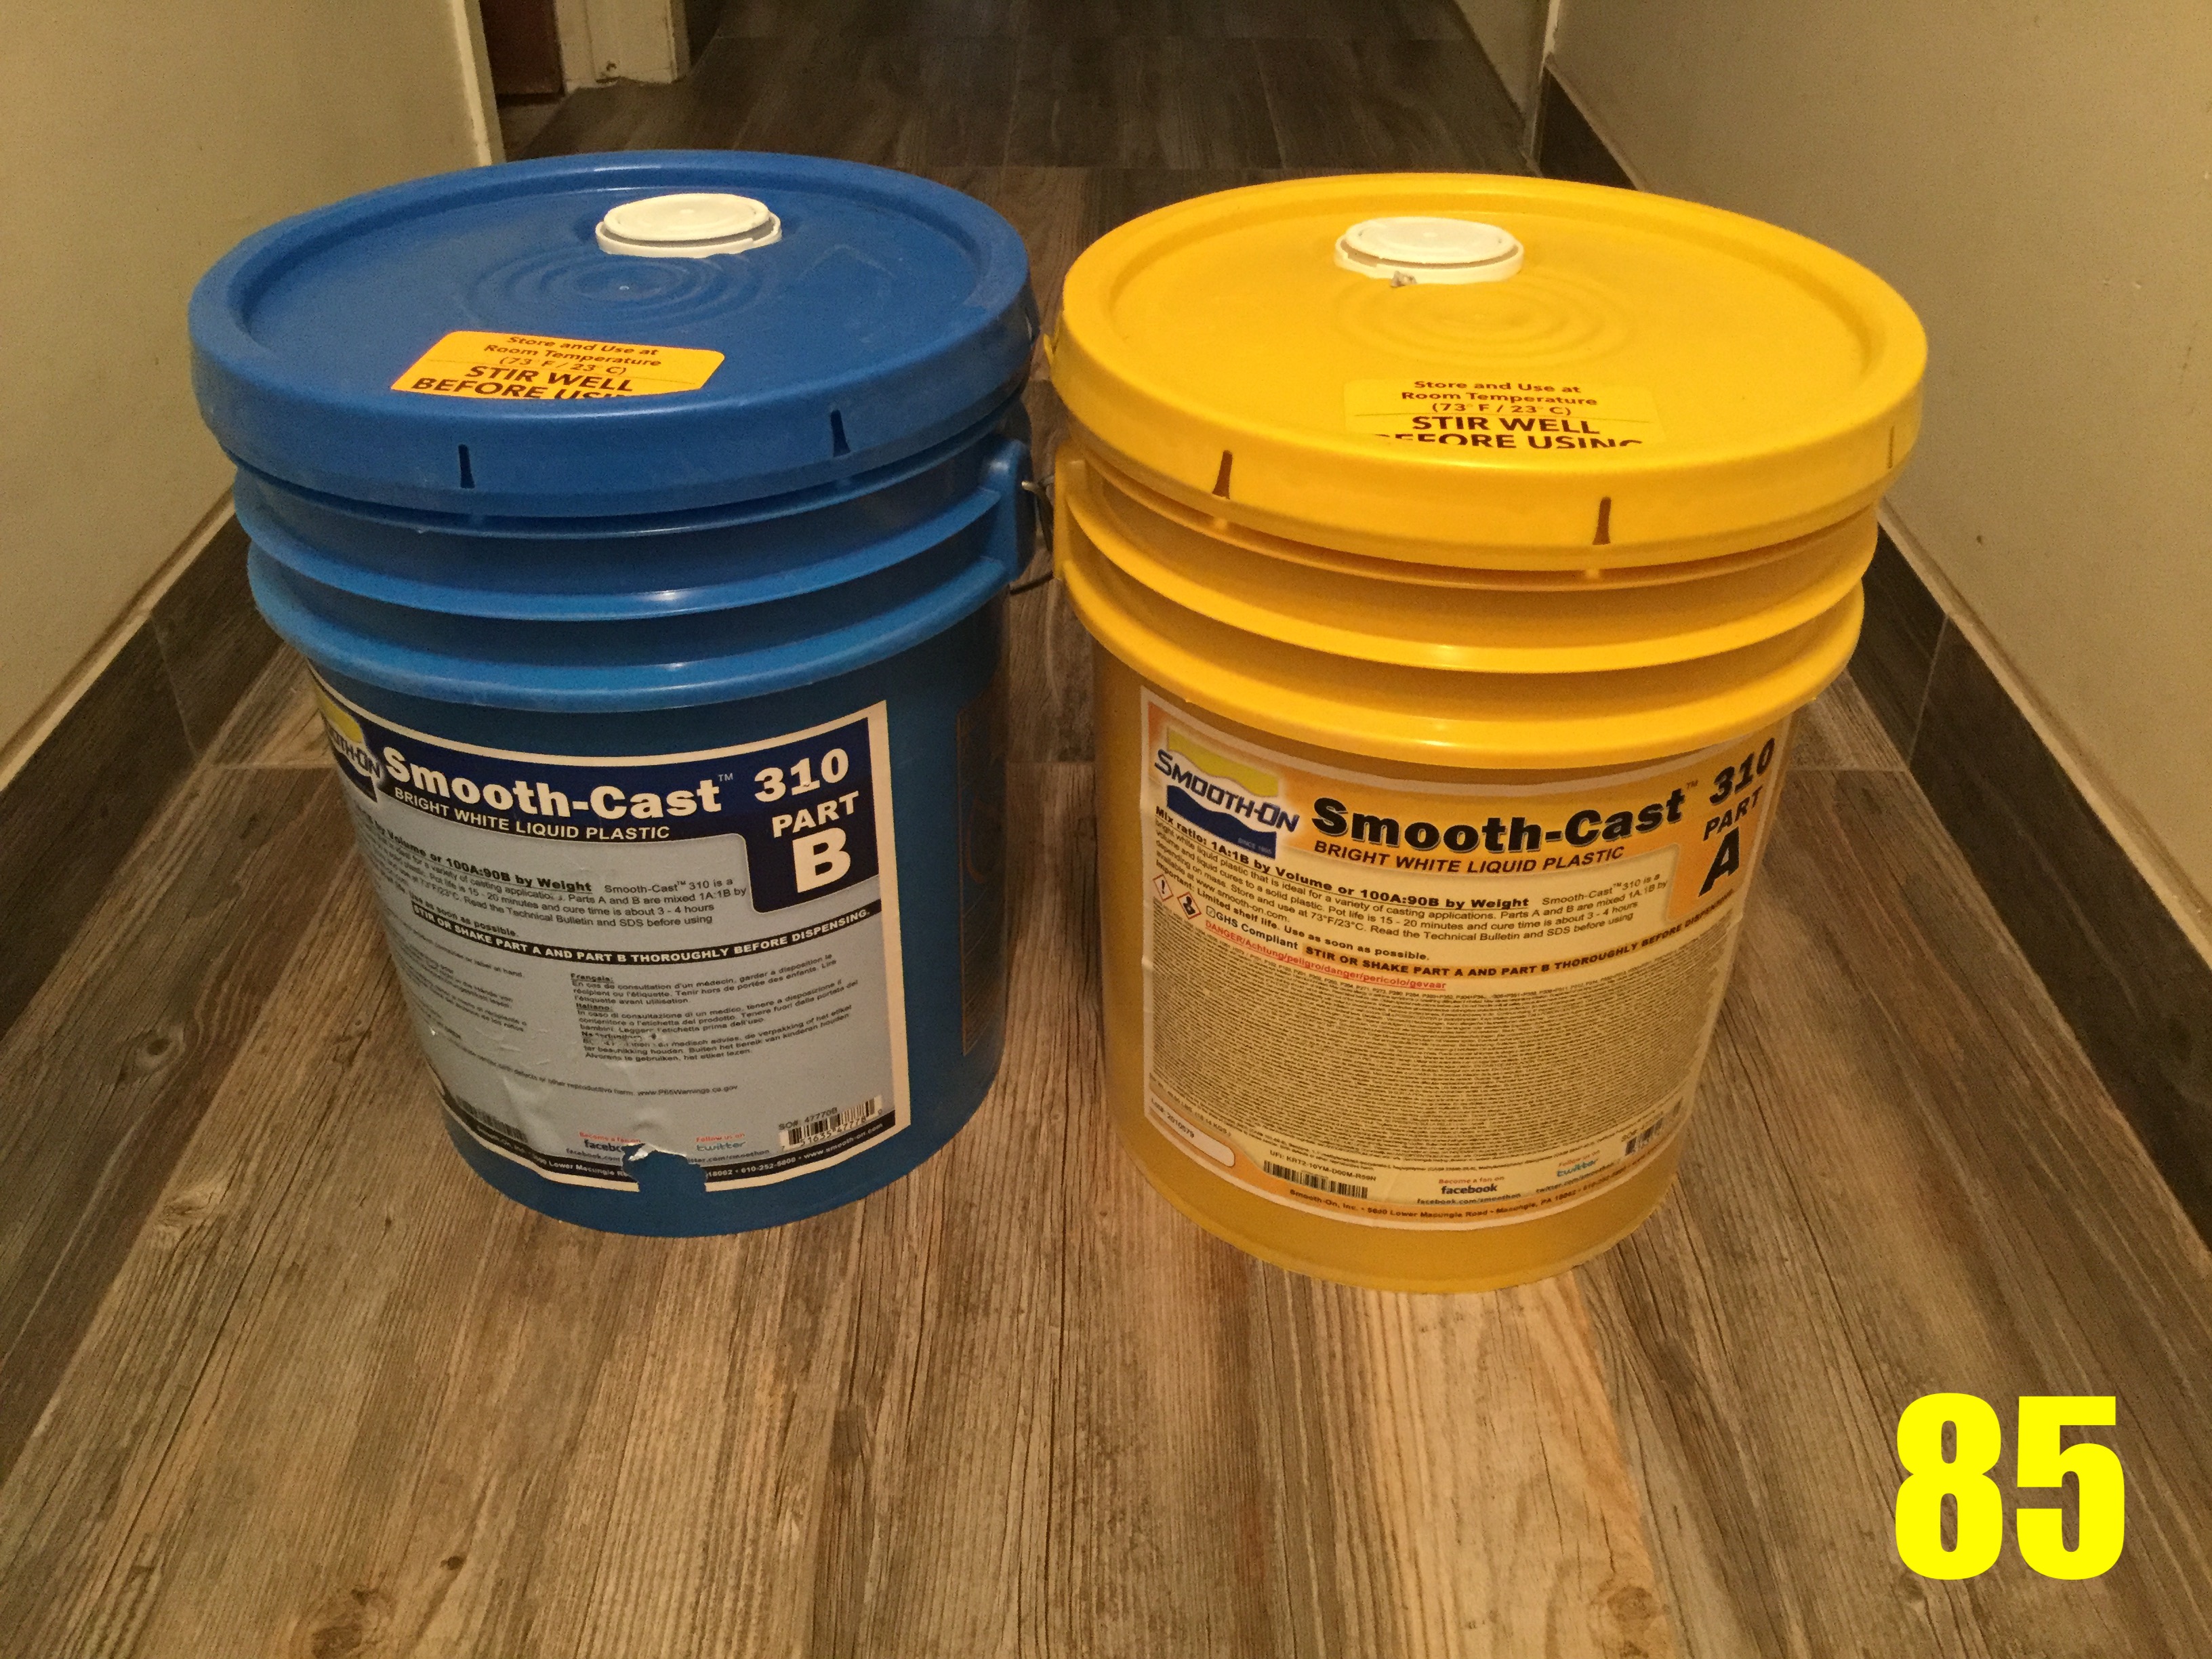
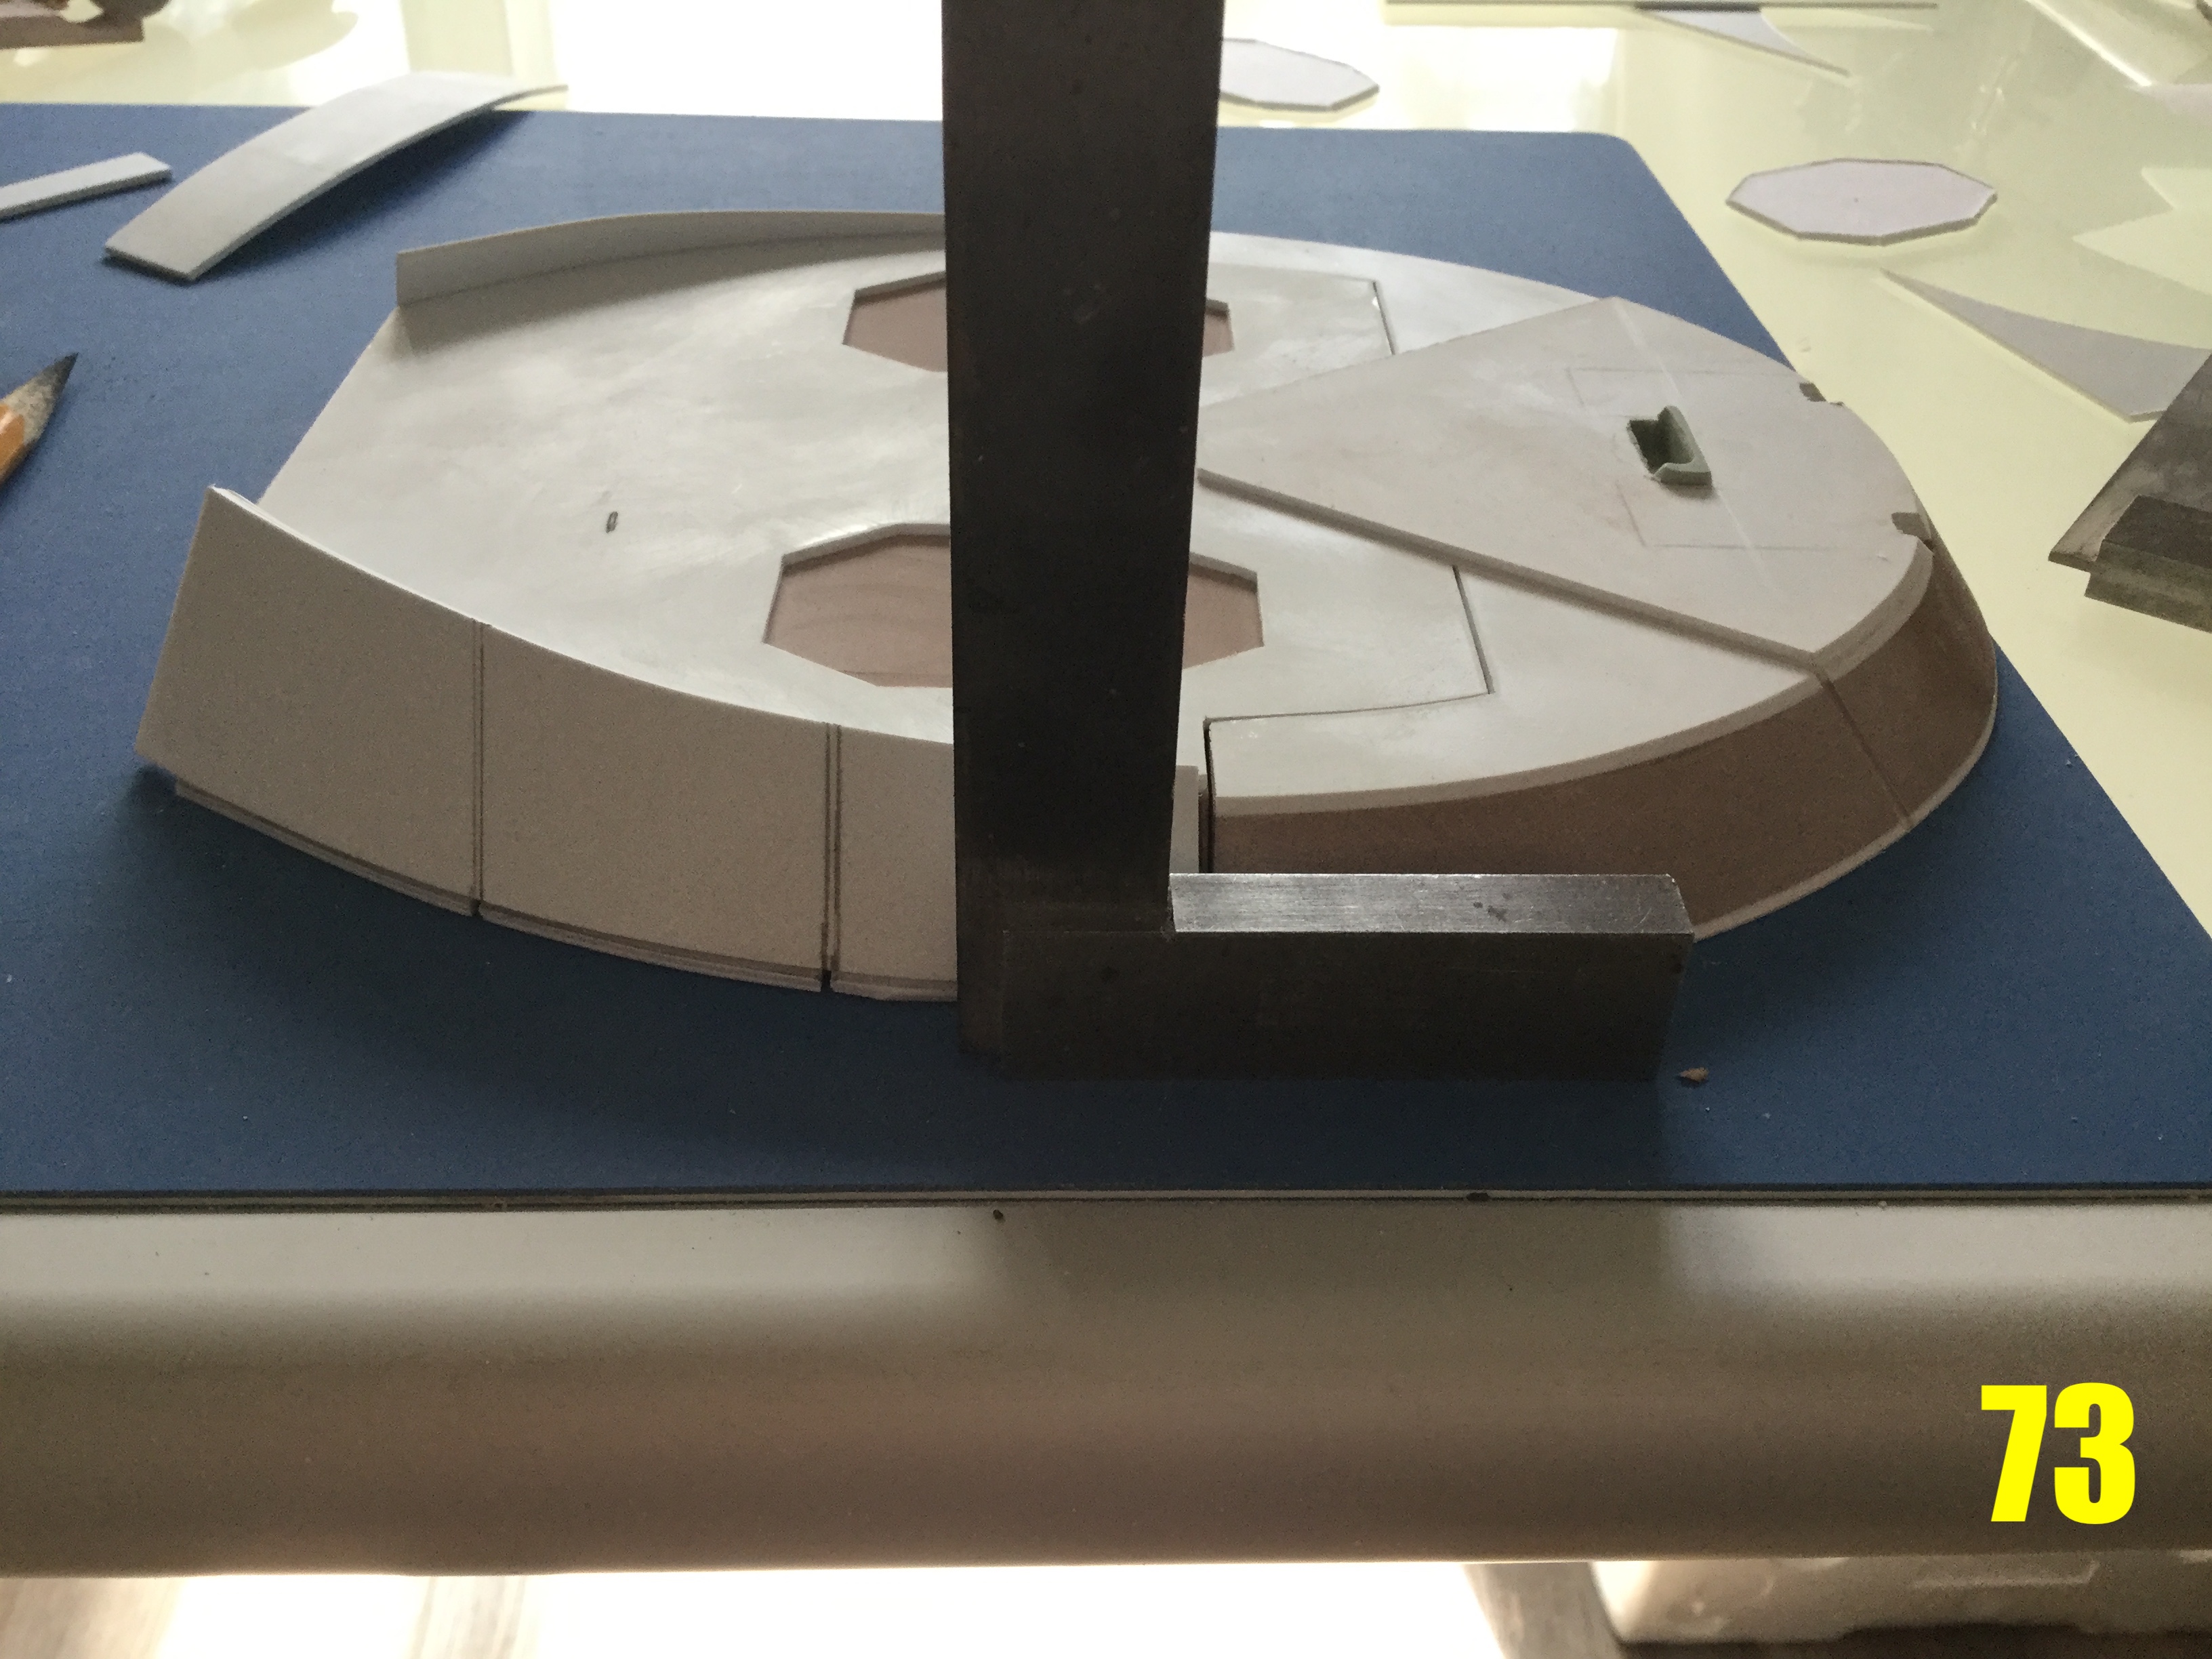
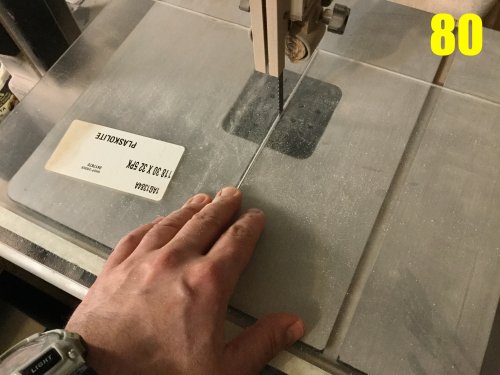
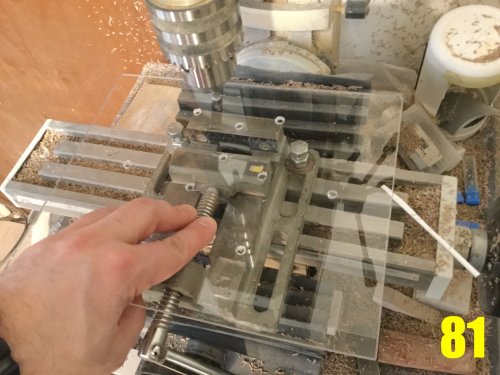
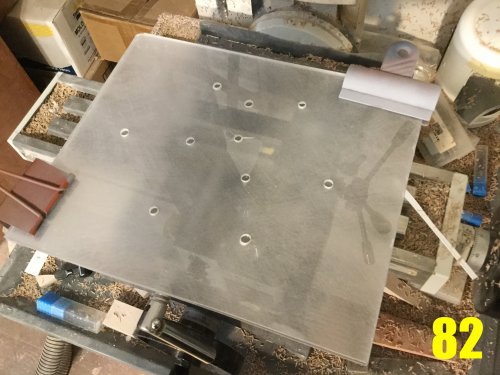
Captain’s log: April 7th, 2021. Mold prep for the sled begins! While this might not be the most exciting update for the casual observer, it will focus on the mold-making process and the preparation of the parts and boxes, which is perfect for all you DIY enthusiasts. One of the first things that needs to be done is a little session of mental chess, whereby each individual part is studied, and an orientation is selected for optimal resin flow of the (future) mold cavity. At this point, any small cracks or crevices that aren’t upposed to be there are sealed with some diluted PVA glue. Once that’s done, I begin to attach flow gates to the parts using hot glue, which is what you see in pic 77. Why hot glue? Because upon demold of the masters, I usually need to reove the gates in order to slice in the right places, and hot glue will hold most parts just firmly enough for the molding process, but can then be easily removed without damaging the masters. Because I tend to be rather ambitious in the creation of certain parts, I sometimes have to squirm my way out of a casting corner by adding some resin flow aids to the masters before molding them. Otherwise, you can end up with air pockets that turn to nasty voids on your castings. One such part is the top of the control column, which is what you see in pic 78. The black piece is just styrene sheet, but it is placed strategically to help air escape the mold upon casting. Pic 79: because the platform sections are so incredibly large, hot gluing gates won’t work: the parts are too heavy, and the glue may not hold the part securely, so these gates are bonded to the masters using CA glue, and also reinforced with styrene. This will help hold the part securely in place, but the white triangular fins also help with resin flow. Each of these parts needs to be measured, cut, and fitted into place very carefully and deliberately to avoid obstructing details. Now that you know what these are, you’ll know to cut them off on your kit parts Pic 80: because the sled hull parts are so massive, I don’t have any mold containers large enough to hold them in, so I need to scratchbuild one, so here goes the plexiglass under the band saw. Pic 81: I didn’t have enough 5mm plexiglass for the whole mold box, so I’ll need to bond two 2.5mm sheets together to get the necessary rigidity for such a large mold. That said, it actually works out better, because I need to dril some holes on the inner plexiglass: this will create interlocking tongue-and-groove segments when the silicone is poured, thus preventing the large, heavy mold from shifting or sliding in its box. Pic 82: the surfaces of both layers of glass are then roughened with 80 grit sandpaper… Then bonded together using CA glue (pic 83.) It’s crude and not pretty, but it works, and works well! Pic 84: the pic doesn’t do it justice, but that’s a big mold box, and will require almost a gallon of mold silicone all by itself! Pic 85: I roughly estimate the main sled hull parts to be about a kilo’s worth of resin, so I stocked-up. Even then, I fear I will need to re-order more resin. The pails you see are 5 gallons each. That said, I’ve quietly been casting the BIO LLOYD mechas over the course of the last week, and got almost half the kits made, so the molds have proven their worthiness! Hopefully by this time next week, the sled parts will all be molded too—stay tuned!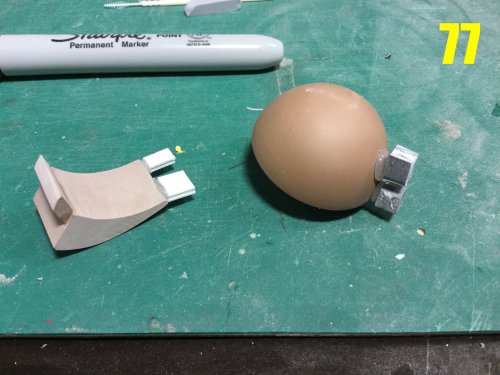


-
True dat. Depending on what source(s) you use, the Inbits can look drastically different. That's why I always go to the animation model sheets: it's the standard that the animators use, however much they often deviate from it. That said, the MEPToys version looks kinda neat, if only because it's different. Sizing is the real issue though, because even the Legioss figures have varied considerably in size and it all depends on what figure(s) they're (the Inbit) intended to be standing next to on the shelf.
-
1/48 SOUTHERN CROSS BIOROID
captain america replied to captain america's topic in Anime or Science Fiction
Skill sets can be acquired with time, patience and repetition. It's amazing how much can be learned just by watching and studying. When I started out, there was no internet. I'd buy issues of Hobby Japan and Model Graphics and study the pictures of scratchbuilds in progress, and making molds. A lot of those techniques are crude, but it's a good introductory step. As you experiment, you find different (and often better) ways of doing things. You'll make lots of mistakes, and if you're clever, you'll learn the most from those to become even better. -
1/48 SOUTHERN CROSS BIOROID
captain america replied to captain america's topic in Anime or Science Fiction
The 460 grade I use isn't really carvable with a knife, it's far too dense. I can do little details with a chisel and maybe an exacto blade when it comes to carving very small, shallow details, but that's it. Precision is everything! Without it, mirrored parts would be wonky, things that should be straight would be crooked, and large, complex parts would be large and wonky. Back when I used to buy garage kits, there was one 1/100 Sazabi I had (Kotobukiya?) and you could see that everything was sculpted freehand, and not in the good way. The rifle had lots of very perceptible angles that were off, it wasn't symmetrical, and a lot of the shapes that should be flat had a noticeable bow to them; a real eyesore, especially when that was a very expensive kit (like 300 USD back in the mid 90s). You have to remember that I'm my own first customer and critic. If I didnt have manual machine tools, I'd very likely resort to 3D modelling for the necessary precision it provides, as I have a few times in the past, when some parts were just too big for my equipment. -
1/48 SOUTHERN CROSS BIOROID
captain america replied to captain america's topic in Anime or Science Fiction
I understand where he's coming from, and I want to tackle that too eventually if I can. I figured I'd try to shake the Bioroid tree as much as possible before I propose that project, particularly because it will have its own complexities and challenges. -
1/48 SOUTHERN CROSS BIOROID
captain america replied to captain america's topic in Anime or Science Fiction
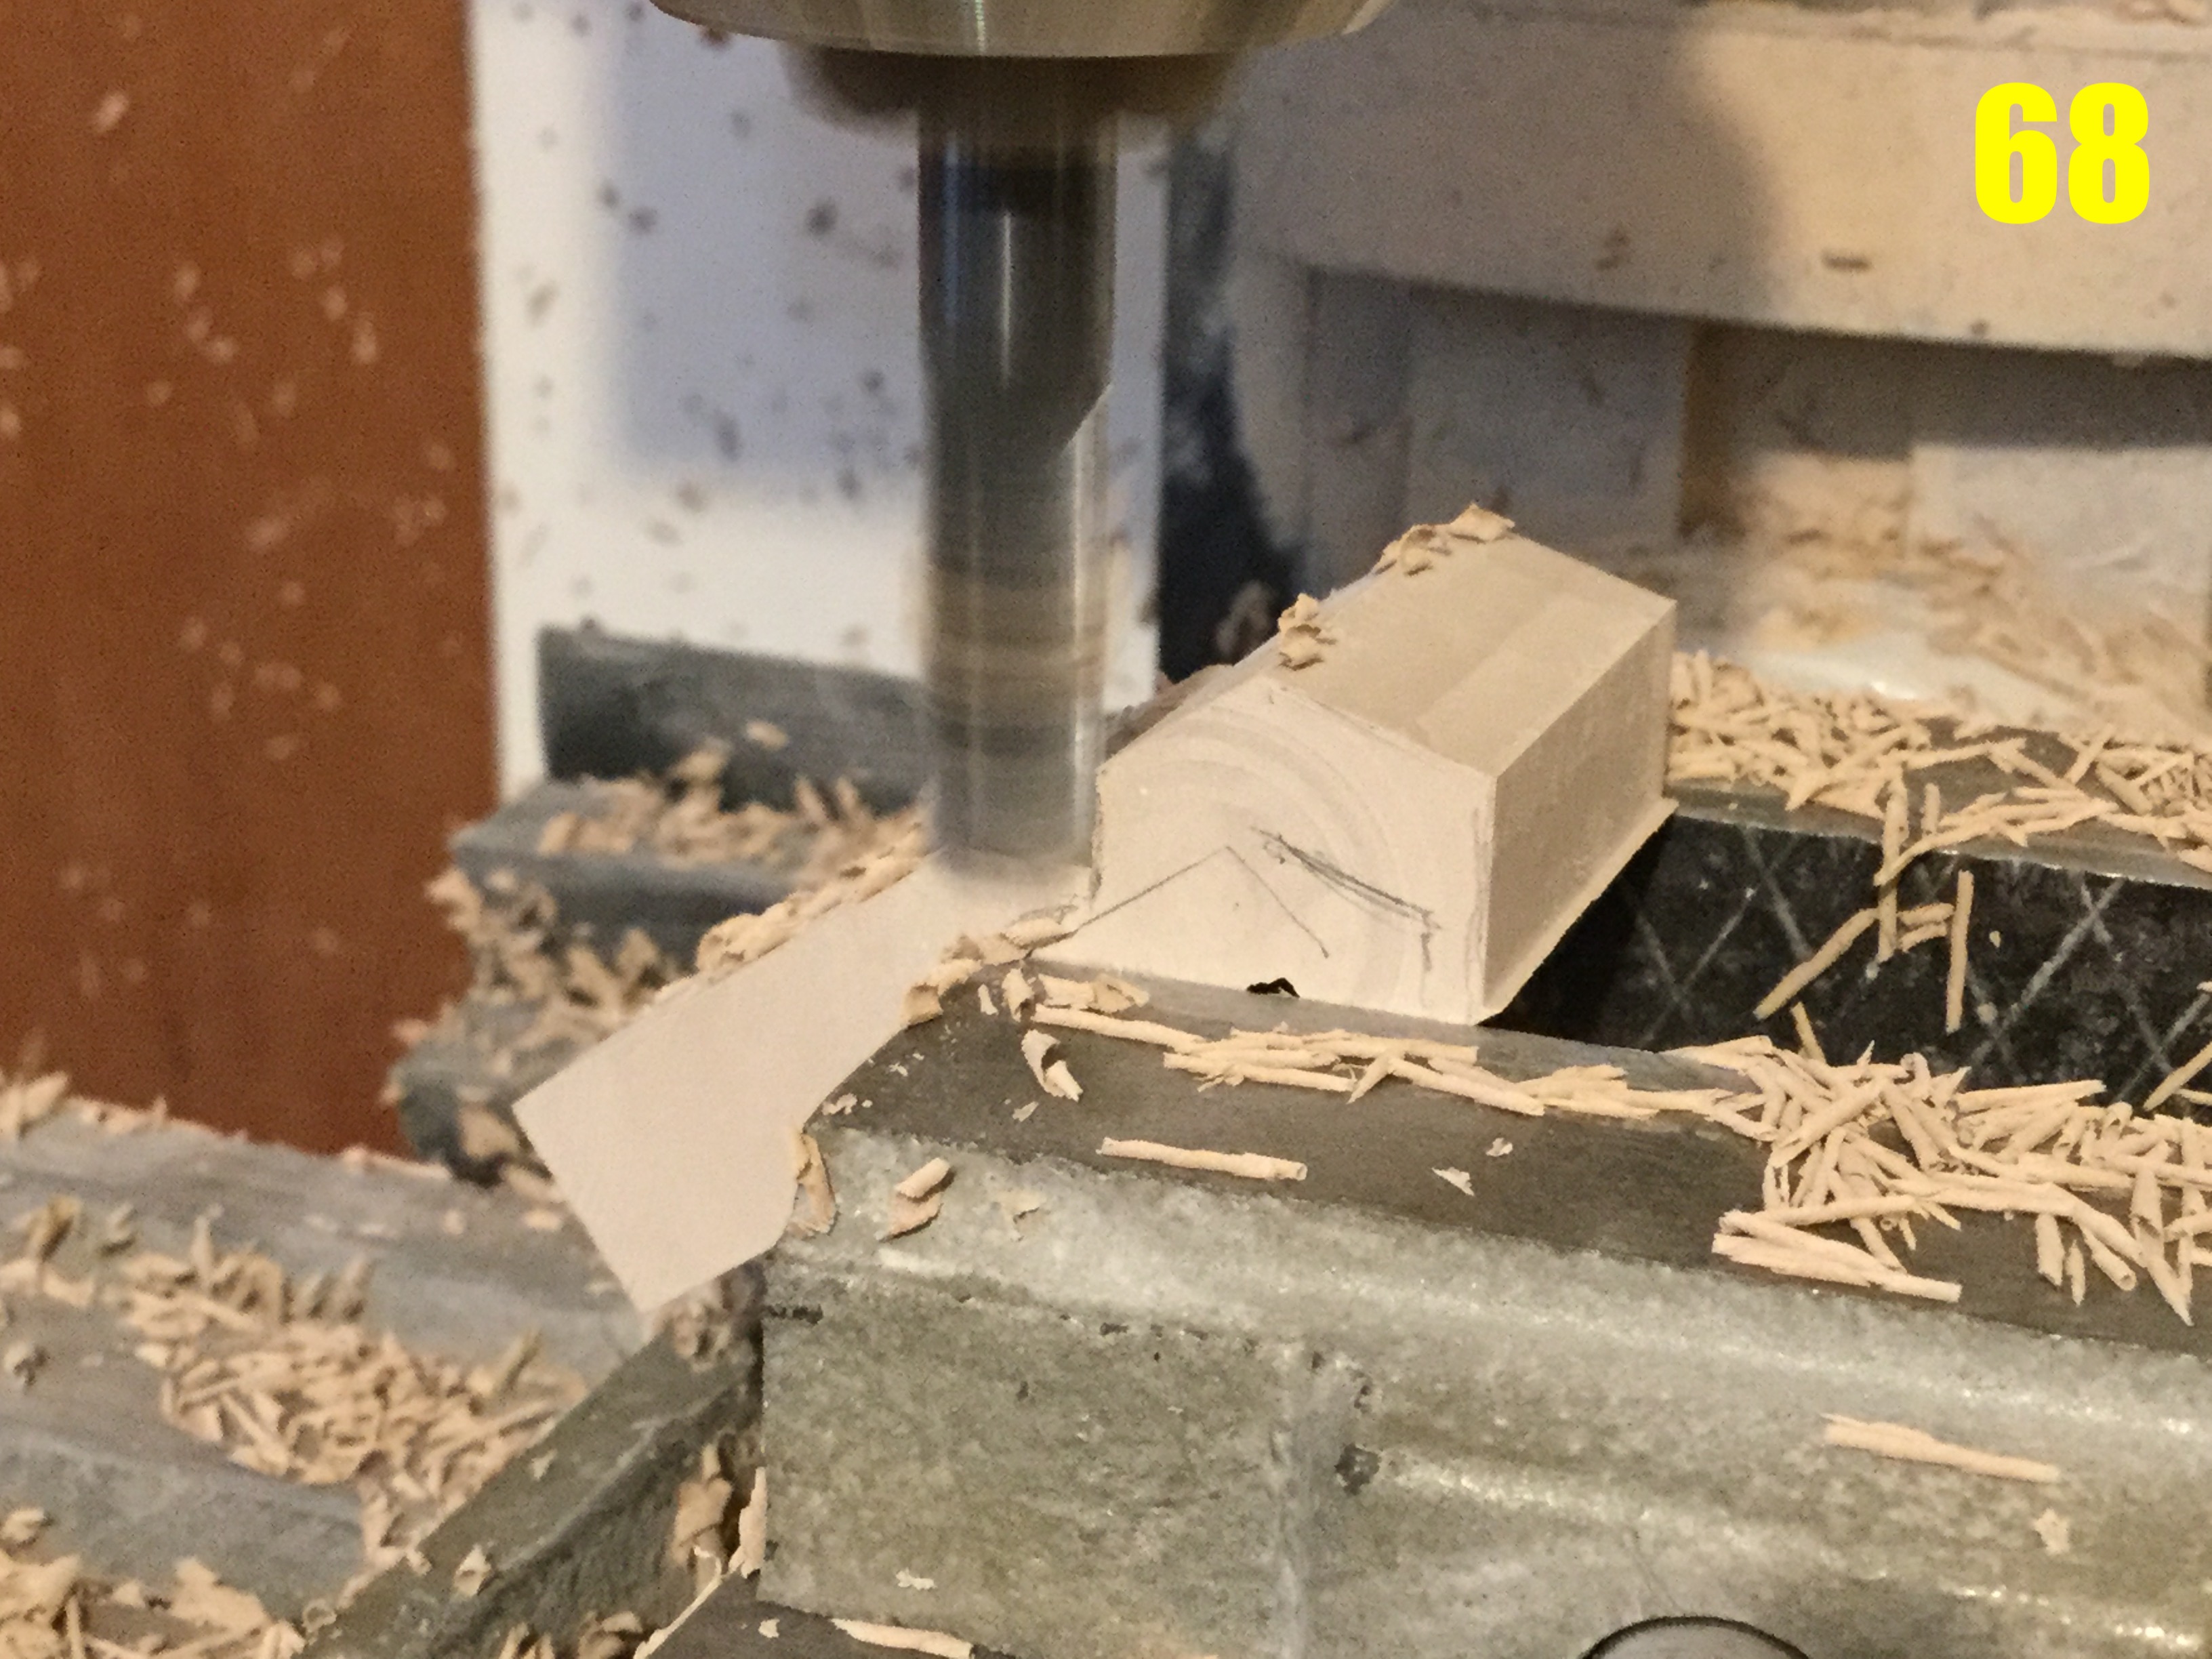
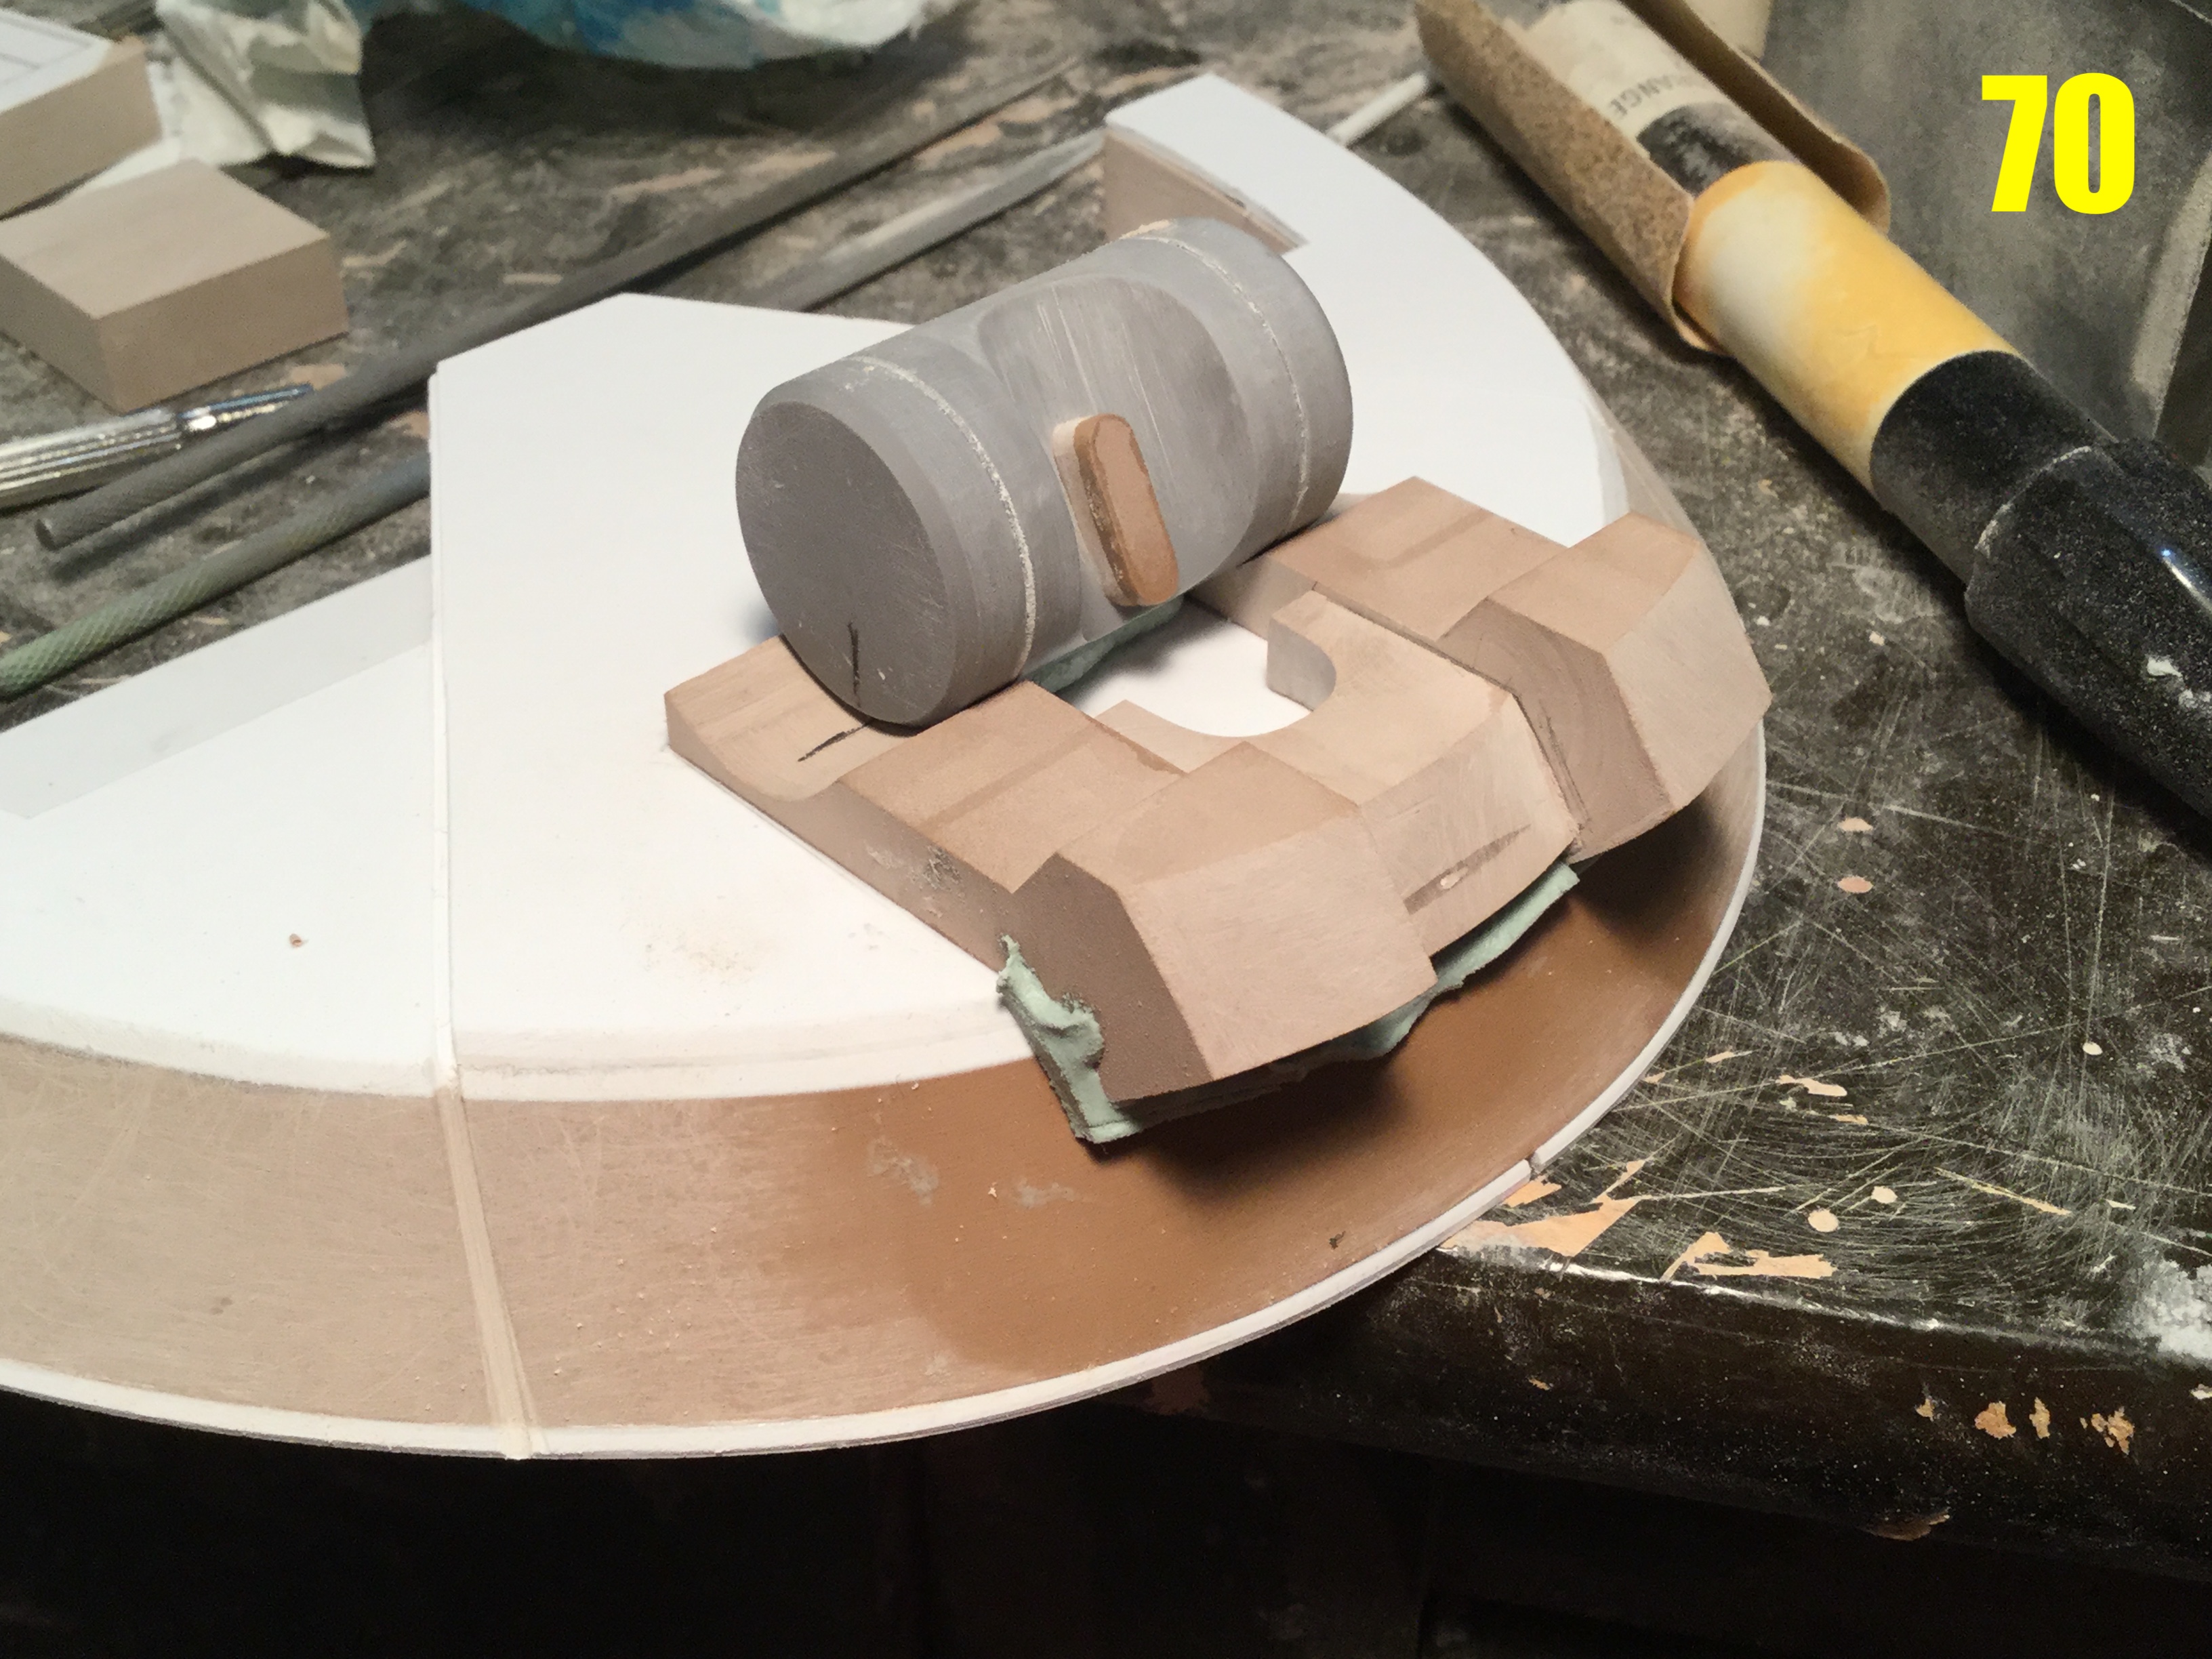
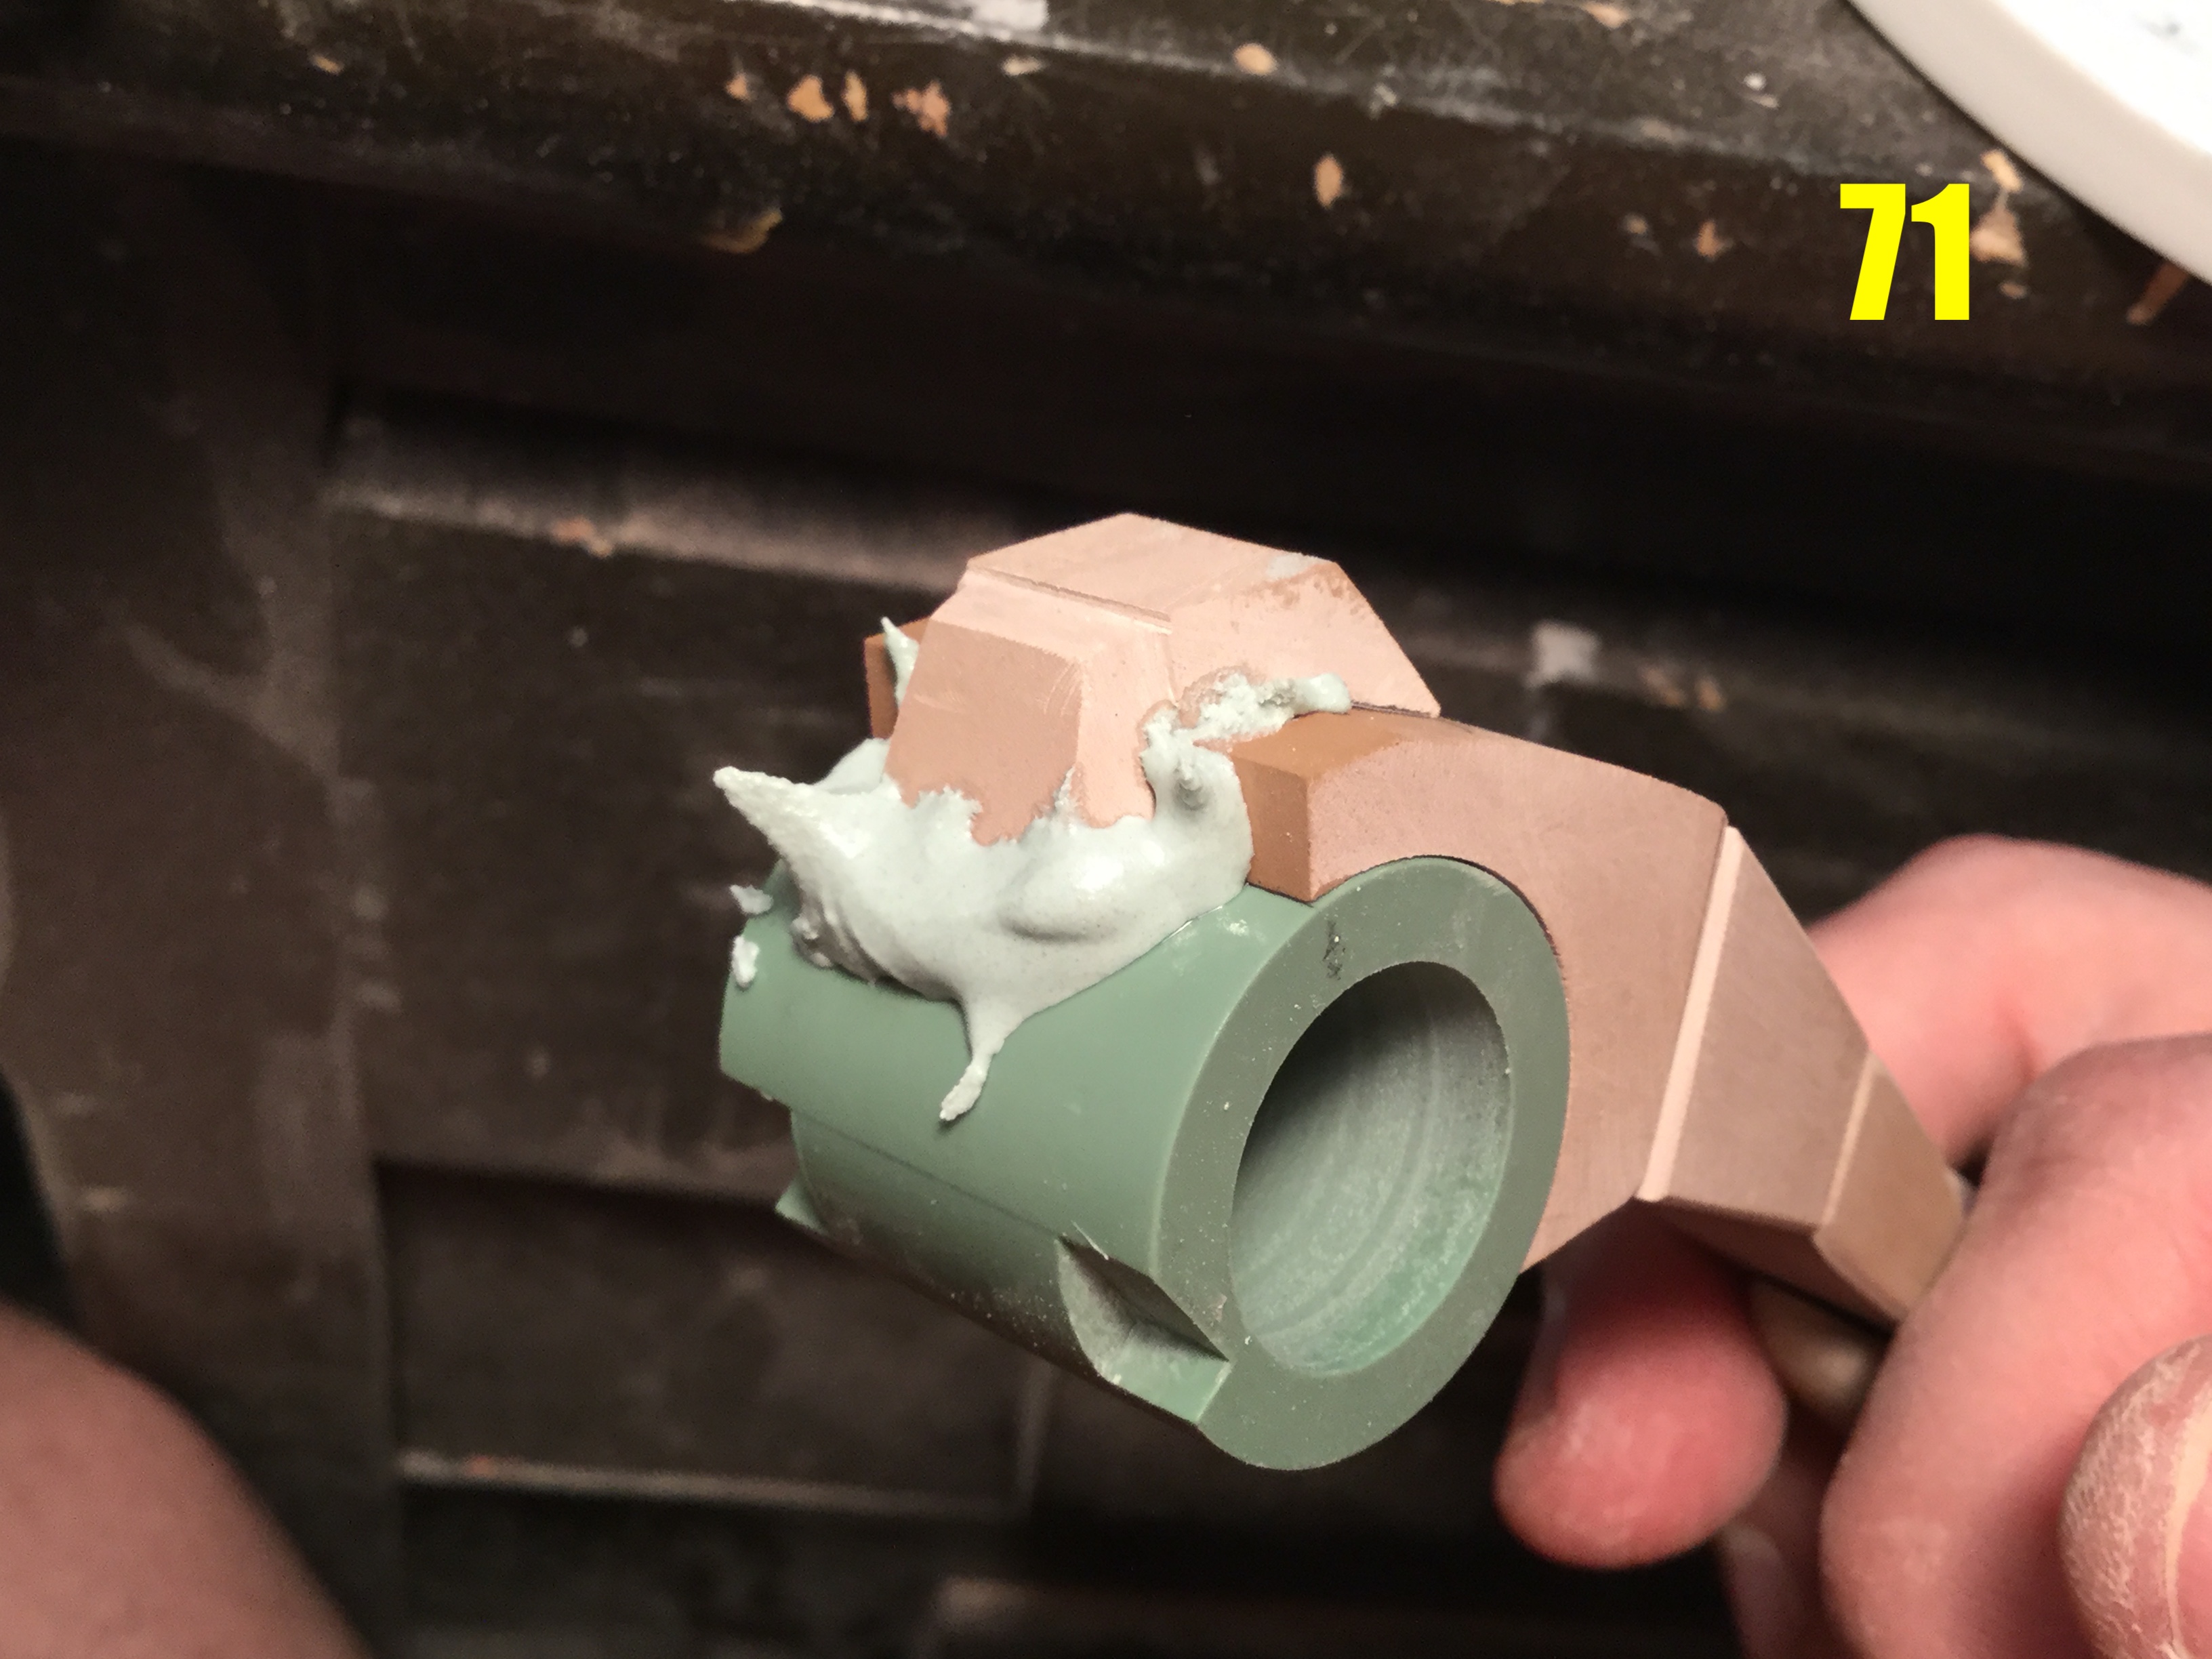
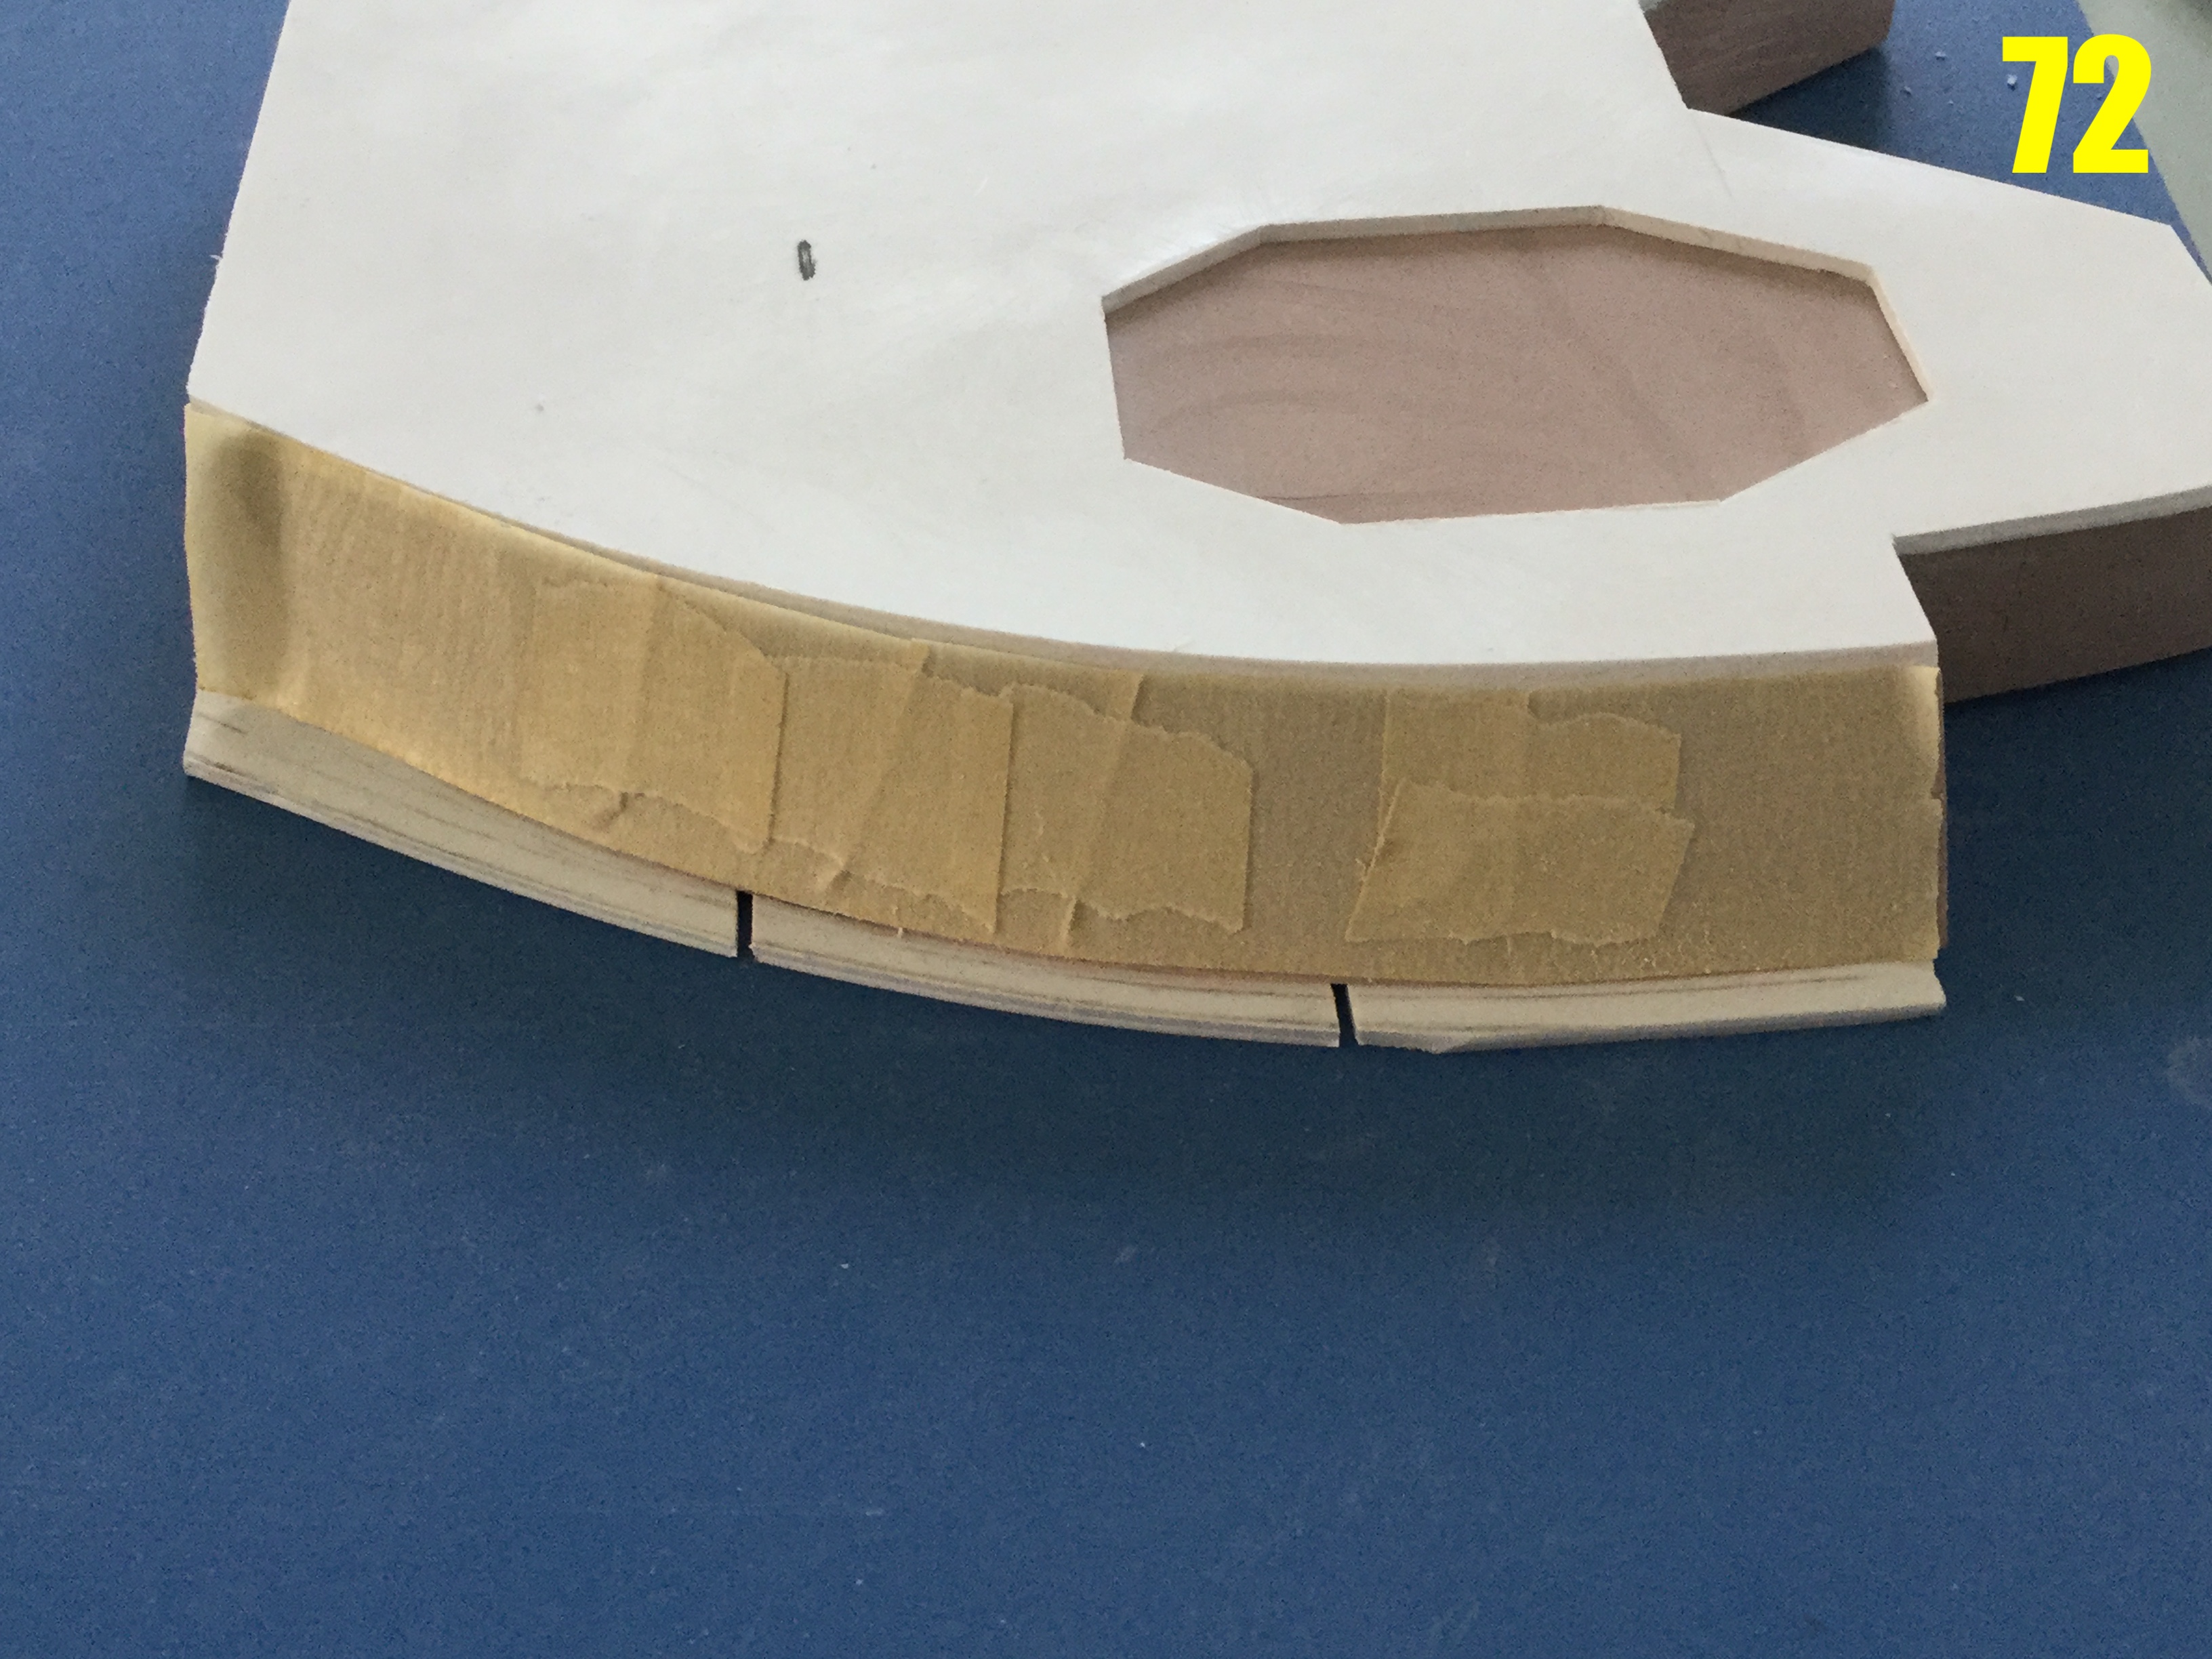
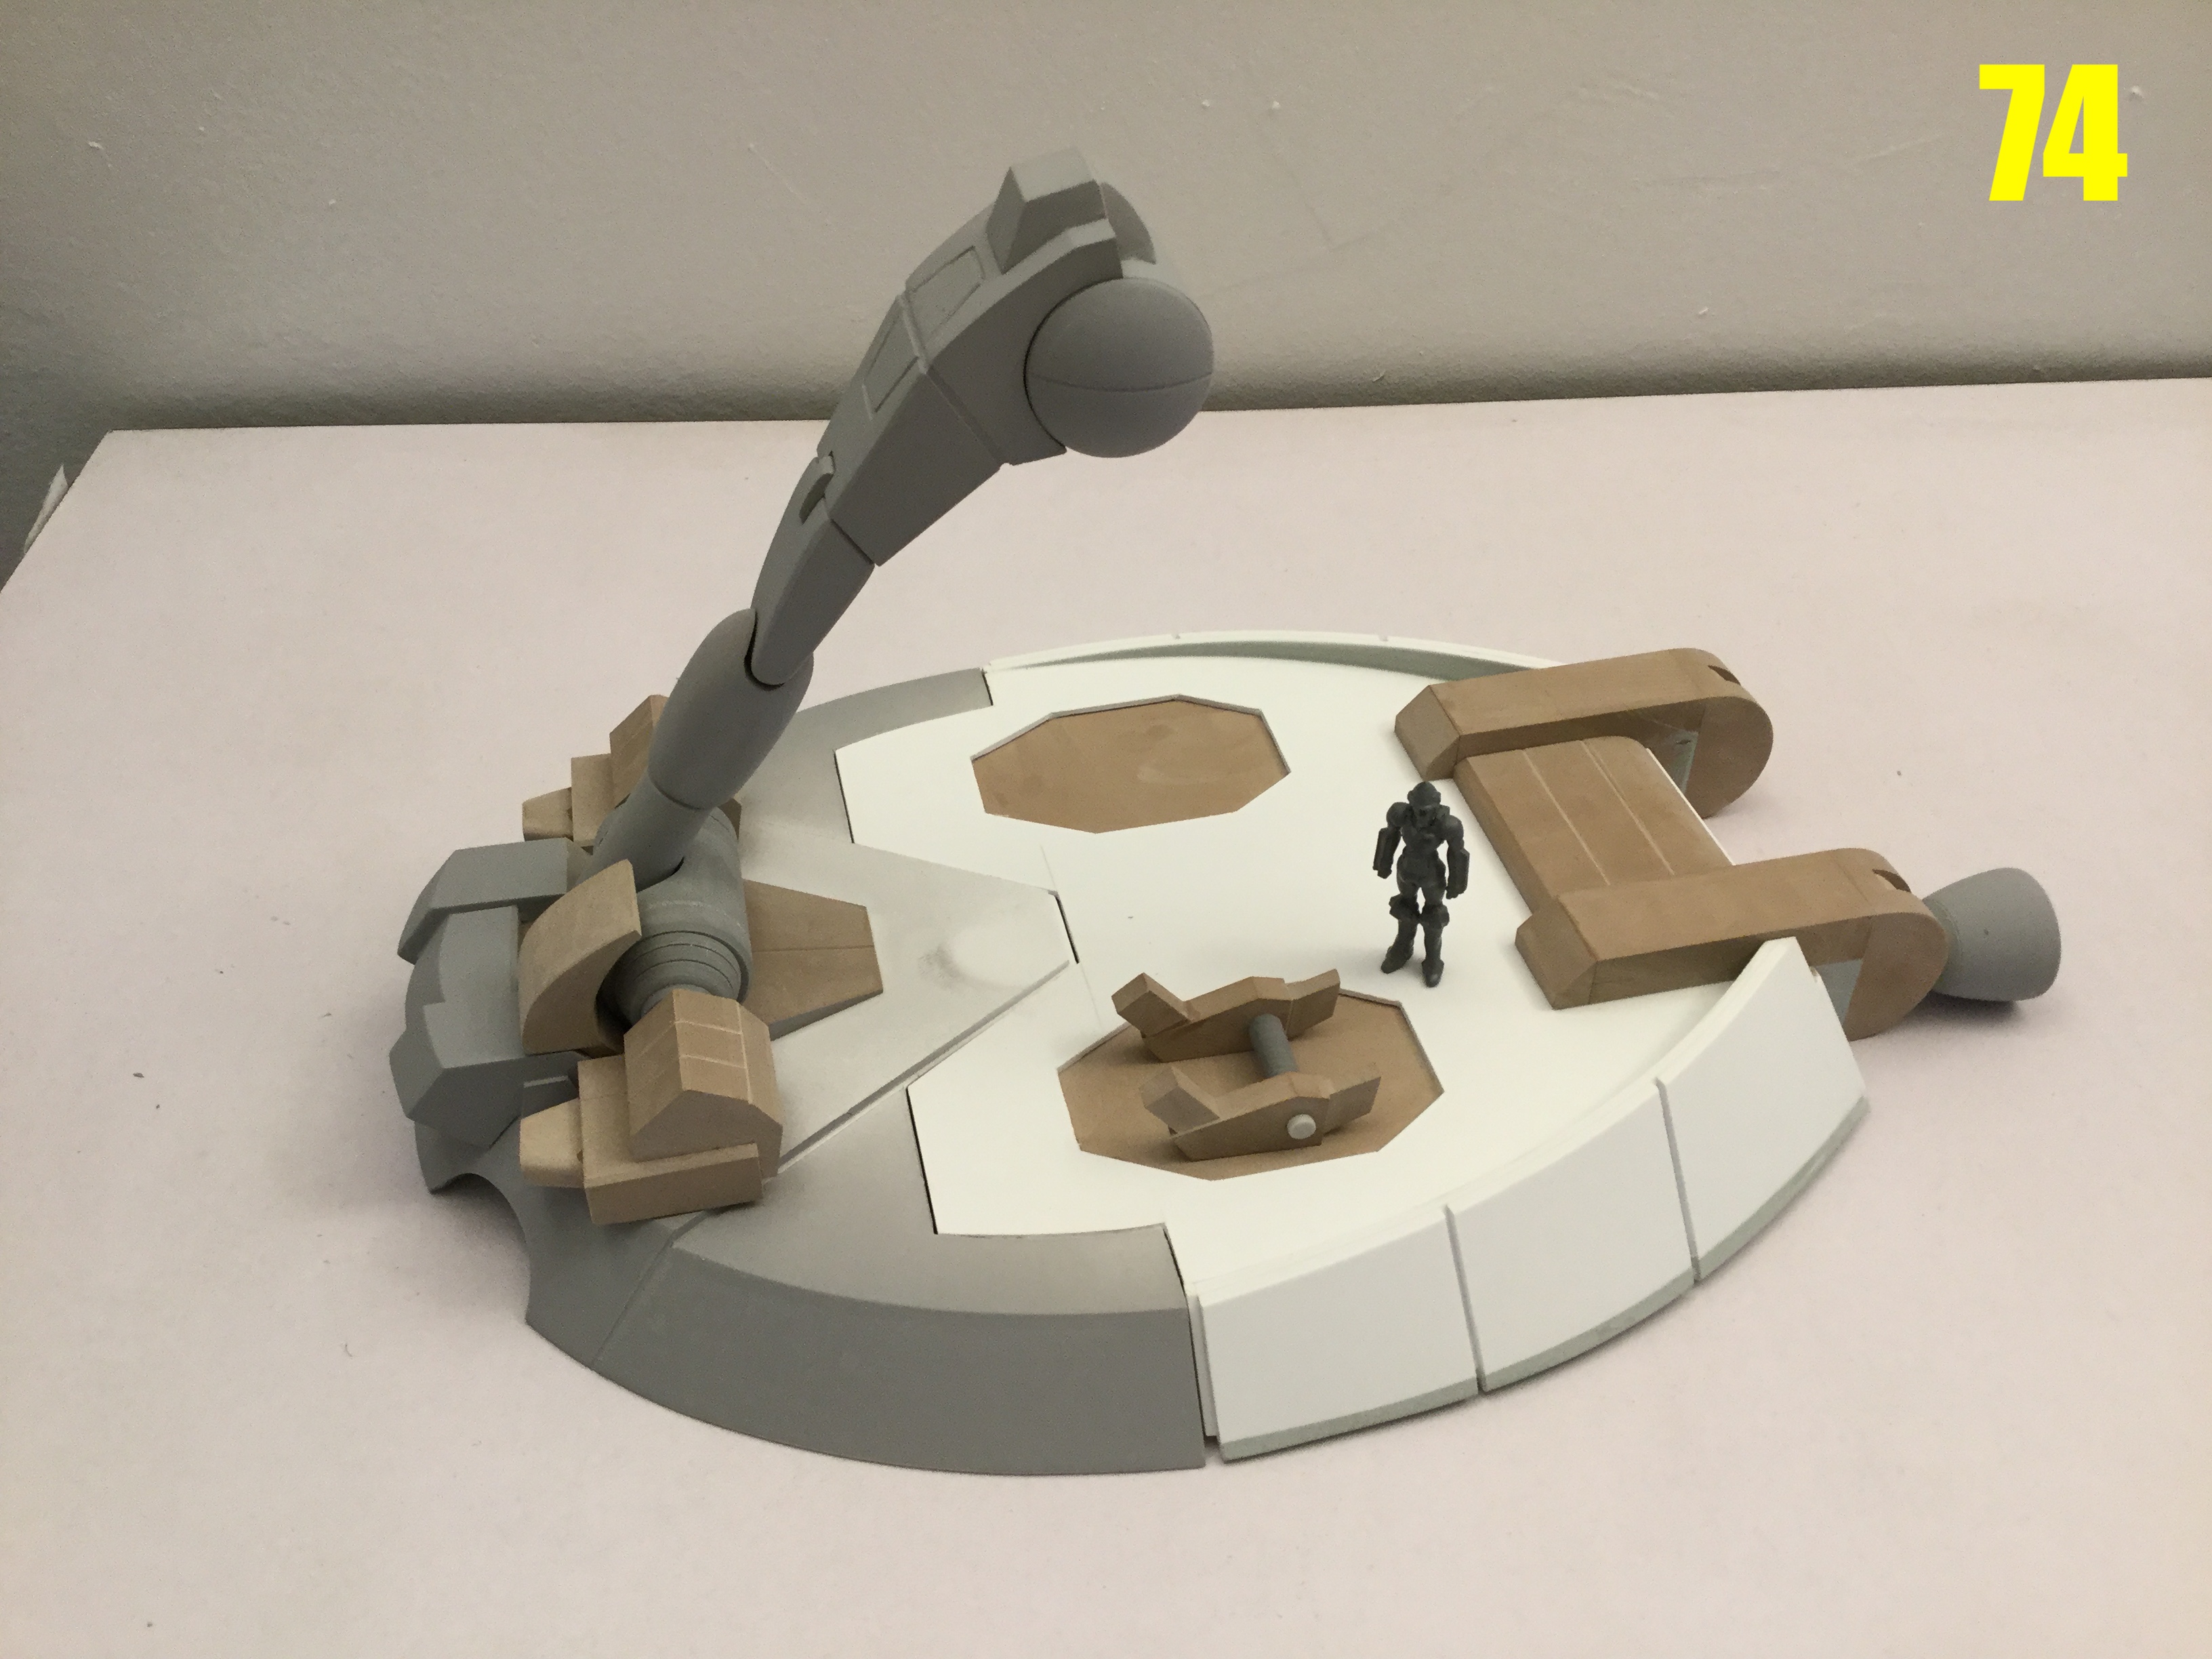
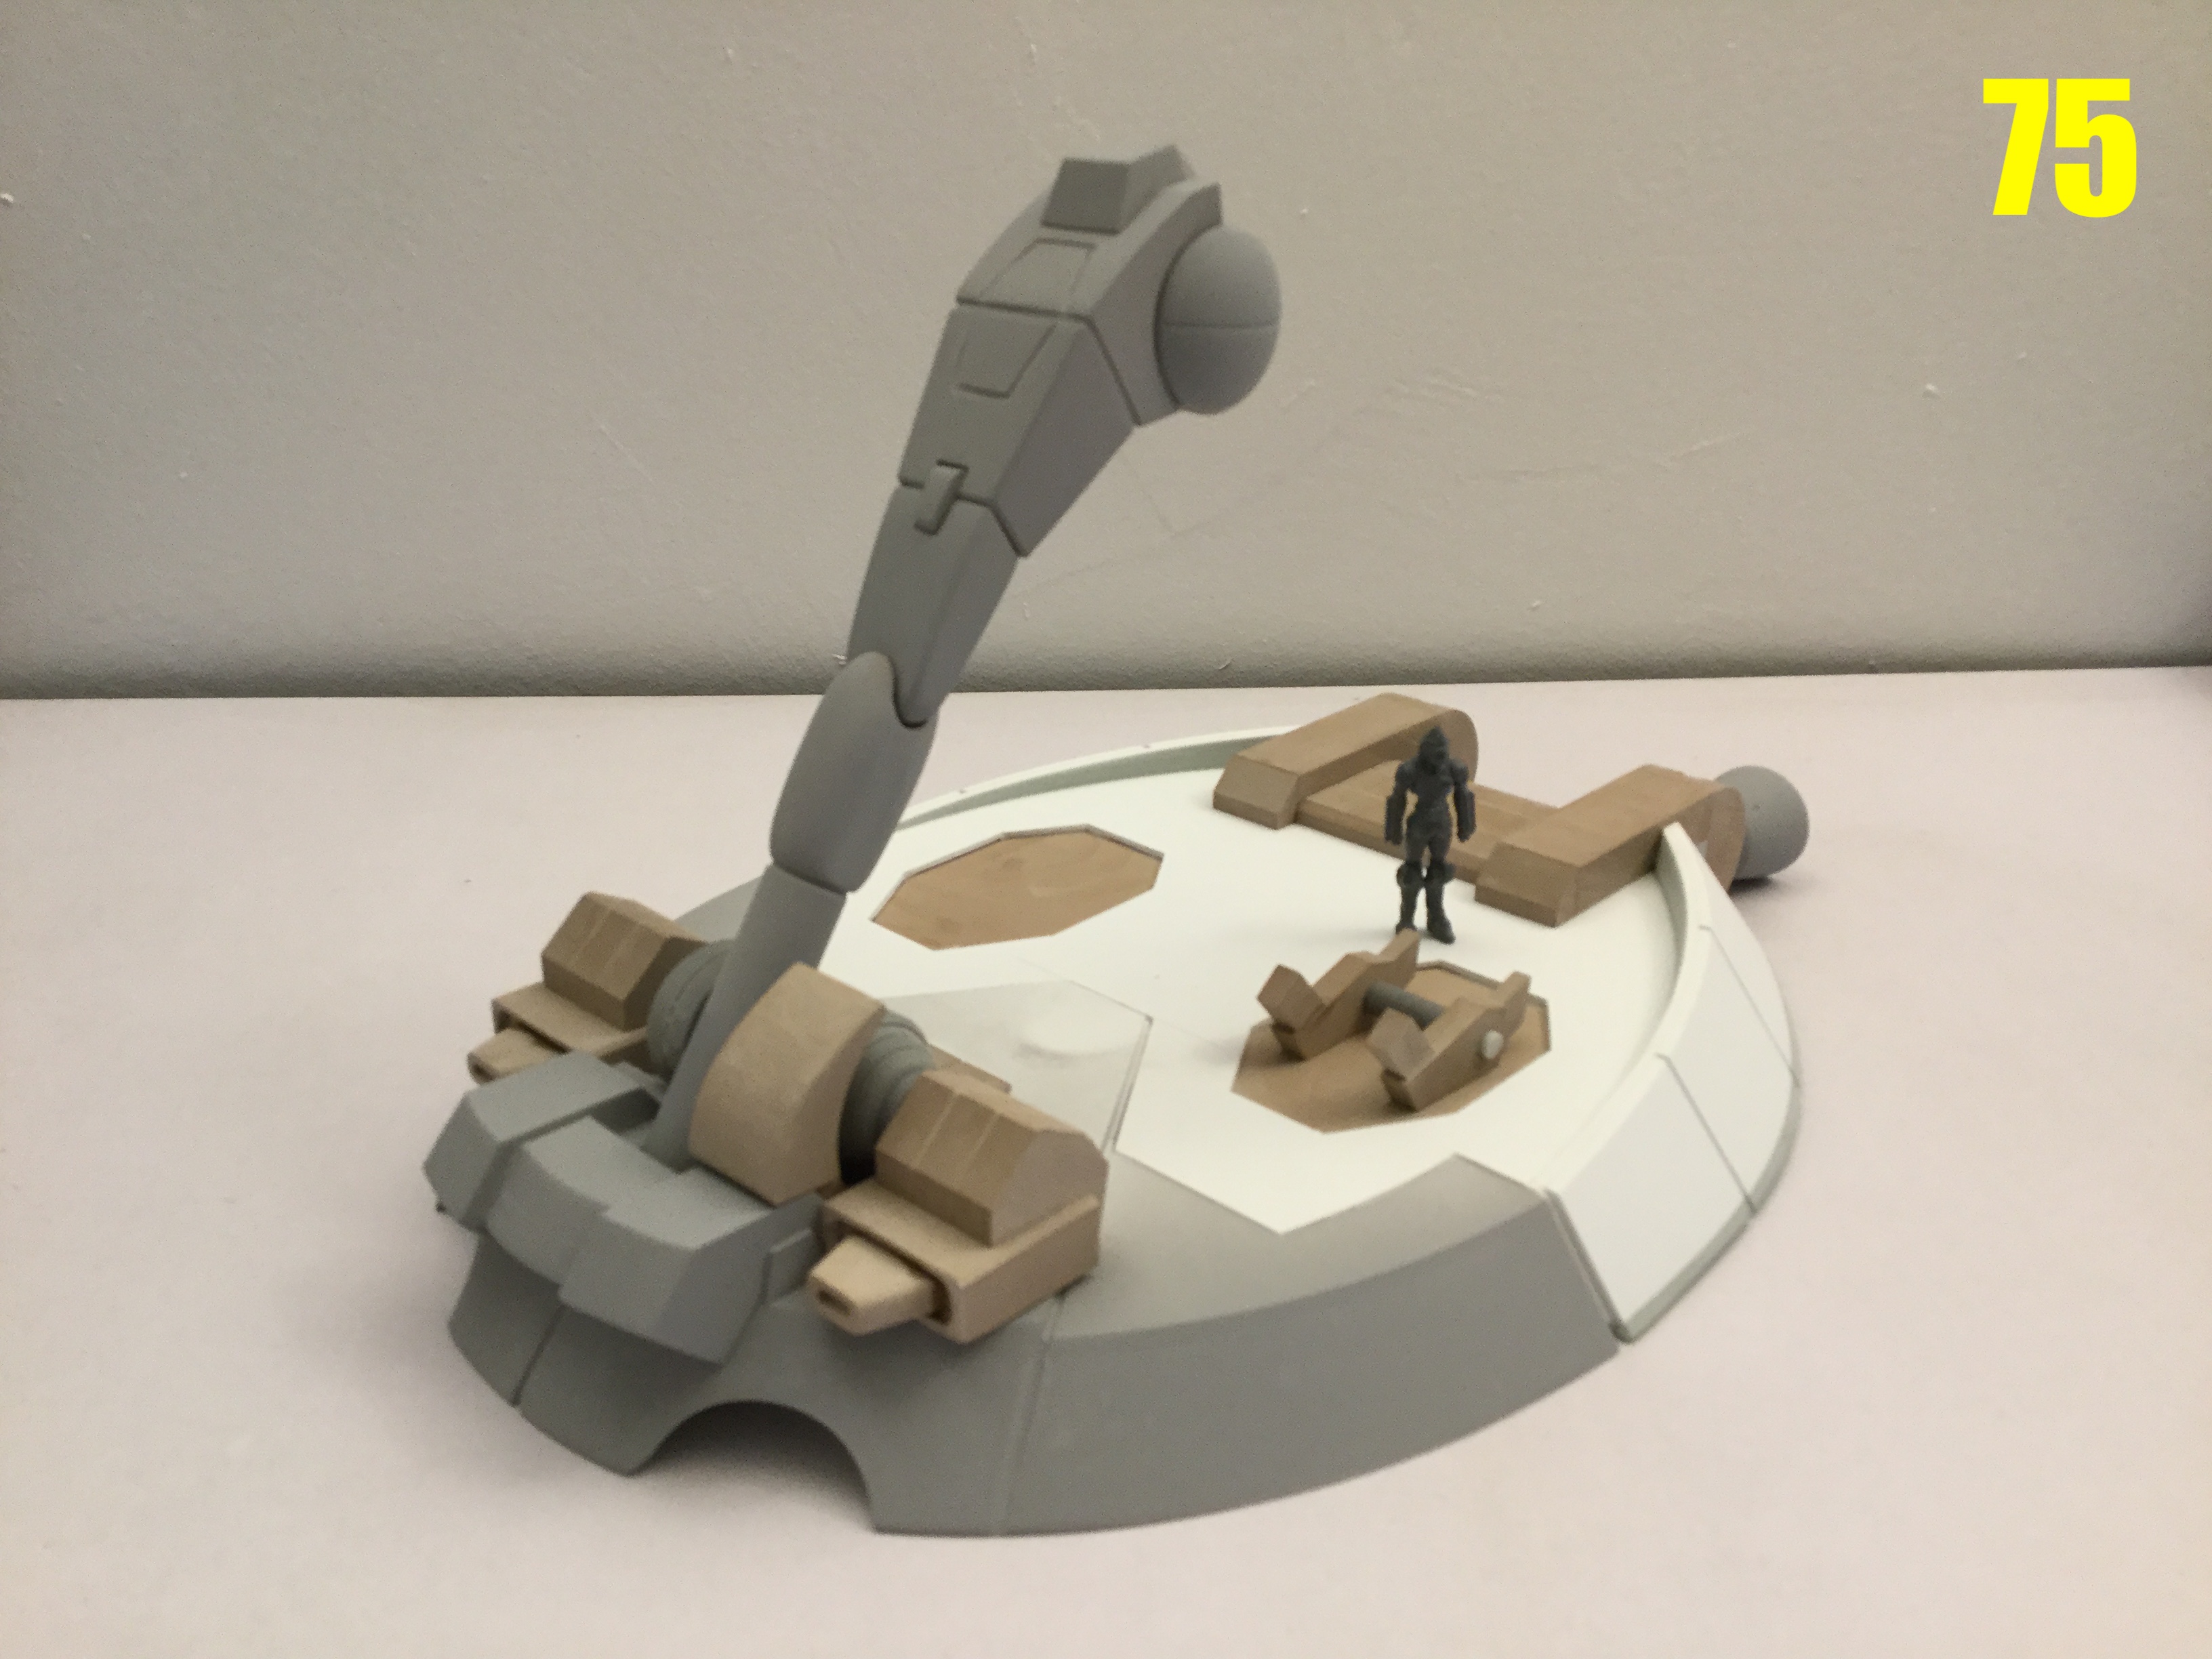
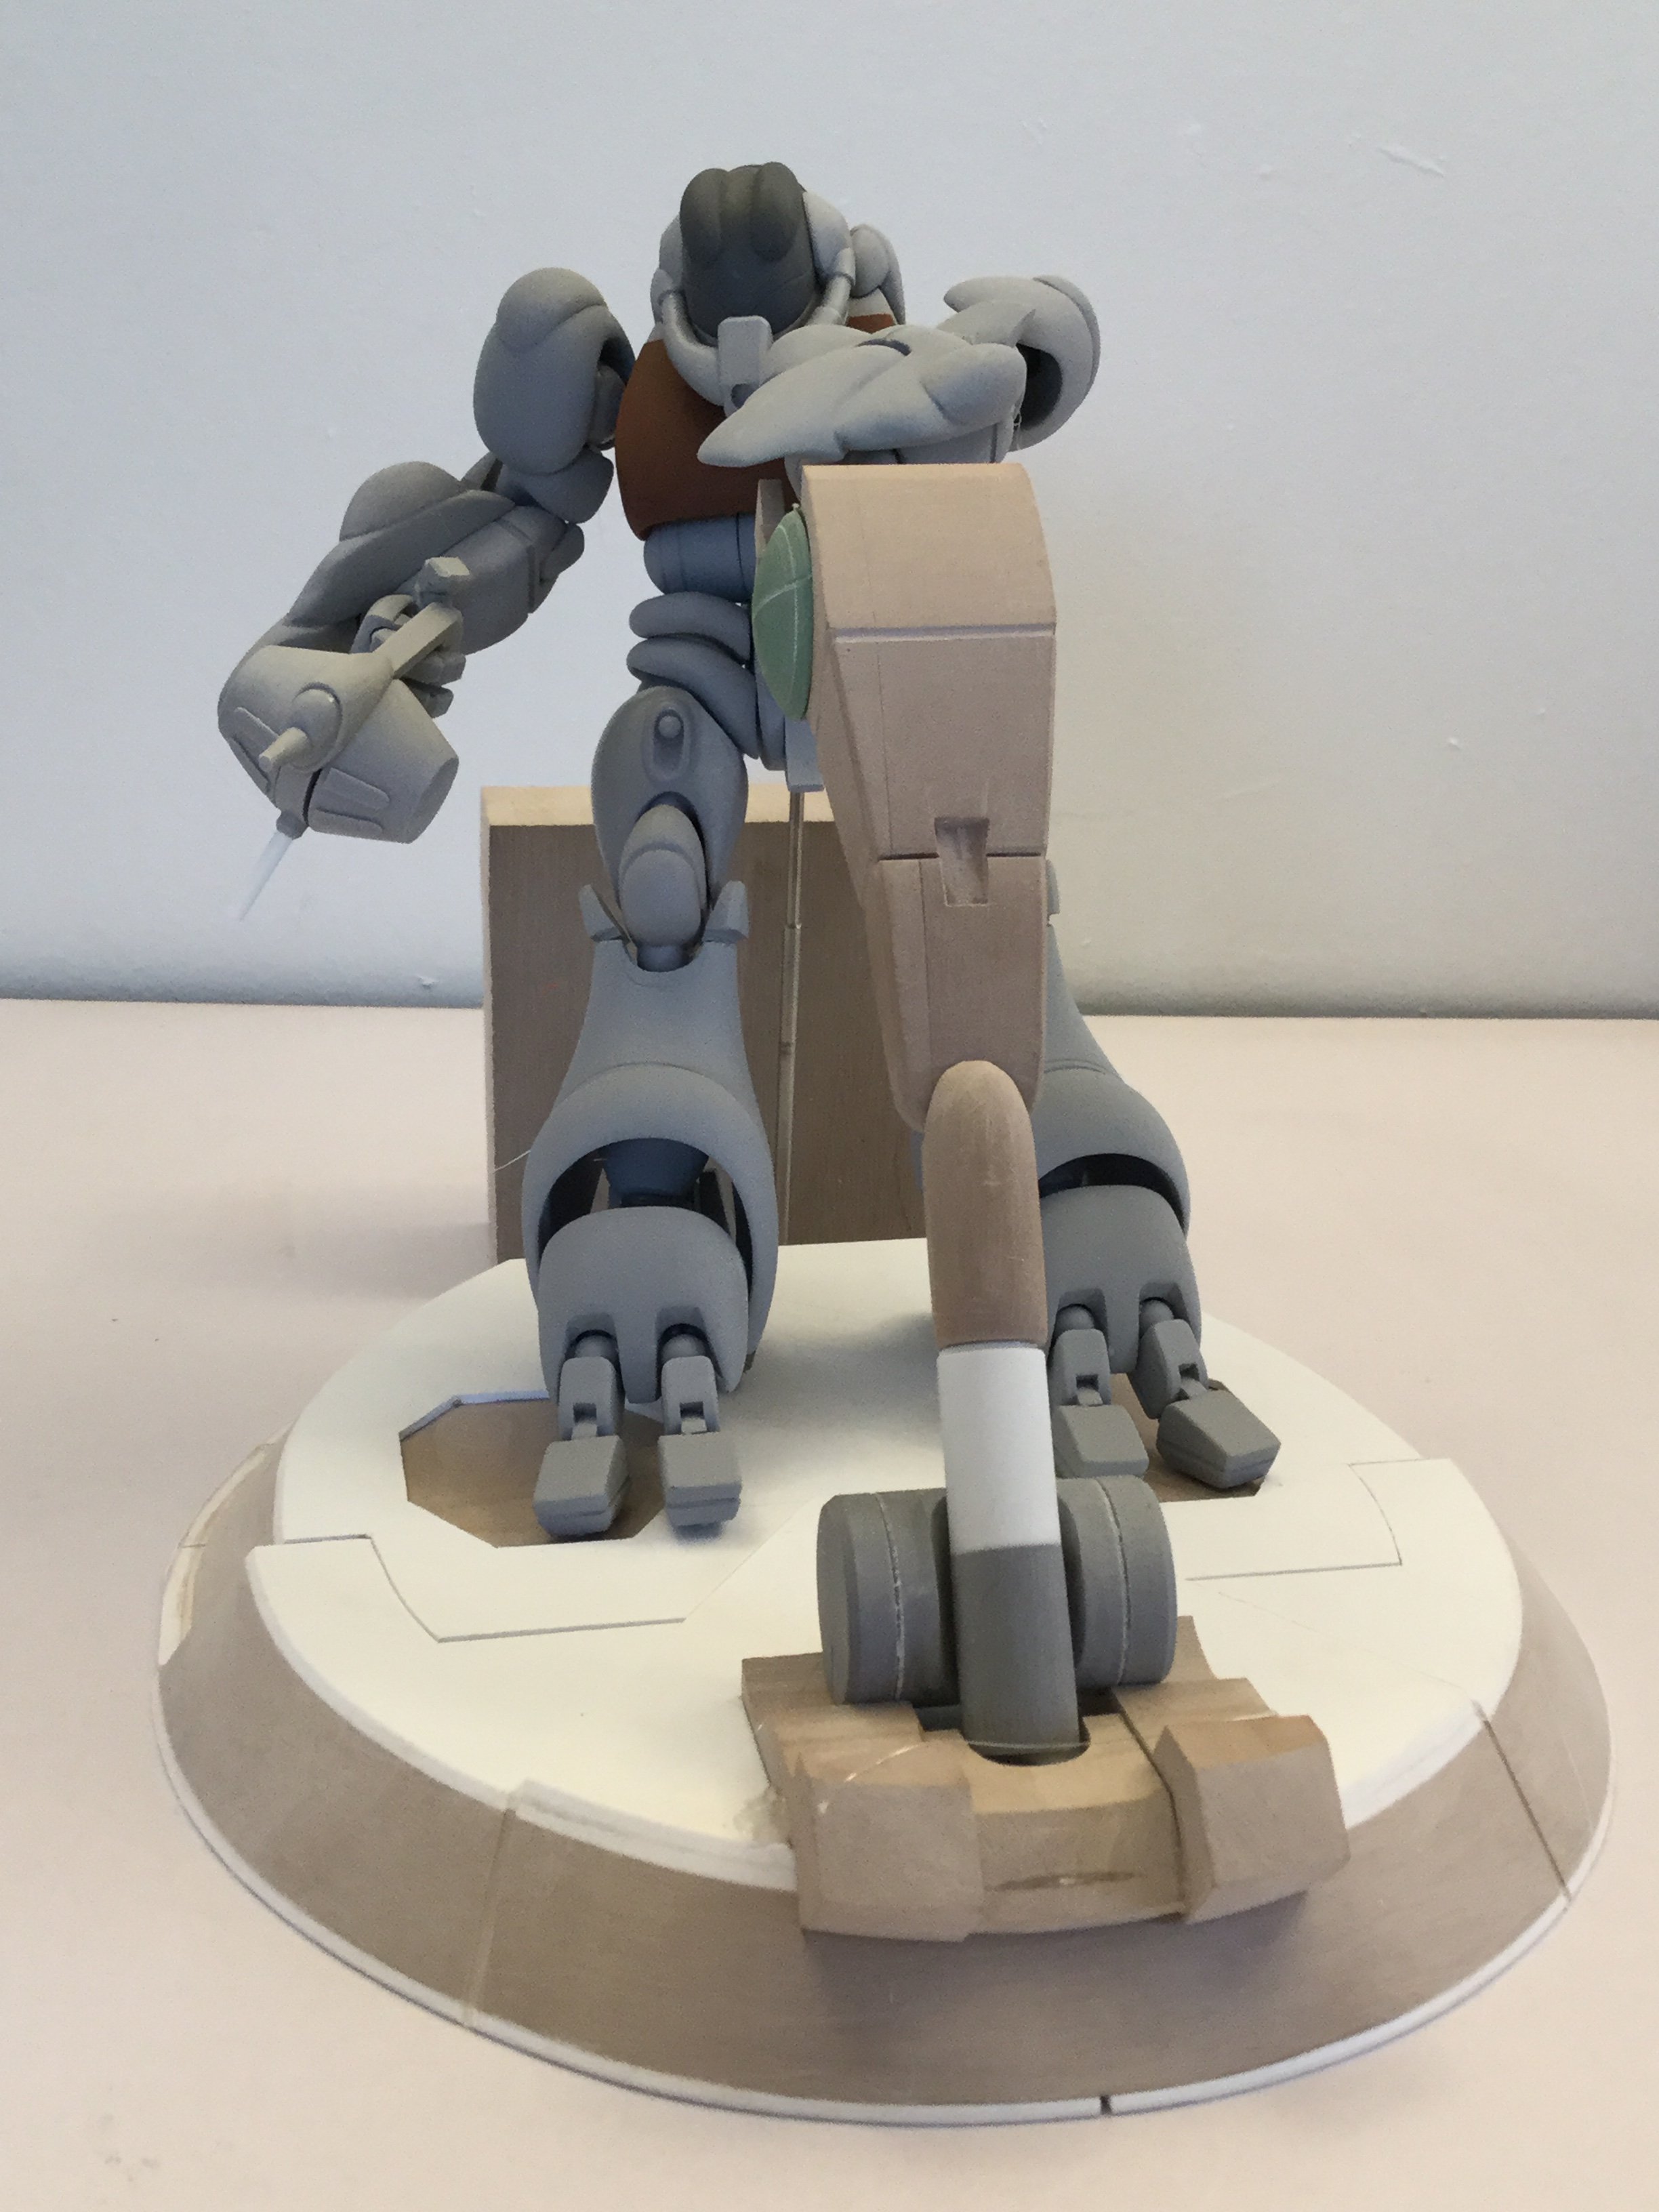
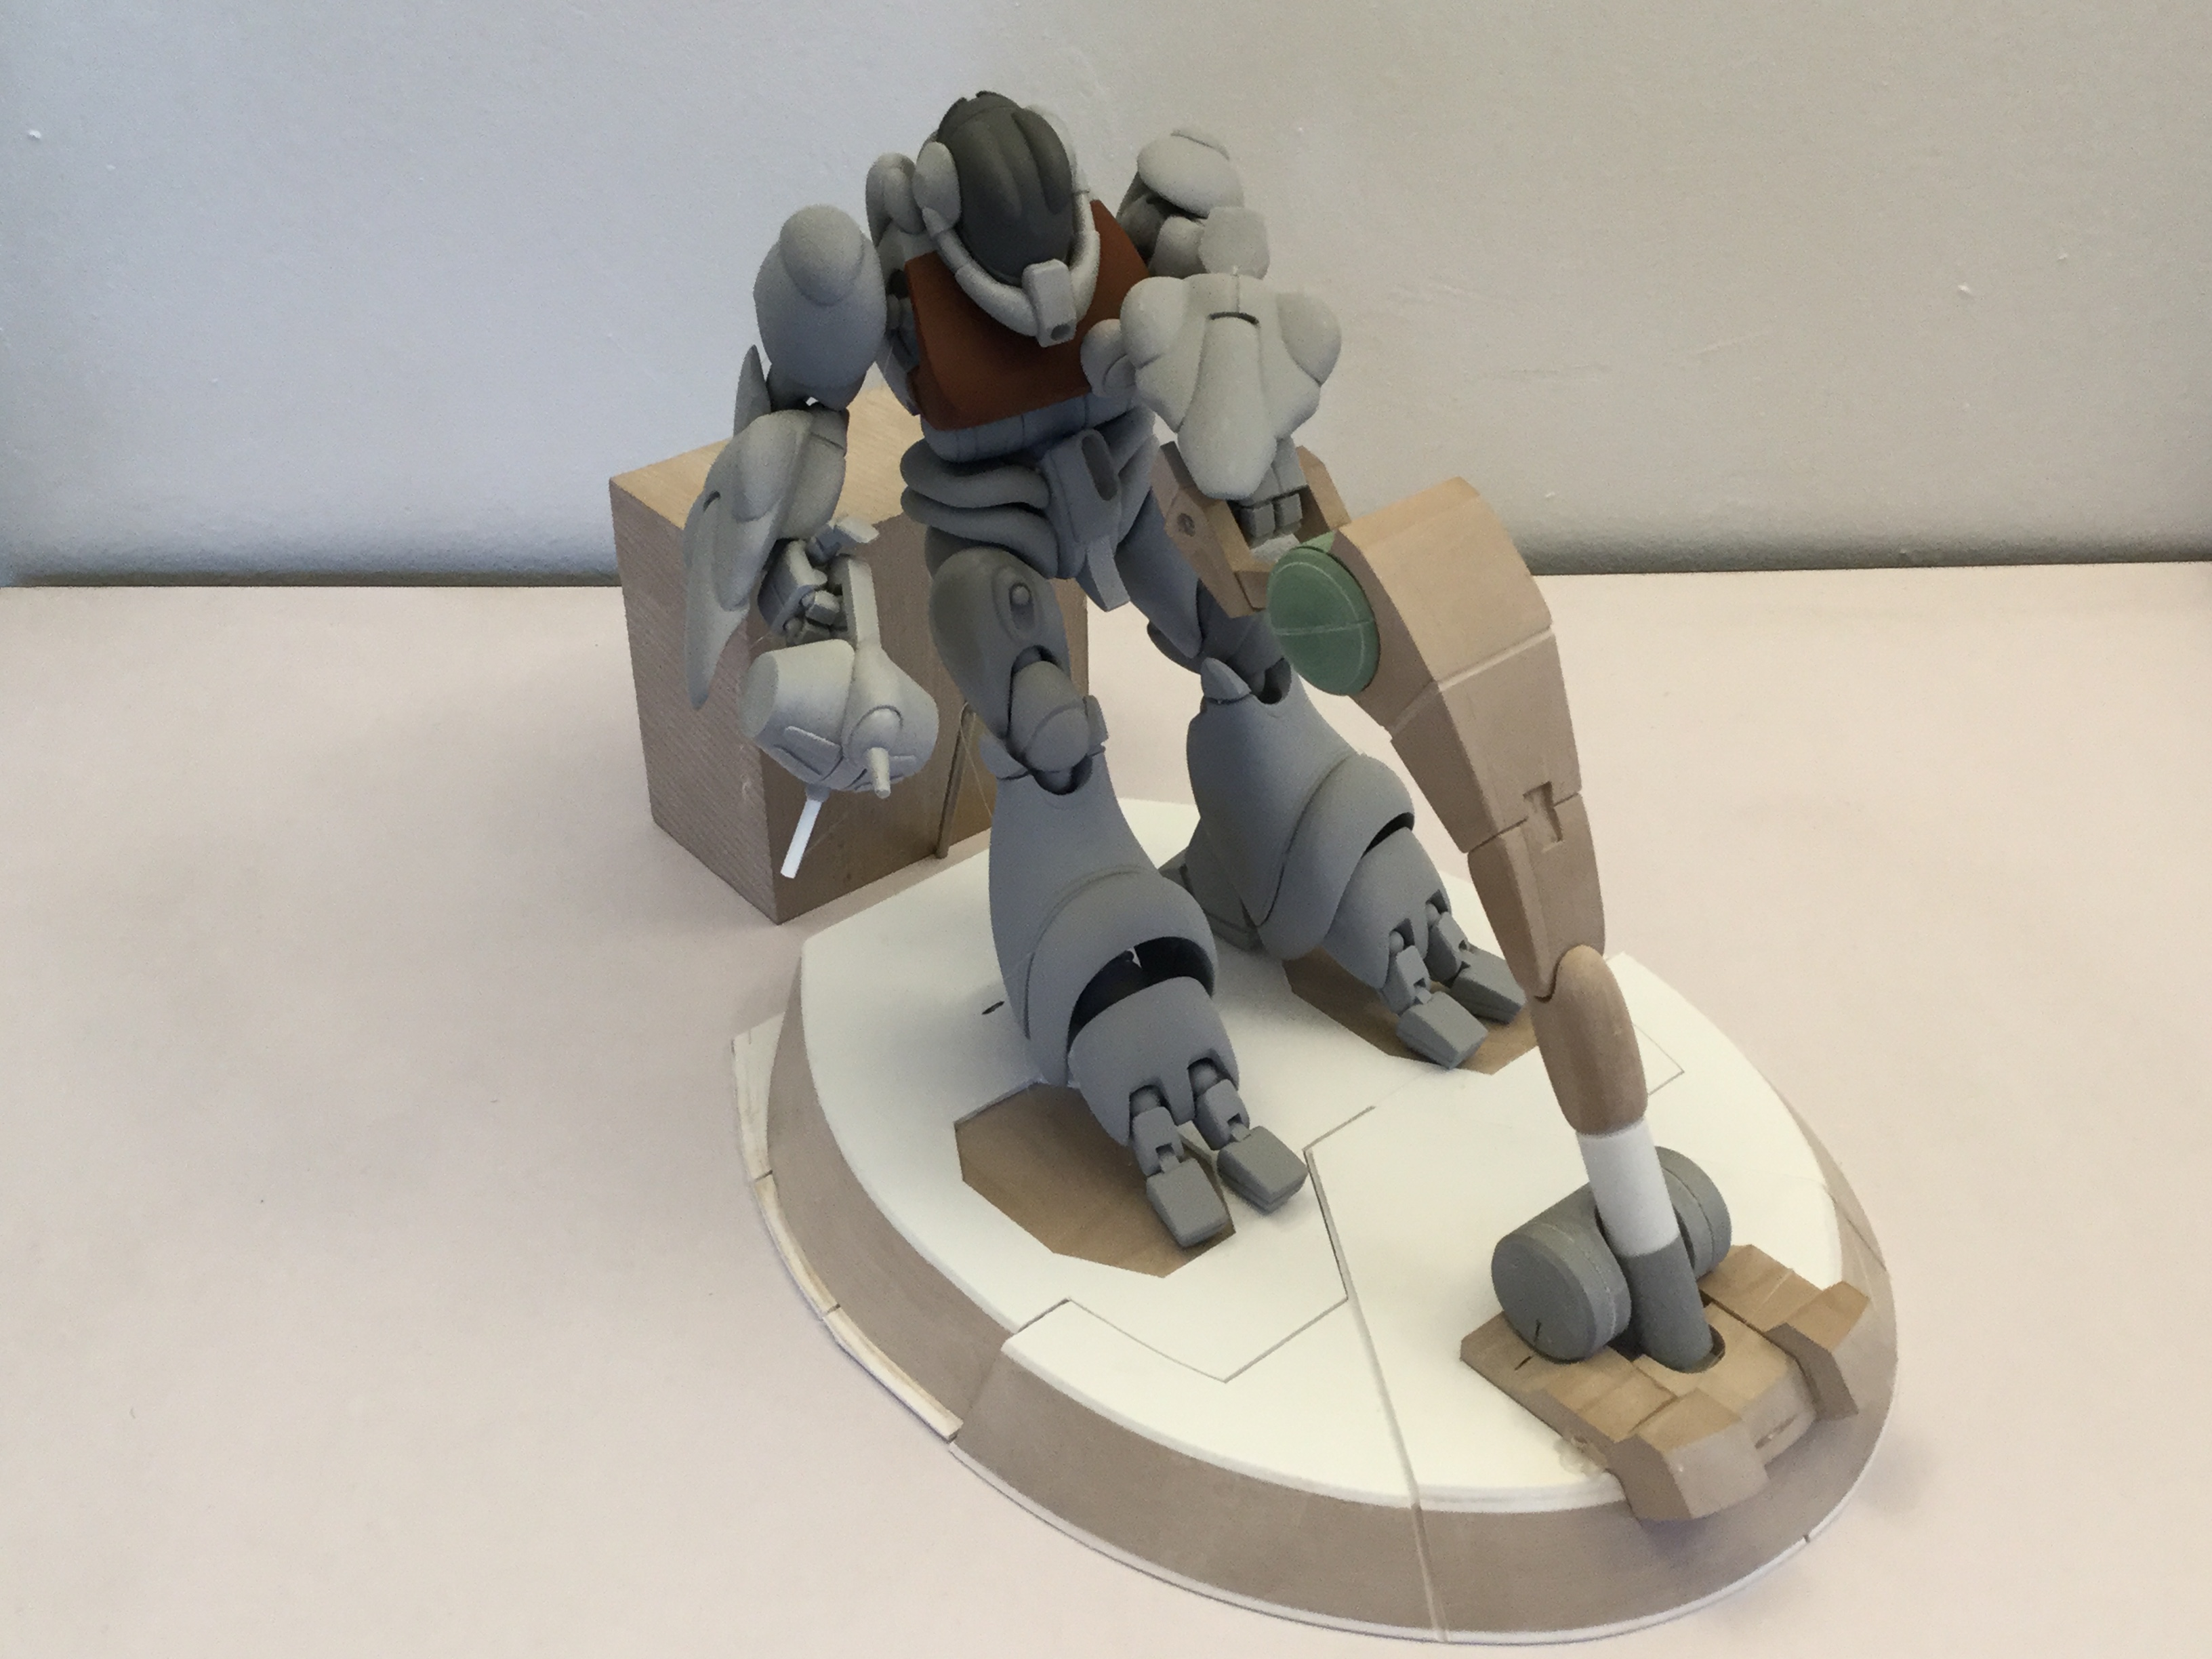
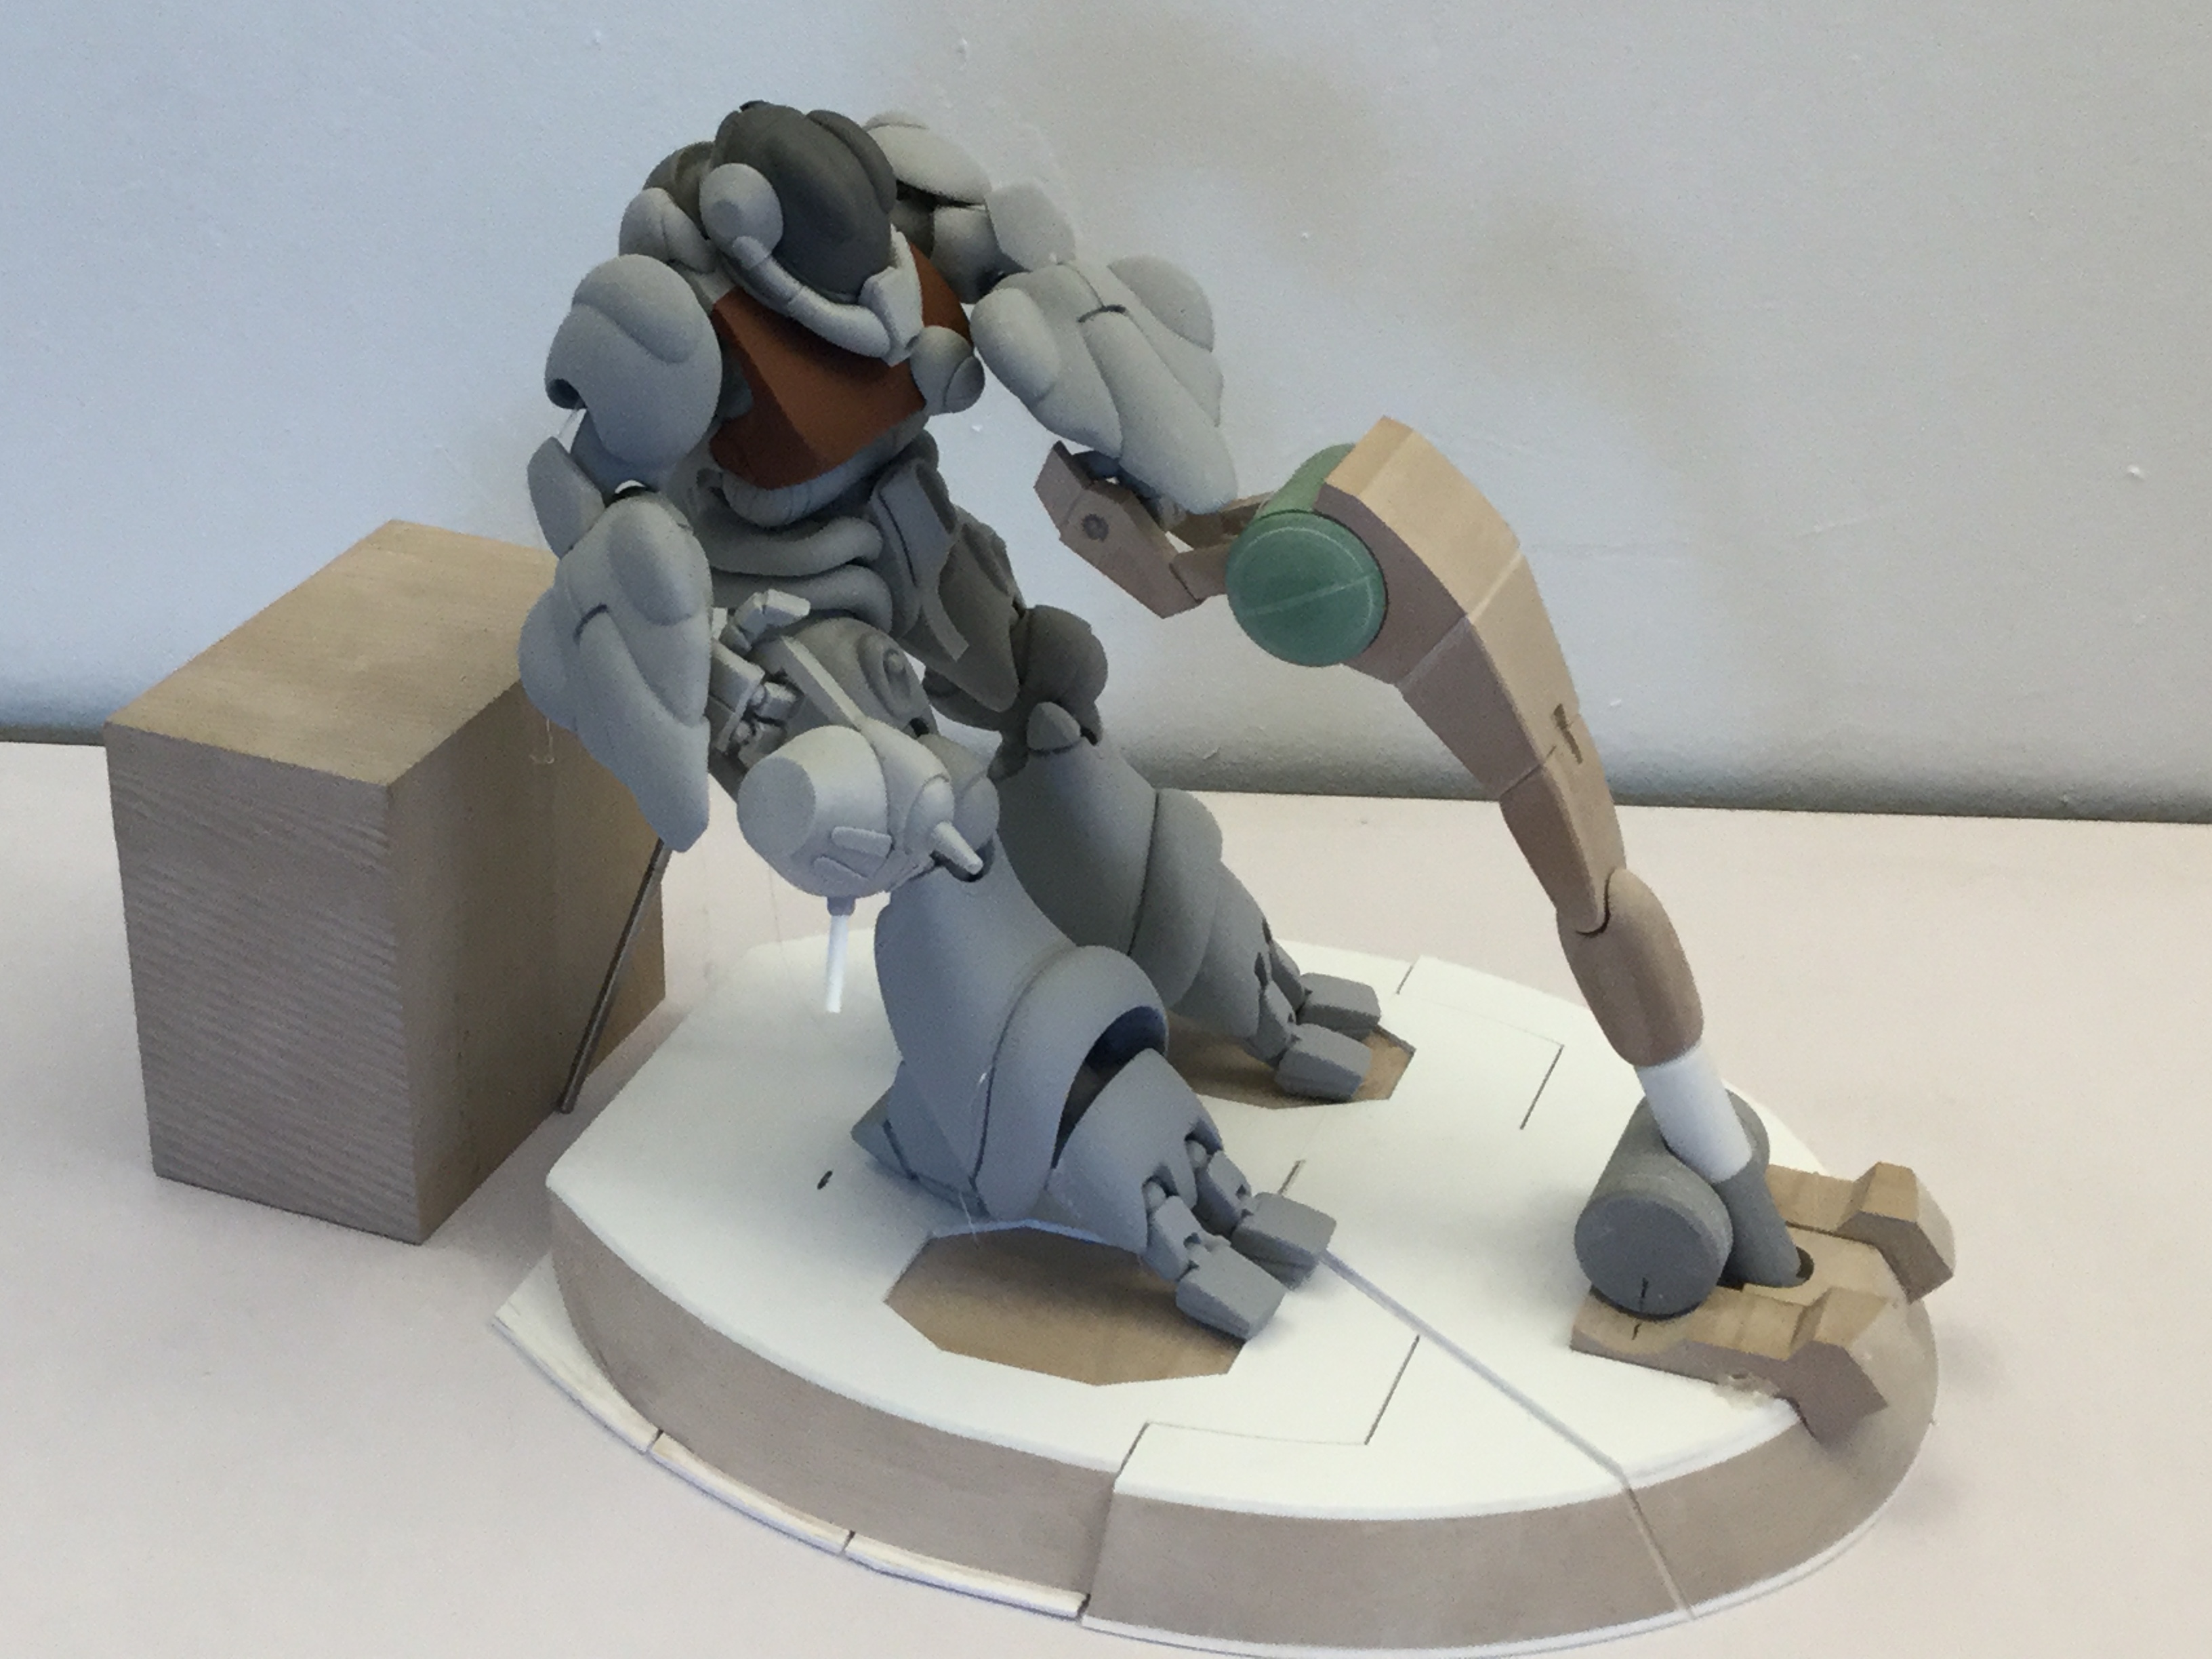
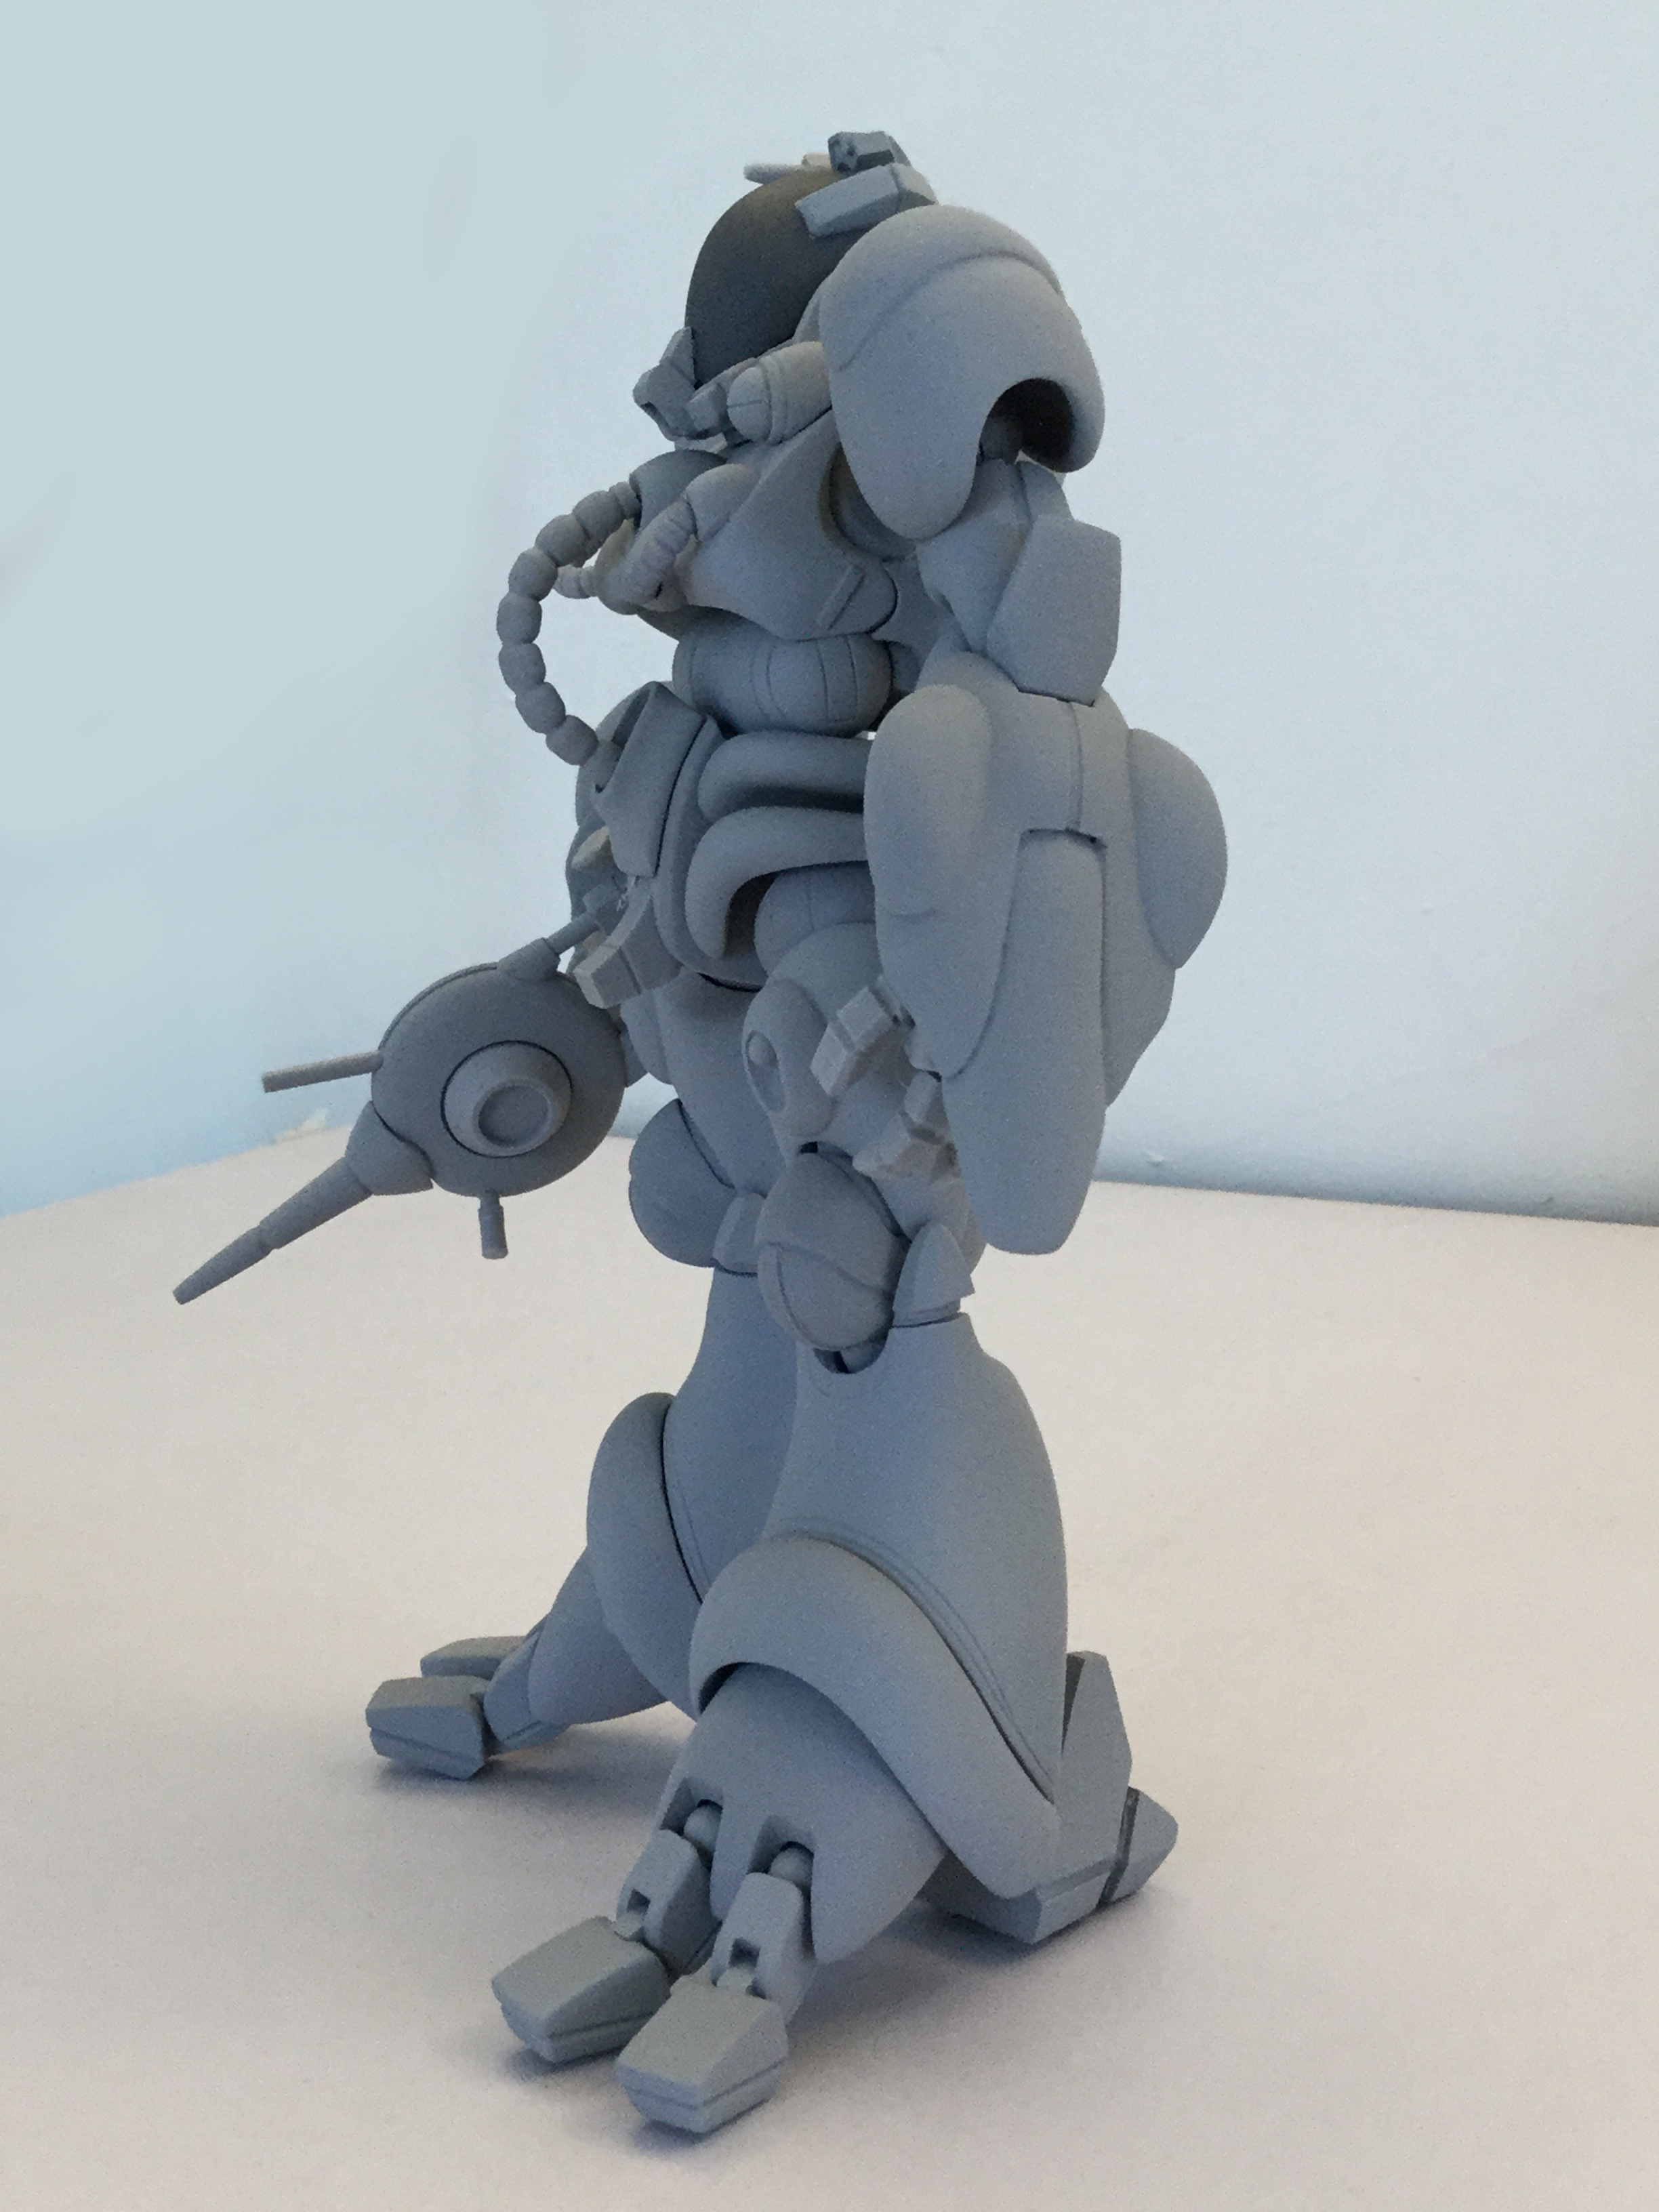
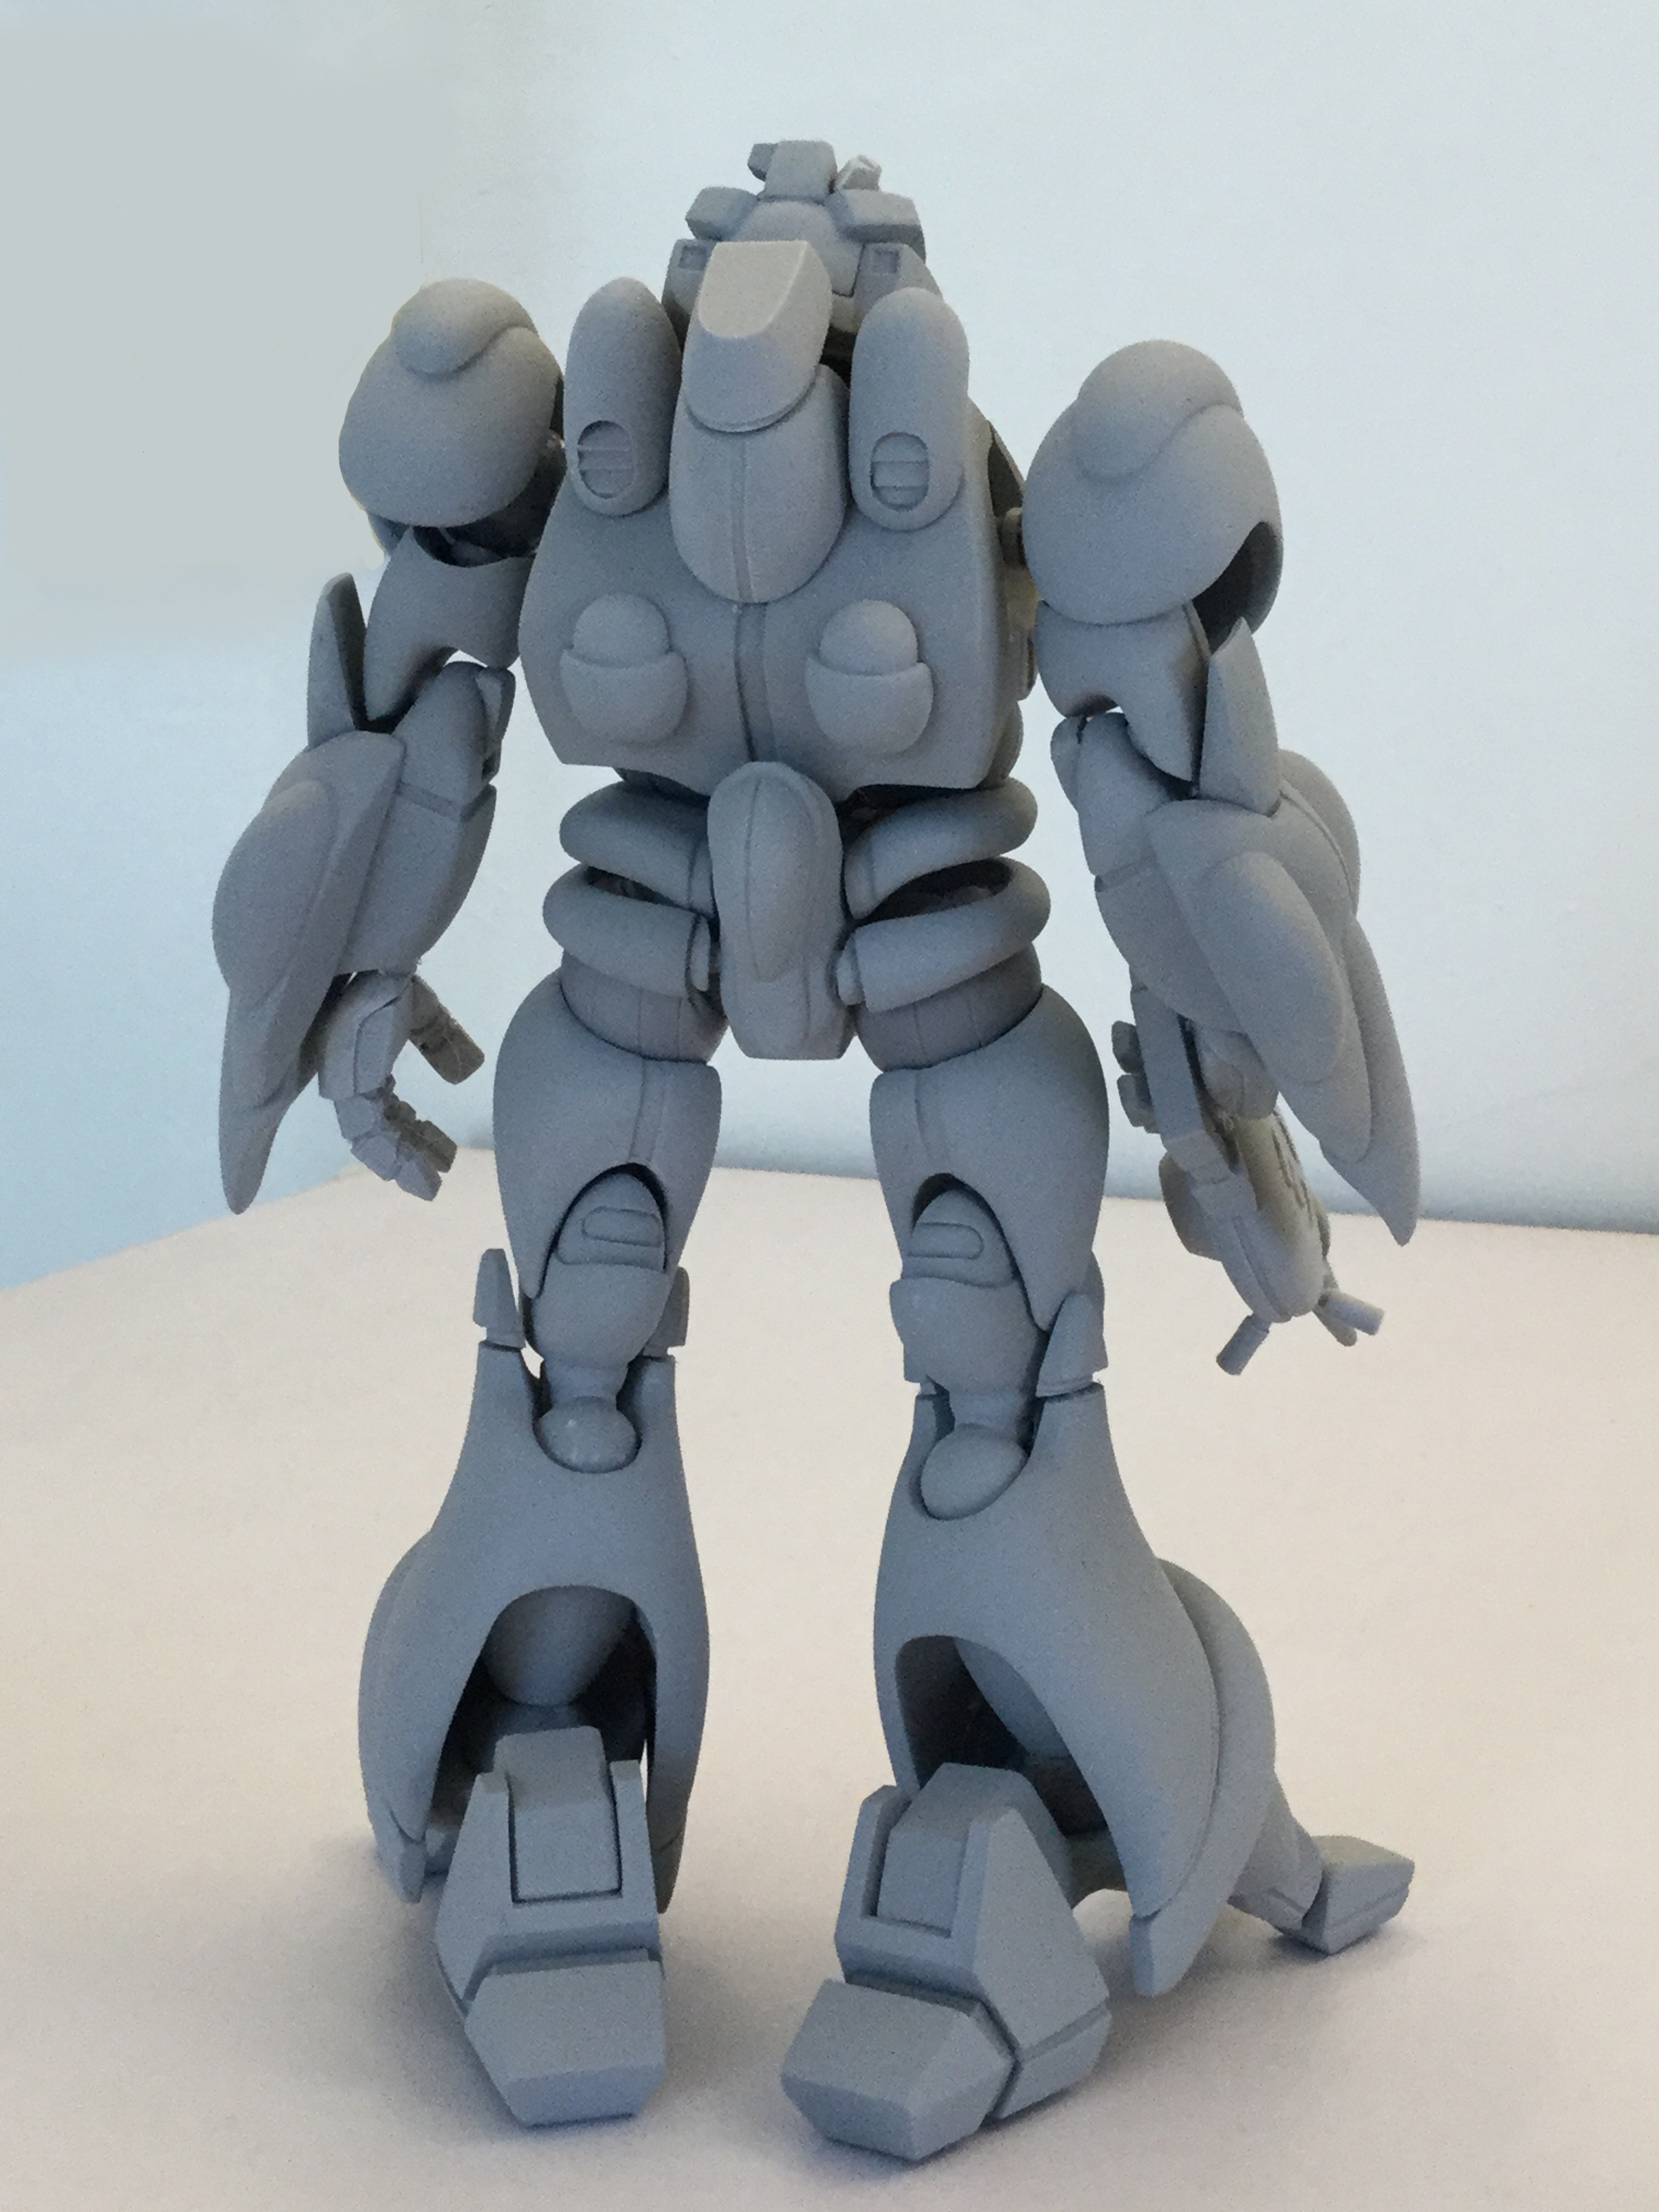
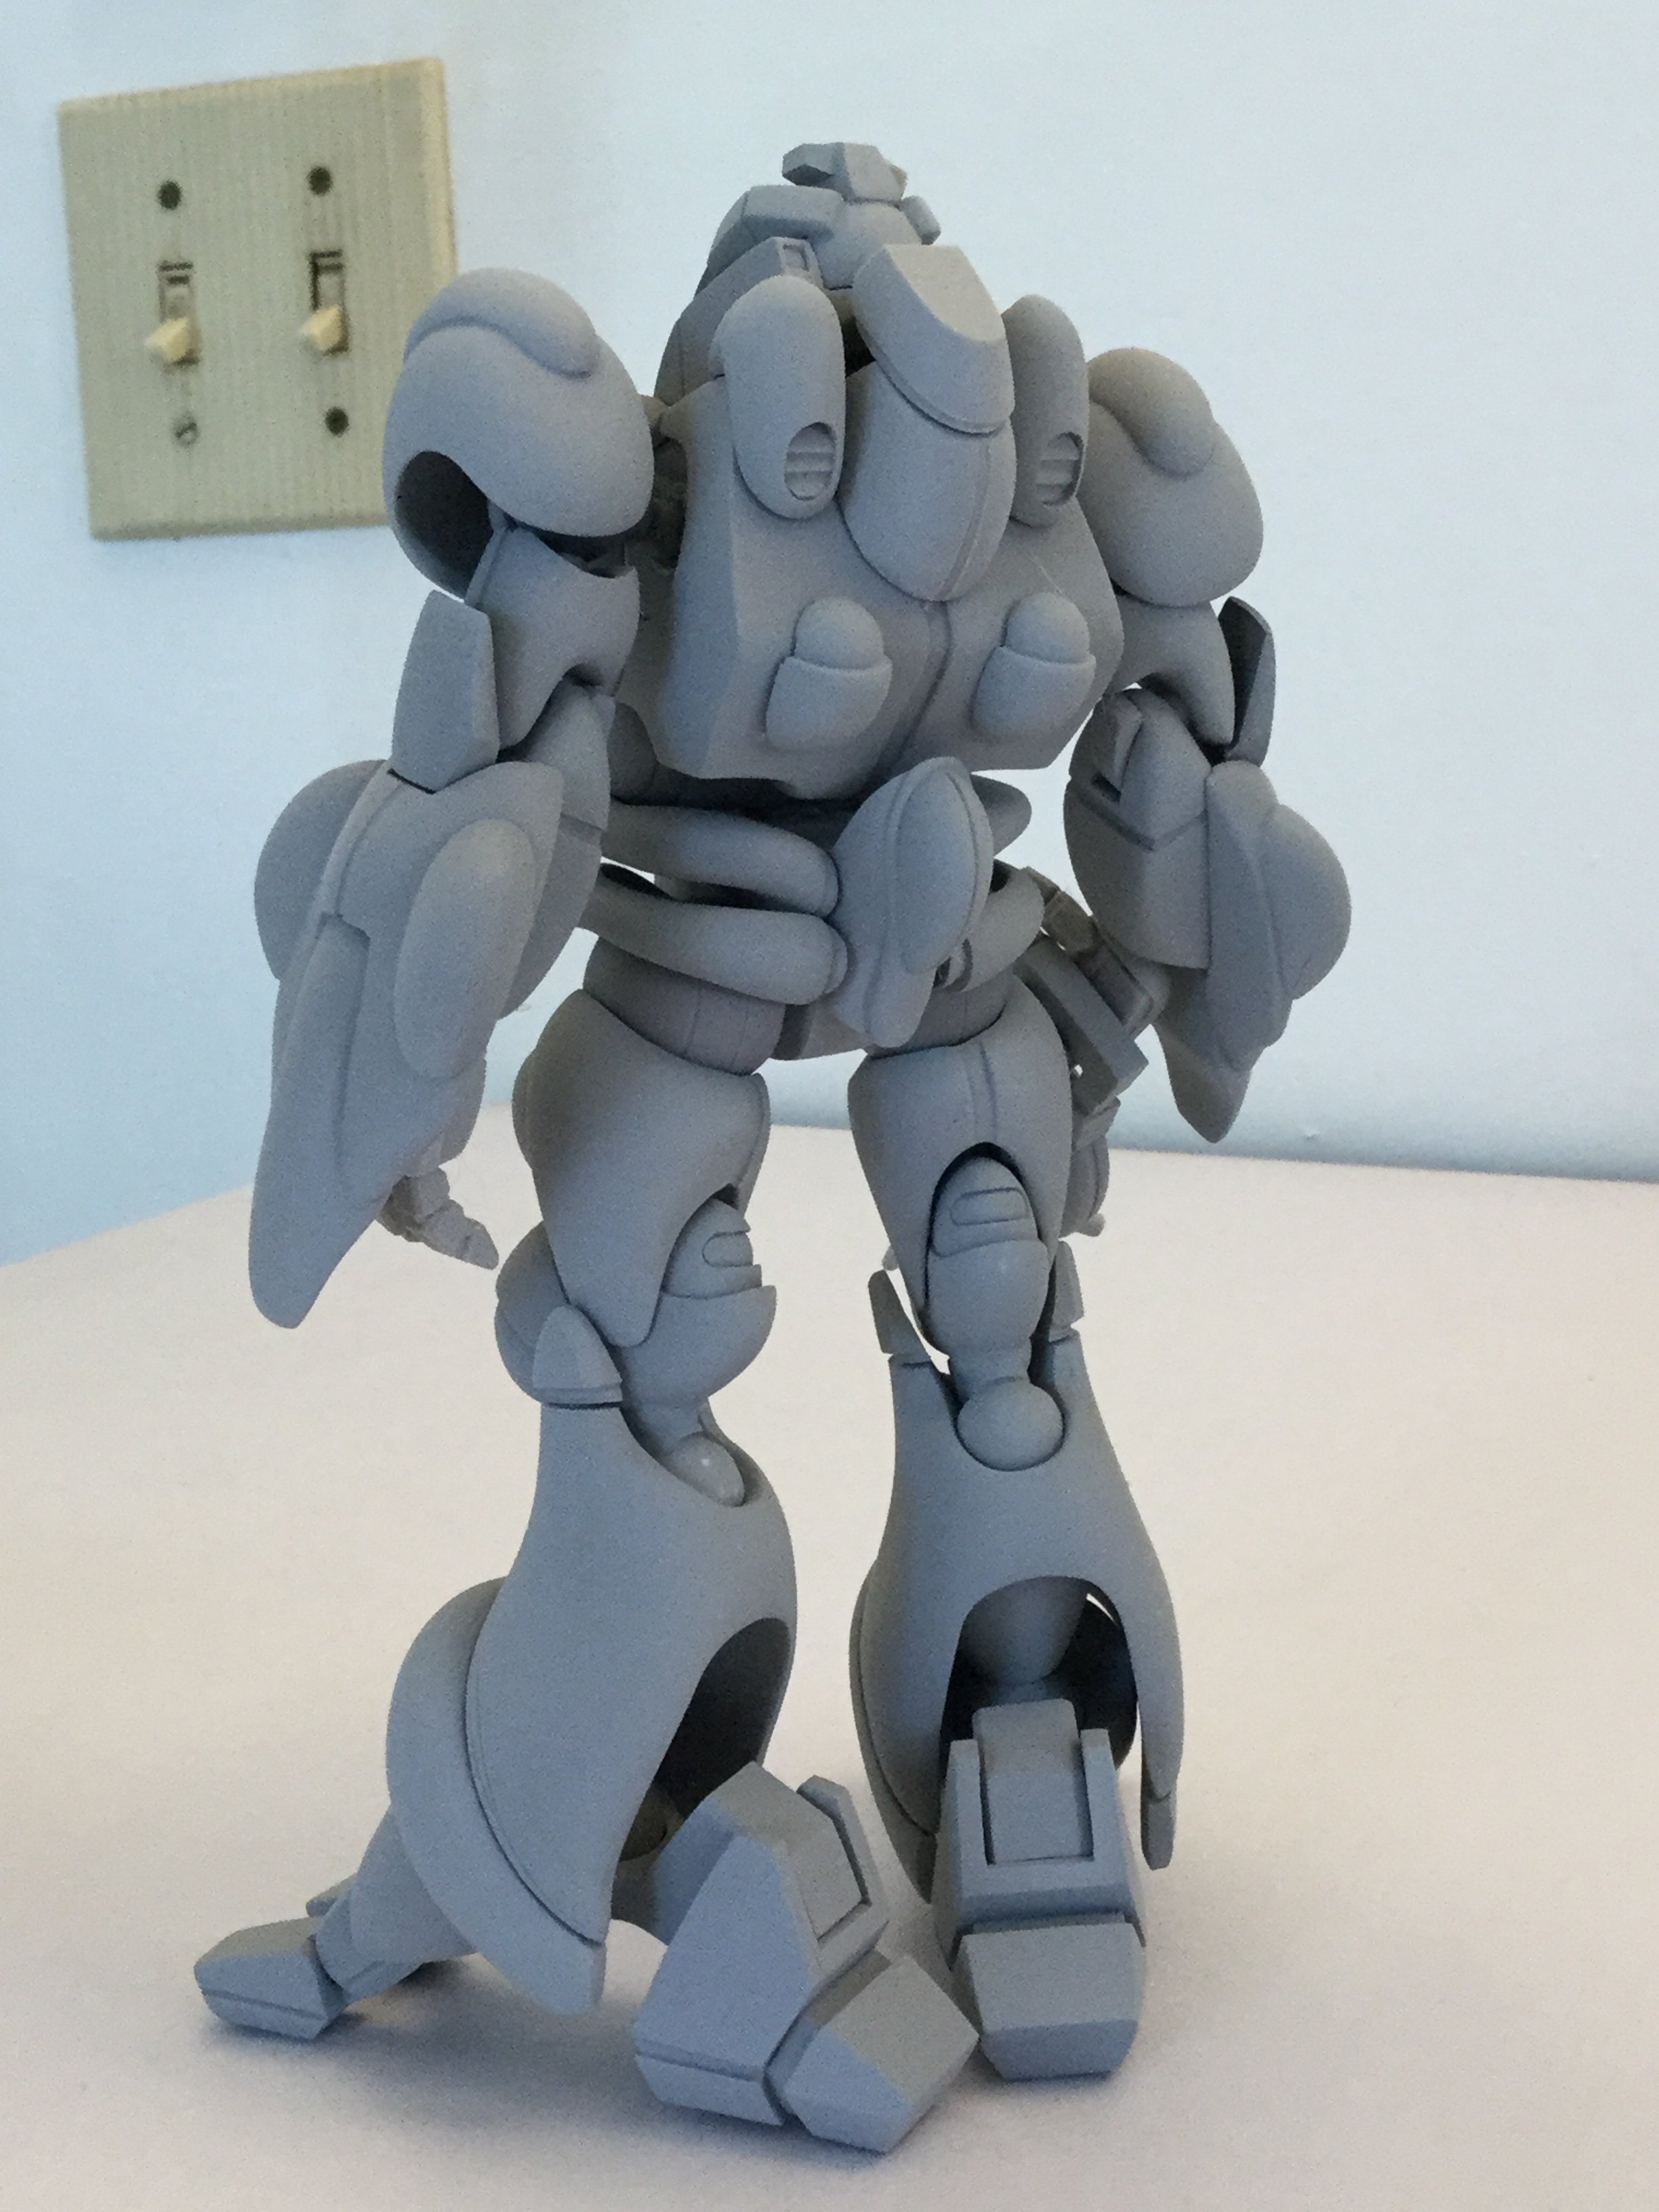
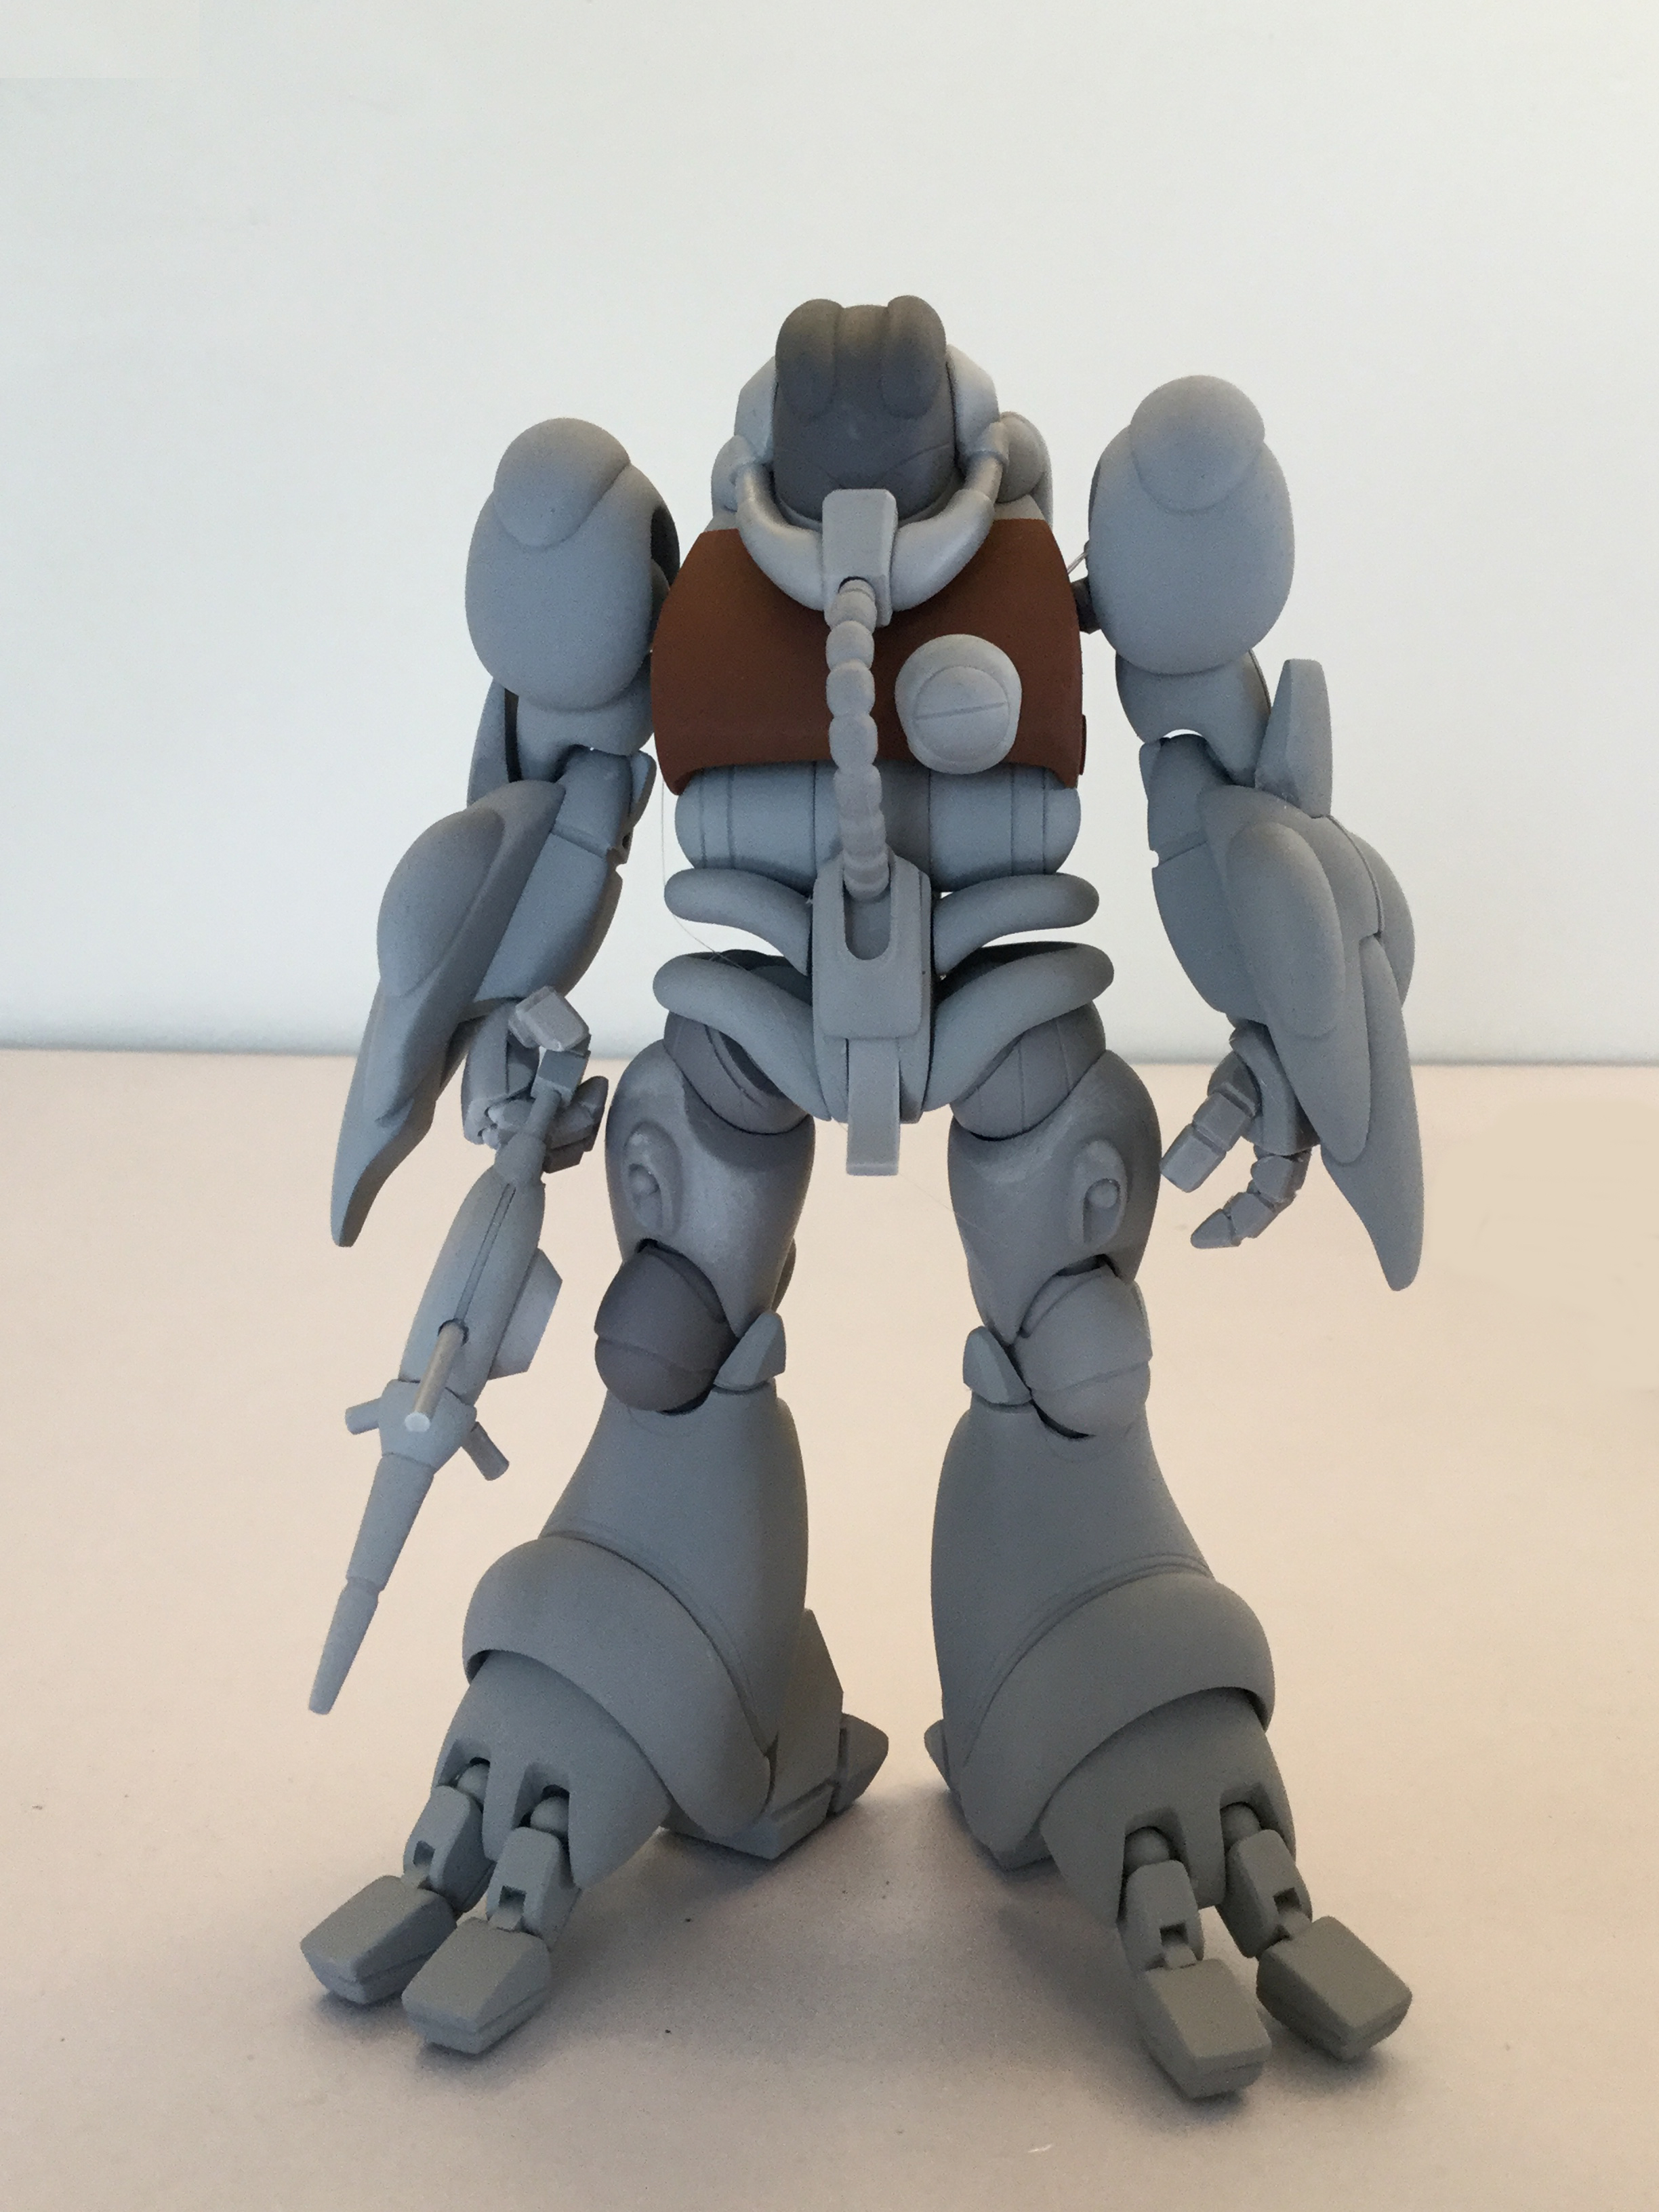
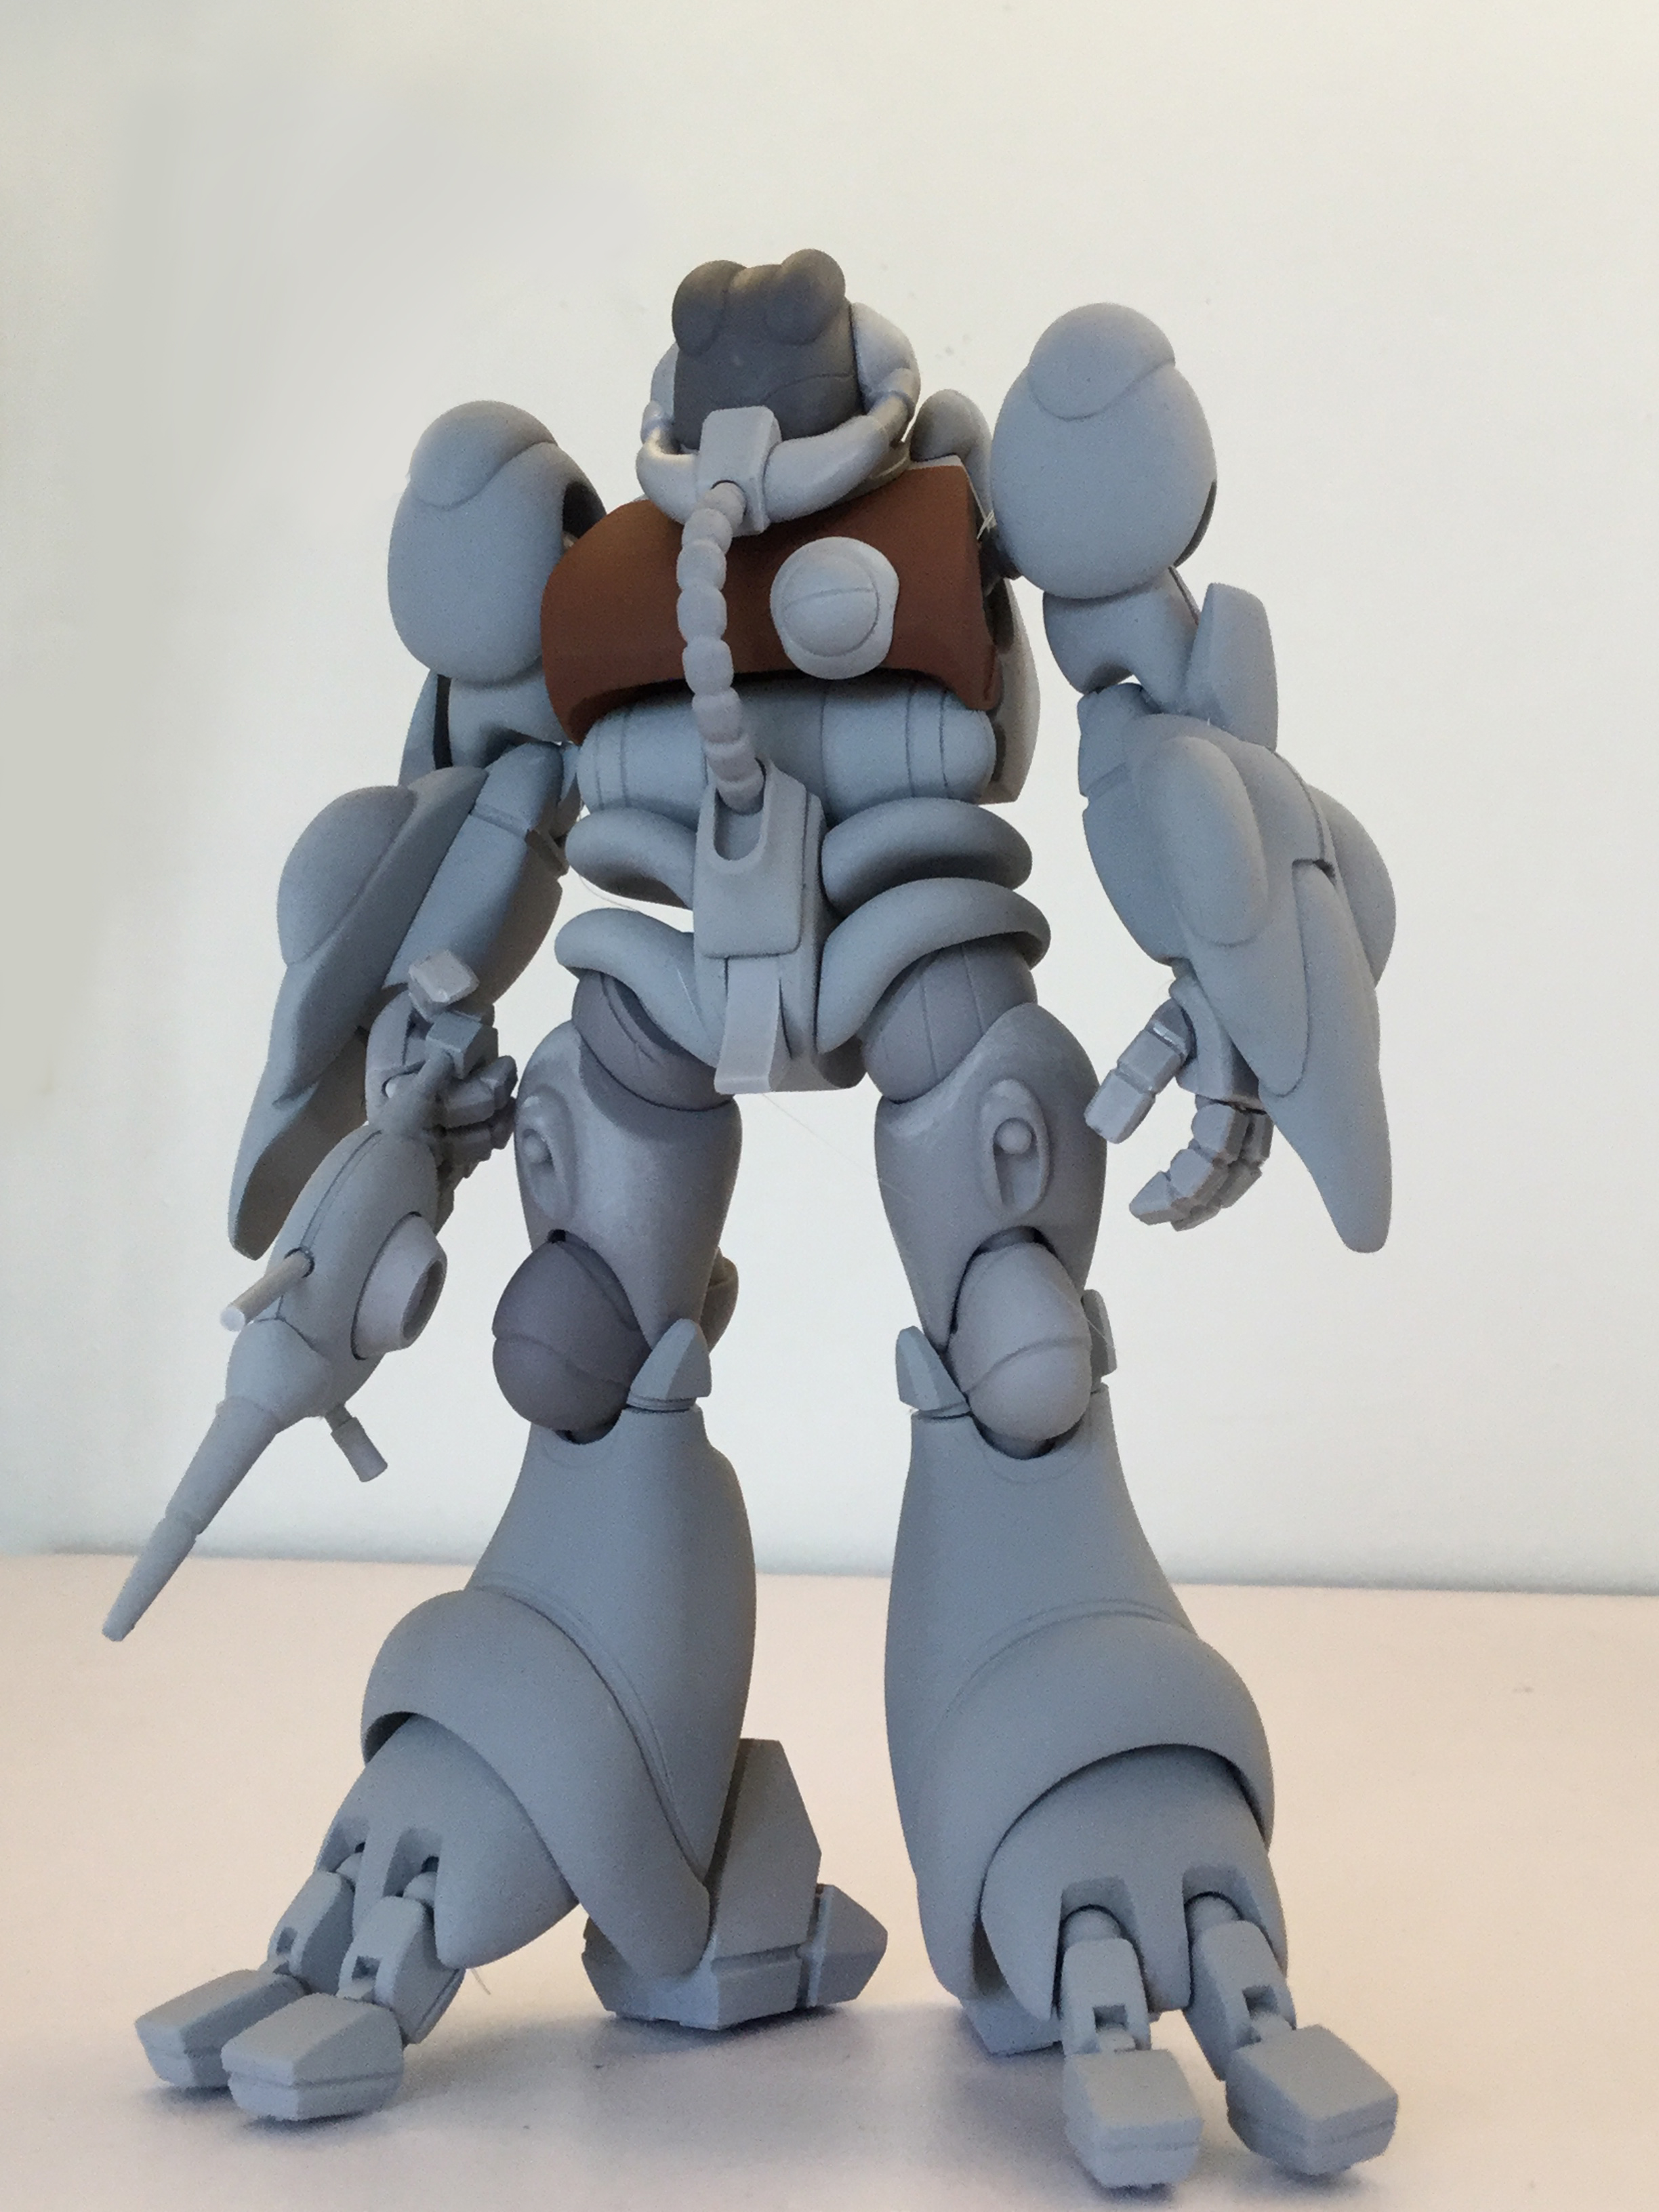
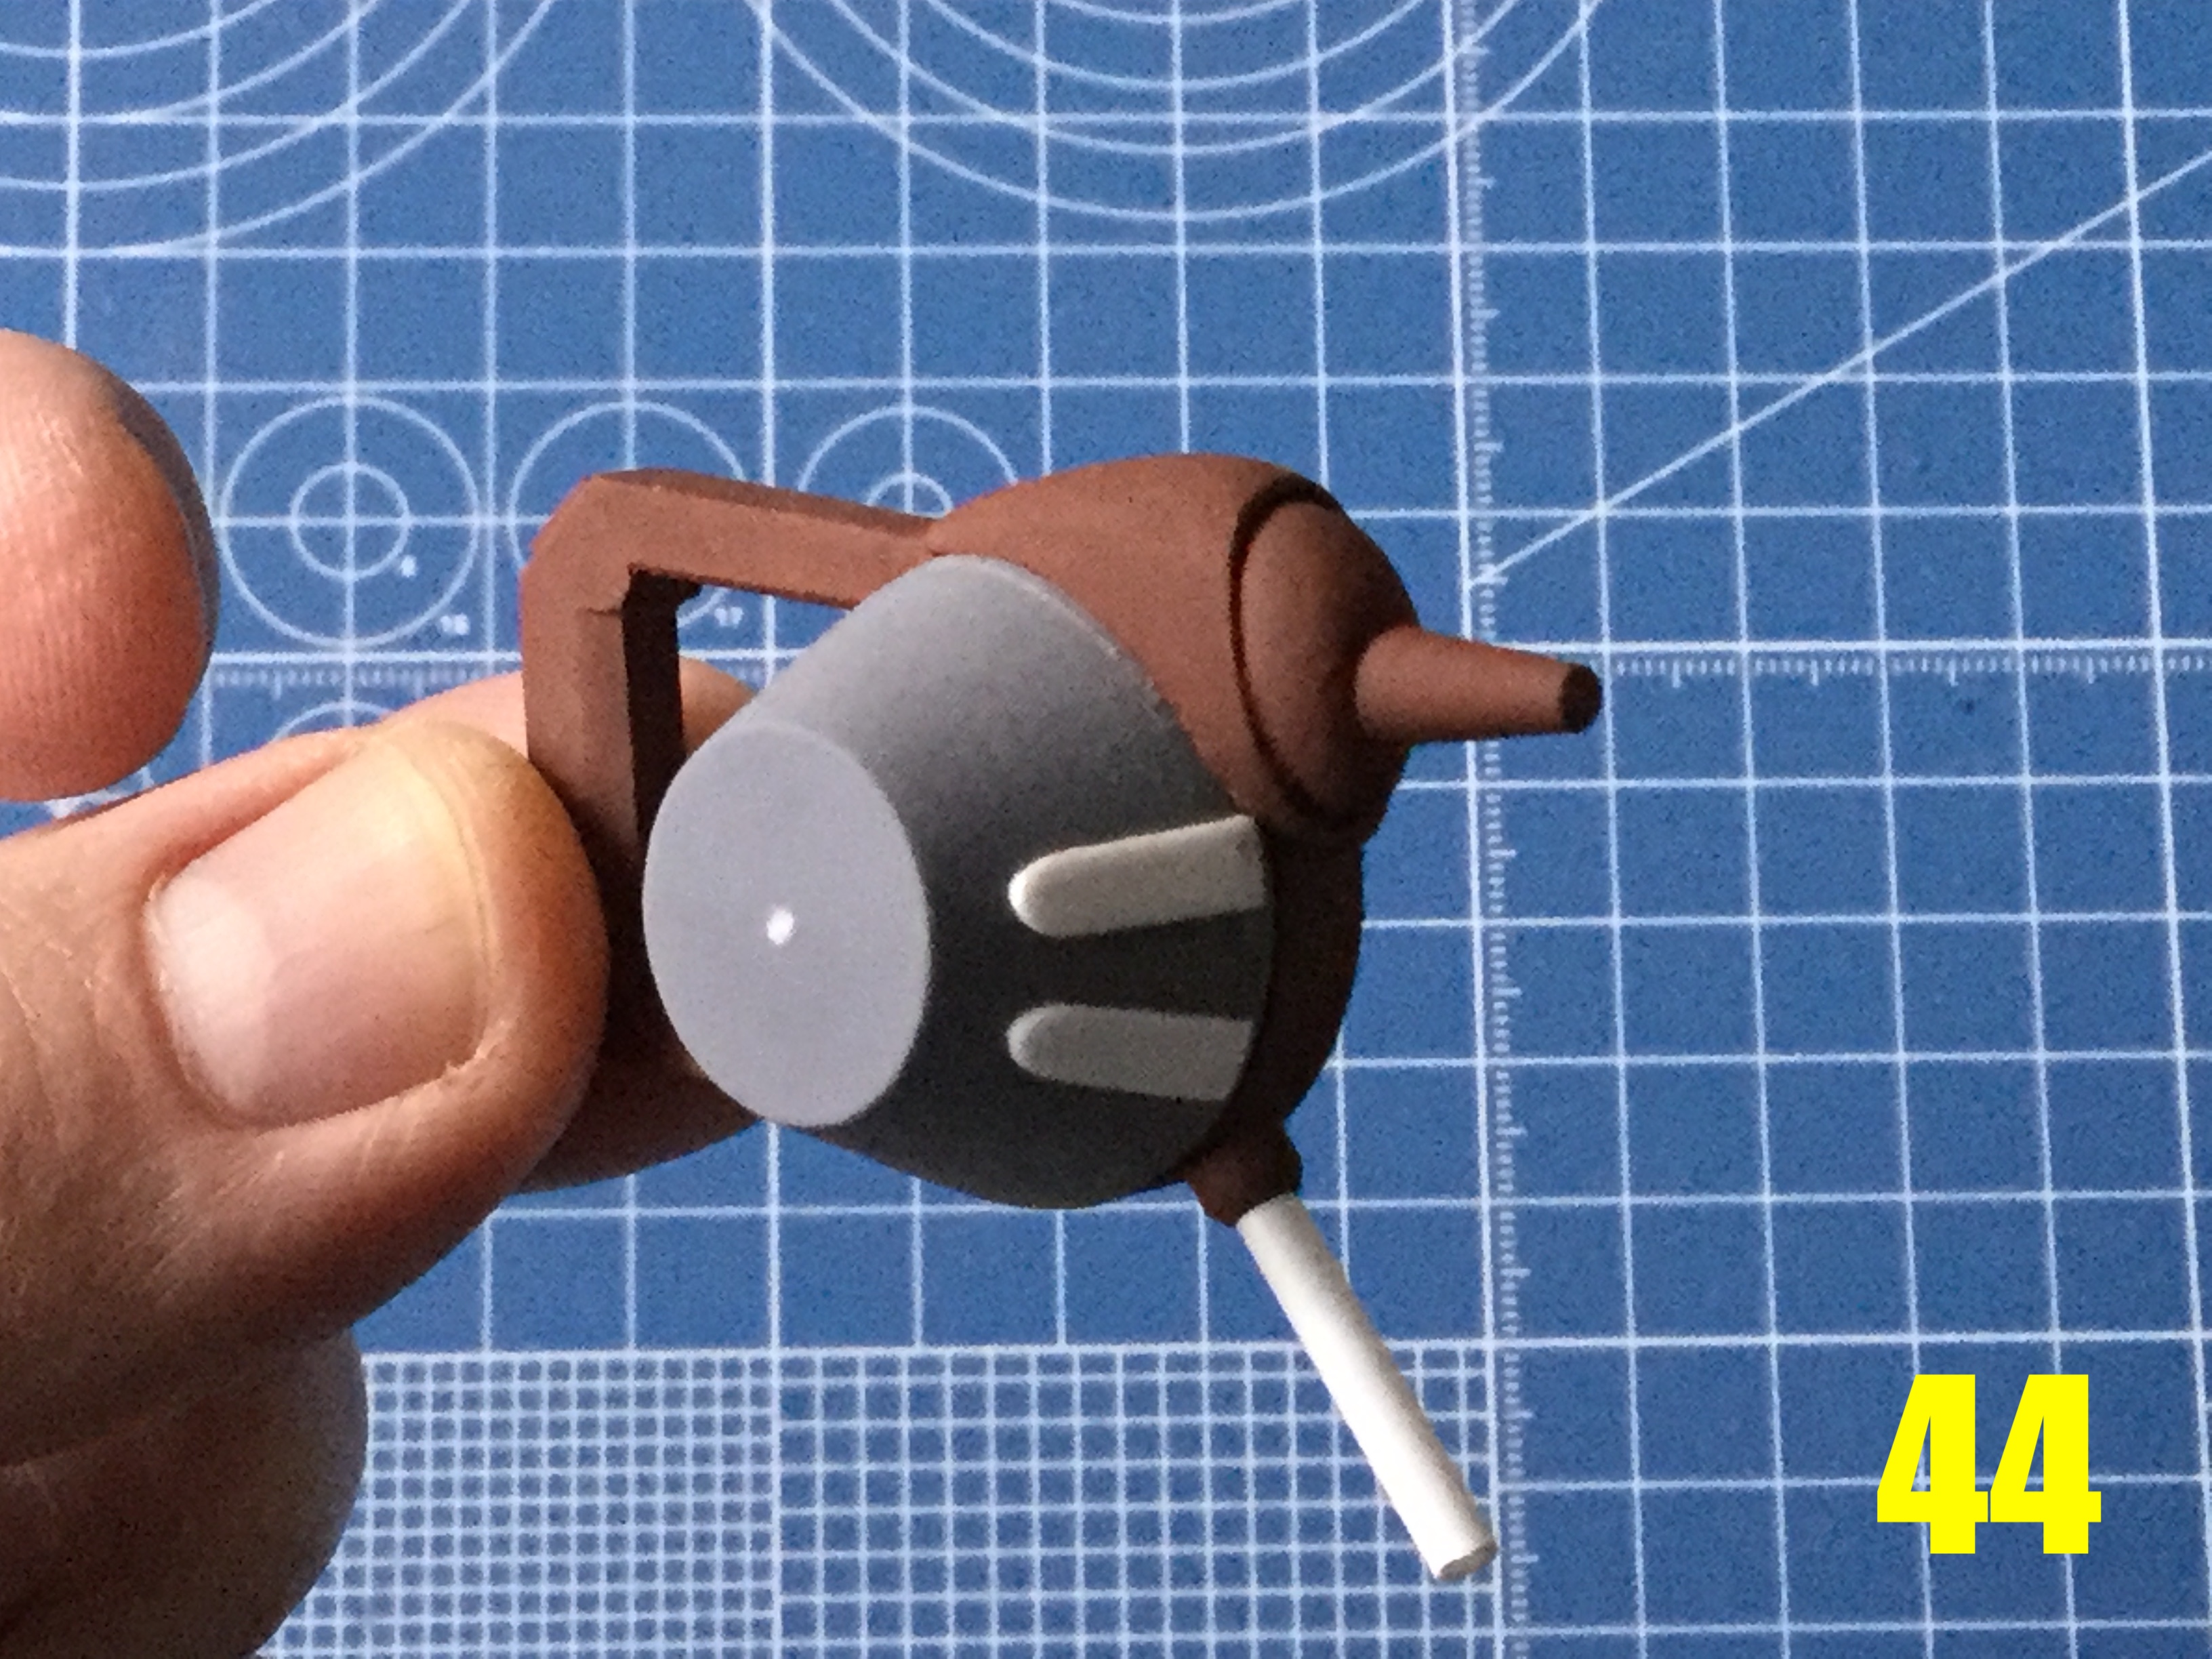
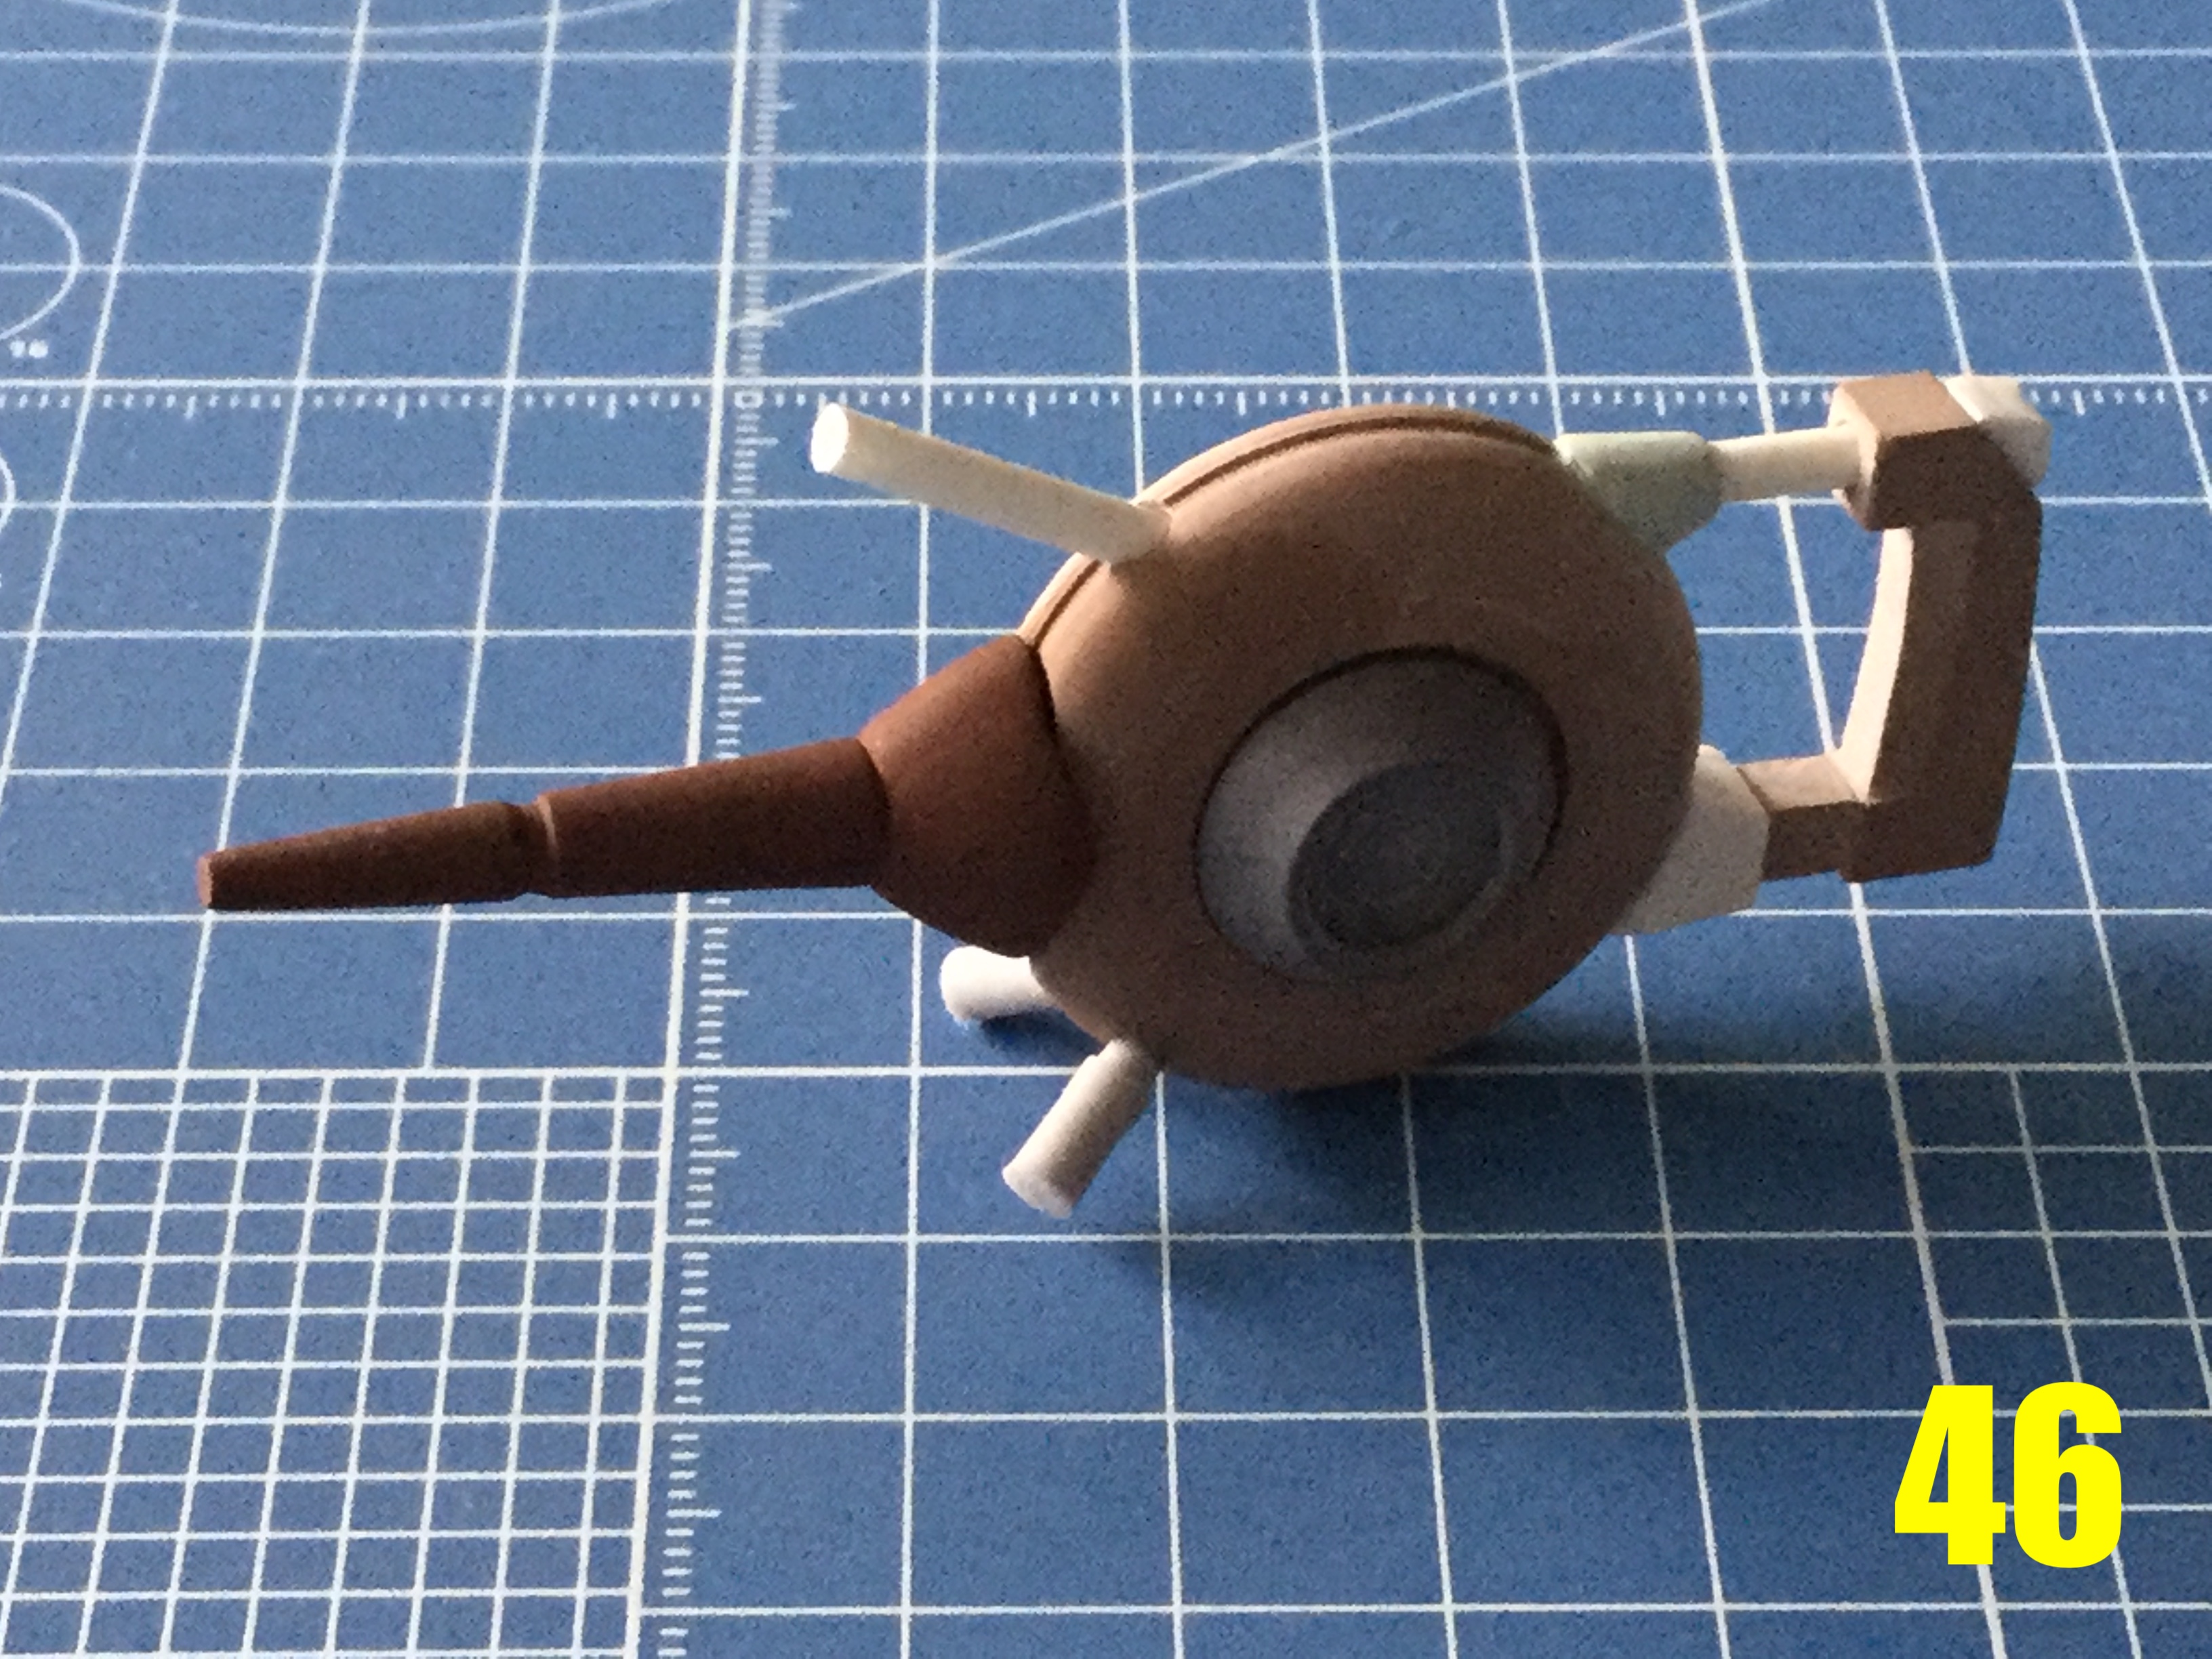
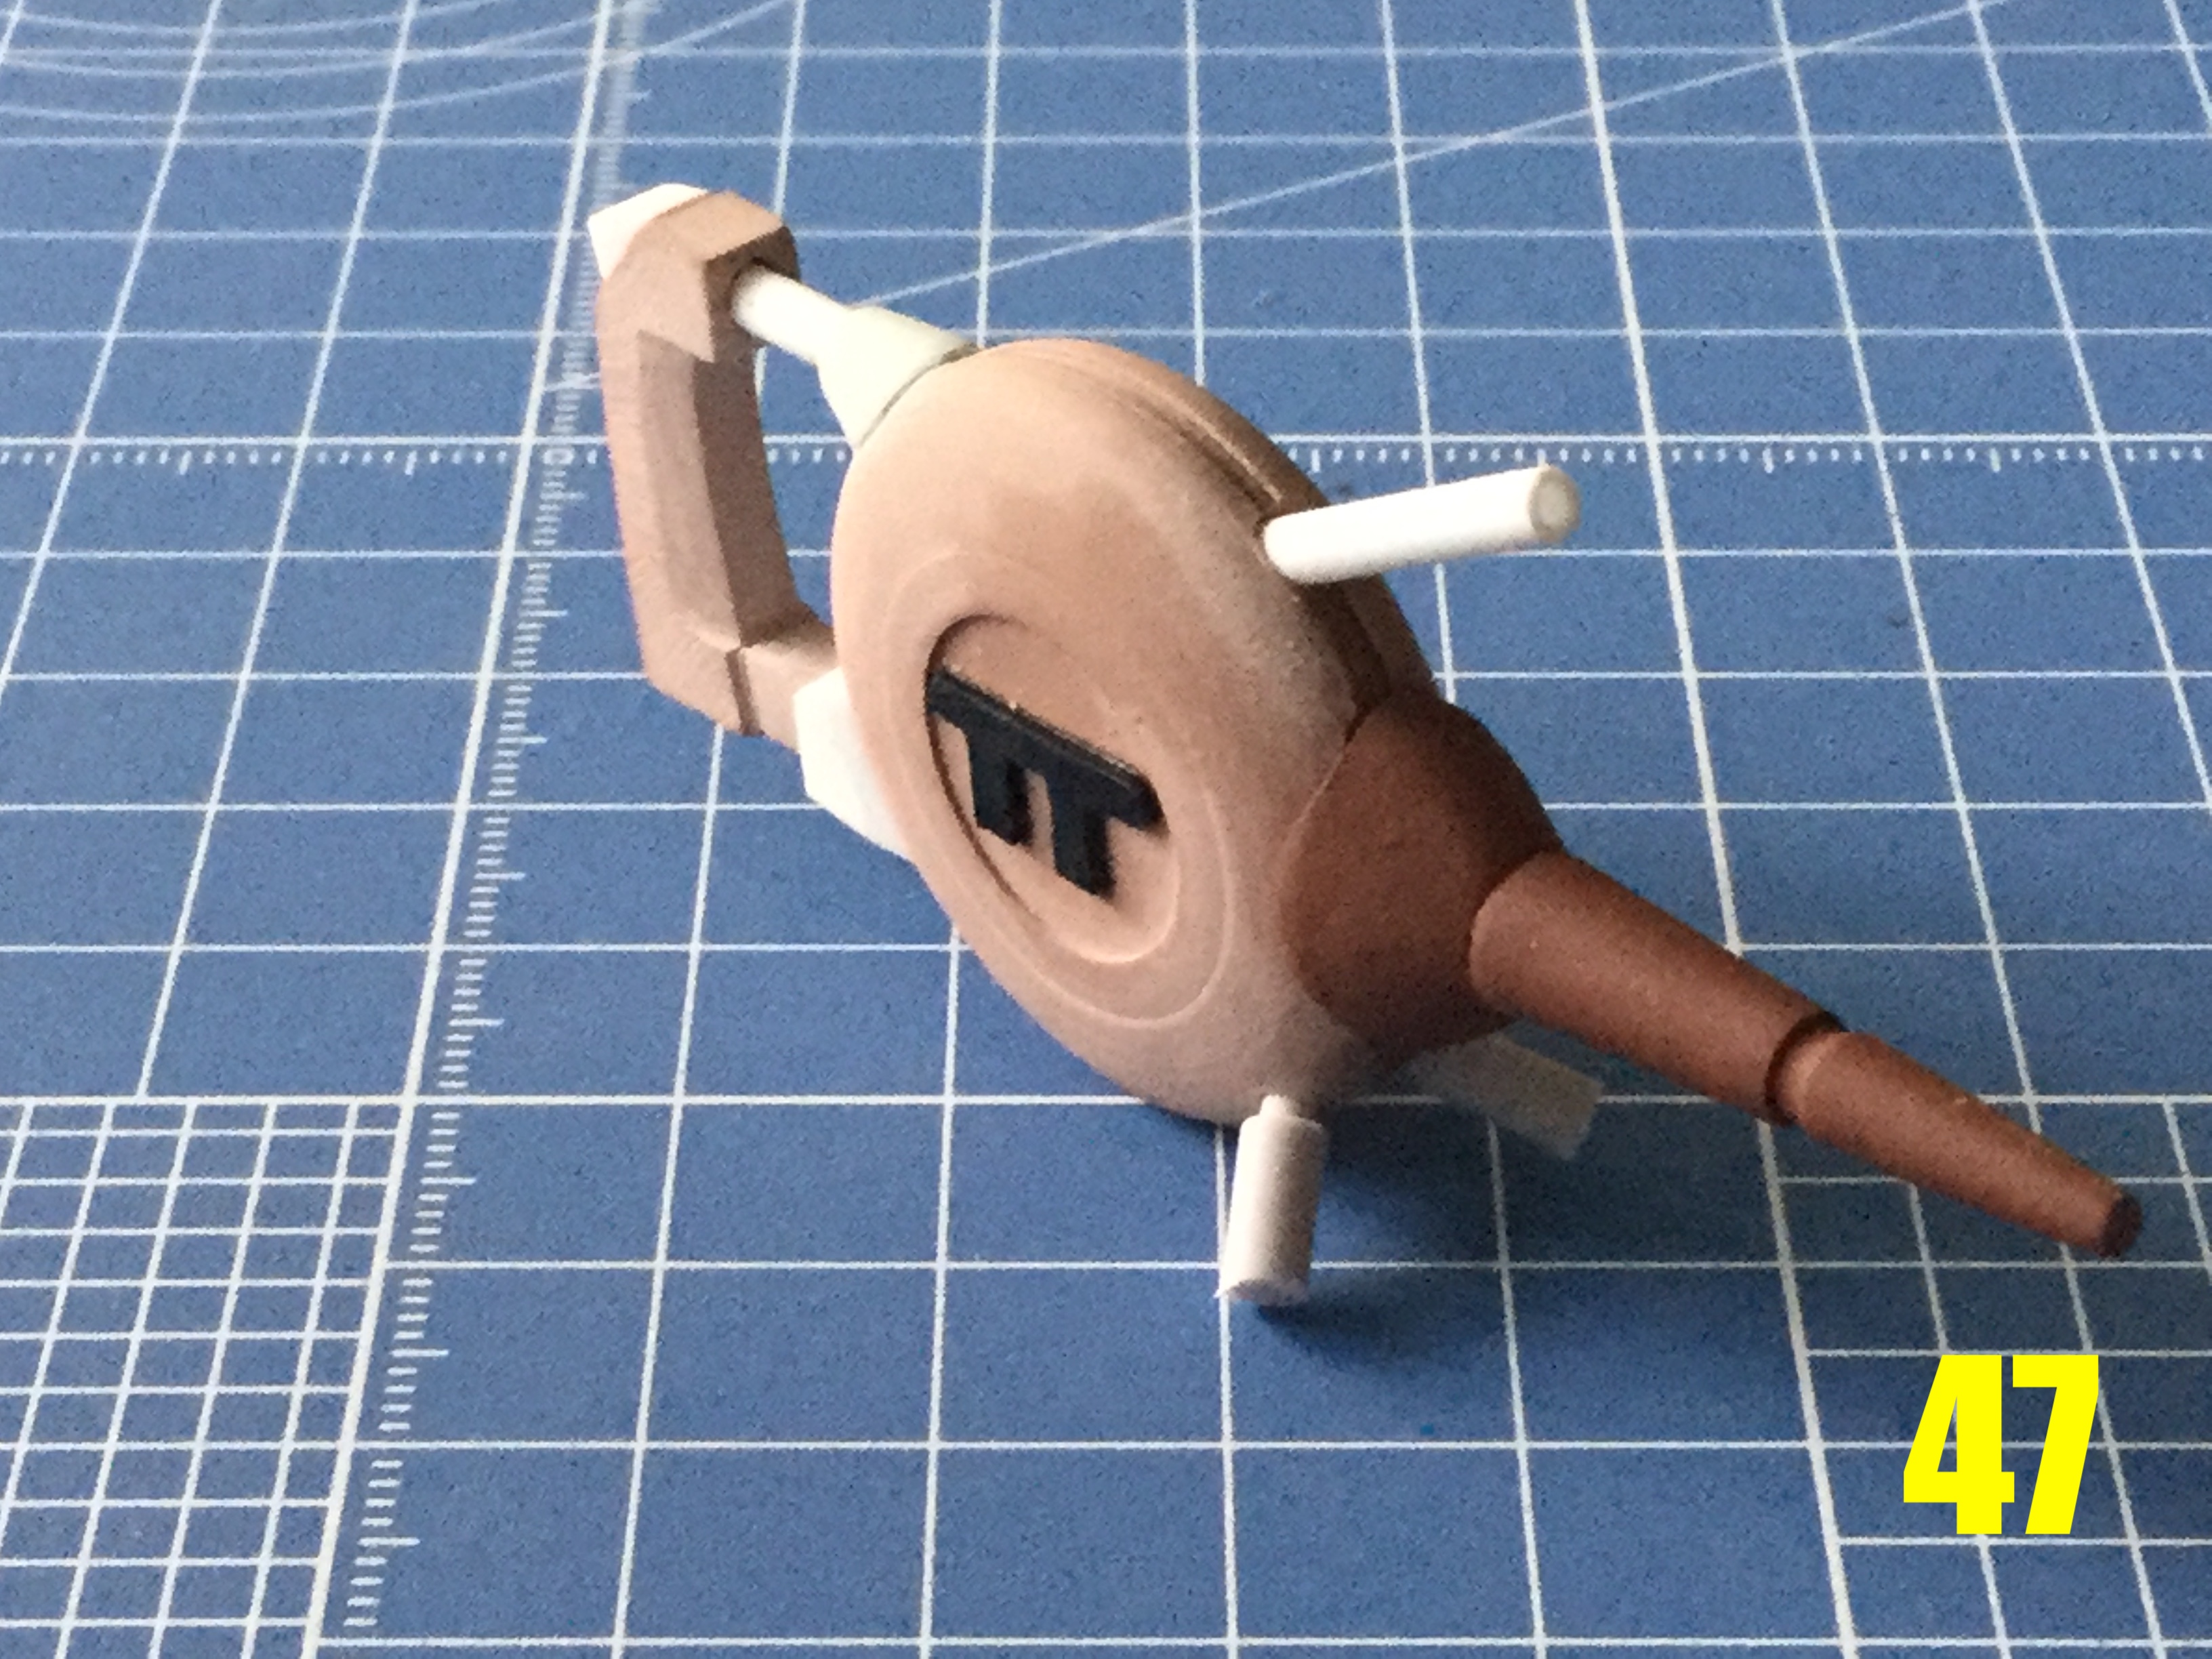
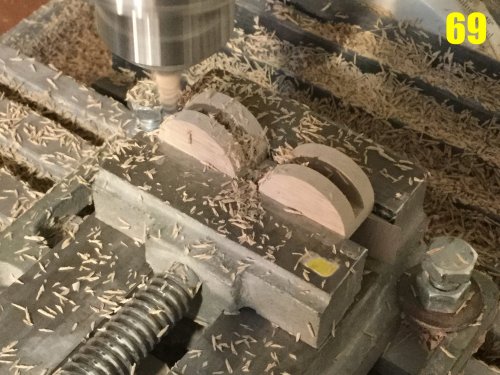
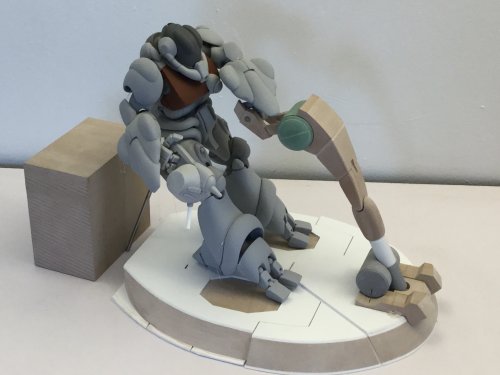
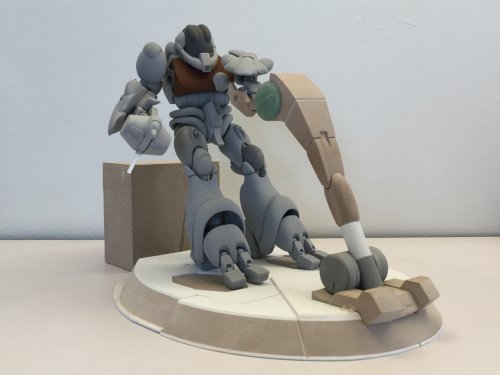
Captain’s log: March 31st, 2021. Work on the hover-sled continues unabated. One of the oddest and trickiest parts of the design is the front dash/bumper/control column housing, mostly because it uses some very wonky geometry that someone could only come up with by freehand sketching. Fair enough! Pic 68 shows preliminary construction on this part, and me machining as much as I can before going manual on it. Pic 69: the aft portions of the sled that hold the (thrust?) nozzles. I needed these to be symmetrical and perfect, so I made and machined them both at the same time. In pic 70, you can start to see the front fairing being fleshed-out. I had to cobble it together with many sub-assemblies, which are now being fit-adjusted t the sled with putty. Same goes for the control arm in pic 71. The aft portion of the sled saucer has these sidewalls that taper upward. There was no point trying to make these from modelling board, as styrene sheet is far easier and more pliable. Of course, because the whole edge is both beveled and curved, you can’t just apply any old piece of styrene, because it won’t fit. Studio Ammonite sticks it to me from the great beyond yet again… Thankfully, I’m not that easily stumped. Using some masking tape, I carefully segmented it to follow the taper of the saucer to create a tape template, which is what you see in pic 72. The tape is then used to cut the styrene winglets, which is what you see in pic 73. That covers the inner layer, but the outer layer has those vertical slits that are prominent throughout the saucer, so I had to mark, cut, and then strategically place those outer styrene layers over the base layer. The result is what you see in pics 74-76. Human scale comparison provided by the enigmatic 1/48 Marie Angel. The hover-sled is now 95% done; just a few little details to add before I can commence molding this monstrosity. Alright, so now you’re asking yourselves just how well LLOYD fits onto his sled. Well I saved the best part for last, so that you can judge for yourselves. Bear in mind that LLOYD is being propped-up with a screwdriver up his corn chute, because the kit hasn’t been pinned. That said, I think he looks bloody epic! It’s hard to see in these pics, but LLOYD has both ab-crunch and waist-swivel features, which were necessary to allow the proper reclined stance on the sled. Unlike the animation, which just drew its various limbs squished to achieve a desired pose, I had no such luxury; I actually had to make everything work. Hard part’s almost over, so next week I go back to mold-prep. Stay tuned!


-
1/48 SOUTHERN CROSS BIOROID
captain america replied to captain america's topic in Anime or Science Fiction
Just an FYI, guys: In the last few days I've found myself mostly unable to access my own Failbook page. They have this SEE OUR NEW FEATURES popup window that is totally unclickable. I was able to act quick enough to disable it today, but the writing is on the wall, so this will be my default place to post until I can set up my own blog or something. Far, far from failbook. The work on the sled is actually further ahead than what I posted yesterday. Getting LLOYD into position was a bit of a PITA, but wait until you see this thing mocked-up. Dreamy!! -
1/48 SOUTHERN CROSS BIOROID
captain america replied to captain america's topic in Anime or Science Fiction
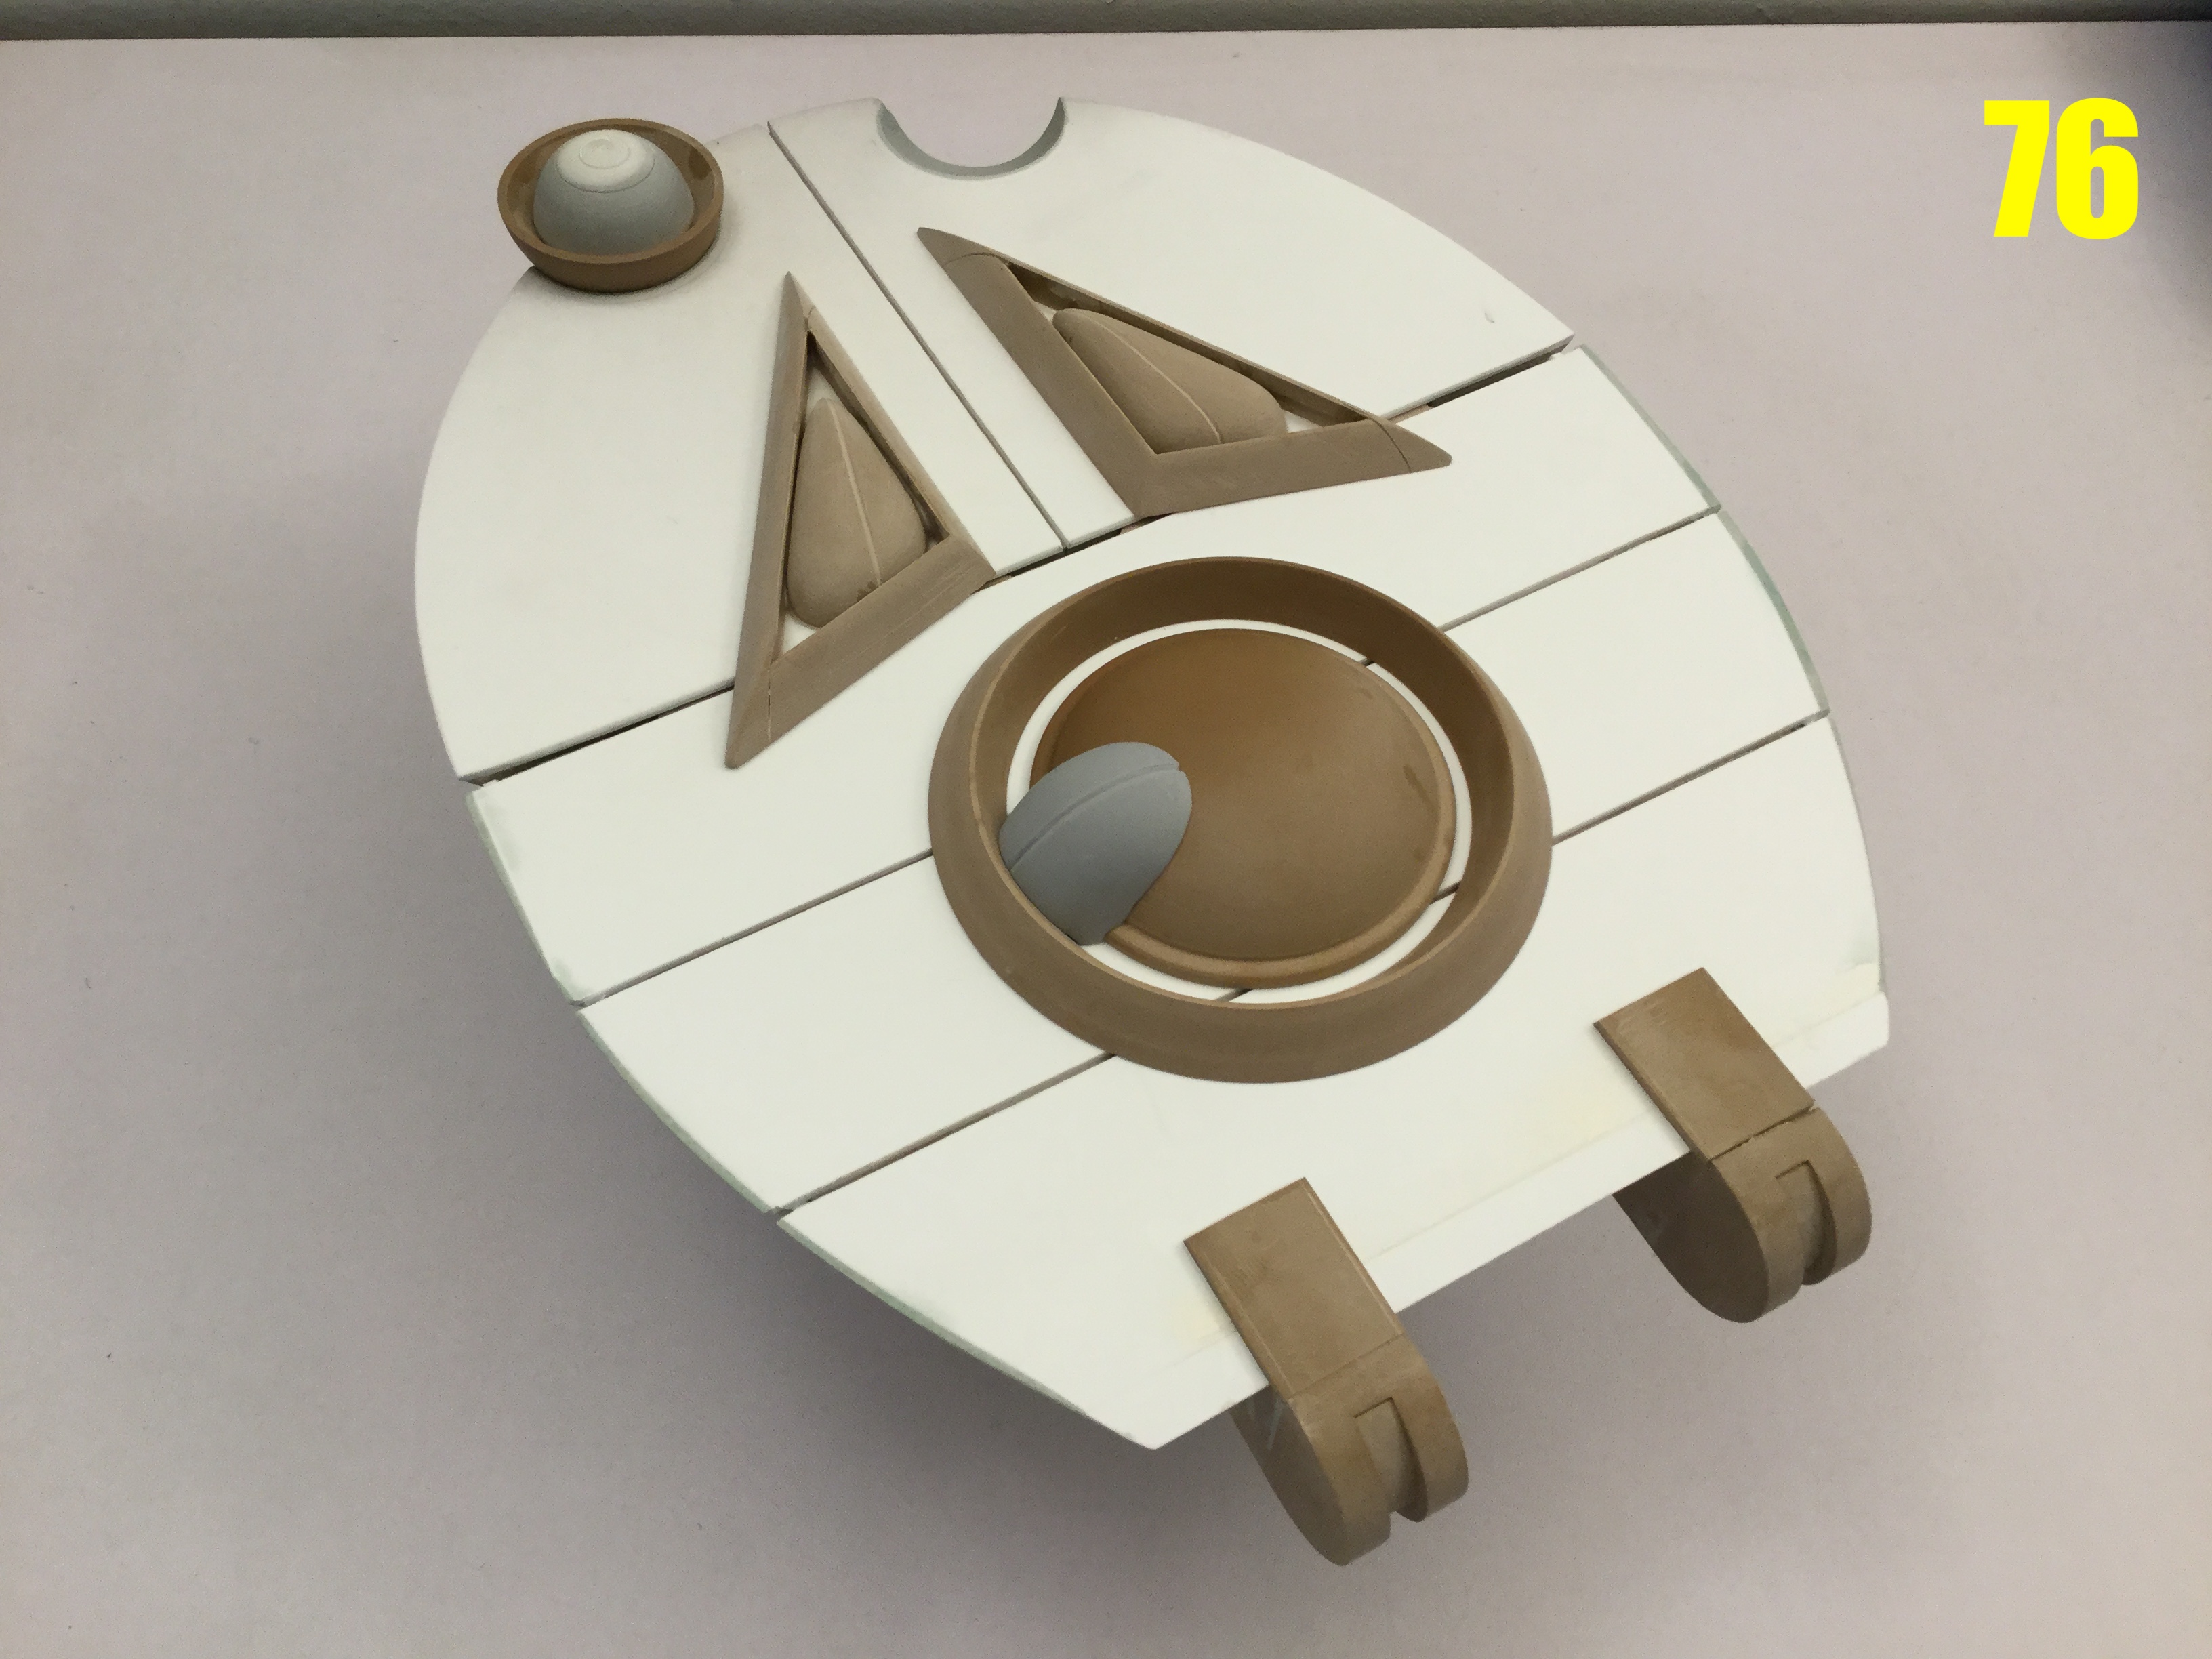
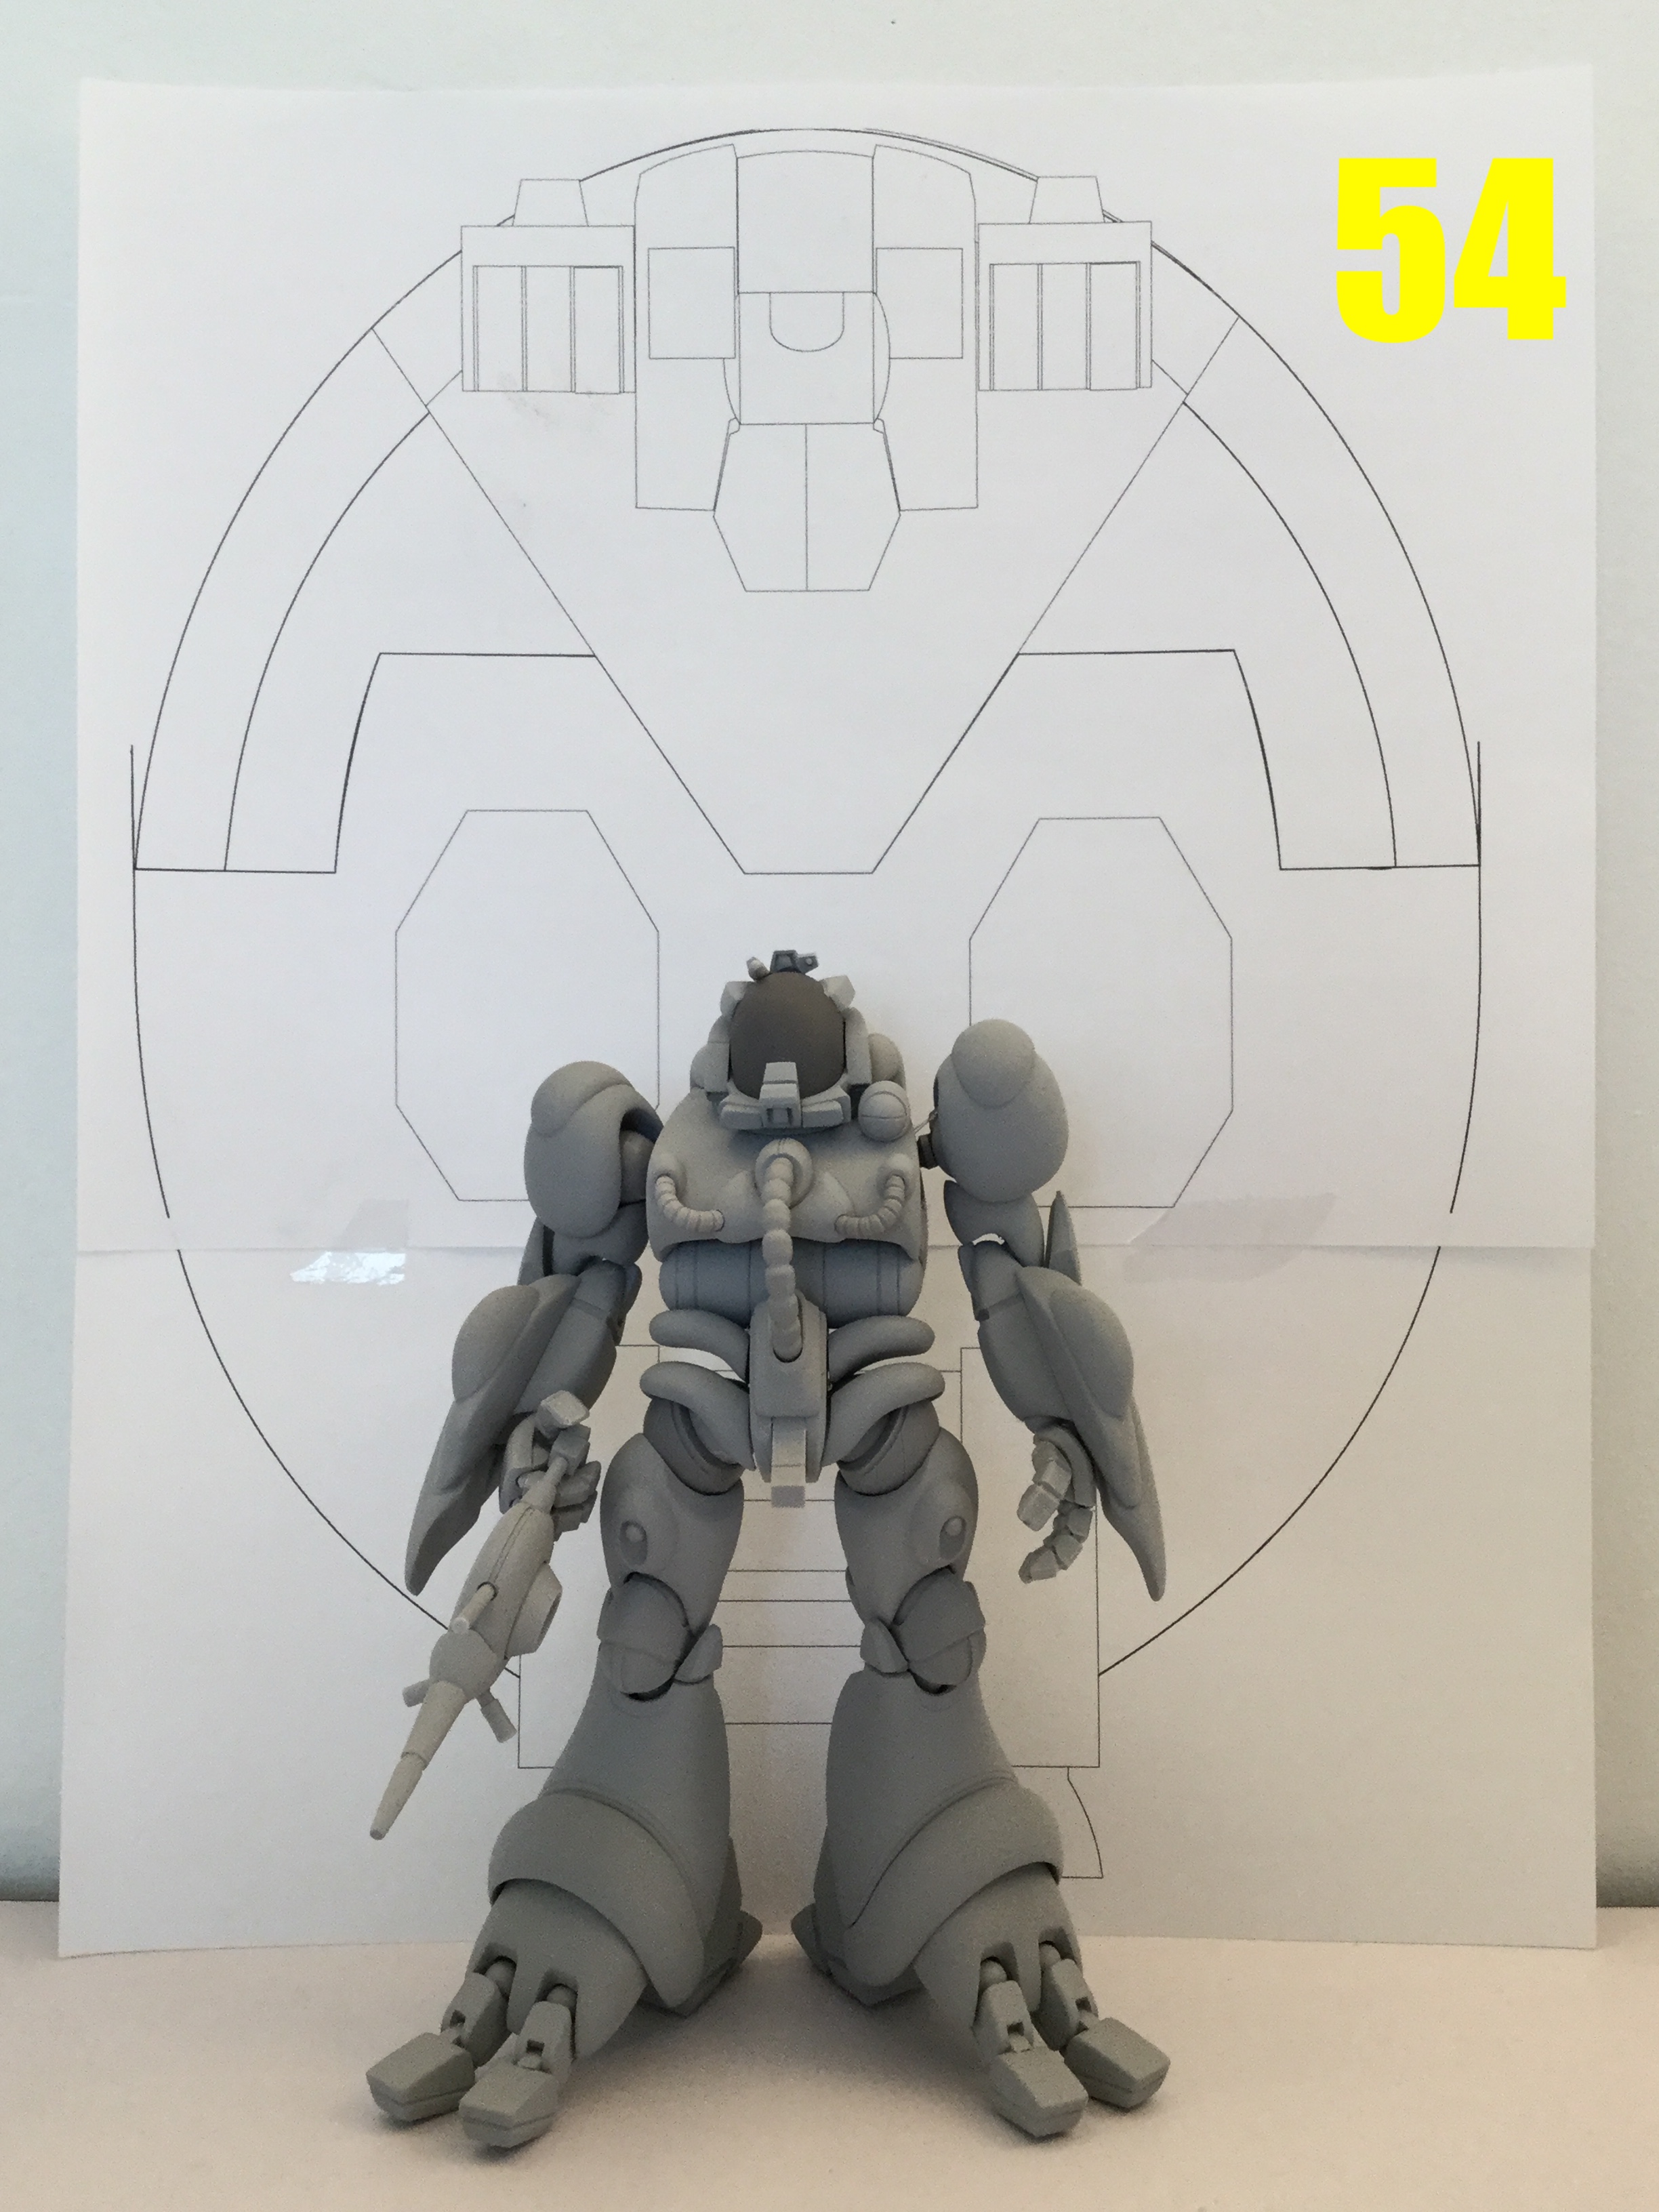
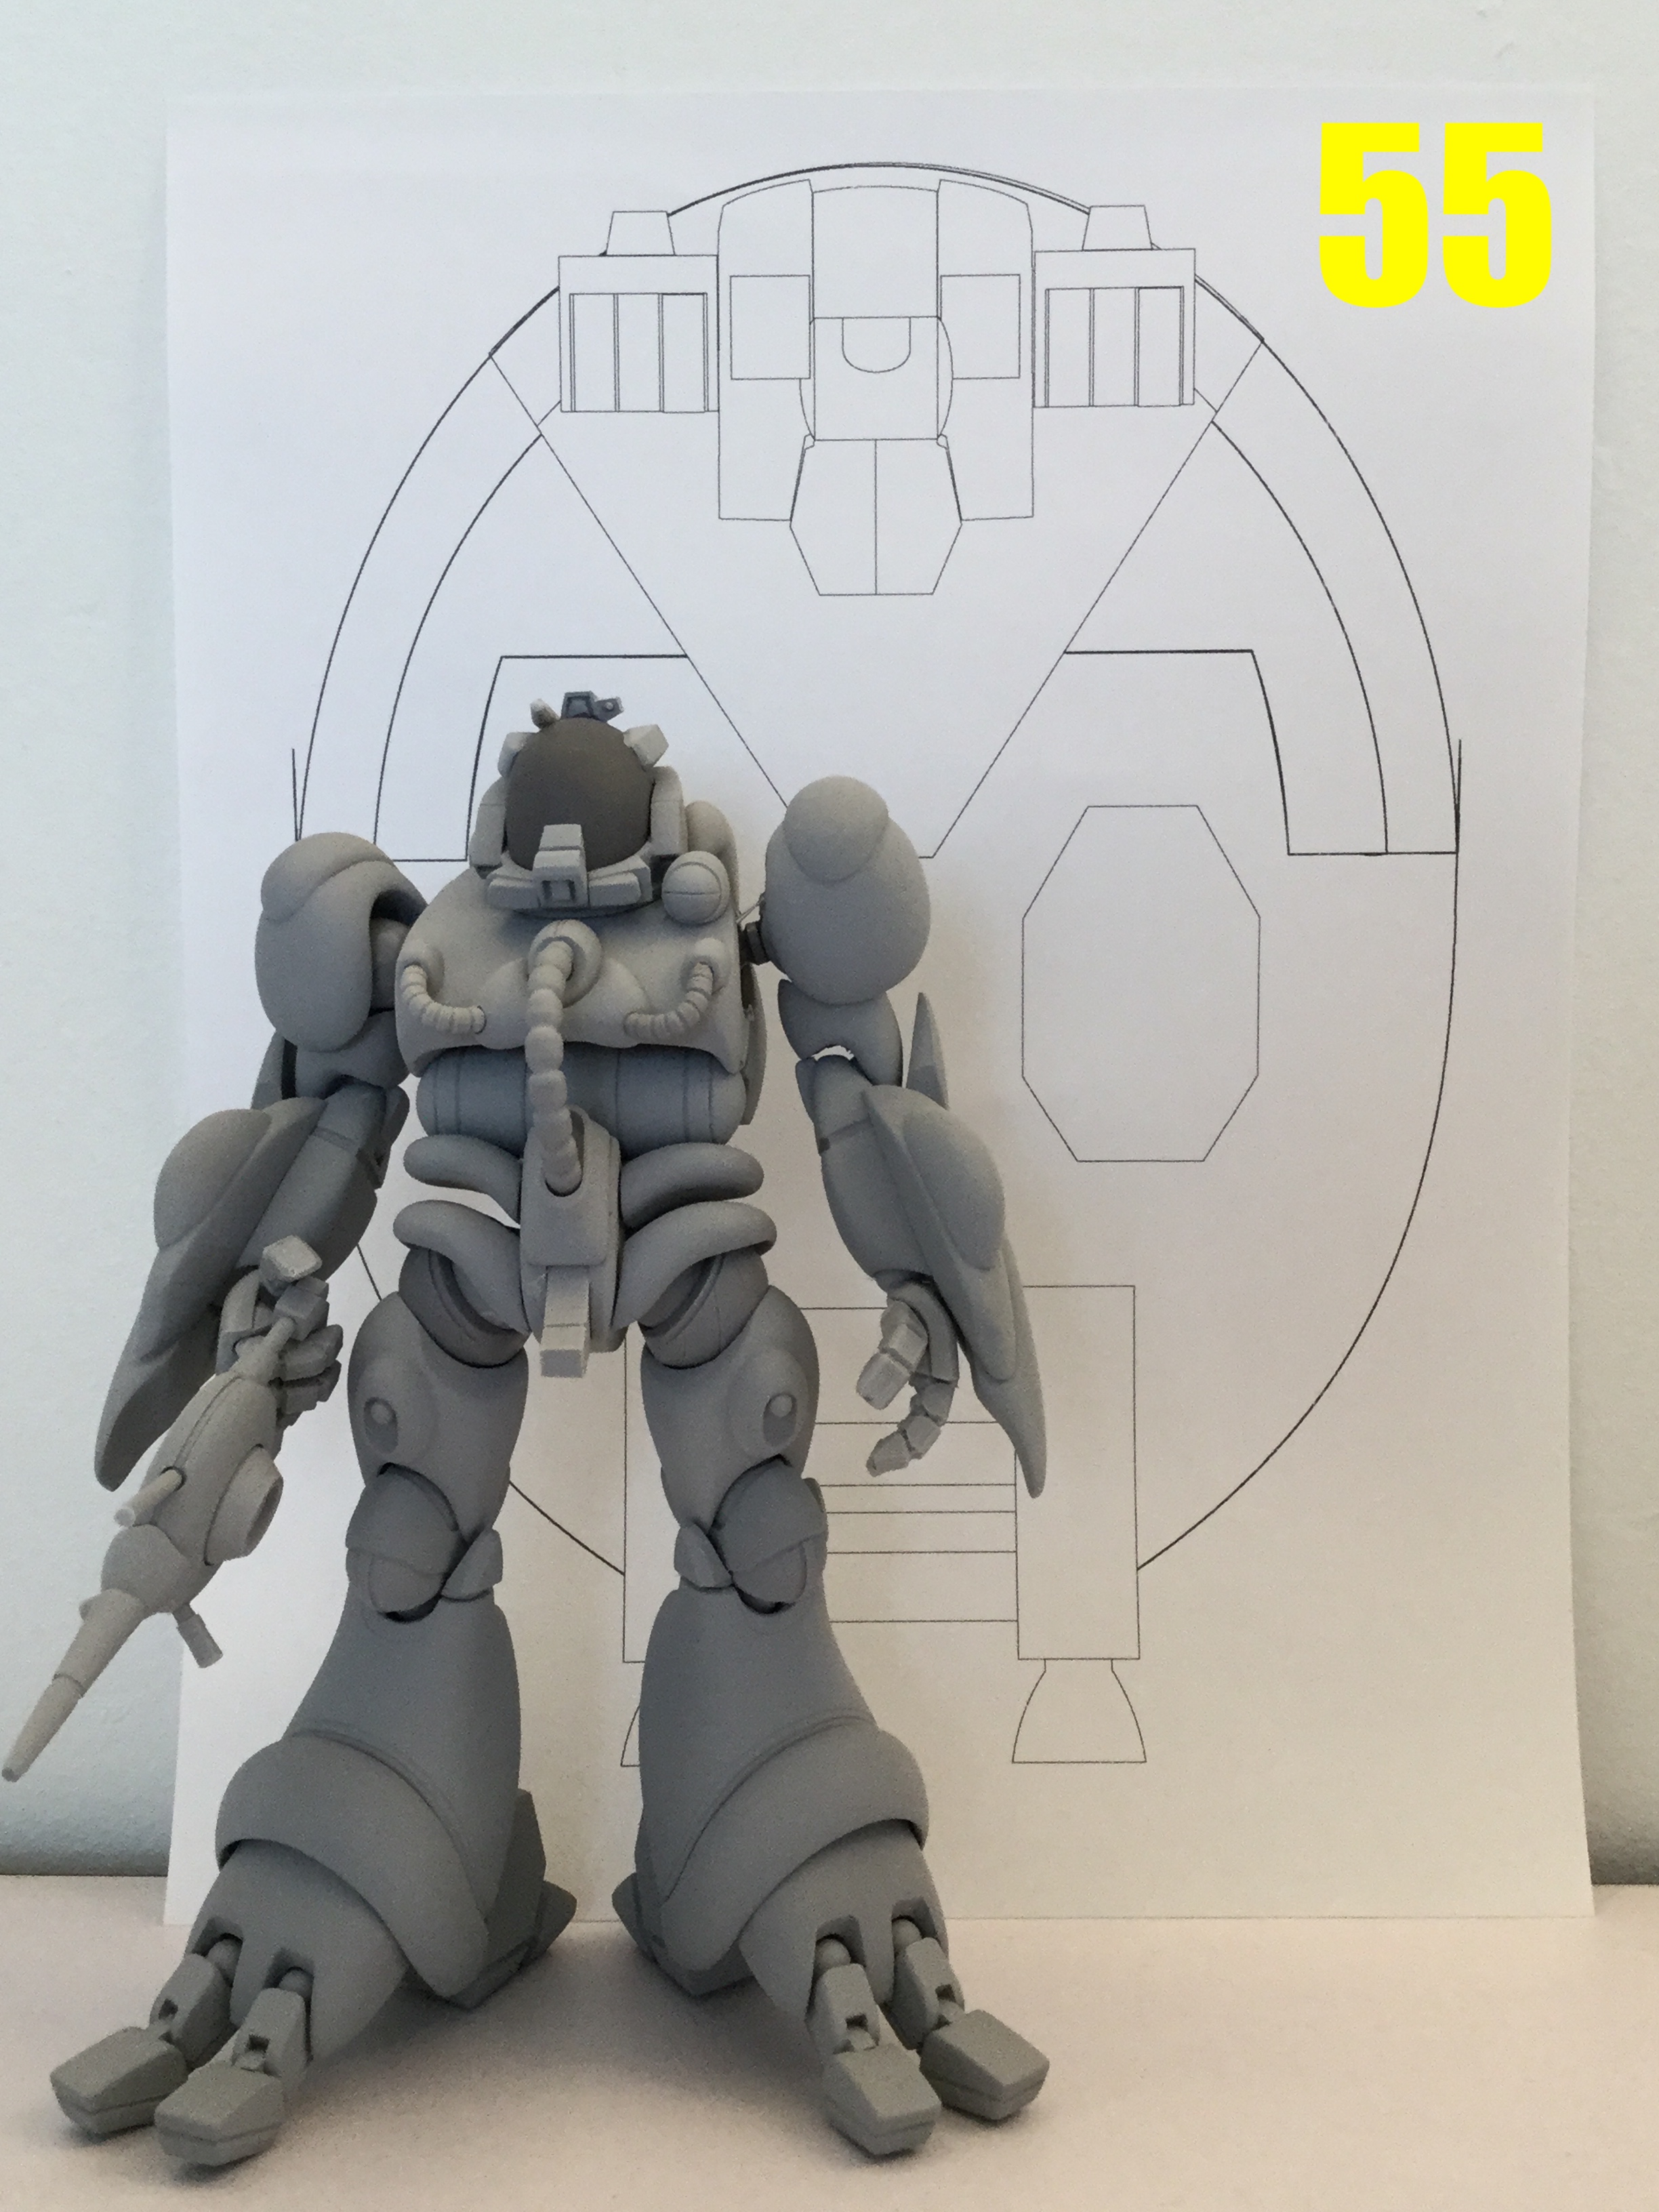
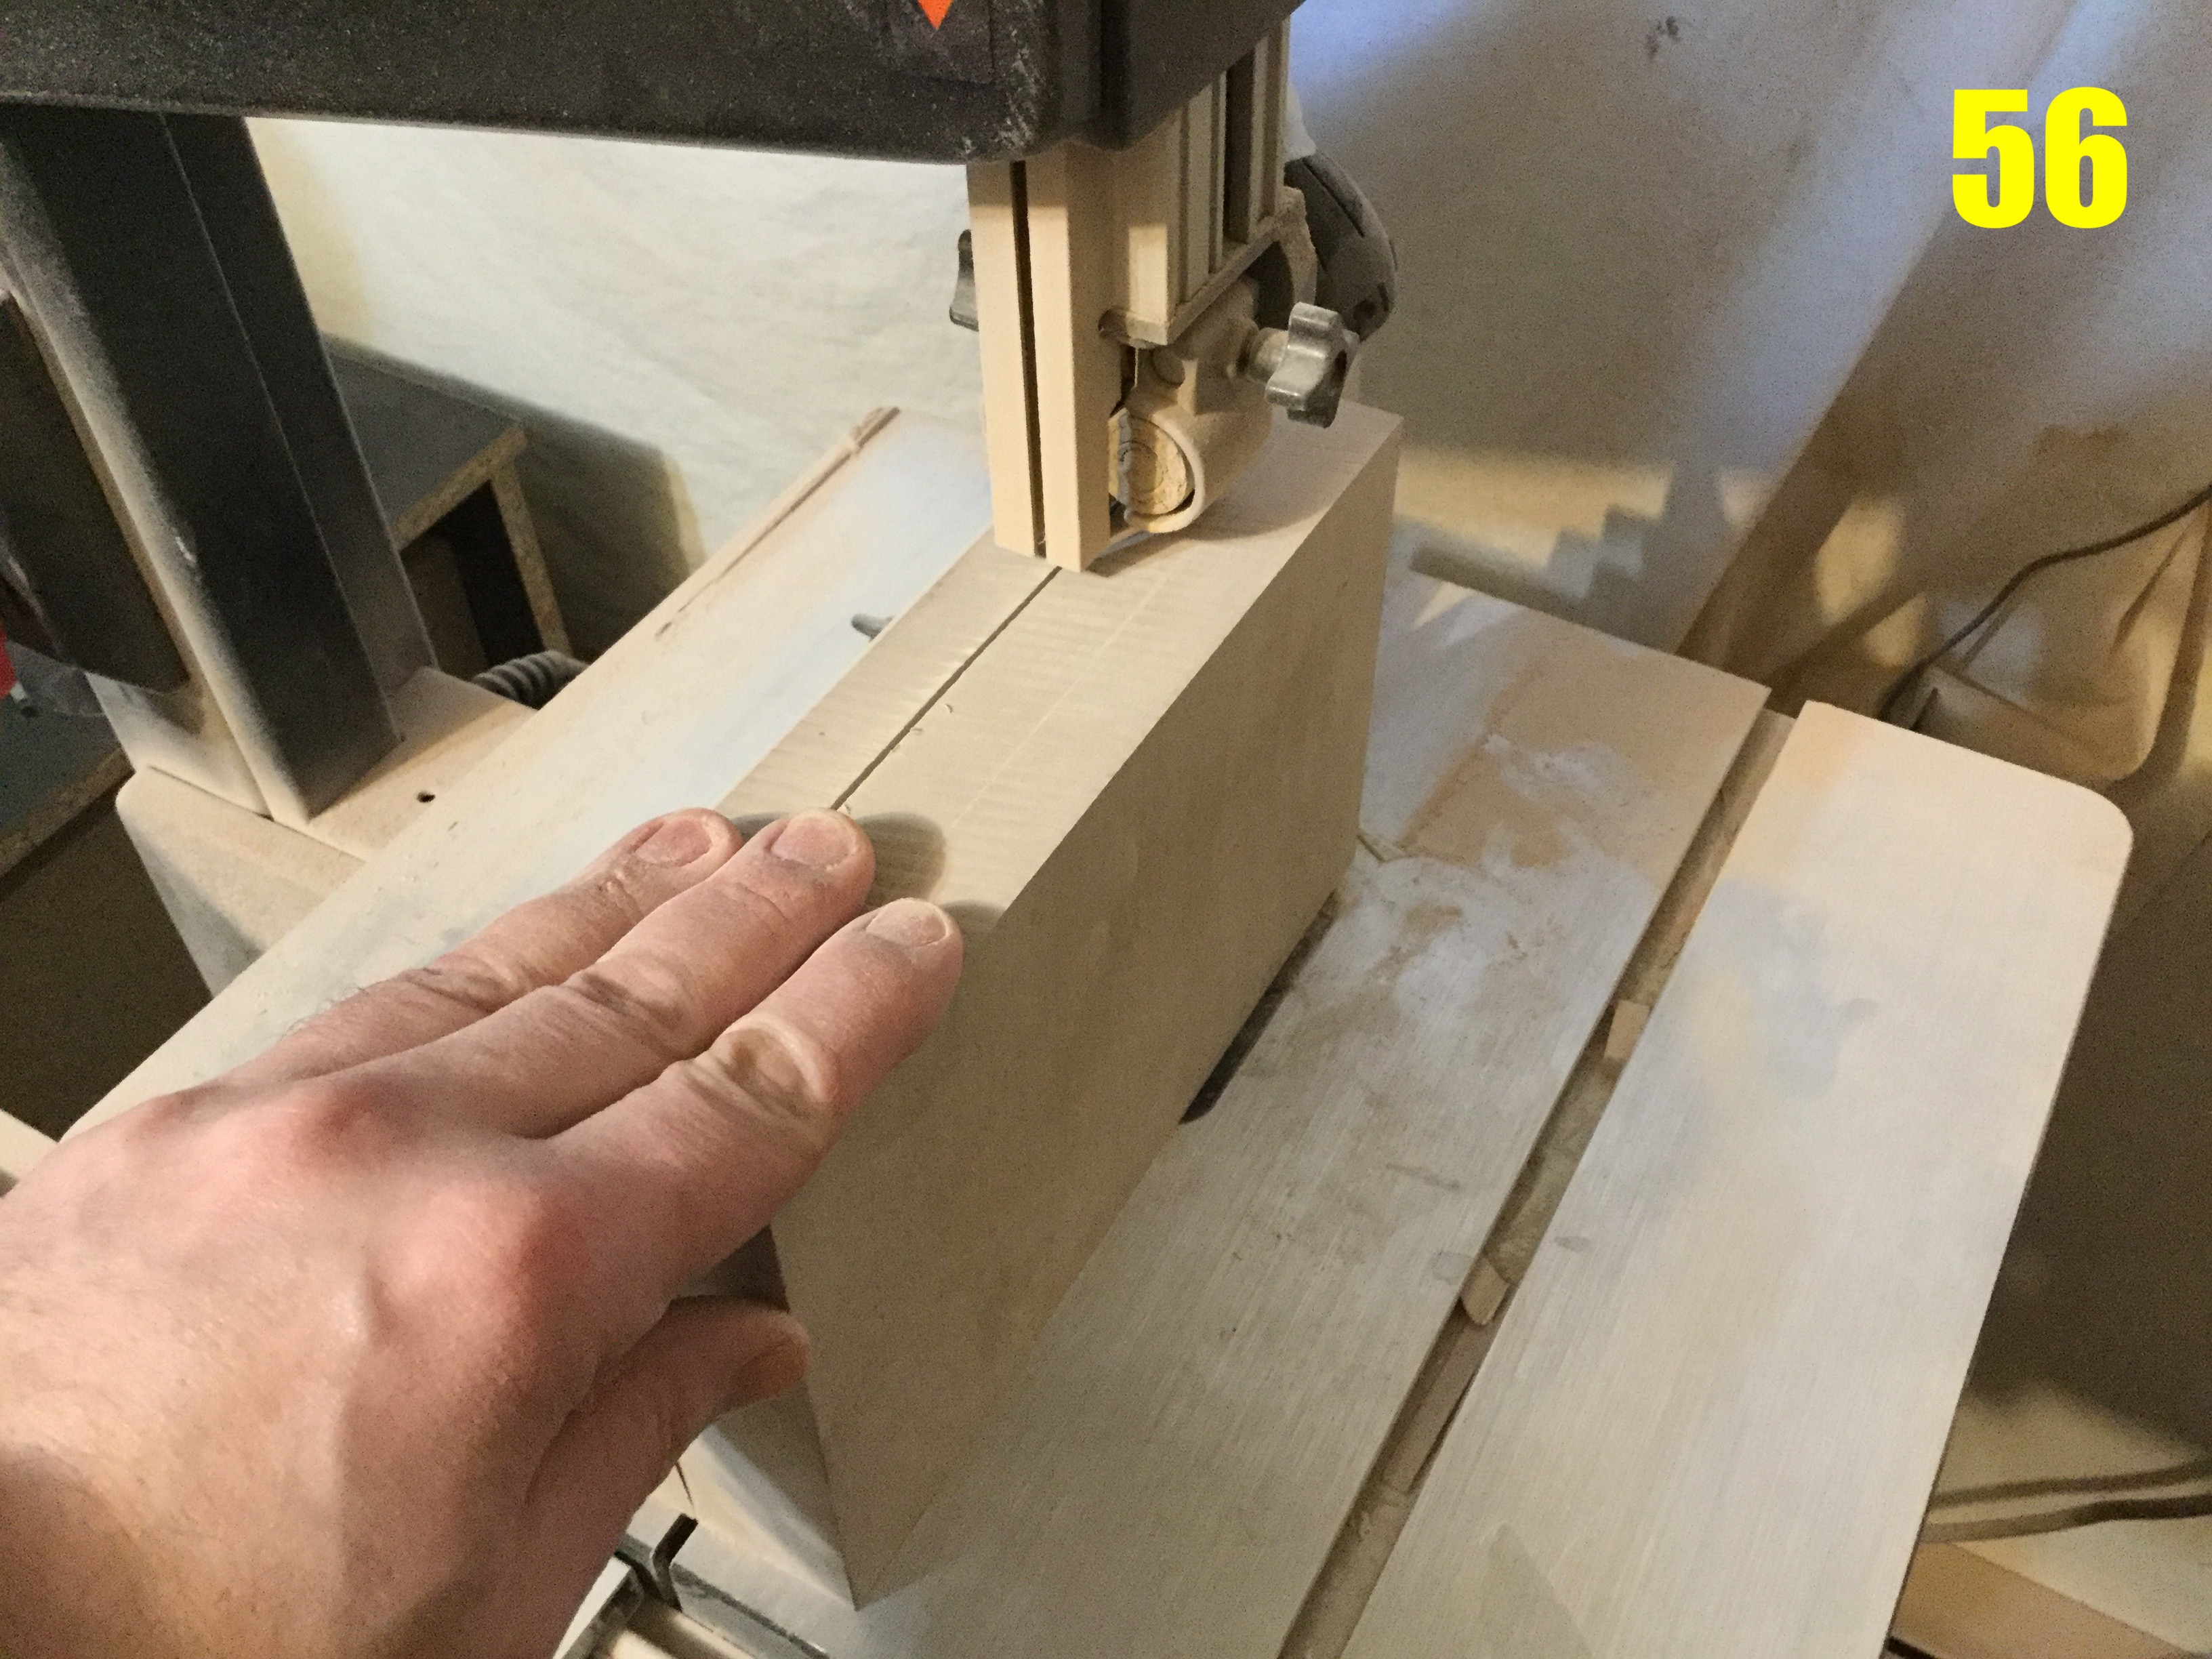
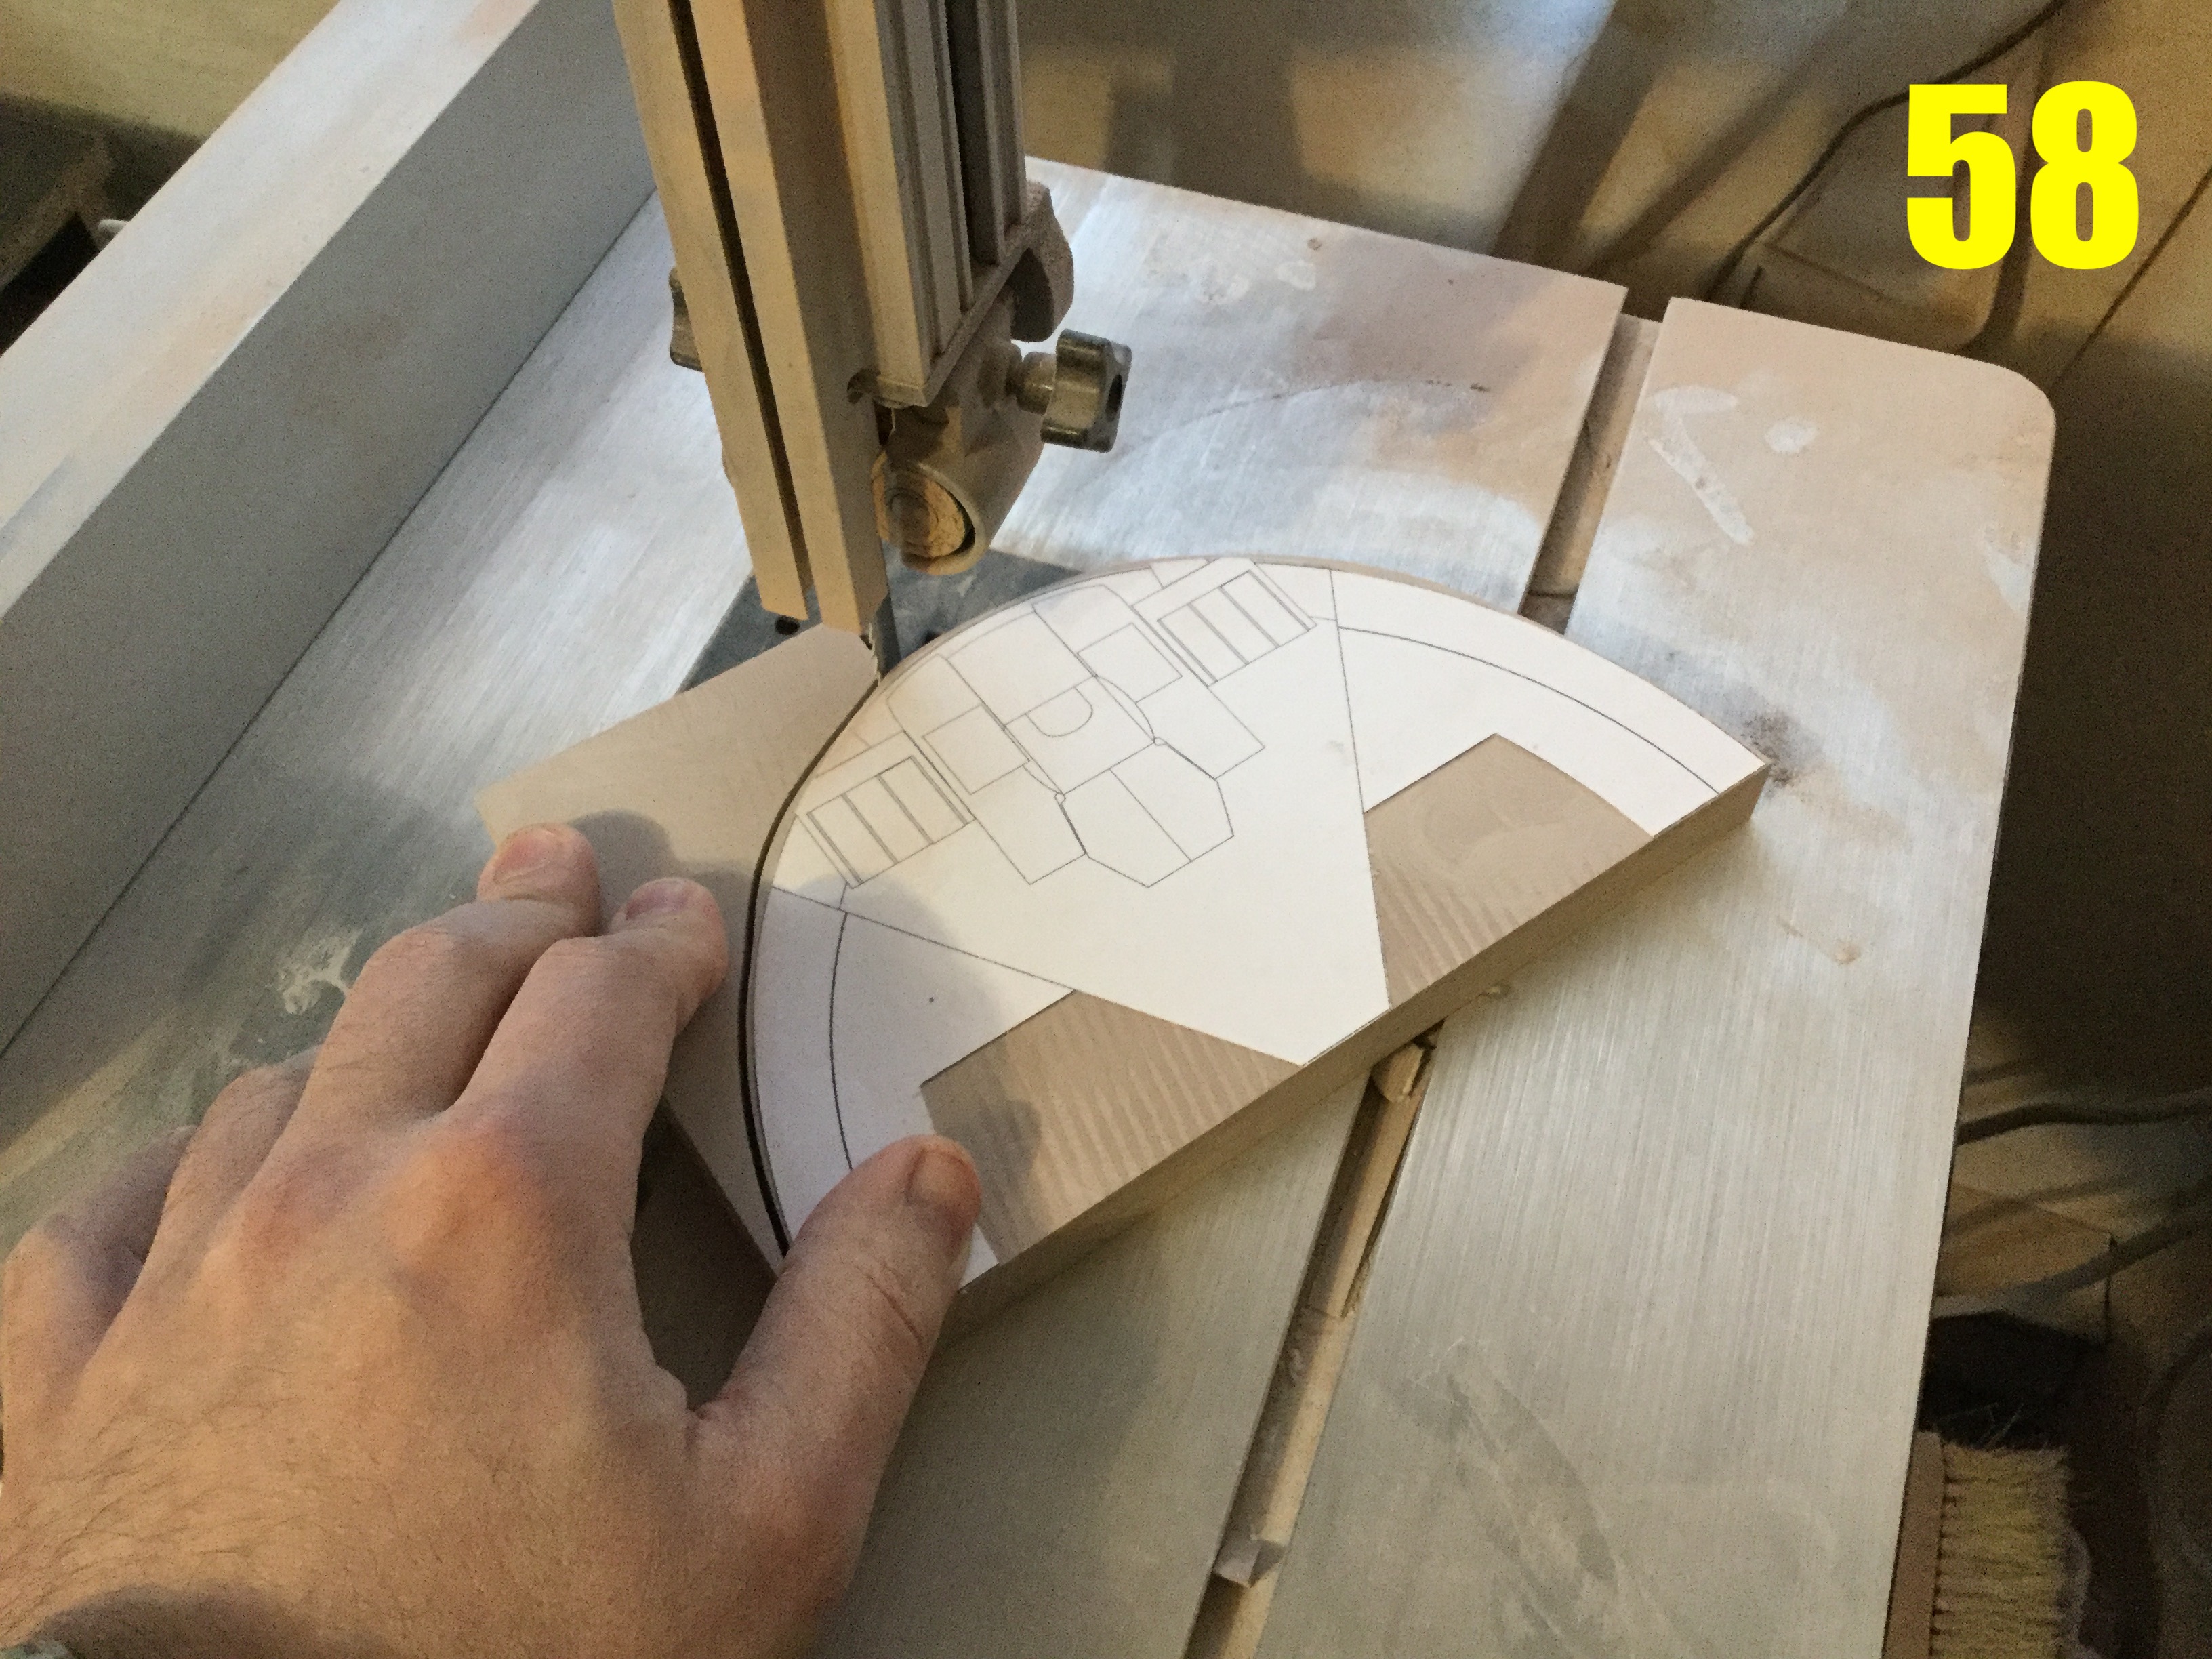
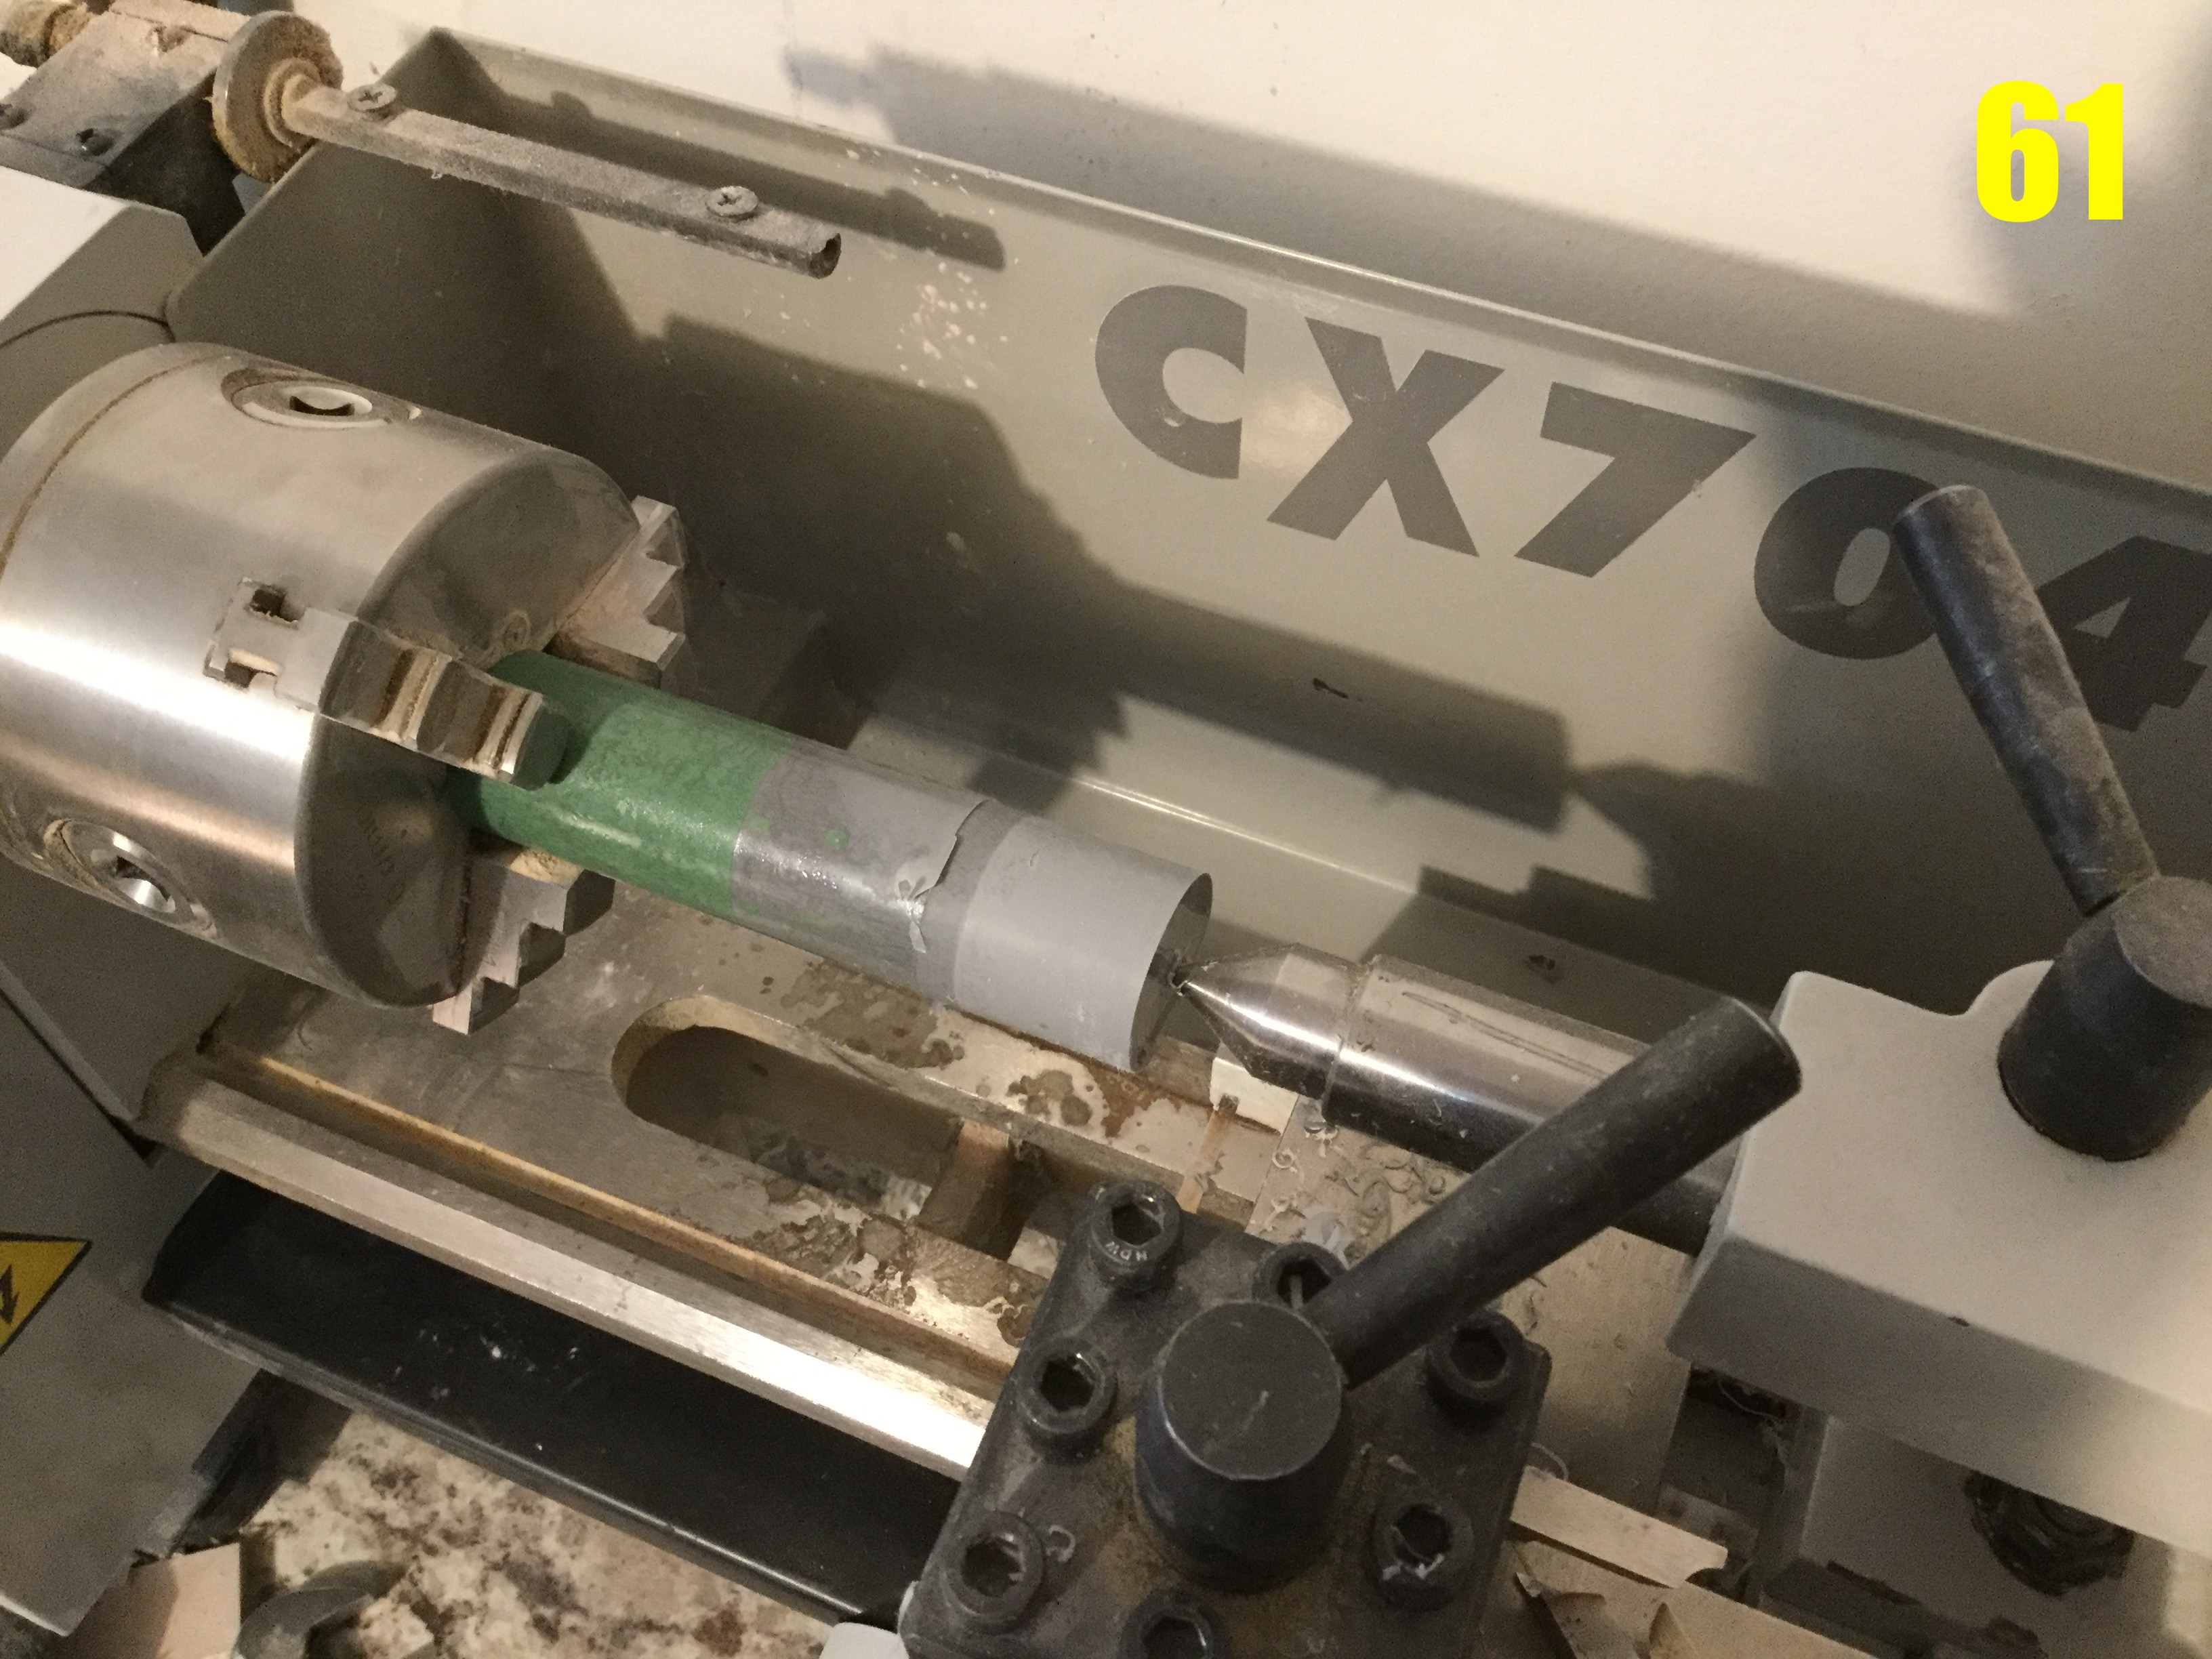
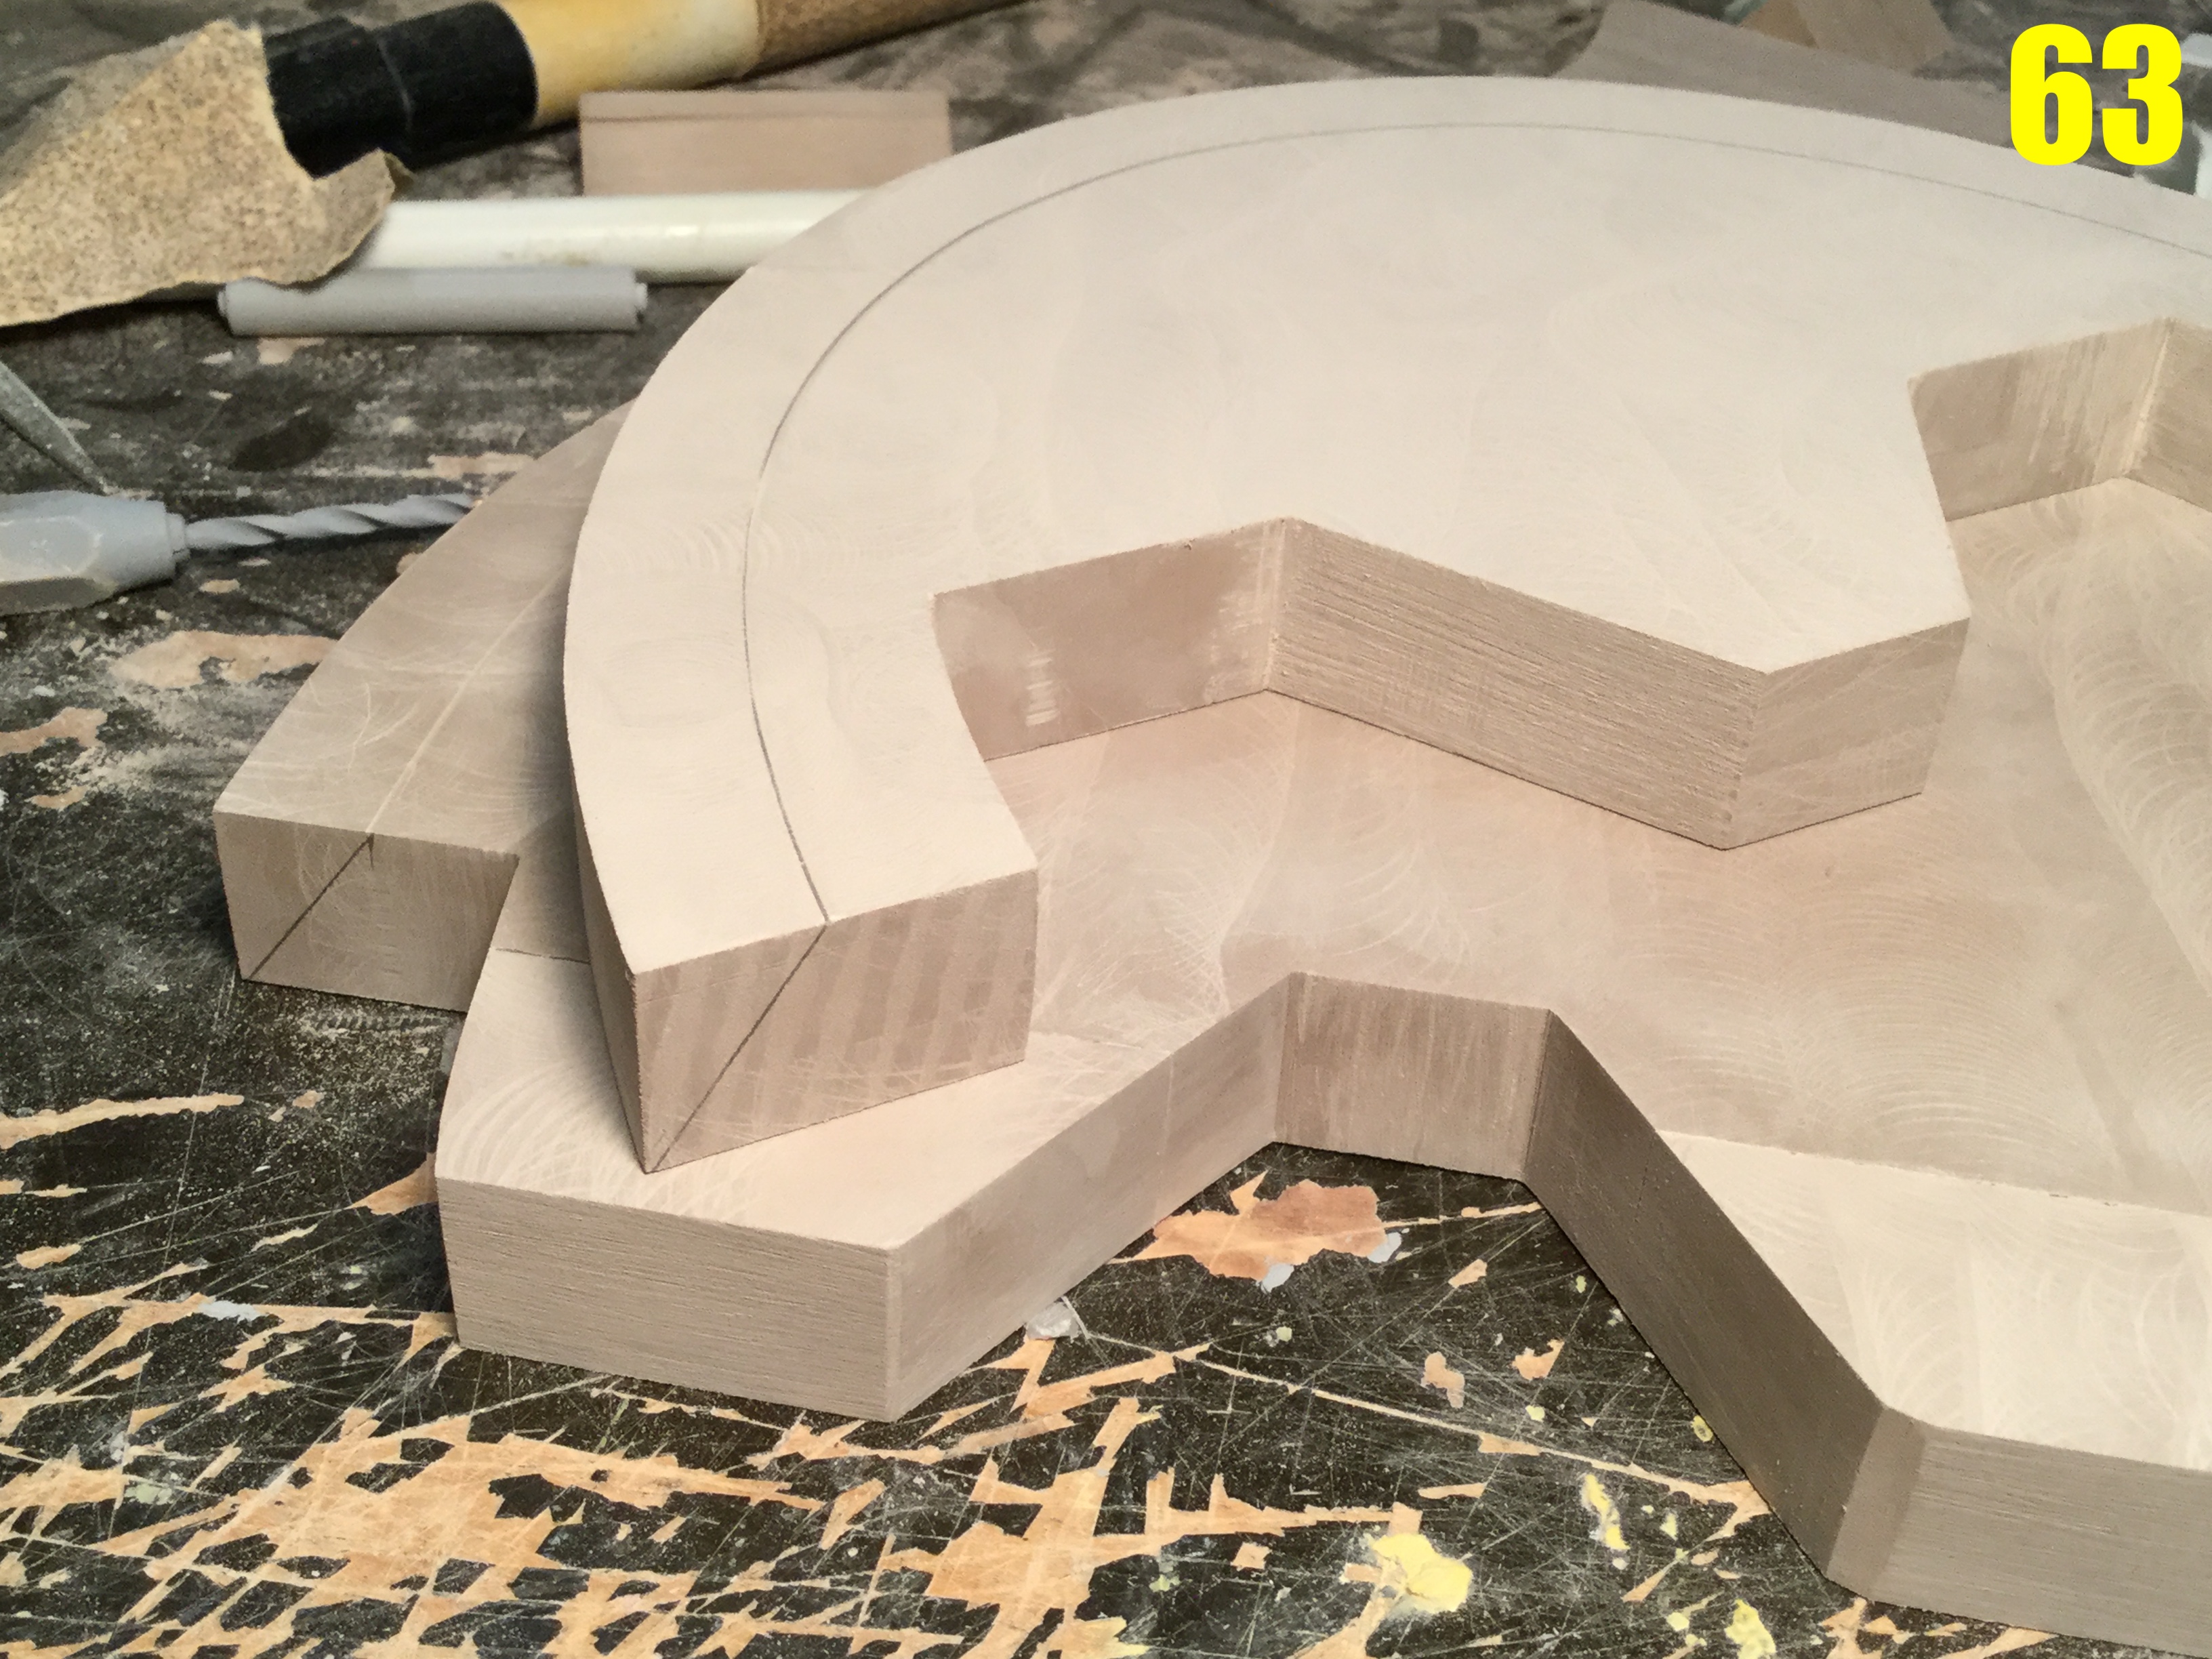
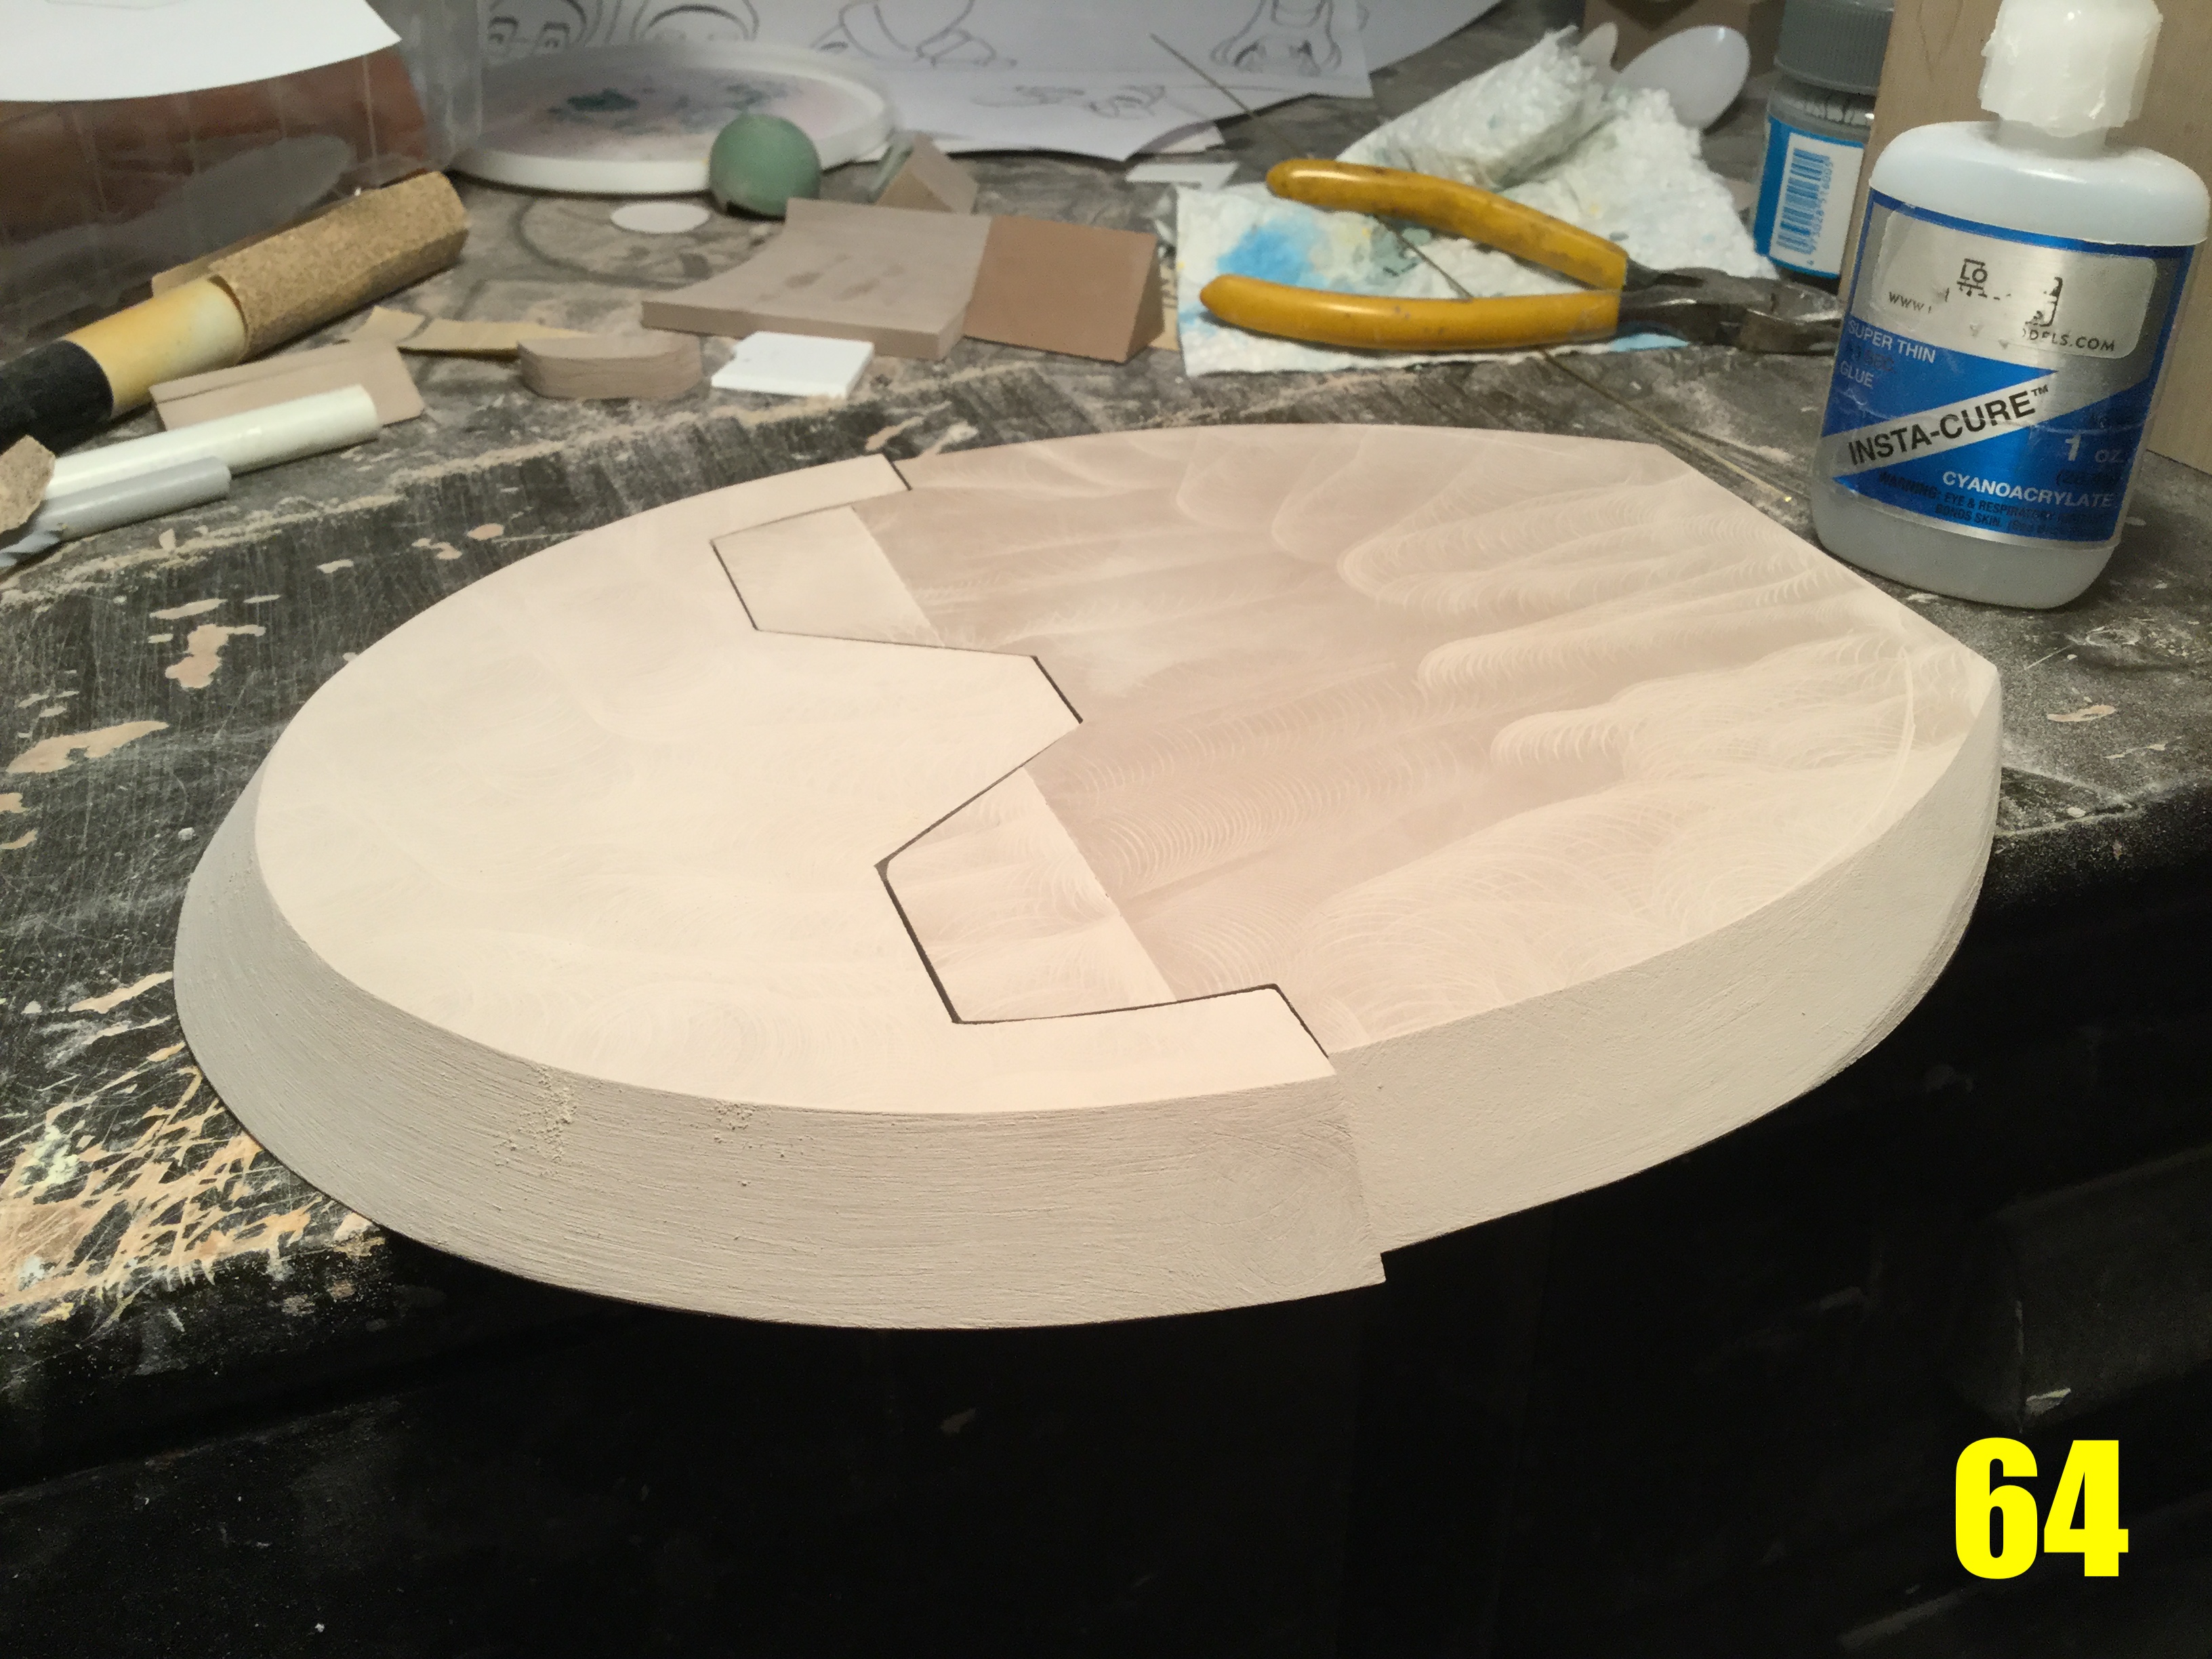
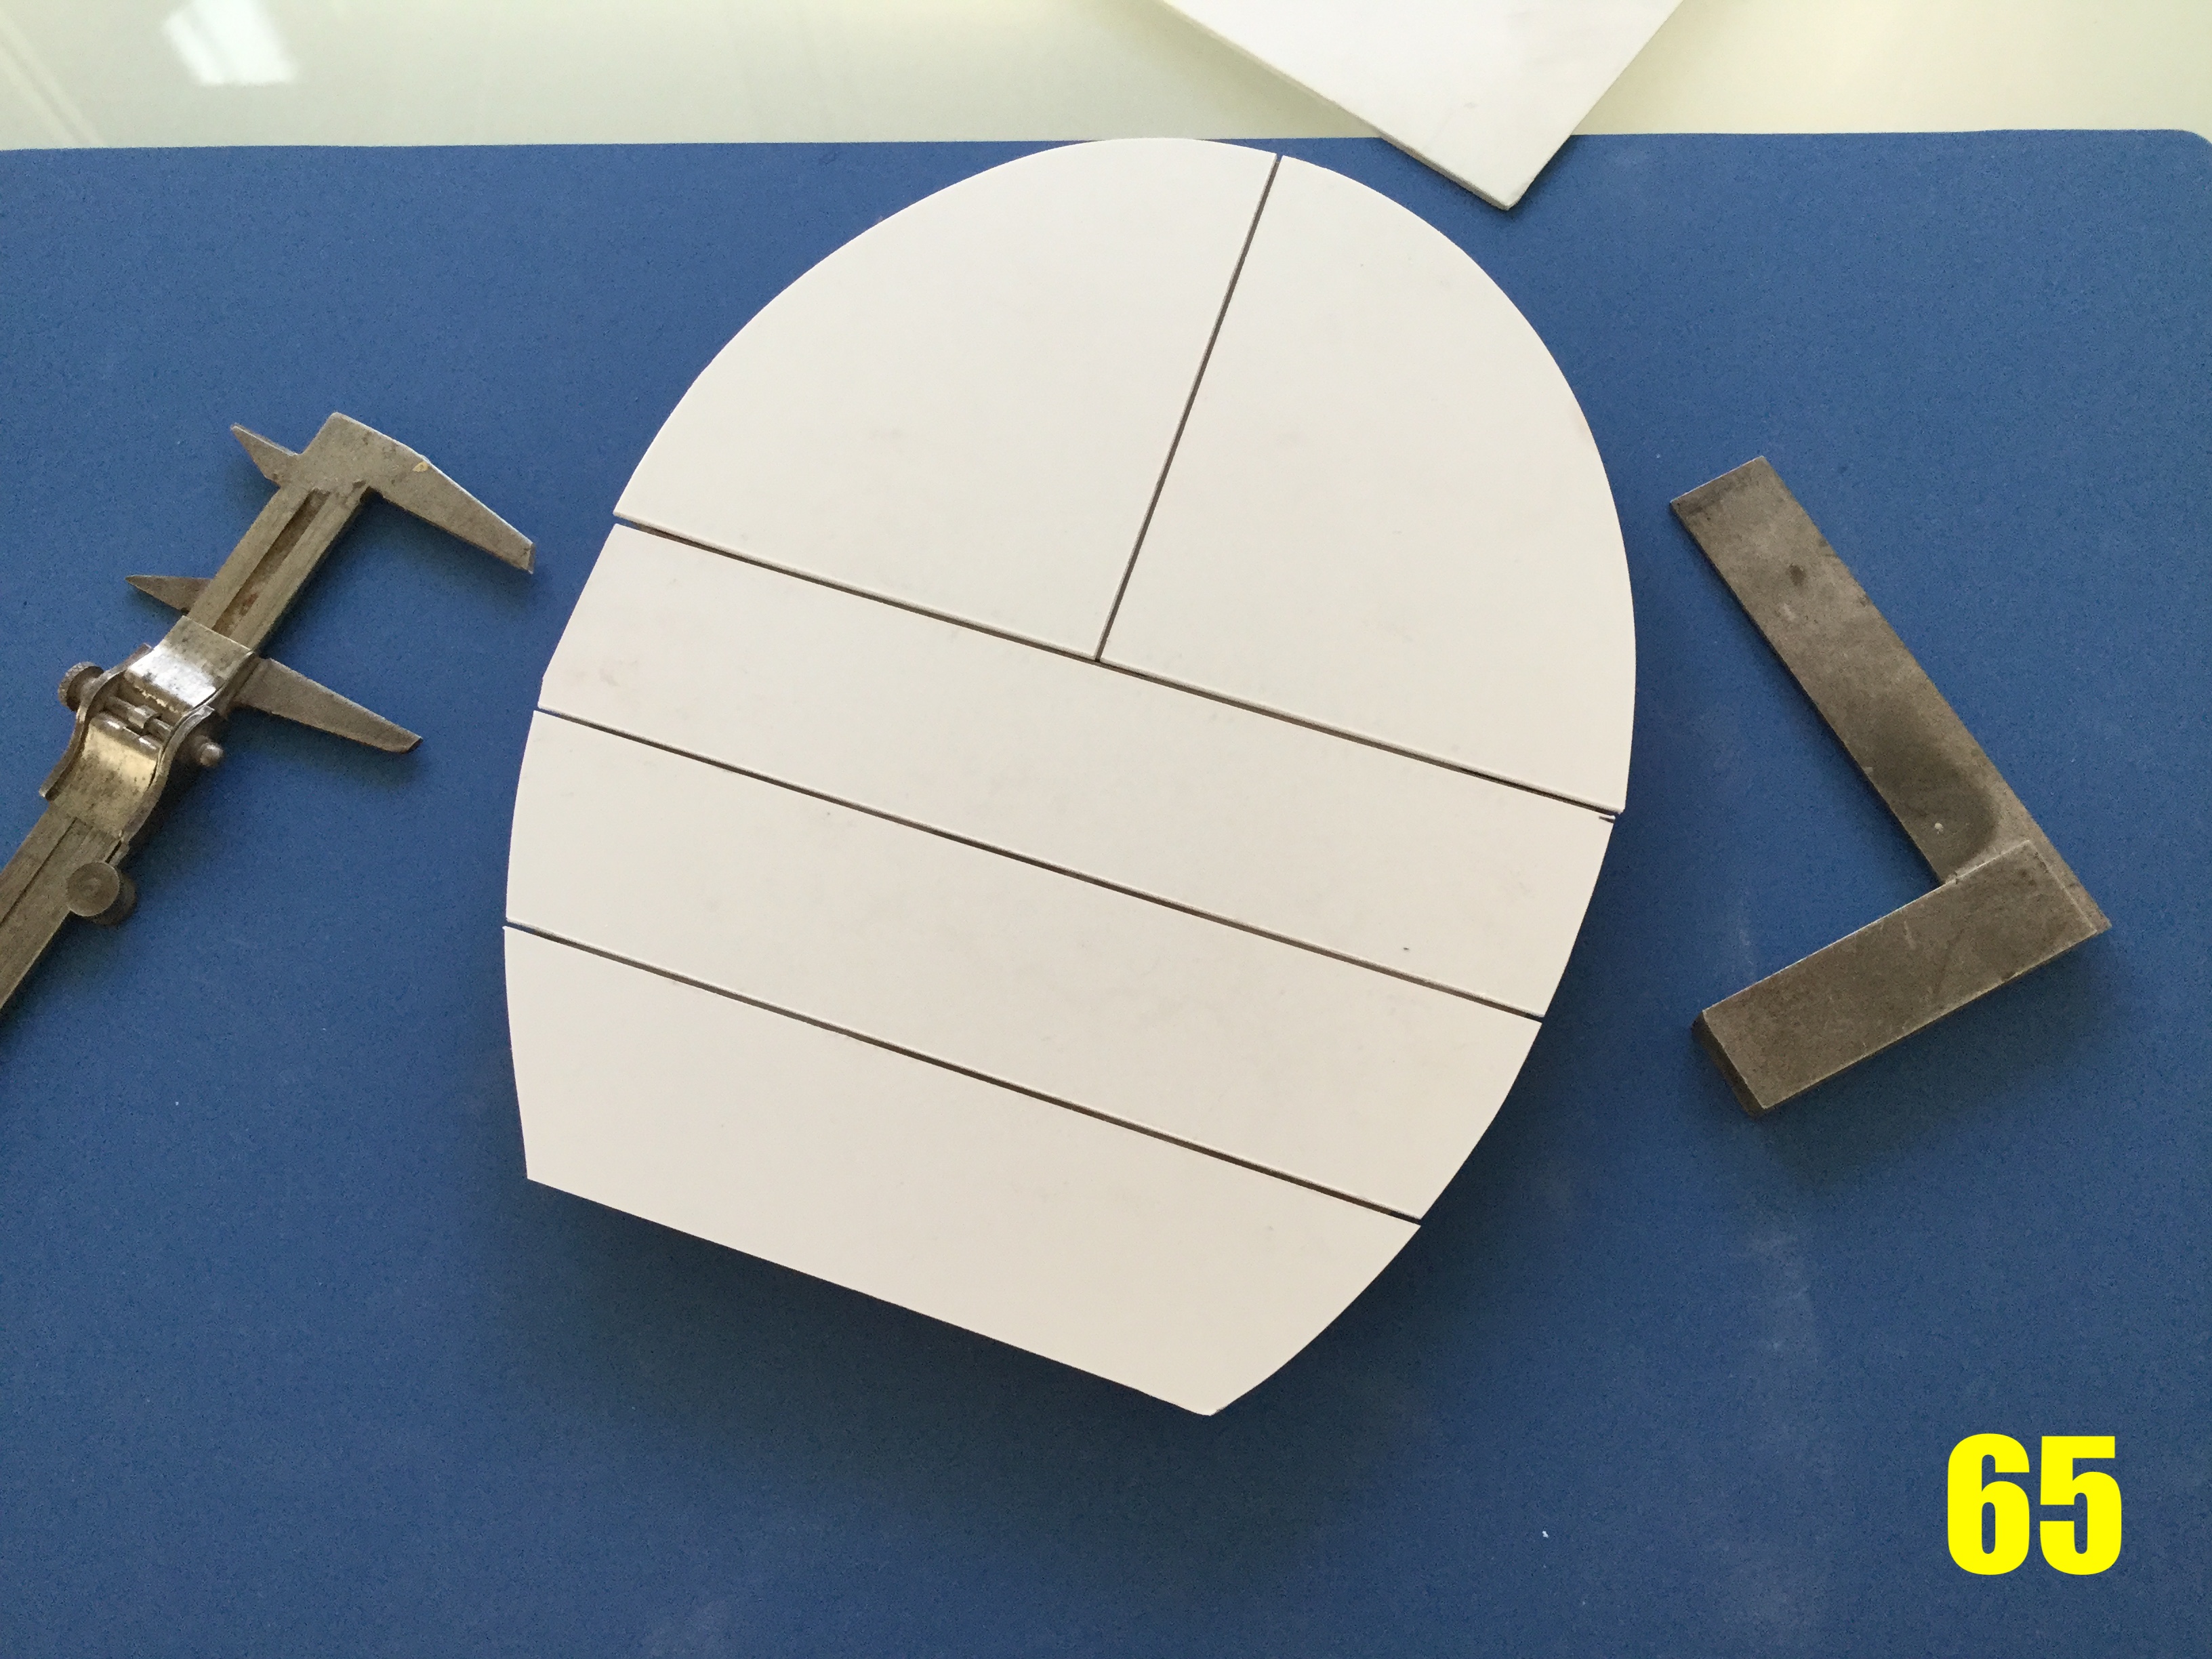
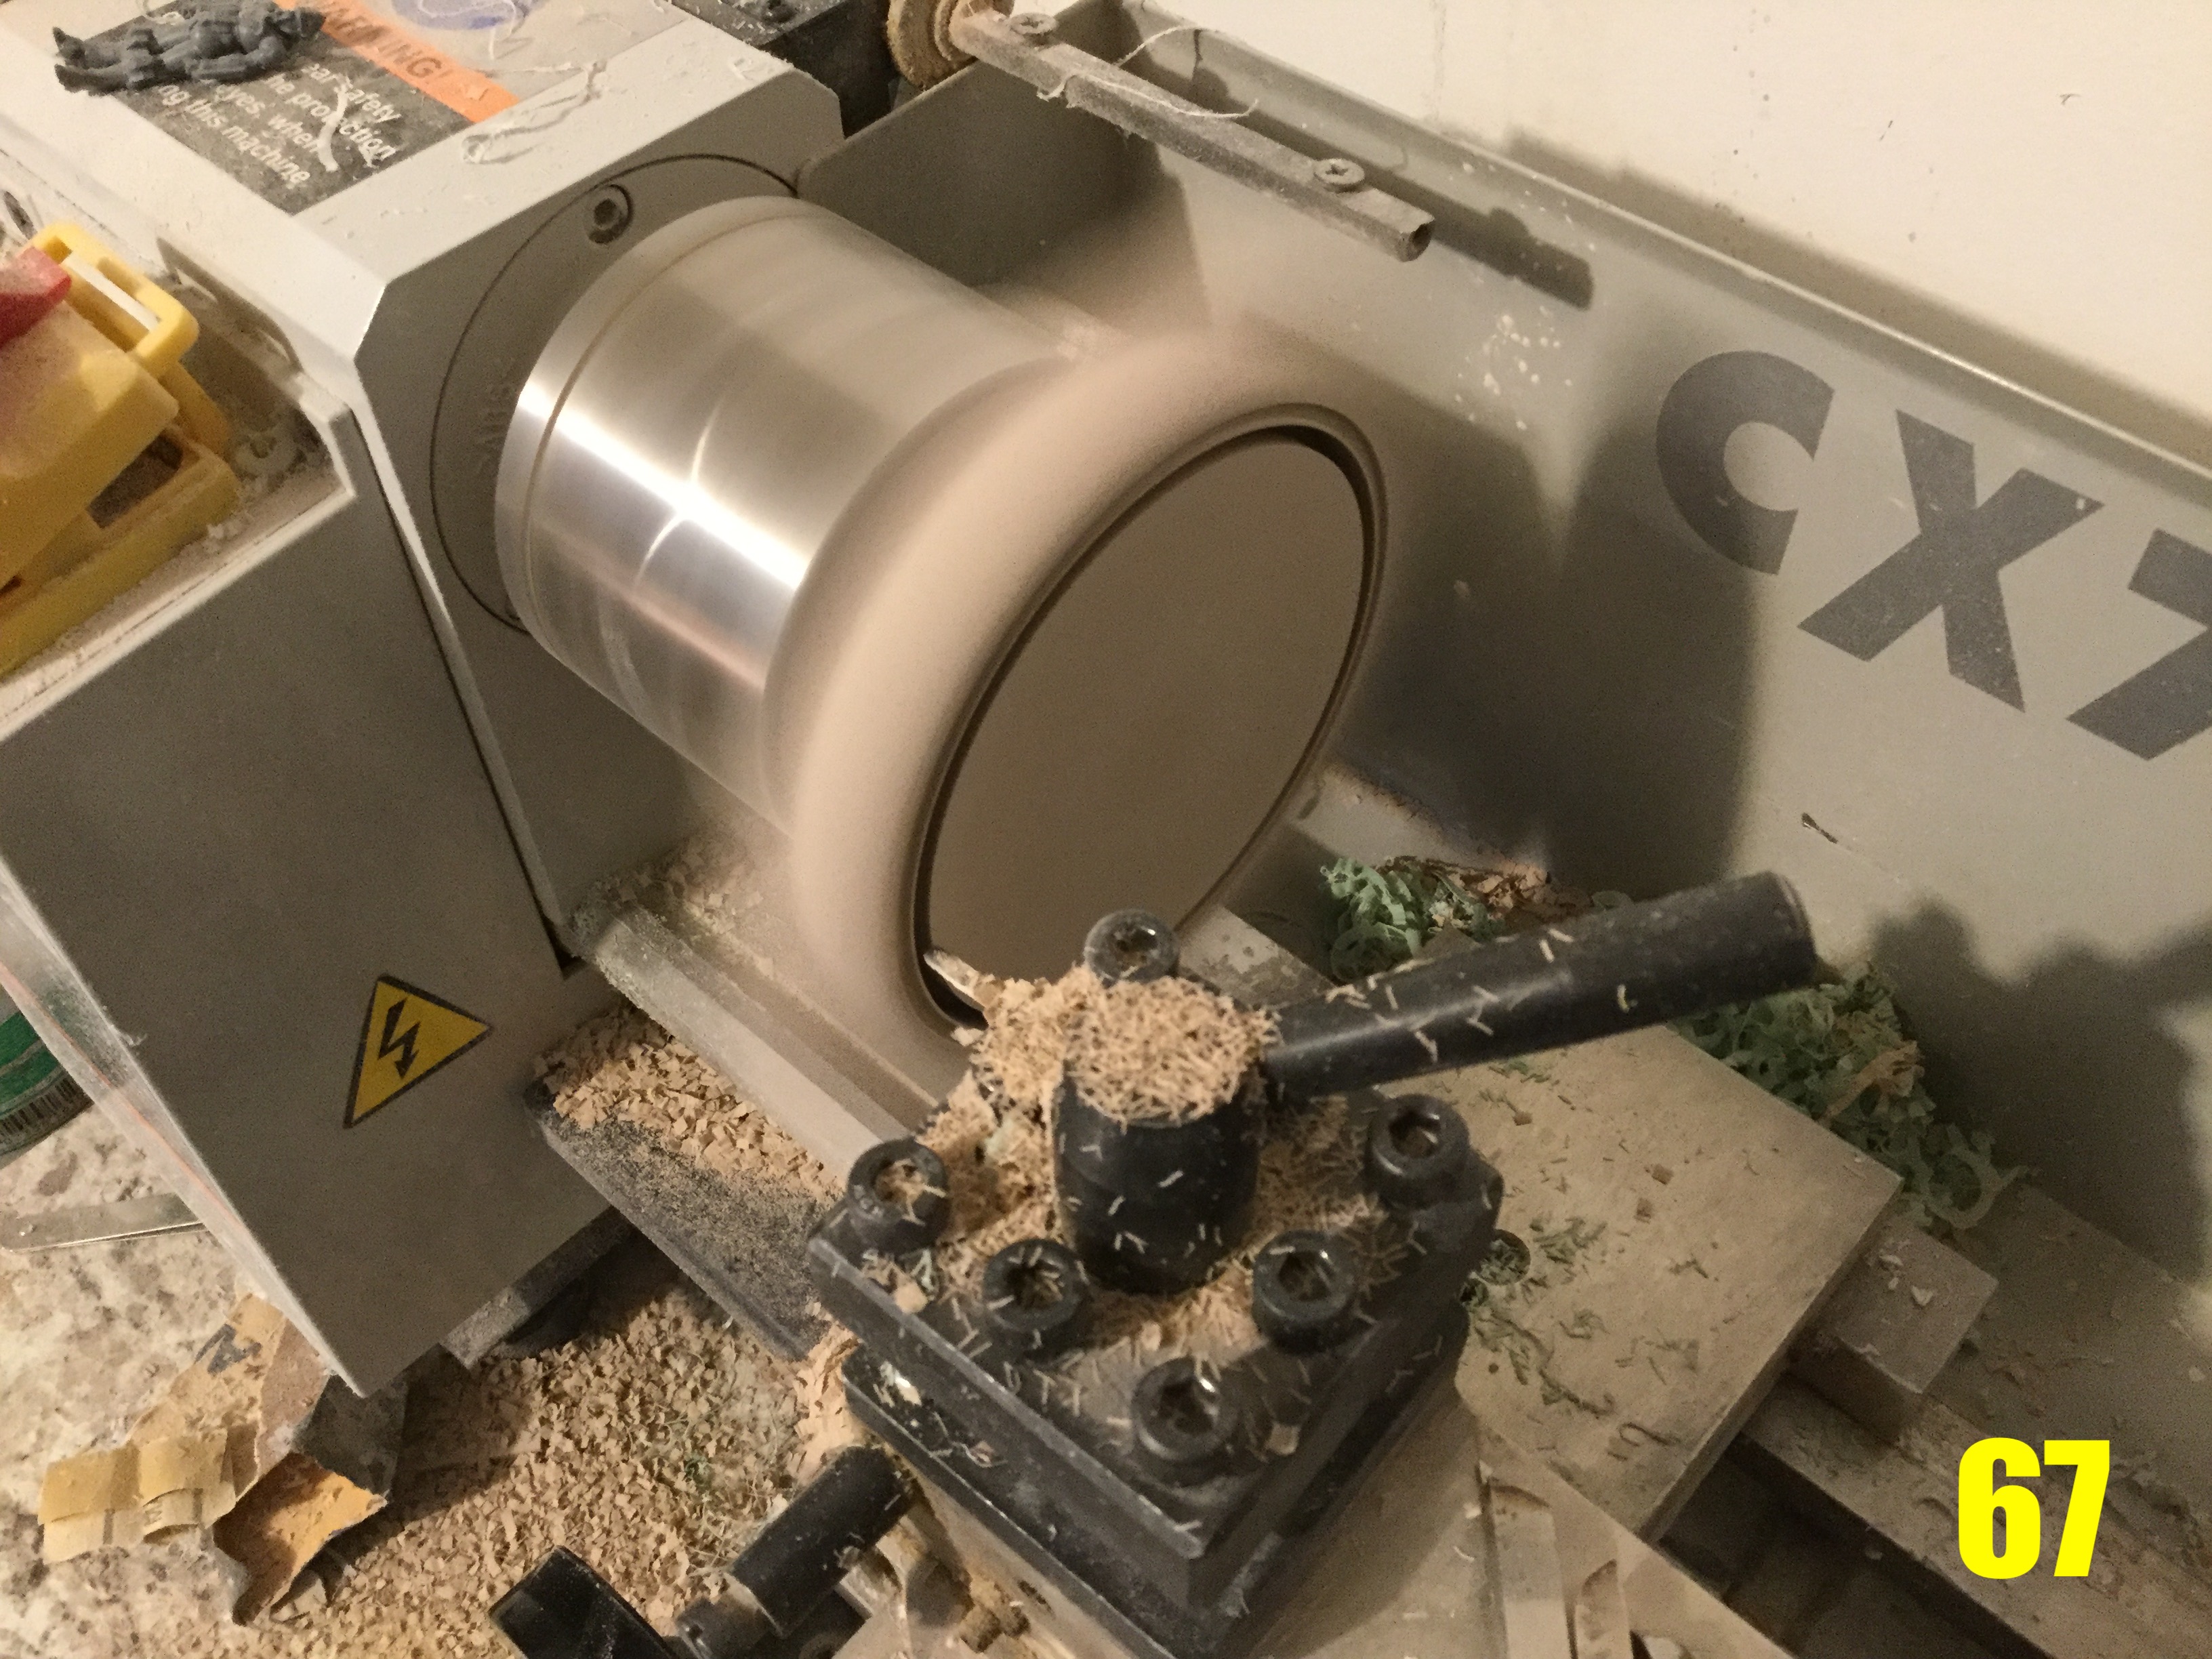
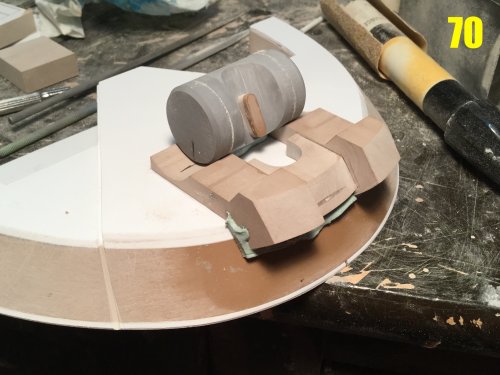
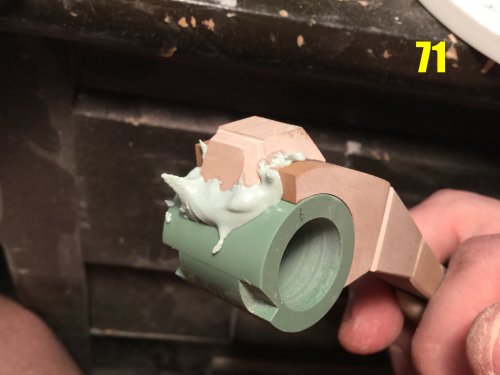
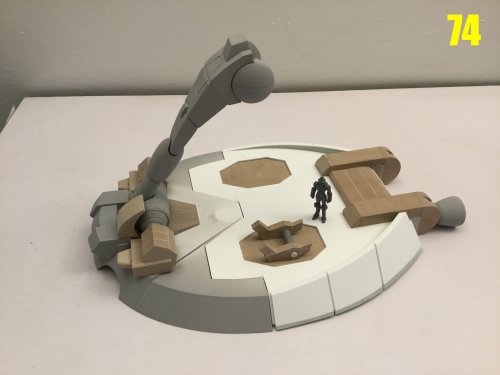
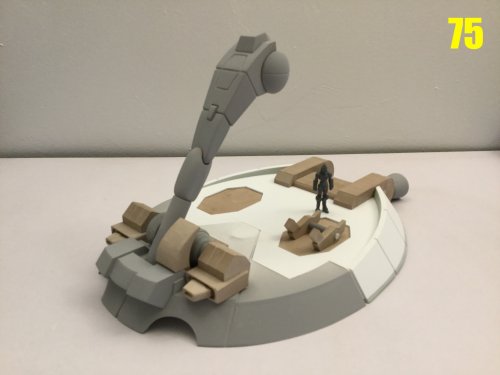
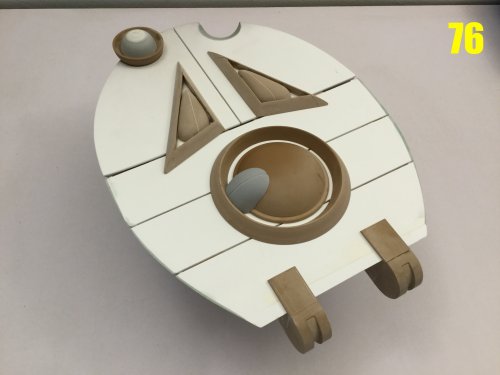
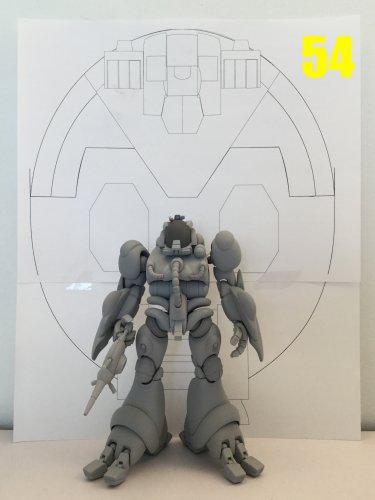
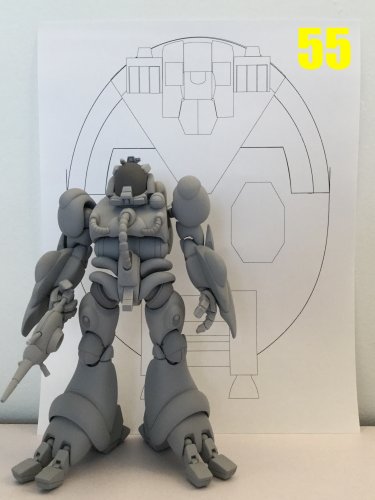
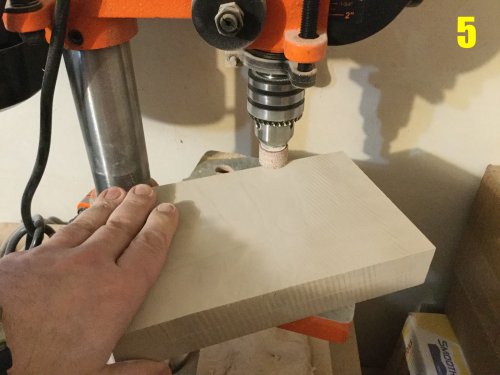
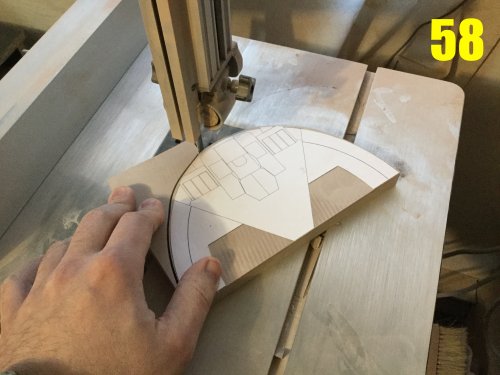
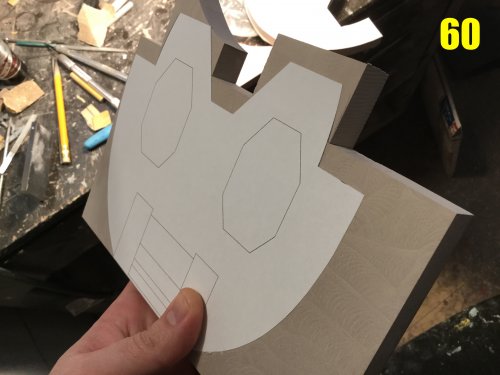
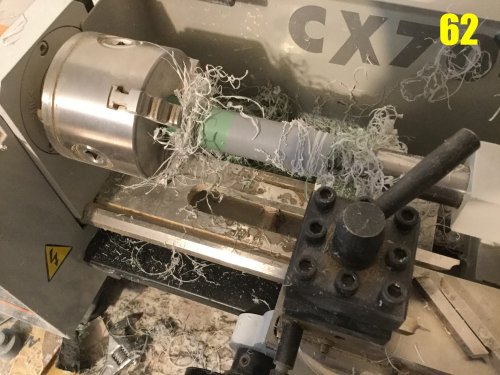
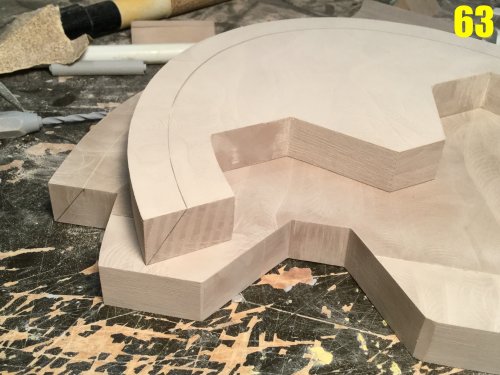
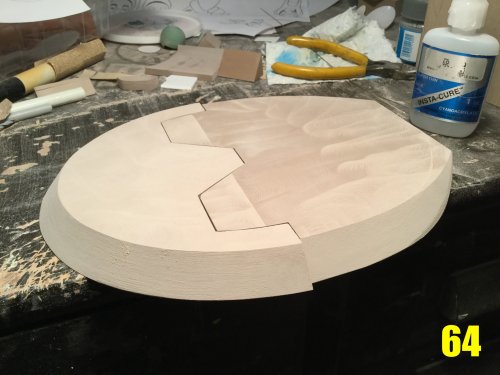
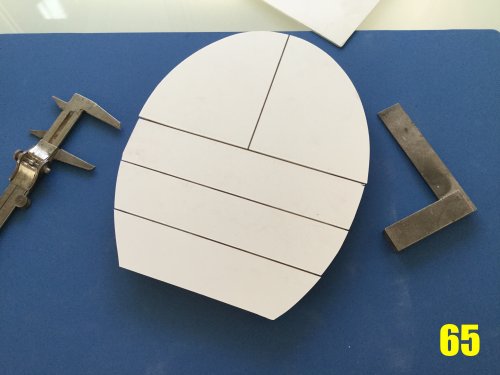
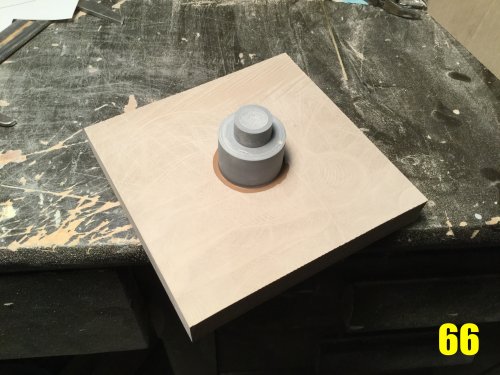
Captain’s log: Wednesday, March 24th. Now that LLOYD is done, I can turn my attention to tackling his airborne conveyance. While some among you may consider the sled to be an after-thought project, I can assure you that it isn’t. In fact, it’s very much its own modelling project, with this portion being even more complex than the 1/350 landing frigate, and much, much larger! And while we’re on that point, allow me to illustrate why this project is such a challenging clusterscrew! In image 53, we see a screen capture of a BIO LLOYD atop its hover sled, which I used as a rough standard to calculate the proper size of the sled platform. This also mirrors what I’ve found in the original line-art. You’ll notice that I layed my technical drawings over the image, and even made the sled a tad smaller than the control image. Now turn to image 54: this illustrates the plan view of the sled platform in relation to LLOYD.—and bear in mind that I undersized it! That sled would be so big that a small family of BIO LLOYDS could pitch a tent over it and live inside it!! Clearly this is absurd, so I went back and fiddled with the dimensions… Which leads us to image 55. The sled platform is now as wide as LLOYD is tall. Still large, but more sensible in scale and proportion to carry one fighting unit. With all that nonsense out of the way, I can start cutting modelling board, ad so that’s what I do. In pic 56, I’m slicing through almost 20cm of material, which is no simple task! In fact, it took me almost 6 minutes to make just one slice in the material, for fear of putting too much pressure on the saw blade. Once I got my two slices, I needed to clean and even-out the surface to make both slices identical, but the plates are so large and flat that they can’t be securely clamped to the milling machine, so I used the drill-press and trusty grinding stone in pic 57. With the surfaces now equalized, I was able to attach paper templates and trim away the excess material, which is shown in pic 58. Pic 59: the very awkward and difficult sawtooth partition being machined, but just barely. Their combination of depth, irregular angles and curvatures meant that I could only do part of it on the mill; the rest had to be done manually. Pic 60: the aft portion of the sled is even longer! So long that I needed to recycle the cutaway scraps from the front to make a part large enough to match the paper pattern. Pic 61: wat my lathe work station looks like when I start. Pic 62 is what it looks like after just 5 minutes! Pic 63: the sled platform parts are now keyed and penciled so that I can Dremel the beveled edge all around. Pic 64: beveled edge complete! I intentionally made the platform a little thinner than it should be, so that I could use styrene sheet to build-up the rest (see pic 65). This was necessary in order to reproduce the different elevations of the platform, as well as the cross-section segments…. Which obviously don’t align with the upper surface. Screw you, Studio Ammonite!! Pic 66: the saucer shapes on the bottom of the hull are quite large in diameter, larger than any of the bar stock I have. Therefore, I will do something you probably shouldn’t without adult supervision: jerry-rig something that’s just barely safe to machine. In this case, a large Renshape slab CA-glued to a resin mandrel so that I can turn it. Pic 67: white-knuckle time! This is something I’d NEVER, EVER do with metal, but modelling board is relatively easy to cut and more-or-less forgiving. I had to monitor my speed very carefully because of the vibration induced when cutting such an unsupported shape, but the operation was successful! More pics of my death-defying antics to come next week, so stay tuned!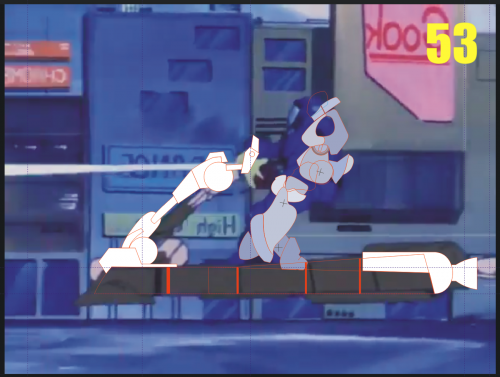


-
1/48 SOUTHERN CROSS BIOROID
captain america replied to captain america's topic in Anime or Science Fiction
Depends on the part. Some parts had to be sculpted molded, cast, and then modified (chest, thighs, toes, etc.), others needed to be full scratch (heads, pistols, back blobs) because they were just so different. -
1/48 SOUTHERN CROSS BIOROID
captain america replied to captain america's topic in Anime or Science Fiction
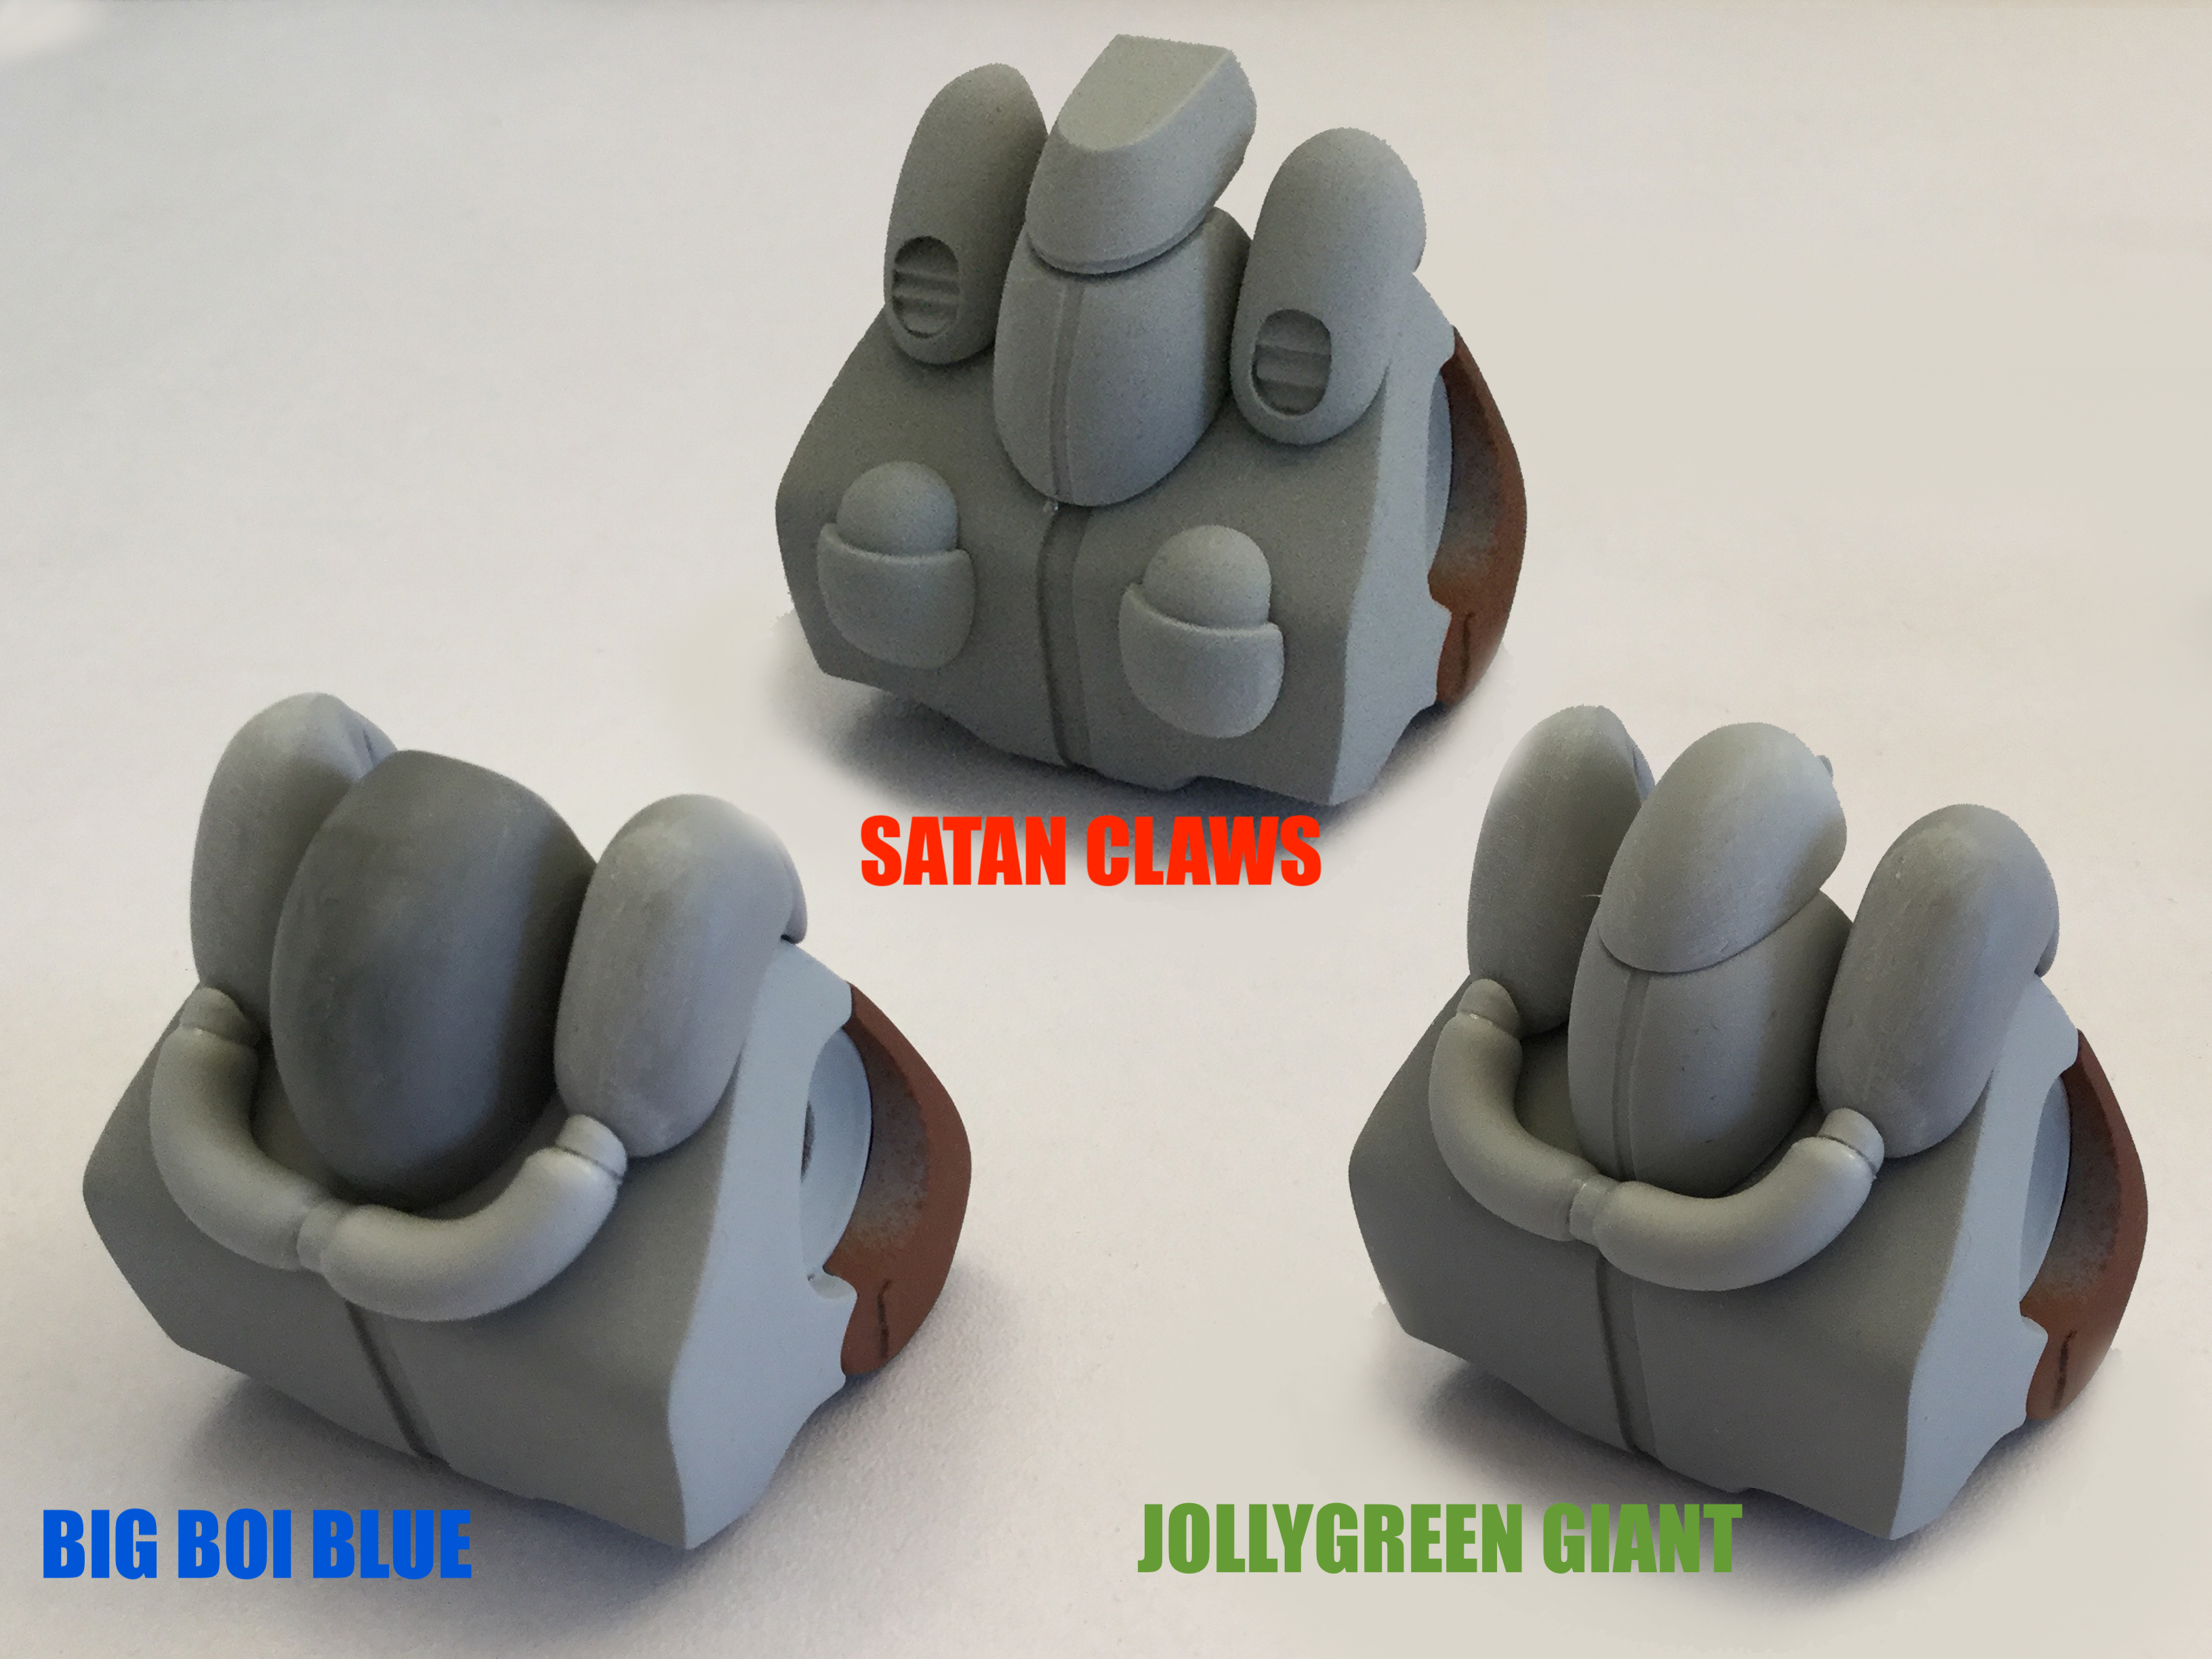
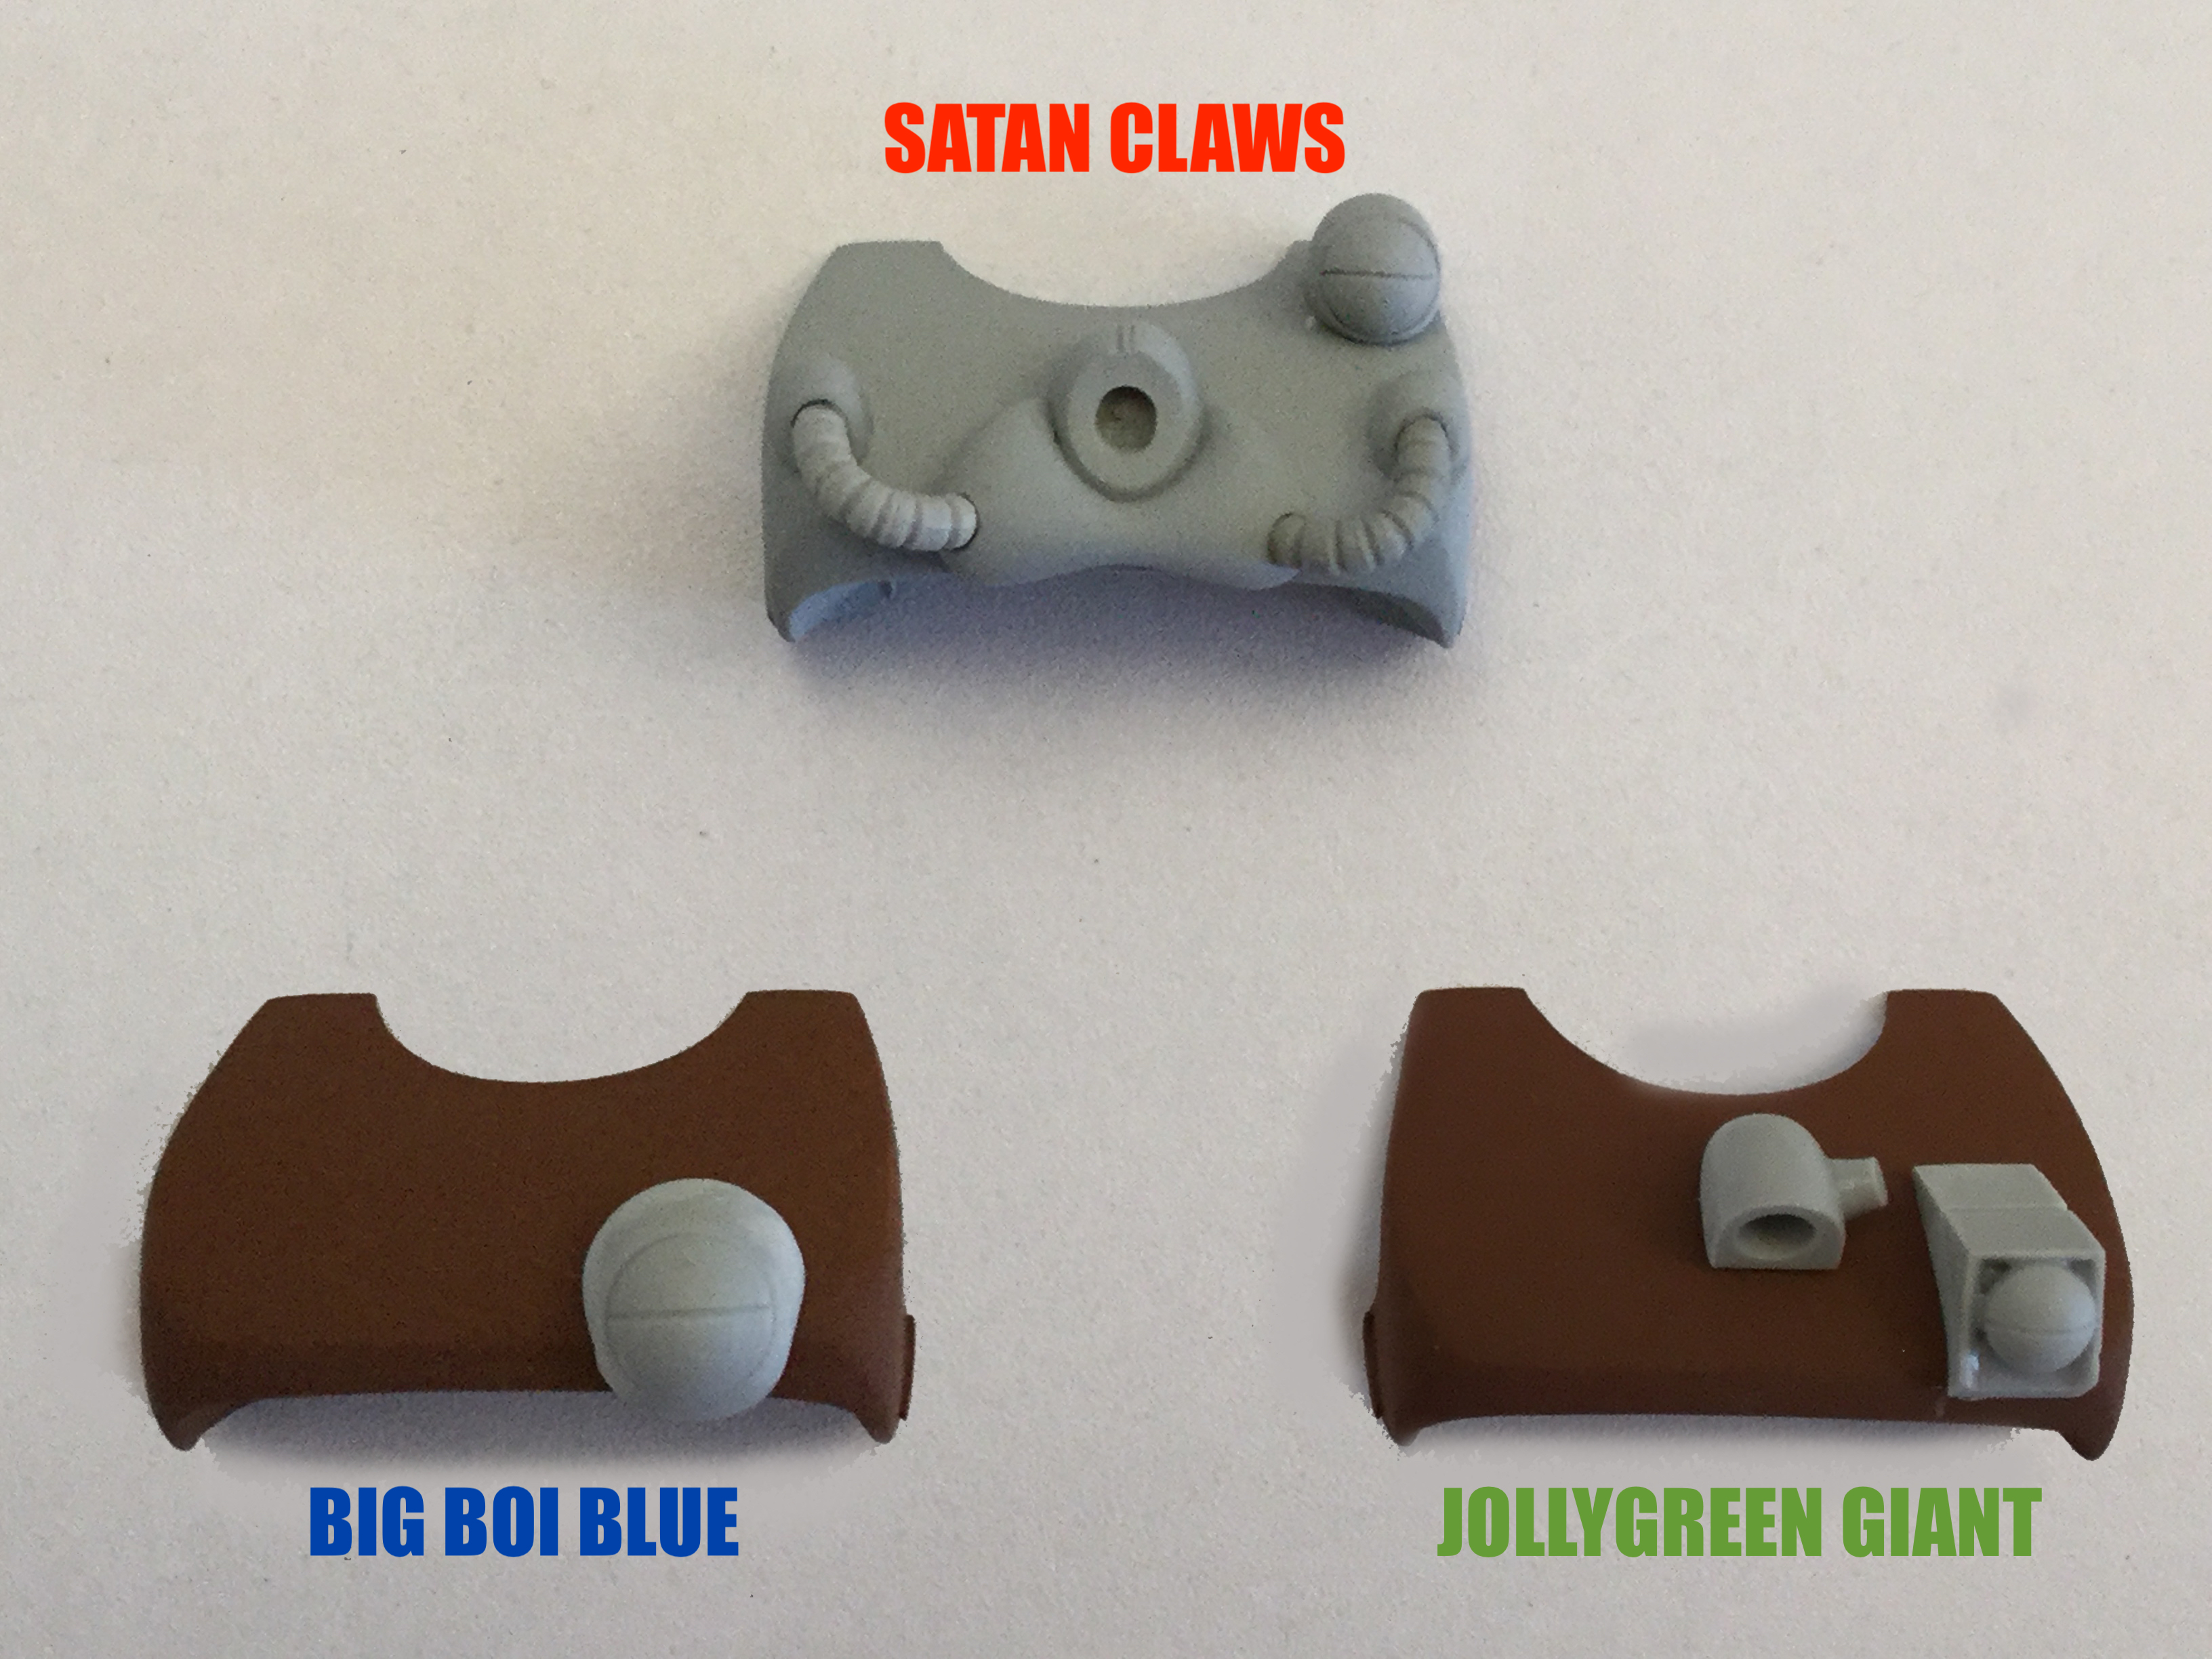
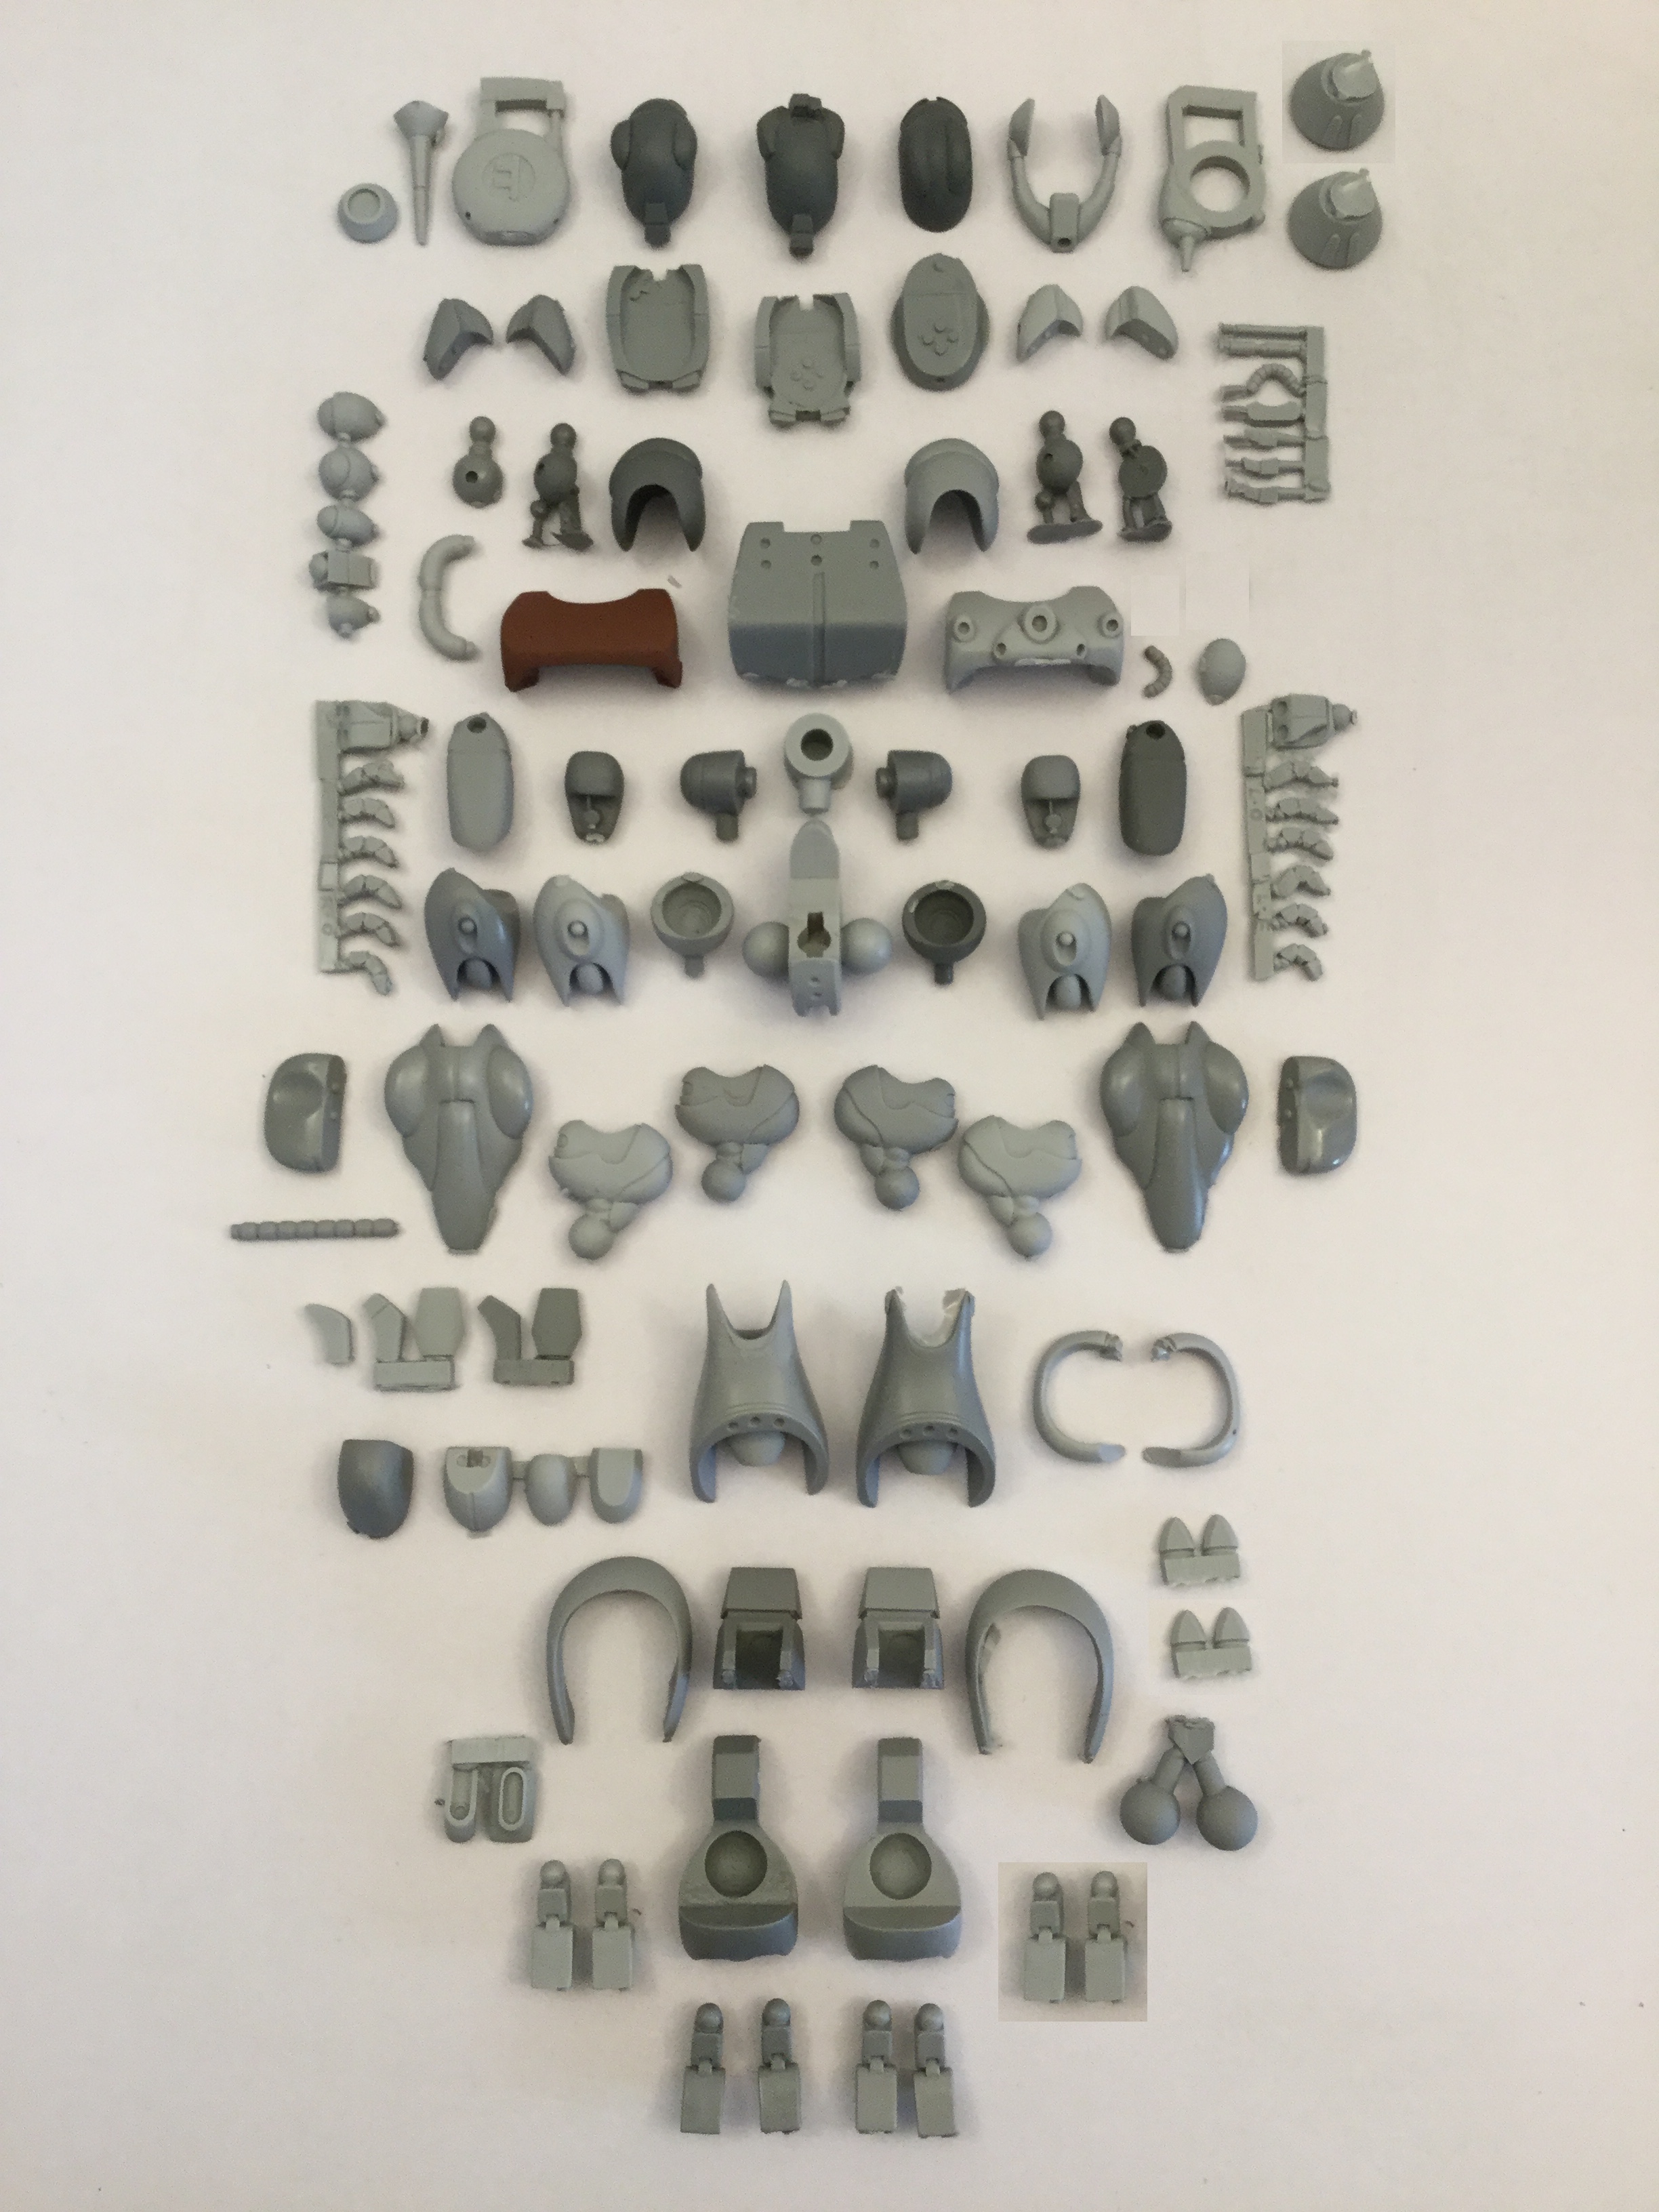
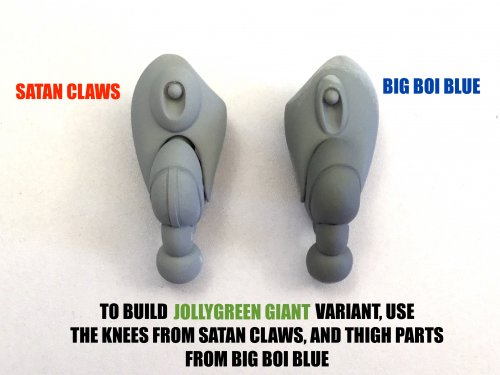
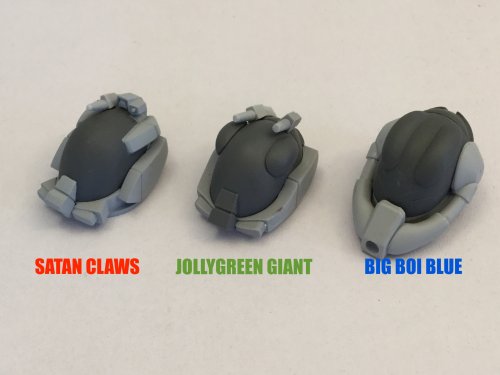
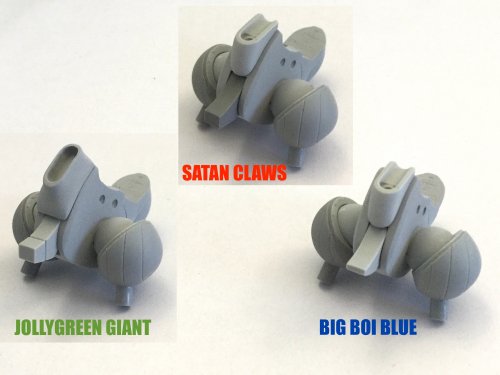
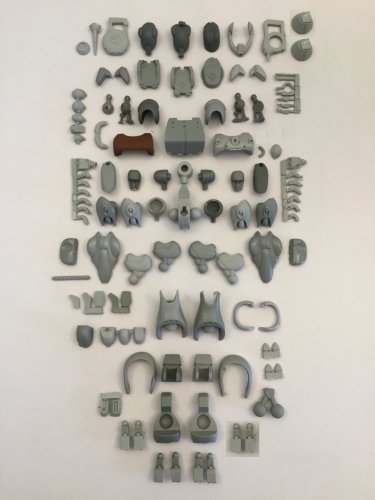
A quick overview of the differences between the three types you can build; part of why it took so long to finish the masters. Because of the shape of the central back blob on Big Boi Blue, that also required a different head hinge, and a whole bunch of other nonsense I won't trouble you with.


-
1/48 SOUTHERN CROSS BIOROID
captain america replied to captain america's topic in Anime or Science Fiction
Several times. Sometimes frame by frame... And enjoyed it! -
1/48 SOUTHERN CROSS BIOROID
captain america replied to captain america's topic in Anime or Science Fiction
If you go to the Moscatohobbymodels page on Facebook and scroll down my timeline (November to early January), I did a full build tutorial for my 1/48 M-72B Gabriel kit, which is similar enough to the BIO LLOYD, albeit slightly smaller. In it I go through the building process, puttying, posing, pinning, painting. That's a good start to help you along with your eventual build. -
1/48 SOUTHERN CROSS BIOROID
captain america replied to captain america's topic in Anime or Science Fiction
Like the Biopsycher? -
1/48 SOUTHERN CROSS BIOROID
captain america replied to captain america's topic in Anime or Science Fiction
Thanks Ted, that means a lot! Despite being a jellybean nightmare, I've been thoroughly enjoying myself and the challenge the source material posed. Just understand that it's not over yet, I still need to complete the sled and adjust it so that it and BIO LLOYD fuse into a synergistic, Spartas-crushing machine! And if, at that later time you decide that you might want to acquire more LLOYDs, just LMK and if I can get an extra 10-12 orders, I'll make new molds. I'm tempted to make the (potential) second run more selective, in that you'd be able to get just the parts for one version, and the sled as an option. -
1/48 SOUTHERN CROSS BIOROID
captain america replied to captain america's topic in Anime or Science Fiction
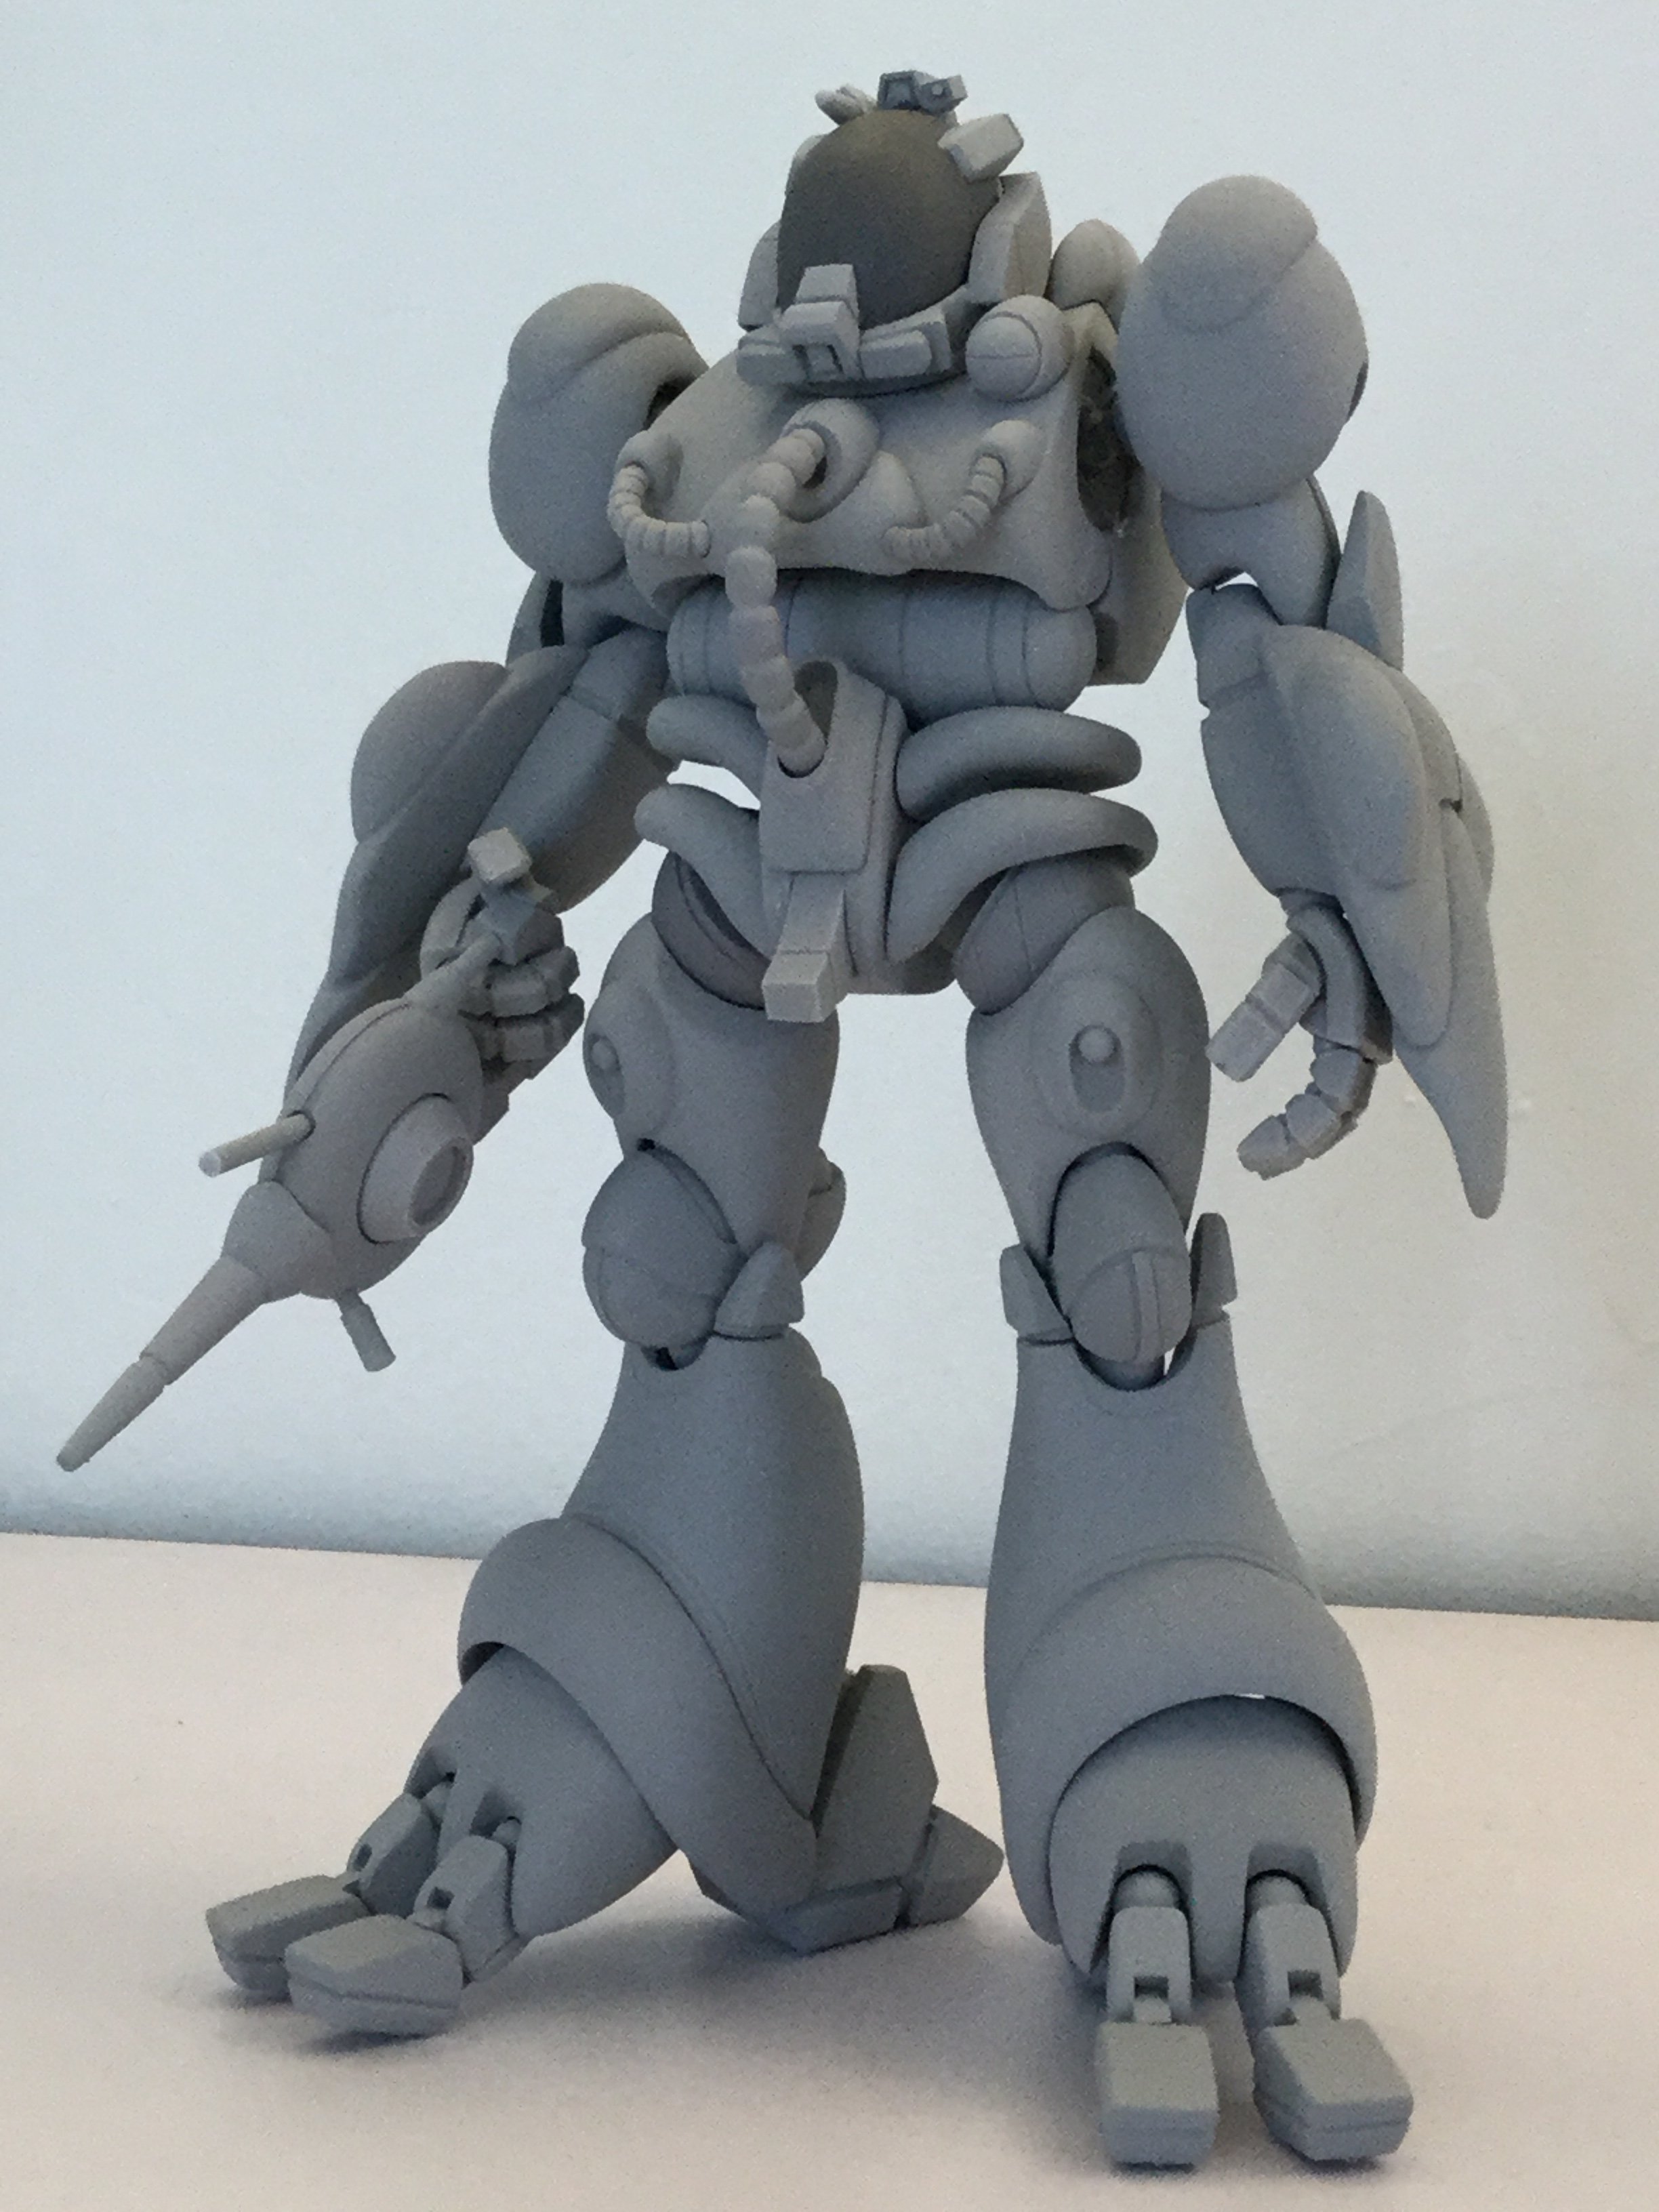
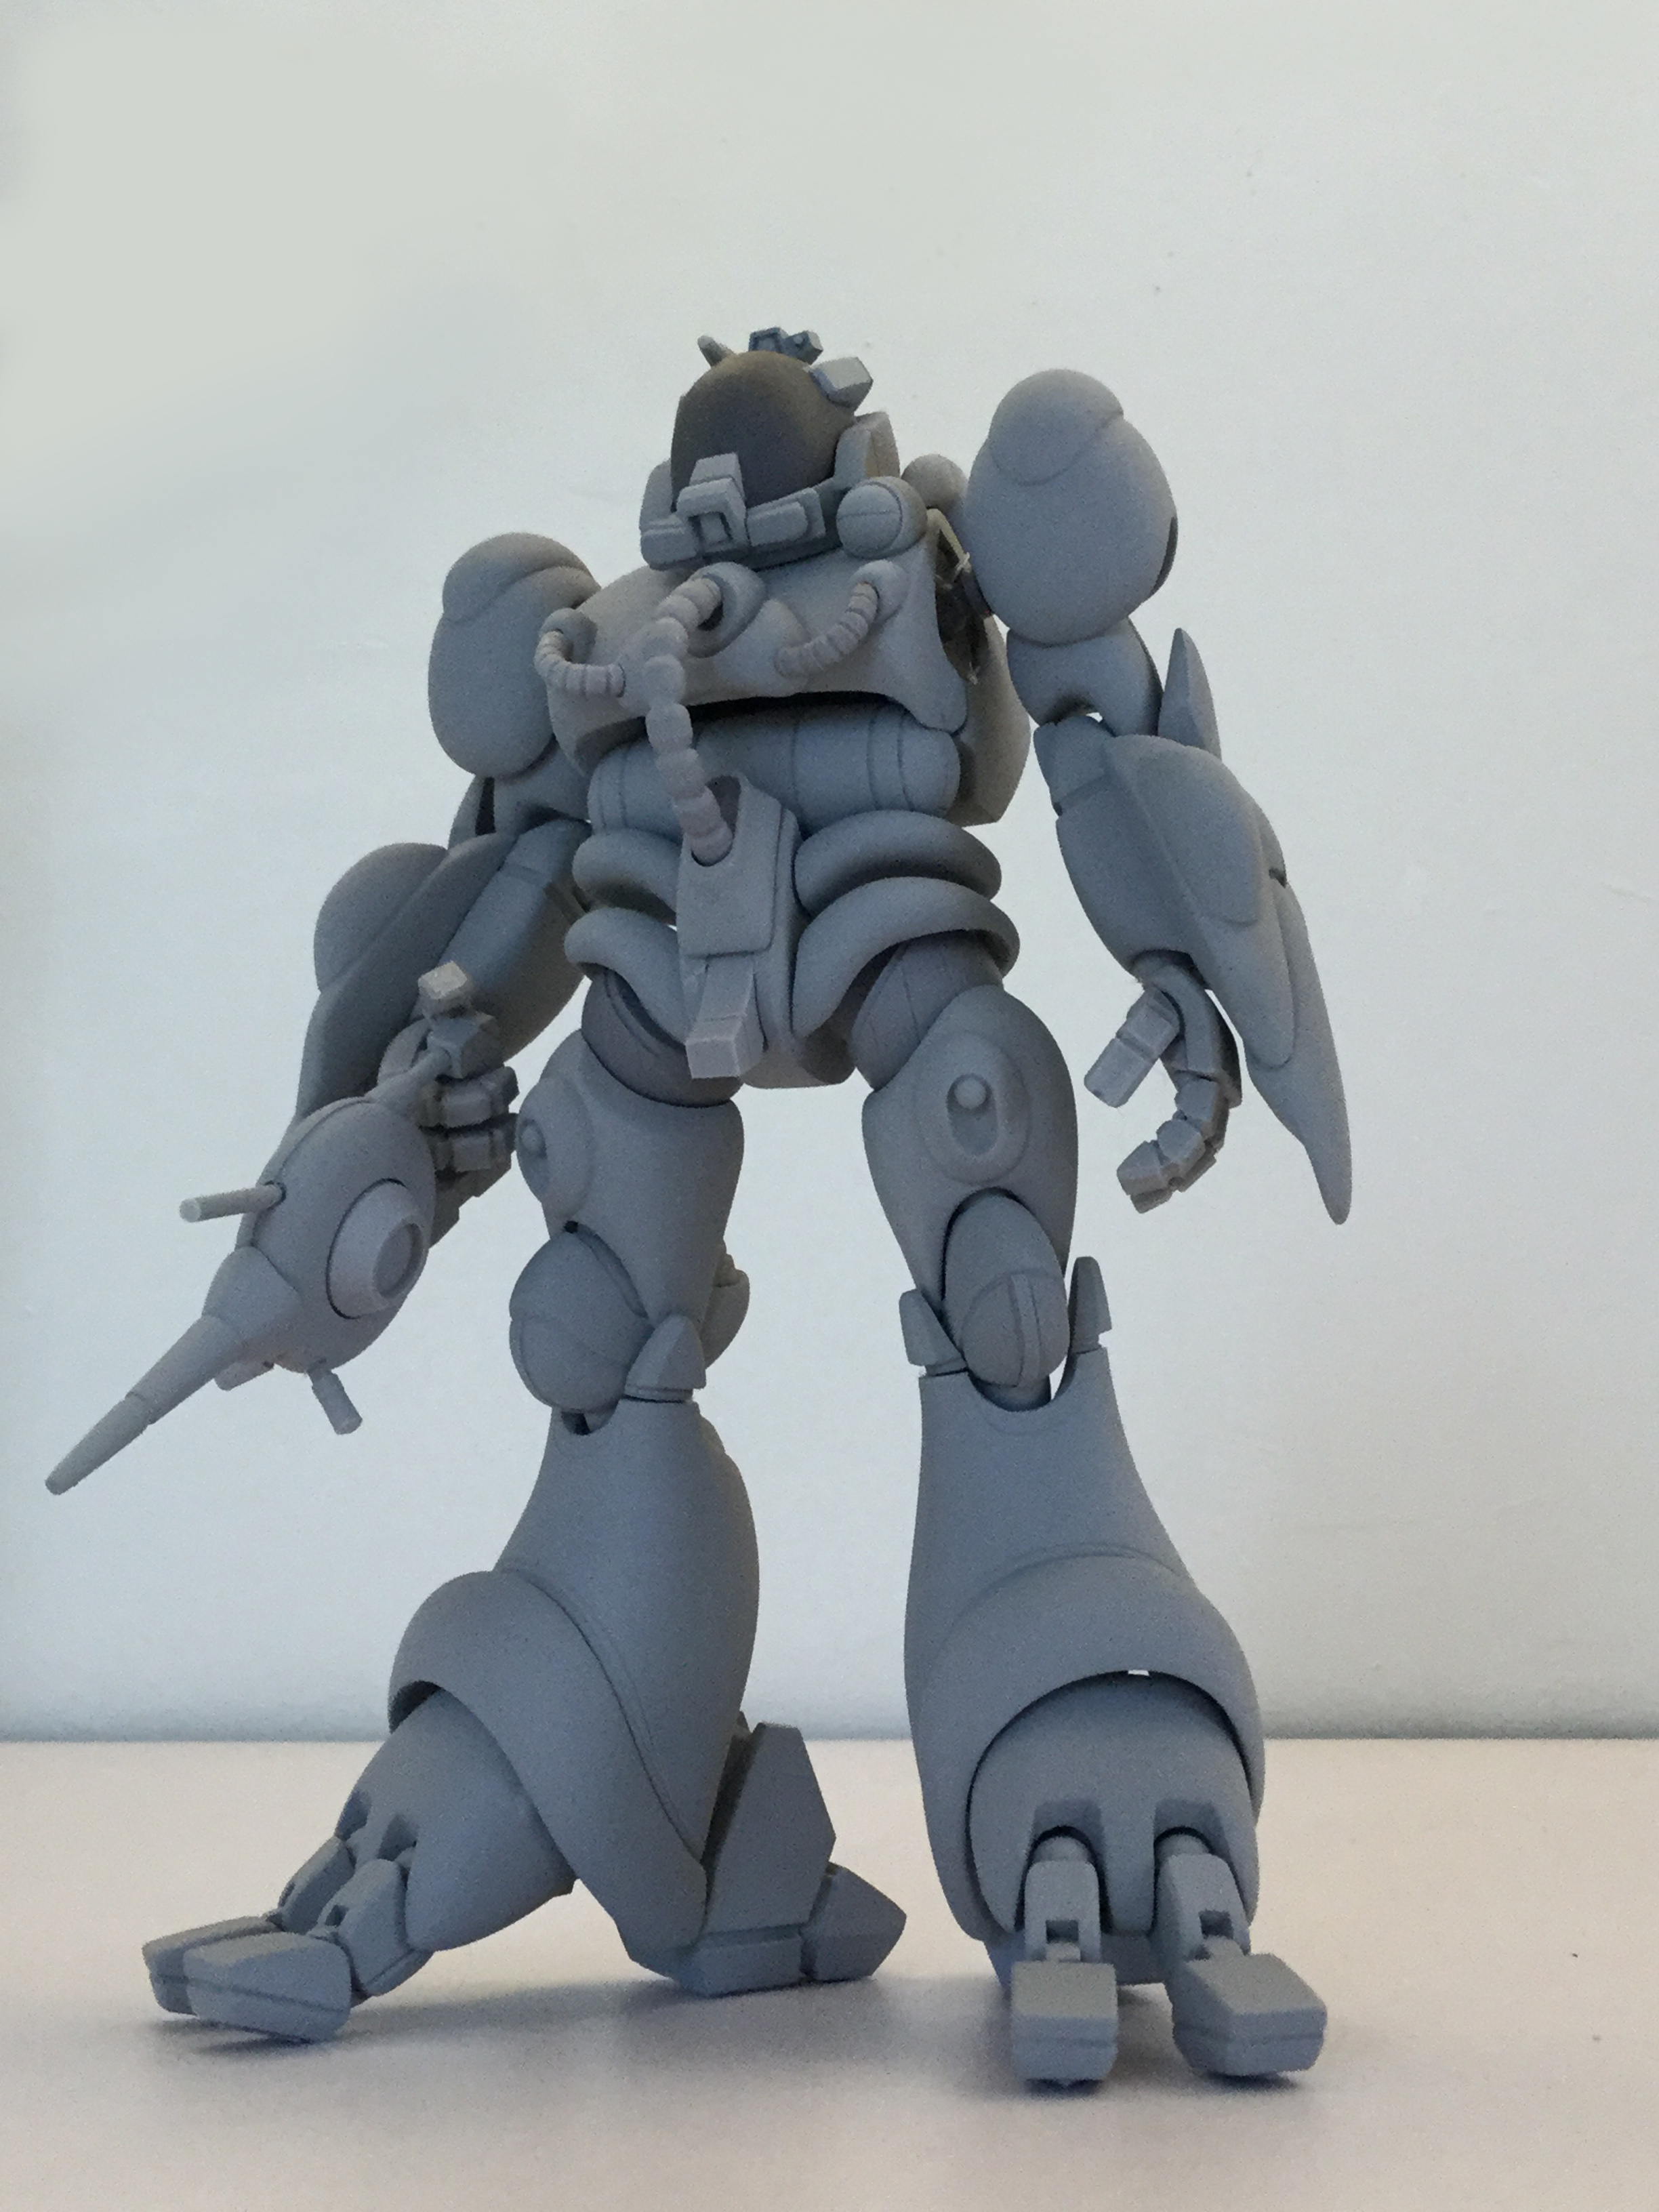
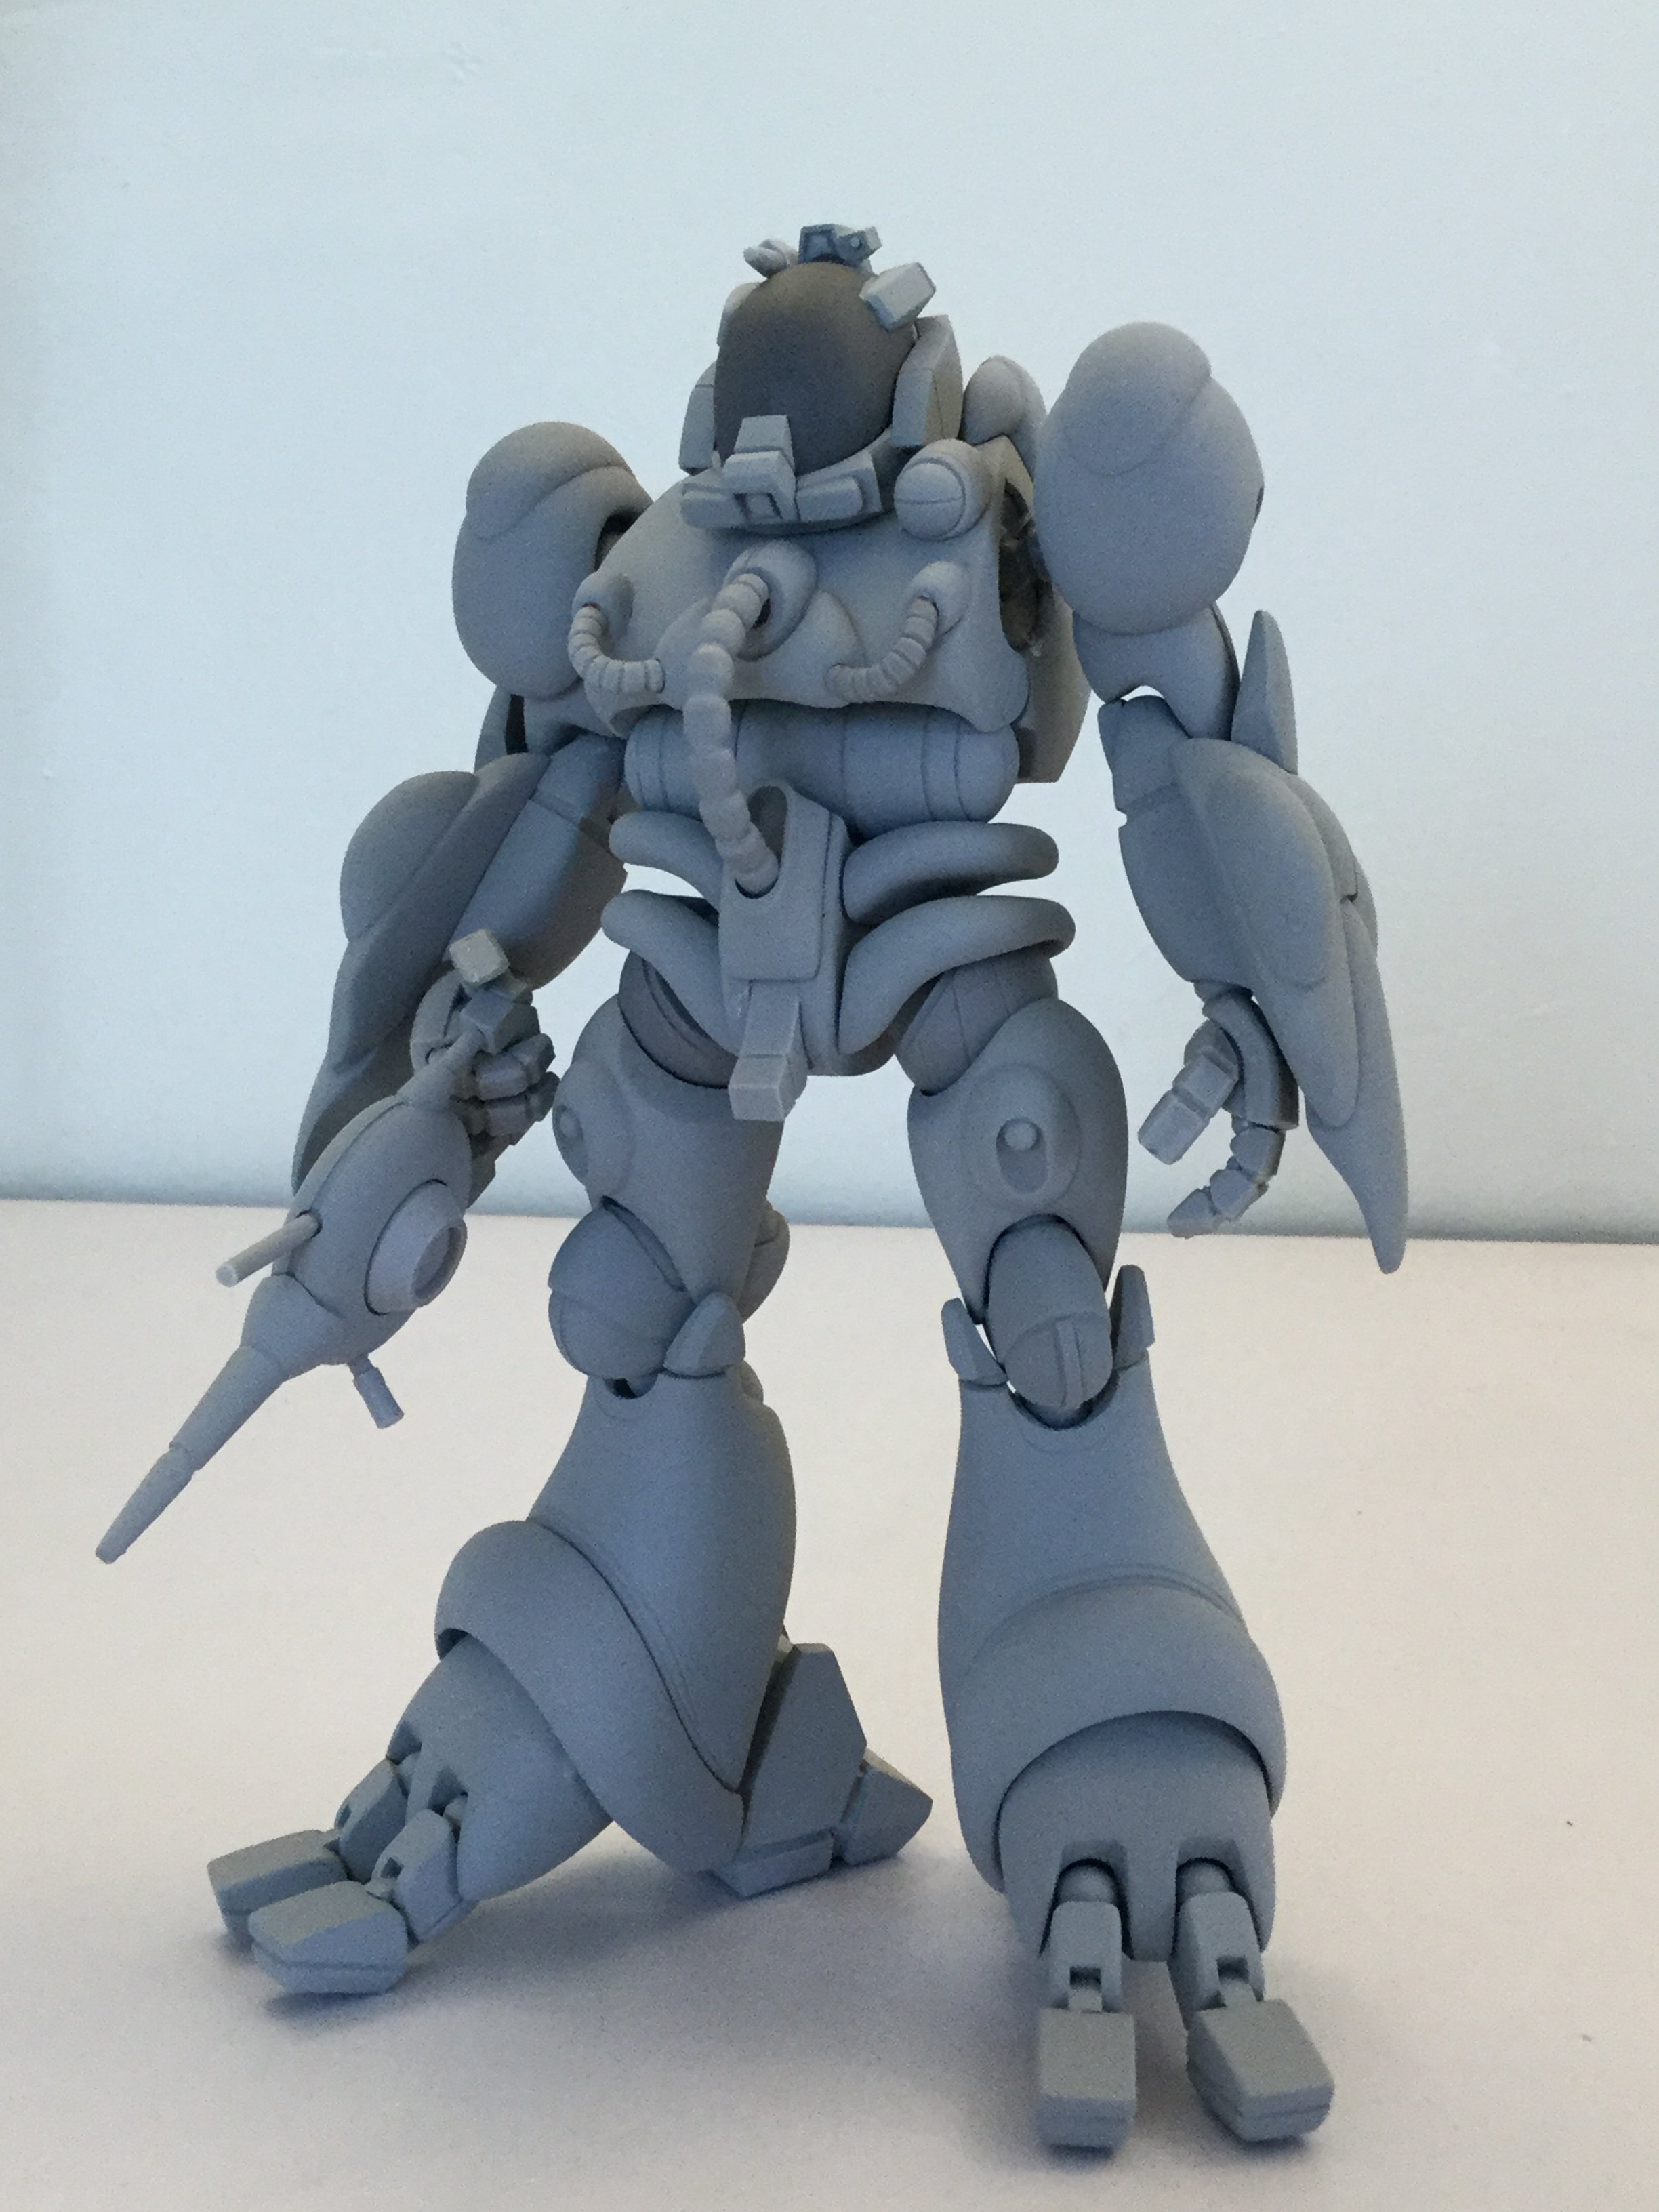
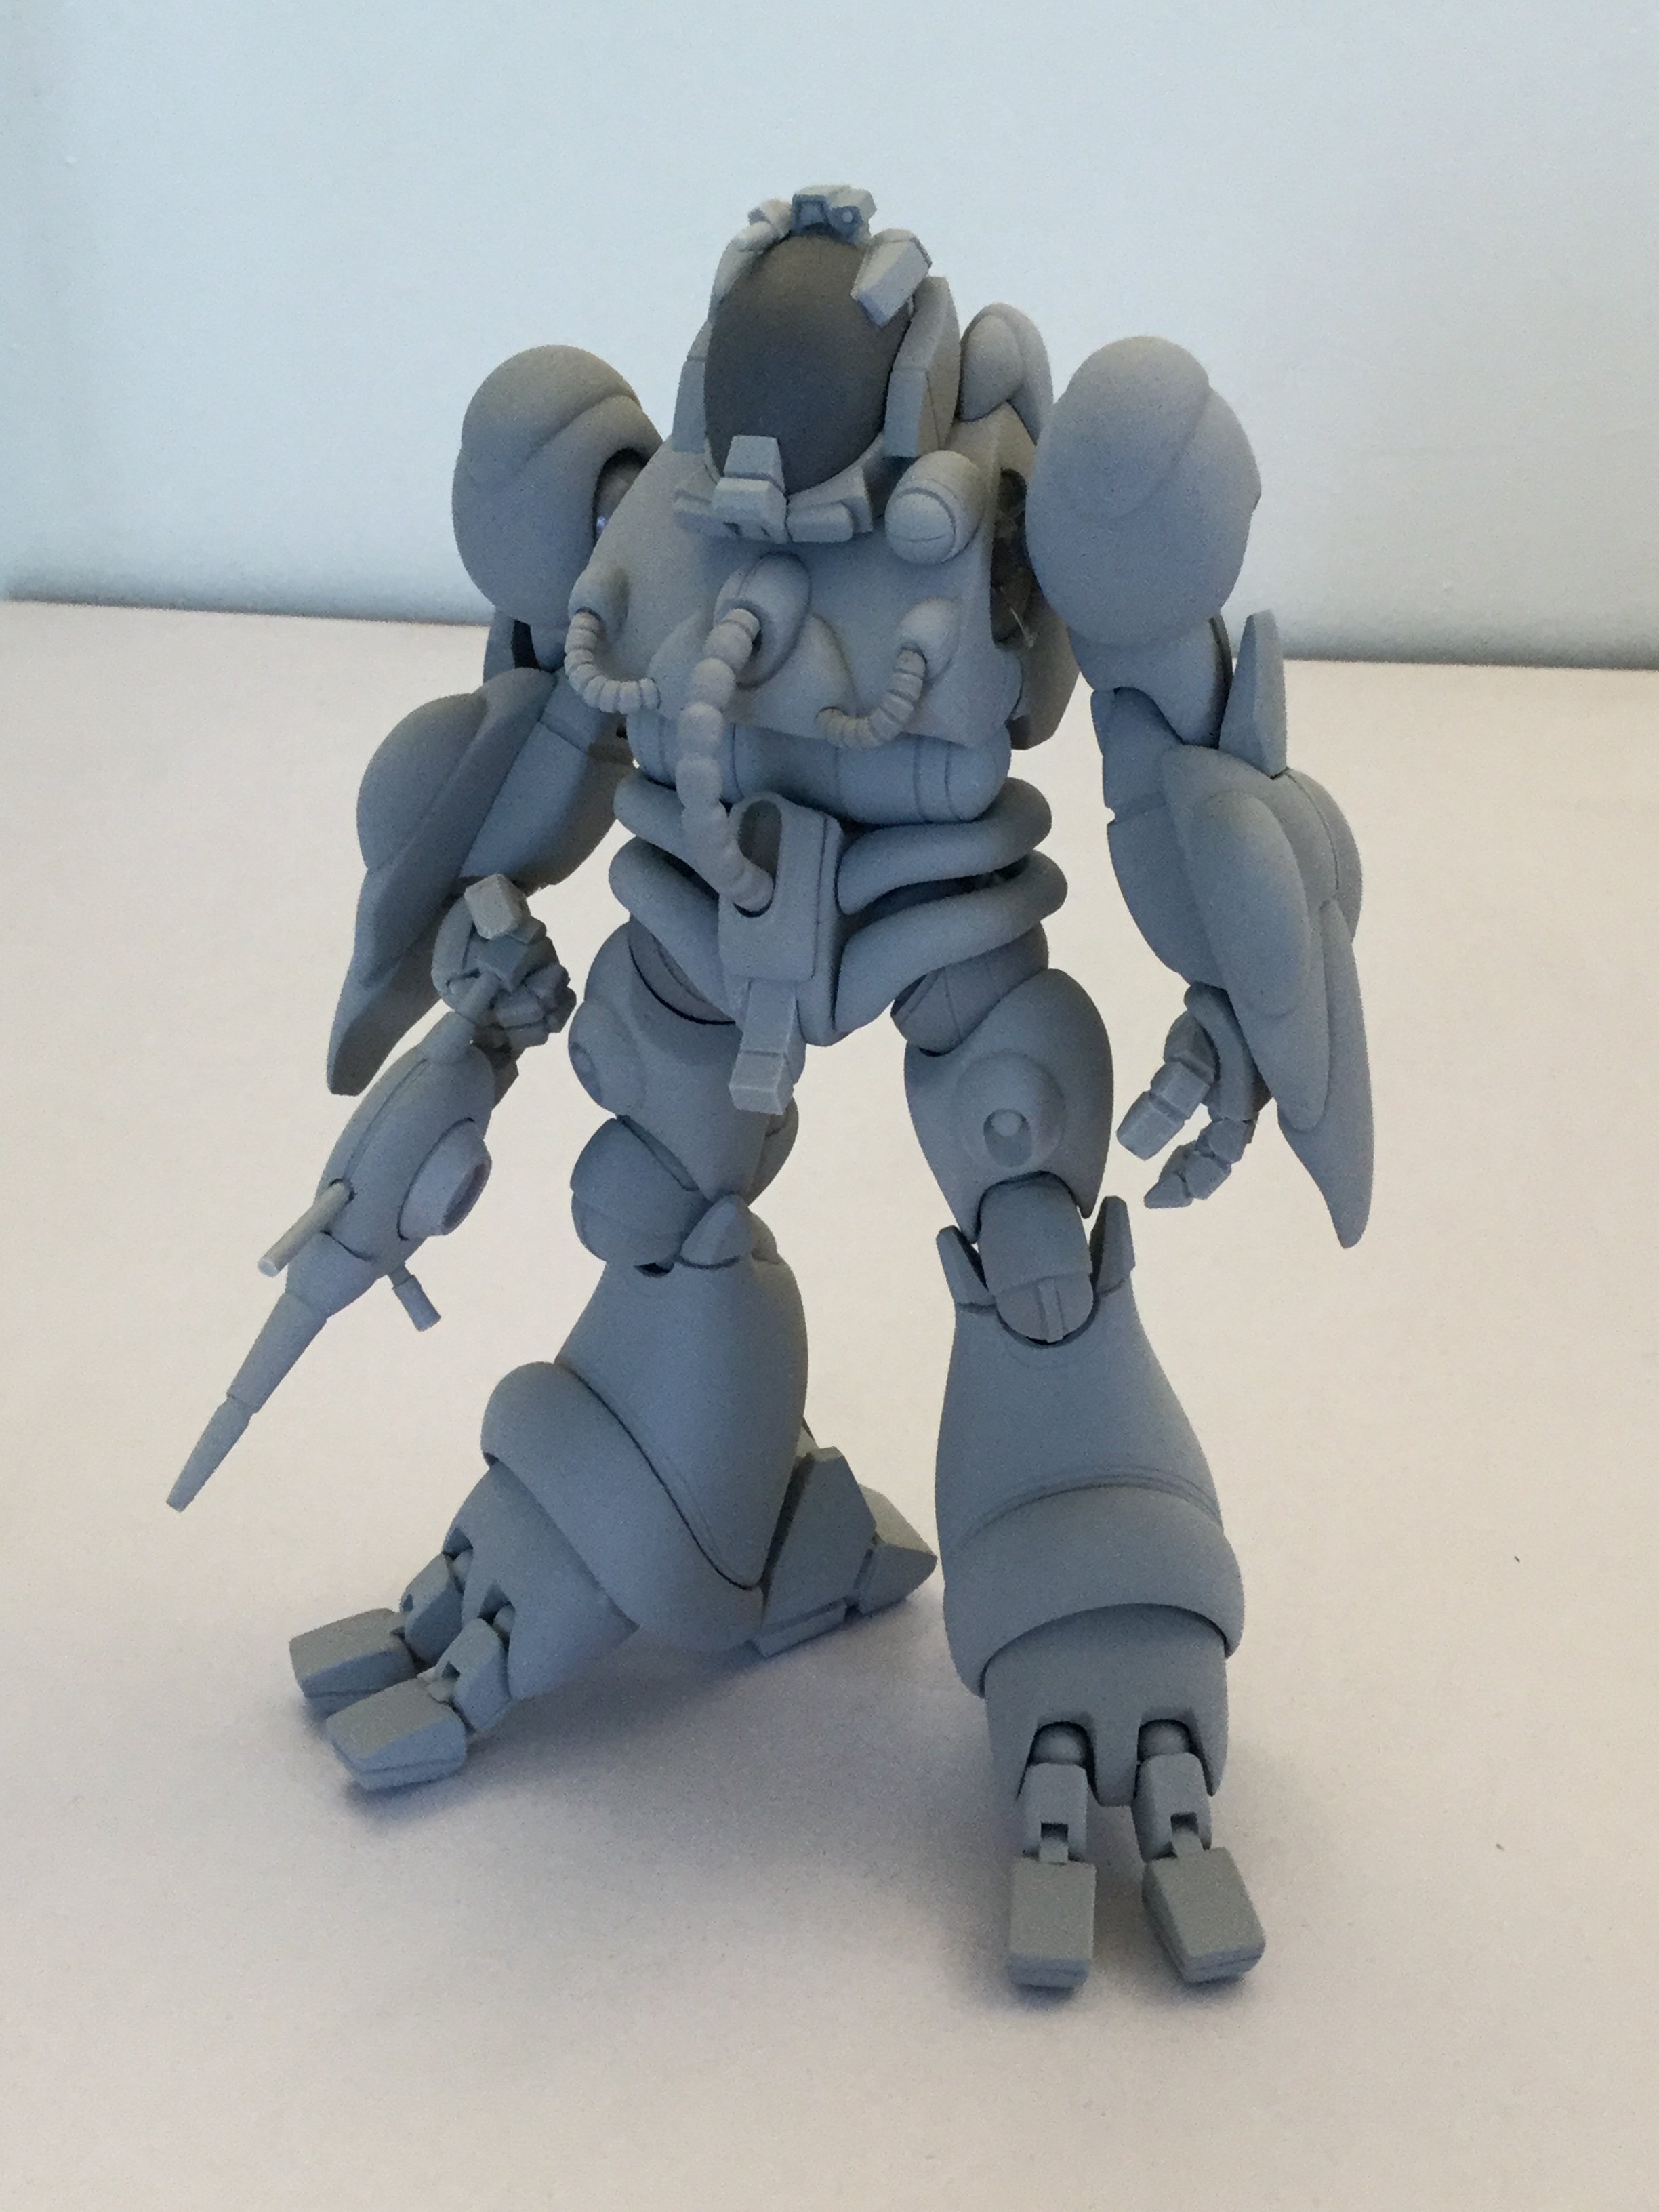
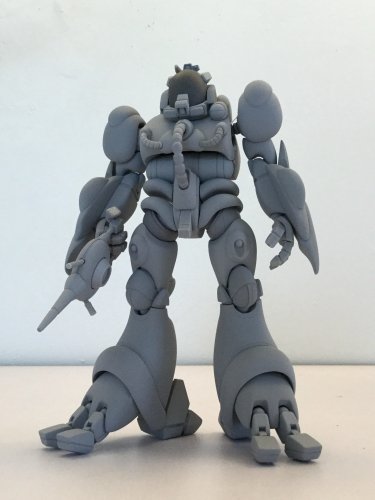
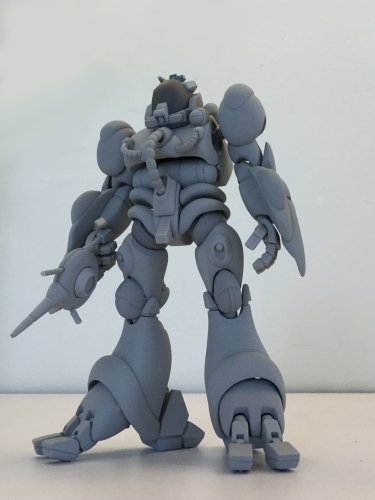
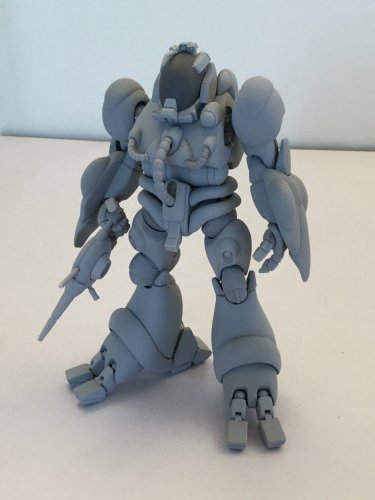
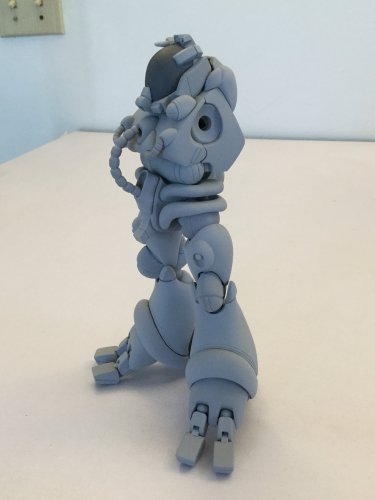
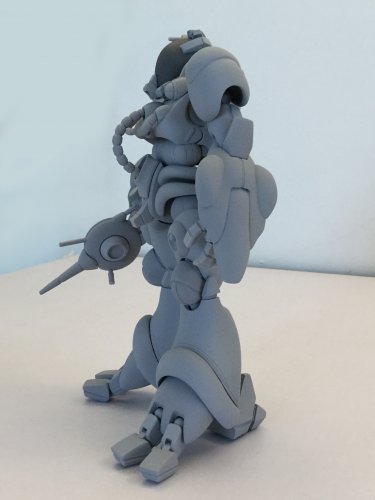
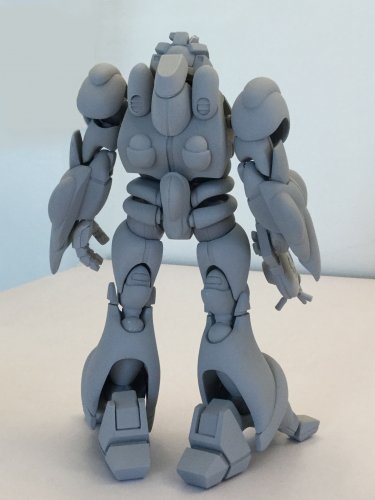
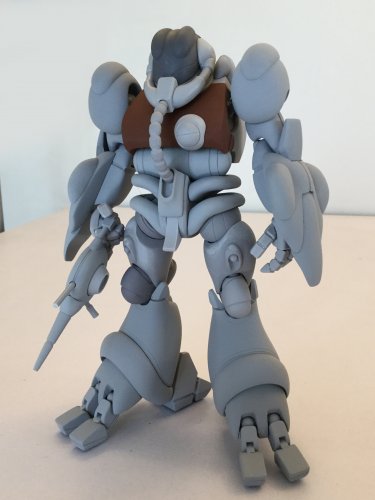
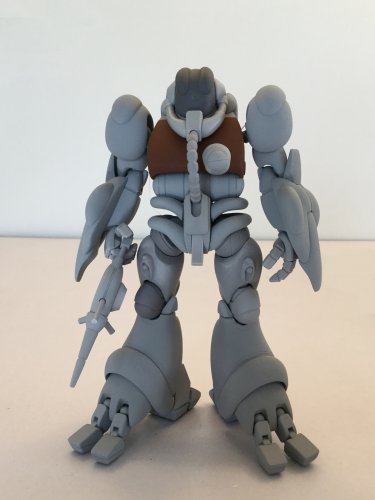
Bam! Red (SATAN CLAWS) and blue (BIG BOI BLUE) versions shown. Please forgive the few minor details that aren't proper to the blue version (toes, codpiece, placement of the hose) since this baby's just holding with hot glue. Preliminary work has already begun on the sled, so you'll get to see some progress on that next week.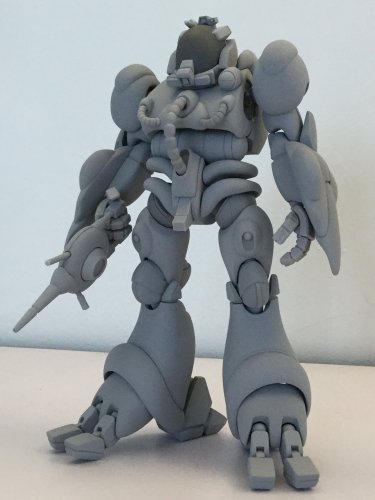


-
1/48 SOUTHERN CROSS BIOROID
captain america replied to captain america's topic in Anime or Science Fiction
Tonight, 8pm. -
1/48 SOUTHERN CROSS BIOROID
captain america replied to captain america's topic in Anime or Science Fiction
Possibly. Large, thin hulls and fuselages are impractical to cast in resin. I was looking to source a machine right as Covid was hitting, and I think it put the supplier out of business, so back to square one. -
1/48 SOUTHERN CROSS BIOROID
captain america replied to captain america's topic in Anime or Science Fiction
I guess expensive is relative. If a large plank costs 700 bucks and lasts 7 years, I consider that bloody cheap. My time/labor is by far the "costliest" part of a project. I use quotes because anyone who has ever tried to contract these types of projects understands that the guys who charge the most usually cost the least in the long run. The biggest money-pits and time-wasters are the jobbers that'll do it for a "good price" as a sideline. Thanks for posting that video! Just another reminder that I need to find a vac-forming machine. -
1/48 SOUTHERN CROSS BIOROID
captain america replied to captain america's topic in Anime or Science Fiction
Increasingly hard to come by according to whom? I buy a 2" by 16" by 60" plank once every 7-10 years, so I can't say I've noticed. I don't ration, but I try to work-out what types of materials and construction methods(s) are best suited to the shape or part I'm making. I re-use a lot of small Renshape pieces simply because I have so many, and it's faster than working from a large slab. -
1/48 SOUTHERN CROSS BIOROID
captain america replied to captain america's topic in Anime or Science Fiction
Undercuts are almost everywhere on my parts, but the beauty of silicone rubber is that it stretches. The bigger problem is twofold: -I often get really ambitious with sculpting, often creating parts that have cavities at either end (like the thigh or the shin armor) and that can very easily lead to trapped air, which in turn leads to extra pockets of resin that need to be de-burred by the modeler. Thankfully, I've developed some hacks to remedy that problem in 97% of cases -then comes the issue of where do I place the mold partitions and gates so as to give the modeler the least amount of grief, while still making sure that the part will mold properly? Many times you will see mold lines on primary surfaces, and this is by design: I'd rather have the modeler repair a relatively even, undetailed surface that's easy to sand, rather than try to hide the parting line and put it in an area that can affect fine detail, or worse, on a mating surface that will alter how parts fit together. Making molds is a bit like playing chess in your head, in that you have to anticipate things 2, 3, 4 steps ahead to avoid problems down the line. -
1/48 SOUTHERN CROSS BIOROID
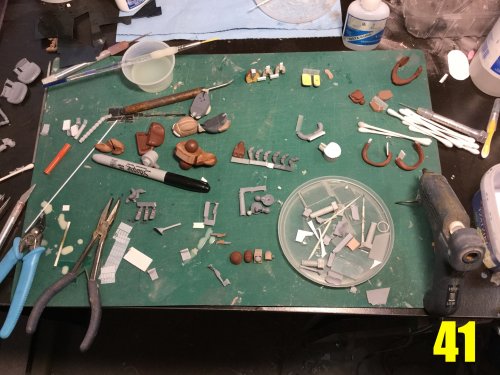
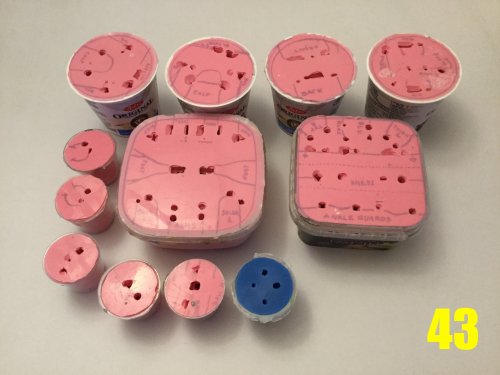
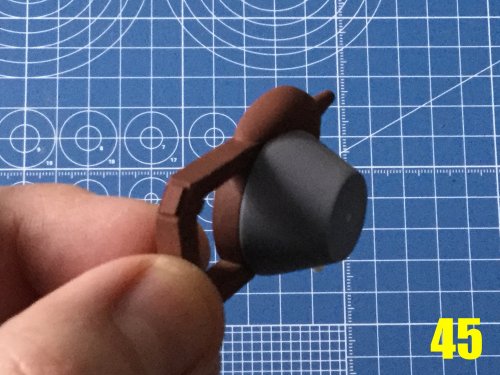
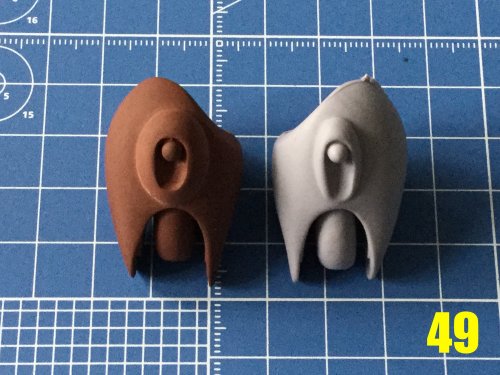
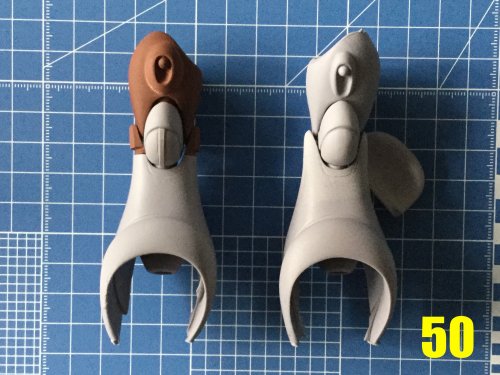
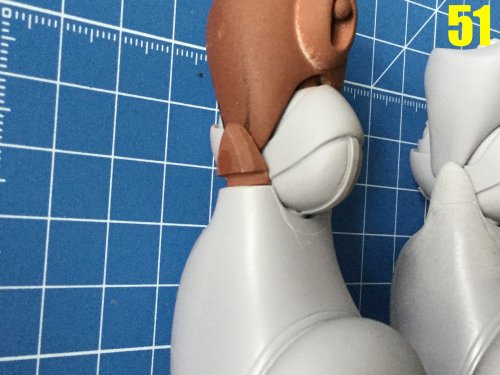
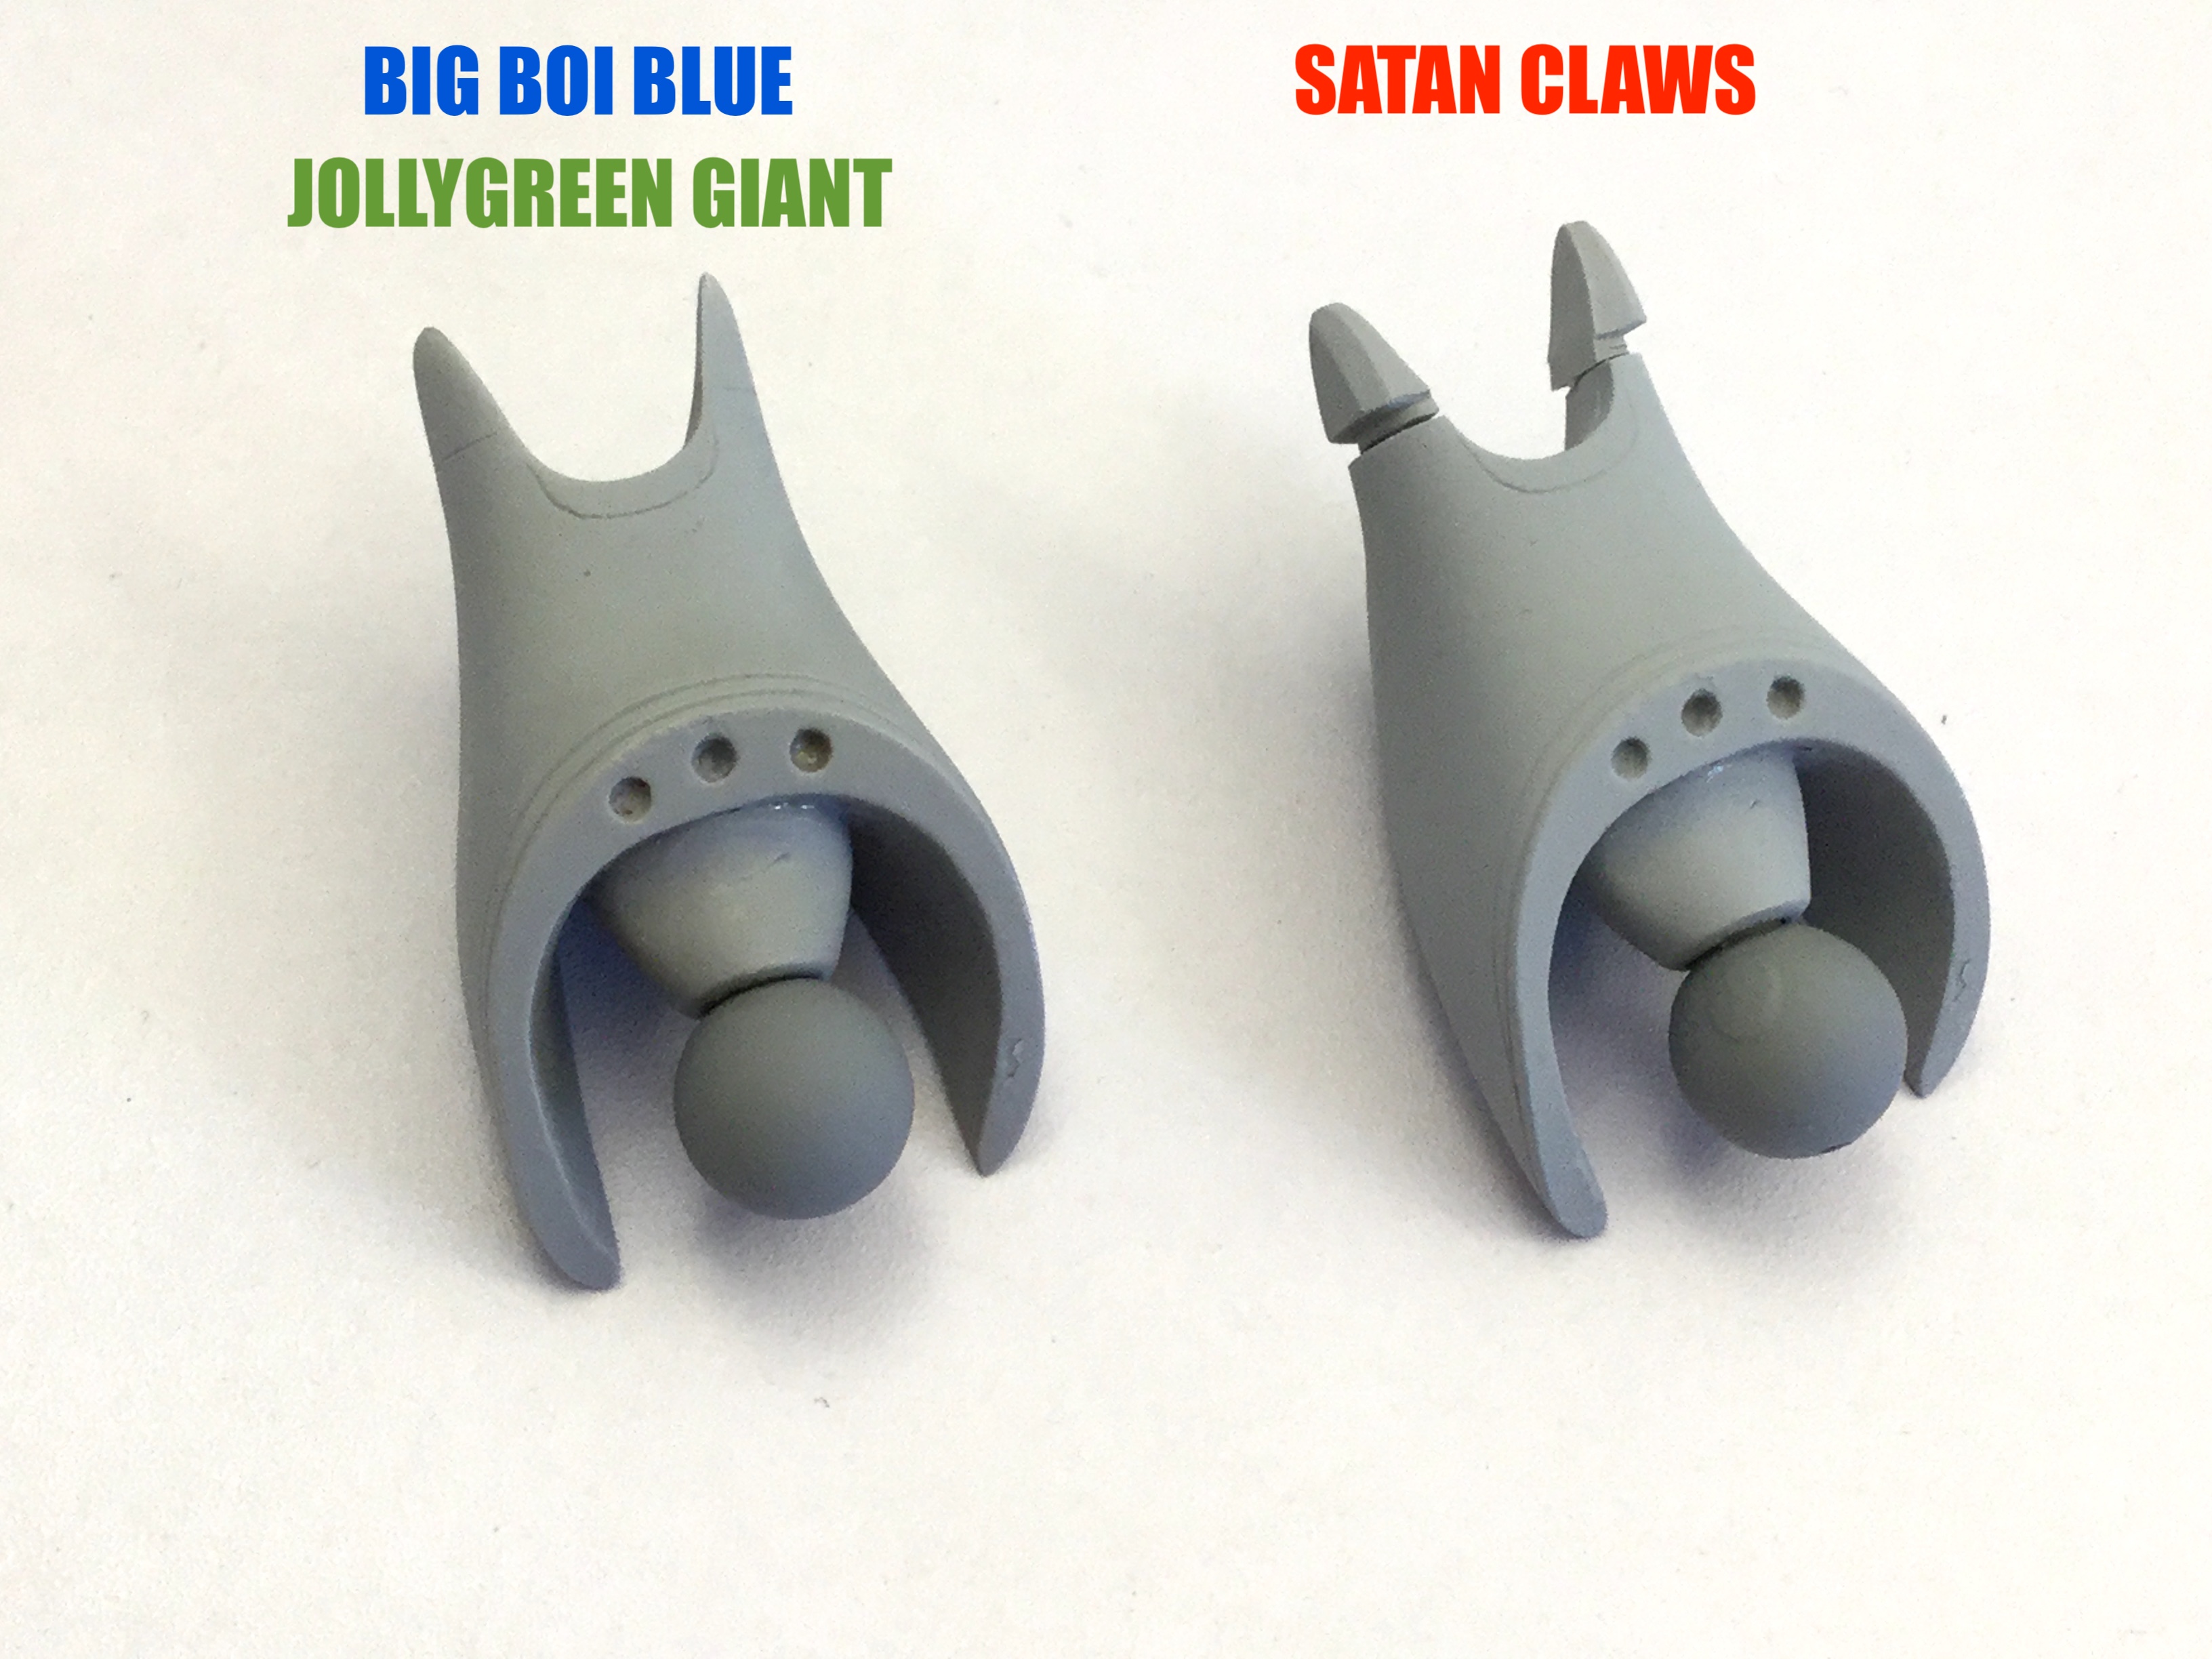
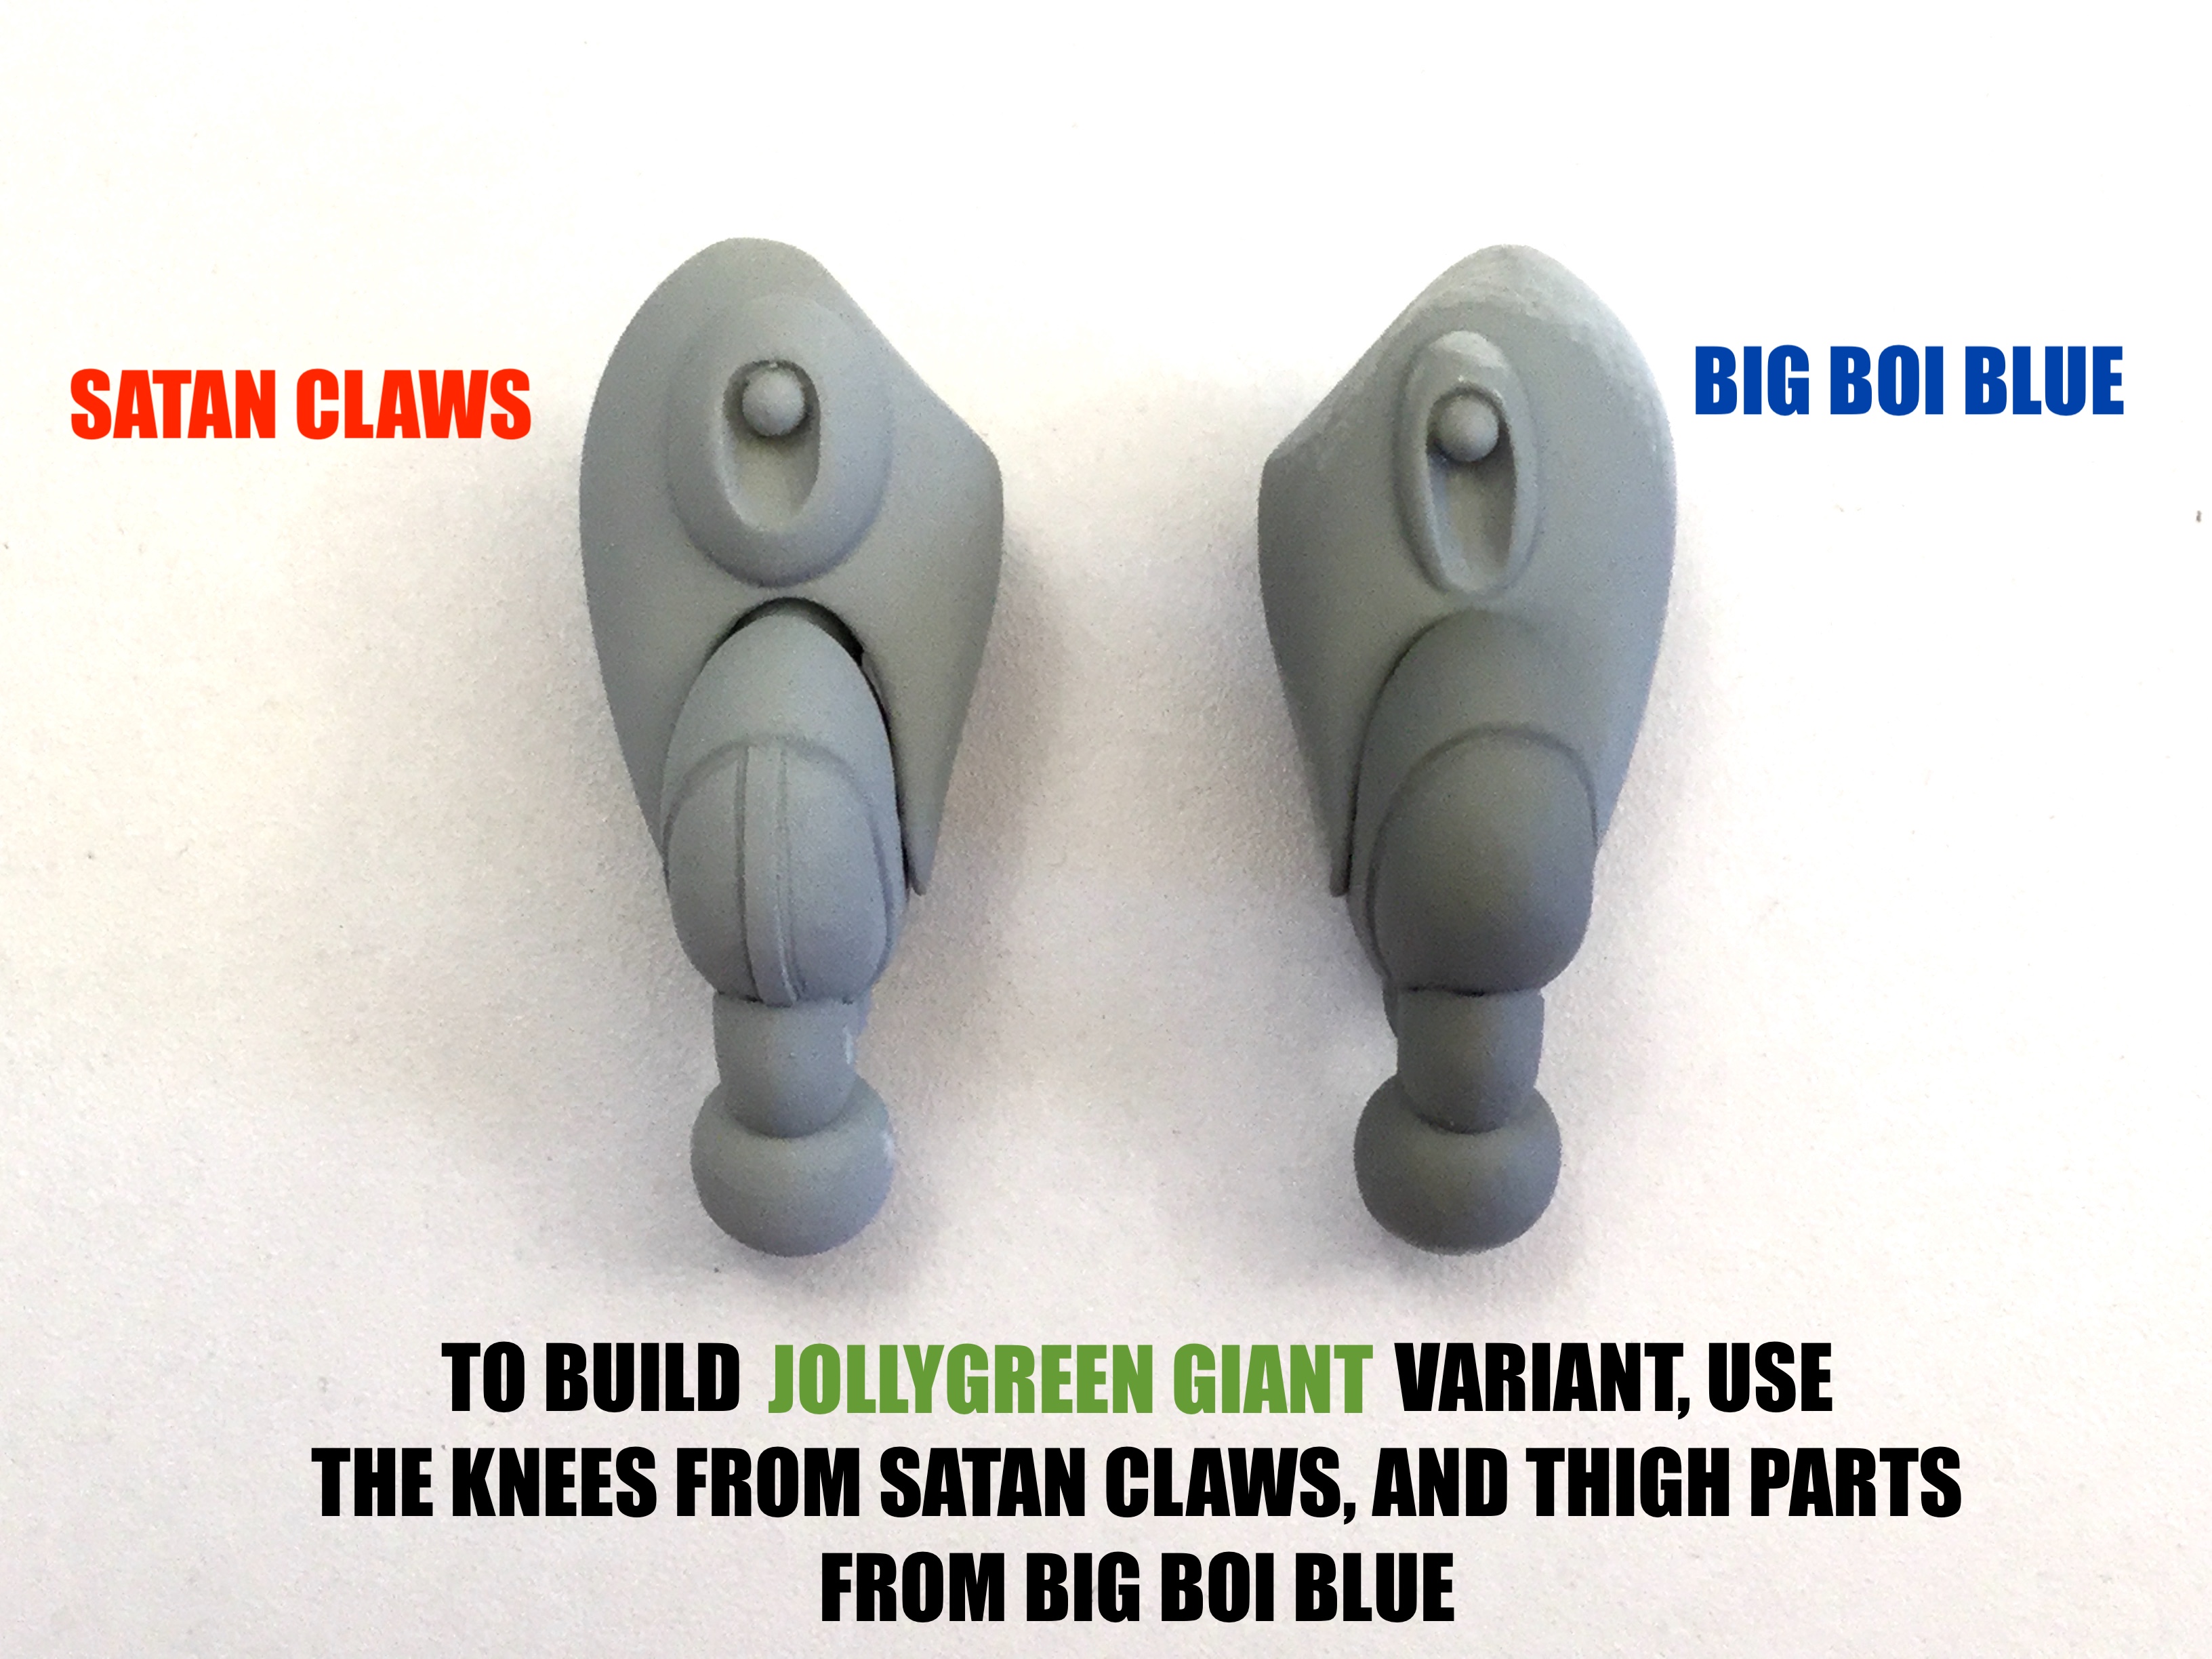
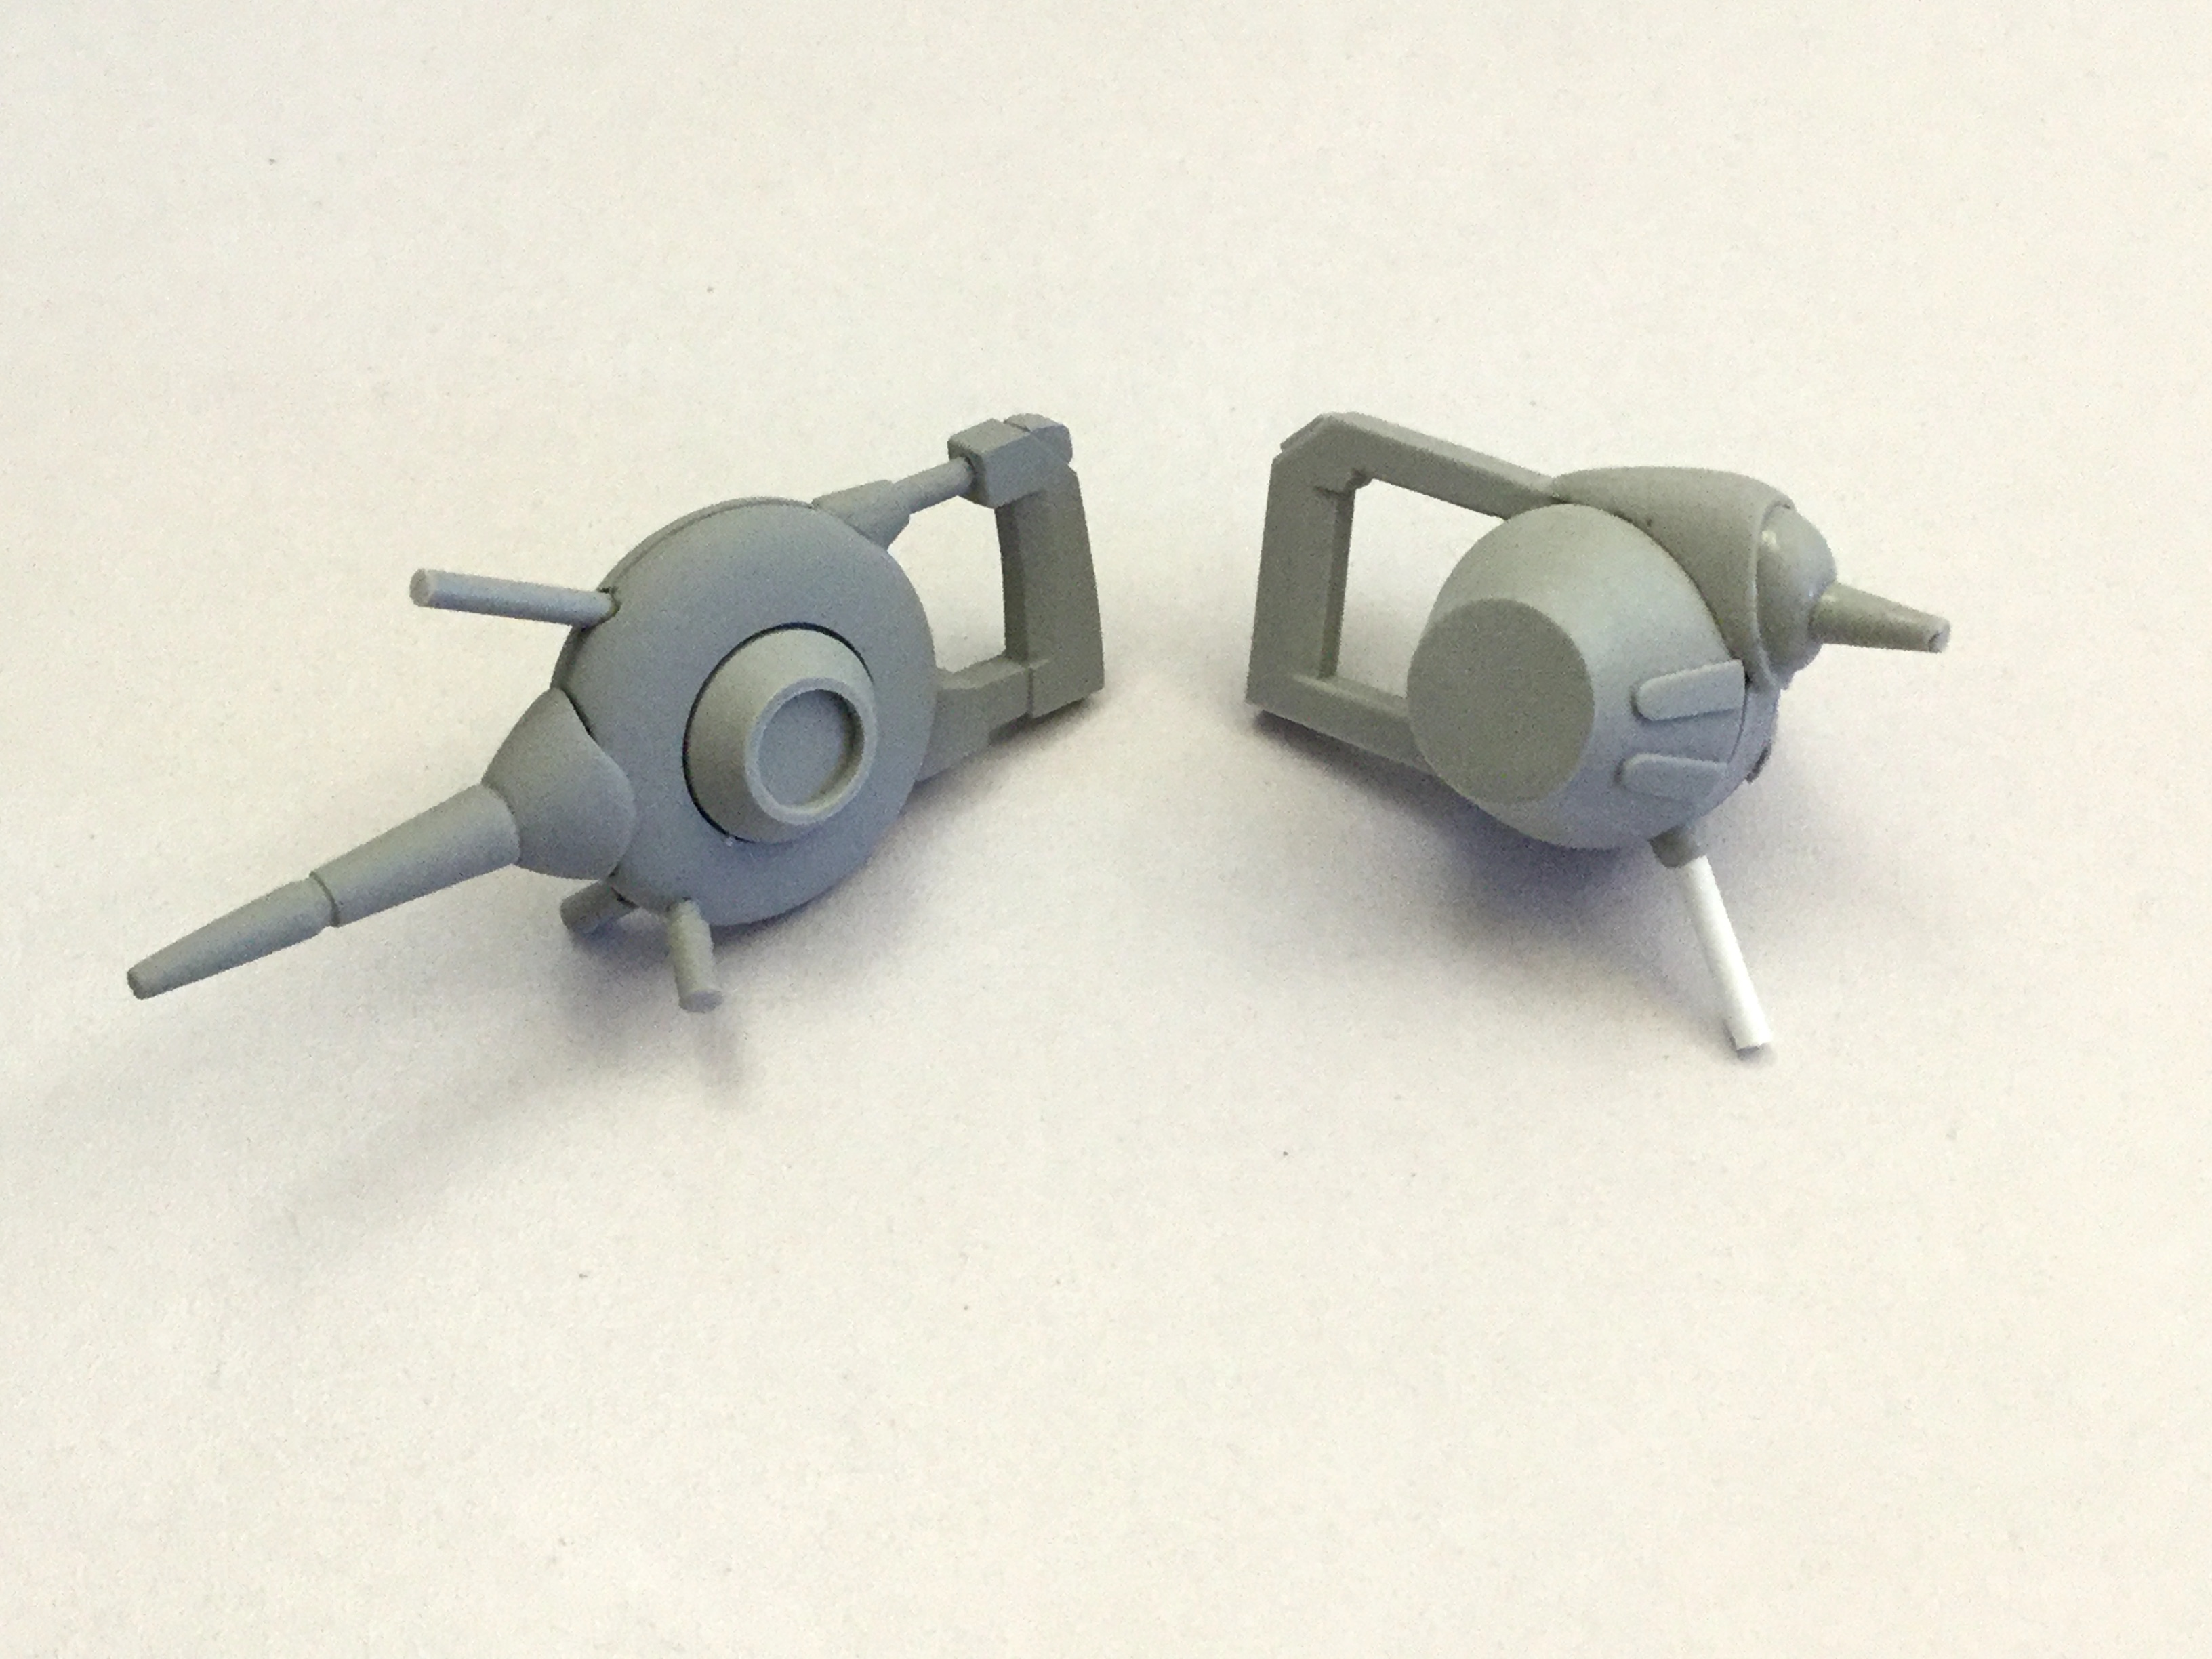
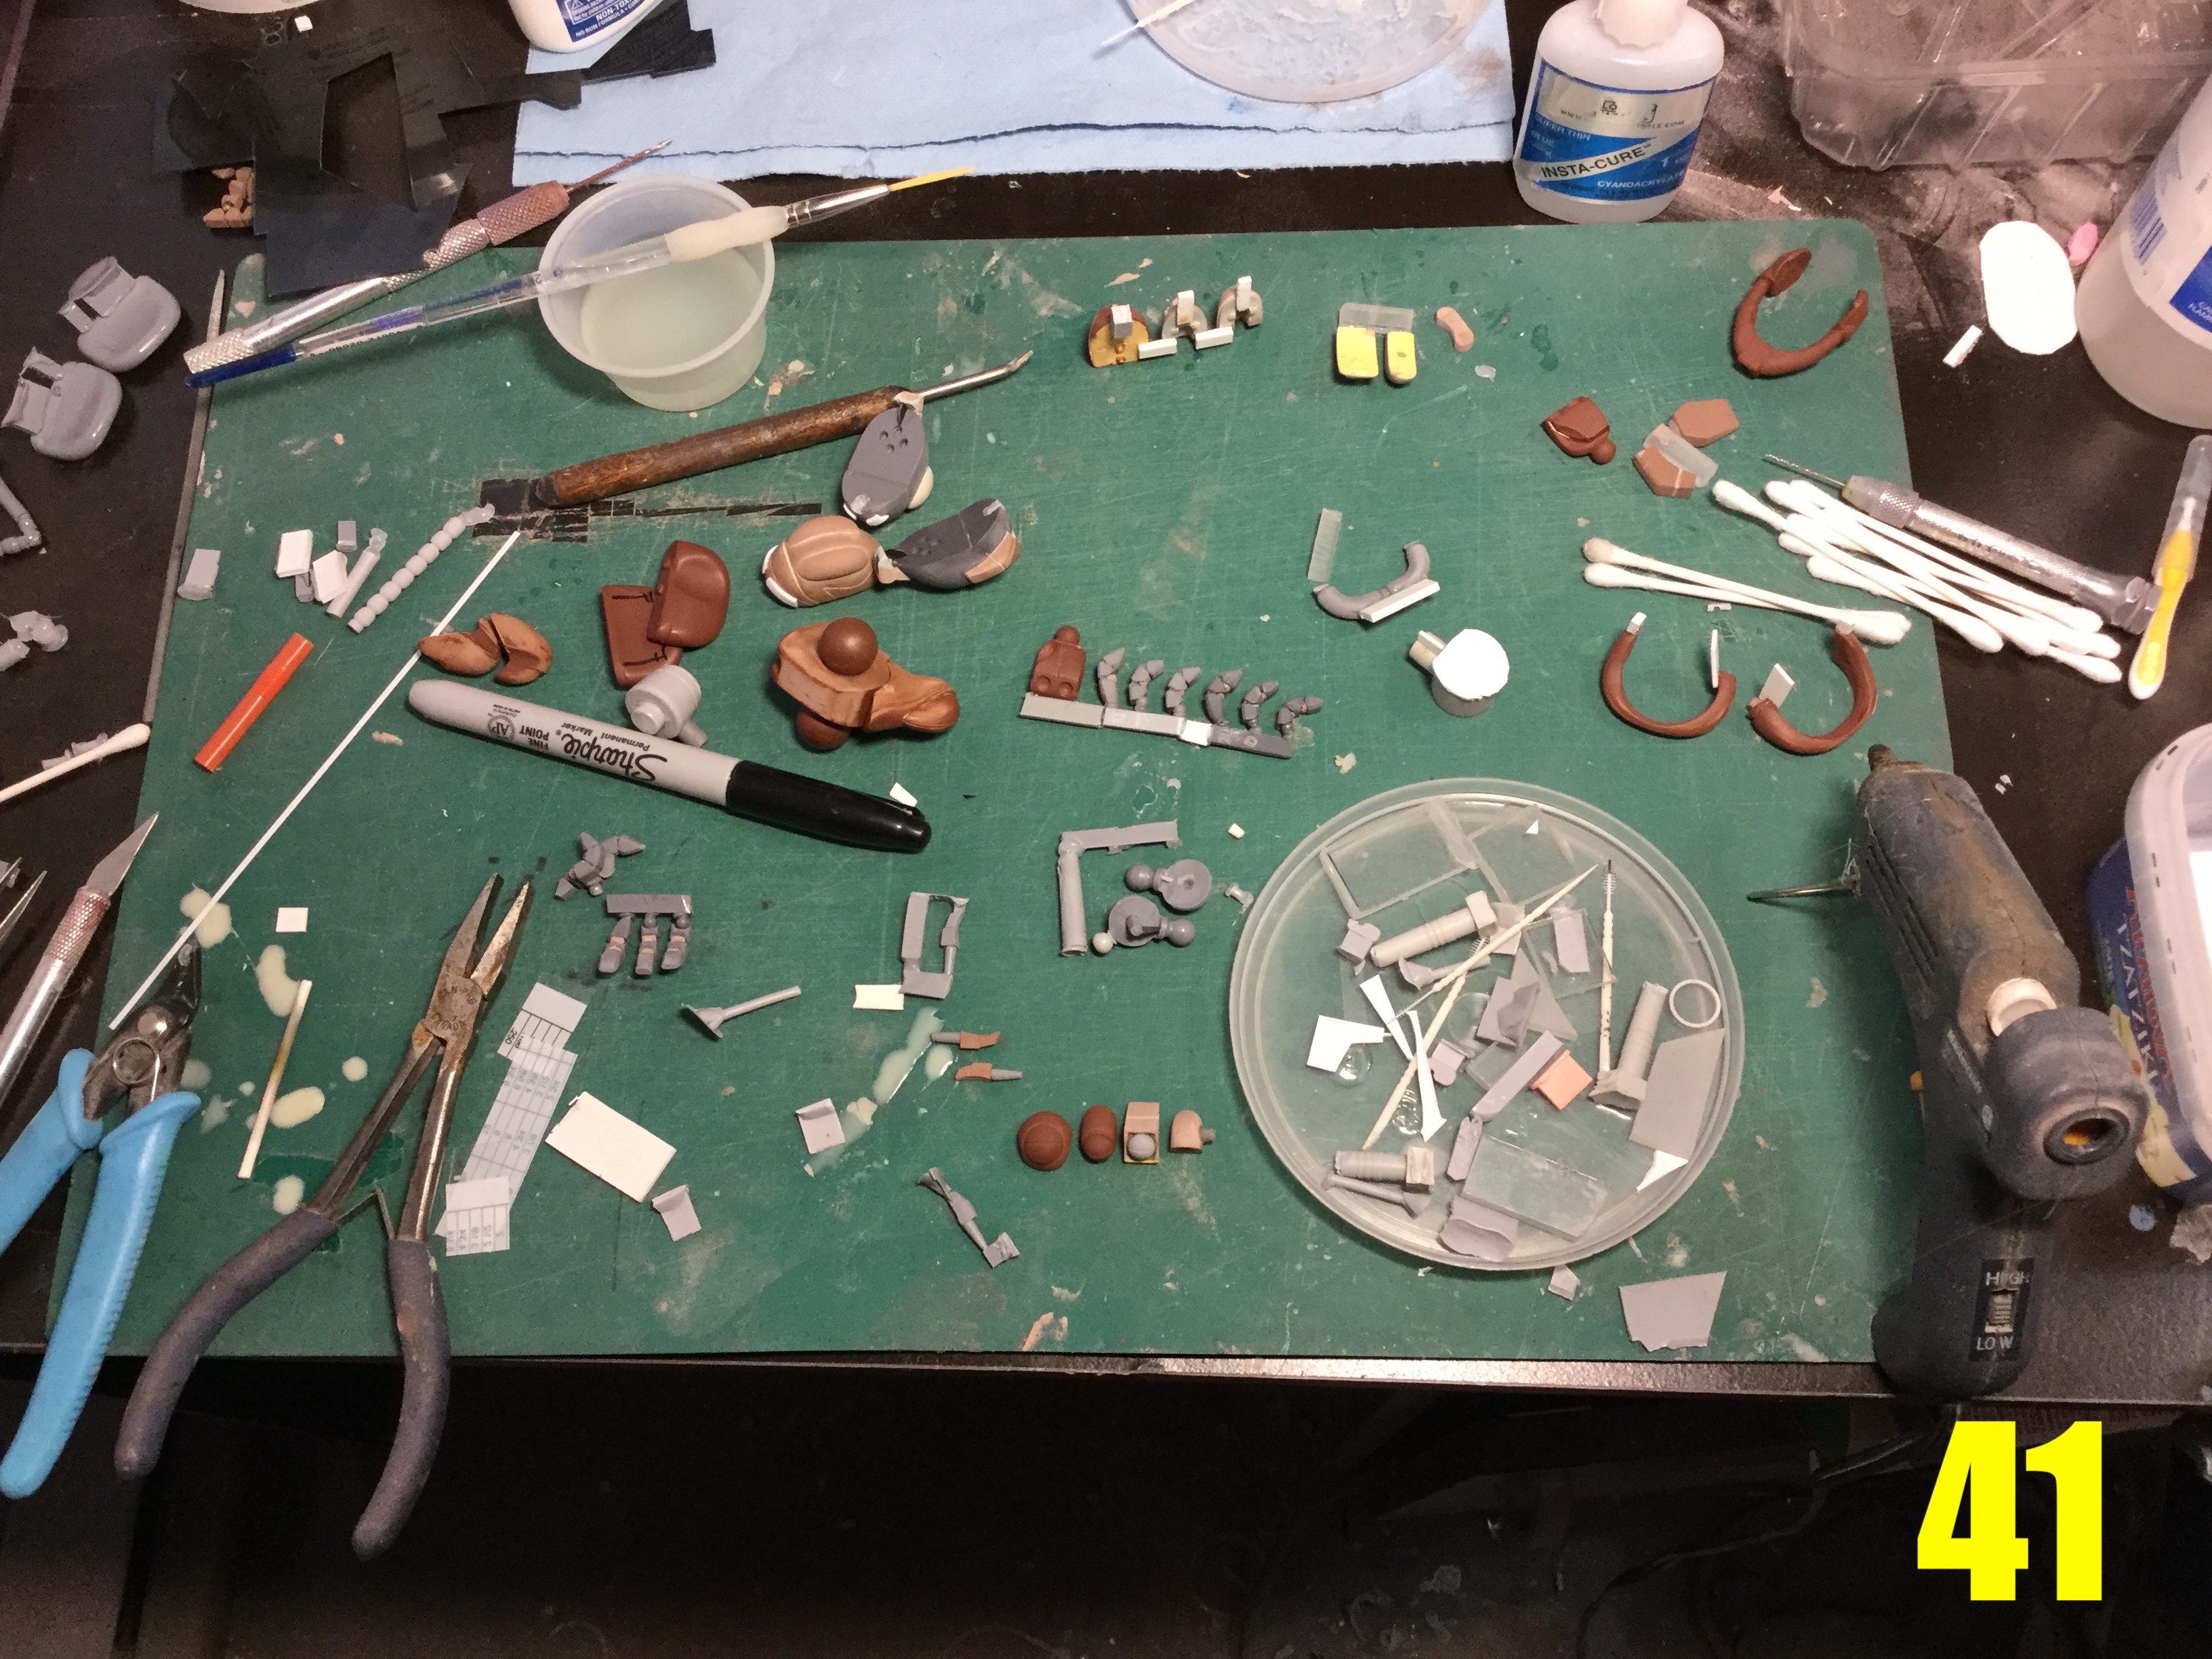
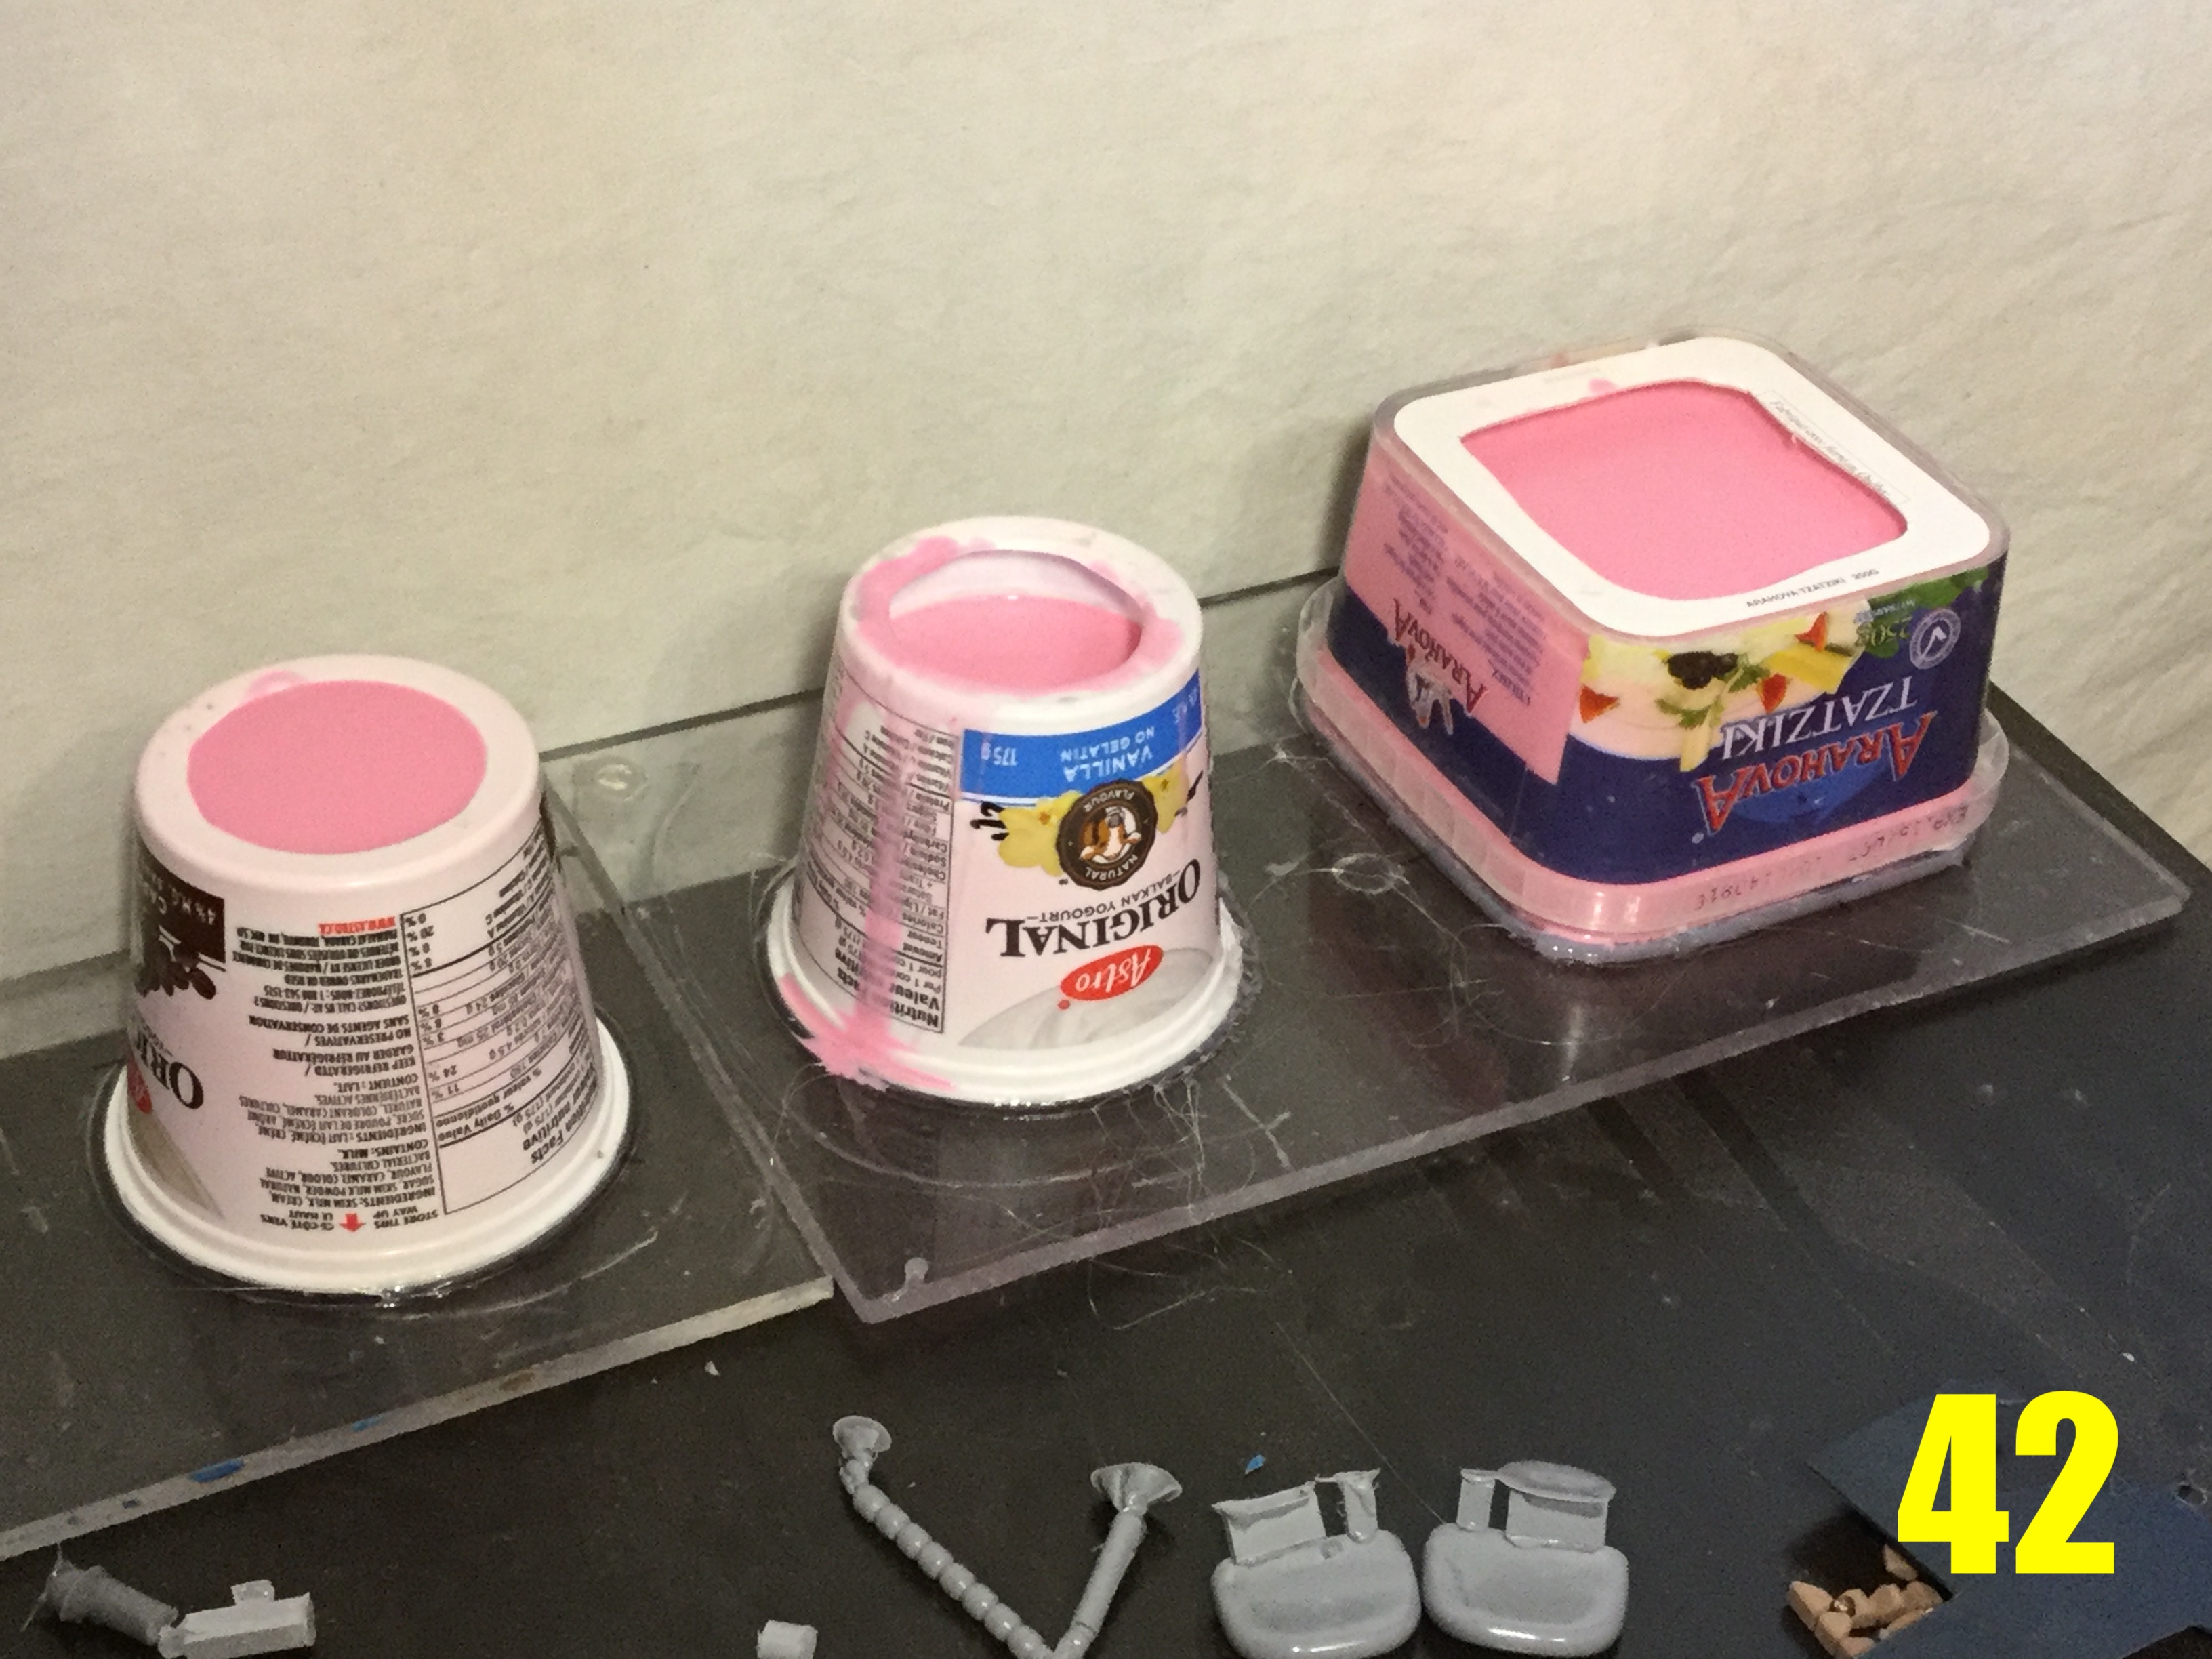
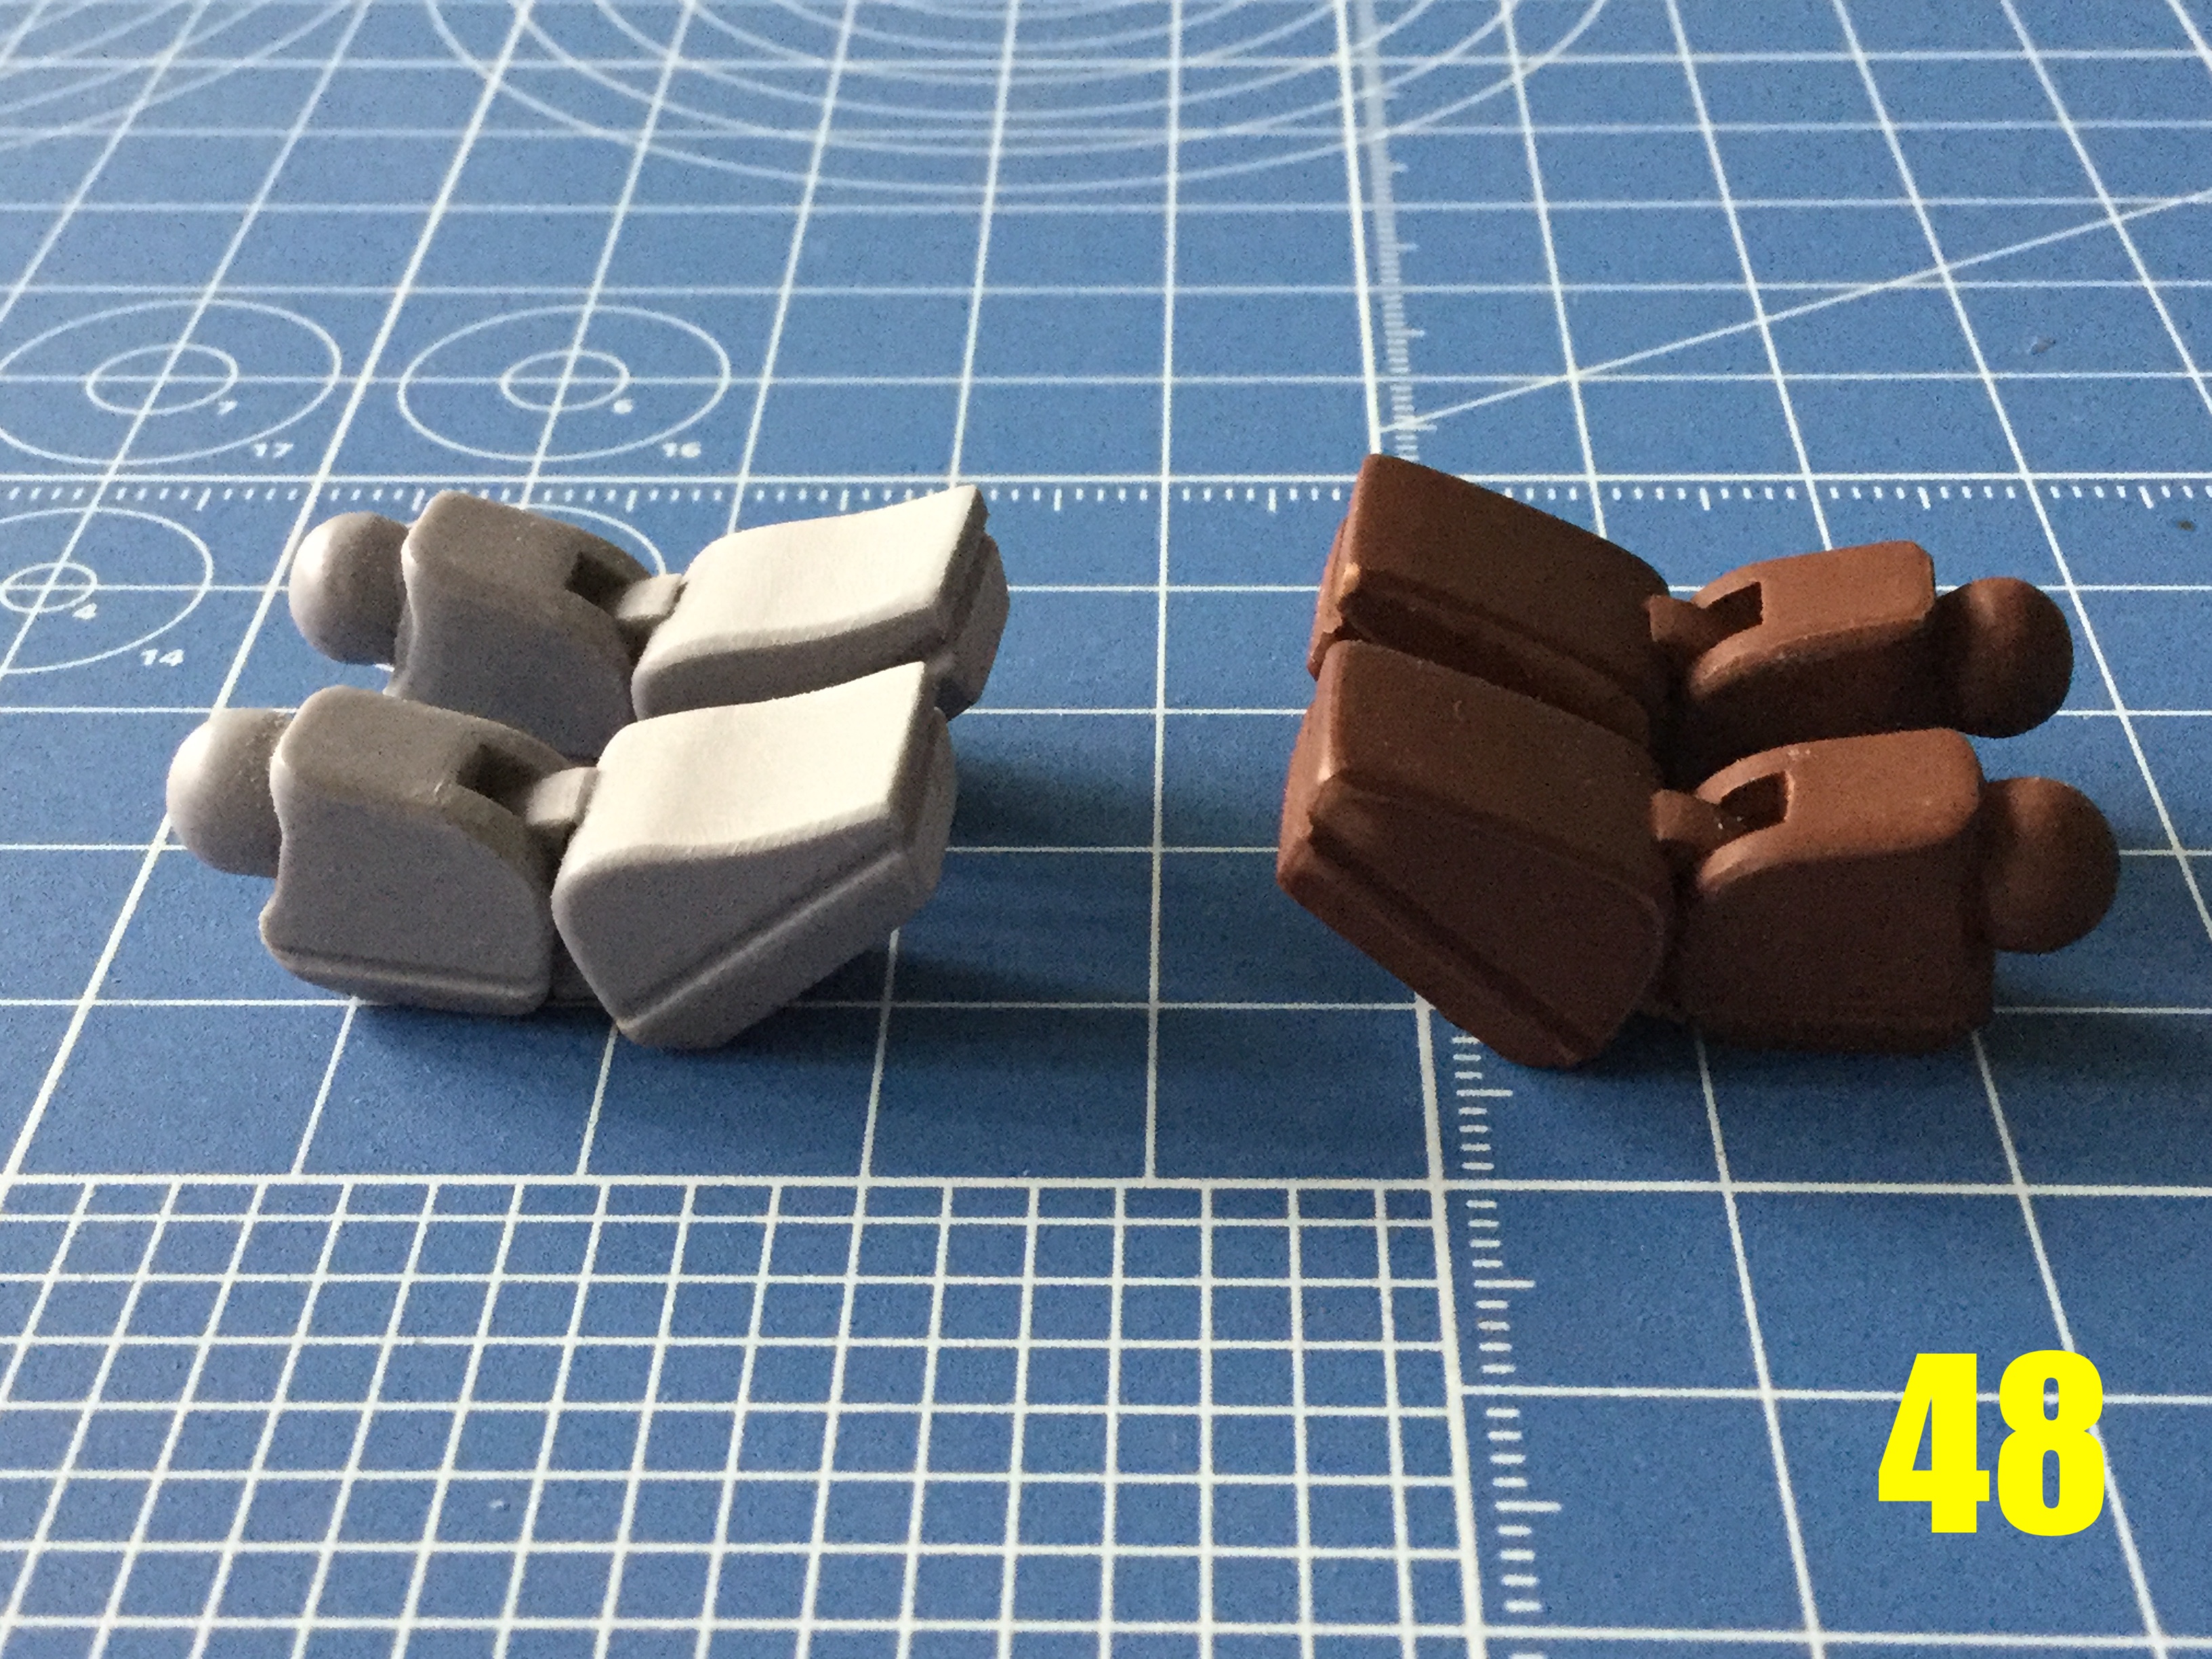
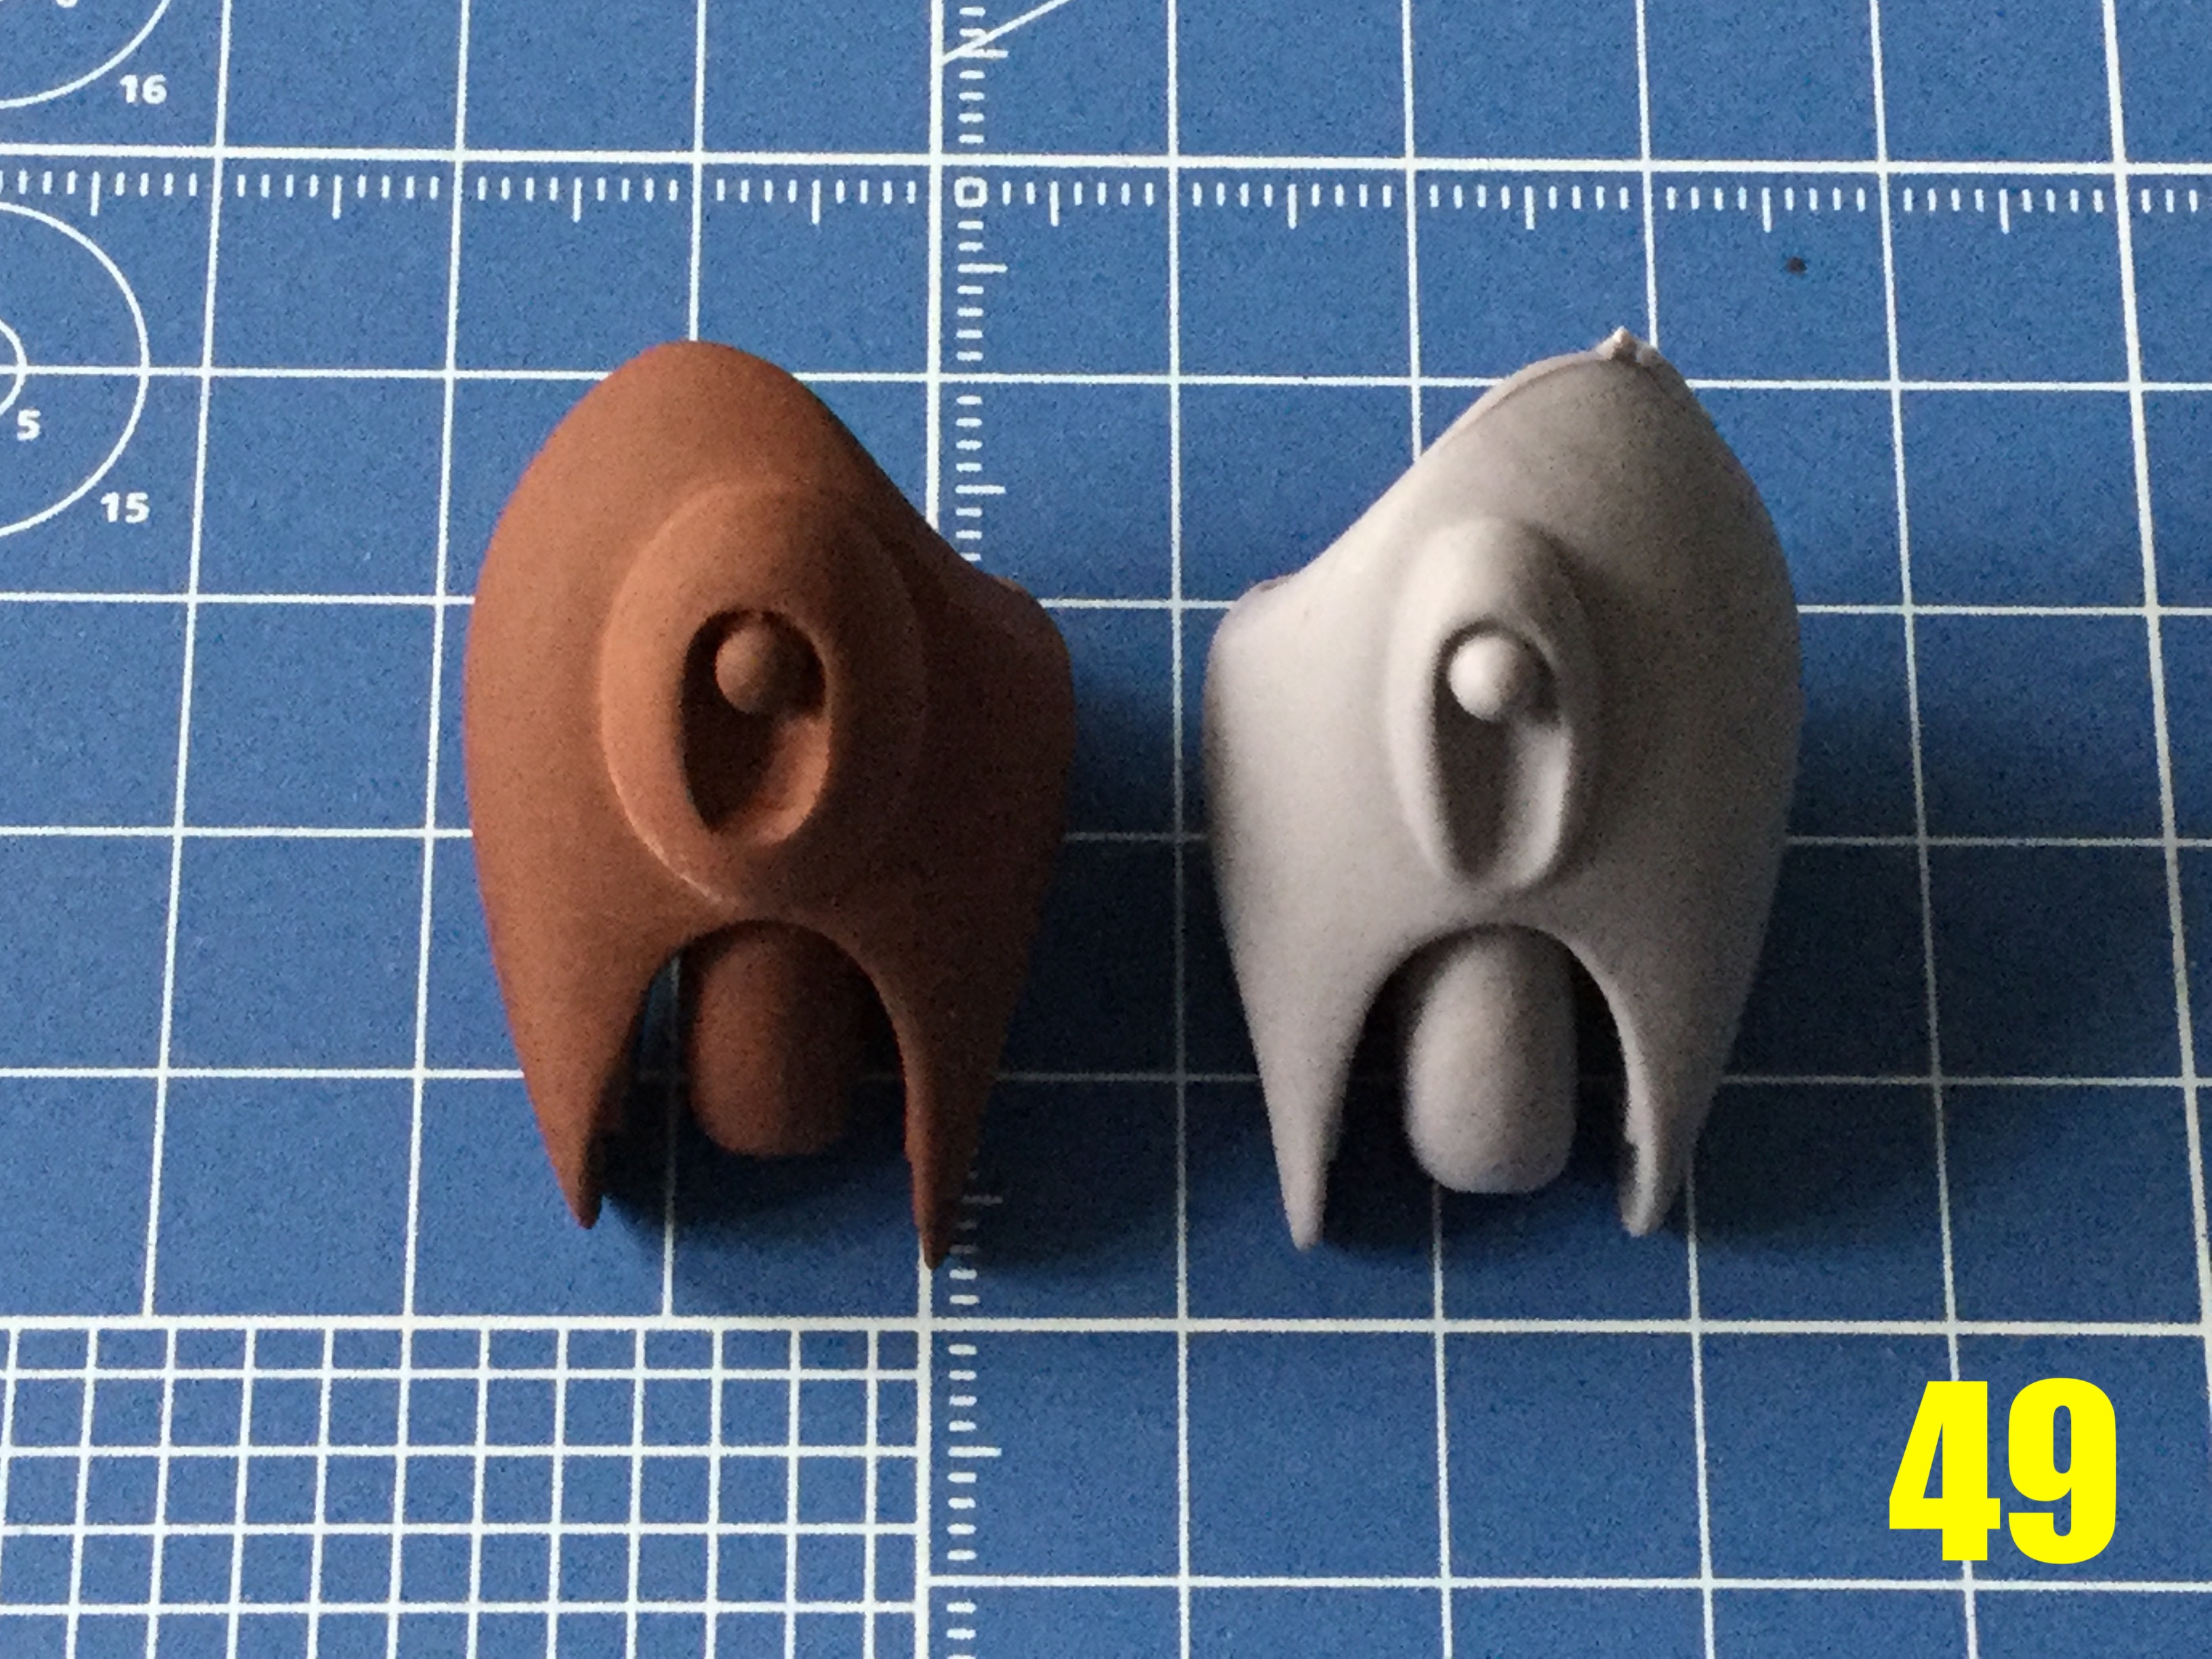
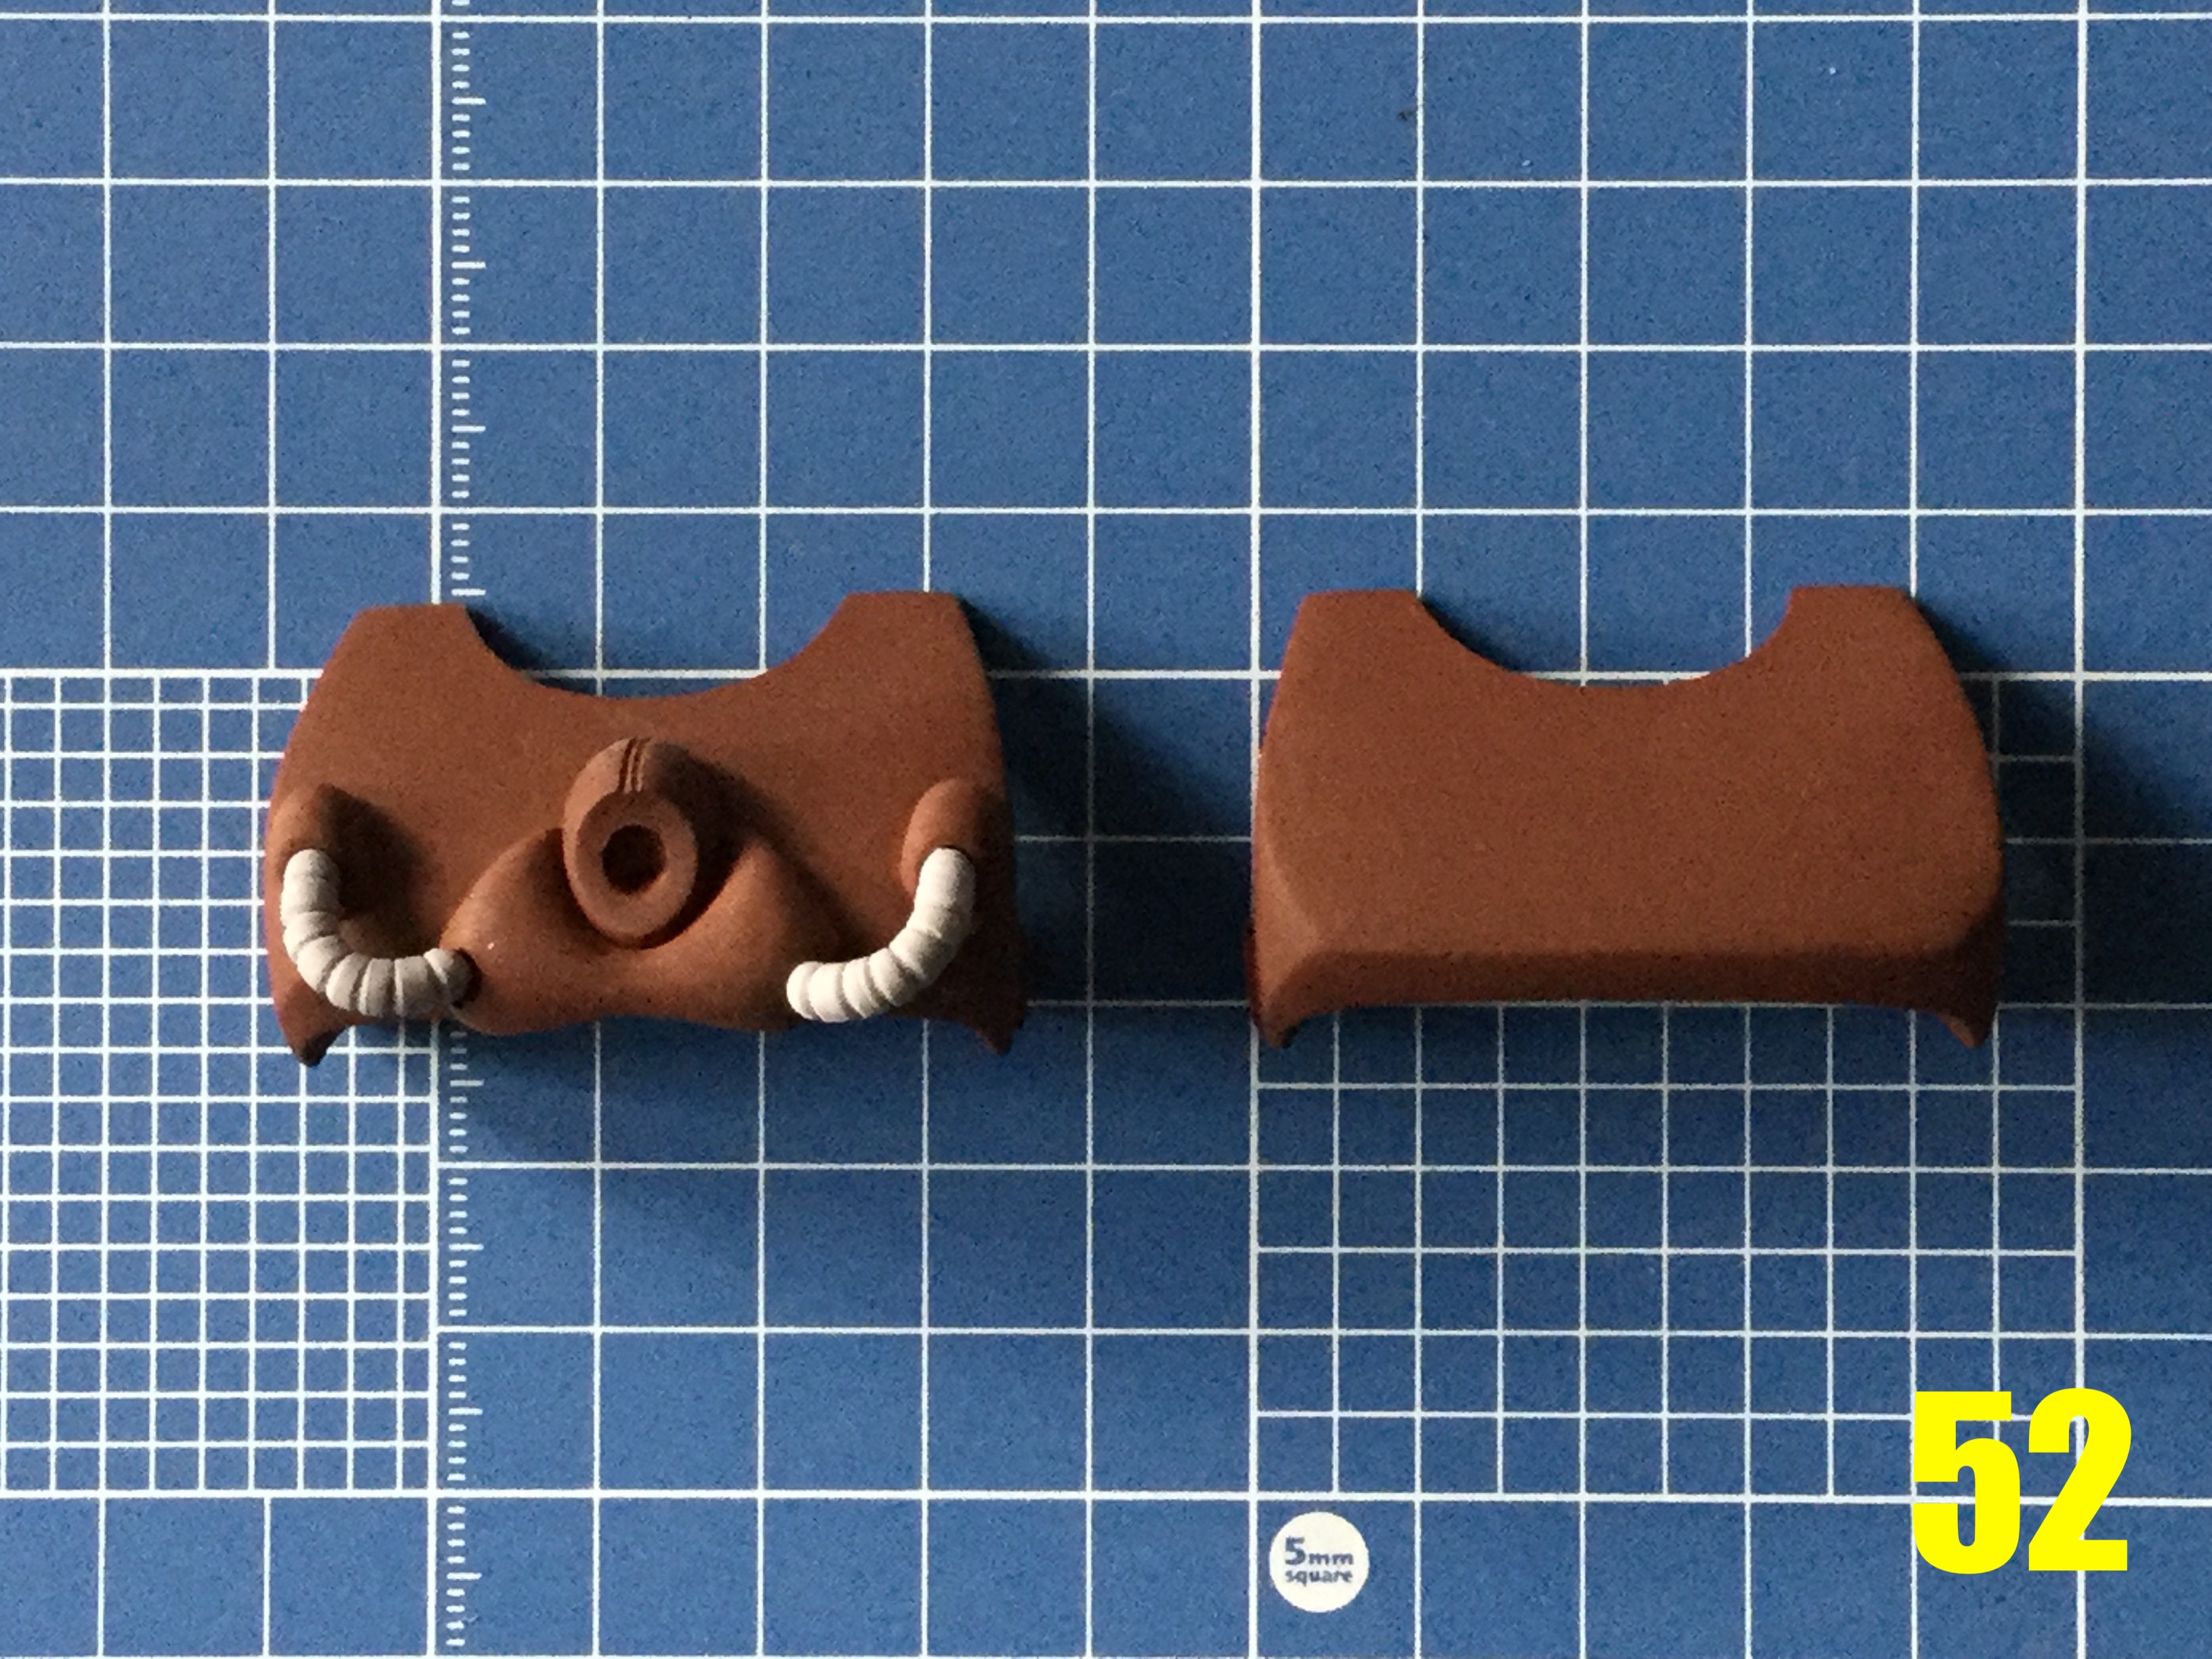
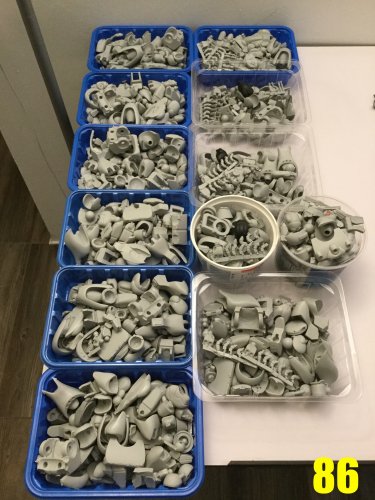
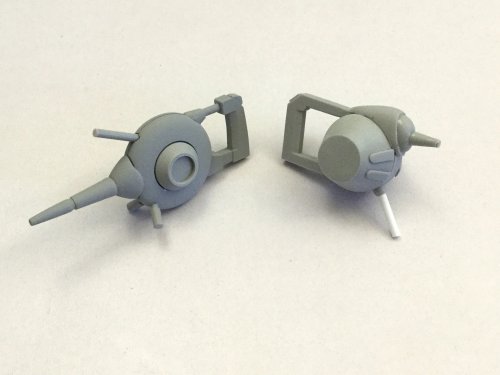
captain america replied to captain america's topic in Anime or Science Fiction
Captain’s Log: March 10th, 2021. After my ‘eventful’ mold-making experience from last week, I’m happy to say that things are now back to normal. Further, all the masters for the BIO-LLOYD figure are now complete, and once I get these next few molds out of the way, I’ll be able to dedicate myself to the completion of the hover-sled. To say that this project is an exercise in tediousness and patience is to state the obvious. Pic 41 shows my molding station, and all the fingers, tiny bloobs, pitot thingies, and other bits that need to be molded. The extra effort comes from not only the addition of all those tiny bits, but then those bits have to be molded, cast, and then modified to suit LLOYD’s different variants, as we will see soon enough. Pic 42: good ol’ trustworthy pink mold silicone is back! Pic 43: believe it or not, this is only about 3/4 of all the molds needed—JUST FOR THE MECHA! Blasters, hands, visor domes and sled parts not included. Speaking of blasters, pics 44 and 45 show the drum weapon masters, while 46 and 47 show the weapon used by Seifreet’s unit (hereafter refered to as SATAN CLAWS.) Now back to the BIO-LLOYD variations, you can see the different toes required in pic 48. Based on the soure material, the toes for the blue unit have a different slope than for the other two versions, so I had to make those. Could I have chalked-up the differences to variations in the penmanship of the illustrator? Probably, but it they looked sufficiently different to me, and I wasn’t about to cut corners. Same goes for the thighs in pic 49. On the left is the SATAN CLAWS version, which has a different blob on it than the other two variants. In pic 50, you can see that the thigh, knee, and even the upper part of the shin armor is different on the SATAN CLAWS variant. For the latter modification, you can simply trim the ‘ears’ on the shin and glue the variant parts as shown in pic 51. The chest module is no exception, as you can see in pic 52. Once again, SATAN CLAWS variant is on the left. The other two variants are simple enough that you need only glue the appropriate blobs in place. You have NO IDEA how utterly tedious and despair-inducing it was to machine those little hoses! For next week, it’s my intention to have one fully cast kit mocked-up so that you can see LLOYD in all his splendor. Wish me luck!