

PsYcHoDyNaMiX
-
Posts
1343 -
Joined
-
Last visited
Content Type
Profiles
Forums
Events
Gallery
Posts posted by PsYcHoDyNaMiX
-
-
DV Mustafar AE looks nice... limited to 4k, comments on fb groups were stating this is based more on the ROTS movie version while the Japan SWCelebration version was more like the Asoka series version based on the color of the eyes... 🧐
I think I only watched the Asoka series 1x and will have to rewatch it.
Anyhow... the eyes are swappable on both versions of the AE. Also swappable on the regular version, yet which is the only version that comes with blue and 'sith' eyes. -
2 hours ago, Froy said:
At this point a VF-22 would have been a better choise for Bandai.
A different head and modified belly plates would have been easier.
That gunpod mounting is totally wrong, you just can't remove it and no problem but that shows how halfa$$ed Bandai went with the 17.
Probably, but I'm thinking Bandai was looking for a product for regular retail release not a lottery/premium bandai release. Bandai would also need to figure out what to do or re-design the entire undersection with the belly plates as the VF22's design/line art would've be broken up with the current transforming sections for the YF21. Or do something else/simple like the conversion project I did and just make VF22S belly plates.
1 hour ago, jenius said:MMmmmmmm but the gunpod mounting would almost certainly be totally wrong on a VF-22 also right? That YF-21 toy is not good... hard to imagine how a VF-22 made from it would be any better than a VF-17 made from the VF-171.
Yea, not sure how Bandai would even attempt the internal gunpod mounting for the VF22S. But being Bandai, they'll just slap/leave them on the bottom just where the YF21 has it currently and if we're lucky Bandai will make some small adjustments so they don't droop.
Enough off topic talk from me, lol. -
31 minutes ago, 26662 said:
My Lucifer just arrived. Are the shoulders assembled incorrectly on all of the revivals? Can one tell just by looking at the underside?
Unfortunately it cannot be determined just by looking at the underside. It would need to be transformed into armless gerwalk mode (legs down) to reveal the sides of the shoulders at the very least.
-
46 minutes ago, Graham said:
I wonder if a lot of Japanese Macross fans are complaining about the DX VF-17S design?
I'm wondering if Japanese local stores still have it available (PO sales reflecting demand). (I'm aware the following ship internationally*) I checked Hobbysearch and the PO is sold out (while the VF19K is available), hlj still has the VF17S available, so does AmiAmi.
-
I don't keep up with Metal Robot Spirits, but the MRS Z Plus A1 (Test Image Color) got listed on PBUS:
https://p-bandai.com/us/item/F2842380001

EDIT: Okay, I see that they've (PBUS) listed the A1/A2 (C1/C2 Compatible Ver.) in the past:
https://p-bandai.com/us/item/F2743613001As well as the Z Gundam III version:
https://p-bandai.com/us/item/F2631686001 -
20 minutes ago, borgified said:
@PsYcHoDyNaMiX post makes it easier to understand honestly, the pic from Bandai doesn't do squat for me as I still didn't understand it.
Take your time on getting the review in the Revival 27 in deck @jenius, I wanted to see an overall complete comparison of all the 27y done together, Maybe its a lack of interest that I have not seen a review of the Revival 27 yet (Mark H's crap quick review in it doesn't do me favours at all).
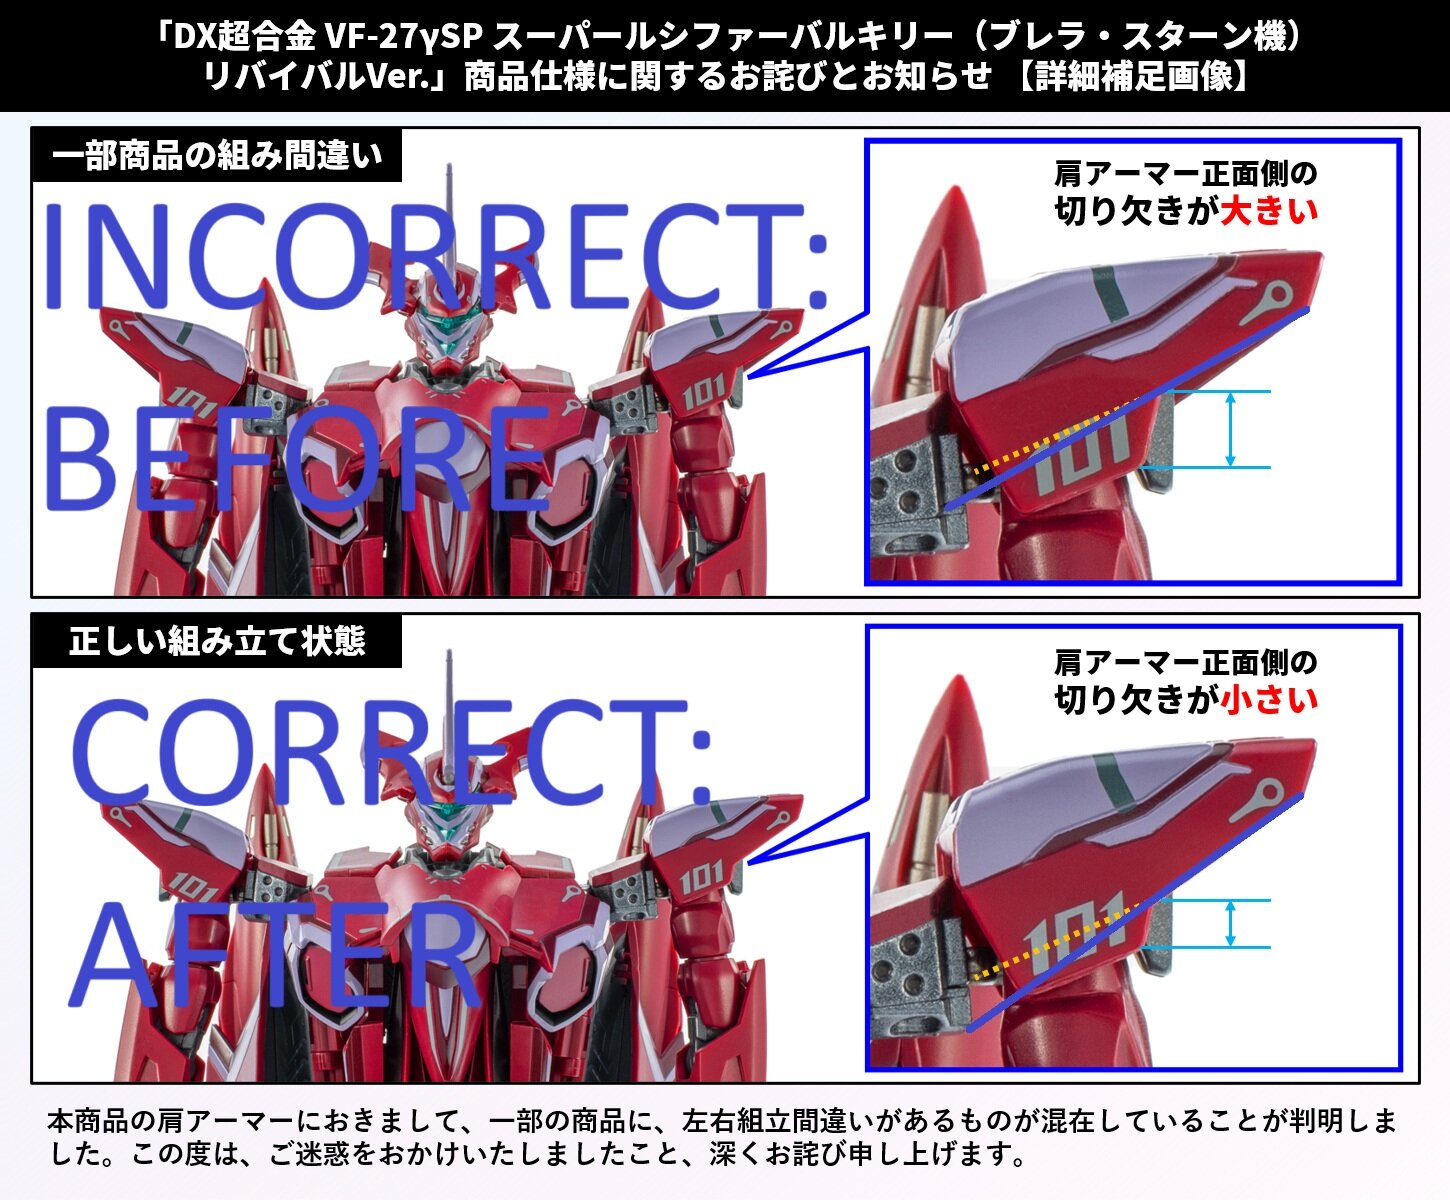
Yea... I was only able to determine the sections/spacing were different from Bandai's picture at first (even with the translations) and was not sure of the exact issue otherwise, until @PointBlankSniper elaborated on the issue (that parts needed to be switched (L to R).
-
1 hour ago, Graham said:
New swag just arrived.😊
NICE swag!
-
27 minutes ago, Marcion said:
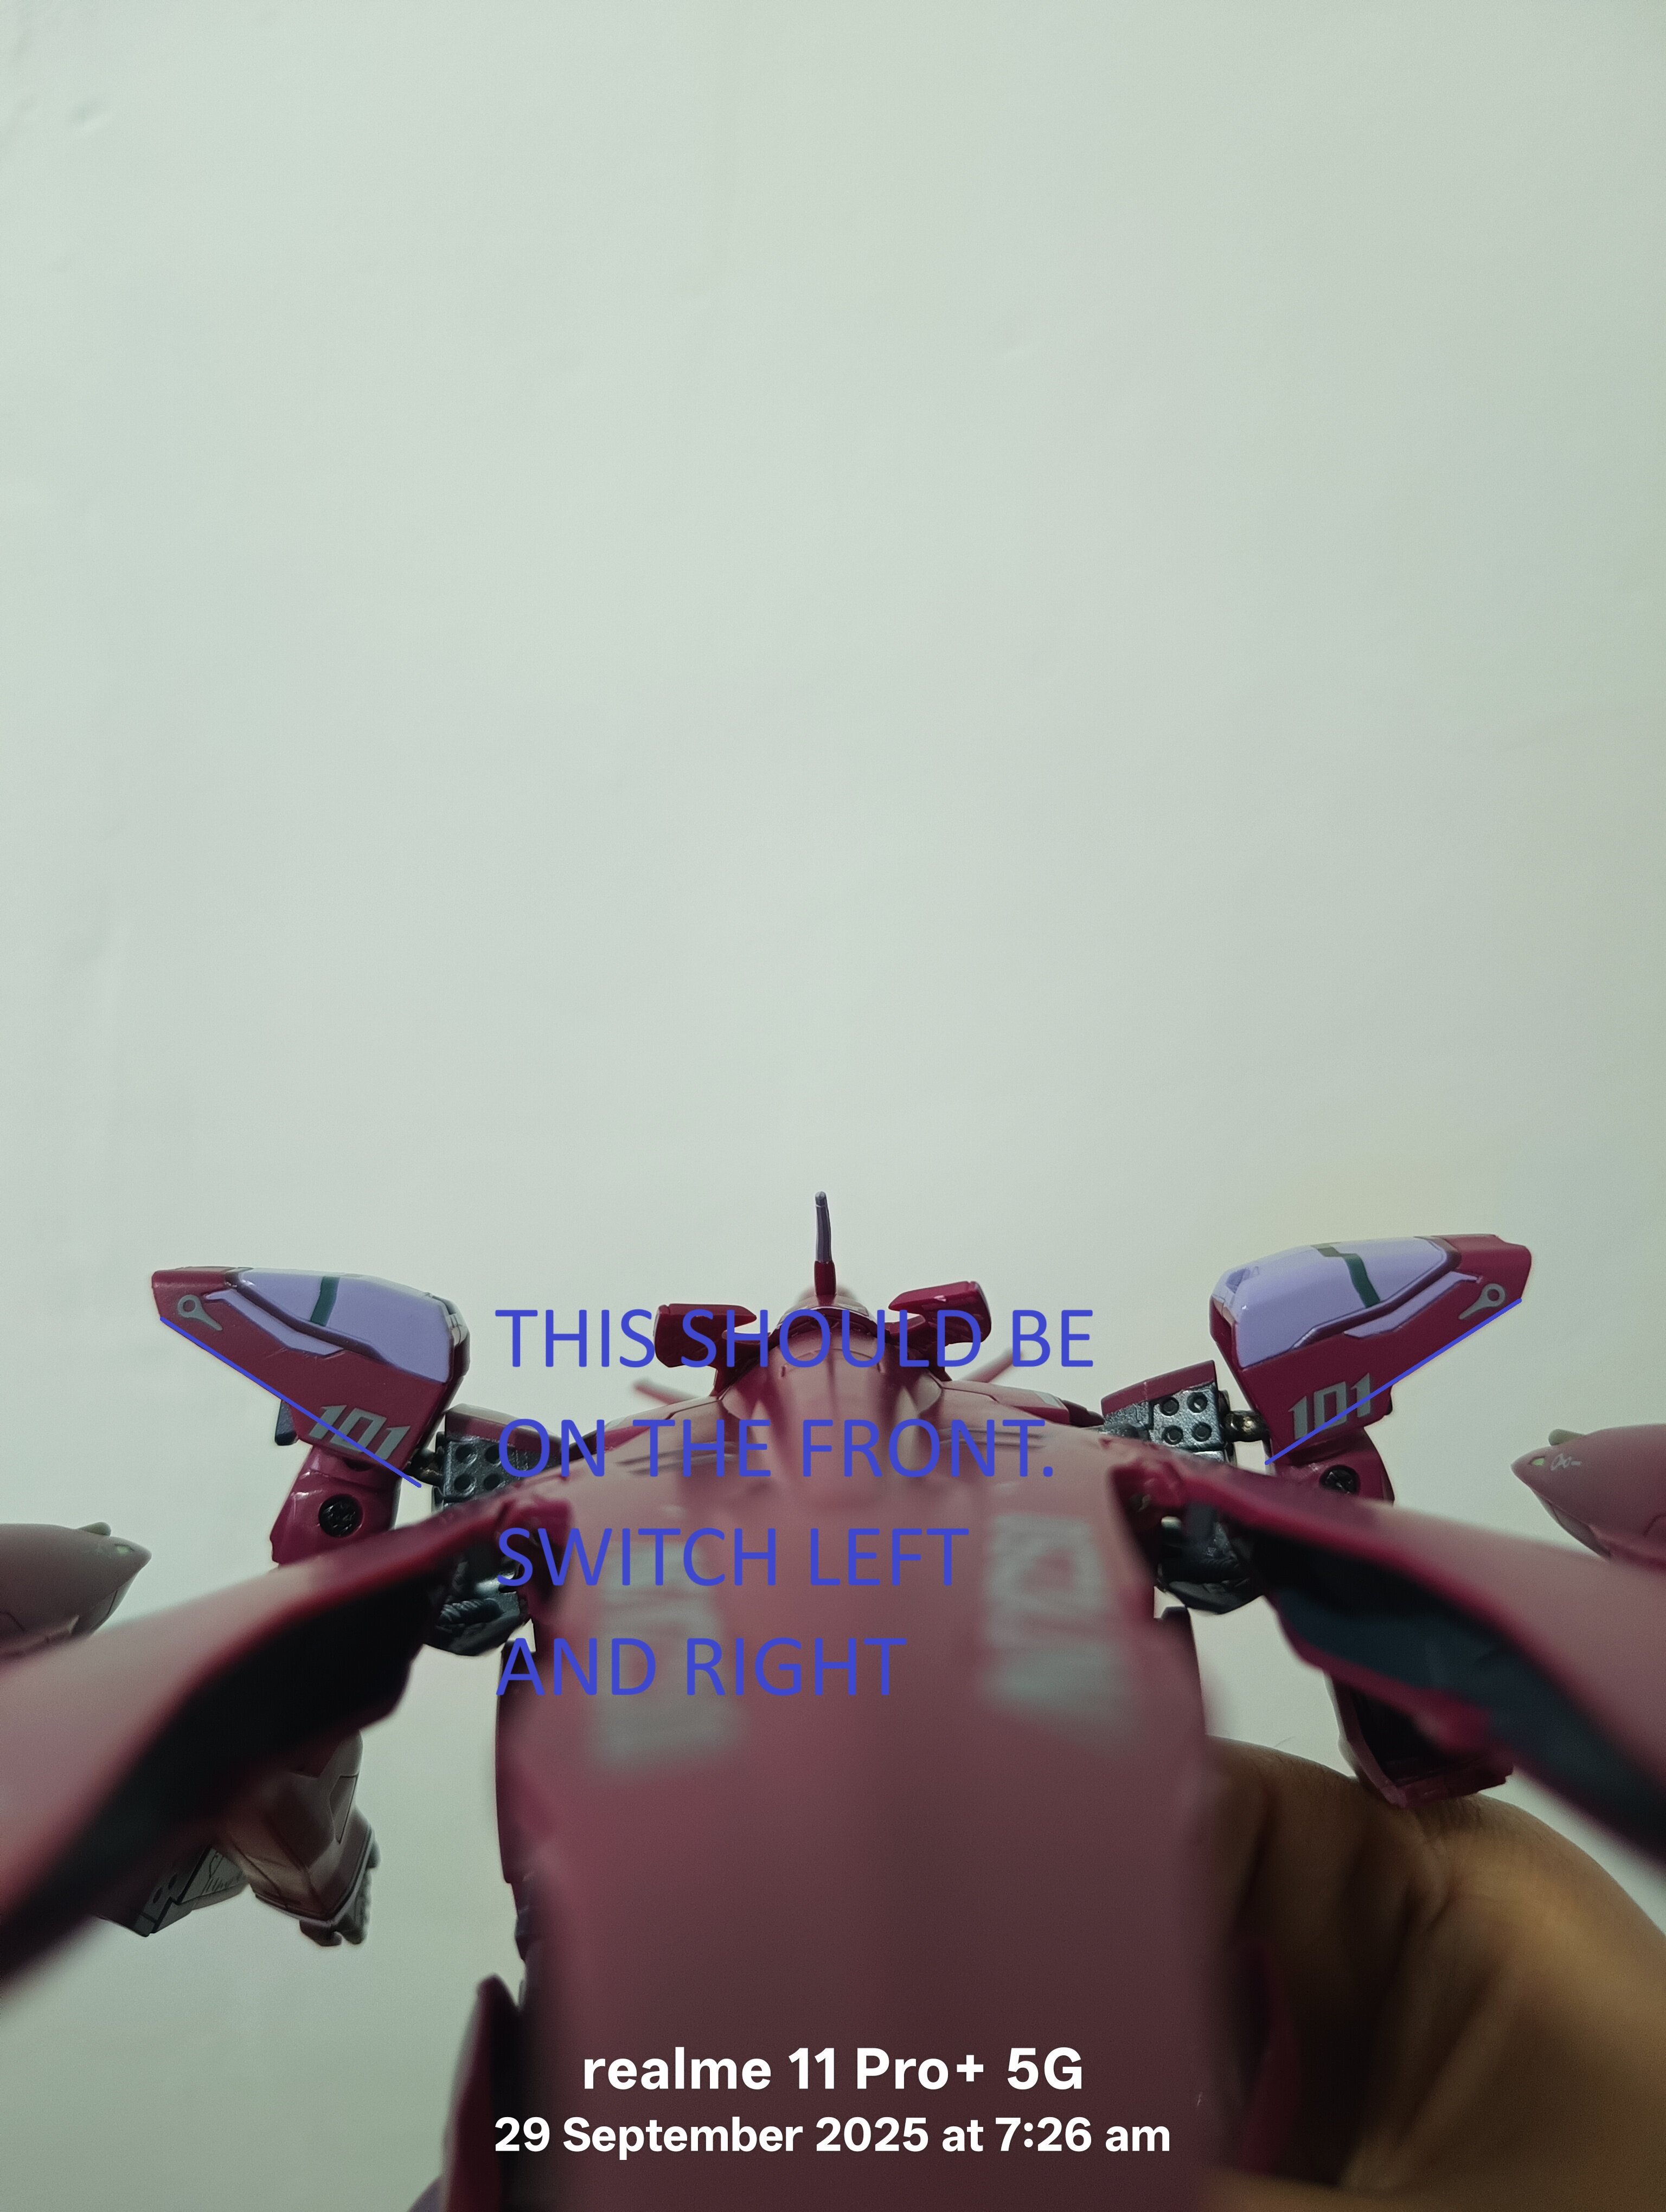
But I look at the back side also same as Infront.
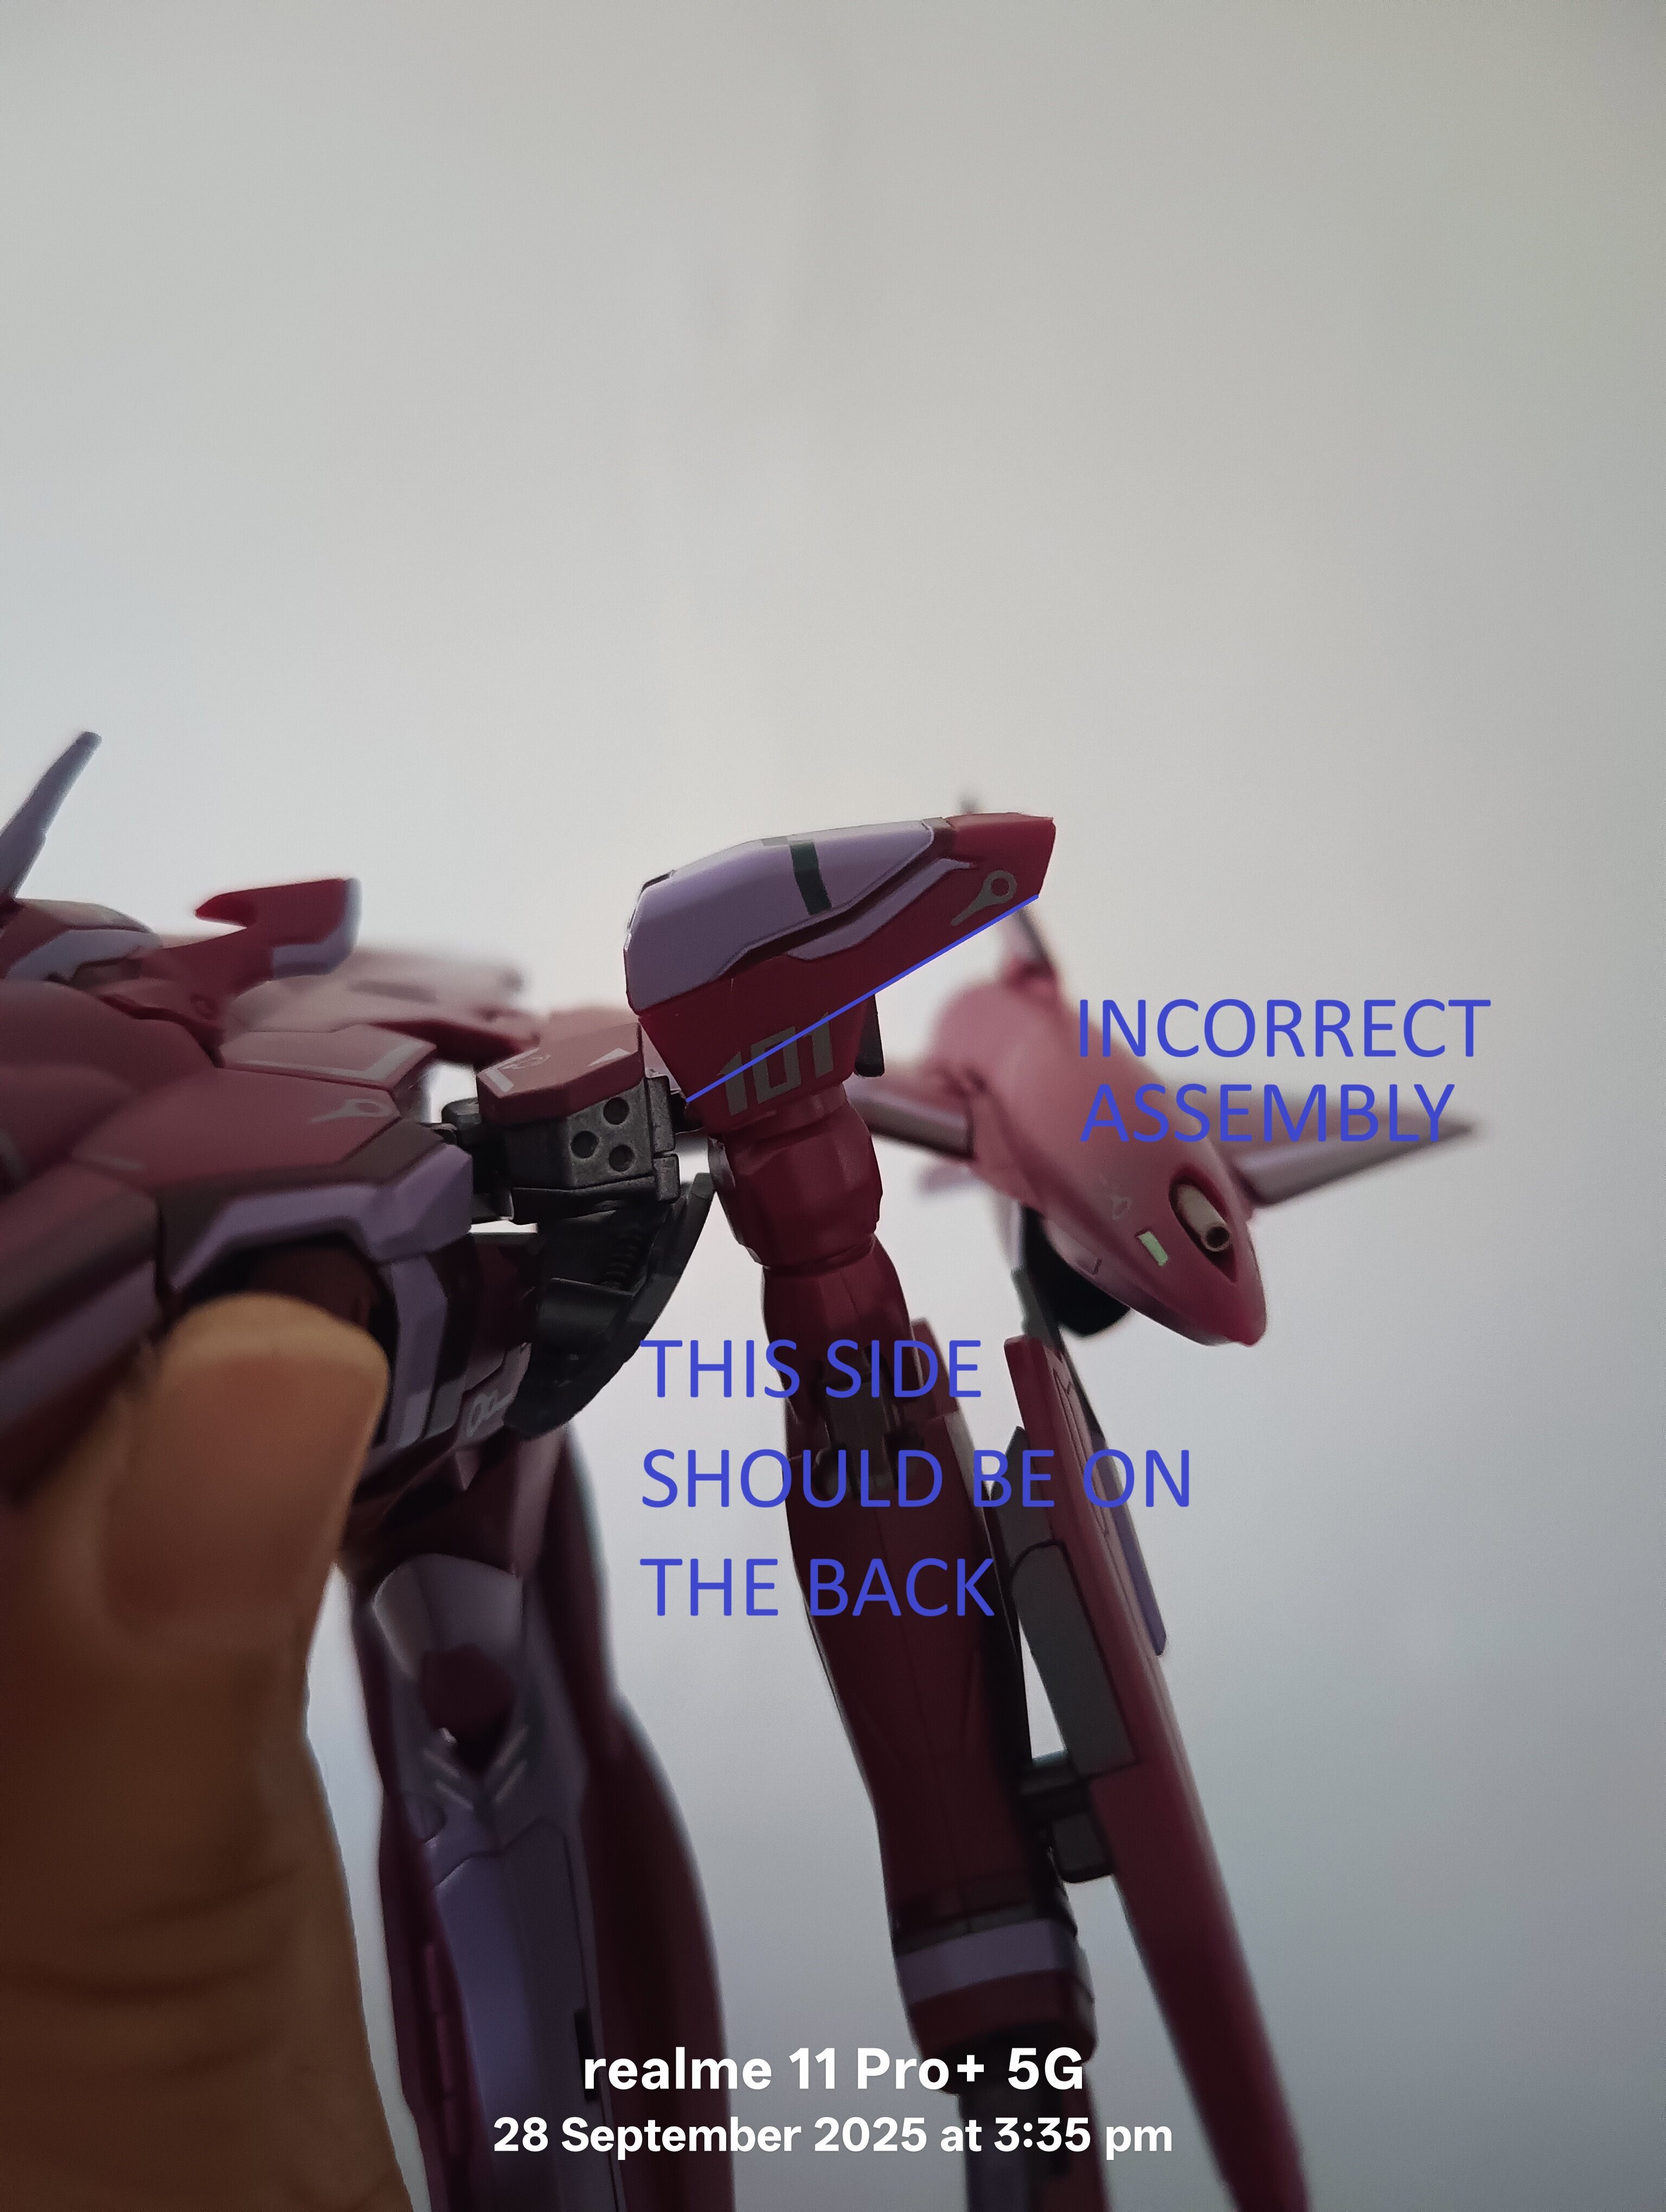
Unfortunately they are not the same. Drawn up for you using MSPaint... You need to disassemble the shoulders and switch the left and right.
-
4 hours ago, Marcion said:
really? but why I look at it, is it in correct way as Bandai showing the correct assembly condition picture. Oh the picture I post the shoulders is not in 90 degree pose because in gerwalk mode.
So I adjusted and take another picture
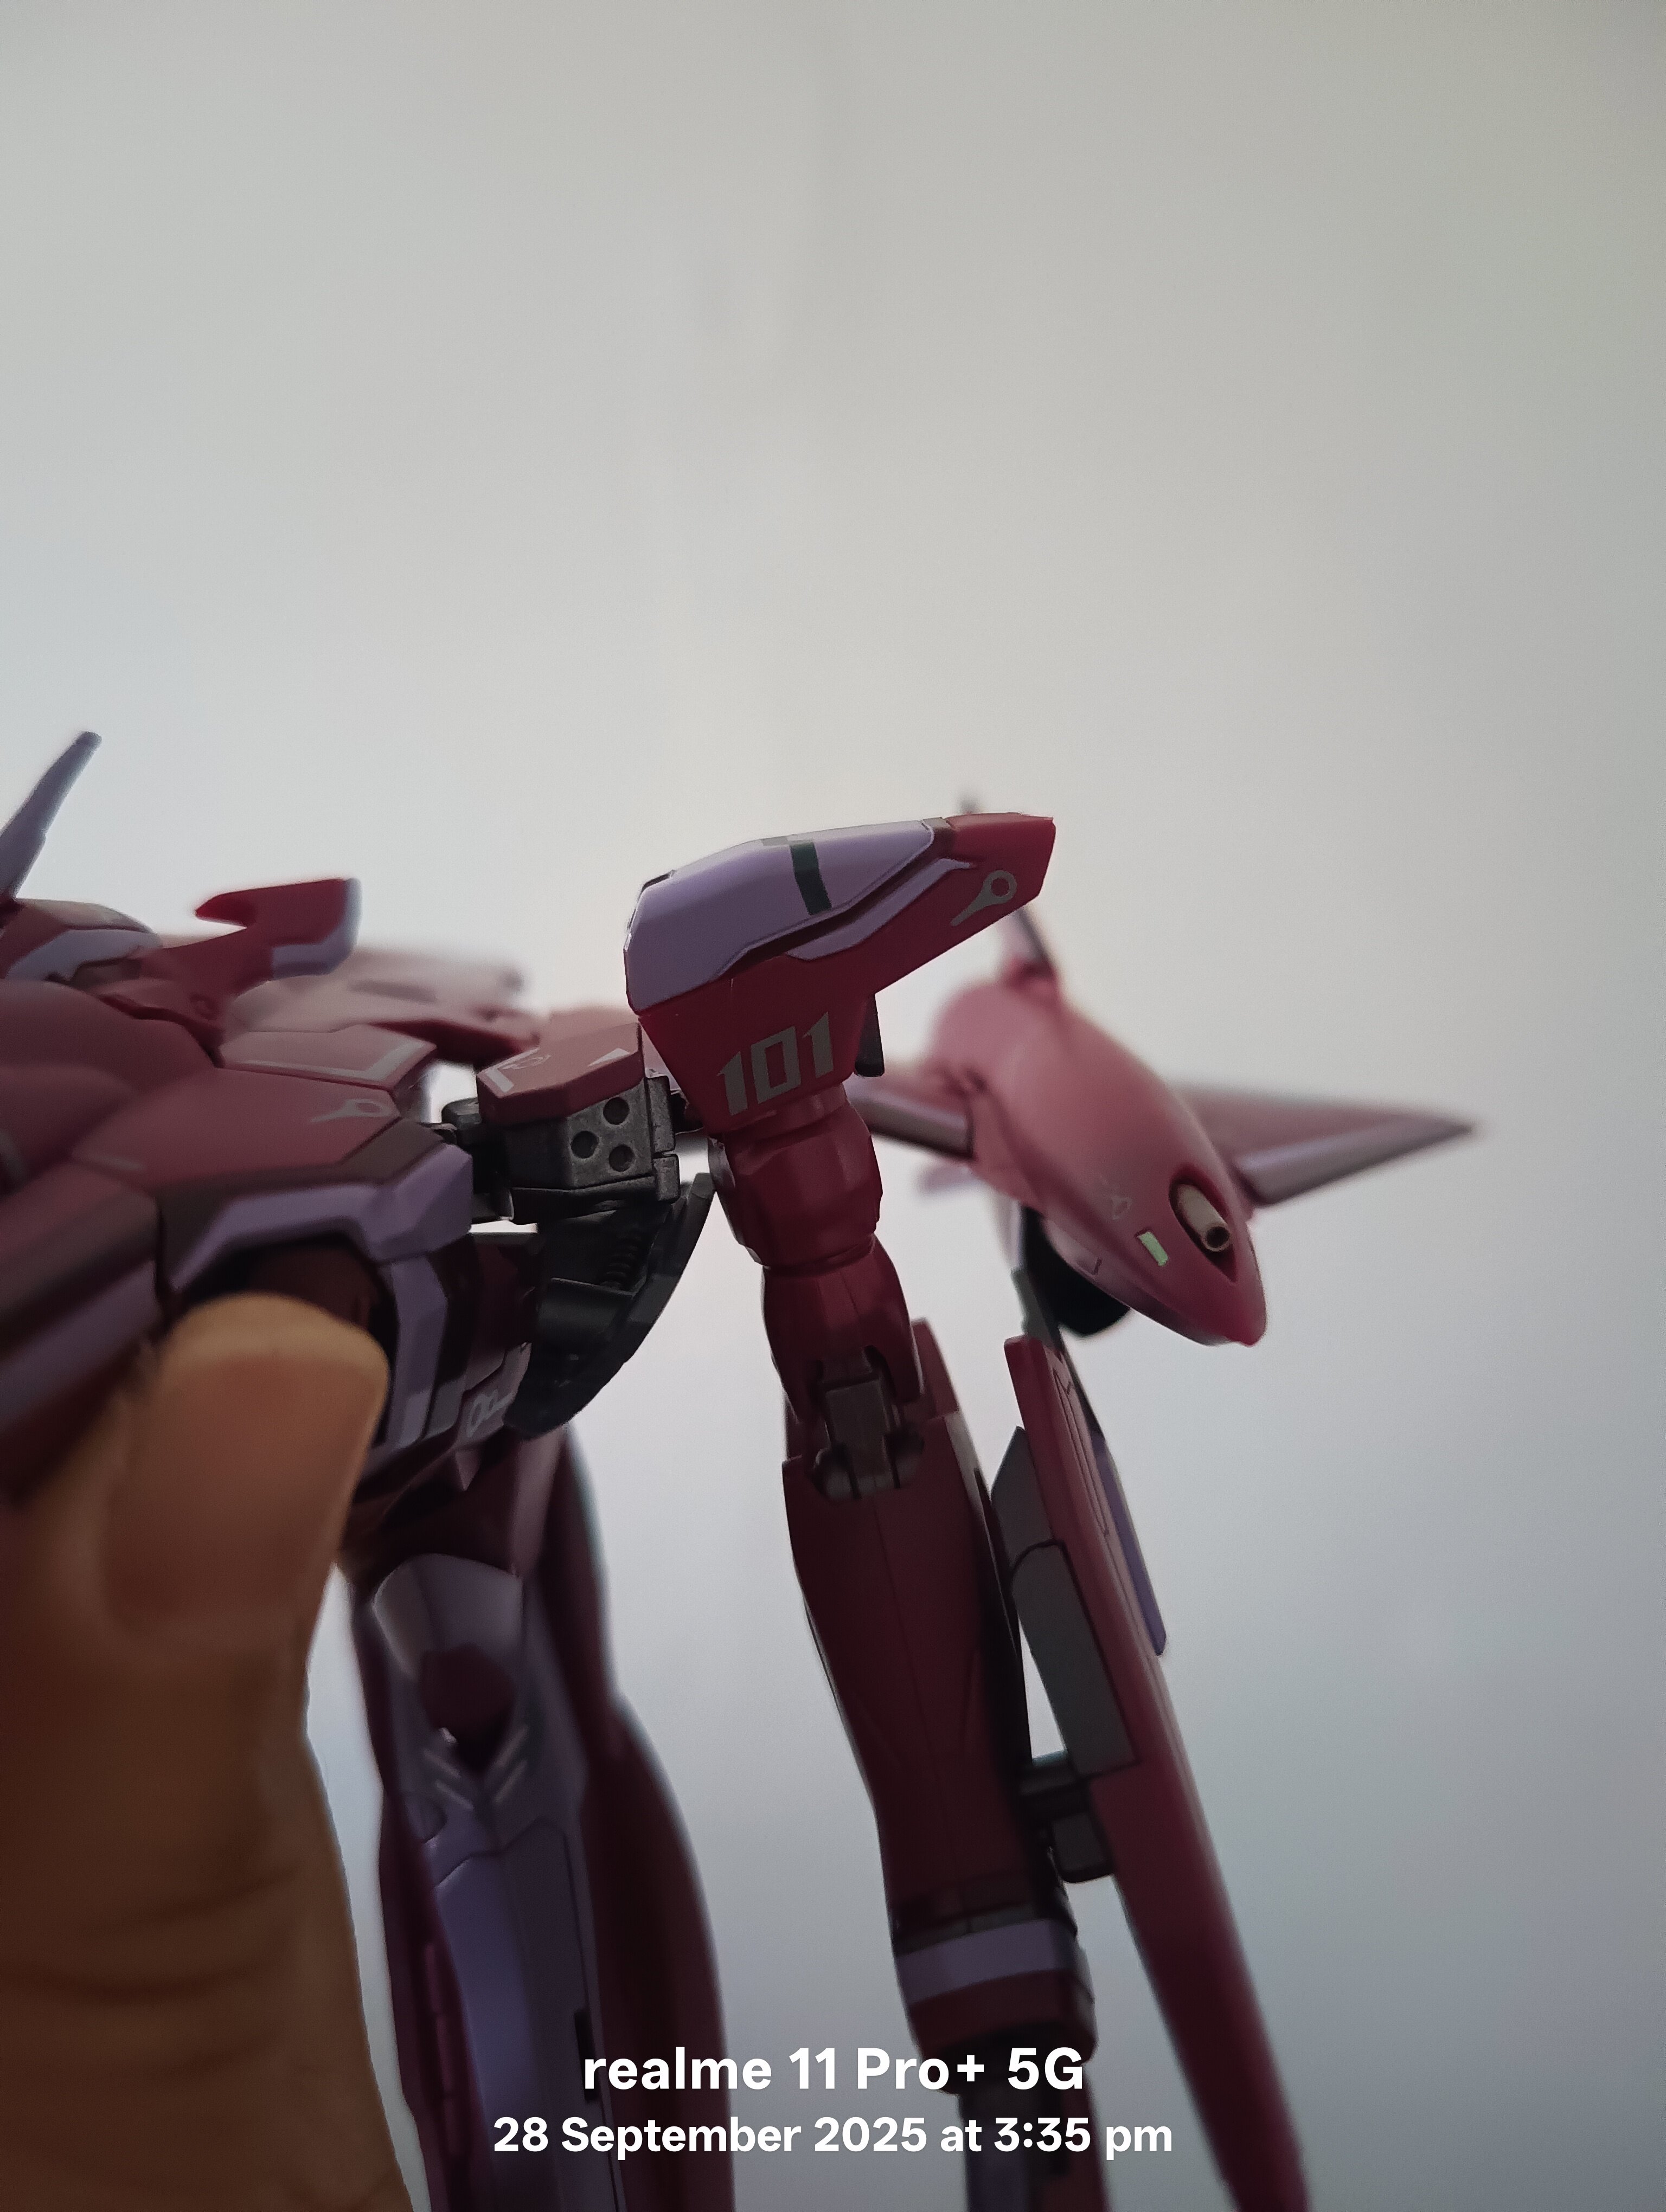
Gerwalk mode or not yours is mis-assembled/assembled incorrectly. You can leave it if you feel like it has no issues. As provided by the Bandai's instructions above, it should be taken apart and swapped.
-
7 minutes ago, PointBlankSniper said:
I'd honestly like to see them try. It would be a technical marvel, starting with crazy instructions to teach the customer to detach the old waist/lower fuselage, because I don't see fat legs fitting without dropping the hip pivot to stay centered with their thickness.
TBF, the leg packs might already work, with some ugly bracing using the armor pack's plugs to hang the pack up against the wing, or they invent an external layer of armor as the brace.
Wait, they could just make the original thick legs as the armor, and that armor could have the correct connection to the leg packs. It might actually work. Free idea for bandai. Just come preassembled with armor in the shape of the anime accurate legs, and pretend the intake/thigh gap from wearing armor isn't there, or cover it with extended armor. Nobody will know the 171's legs are inside 😁. I'm sure bandai won't have the balls to do it, but maybe someone with a 3D printer can figure it out
The real magic is actually with the backpack cannons that come with the pack, because the cockroach shell has no connection slots and can't be latched on with hooks around the edges because they have to leave clearance for the arms and wings on all sides. Those will need double sided tape, or tossing out and replacing the top half of the plane.
Yea... a 3d printer and also a scanner (would help). I have the first release 171EX and the re-issue from a few years ago, but idk if I want to put the leg work in for something Bandai is probably going to or already has lined up.
Yup not sure about the backpack cannons either, but Bandai can also change that part (the cockroach shell) of the mold up to include connection slots with minimal effort. That's a lot less work that modeling a part up from scratch (ie. the thick legs).
I only modeled up a VF22S conversion because I fanboyed hard, lol. -
OH OH OH, I know what Bandai is going to do... they'll make correct thick leg fast pack add-ons available through PBJP! LOL... 🤣🙄
-
13 minutes ago, PointBlankSniper said:
I think that fear is a stretch too far. People have already put the super parts on their's just fine. They found the issue from comparing it to the back side and noticing that it has the correct front face on the wrong side. Busting out the wrong molds that should have been stored with their accompanying production run, while also already producing the correct parts is very whack.
So far everyone has matched pairs, too. So it seems much less scary an issue than it initially looked.
All it comes down to is whether there is a high chance of damage for the reassembly operation.
ahh okay my mistake for reading too far in then, lol. Okay if its just screws and swaps that should be fine.👍
-
7 hours ago, jenius said:
I think Kawamori has very limited ability to do anything and his involvement is largely collecting a fee to say he is involved.
That's a very sad thing to hear, but very logical and likely scenario. 😕
6 hours ago, Chronocidal said:So it was pretty deeply buried in this thread, but I found it.
Unfortunately I managed to schnooker myself into thinking the image I had saved of the tails being correct was something that actually happened.. no, I actually photoshopped that myself as a "what if" to see how much of a difference it made.

Yea I thought I'd try to comb through the earlier pages of the thread last night for a pic of the grey prototype (because I was interested in Bandai's earlier approach), but got only as far as the 15th page before falling asleep.
LOL... no worries. -
16 minutes ago, jenius said:
Oh man, you're tempting me to push this up in my review cycle.
😅Take your time! No rush at all!
-
Too bad the image provided by Bandai doesn't show the top portion of the incorrect shoulder. The erroneous proportion of the shoulder shown looks like the pre-renewal (1st edition) shoulder which does not have a cutout on the top outer edges (for the super/fast packs).
I just really hope it's not a case of pre-renewal molded shoulders in circulation... 🙄
Thank you @jenius for pics, 🙏.

-
14 hours ago, Chronocidal said:
See, the parts I'm thinking of are the irritating little aesthetic choices that actually have absolutely no impact on the transformation whatsoever. They're just shapes and details that Bandai looked at and decided, "No, we're doing something different."
So.. as a fair warning, I'll spoiler it for folks who don't care to hear my rantings about little details.
For a simple summary, I would just say to look at their HG 1/100 YF-21 kit. Practically every gripe I have about the details on the DX is correct on that version. And I absolutely mean "correct" in the literal sense. They changed things so that they do not match any line art, any animation or any other YF-21 product ever produced in the entire existence of the design. These aren't "anime magic," this is stuff like specifically changing the planform of the wings and tails (the tails were absolutely correct on an early gray prototype), specifically reshaping the cockpit in its entirety, just generally re-arranging or even omitting certain details when they are unrelated to the transformation in any way. There is no excuse to change them, and the only potential reason for it is "We liked it better this way."
It's just insanely frustrating to me, because while they are purely aesthetic choices, the aesthetics of the design are why I like it in the first place, and Bandai went and screwed with them. And I fully recognize, this is absolutely a "me" thing, but it feels like an insult where Bandai just goes and says "Here, we made you a thing you asked for, but we adjusted it because we didn't like the original." And they're doing the exact same thing with the VF-17S now.
Just the TLDR though.. Bandai changed little aesthetic details that don't impact the transformation. Are these nit-picks? Absolutely. But there is no valid reason for why those details were changed in the first place. It's just Bandai deciding they know better, and I'm so tired of that attitude.
As for the tampo, while I think it's obnoxious, for what it's worth, I can appreciate these markings more than the slop they threw on the YF-19 (at least these are symmetrical), but I still think they went overboard.
What's sad? The worst part isn't even the added markings. The dingbats went and printed the UN emblem on the left wing cock-eyed. It is absolutely misaligned on every single picture I've seen of the YF-21, and that is just a bizarre level of incompetence on a product at this price point. I'm VERY tempted to just strip those off and put fresh decals on to fix it, since I think they're about the same size as the Yamato 1/60 VF-1 fast pack markings.
Aside from the things that are "anime magic", yes I completely agree with how Bandai is probably throwing in their own take ("knowing better") and it's sucks that they're doing that. In the end I'm sure it (the DXC YF-21) like many other Macross stuff has go through the final approval of Kawamori (and maybe his team: Tenjin, etc.) for final say, right? It's not like Kawamori comes into Bandai's office only to look at it during the prototypes for a once over and gives a yes/no and that's it. It would be believable Bandai gives Kawamori his own milestone prototype version(s) to take back to his home/office to further study/play with (to do his own homework on) and is in full communication directly with Bandai's team before it goes to the production line. Do we even know if (maybe) it's Kawamori making/suggesting these ("better known") changes to Bandai's team for the macross line? And that's not to say (maybe) Kawamori is aware but just overlooks and passes off these changes? 🤷♂️🙄 If so, then that would be sad...
I'm interested in looking at the early grey prototype that you're referencing. Do you have a link or picture? As I've said in the previous post I couldn't find it, but recall seeing something of the DXC YF-21 tease year(s) prior to Bandai's TN2019 reveal.
Yes the markings on the DXC YF-21 are better than the 19's markings by far.
Yea Bandai really f'd up the tampo on the Macross logo for the DXC YF-21's wing and with previous tampo issues (DXC VF-1's 001/100). The Macross logo was correct on the YF-21's prototype displayed at TN2019. We already know Bandai won't own up to it just like the YF-21's antenna issue (how they stated damage was due to the shipping/handling process). -
Would it be better just to go onto Bandai's or Kawamori's X post/social media and just have everyone comment about the too thin/too skinny proportions? Maybe with enough public outcry directly would get them to reconsider?
-
1 hour ago, Chronocidal said:
All aspects of the transformation and proportions aside, I feel like they absolutely went off the rails though. While they're not what most people would call "significant" departures, there is a rather large pile of details on the original design that they just completely ignored, or purposefully redesigned for no explicable reason.
The worst part of this is that some of these were correct on early prototype pics, and Bandai later changed them specifically to be contrary to every piece of reference material, animated, drawn, rendered, or otherwise.
They just looked that the art, flipped it off, and did their own thing.
If not referencing transformation and proportions... which parts (no need to list all), like the extensive panel lining detail and excessive tampo? The way the underbelly splits into sections? The shelf like feature towards the rear of the fighter mode? I'm curious because the YF-21's design was based on so much anime magic, things were probably going to be redesigned. This is Bandai we're talking about, lol...
Looking at the earlier pics (from the beginning of this thread, first 1-3 pages) a few sections were changed on the colored prototype. One section I noticed was the center fuselage (battroid hood section rearwards where bandai included an airbrake) is wider and more rounder than what was sold for production (more of a pronounced peak/less round, narrow/tapered, sharper). On the back of the forearms, detail was added and opening/nook was created for the (fighter mode) forward beam cannons.
According to the (then) twitter post that it was the 3rd prototype which was shown. The uncolored prototype which appeared in HJweb was from Dec 2023 which reflects more with the final production version. I thought there were older prototype pics prior to 2019 but I couldn't find them when I searched.
I'm sure Bandai had input/oversight (milestone meetings) from/with Kawamori. One of the posts mentioned Tenjin was at one of the meetings as well. 🤷♂️ -
Yes, the transformation on the YF-21 isn't horrible but there are points where it makes you think if the legs are actually going to fit in/out of the bay/under section. Jenius' video and write-up definitely helped when I was working on the YF-21.
I feel like Bandai (almost) did the best they could, but of course in hindsight there are always areas for improvement (longer fuselage/nose-section, fold out latch for bracket free transformation, etc.).
I'm wondering if/when Bandai does a VF-22S how are they going to address the bay doors (22's are a bit different from 21's) without breaking-up the line art too much. A portion of the VF22S's bay door design extends further below what Bandai currently has for the bay door/side leg cover sections. -
With the announcement of the DX Chogokin VF-17S, adding to the M7 hype! 🤣

-
18 hours ago, weiser21 said:
So international customers that purchased from a Japanese based store are screwed then?
Yup or contact the proxy service/site you purchased from to see if they can do something for you.
-
@RavenHawk, I'm not sure which state you reside in but depending which (in this case most) BBTS also charges state tax (which is also another consideration). I'm guessing you're aware of this since you have probably frequented BBTS more than I have (which has been nil in the last 6 years for me).
Tariffs is a ton of crap because we already get charged state sales tax for most states... so tariffs are pmuch doubling up on taxing.
Opps, strayed off topic cause it hurts the wallet. Back to the main programming. -
Bump*
Added Pre-Built VF-22S Conversion kits:
https://www.ebay.com/itm/167766712437The asking price for a pre-built kit for MWF members is $110 (before G&S, shipping fees, etc.).
Added Pre-Colored/Painted AAL Antennas:
https://www.ebay.com/itm/167766541993
The price for pre-colored AAL Antenna set through MWF is $10
Added NOT RED PAINTED AAL Antenna listing:
https://www.ebay.com/itm/167766586128
The price for NOT RED PAINTED AAL Antennas through MWF is $8
Also reduced the price of the hobby kit (un-built) version of the VF-22S conversion kit (both here on MWF and on eBay), sorry still have not gotten around to Etsy. -
Added Pre-Built VF-22S Conversion kits:
https://www.ebay.com/itm/167766712437The asking price for a pre-built kit for MWF members is $110 (before G&S, shipping fees, etc.).
Added Pre-Colored/Painted AAL Antennas:
https://www.ebay.com/itm/167766541993
The price for pre-colored AAL Antenna set through MWF is $10
Added NOT RED PAINTED AAL Antenna listing:
https://www.ebay.com/itm/167766586128
The price for NOT RED PAINTED AAL Antennas through MWF is $8
Also reduced the price of the hobby kit (un-built) version of the VF-22S conversion kit (both here on MWF and on eBay), sorry still have not gotten around to Etsy.
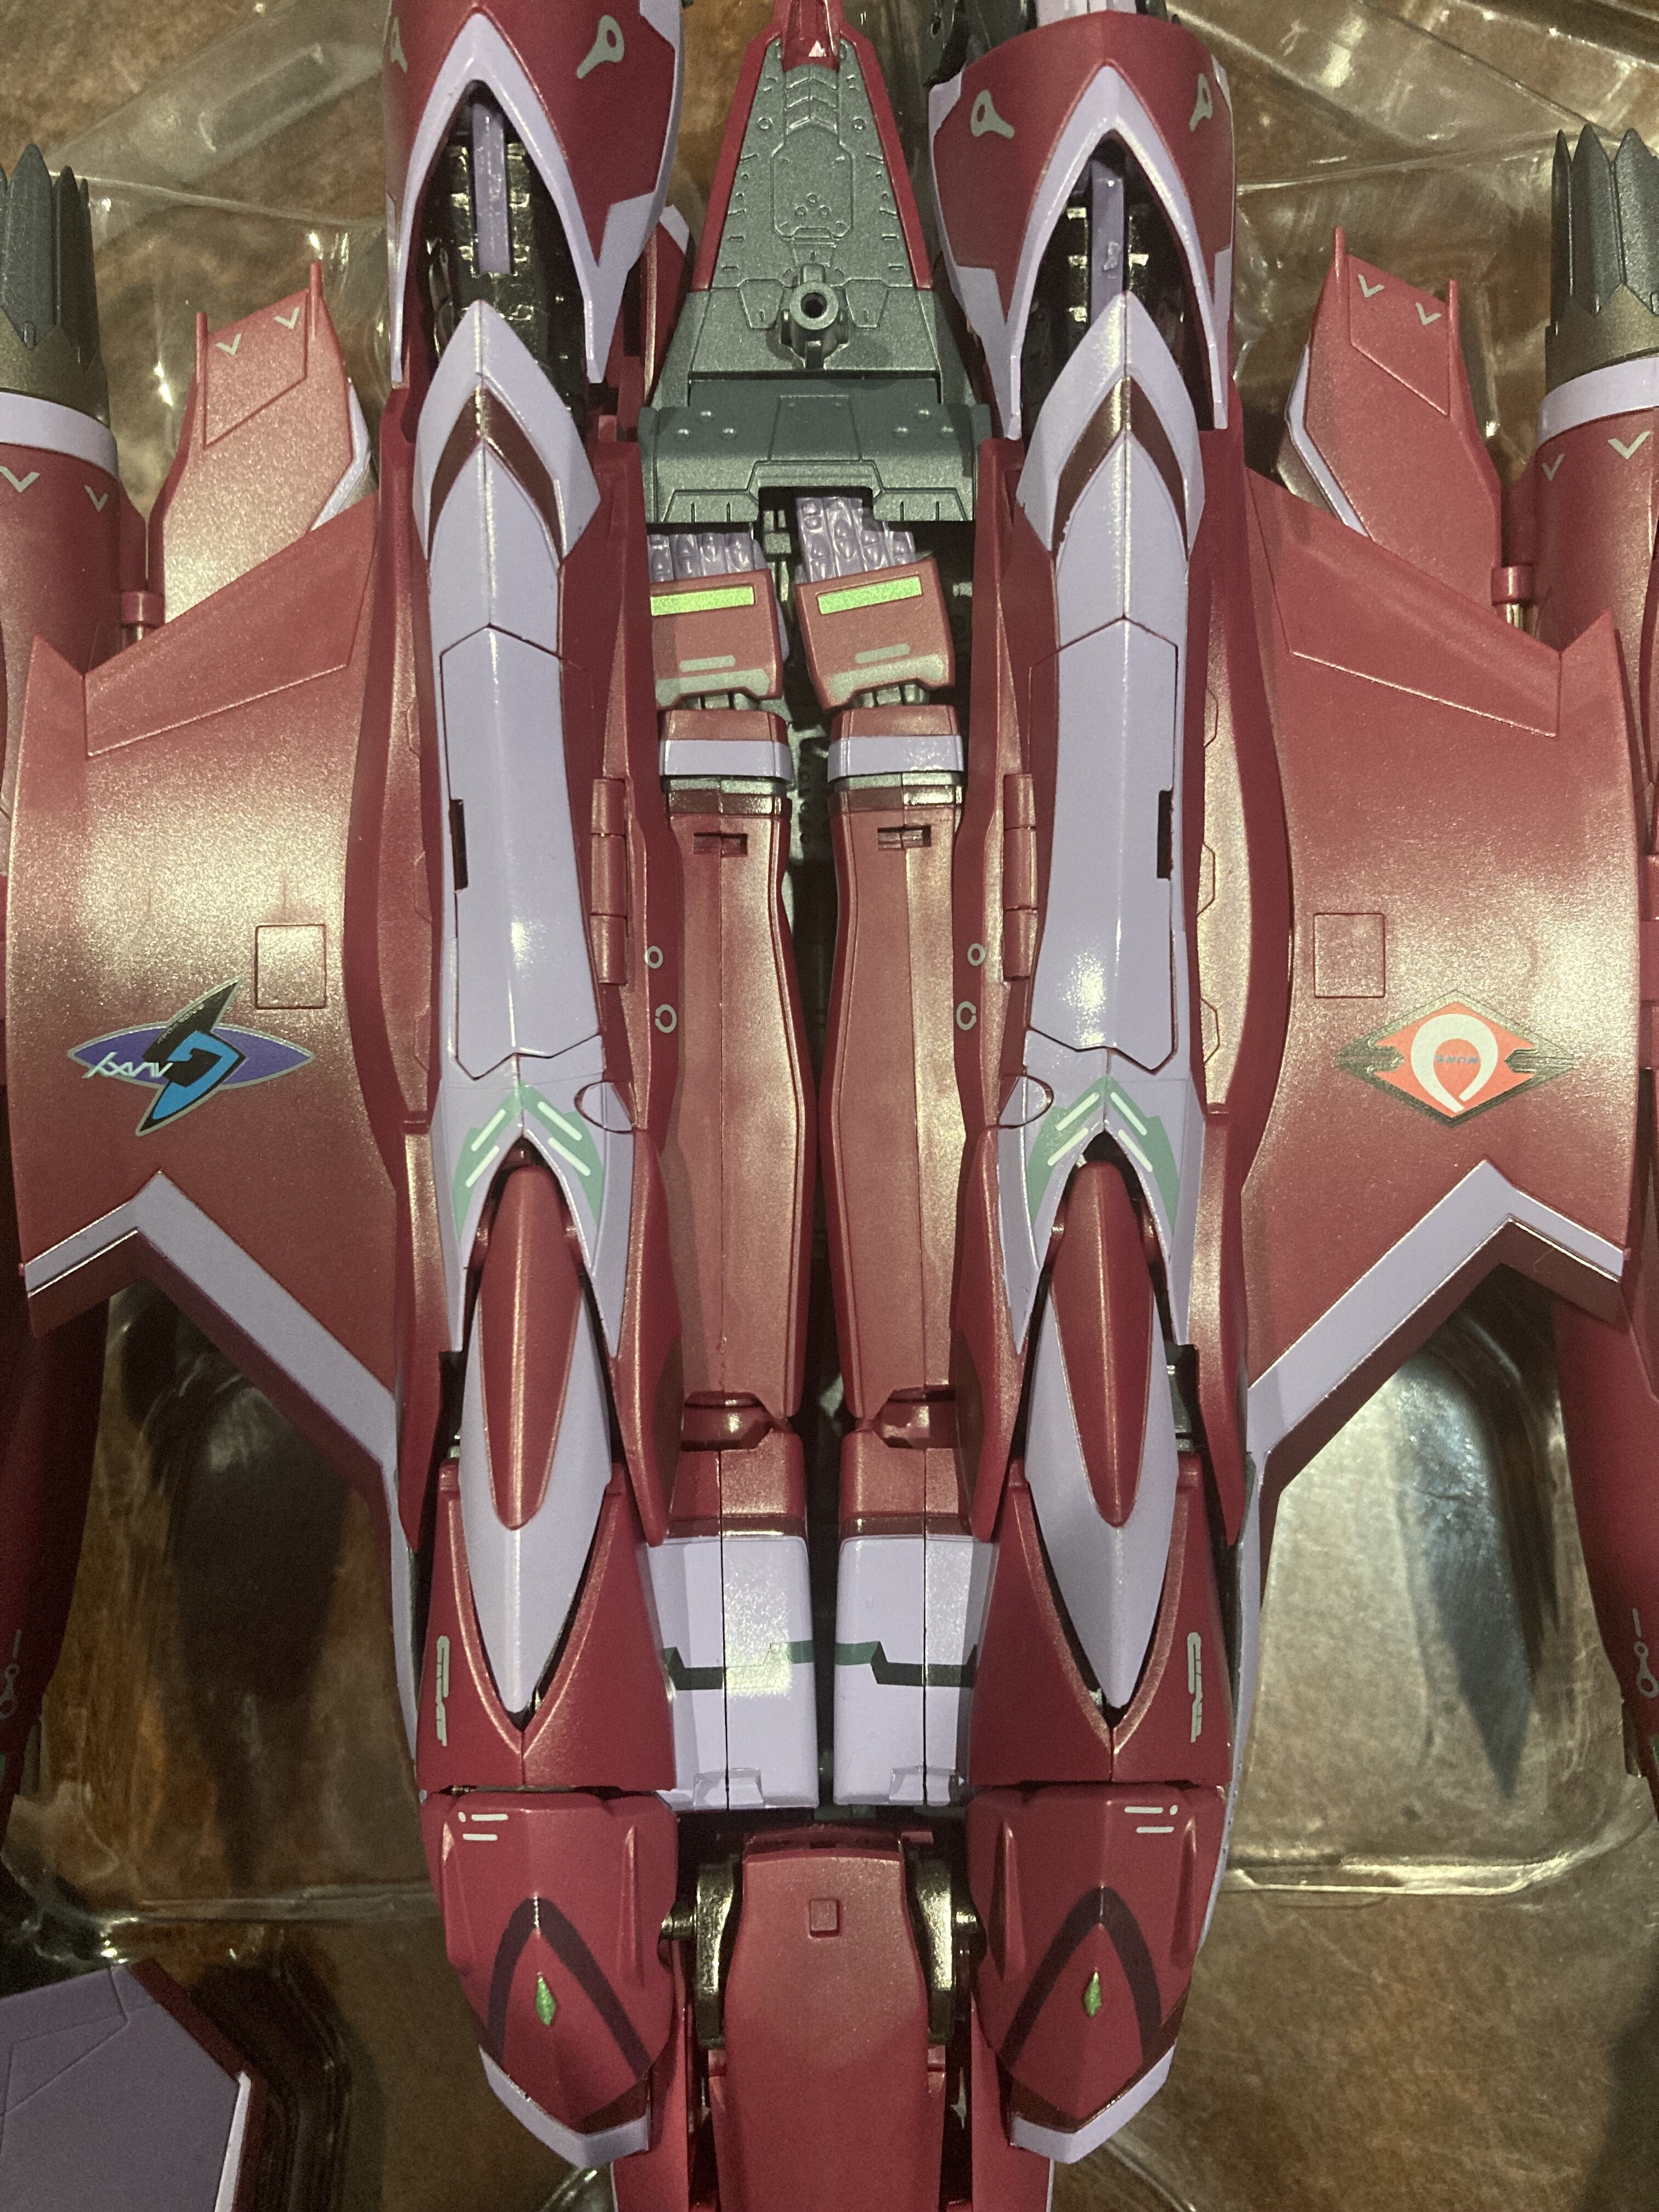
Bandai 1/60 DX Chogokin Macross 7 Fire Valkyrie
in Toys
Posted · Edited by PsYcHoDyNaMiX
The ports/holes onto of the DX's shoulders look like they would line up with the sounder booster.

EDIT:
Interesting... it looks like the holes would line up where the HG kit has the sound boosters on the shoulders but the Hi-Metal it looks like it might not use them. I don't own either of those versions could anyone confirm how the sound booster is mounted for either (or both) of those?
HG:
HiMetal: