wm cheng
-
Posts
4305 -
Joined
-
Last visited
Content Type
Profiles
Forums
Events
Gallery
Everything posted by wm cheng
-
Gorgeous and sooo smooth @electric indigo Do you primer first? If so what do you use?
-
I guess I've been just lucky then since I haven't had any customs or duties on anything that has been sent to me via EMS for the last 3-4yrs (including the YF-19 I just received). I got dinged with EMS maybe 4yrs ago once but then nothing before that for a few years. I do however get dinged consistently 100% when it comes through via DHL, FedEx or Purolator. Most recently, I got a SSP delivered and that cost me $33.37 from DHL. The actual customs & taxes were only $14.72, (which is probably what I would have paid via post) but DHL tacked on a processing fee of $12.71 AND a transaction fee of $5.93. So $18.64 went to DHL is what I meant which didn't sit right with me.
-
Well, EMS to Canada took over 1.5 months from Mandarake for my YF-19 but no Customs & Duties. DHL however I was just dinged both a Processing Fee AND a Transaction Fee on top of the Government Duties and Taxes which ended up paying more to DHL than the government. Never had Customs & Duties when I ordered EMS, only through couriers.
-
Hey where did you get those clips on the sticks and that cardboard base? What is it called? I've been trying to look for something like that but don't know what to search for?
-
I just got my YF-19 from Mandarake and paid EMS (you have to watch which countries accept EMS - Canada does, but US doesn't) and it shipped Apr 15 and just got it last week which was 1.5 months so I don't think there's much air travel, I think it must have arrived via boat. I don't think it was worth EMS, either slow boat ship it or pay for couriers like FedEx or DHL if you can't wait.
-
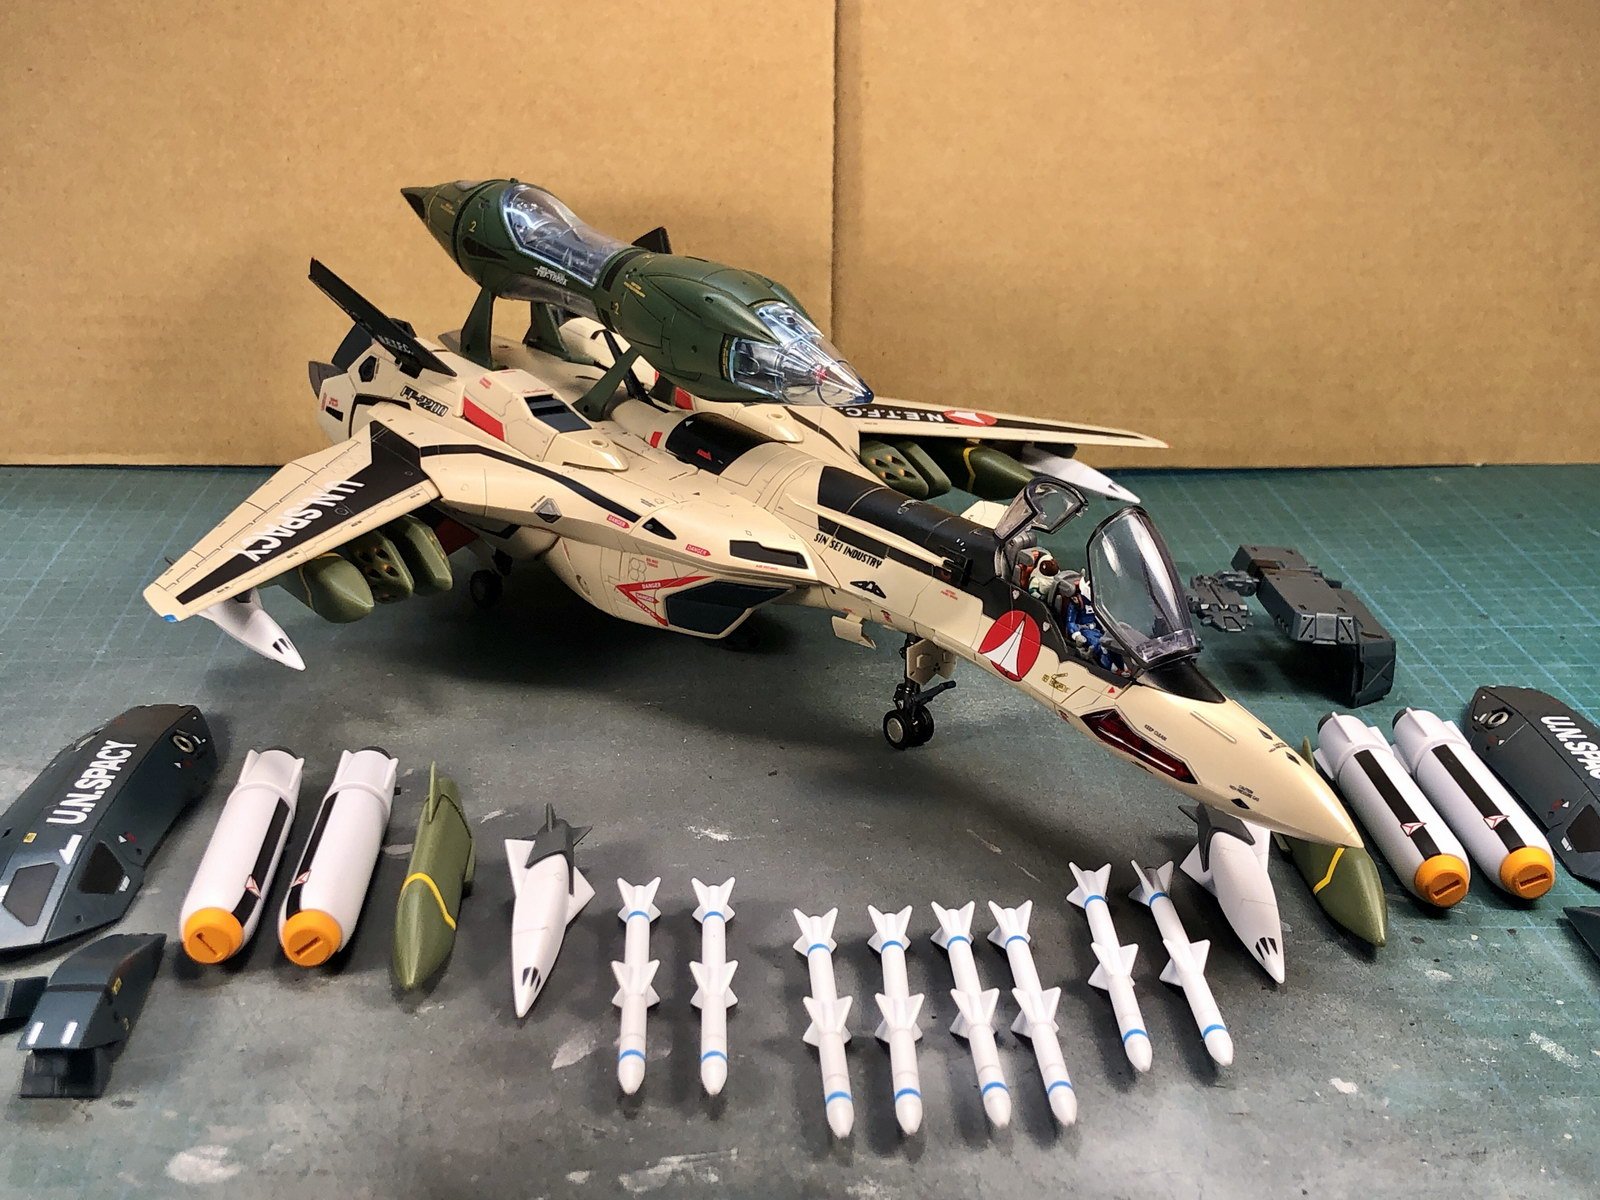
I just got my YF-19 from Mandarake last week (EMS shipped Apr 15 - 1.5 months argh!) and can't stop playing with it! I love it (I originally didn't get it because I had the Bandai VF-19 already and the Arcadia YF-19 unfortunately). LOVE this toy (got it thinking it might be hard once YF-21 comes out and makes a better pair than the Arcadia) - the extra tampo is great, love the extra twist in Gerwalk leg joint, love the fold booster, love the folding arm weapons - wished I only got this instead of the expensive POS Arcadia (keeping it only because I put so much work into decaling, panel line and clear coating it to make it presentable) and if this came out before the VF-19 - I would have never bought that, smart move Bandai! All I've done is Flory Panel Line wash it in light grey and black for the moveable surfaces and vents. I haven't painted the gears white yet since I only have white acrylic, I think these structs needs a white lacquer to stick better and stand up more as there's a bit more punishment in the forward gear folding mechanism. Highly recommend it to anyone on the fence, and surprisingly they haven't gone up in price too much over the last 1.5yrs - but maybe not pay for EMS.
-
THANK YOU!!! You're the best.
-
Shipped to North America for 12,238Y or within Japan? I'm getting 15,306Y for Standard Shipping to Canada.
-
So where is the best place to get another SSP these days (with reduced shipping and all) and what would be a decent price for a set? (Now you got me all worried about a naked upcoming Roy - I really love them on my VF-1S Hikkie) Anyone in Canada wanting to unload any extras?
-
I never knew how much they went up (never kept track). You never said find a cheap one :P The only Frontier Hasegawa I have was their VF-31A Kairos.
-
THANKS SO MUCH!!!
-
I use Tamiya black so I can't suggest anything else (nothing beats it for ease of clean up, dunk the brush in a bit of Windex and you're good to go!). I am starting to move over to Mr. Color since they match FS military colours and Tamiya does not - also they are in semi-gloss. They are lacquers so its harder to clean up though. However I've just discovered Motolow Liquid Chrome Markers, nothing gives a true chrome/silver like it. I used to dab a bunch of Tamiya Silver Marker into a small dish and use a paint brush to dip in it, I use lacquer thinner to thin it if it starts to dry out. But this Motolow stuff looks more amazing and they come in a 1mm marker so some small stuff can just use the marker tip instead of cleaning a brush. The only thing is it takes a long time to dry and you can't touch it until its dry or you'll ruin the mirror finish. No bottle silver paint comes close to these markers (maybe Alclad but its only airbrush consistency).
-
What about putting a layer of trace paper, mylar (drafting film) or parchment paper in front of the LEDs to diffuse the lights? I had to get myself the Limited Edition so it had all the lighting included. I was thinking of using the clear pieces so I can paint them and pinvise more smaller holes just scratching the paint to give me more windows that are lit. It's amazing Bandai managed to mold such tiny holes into those pieces, but I feel its still missing about 1/3-1/2 more windows than the filming model (which of course is much bigger!).
-
I hear ya @NZEOD its painful to weather over a flawless paintjob sometimes. Even though I love the painting/weathering/decaling stage, I'm sometimes almost afraid to advance to the next stage for fear of wrecking the previous stage. Envy your electronic lighting skills @derex3592!!! Any lighting I've done its been a "dummy" kit that all I have to do is put in batteries. Are you going to gel those LEDs so they appear warm?
-
Yeah, nothing worked on those Bandai decals (if I remember correctly) - they are so strong. I think that's when I moved off of MicroSet and MicroSOL and moved onto Mr. Setter and Mr. Softer (which is deadly to any other decals but barely made a difference with those Bandai VF-25 ones).
-
I feel exactly the same, I initially thought I'd be happy with my Yamato 1/48 but the more I handle these Bandais the more I love them! I just got the SSPs (NY delivered although I did order them in the first few minutes only to have to wait so long!) and my VF-1S seems new again, so hefty and poseable! I may need to get another SSP - argh!
-
Gorgeous, simply beautiful @Lolicon another masterpiece to add to your collection. Didn't go with the dark grey leading edge?
-
Yep, I just cleaned and vacuumed the floor of my workbench and found some old tiny photoetched parts I lost years ago, and I am sure I spent a good 6-8hrs looking for them. Now years later even after a basement renovation, I found some of those parts - although I no longer even have those models. I'm sure someone in another dimension was f**king with us.
-
Huh, I never knew Wave did Destroids - the only destroids I have are the 1/200 Nichimo little ones. I've only had eyes for planes of Macross. I will keep an eye out for the kit in my travels though. @NZEOD
-
@NZEOD What?!?! You wouldn't happen to have the white ones that go on the black canopy rails do you? Pushing my luck now... for VFA-103 Jolly Rogers? Please let me know what I can do for you! @derex3592 All those Enterprises look fantastic! Could you take a picture of them with your hand (maybe the Refit one) so I can get a sense of scale - all you amazing careful work make them look bigger than they are I'm sure. I've personally been itching to build that beautiful Bandai Star Destroyer too, but I've been waiting on Greenstrawberry, they are releasing upgrade parts anytime now (they've been working on it almost a year). The part that bugs me most is the 3 single piece engine bells, its really missing that thin outer ring that lets light though and I mentioned it to the people at Greenstrawberry and they are listening to my wish. @MechTech I can't fathom your amazing builds from scratch. I just don't get how you do it?!?! Its amazing, I'm just a decent painter, but I need the canvas to work on, I don't get how you can make such perfect canvas out of nothing!!! That's truely an art sir. @joscasle That VF-25 is coming along, you're not going to regret all the effort into painting it instead of decals. Can't wait to see more.
-
@NZEOD OMG! You are a life saver!!! I have been so grumpy to my family the last few days and none of them understand the effort and time I put into only to get destroyed at the last 5% - I'm sure they thank you too! THANK YOU SOOOO MUCH, I owe you, how can I make it up to you? PMed you with my address. @Dobber I know, hearing that "snap" is so heartbreaking! @pengbuzz I'm definitely not that handy or brave to pull my own formed canopies - I recognize where my abilities end and its just a route to frustration...
-
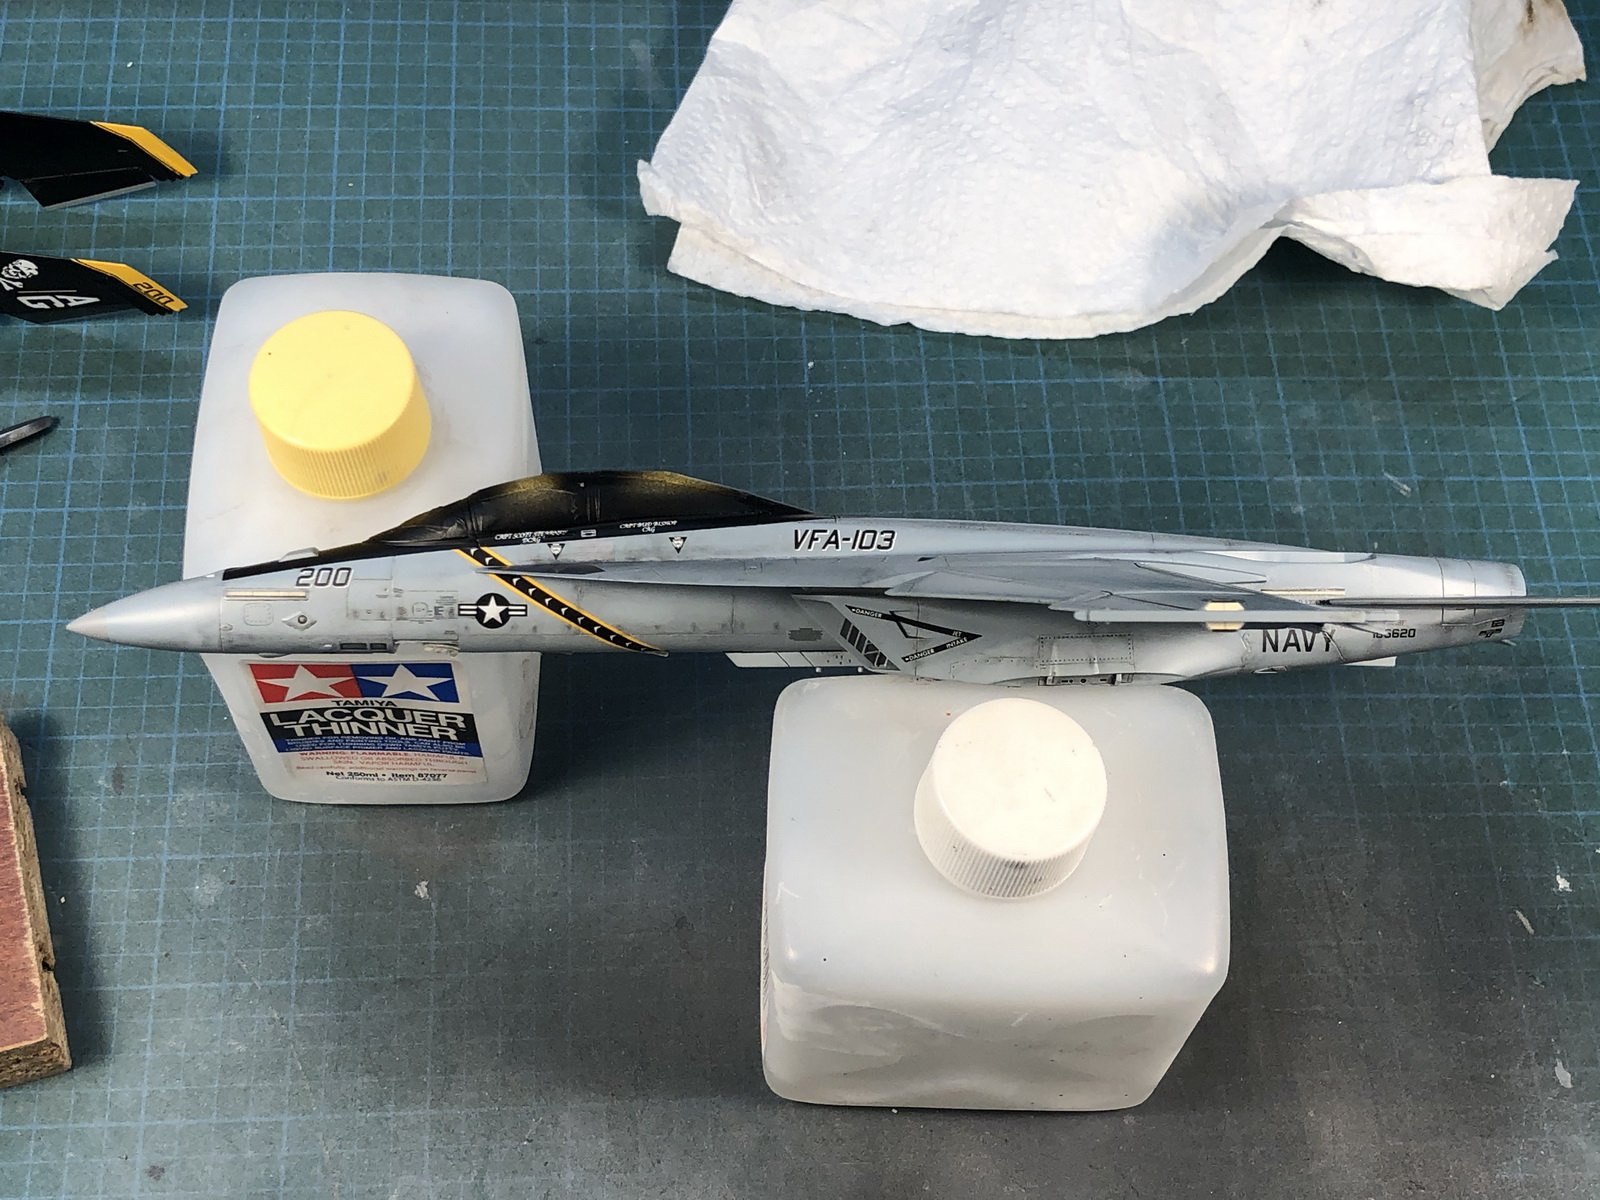
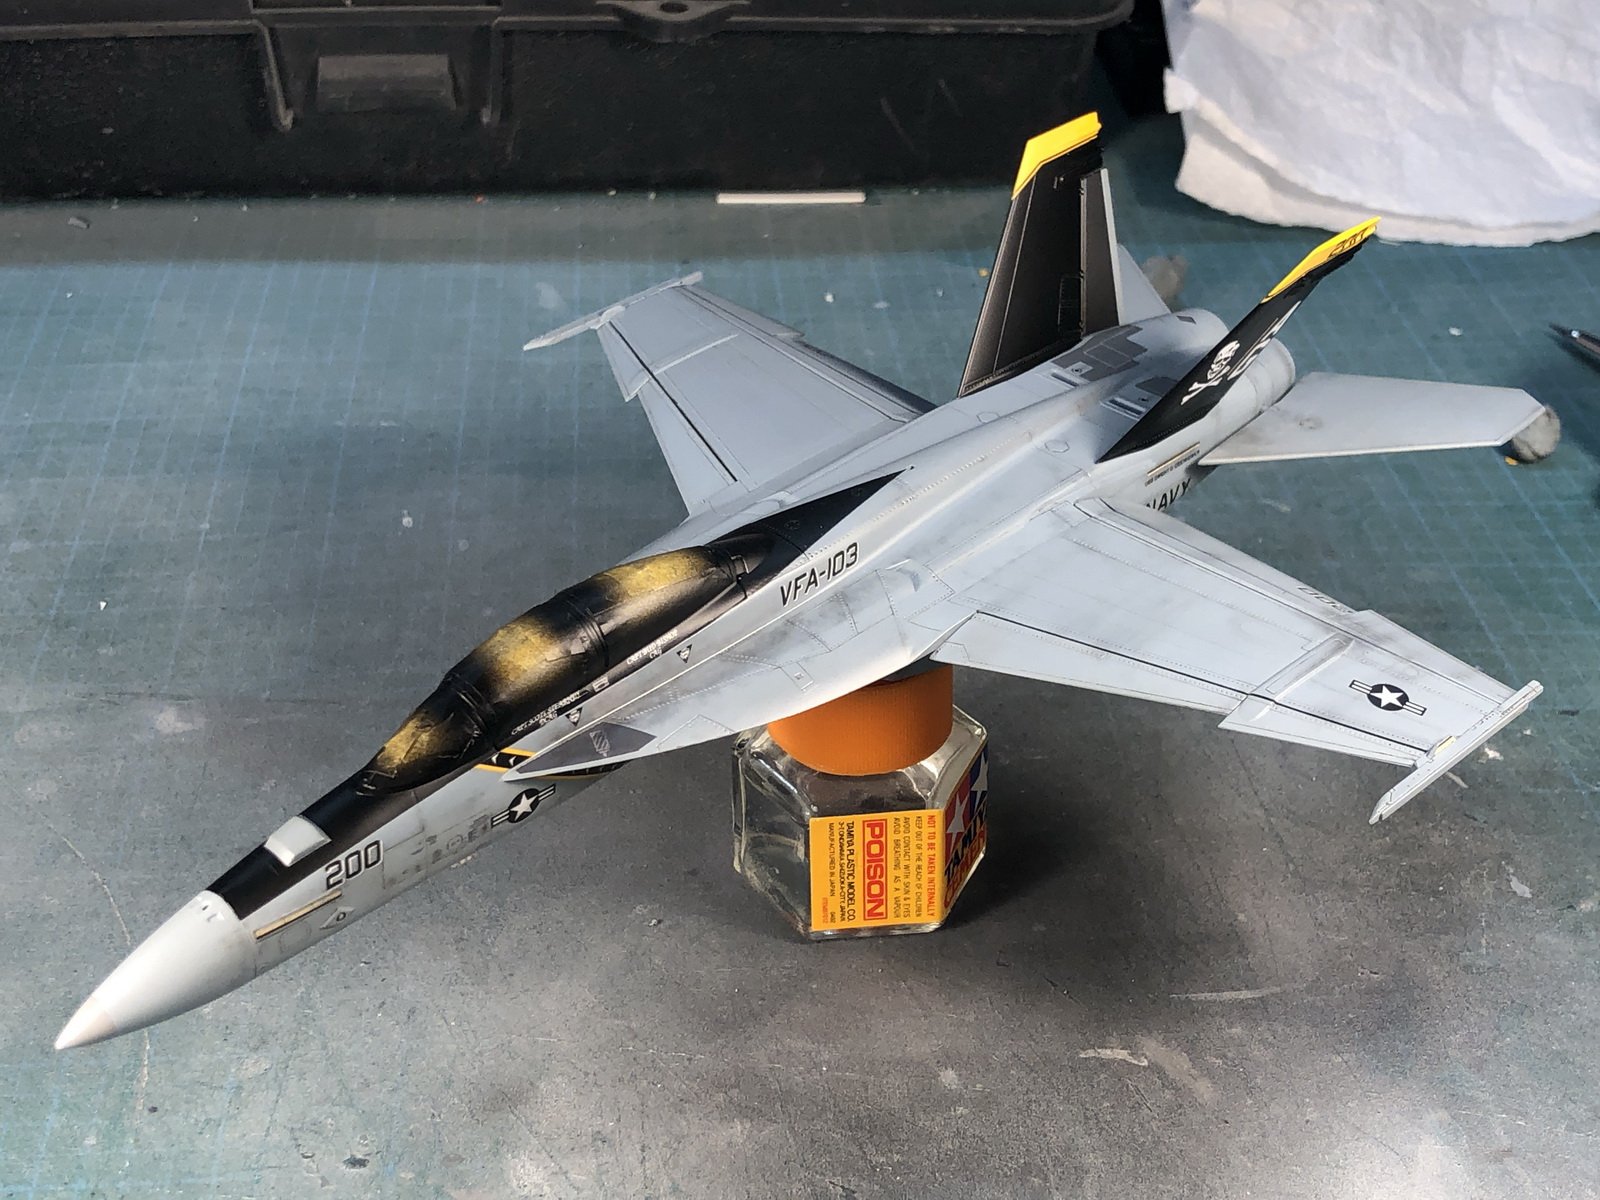
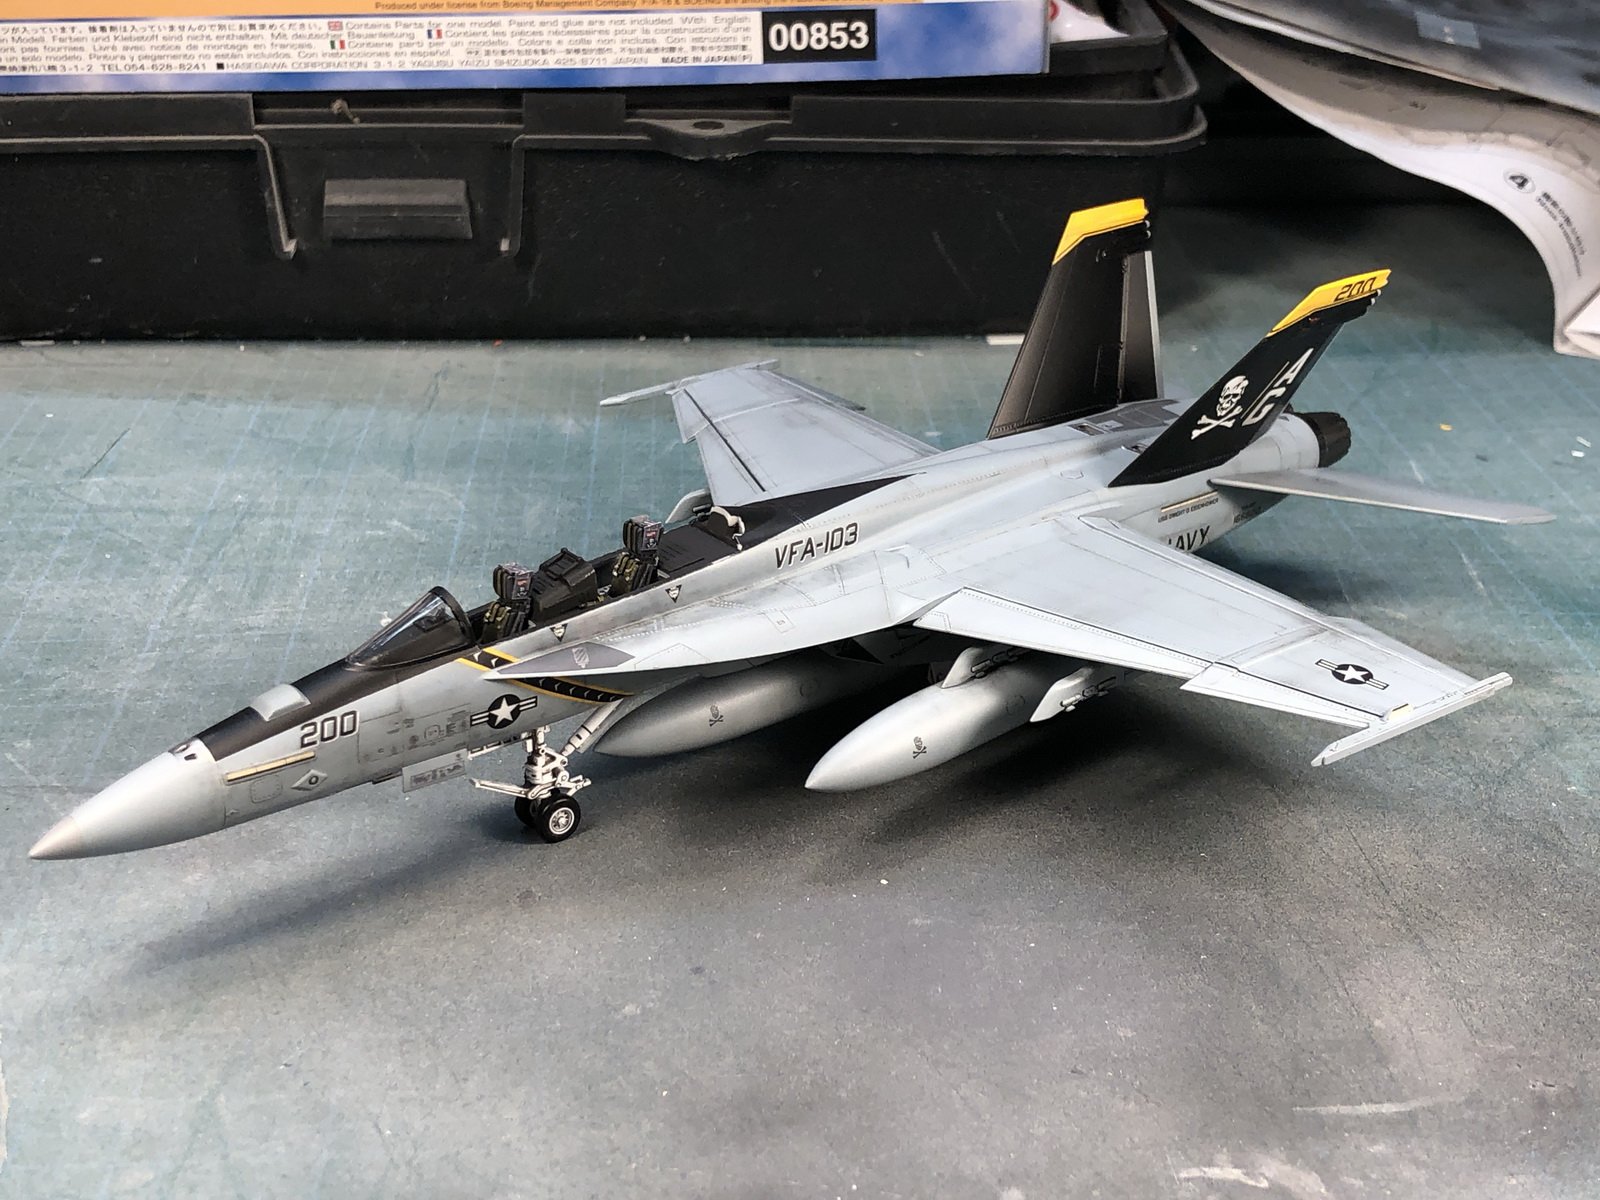
@NZEOD What!!! REALLY?!?! @derex3592 is right, its 1/72 scale - any F-18F Super Hornet canopy (just the main one, the forward one is fine) would do because its a two seater. The actual kit is 00853 1/72 Hasegawa F/A-18F Super Hornet which would have the pilots names on the canopy in white, but I could get aftermarket decals for those.
-
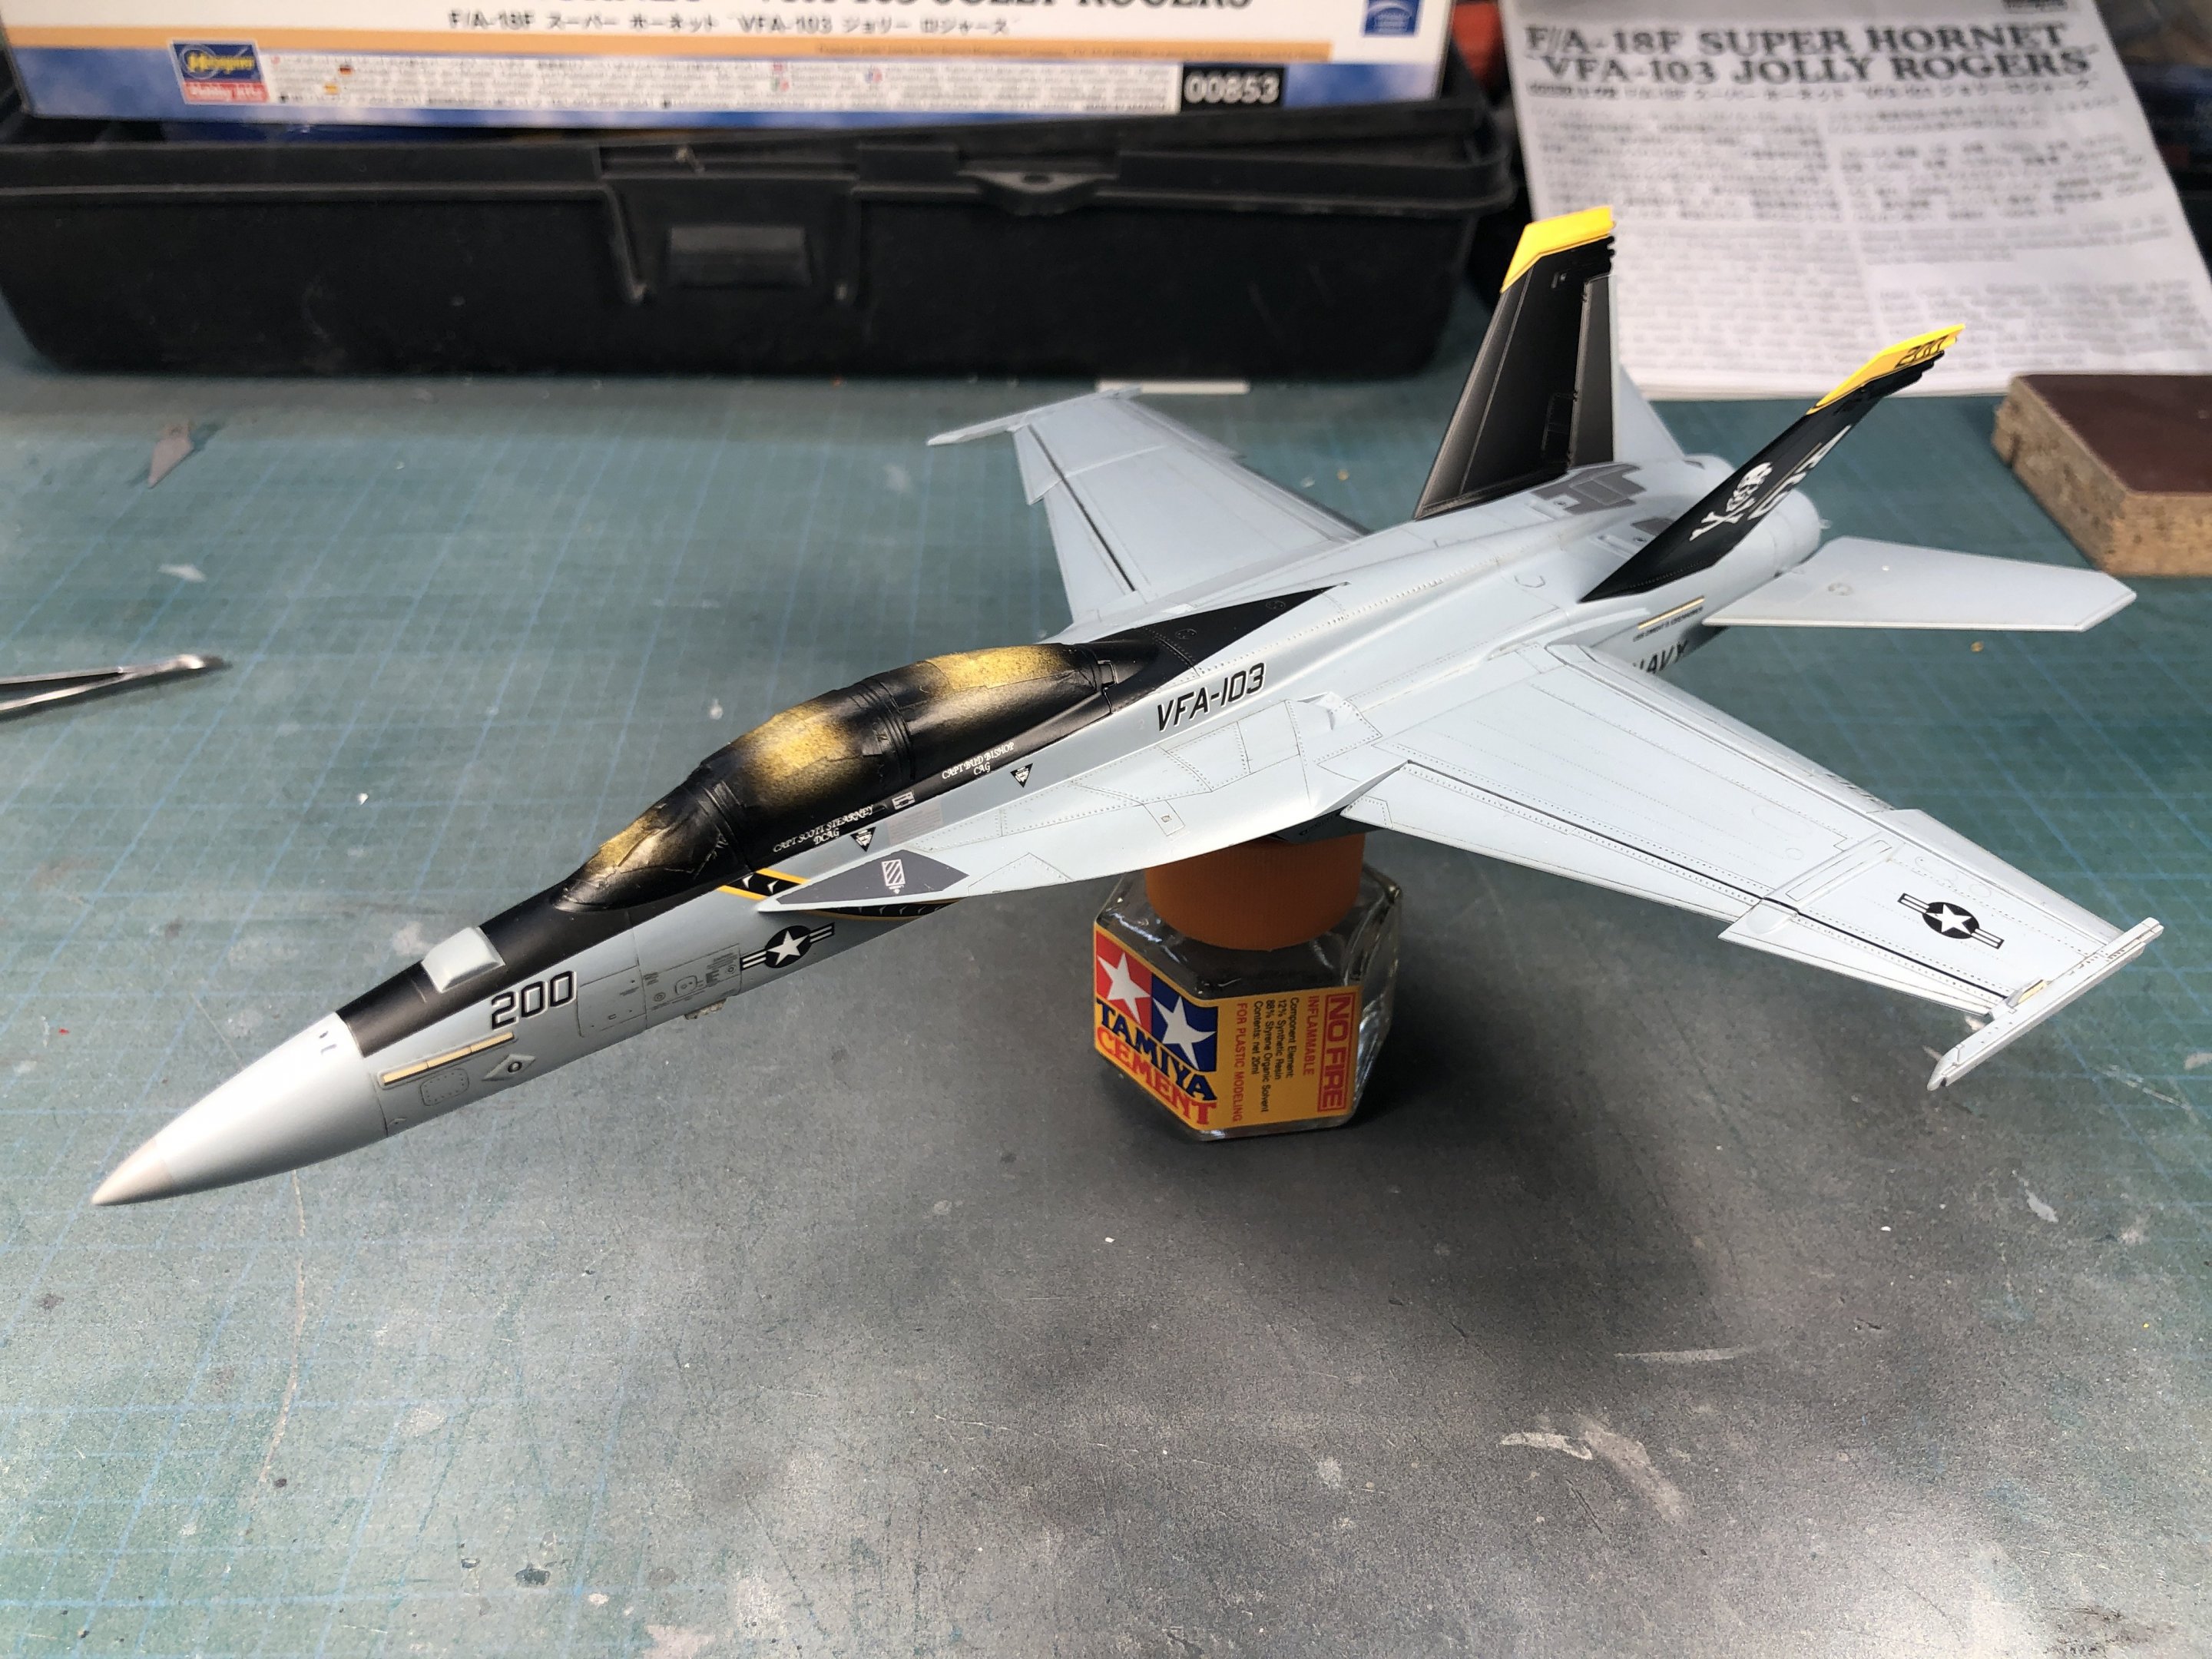
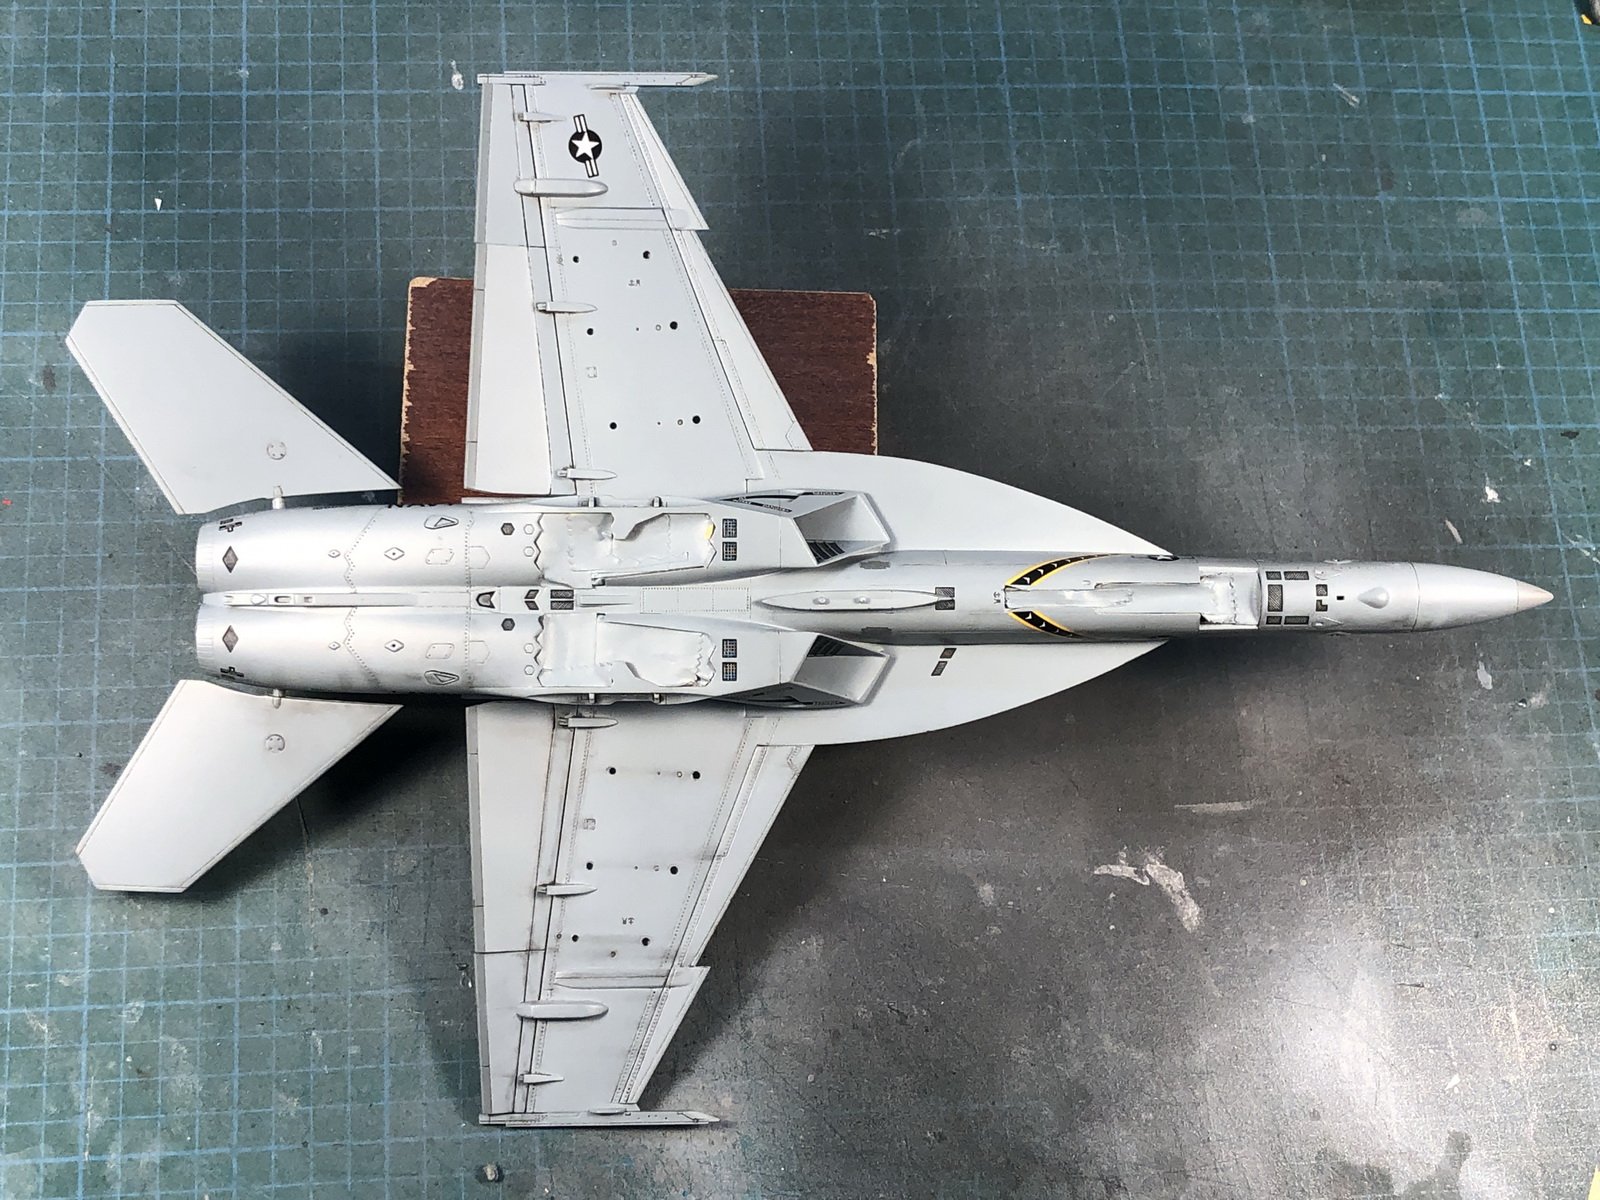
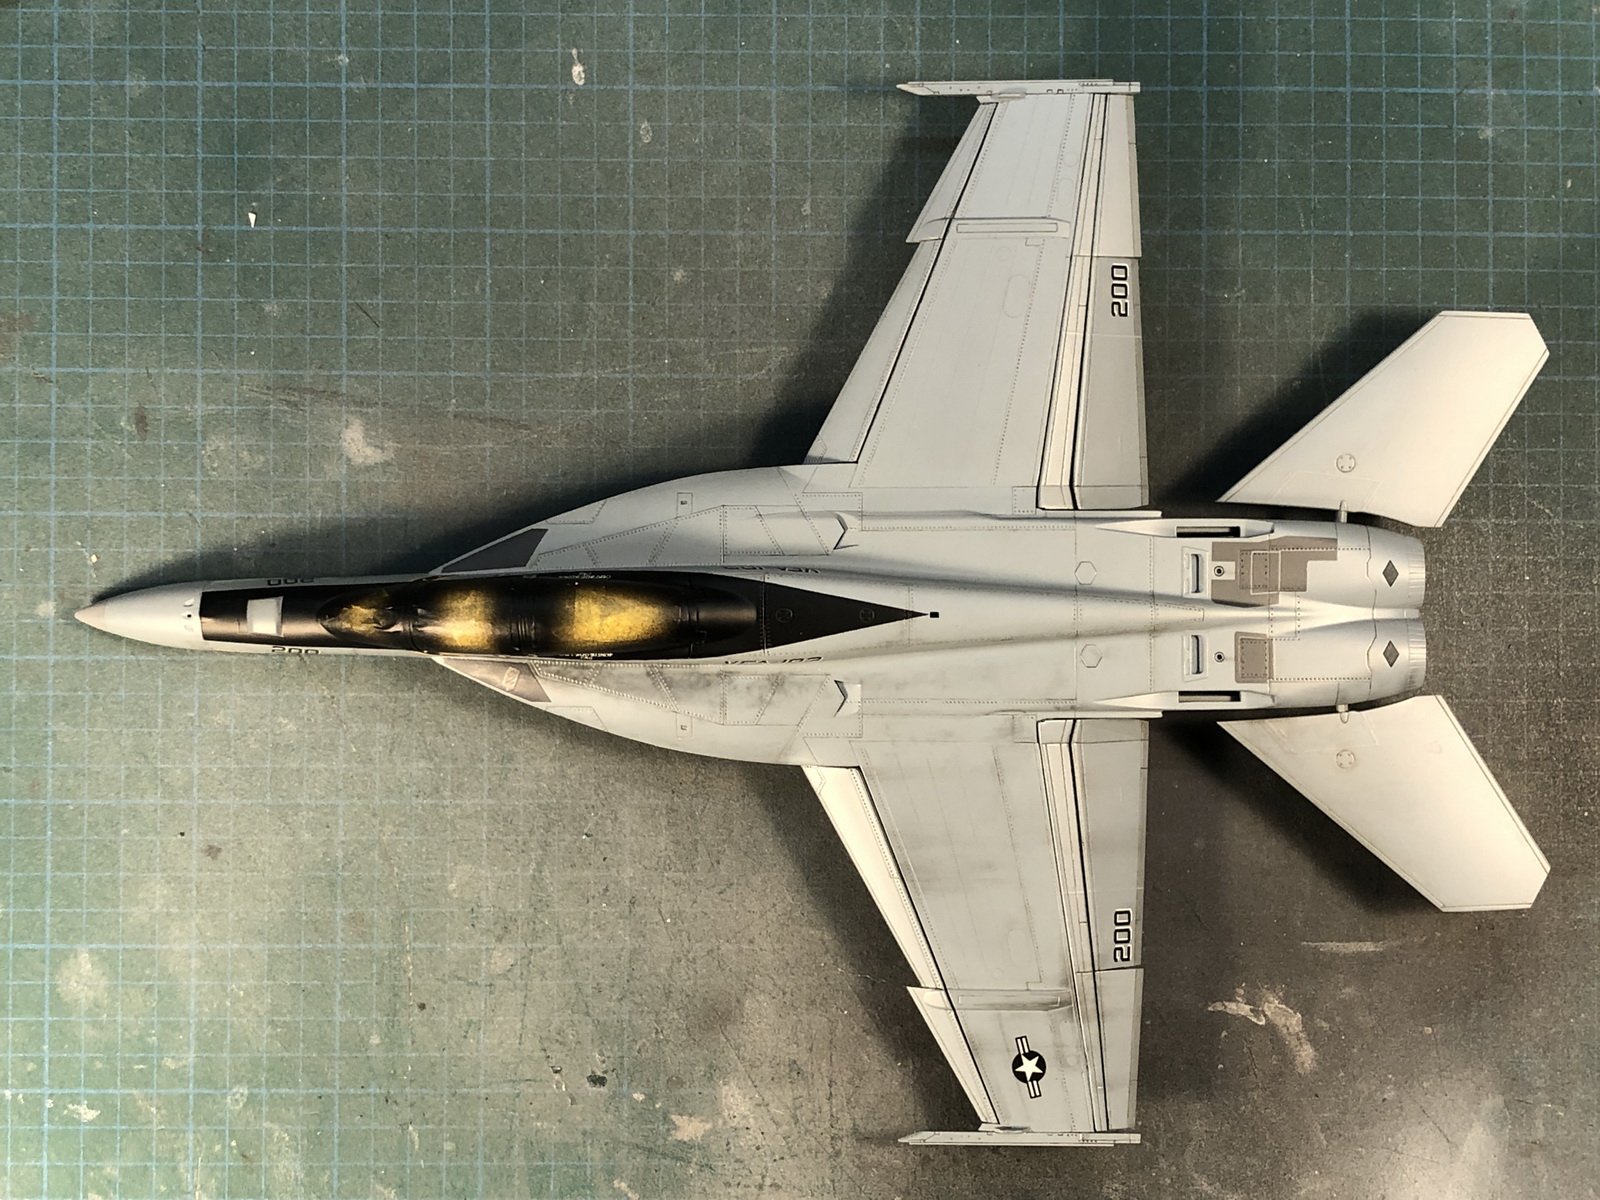
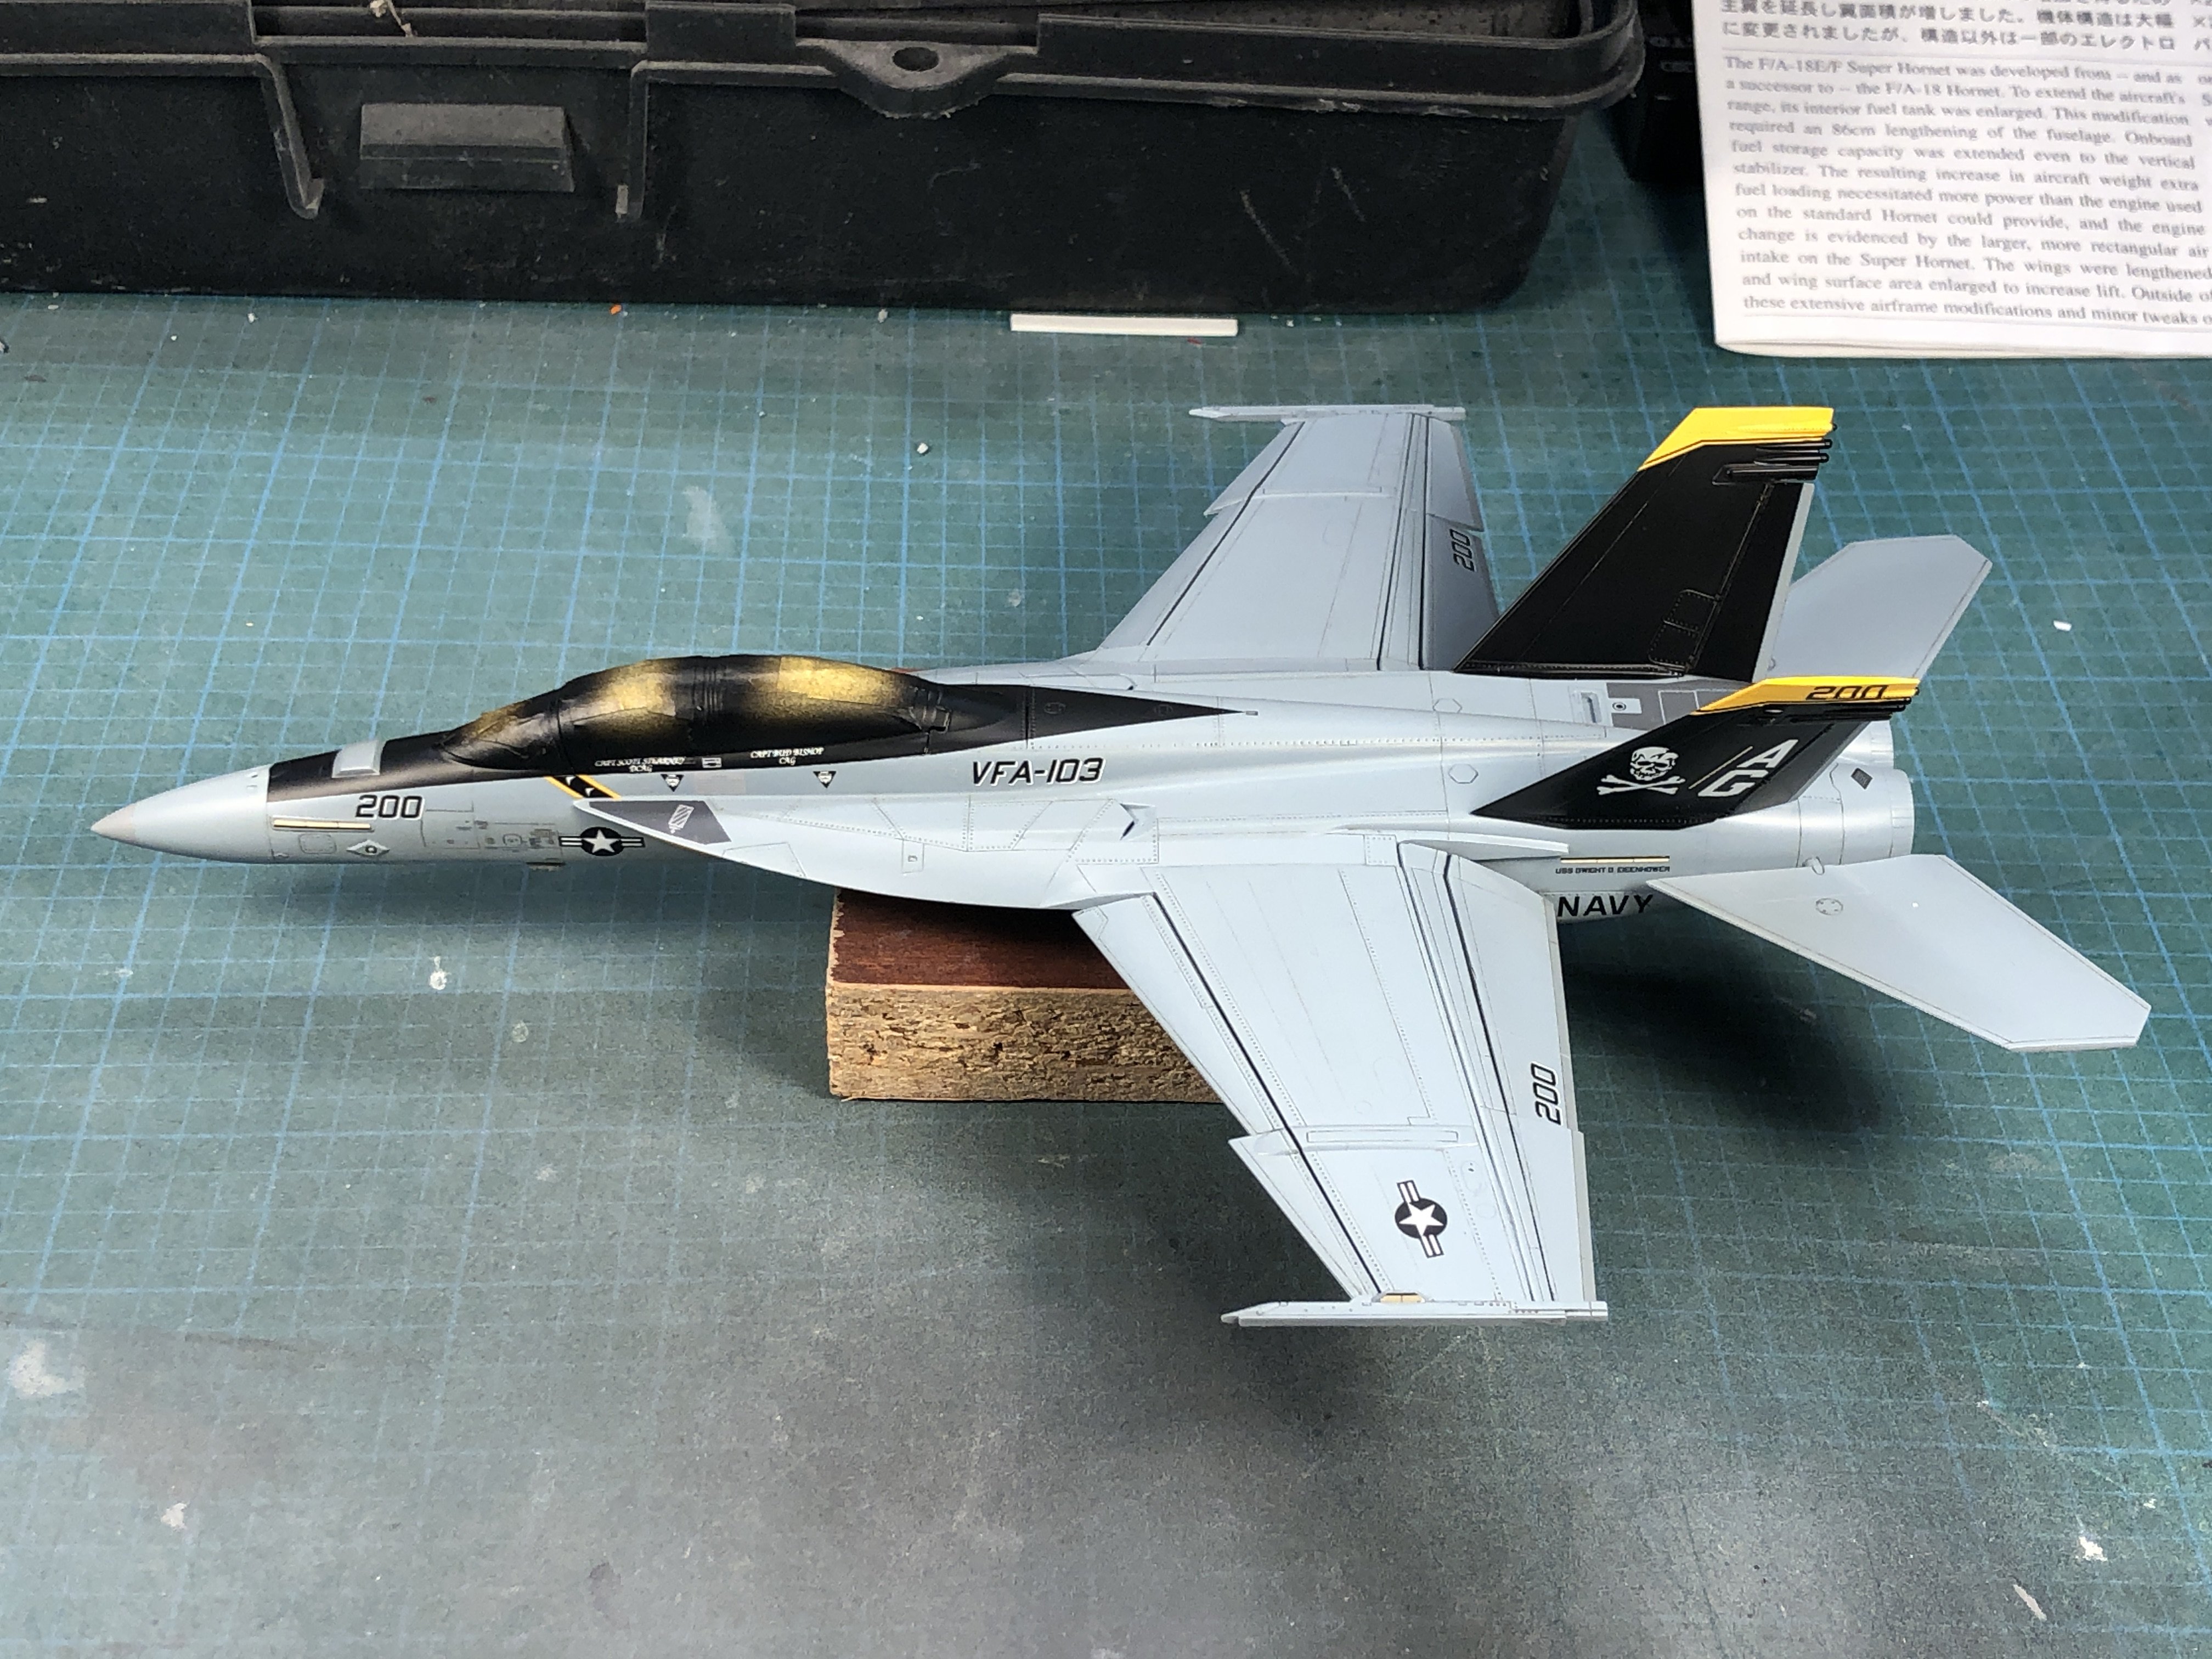
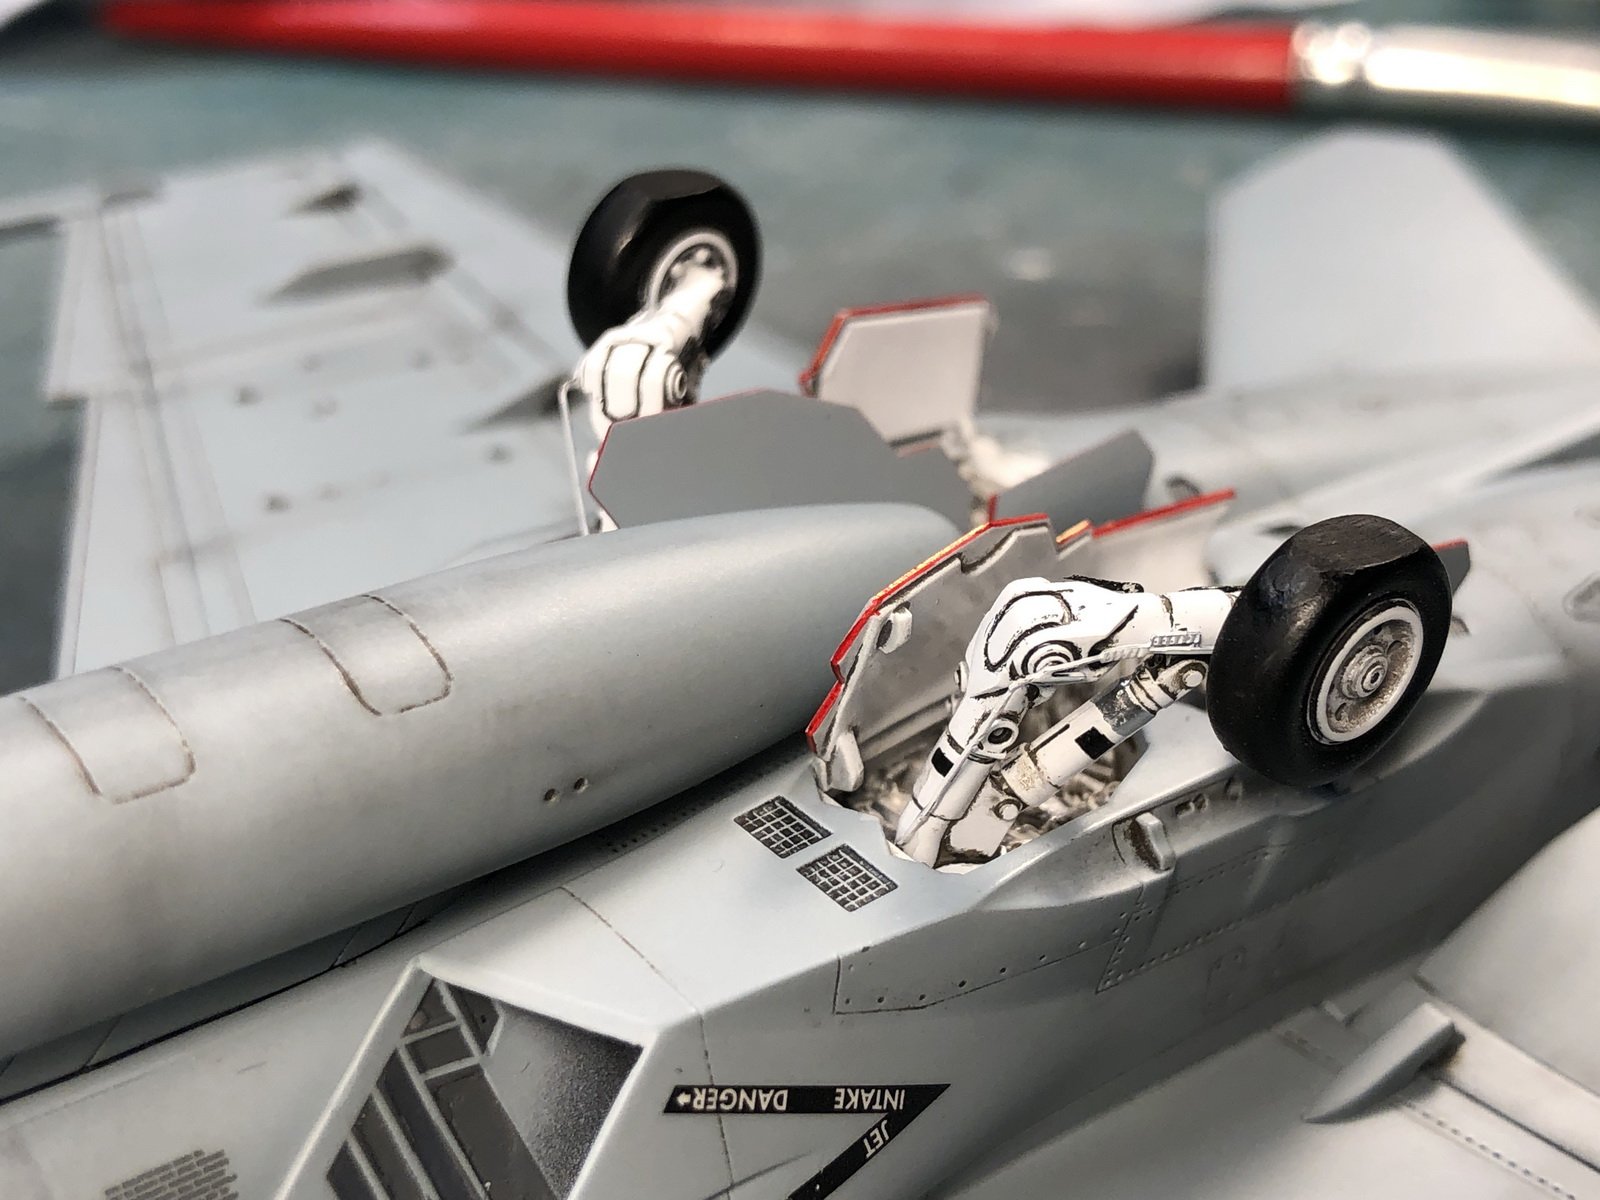
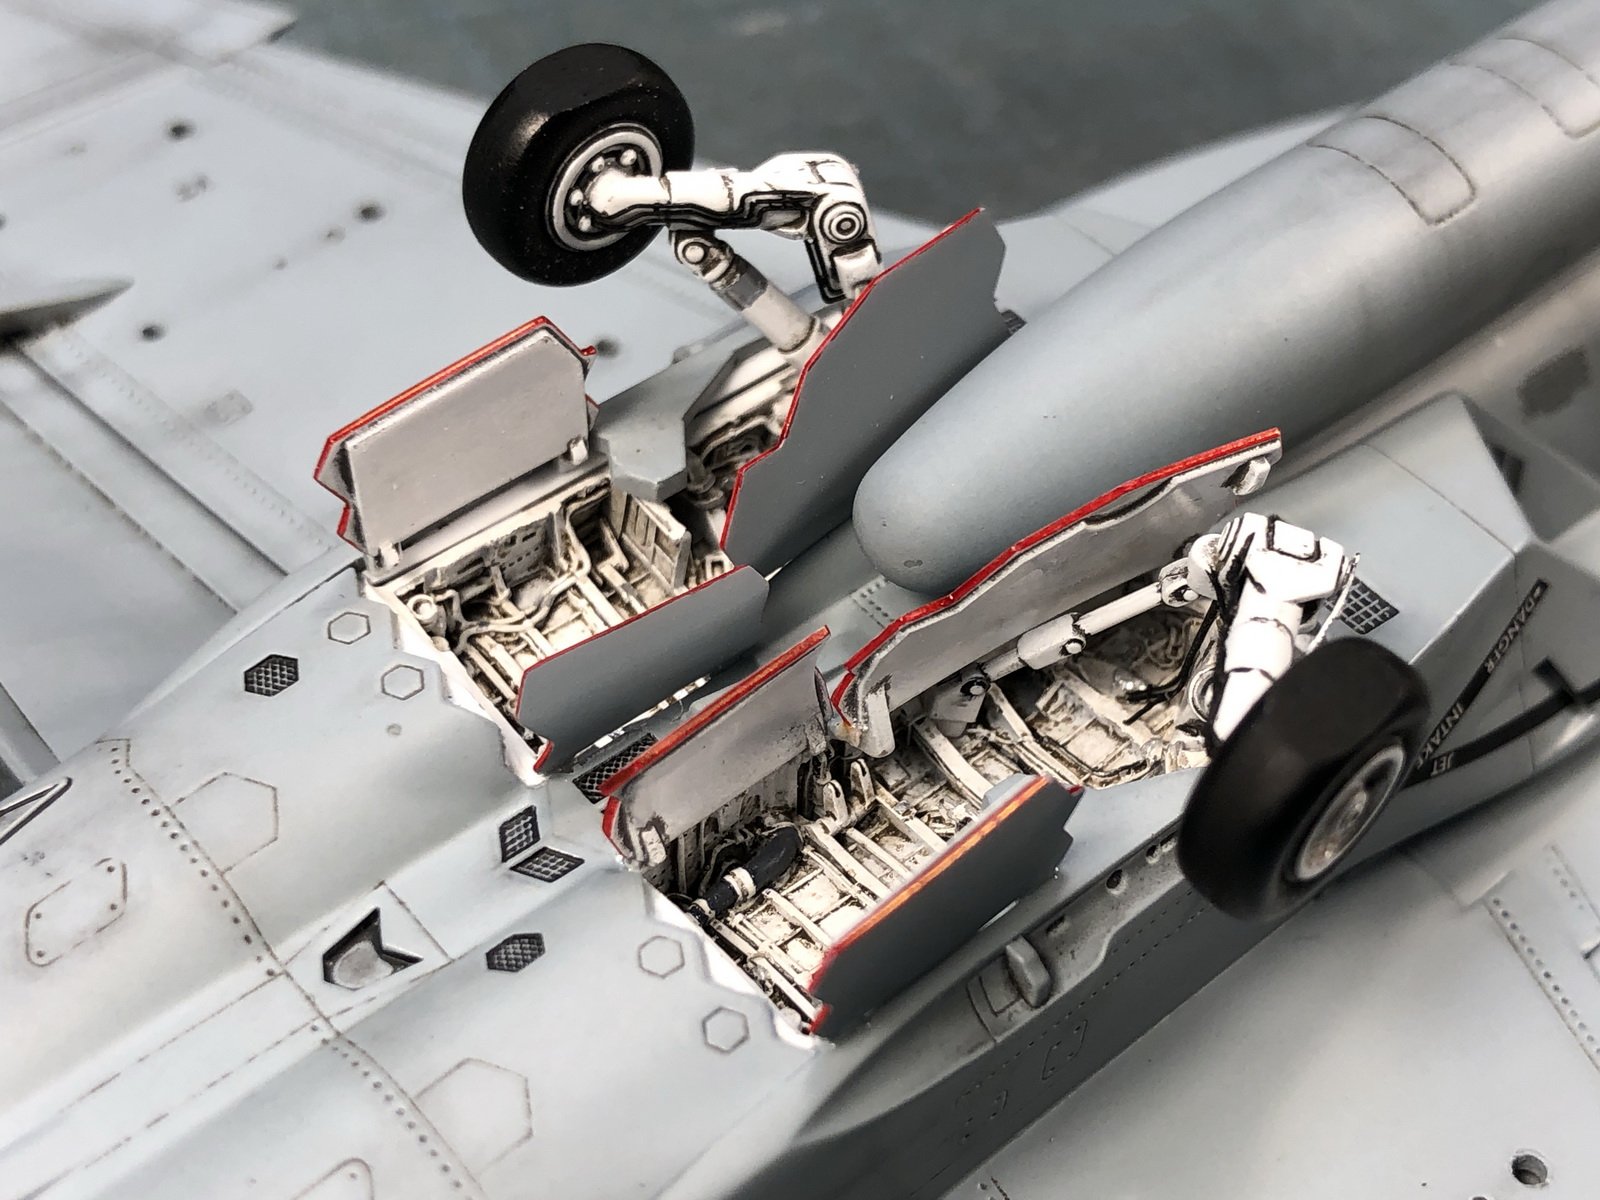
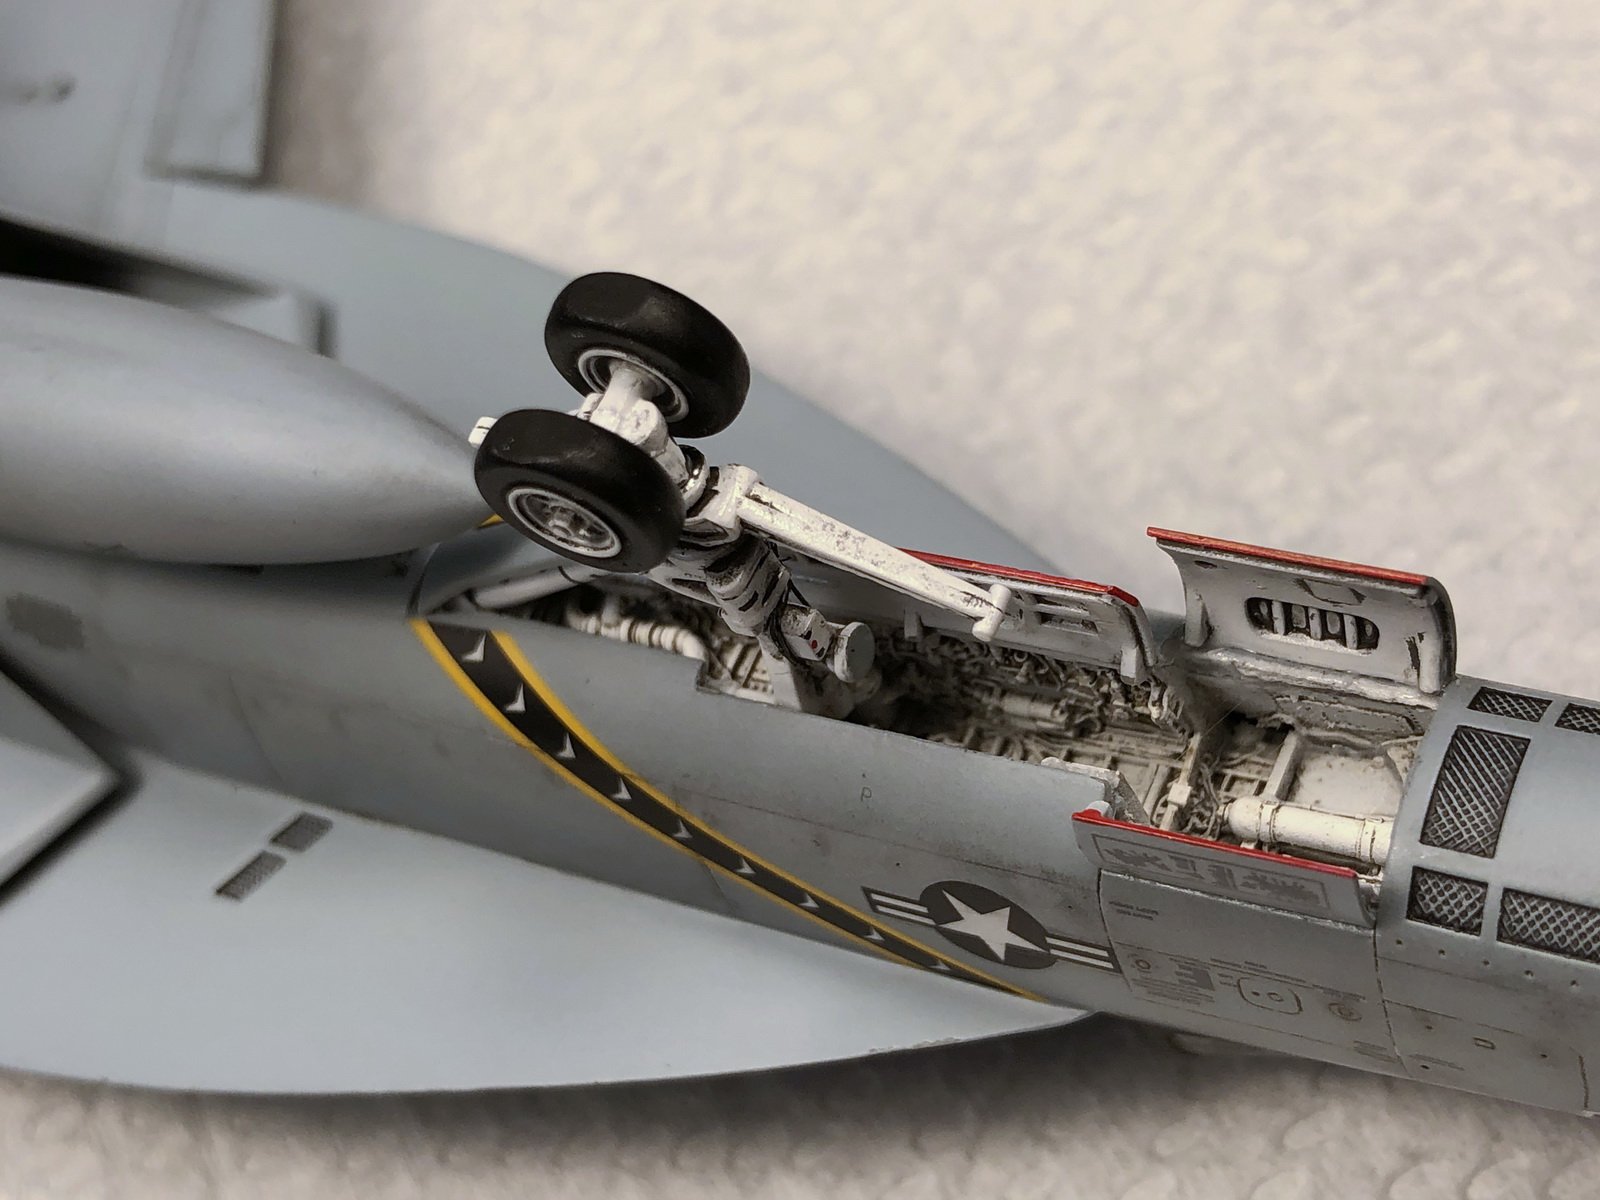
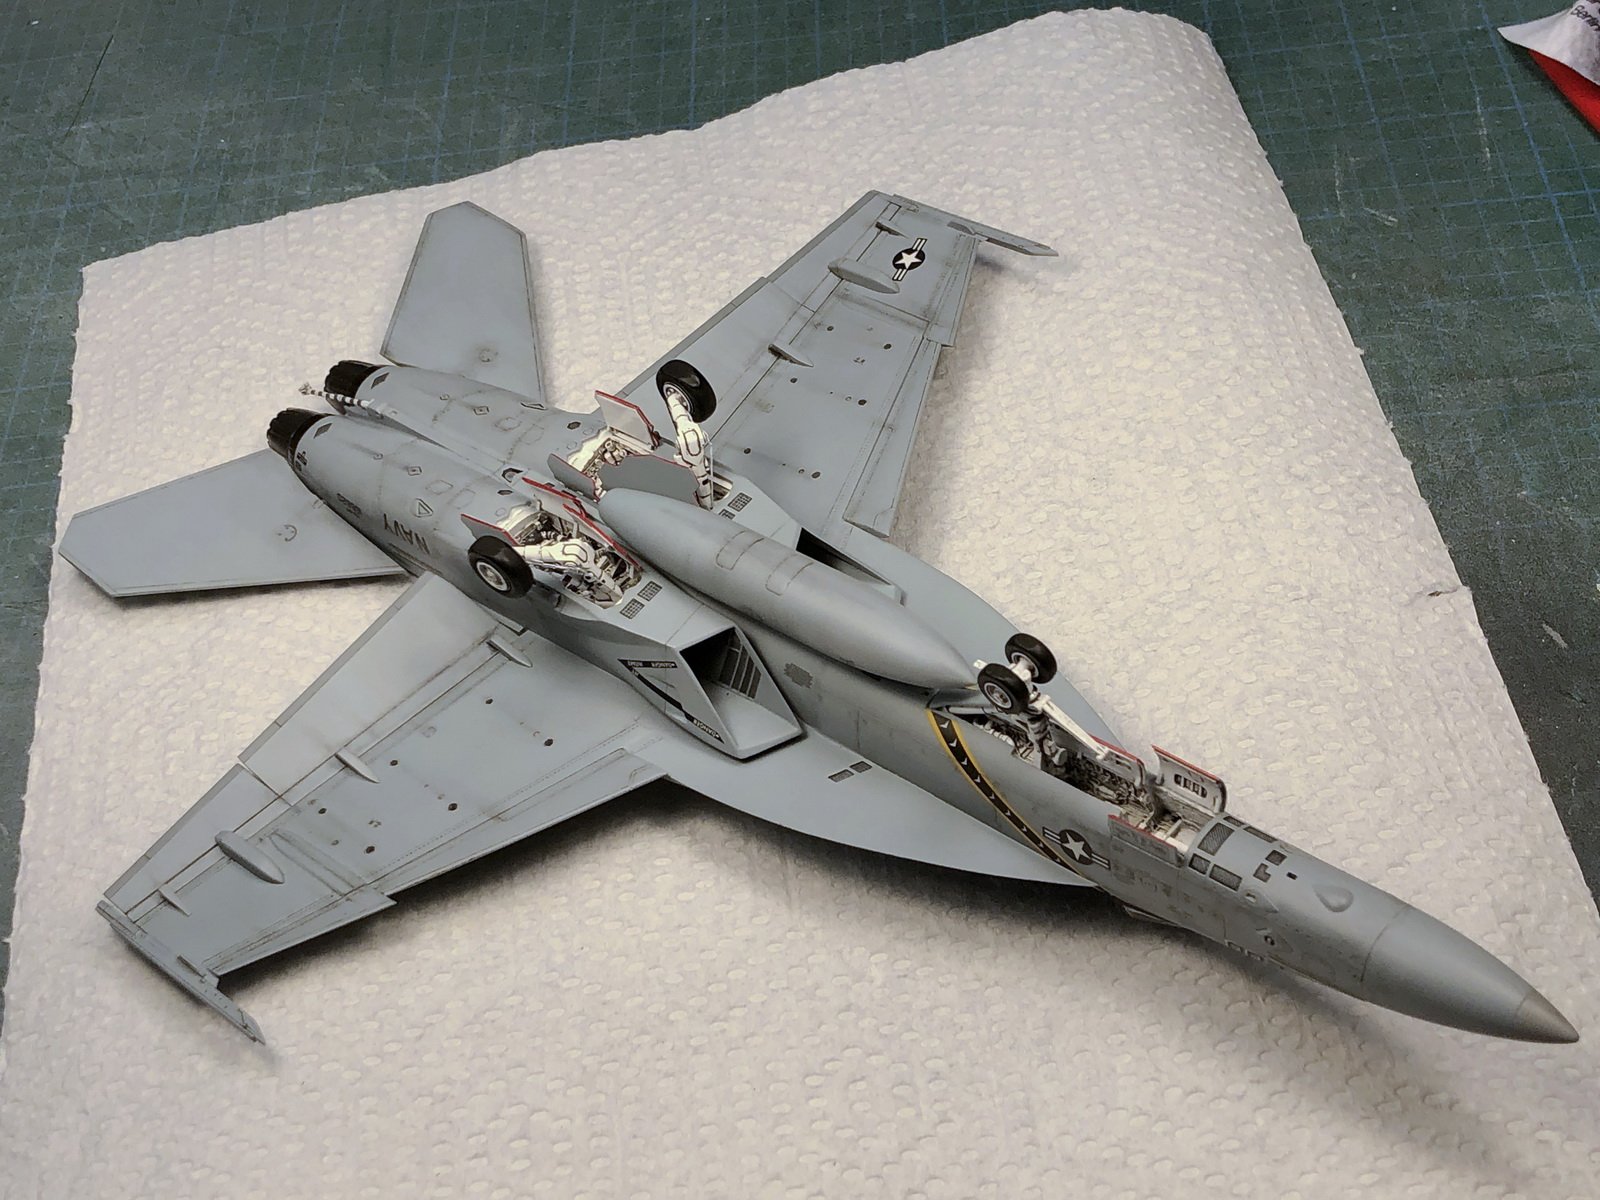
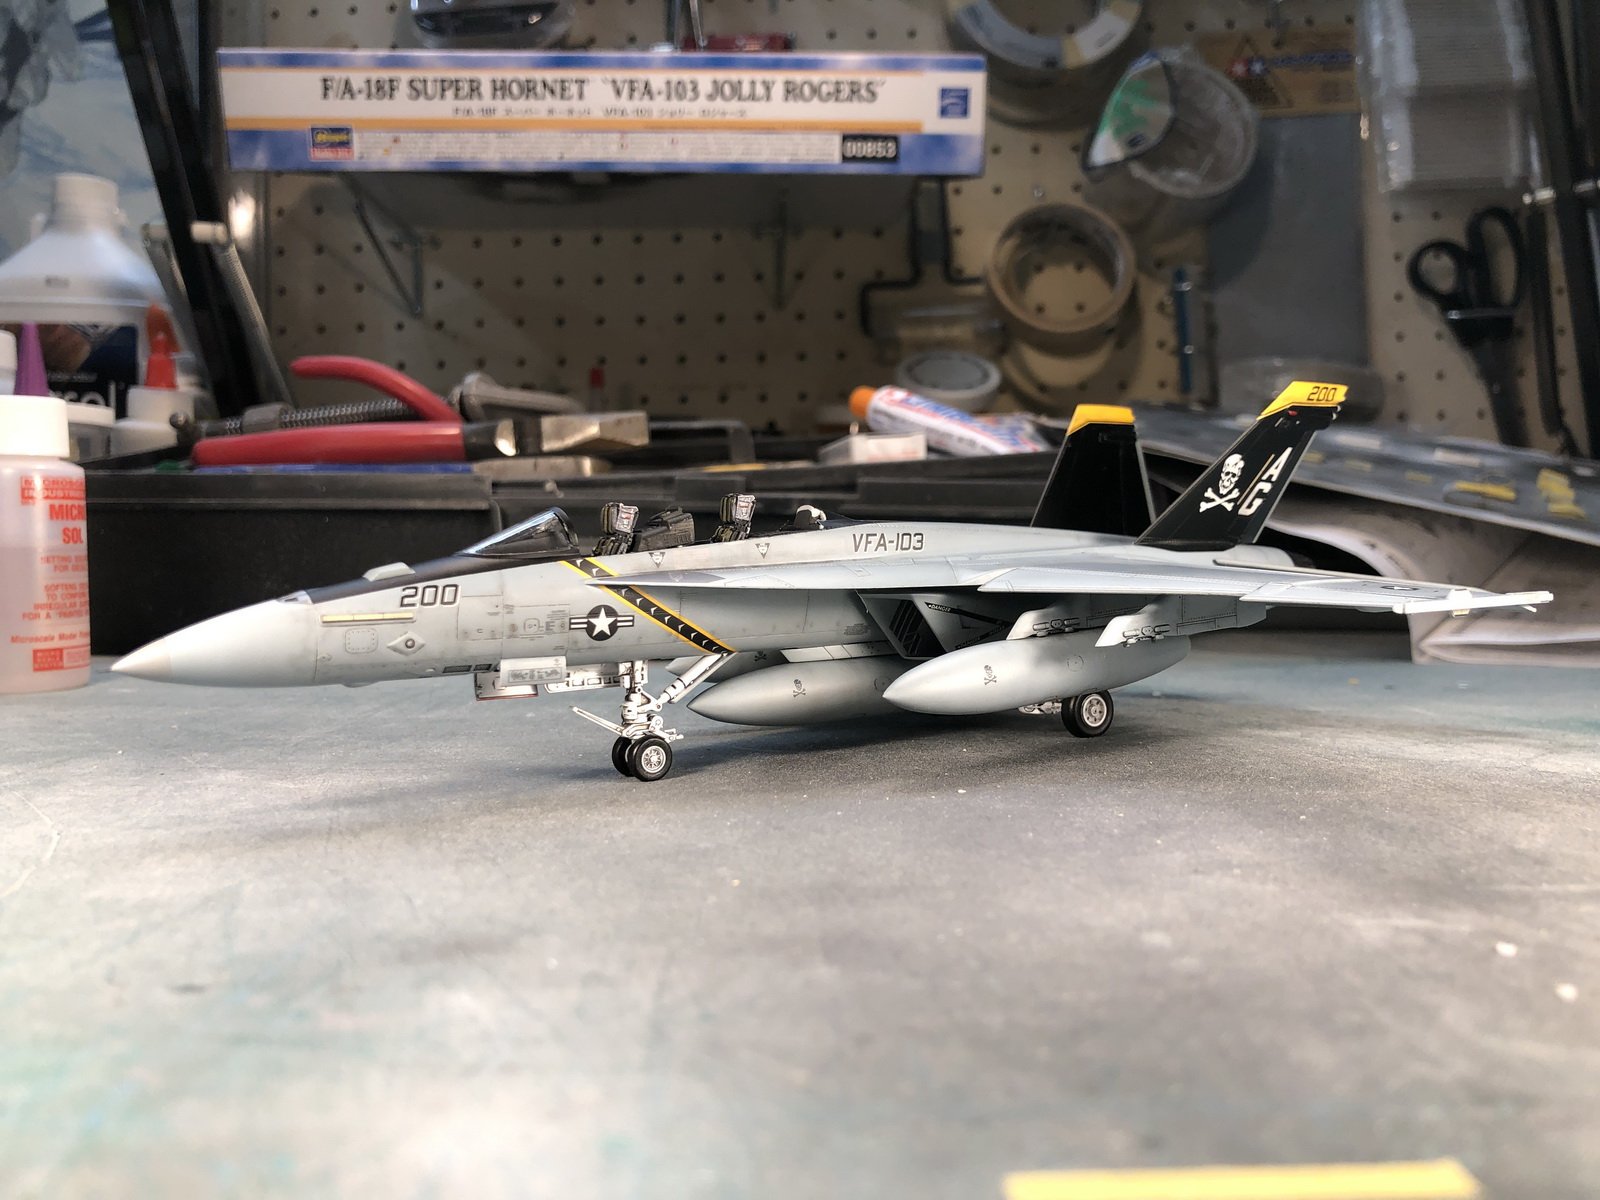
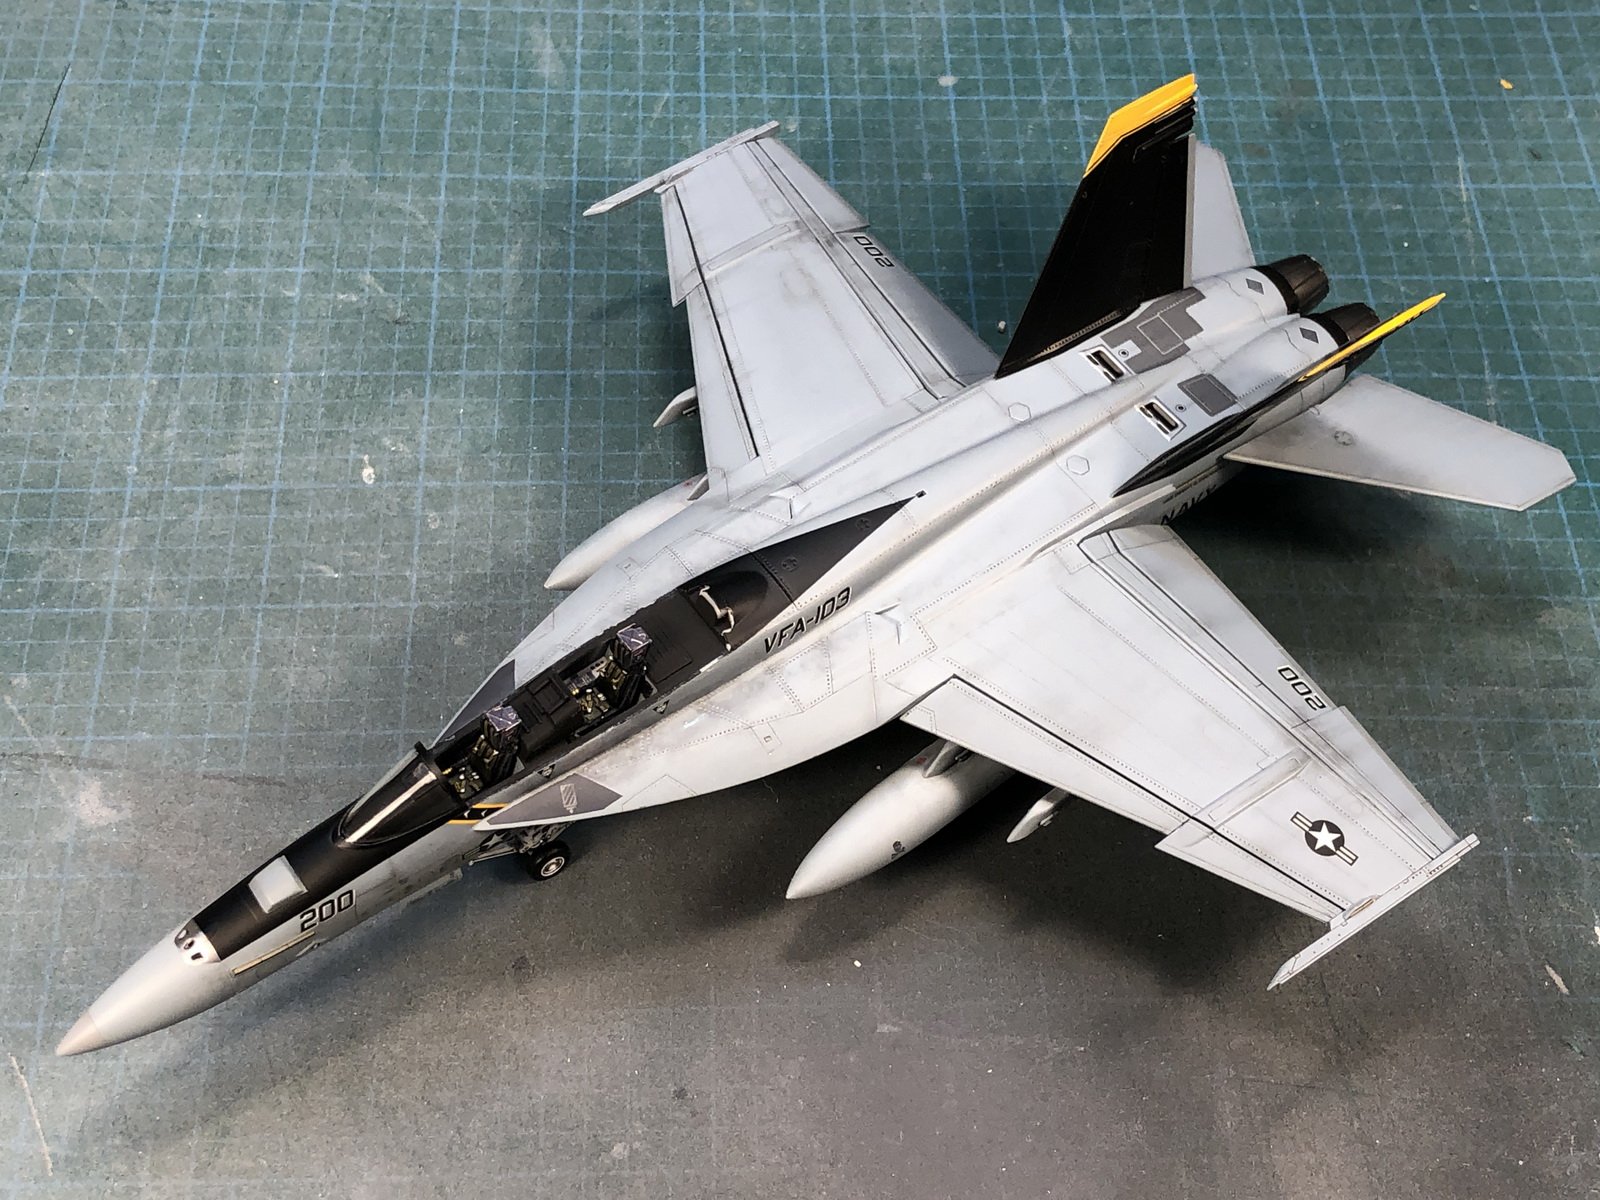
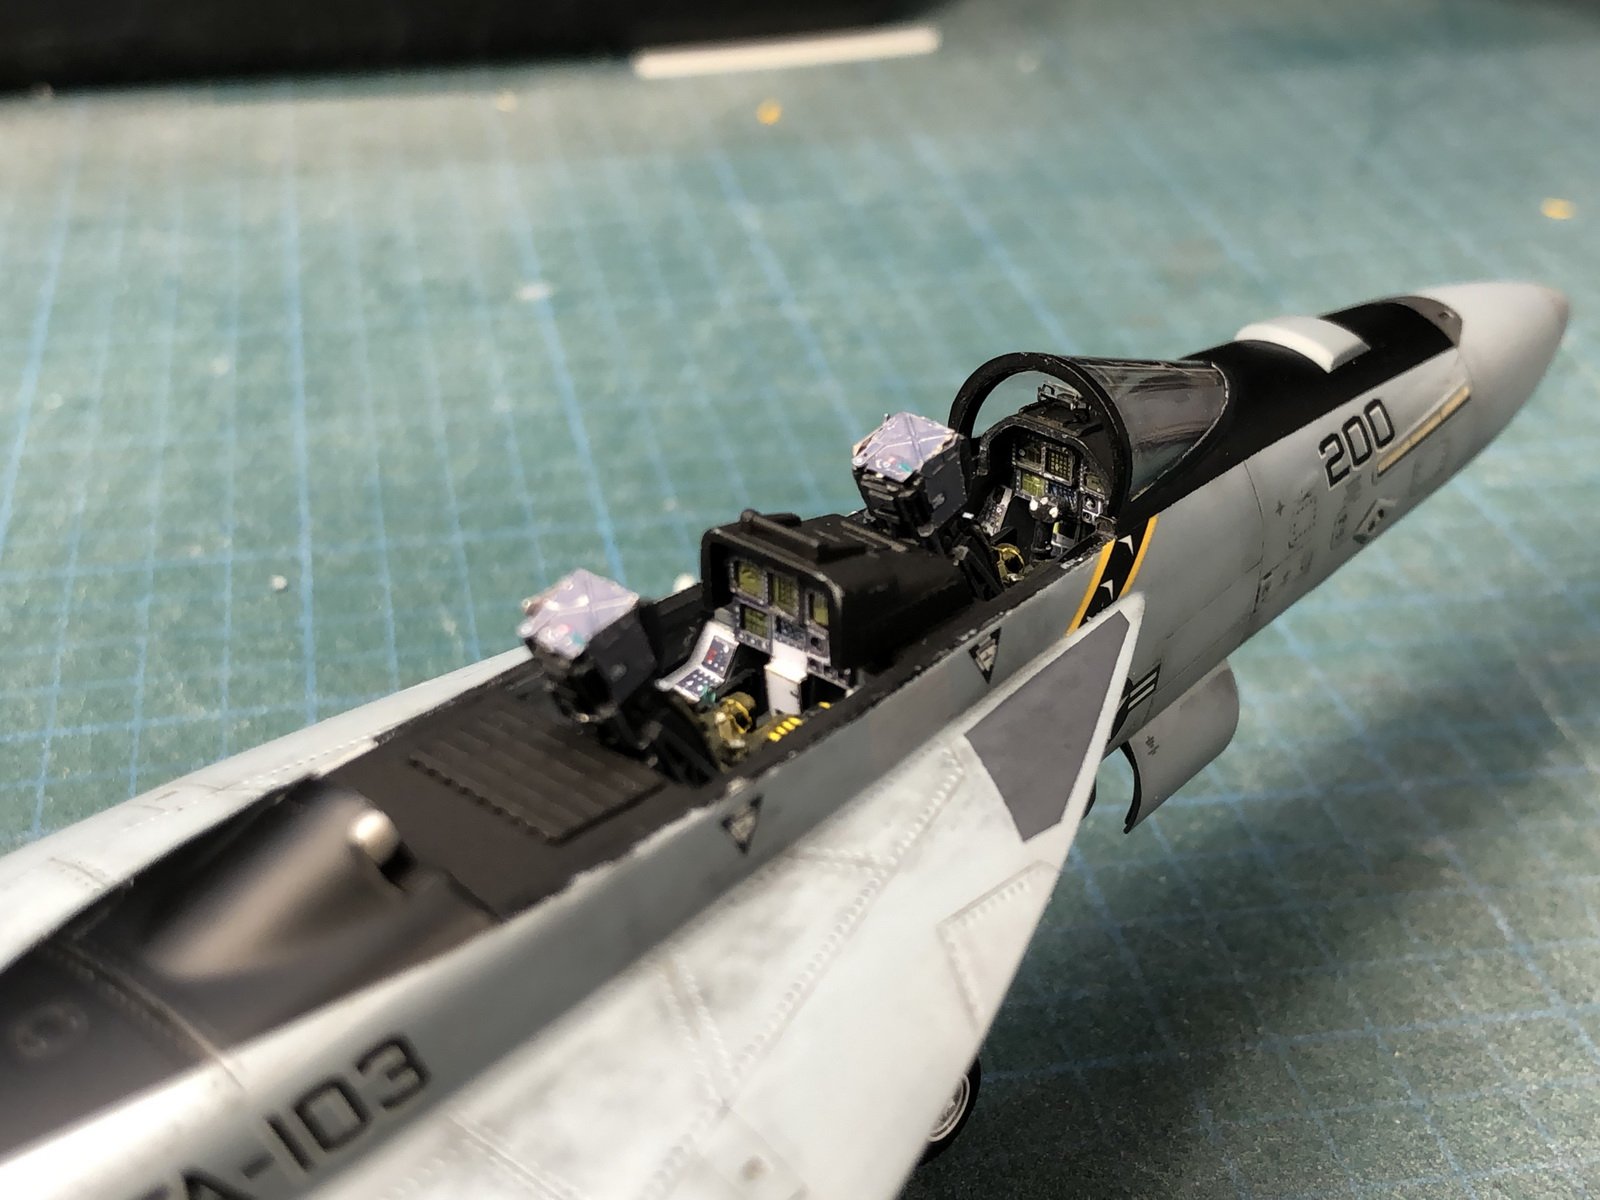
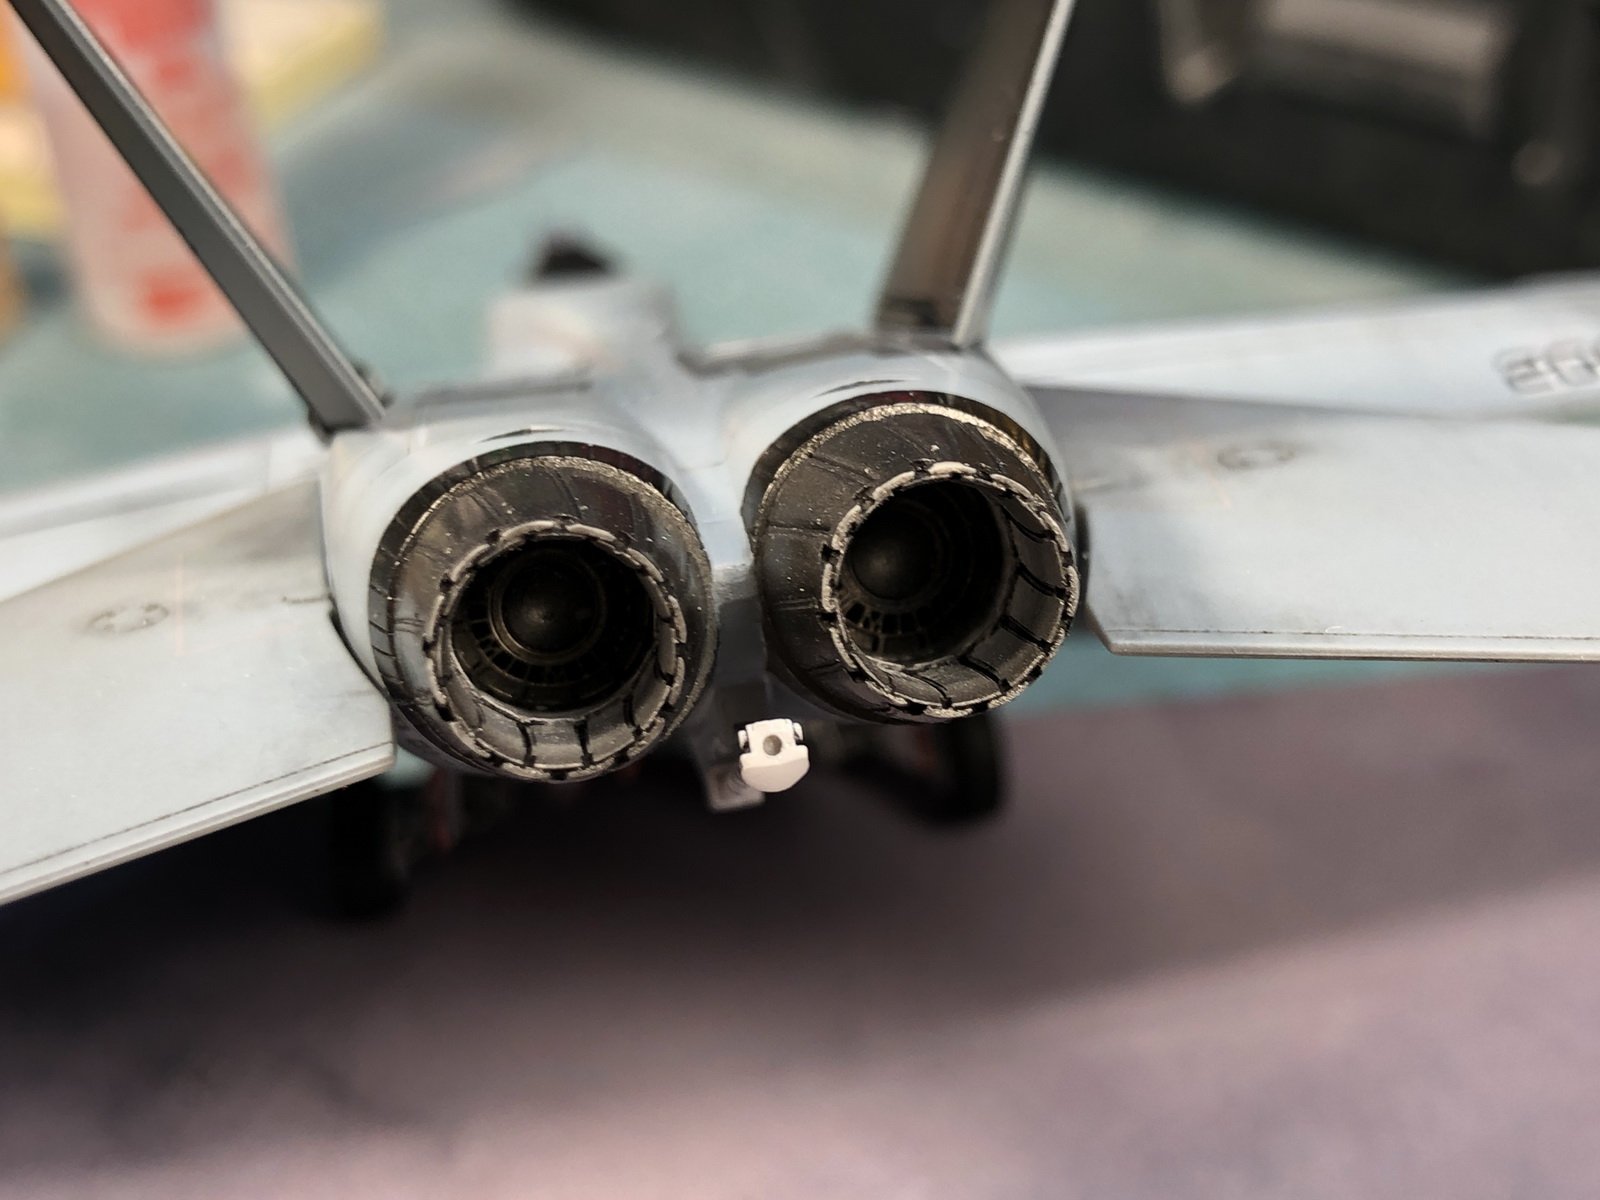
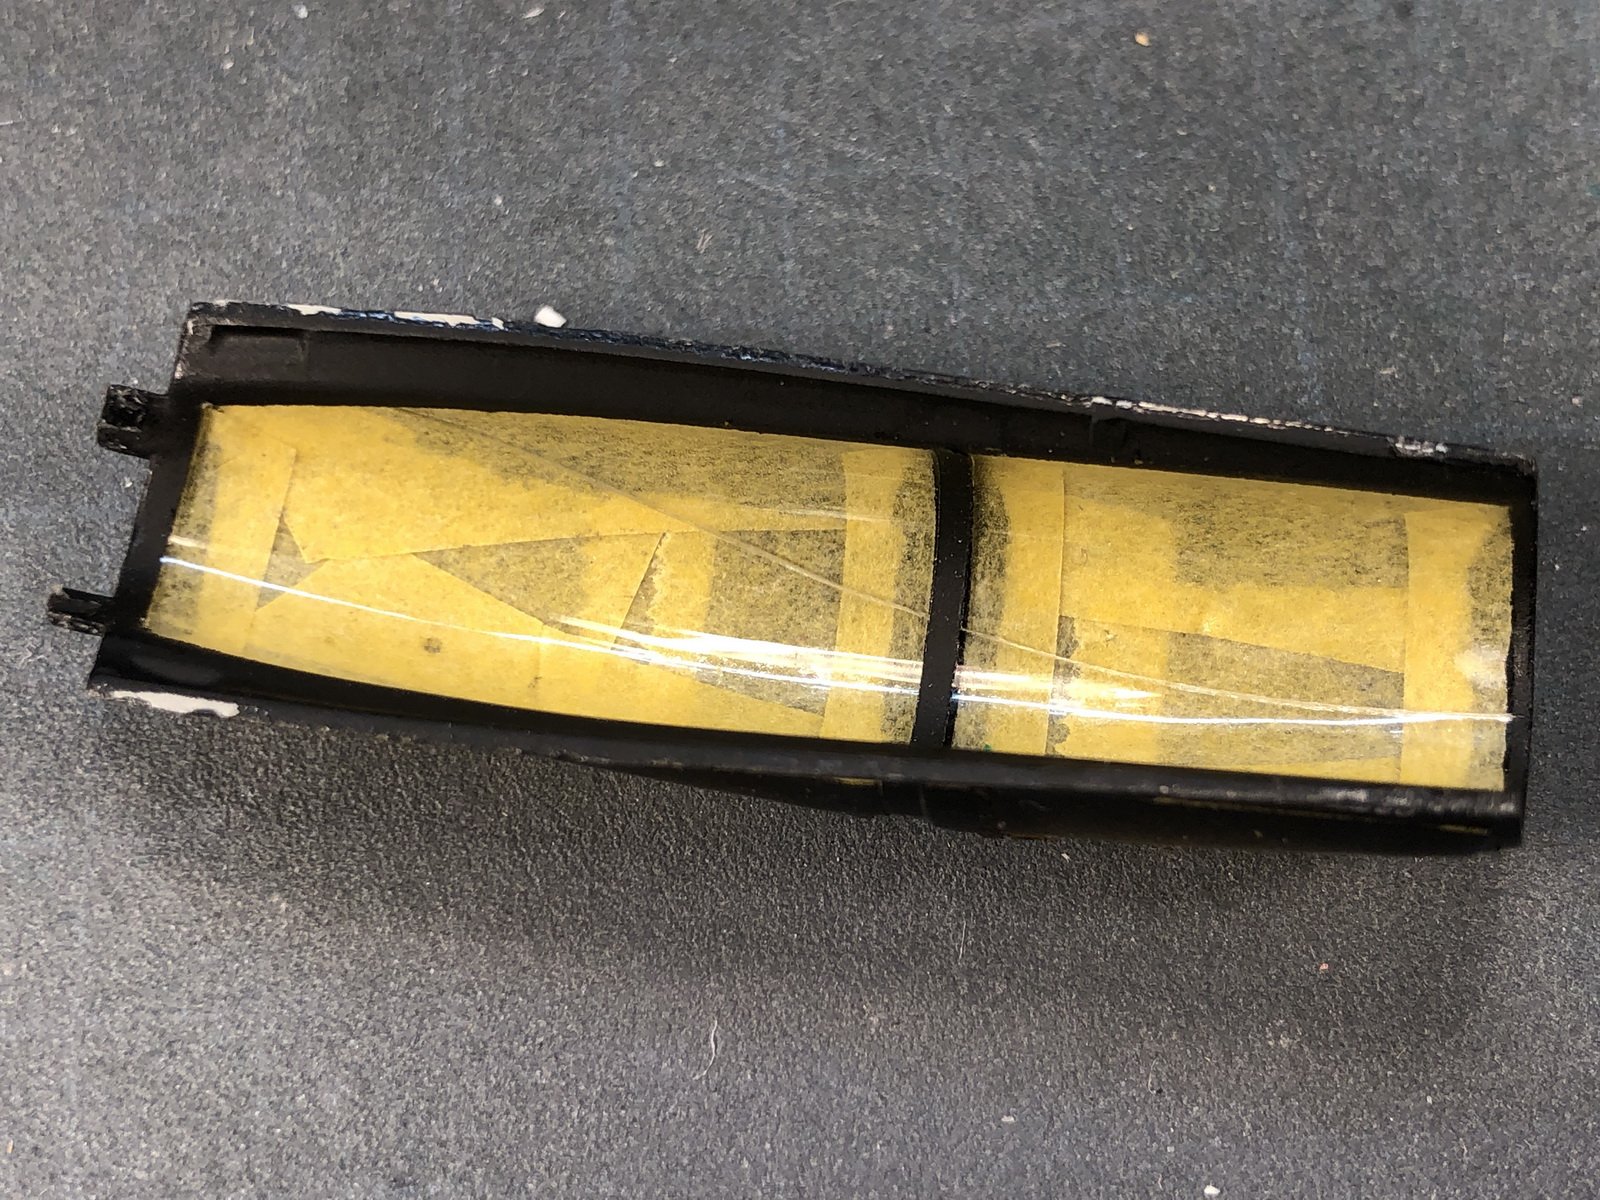
DISASTER STRUCK!!! Everything has gone wrong, even this post! This is the second time as the first post just disappeared with all my writing. I cracked my main canopy while trying to remove it from the fuselage (perhaps it was a bad idea to use it as a mask for the cockpit - I have done this times before with no problems). Maybe it was my first time use of the Mr. Super Clear Matt rattle can spray, it did go one much thicker than an airbrushed matt coat and gummed up and sealed the canopy fuselage connection. I carefully sliced all around the canopy but it wouldn't budge, I kept slicing an carefully prying the canopy out (I just used a dab of white glue to secure it originally) until finally CRACK! it cracked down the length of the canopy before giving way. ARGH!!! To me the cockpit and canopy are the jewels that bullseye the eye to your model - and this just screams out. There's been some many things wrong with this build, trying to shoe-horn the F-18A resin wheel wells into this 18F kit (it did pay off in the end, but it was so much work!), so much sanding and re-sanding of the horrendously poor fit of the kit, the tail fin yellow decal melted disaster, the wing tank that fell 5 times and had to repainted from scratch each time.... the list goes on and after each hurdle and trying to repair it, I finally get to this final break that is irreparable - just stings so much!!! The good stuff first, the extensive modifications required to get the resin aftermarket landing gear wells into this kit, of course you have to flip the plane around to appreciate it (I'm just a sucker for punishment. The top side, the tail fins aren't glued in place yet and you can see all the damage around the edge of the canopy opening trying to pry out the glasss, but the rest of the plane turned out well, its actually a little more heavily weathered than the photos suggest (it tended to white wash a lot of the finer weathering out) I had to majorly cut the afterburners short to fit into this kit because there were internal bracing for the rear stabilizers that I had to clear but you can barely make out the photoetched fuel burners at the end of the afterburner tunnel. So to in the off chance if anyone knows how I can order/purchase an extra canopy and a set of the decals for the pilots names and warning label for the canopy, I'm posting the very sad picture of the cracked canopy. I see if you live in Japan you can order just trees or decals from Hasegawa, but I do not, I'm in Canada. I will post to ARC if there's a kind soul there to help out or last case scenario, I'll just buy another kit for these parts (I've invested too much sweat and tears to throw it out at this point.

-
Love seeing all the builds lately! Nice to poke back in on the boards. Very nice scheme of the VF-25 @CrossAir. Love that Armored @CHAVAKAISER. @Return To Kit Form I don't recognize your figure, where is that from? Nice paint job though.
-
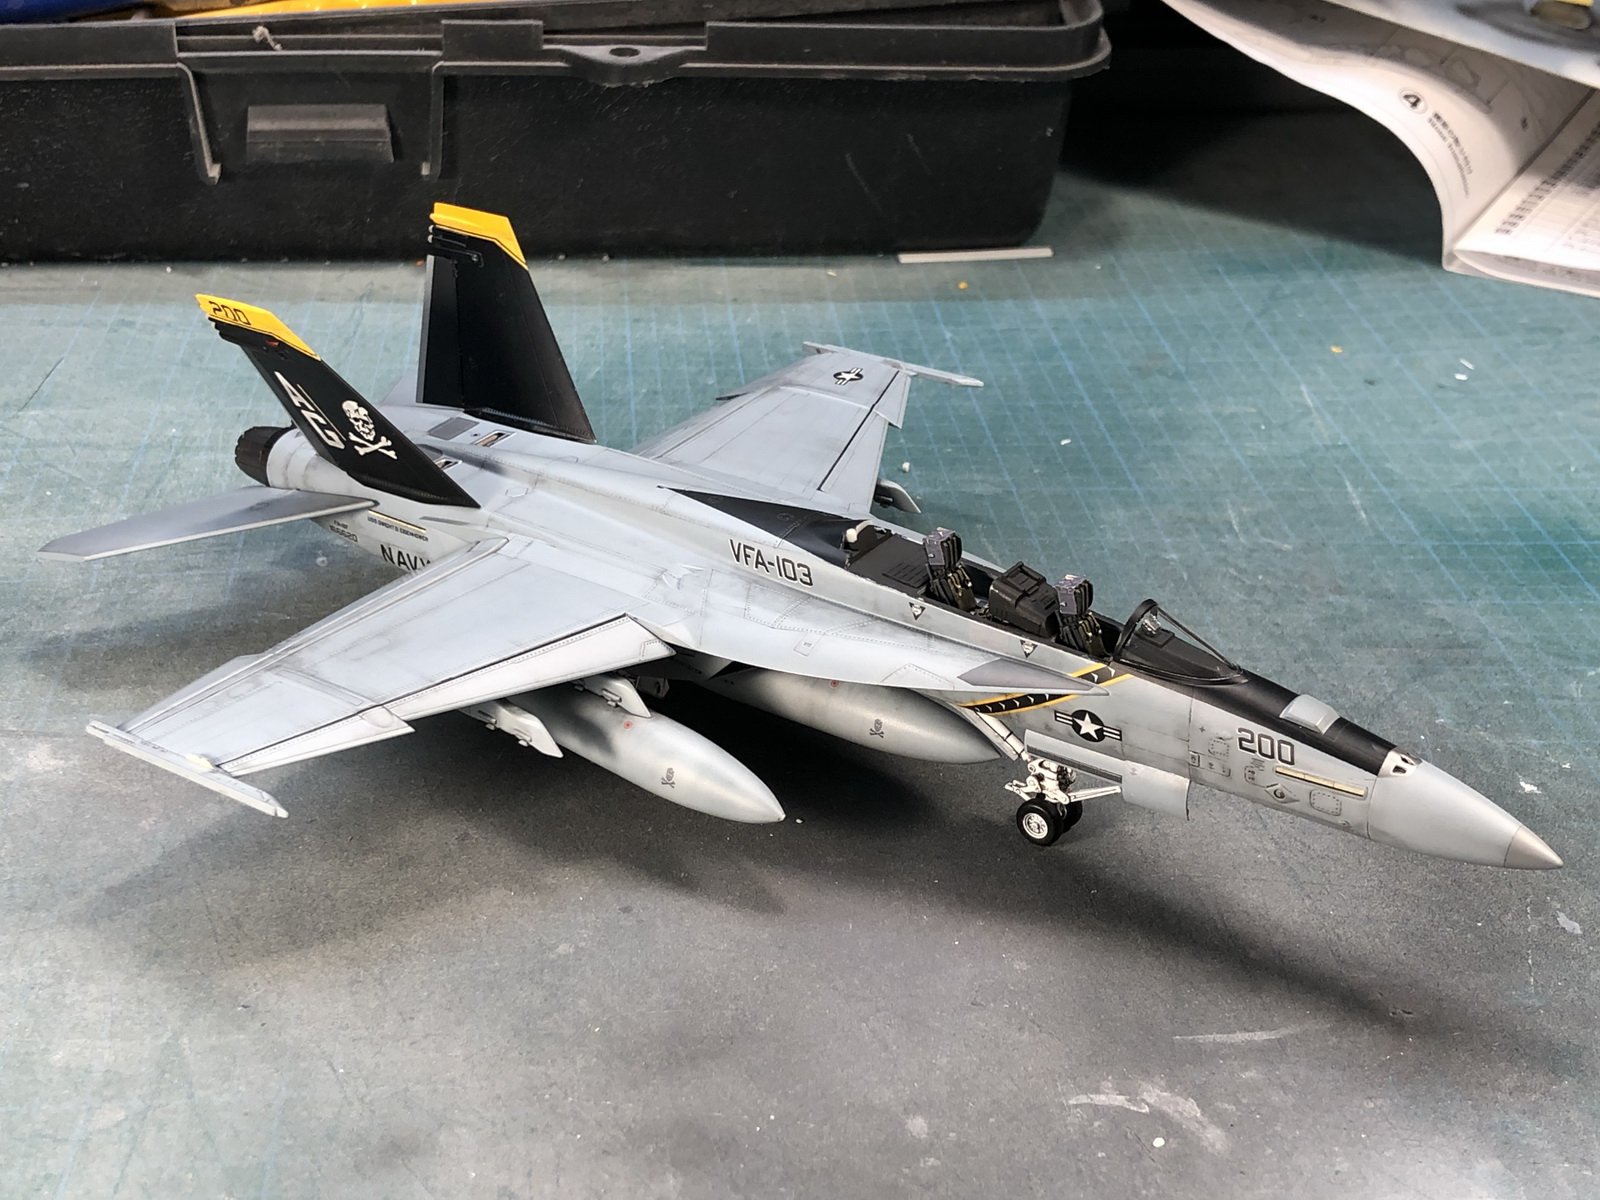
OMG @MechTech that US Navy.mil photo site is AMAZING!!! THANK YOU SO MUCH! I could loose myself there for hours. What a great resource. To all the people building the Bandai VF-25 transformable model - you have brought back PTSD for me Best of luck, less painful to watch others go through it but it makes me relive my bad memories. I congratulate you @joscasle for attempting to paint all the markings, that's the way it should be done and your patience will pay off big time in the end! I just wanted to jump ahead and not get hung up on the ordinance issues so I went back the the main bird. This is the last time I get to see it clean from the factory. BTW, I love this Mr. Super Smooth Clear Matt rattle can - I used to mix Tamiya flat into Future to provide a clear matt spray, but it took a bit to get the mixture right and I found matt to dry/gum up the airbrush a lot during spray. So the lazy me took to the clear matt rattle can and its amazing! No clean up and super smooth and highly recommended. It leaves a matt that will take weathering, but still has a slight sheen to it which is perfect. I started the weathering with some graphite powder (mechanical pencil shavings), smudge stick (blending stump) and kneadable eraser and started to work on half the plane trying to follow the photo references as much as possible. All the photos show they kept this particular plane fairly clean with the exception of the walkway near the canopy. This is my first past. I'll maybe tone it down and blend it in a bit more, the nice thing is you can just erase it if its too heavy or add if its too light. I kept the underside very lightly done as they were much cleaner than the top Its hard to get the real handprints with the paint over at this scale (I need a really sharp eraser to get those cleaned off patches)