promethuem5 Posted January 4, 2009 Share Posted January 4, 2009 Hi all, This is going to be a a photo work blog for a comission I received for a pair of Clone Trooper squads repainted in the Republic Commando team scheme from the video game. One set of 4 will be parade clean, and the other will be in action weathered and beat up looking. The customer asked if I would do a WIP blog as I worked through the sets, and I thought this was a neat idea, and something I've never done before, so this is gonna be a learning experience for all of us I asked the customer for an extra generic trooper figure so I could test techniques and the checmical reactions of all the paints and such... sometimes softer plastic figures react funny to paint, but I've gotten some advice on what to use to prevent this, so this first guy will be my test bed figure... a second generic was also provided, and both will be finished up as extra detailed generics for the customer. First two pics just show my first vic...er volunteer! All that's happened in this pic is that I used some files and sandpaper to clean up mold seams on the figure, and get to know the sculpt. The second pair of pics show our hapless trooper after primer and a basecoat... there's a few spots to touch up with a brush, and I need to get more canned air, but this is the base color I whipped up, and made enough for all the figures I recieved (and maybe more). Right now the base color looks a bit dark and grey, but this allows me to build up the white color a bit and add some depth, and then I can work from there... the tonal value of the figure will change as I work thru the weathering and such as well, and since I want to test all of the products I'll be using, this first guy will get plenty beat up. I've been looking around, and have gathered some reference pics of the four RC video game troopers, and was provided some more pics from the customer, but if any of you fans from the crowd have some especially good pics of each guy (front, and especially back if possible) I'd appreciate the images. More to come tomorrow night when there's more to show. Quote Link to comment Share on other sites More sharing options...
promethuem5 Posted January 4, 2009 Author Share Posted January 4, 2009 Alright, our plucky young volunteer is starting to look like something... drybruhsing was used to build up to the armor color (I opted to go a bit more off white than white, as I think it's more interesting... leave stark white for the Stormtroopers). A grey oil wash followed to pick out details... I'm going to throw a few appropriate markings on the figure and seal it before adding in the under-armor suit at the joints and beginning the weathering. This is closer to where the parade clean set will look. Quote Link to comment Share on other sites More sharing options...
promethuem5 Posted January 5, 2009 Author Share Posted January 5, 2009 Alright, Sgt. Test-bed is just about done... the first couple pics show him with the quick and dirty Clone Trooper-esque markings I threw on, and the rest show the figure in its current state... only thing left is a coat or two of Future to seal all the paint (especially on the joints) and seal the paint to the plastic, as I still don't know if I can trust the checmicals on the soft plastic, and as Future is an acrylic finish, it basically makes a shell over the paint that keeps it in place and prevents any reactions... after that I'll throw on another matte coat and maybe a few mettalic scratches and gloss the visor. Let me know what you guys think, as this is what I'm thinking the RC figs should basically look like... I tried to keep the Lucas-ey palette... troopers and the like have a pretty limited color palette on their armor... it doesn't rust or streak, but it gets dinged up. Quote Link to comment Share on other sites More sharing options...
Dax415 Posted January 5, 2009 Share Posted January 5, 2009 coming along nicely! amazing how a good paint job brings out details in a action figure you wouldn't normally see with the factory paint. Quote Link to comment Share on other sites More sharing options...
promethuem5 Posted January 5, 2009 Author Share Posted January 5, 2009 Yeah, as figures go these seem to be alot better than the SW figures I remember from the Power of the Force era... Quote Link to comment Share on other sites More sharing options...
wolfx Posted January 5, 2009 Share Posted January 5, 2009 Curious though, are u starting with the generic trooper and working your way up into a RC? Because their helmets,weapons and backpacks are considerably different from the average trooper and some retooling needs to be done...unless you're just doing the generic troopers in their paint scheme? Quote Link to comment Share on other sites More sharing options...
promethuem5 Posted January 5, 2009 Author Share Posted January 5, 2009 Nope, but good question... I was provided with some specific trooper figures that I assume are appropriate... I don;t know a ton about it tho. Quote Link to comment Share on other sites More sharing options...
wolfx Posted January 5, 2009 Share Posted January 5, 2009 So as far as your commisioning job, you're only going to be painting right? No fancy scratch builds? Quote Link to comment Share on other sites More sharing options...
promethuem5 Posted January 5, 2009 Author Share Posted January 5, 2009 Haha, yeah, just paintwork... my scratchbuilding skills are just budding. Quote Link to comment Share on other sites More sharing options...
promethuem5 Posted January 7, 2009 Author Share Posted January 7, 2009 (edited) Alright, proof that this project continues... first shot is Srg. Testbed 100% done, posing with someone else's gun. Next two are the beginning of the actual comission... two sets of Delta Squad. Second pics shows their current condition, sanded and primed... tomorrow's supposed to snow alot, so there'll be plenty of time stuck inside to spray the base color and go from there. Hopefully I'll get all the gear cleaned up and primed tomorrow as well. What I find amazing is that the testbed figure, which had an action gimick using the legs, and therefore no hip articulation, still managed to have better posability than the commando squad figs, which I assume were some special limited set? This works out much better for me, as the biggest problem on Srg. Testbed was paintwear on the joints... the only multi-joint like on Testbed is the elbows on the commandos... otherwise, they're shoulder swivels and hip swivels with no knees or ankles... they do have a nice ab ball joint, but it's not looking to be a problem for the paint. Edited January 7, 2009 by promethuem5 Quote Link to comment Share on other sites More sharing options...
wolfx Posted January 7, 2009 Share Posted January 7, 2009 Alright, proof that this project continues... first shot is Srg. Testbed 100% done, posing with someone else's gun. Next two are the beginning of the actual comission... two sets of Delta Squad. Second pics shows their current condition, sanded and primed... tomorrow's supposed to snow alot, so there'll be plenty of time stuck inside to spray the base color and go from there. Hopefully I'll get all the gear cleaned up and primed tomorrow as well. What I find amazing is that the testbed figure, which had an action gimick using the legs, and therefore no hip articulation, still managed to have better posability than the commando squad figs, which I assume were some special limited set? This works out much better for me, as the biggest problem on Srg. Testbed was paintwear on the joints... the only multi-joint like on Testbed is the elbows on the commandos... otherwise, they're shoulder swivels and hip swivels with no knees or ankles... they do have a nice ab ball joint, but it's not looking to be a problem for the paint. Nice. I haven't seen the black Rep Commando squad before but i guess its just a recolour of the originals. The generic trooper is touted as "super poseable" and like its namesake is the most poseable trooper. The Rep Commando's poseability are really limited in comparison as you have mentioned. Quote Link to comment Share on other sites More sharing options...
promethuem5 Posted January 7, 2009 Author Share Posted January 7, 2009 (edited) Weird tho... the generic has an action feature where if you squeeze his legs, his arm karate-chops (or as I like to do it, picks his enemy's nose ) Hasbro never could figure out the difference between articulation as a feature and articulation plus a feature. Edited January 7, 2009 by promethuem5 Quote Link to comment Share on other sites More sharing options...
wolfx Posted January 7, 2009 Share Posted January 7, 2009 Weird tho... the generic has an action feature where if you squeeze his legs, his arm karate-chops (or as I like to do it, pickls his enemies nose ) Hasbro never could figure out the difference between articulation as a feature and articulation plus a feature. Oh....THAT one. Its supposed to be a "Quick-Draw" action. The super poseable one is almost the idendical except it has a waist ball joint whereas the quick-draw one doesn't. Quote Link to comment Share on other sites More sharing options...
big F Posted January 7, 2009 Share Posted January 7, 2009 Like the detail level here. I have a few of the 12" figures that I was considering doing some work on. The only problem with the Storm troopers that Hasbro did is the hands and the arm and leg armor is way too big and needs to be altered. I have another armor set that is much tighter and fits a dragon figure the dirrernce in detail is like comparing a 1/55 to a 1/48. Any one have any ideas of how to re-join the rubbery armor after I cut it to slim its width down. Sorry Im not trying hijack this thread but a quick answer or pointer would be great. Quote Link to comment Share on other sites More sharing options...
promethuem5 Posted January 7, 2009 Author Share Posted January 7, 2009 No worries about the question F... what kind of material is it, and how/where is it cut? Superglue's usually the best bet for funny materials, but it would depend alot on the joint to be glued, especially if it's a joint that needs any tensile strength. Quote Link to comment Share on other sites More sharing options...
theplasticwerks Posted January 7, 2009 Share Posted January 7, 2009 I haven't seen the black Rep Commando squad before but i guess its just a recolour of the originals. The generic trooper is touted as "super poseable" and like its namesake is the most poseable trooper. The Rep Commando's poseability are really limited in comparison as you have mentioned. The black commandos represent Omega Squad, main characters of the Republic Commando novels. One of their members got a mention in the game as a member of Theta Squad (Omega is made up of last-men-standing). They were packed in with three Mandalorian training sergeants in an Entertainment Earth exclusive; a companion set includes two black ARC trooper captains and a pair of Phase II troopers with Mandalorian deco in addition to another three Mandalorians. The RepCom figure has ball-hinge joints at the elbow and waist, a true ball at the neck, and swivels at the shoulder and hip - not much more articulated than your typical secondary character figure. However, there is a super-posable Republic Commando figure slated for some time in the next two years. They can be fairly easily modified with regular trooper legs (with some minor resculpting). Quote Link to comment Share on other sites More sharing options...
promethuem5 Posted January 8, 2009 Author Share Posted January 8, 2009 Here's where Delta Squad(s) end for the night... the white of the armor is done, and I'm throwing a satin varnish on before all the real work starts... tomorrow I'll use a grey oil wash to bring out the detail, and then begin the individual markings. Quote Link to comment Share on other sites More sharing options...
big F Posted January 8, 2009 Share Posted January 8, 2009 No worries about the question F... what kind of material is it, and how/where is it cut? Superglue's usually the best bet for funny materials, but it would depend alot on the joint to be glued, especially if it's a joint that needs any tensile strength. I was thinking Super glue but as these are the Hasbro 12" Power of the force figures you have to slip the armor over the GI Joe/ Actionman figure after detailing and I aws thinking that Super Glue is not too flexable it wouldnt survive, these leg and arm parts need to be pulled and pushed a bit to get round feet and elbows etc. I an thinking that I would cut them on the inside leg and inside arm to hlep hide the joins, the stuff is Rubberised plastic and cuts really easy with a craft knife. Quote Link to comment Share on other sites More sharing options...
promethuem5 Posted January 10, 2009 Author Share Posted January 10, 2009 Delta Squad reporting, ready to become individual....er... clones Quote Link to comment Share on other sites More sharing options...
promethuem5 Posted January 11, 2009 Author Share Posted January 11, 2009 So here's where we stand tonight... worked on two guys, Boss and Fixer, and got their color laid down. The other two figures, Sev and Scorch, are a color and black, so I'm doing them together. Disregard the messy guy in the first pic, he had a little snafu situation... I had a one in four chance to accidentally use a Scorch body for someone else and managed it... thankfully it was Boss, who only has a few bits of color, so stripping the wrong parts wasn't too terrible... and Scorch has alot of black, so the only parts I need to re-make white are the face, torso, and shoulders. The colors on Fixer still look a bit rough, but after a drybrush and a little more work, I'll make the color nice and solid and lighten it up a tad. Quote Link to comment Share on other sites More sharing options...
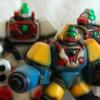
promethuem5 Posted January 12, 2009 Author Share Posted January 12, 2009 Here's the three members of Delta Squad tonight... Cpl. Paint Travesty and his mathcing Scorch-to-be blank are as yet un-touched until I finish repairing Cpl. Travesty (I still can't believe I screwed it up.) Boss, Fixer, and Sev have had their armor colors completely applied... Sev was particularly fun, and I'm really pleased with how the blood-markings came out. I've come across a number of different pics of all the characters, from miniatures to other figure customs, game shots and cosplay costumes, so I'm taking the average of all of them, with some artistic license to boot (as the commissioner allowed). The last few pics show the clean squad and the beginning of the battle-worn squad as of tonight. The white on the battle worn squad looks funny right now, but alot of it will be covered in dark grey chipping like the sample figure... he looked this way for a while as well. Let me know how thye look! Quote Link to comment Share on other sites More sharing options...
Dax415 Posted January 13, 2009 Share Posted January 13, 2009 (edited) Nice...the contrast between the clean armor and combat abused armor starts to show up already. I could never tell if sev had blood markings or if the idea behind it was more like a clan marking of some type. As far as I know the commando squads were quickly reformed from already ravaged units and had to adapt quickly to one another to form a team. The ARC troopers and Commandos were "free thinkers" true individuals from what i've read and although taught to be loyal to the republic, were not "programed" like regular clone troopers. keep up the good work, can't wait to see how scorch turns out. Edited January 13, 2009 by Dax415 Quote Link to comment Share on other sites More sharing options...
promethuem5 Posted January 13, 2009 Author Share Posted January 13, 2009 Good timing Dax, as I'm here for my nightly update... tomorrow I pack up for school, so there probably won't be any more updates until the weekend after I'm unpacked and resituated in Worcester. Scorch 1 and 2 have had their base colors laid down successfully... I really like how they look, and can see why he's an appealing character from the group. Both Scorches need the black armor drybrushed to bring out detail, and a little oil color on the yellow bits for the panel lines. Then I'll catch up the damaged one to the rest of his team, but be a little more deliberate in the chipping work, as the white chipping of the colors is going to stand out alot more than the dark grey bare-armor dings and chips. I also got the base black for the undersuits done... that was a painful process but now that it's out of the way, that represents the end of the large color applications... everything from here on out is highlighting and detail work, which should go nicely, and can be spaced out a bit to prevent burn out. I'll do some touch ups for the clean squad and get them basically done, and start on the weapons while I do the beaten up squad. Quote Link to comment Share on other sites More sharing options...
promethuem5 Posted January 16, 2009 Author Share Posted January 16, 2009 OK, settled back in at school, and this is what I did tonight... used drybrushing to finish everyone's undersuits and Scorch's armor... then did the white chipping on the paintwork for Scorch and did the weathered squad's real chipping and other battle damage. I also got the basecoat on the gear and stared the metals for Scorch's fuel canisters(?) This is pretty much in the home stretch now... the clean squad is effectively done, and the weathered team needs dirt applied, then it's sealer layers for everyone! Quote Link to comment Share on other sites More sharing options...
promethuem5 Posted January 17, 2009 Author Share Posted January 17, 2009 I finished the gear and mud and applied the Future coat, which is gonna dry over night, but it's too dark here to take any pics. These guys are basically done now, and I'll wait until they're complete to post anymore. Quote Link to comment Share on other sites More sharing options...
promethuem5 Posted January 20, 2009 Author Share Posted January 20, 2009 I'm working on the matte varnishing of all the figures... it's tedious, but not too bad seeing as I basically throw the matte varnish on a spot on all the figures and leave it to dry... I'll have finished pics once they're totally done and I can get time to take nice pictures before packing these guys up... maybe on Thursday, or if not, by the weekend. Quote Link to comment Share on other sites More sharing options...
promethuem5 Posted January 21, 2009 Author Share Posted January 21, 2009 Alright, These bad boys are done, barring anything the buyer notices, so I'm posting them for review, and once I'm given the OK they'll be off to their new home. First up is the clean squad: Quote Link to comment Share on other sites More sharing options...
promethuem5 Posted January 21, 2009 Author Share Posted January 21, 2009 Here's the dirty finished squad! Overall thoughts of this project: I had a good time doing it, and the subjects were an interesting change of pace. There's some chipping around the joints on the figures that bugs me a bit, but I can't really see anyway to fix with the design of the figures as they are. Quote Link to comment Share on other sites More sharing options...
wolfx Posted January 21, 2009 Share Posted January 21, 2009 (edited) Nice. Just curious, but why did you decide to do Sev up with red patches rather than the clean patterns on his other mates? EDIT: Nvm...seems his scheme IS like that. I personally think the "dirty" troopers were abit overdone with the chipping but at least you got the effect right. Nice job overall. Edited January 21, 2009 by wolfx Quote Link to comment Share on other sites More sharing options...
promethuem5 Posted January 22, 2009 Author Share Posted January 22, 2009 Thanks for the comments... I think I agree with you that the chipping ended up being a bit overdone. Quote Link to comment Share on other sites More sharing options...
big F Posted January 22, 2009 Share Posted January 22, 2009 I like these they are great I personally think the "dirty" troopers were abit overdone with the chipping but at least you got the effect right. Nice job overall. You've obviously not seen me play Republic Commando. After they have been through the whole campaign on hard settings they'd be lucky to have any paint on the armor. Quote Link to comment Share on other sites More sharing options...
Recommended Posts
Join the conversation
You can post now and register later. If you have an account, sign in now to post with your account.