

Bobby
-
Posts
532 -
Joined
-
Last visited
Content Type
Profiles
Forums
Events
Gallery
Posts posted by Bobby
-
-
You're welcome!
Btw, if you lose an auction zen gives you the 300¥ commission back and of course the amount you bid. Also, you get options for which carrier you want after everything is packaged and weighed so you can choose the cheapest and/or the fastest method.
-
I use zenmarket.jp. I purchased lots of items through Buyee in the past and never ever had a problem. But over time, the fees kind of got to me (high service and packing fee in particular). After researching I found zen...they don't charge anything for packaging your items and they have a straight service fee of 300¥ per transaction no matter what you buy. They also have a built in sniper system (but you still do have to honor YJA platform of waiting until all bidding is done for). The main difference is that you have to pay upfront to load your account while buyee just charges as you go along if I remember correctly since it's been awhile. You can buy credits when the yen is weak as well so market behavior can be in your favor/control instead of just when it happens. I have purchased over a hundred items (lots of books mainly) with zen and again, never had any issues and their contact support always gets back to me within 24hrs.
-
I bought some of this awhile back...yeah, it really didn't work that well as a glue/weld. I too was quite hopeful when I saw it. However, it works great as a custom formed support to test-fit and/or glue pieces together after using it. But in the end the bond is as only as strong as the glue you used and maybe it has a little more support as it adheres the resin cast you created to the joint you were repairing.
The music and claims being made in that first video reminded me of this parody of another promise to relieve pain...just not broken toy pain!
-
I got a message requesting more specifics on this mod. I figured I might as well post the pic I made as a reference in case anyone else was curious.
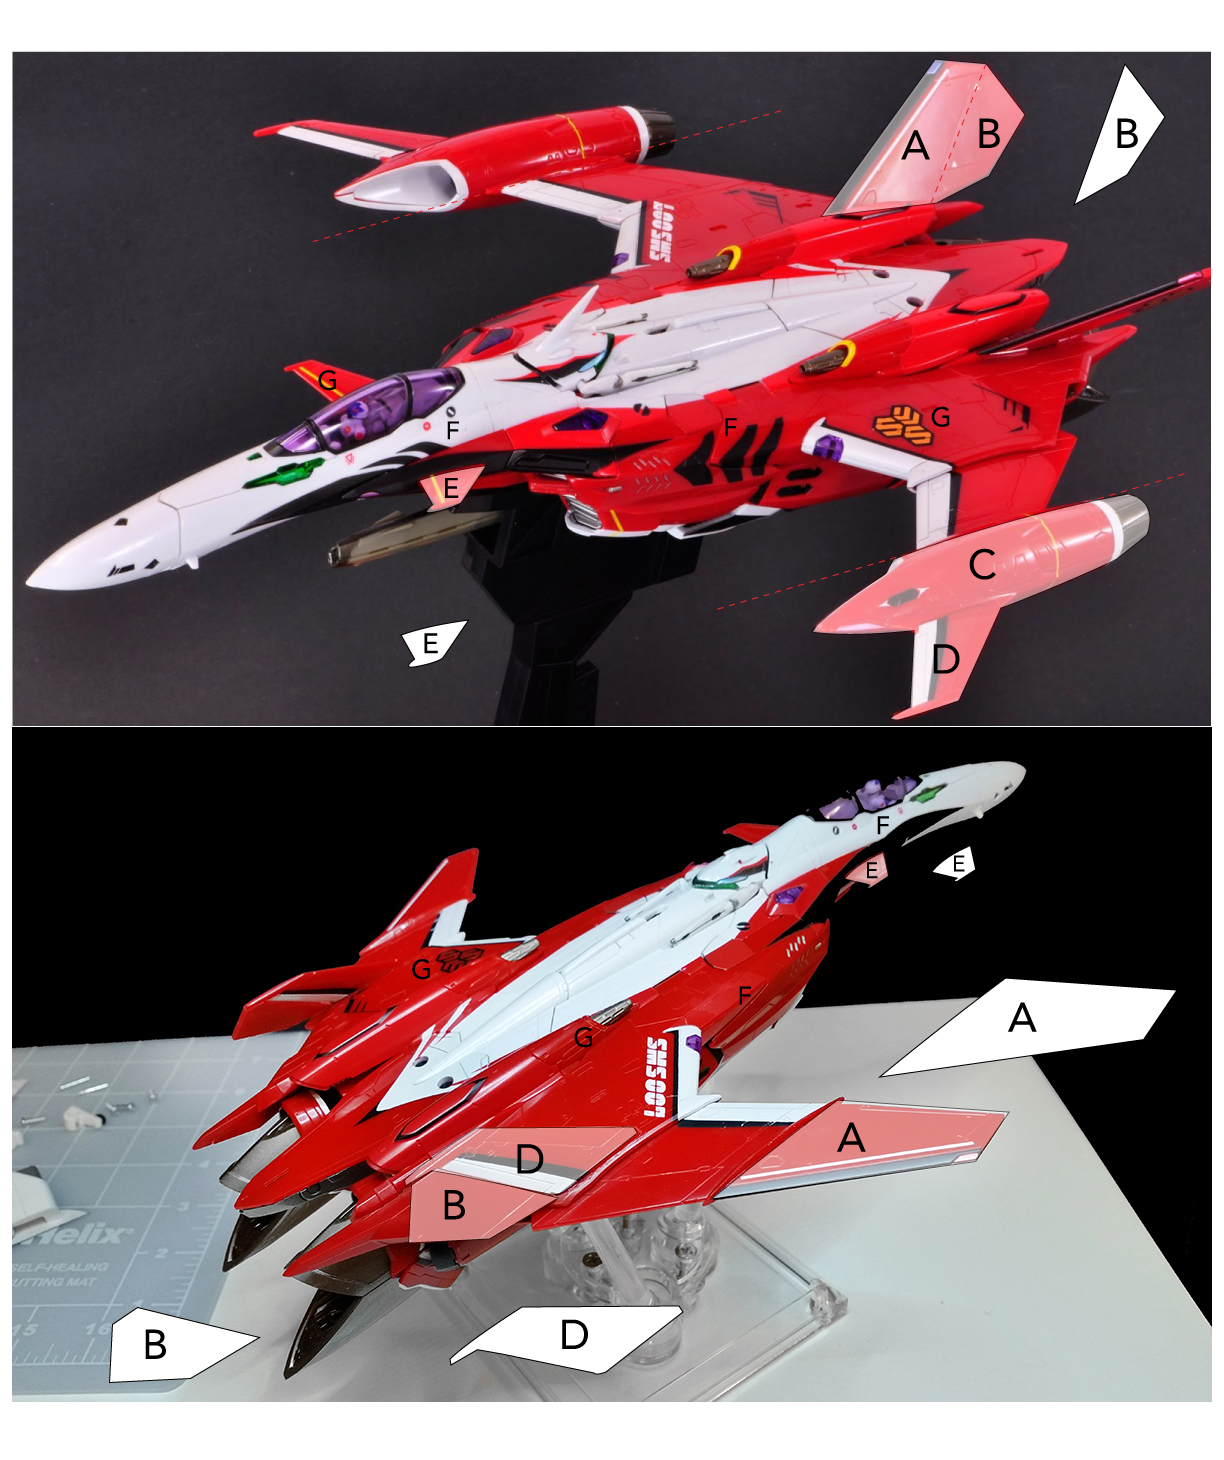
7-Step Summary
i. Remove Rudder A/B w/dremel (leave hinging portion so there is no gap). File/sand everything smooth.
ii. Separate B from A w/knife or dremel. File/sand smooth.
iii. Remove C and D from wing (separate C parts from each other, D will fall out, use dremel to remove plastic peg that C rotated on and file/sand smooth)
iv. Fasten A (plastic weld or super glue) to existing wing (make sure you sanded an angle that matches the existing wing).
v. Weld/glue D and B together to form new rudder and weld/glue new rudder right before wing joint towards the rear.
vi. Swap E with each other so they are facing the opposite direction or leave it off.
vii. Use 91% alcohol to remove F tiger stripes and G yellow/orange line/logo markings
As a general rule, always have as smooth/flat surfaces as possible before mating any pieces together for a strong, secure bond.
Once complete, it still fits in the foam insert in the box and the wings still extend in and out. The only thing that's fixed are the rudders but a hinge modification could be possible.
-
This. Is. Great.

Please. Post. More.
)")
-
Another great transaction with anubis20 for TWO items just as described! Great communication and fast shipping!
-
Hi-Metal R
in Toys
oh man...oh man...oh man...hot diggity dog


-
-
Another great transaction with kajnrig. Great communication, totally goes above and beyond to make sure everything goes smoothly. Thanks
-
-
Excellent transaction with adankree. Great communication, kept me posted all throughout and everything was just as described! Thanks!
-
-
Great communication --> kajnrig <-- Excellent seller!
-
Excellent service, communication, and promptness with Duymon!
-
-
Smooth transaction w/bbrain, great communication, prompt...just awesome!
-
pm sent
-
Excellent transaction with HG Blows! Thank you for getting it out so quick and keeping me posted along the way!
-
-
-
Thank you Vortech for great communication, prompt shipping, and an awesome item!
-
BIG thanks to MikeRoz for a great communication and a fast, easy transaction!
-
-


Yahoo! Japan - Experience? Best proxy?
in Toys
Posted · Edited by Bobby
You know, I've never had to do that before so I unfortunately don't have any experience with that. It usually just plays out like this...I use Paypal (2.9% which is cheaper than one single Buyee handling fee <$300) the money then goes into my account.
I bid x amount which is usually my max bid (sniper) plus 300¥ and the money is no longer accessible because it is "reserved" for my bid until the auction ends (but you can still cancel your still). If I win, great, if I lose, all of that money plus the 300¥ returns into my Zen account and I usually win something else and have the money already there for another item + shipping.
So in addition to the 300¥ service fee and 2.9% to load my account, the only other thing is the shipping costs (ex. of my latest shipments):
size: 35 x 35 x 8 (14" x 14" x 3")
weight: 2345g (5.2 lbs)
fedex: ¥3,783 ($34 USD)
--
size: 33 x 24 x 13 (13" x 9.5" x 5")
weight: 3430g (7.6 lbs)
fedex: ¥5,148 ($47 USD)
As you can see, that seems very reasonable for that size and weight. Even though the yen has been getting stronger in the last few weeks, this ended up being much cheaper than Buyee as well because at Buyee they won't take your items out of the packaging they received it in. So if you win multiple items, the box just keeps getting bigger and bigger and heavier and heavier because it has to hold all these other boxes/envelopes and all this wasted space (another thing that bothered me). For the most part, I've seen that Zen unpacks and then packs more efficiently (at no charge) and can even send you pics of your items for inspection (for a small fee). It might depend on the packer or the item though because I do recall having received a few items before that were still in their originally shipped box (from the YJA seller to Zen).
If you've ever wanted an item from Amazon Japan but saw they are unable to ship to your stateside address, Zen has a tab (just like Buyee) where you just click the Amazon tab and buy it. And for that matter, technically ANY website in Japan that will not ship to the USA (just click the "Other Shops" tab) can be bought from by simply adding the shops URL to the shopping cart and then buying the items which I've done as well and was very happy. My point being that there are SO MANY ITEMS in Japan that you are bound to find something! At least that's why I've never needed to get my money put back on my card
About getting your money back: With all that said, it might just come down to this...if I recall correctly, Buyee doesn't charge unless you win...so that's definitely a great value proposition and eliminates this whole issue and might be the way to go for single items and infrequent overseas shopping vs. if you are a regular overseas Japan shopper and purchase multiple items on a fairly regular basis.