Tage
-
Posts
194 -
Joined
-
Last visited
Content Type
Profiles
Forums
Events
Gallery
Everything posted by Tage
-
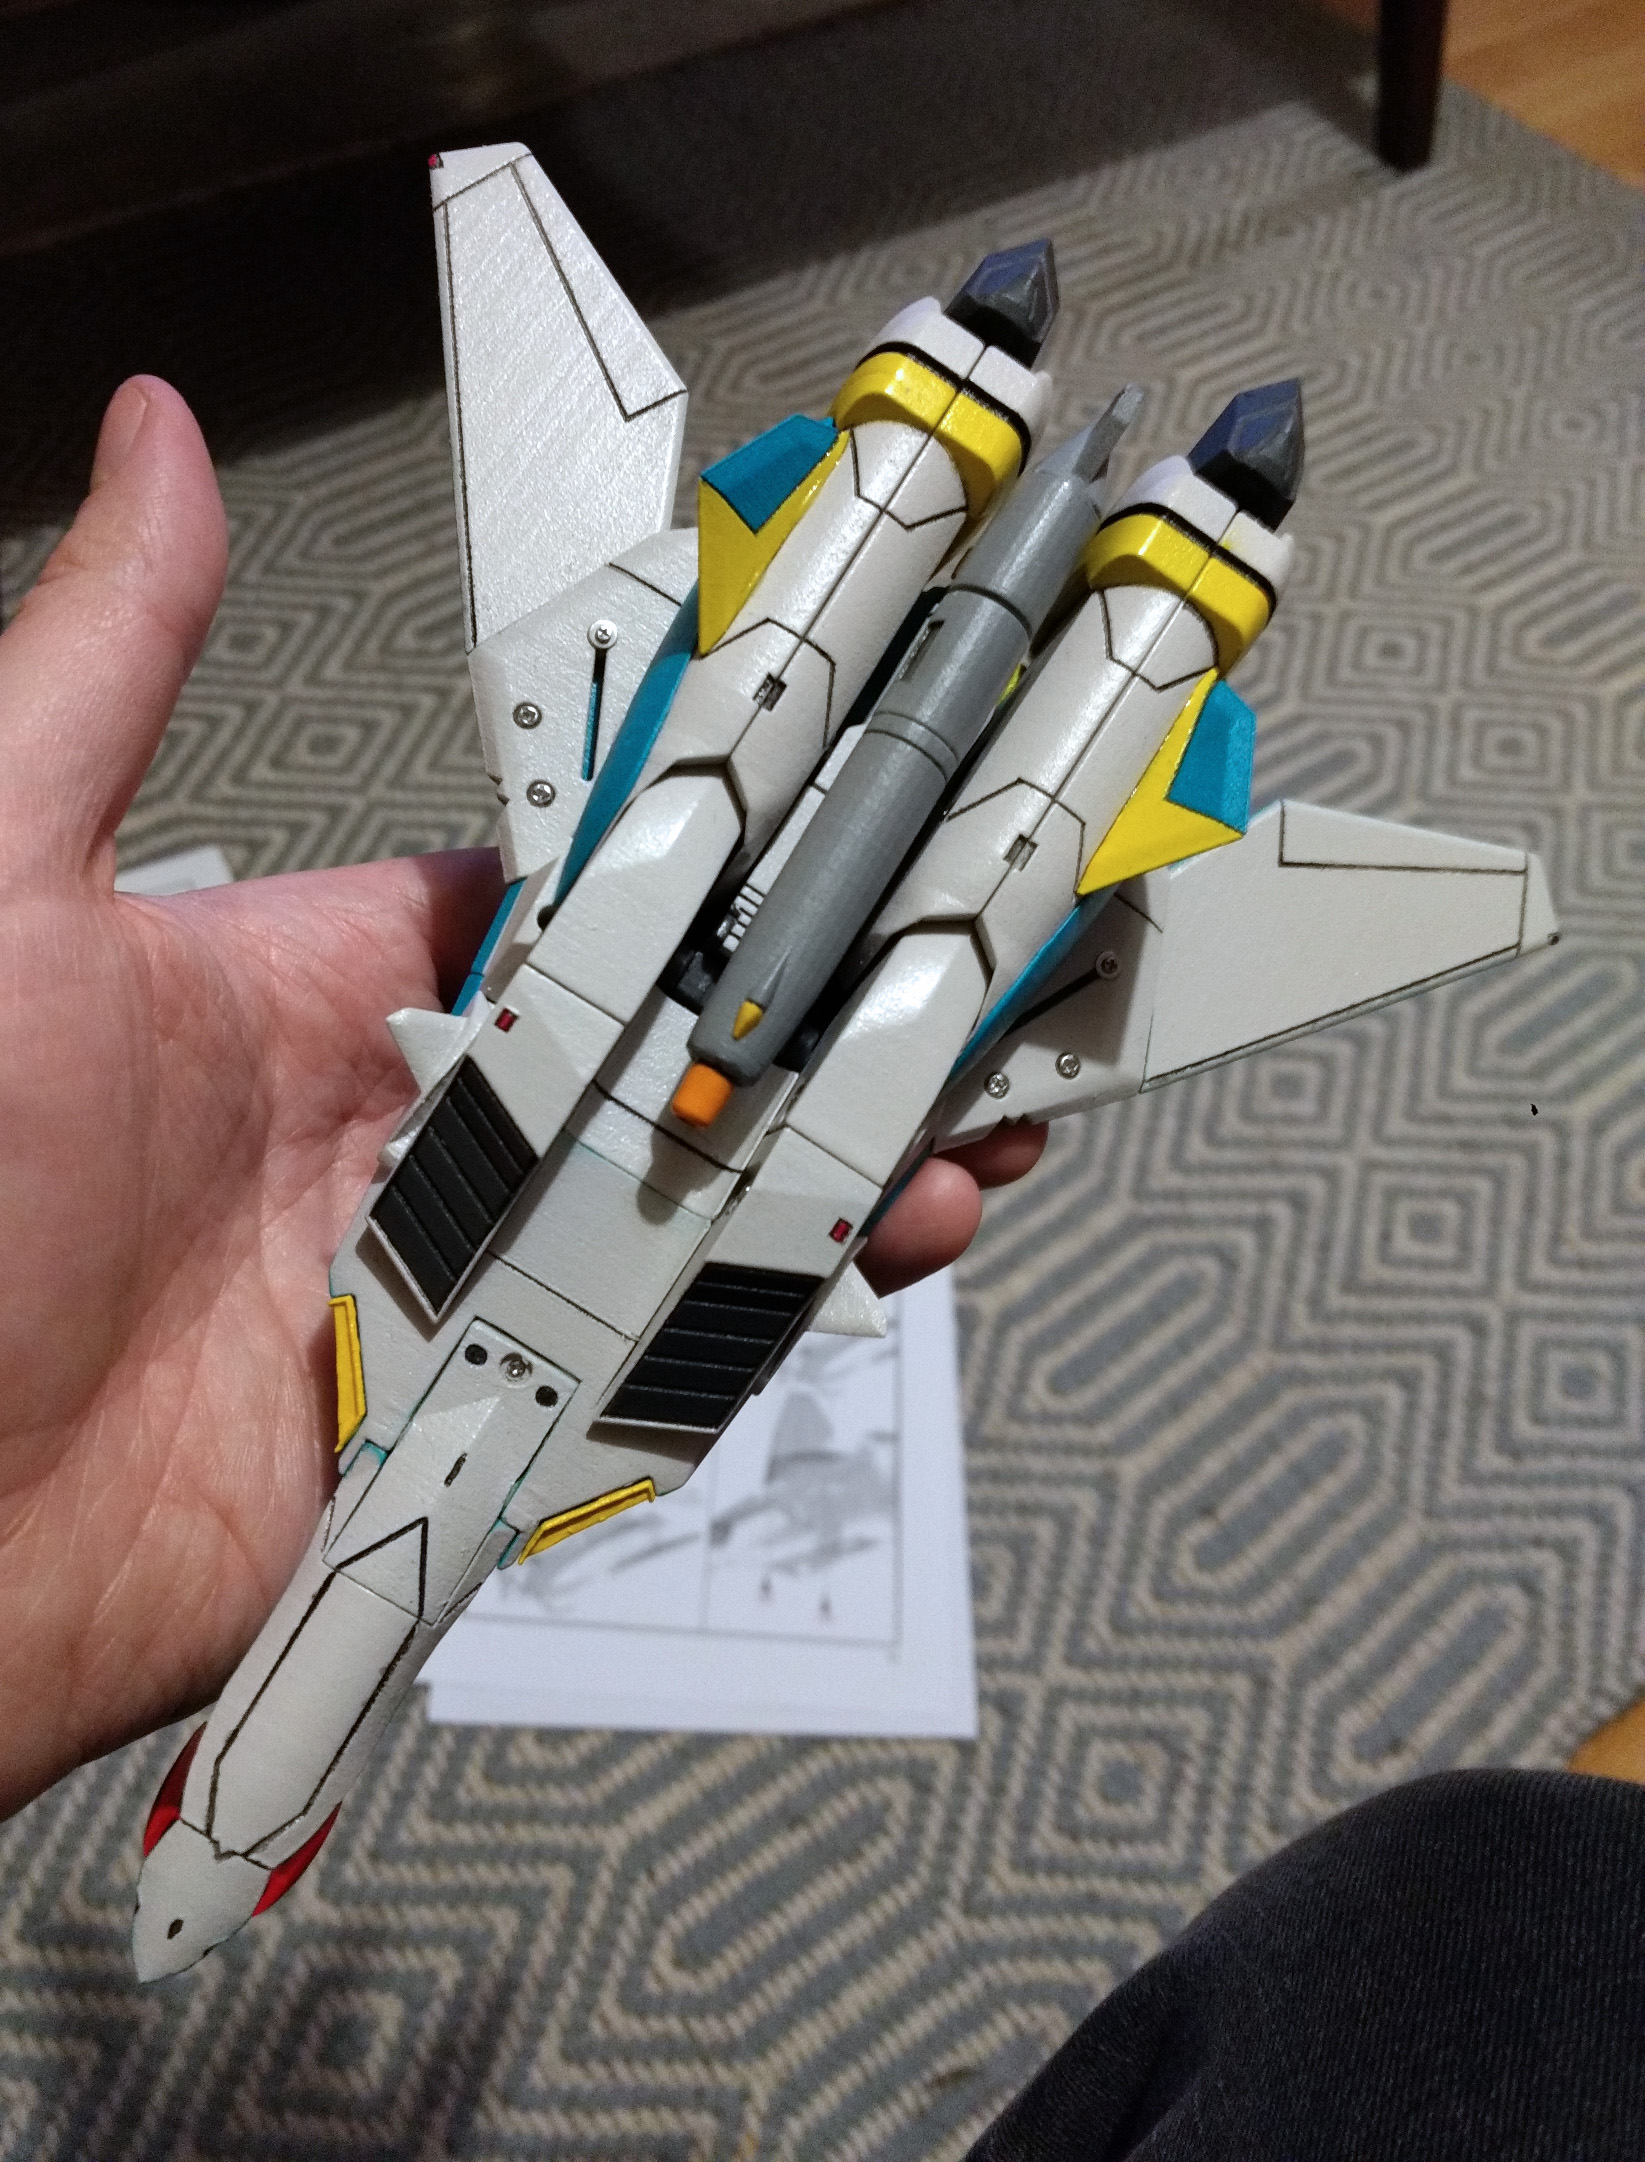
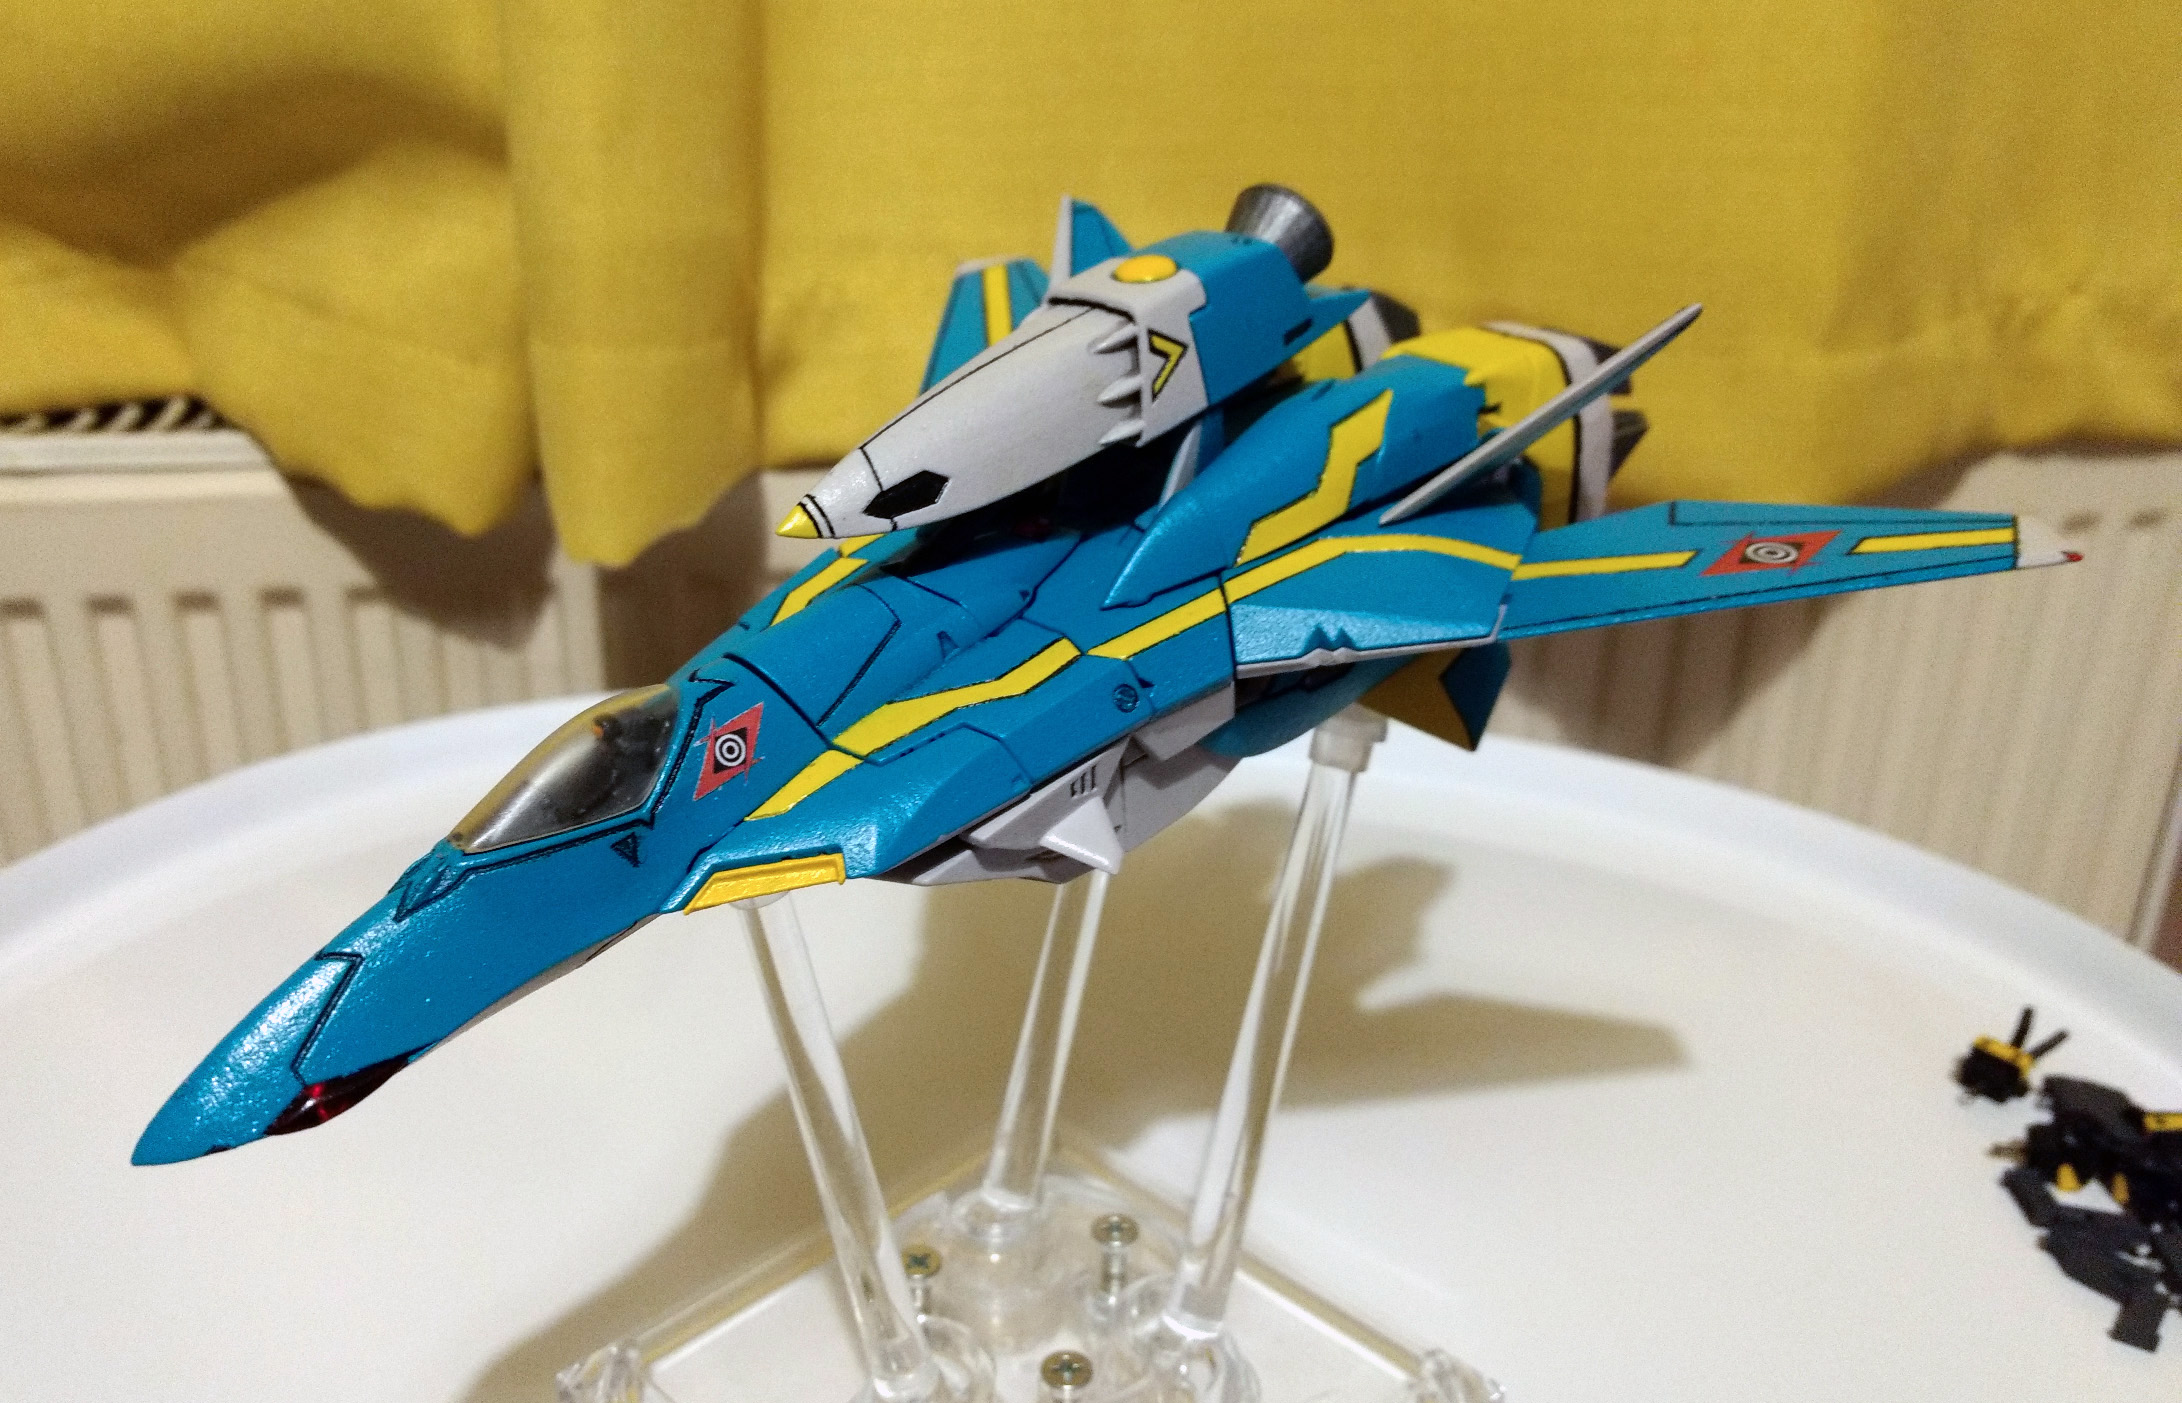
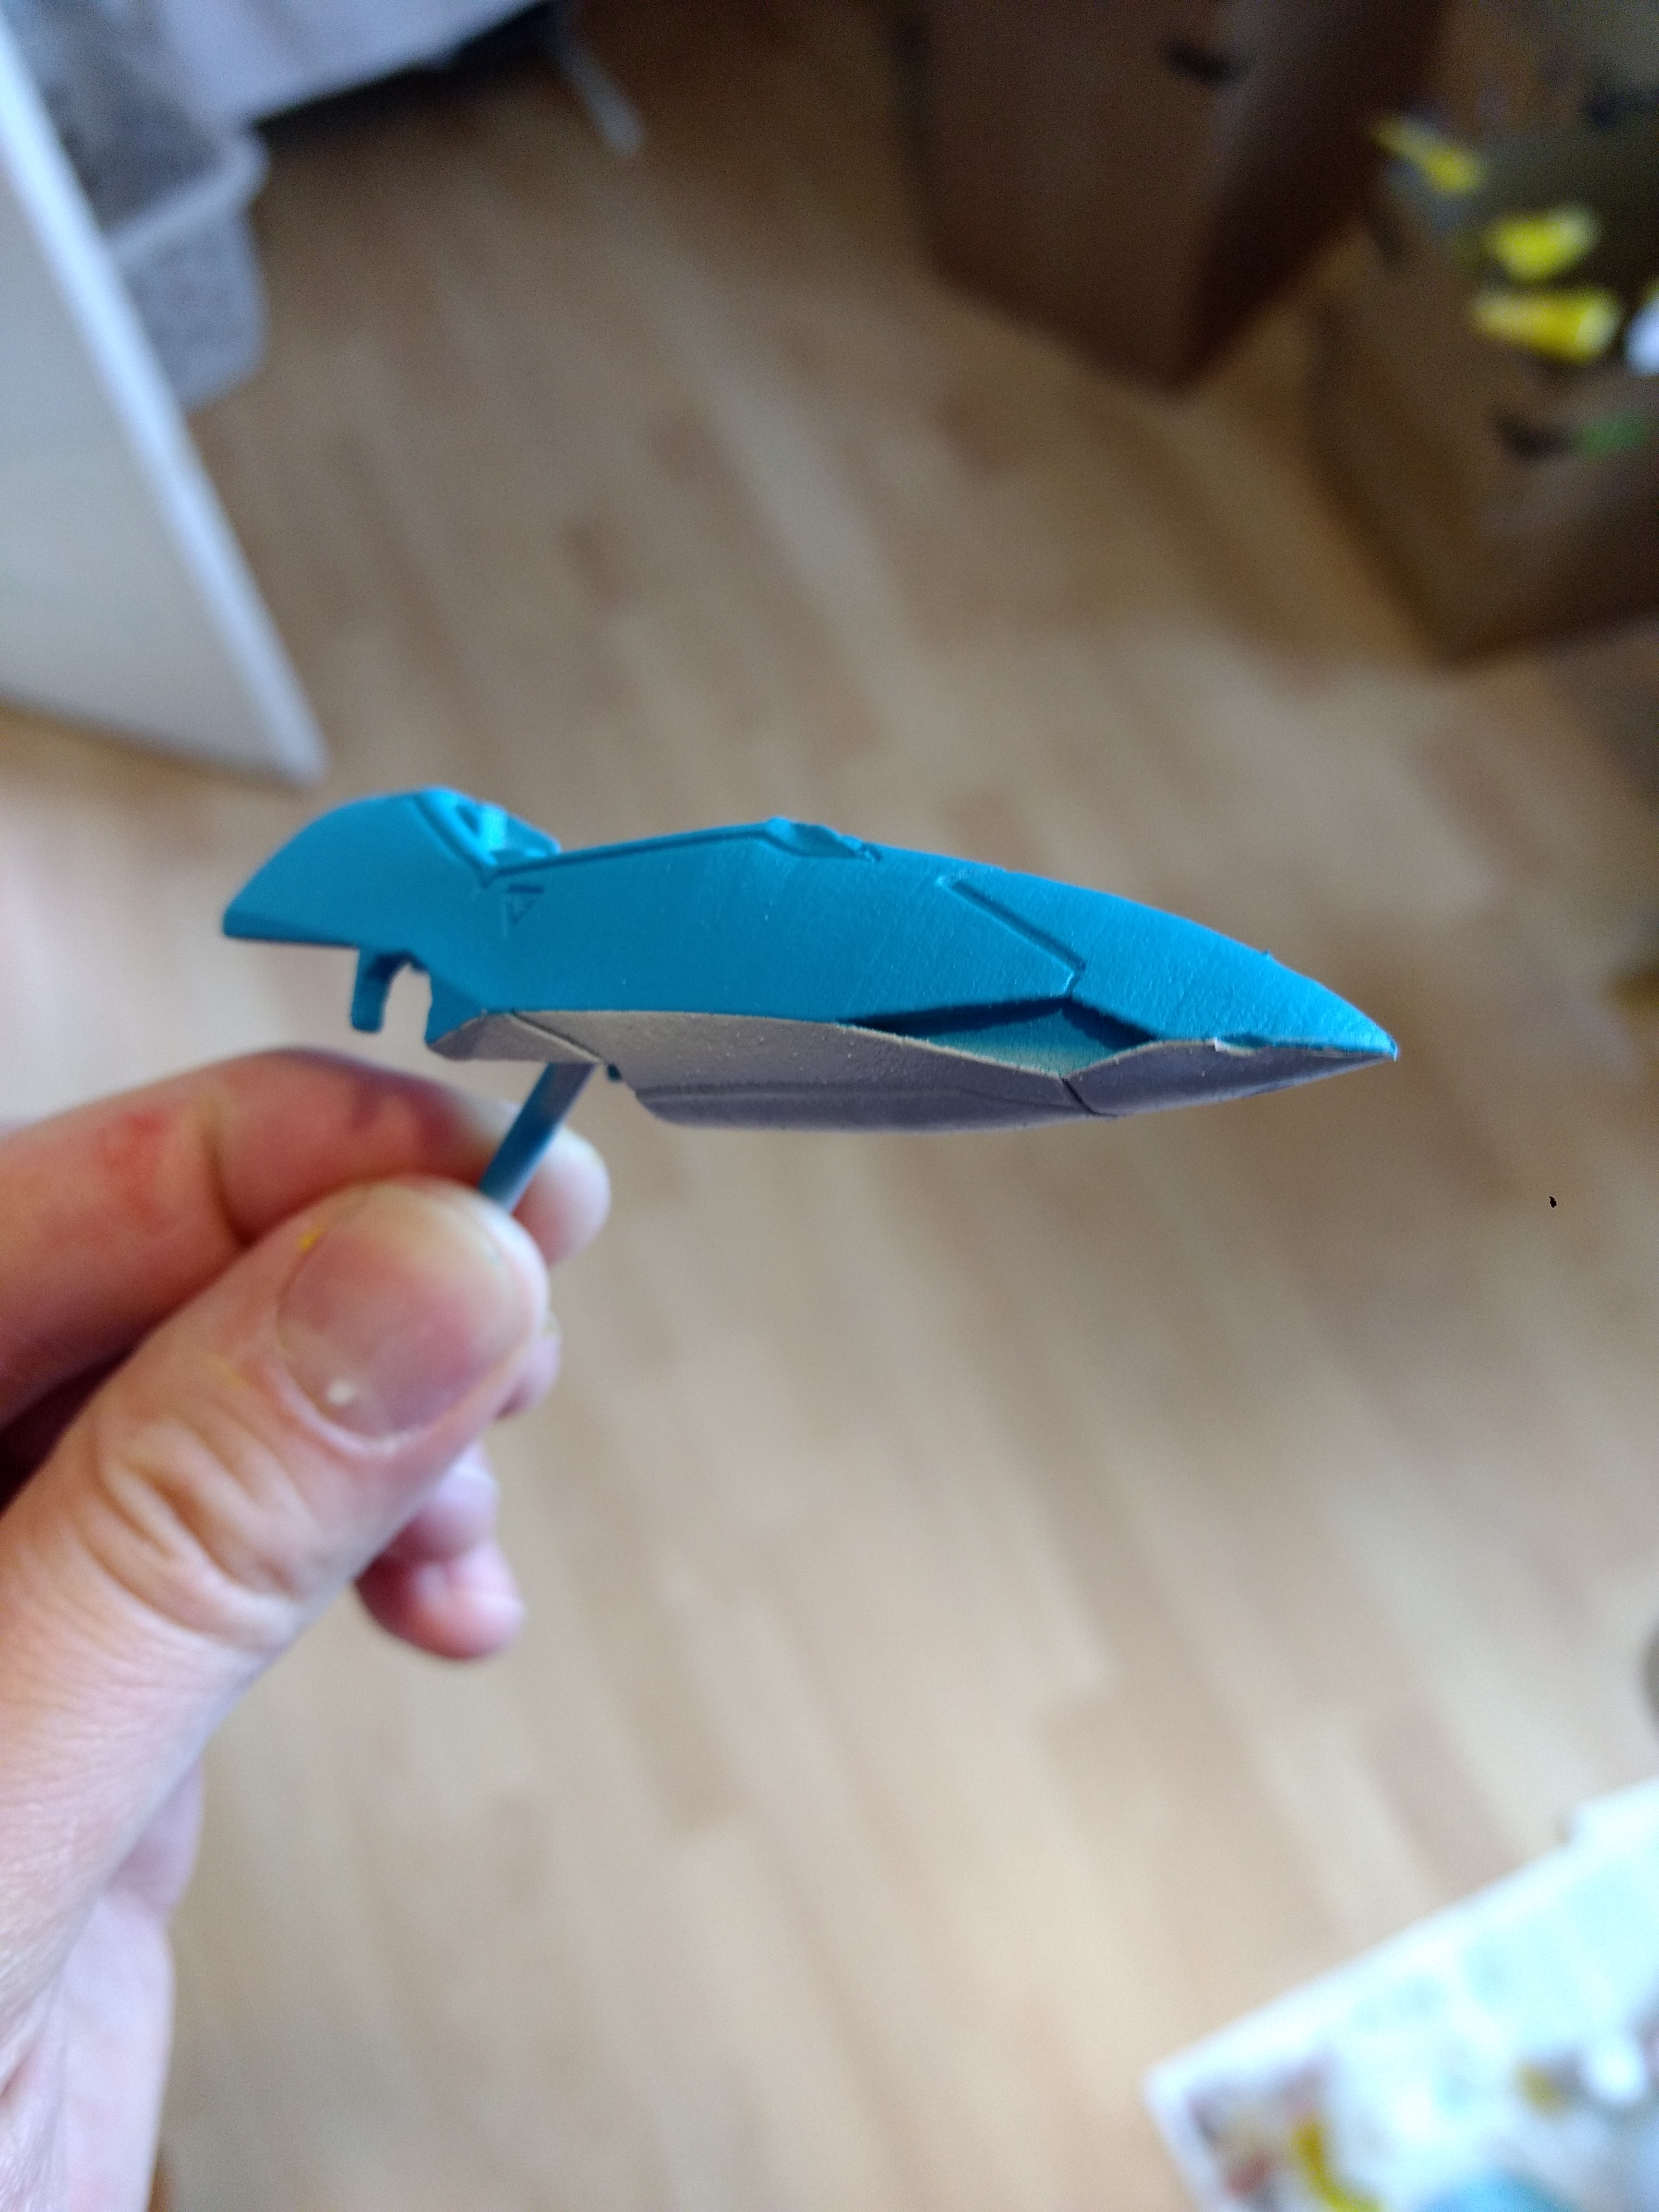
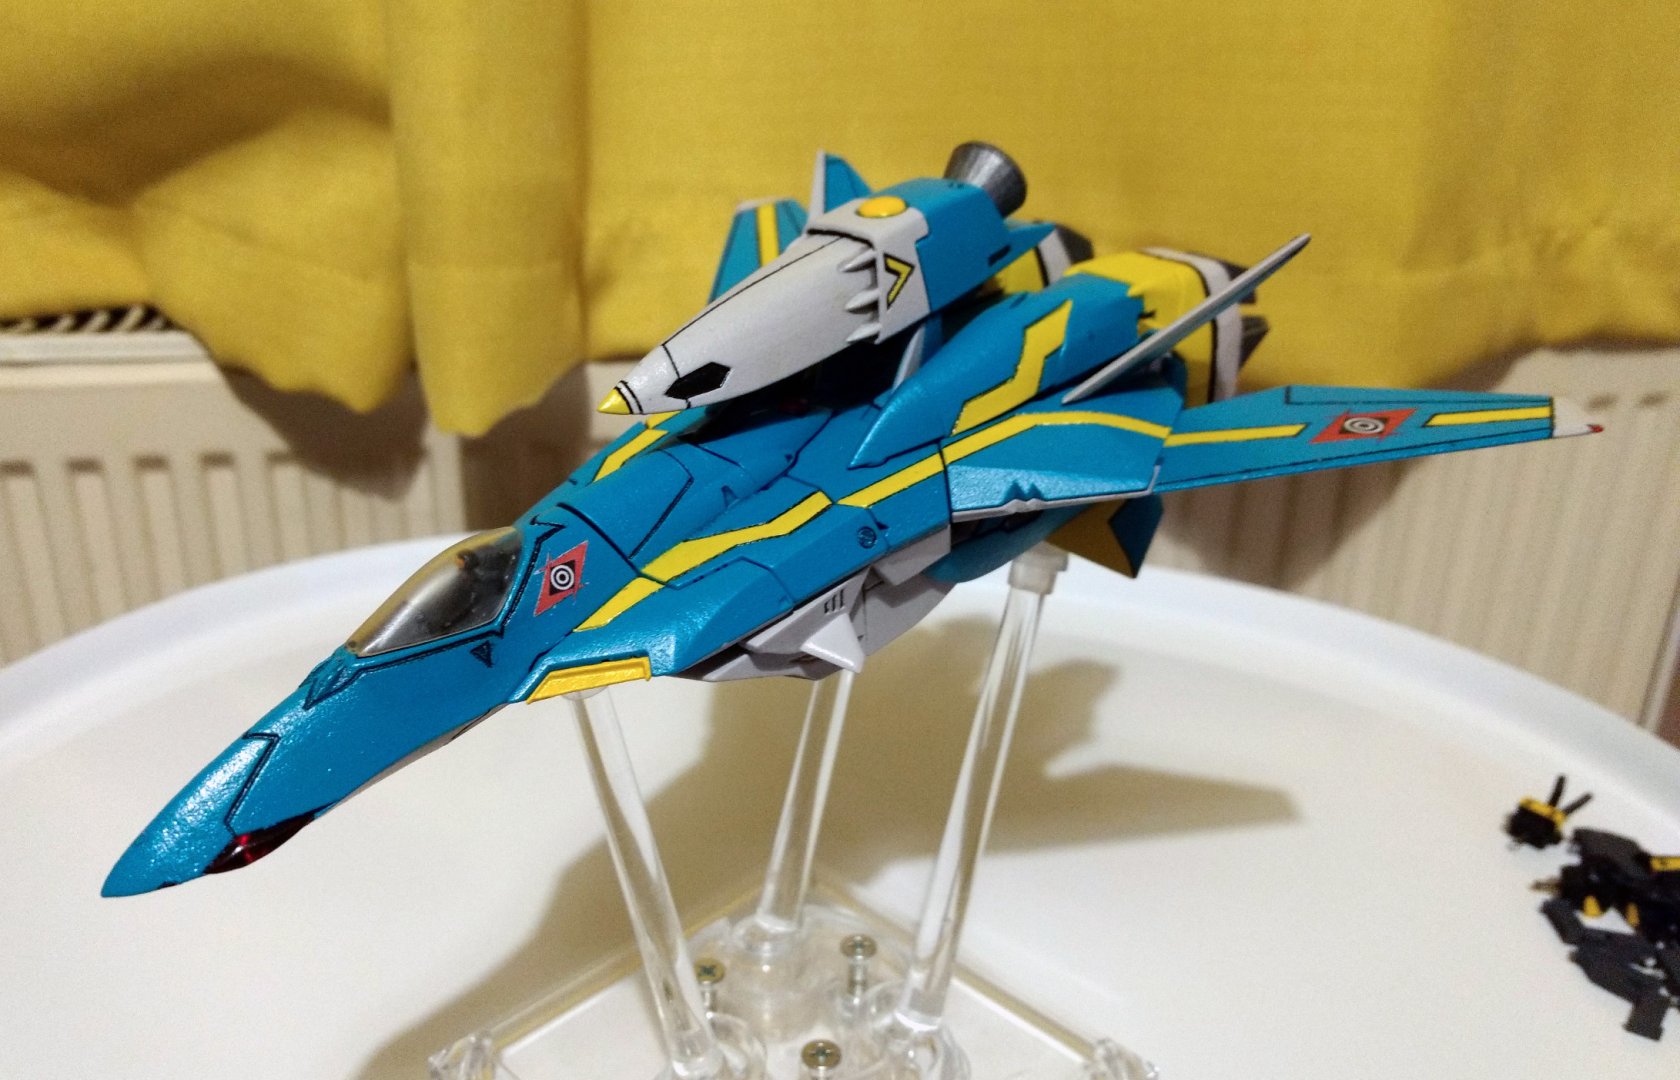
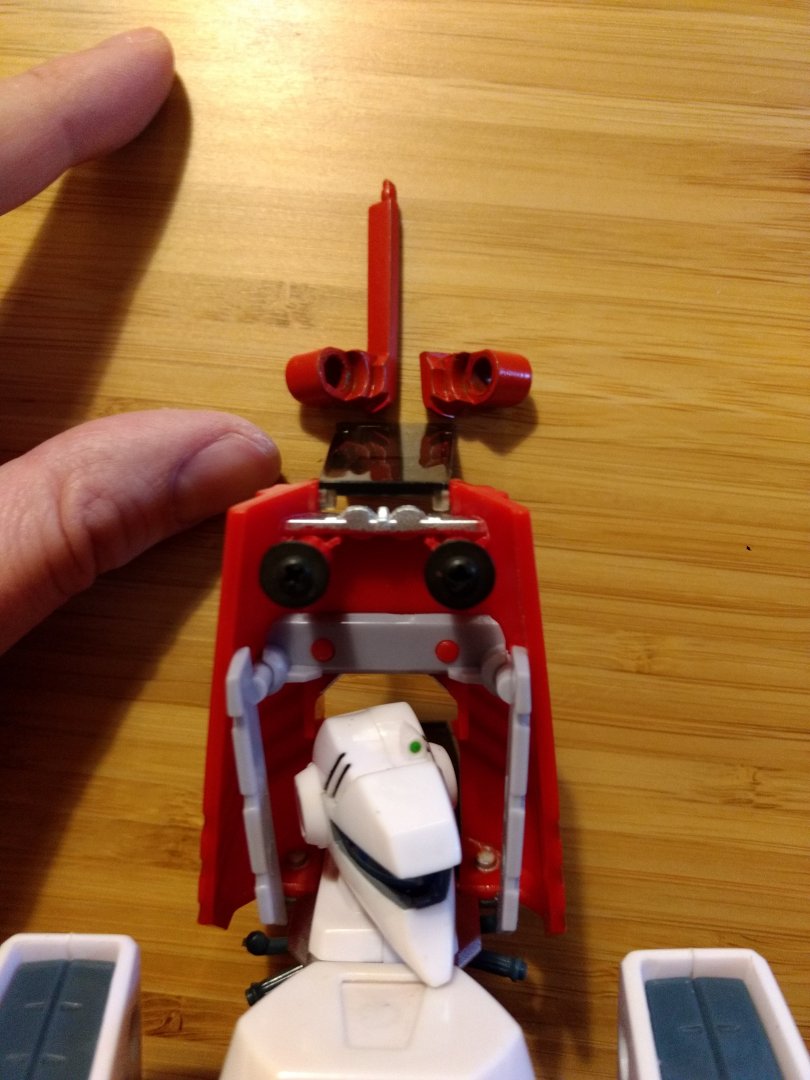
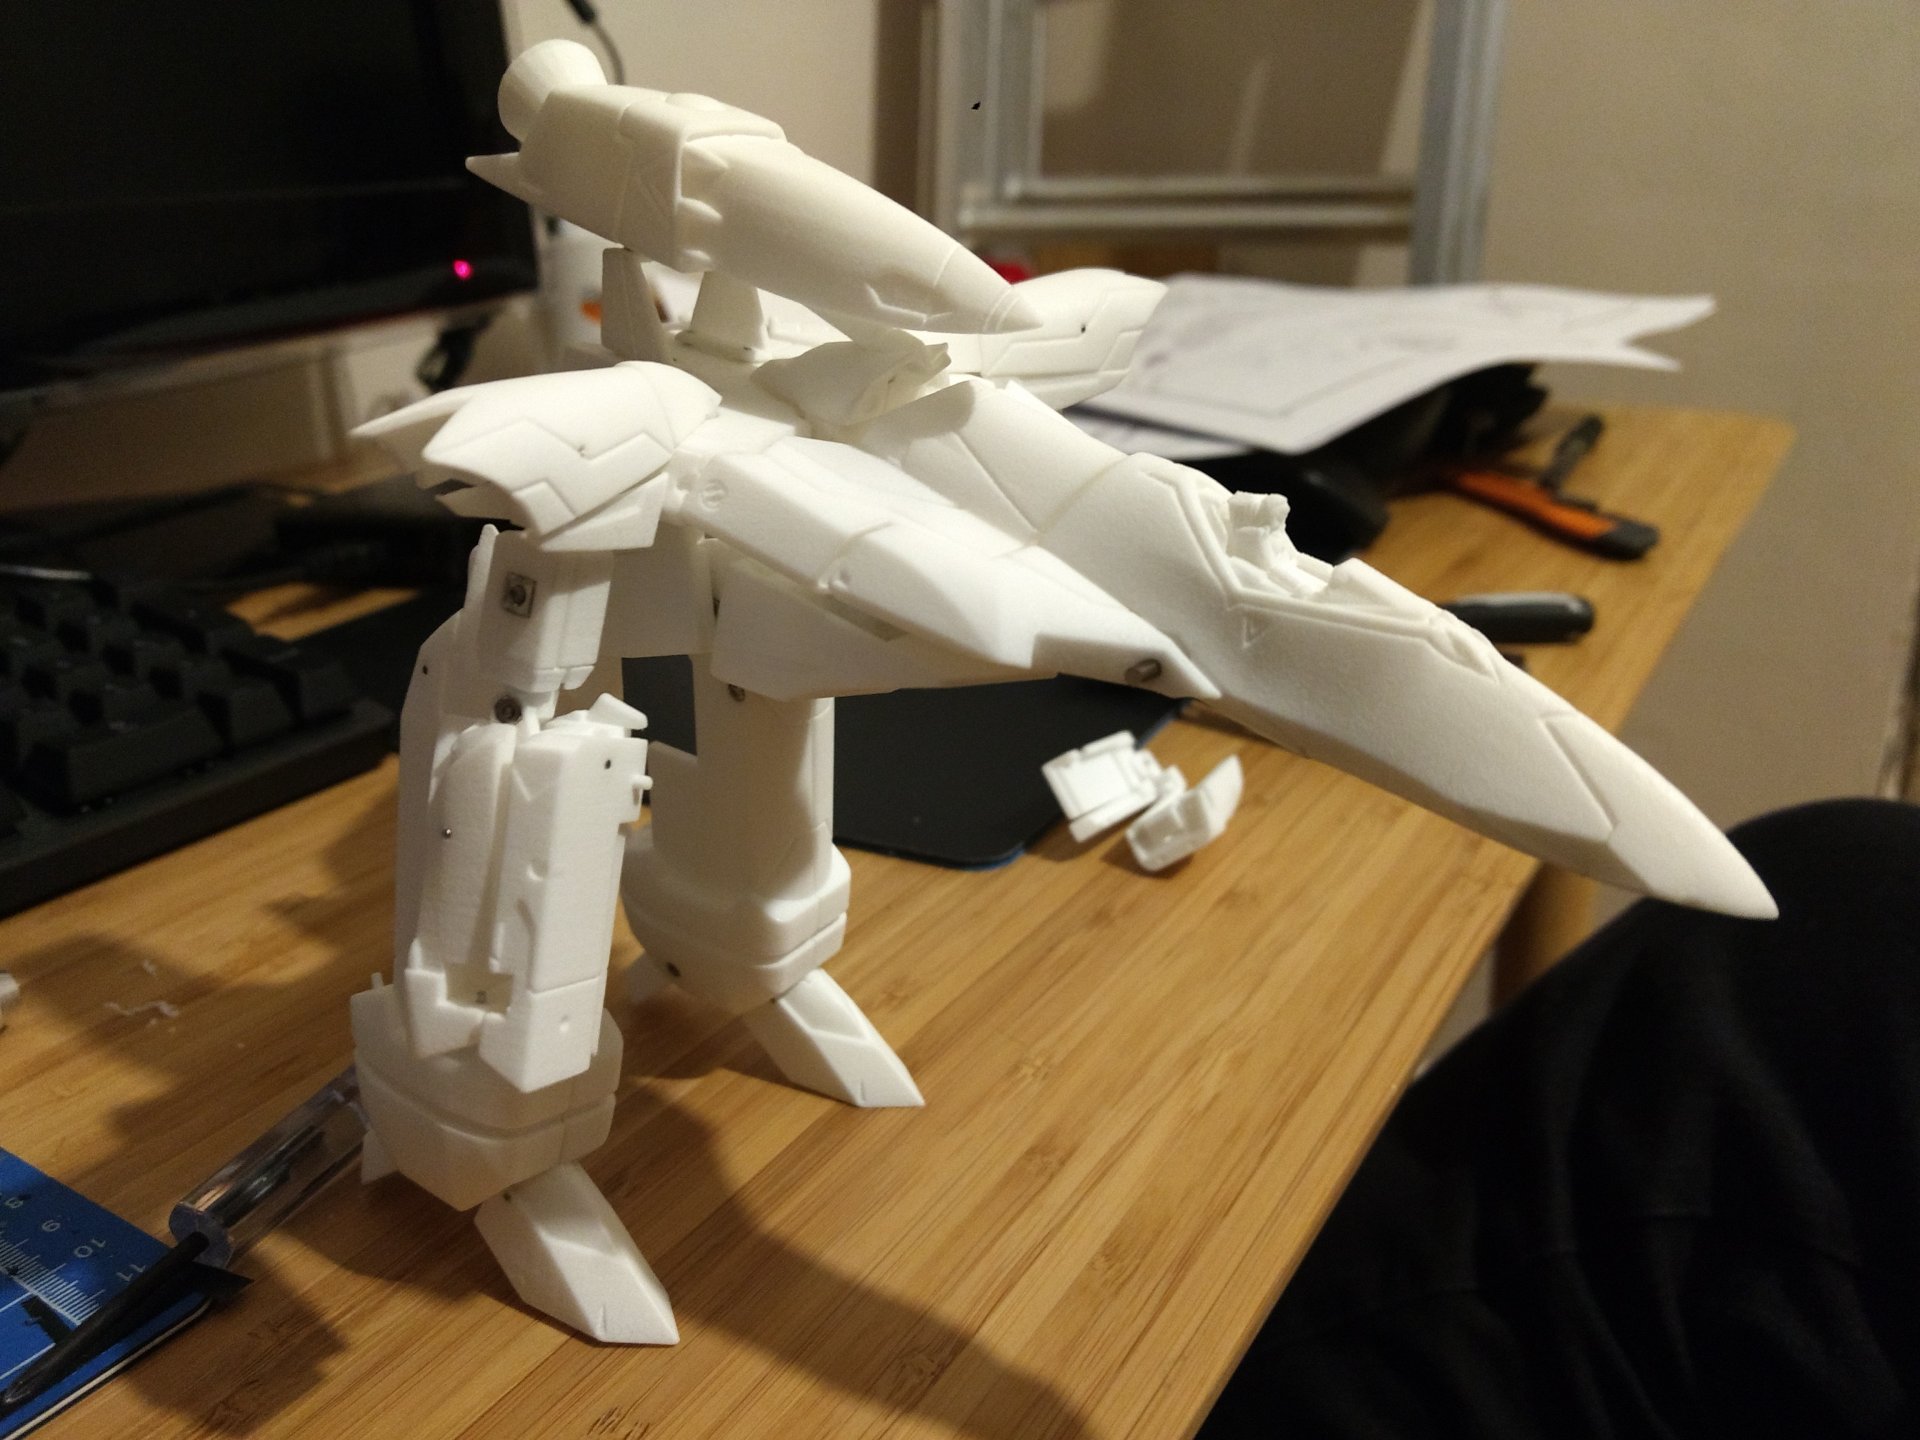
Hey Guys, just a quick updated. He's all painted and together! Next i'll do that video i mentioned earlier and take photos in his bot mode. I'm really happy with how he's turned out. Showing the gunpod's sliding mechanism too :-)


-
Hey Arbit, oh wow yeah that's pretty darn good. My prints are about that level of quality too. I've really just does a couple layers of primer and my layers of pain have smoothed things out a little bit... I probably have been a little lazy/impatient with my prep work before painting these things (it's been about 2 years in the making lol). But that method of smoothing would be super easy on this kit considering the amount of long flat/easy curved surfaces. I'd just watch out you don't cover any panel lines. Great tip though for sure. I'm sure a lot of you are better model painters out there than I am!
-
Ah Pledge! Yeah that's a big brand over here. Thanks man, i'll have a hunt for it. Just had a hunt myself and a few UK model sights have also recommended that. :-)
-
No, but keen to try... do you know what the UK equivalent would be?
-
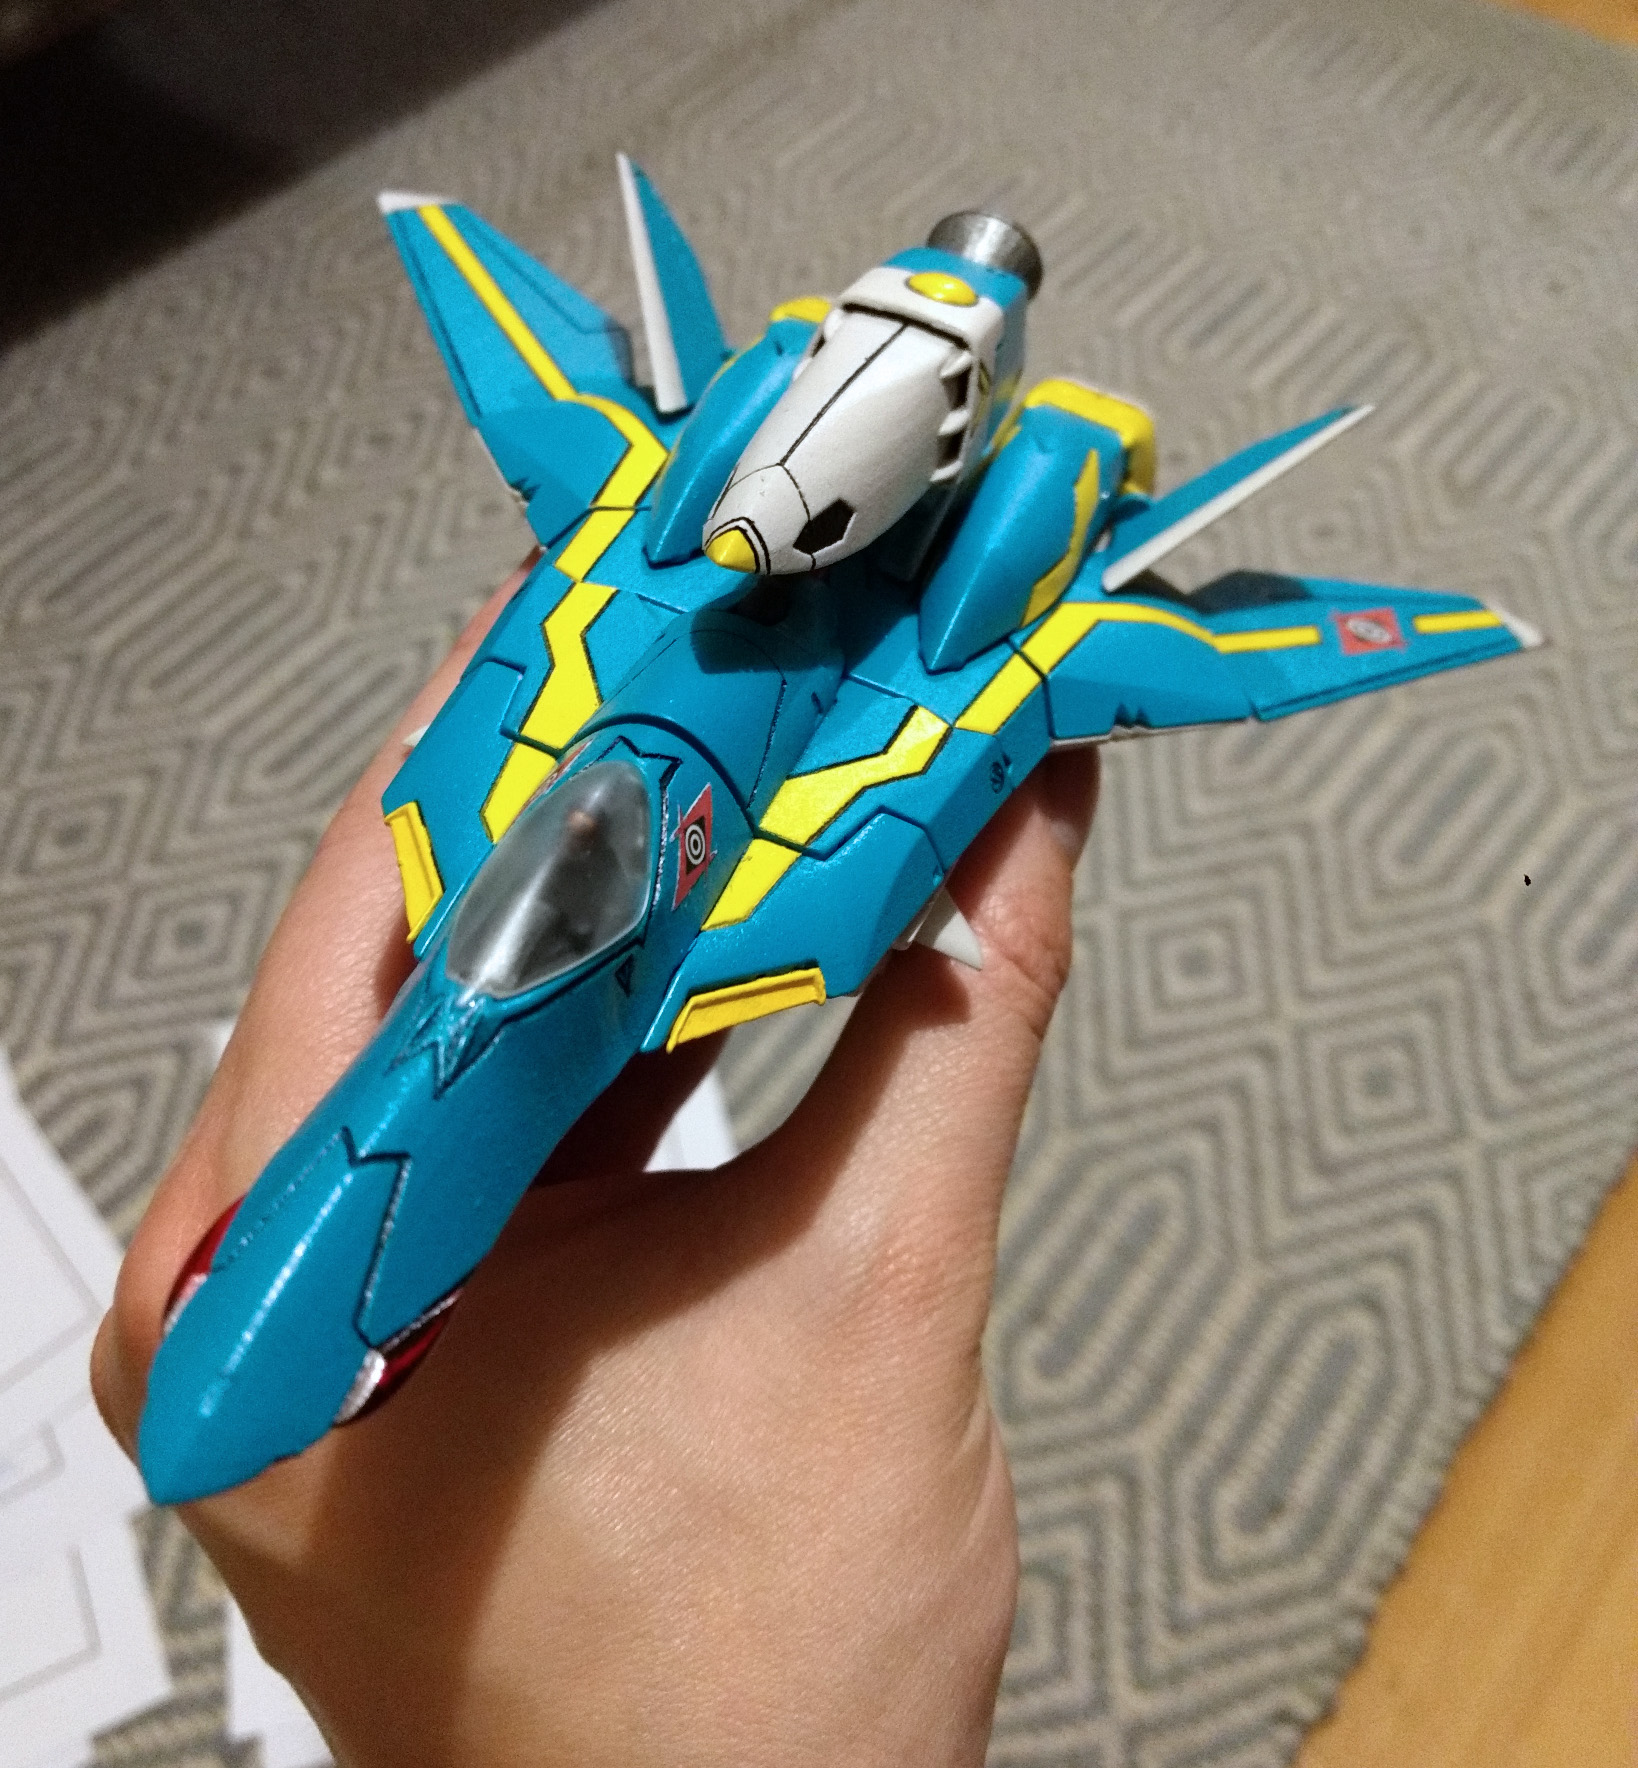
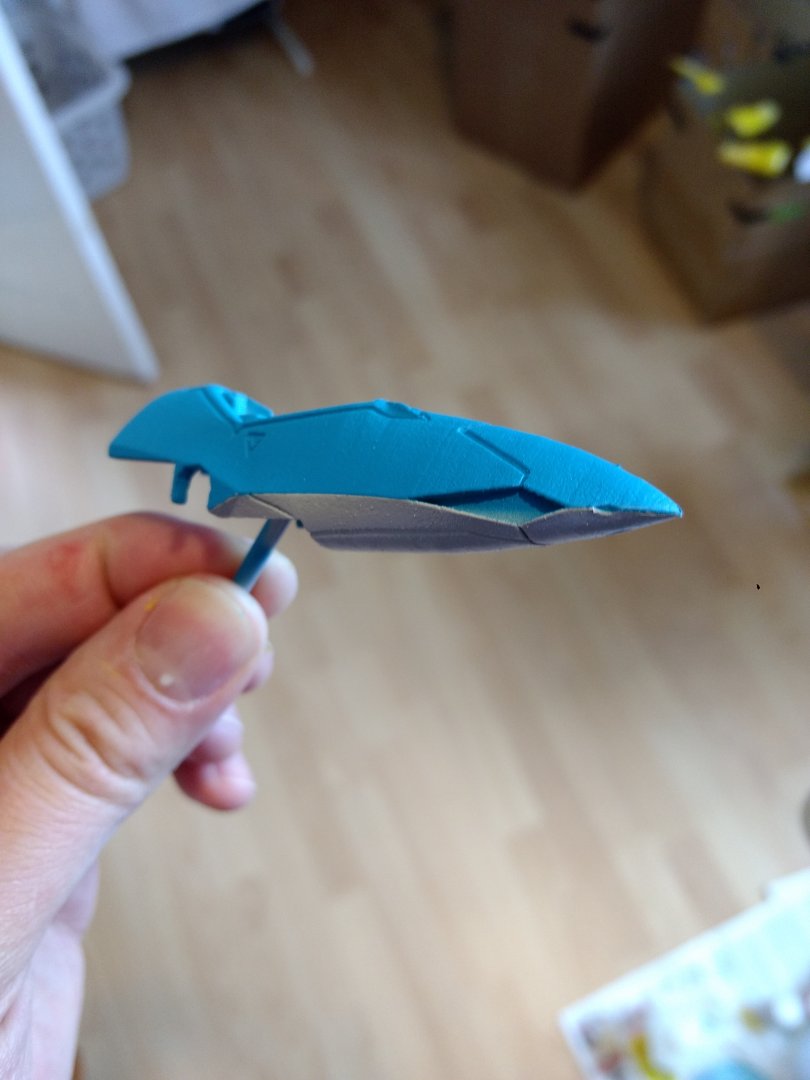
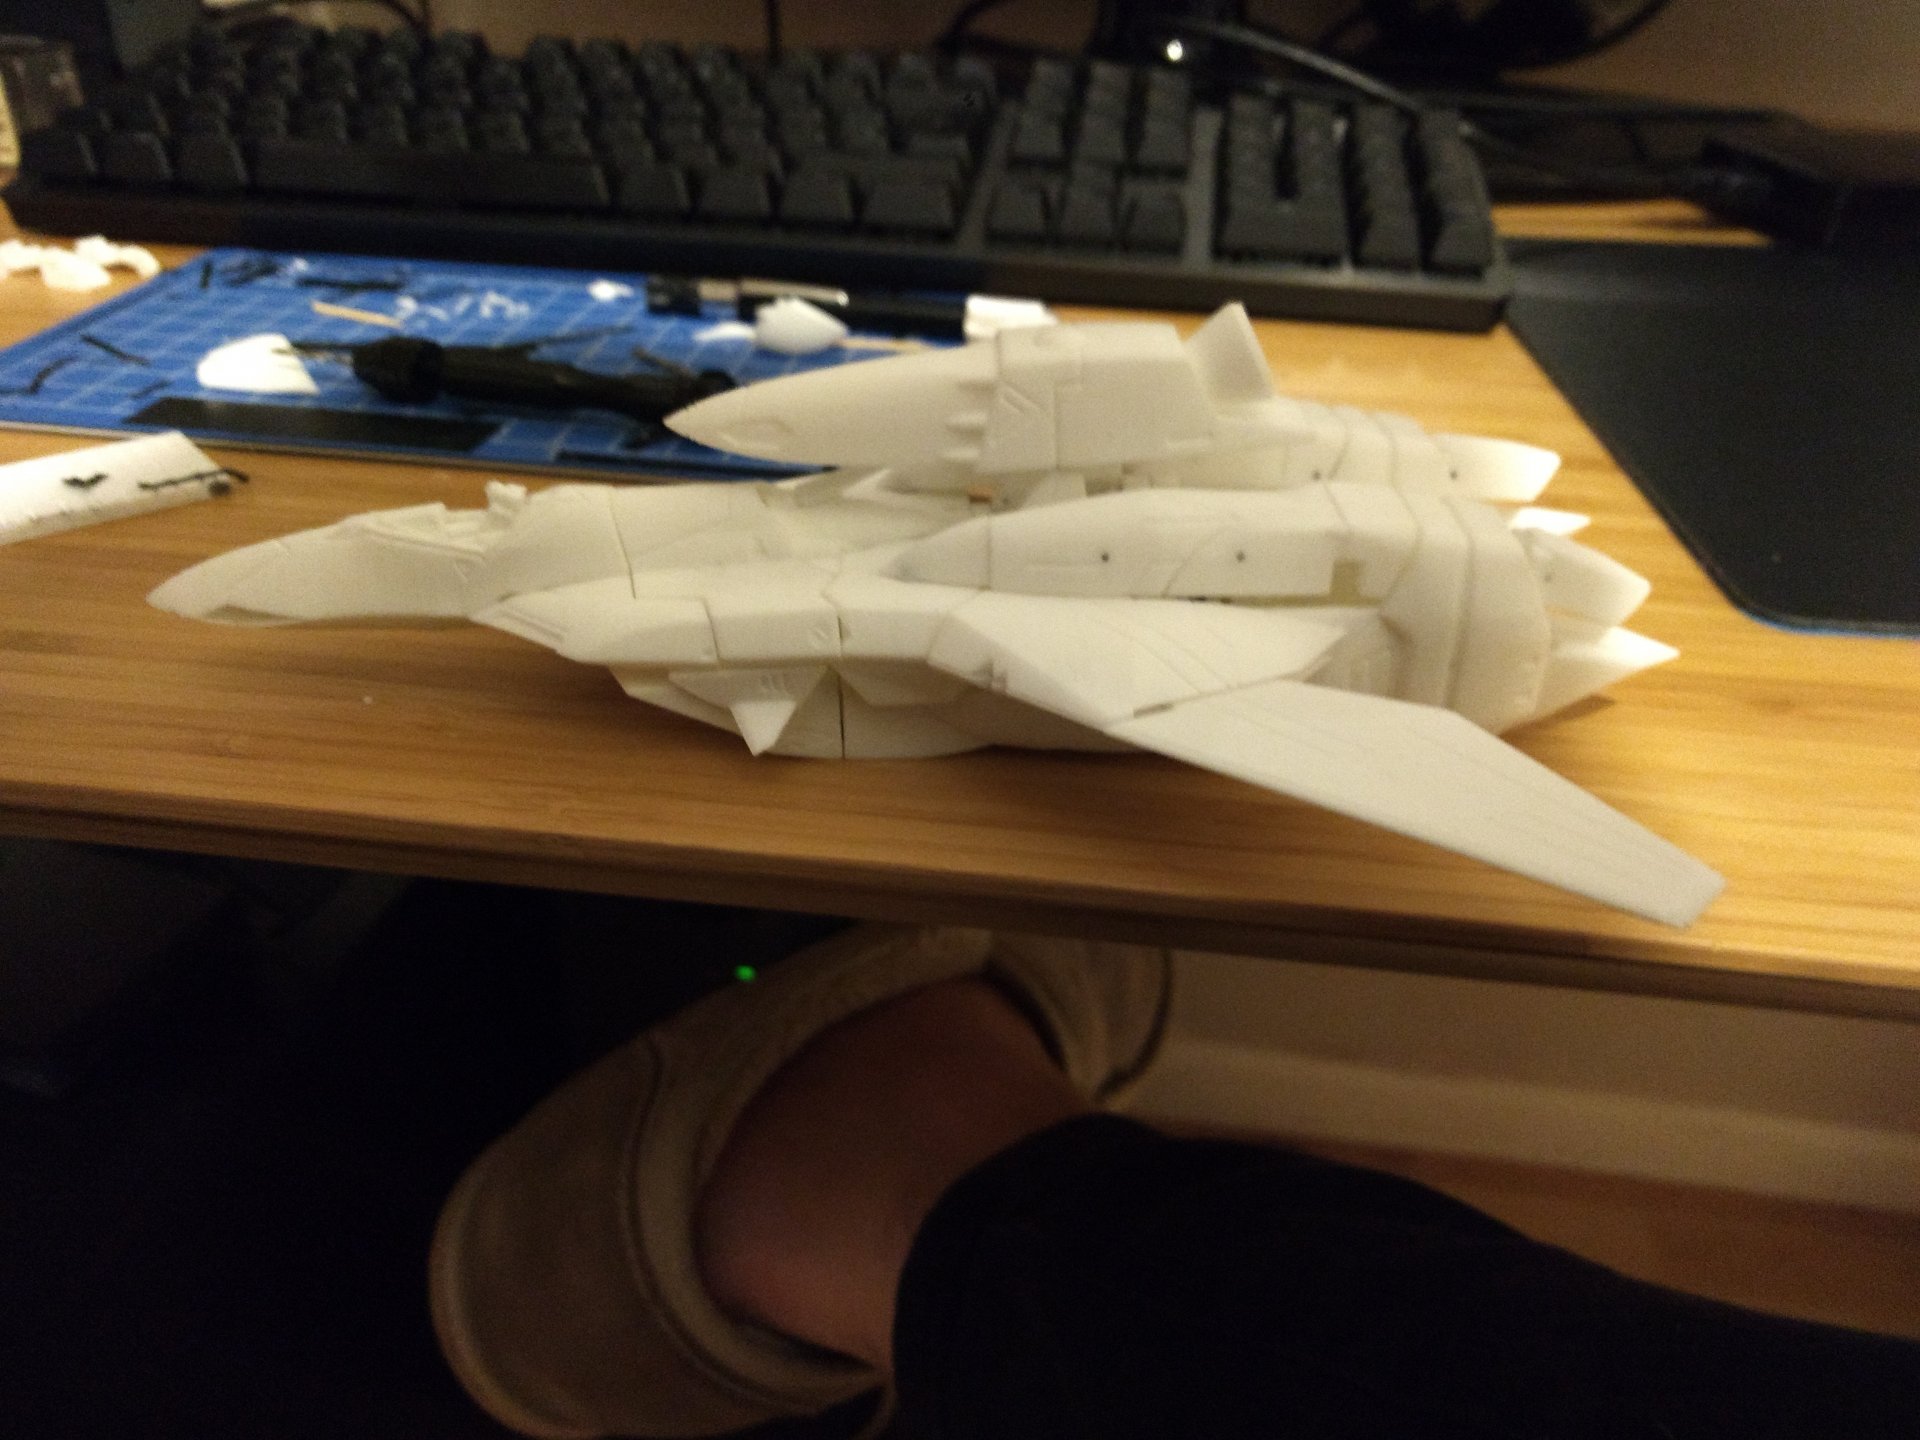
Hey Team, just a quick update. Started painting it all. Used a nice off-white for all the underparts, but the top parts came out a little more blue than i expected.... i've ordered some more paint that's a little more green and more like the actual plane, but it'll probably arrive Tuesday :-( I'll get painting as soon as it arrives though. In better news the clear parts i ordered scrub up really nice. The top canopy is one that's been sanded from 400, all the way to 3000 grit paper, and the bottom one is how clear it gets once you've used a clear coat on a similarly sanded canopy. Super clear huh? So yeah, super quick update! hopefully next time i'll be posting up shots of him all done, and maybe even a video! :-)

-
PMed you both :-)
-
Nope but you are now :-) i'll PM you soon(ish)
-
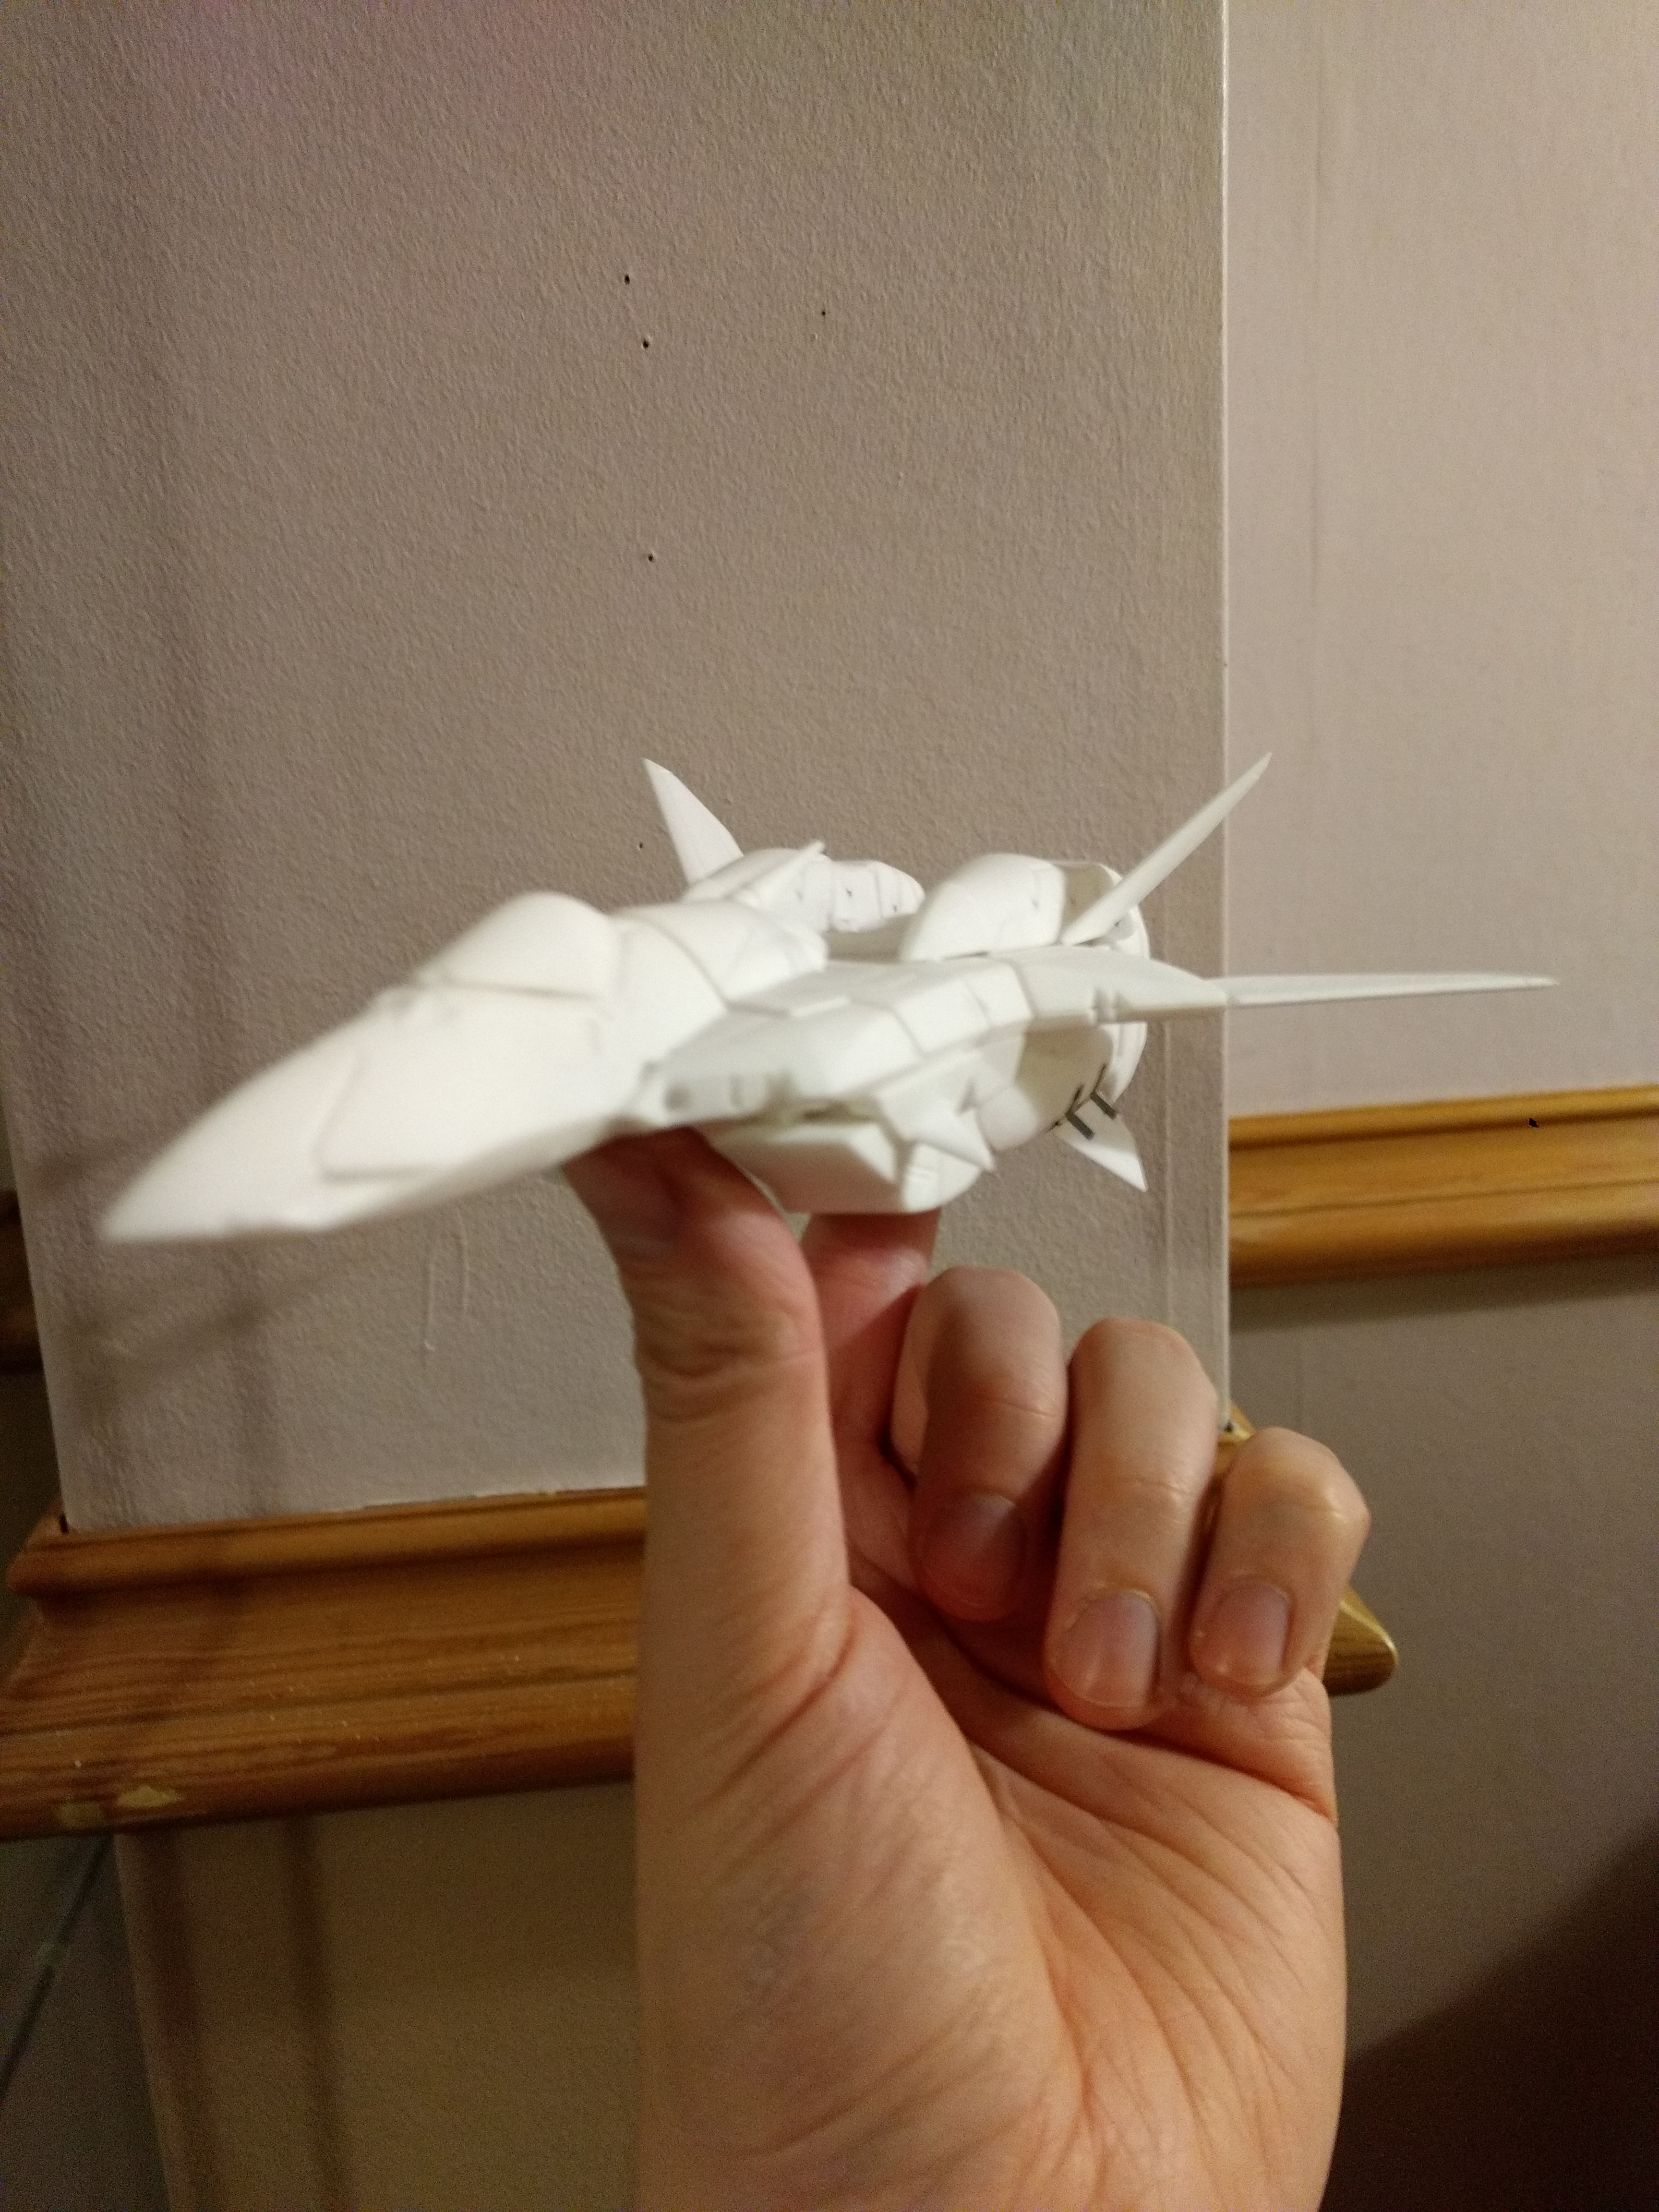
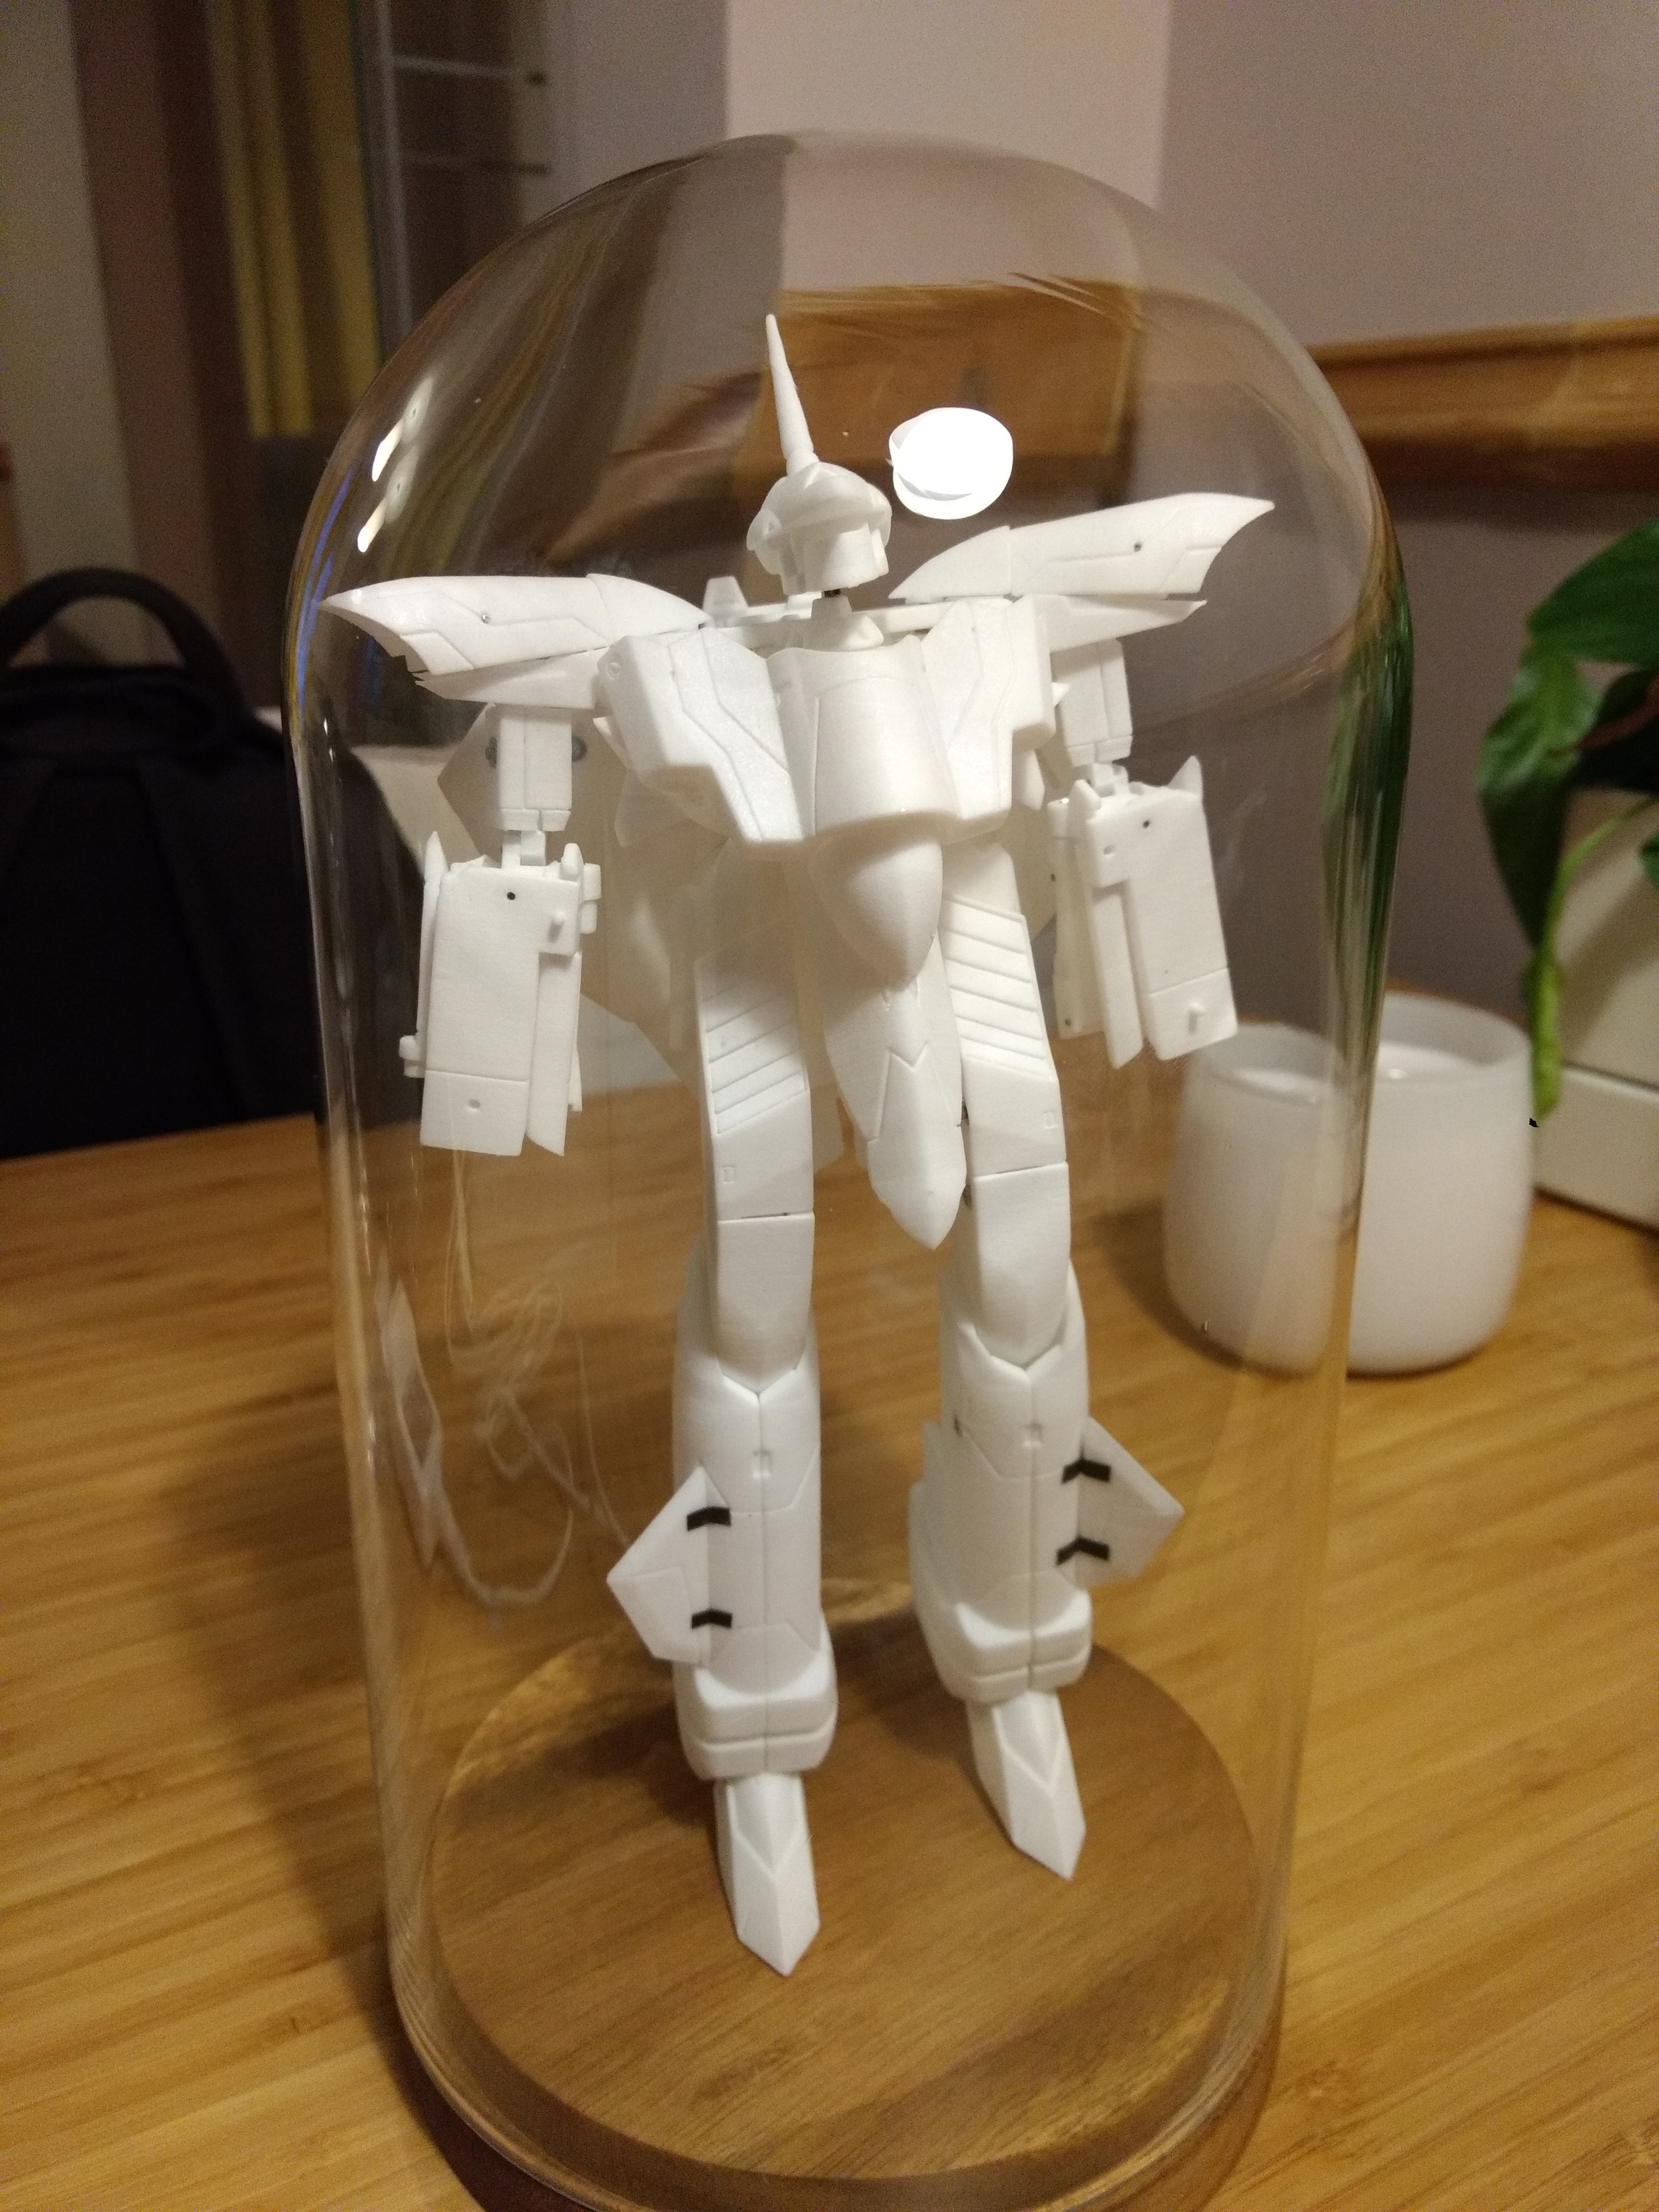
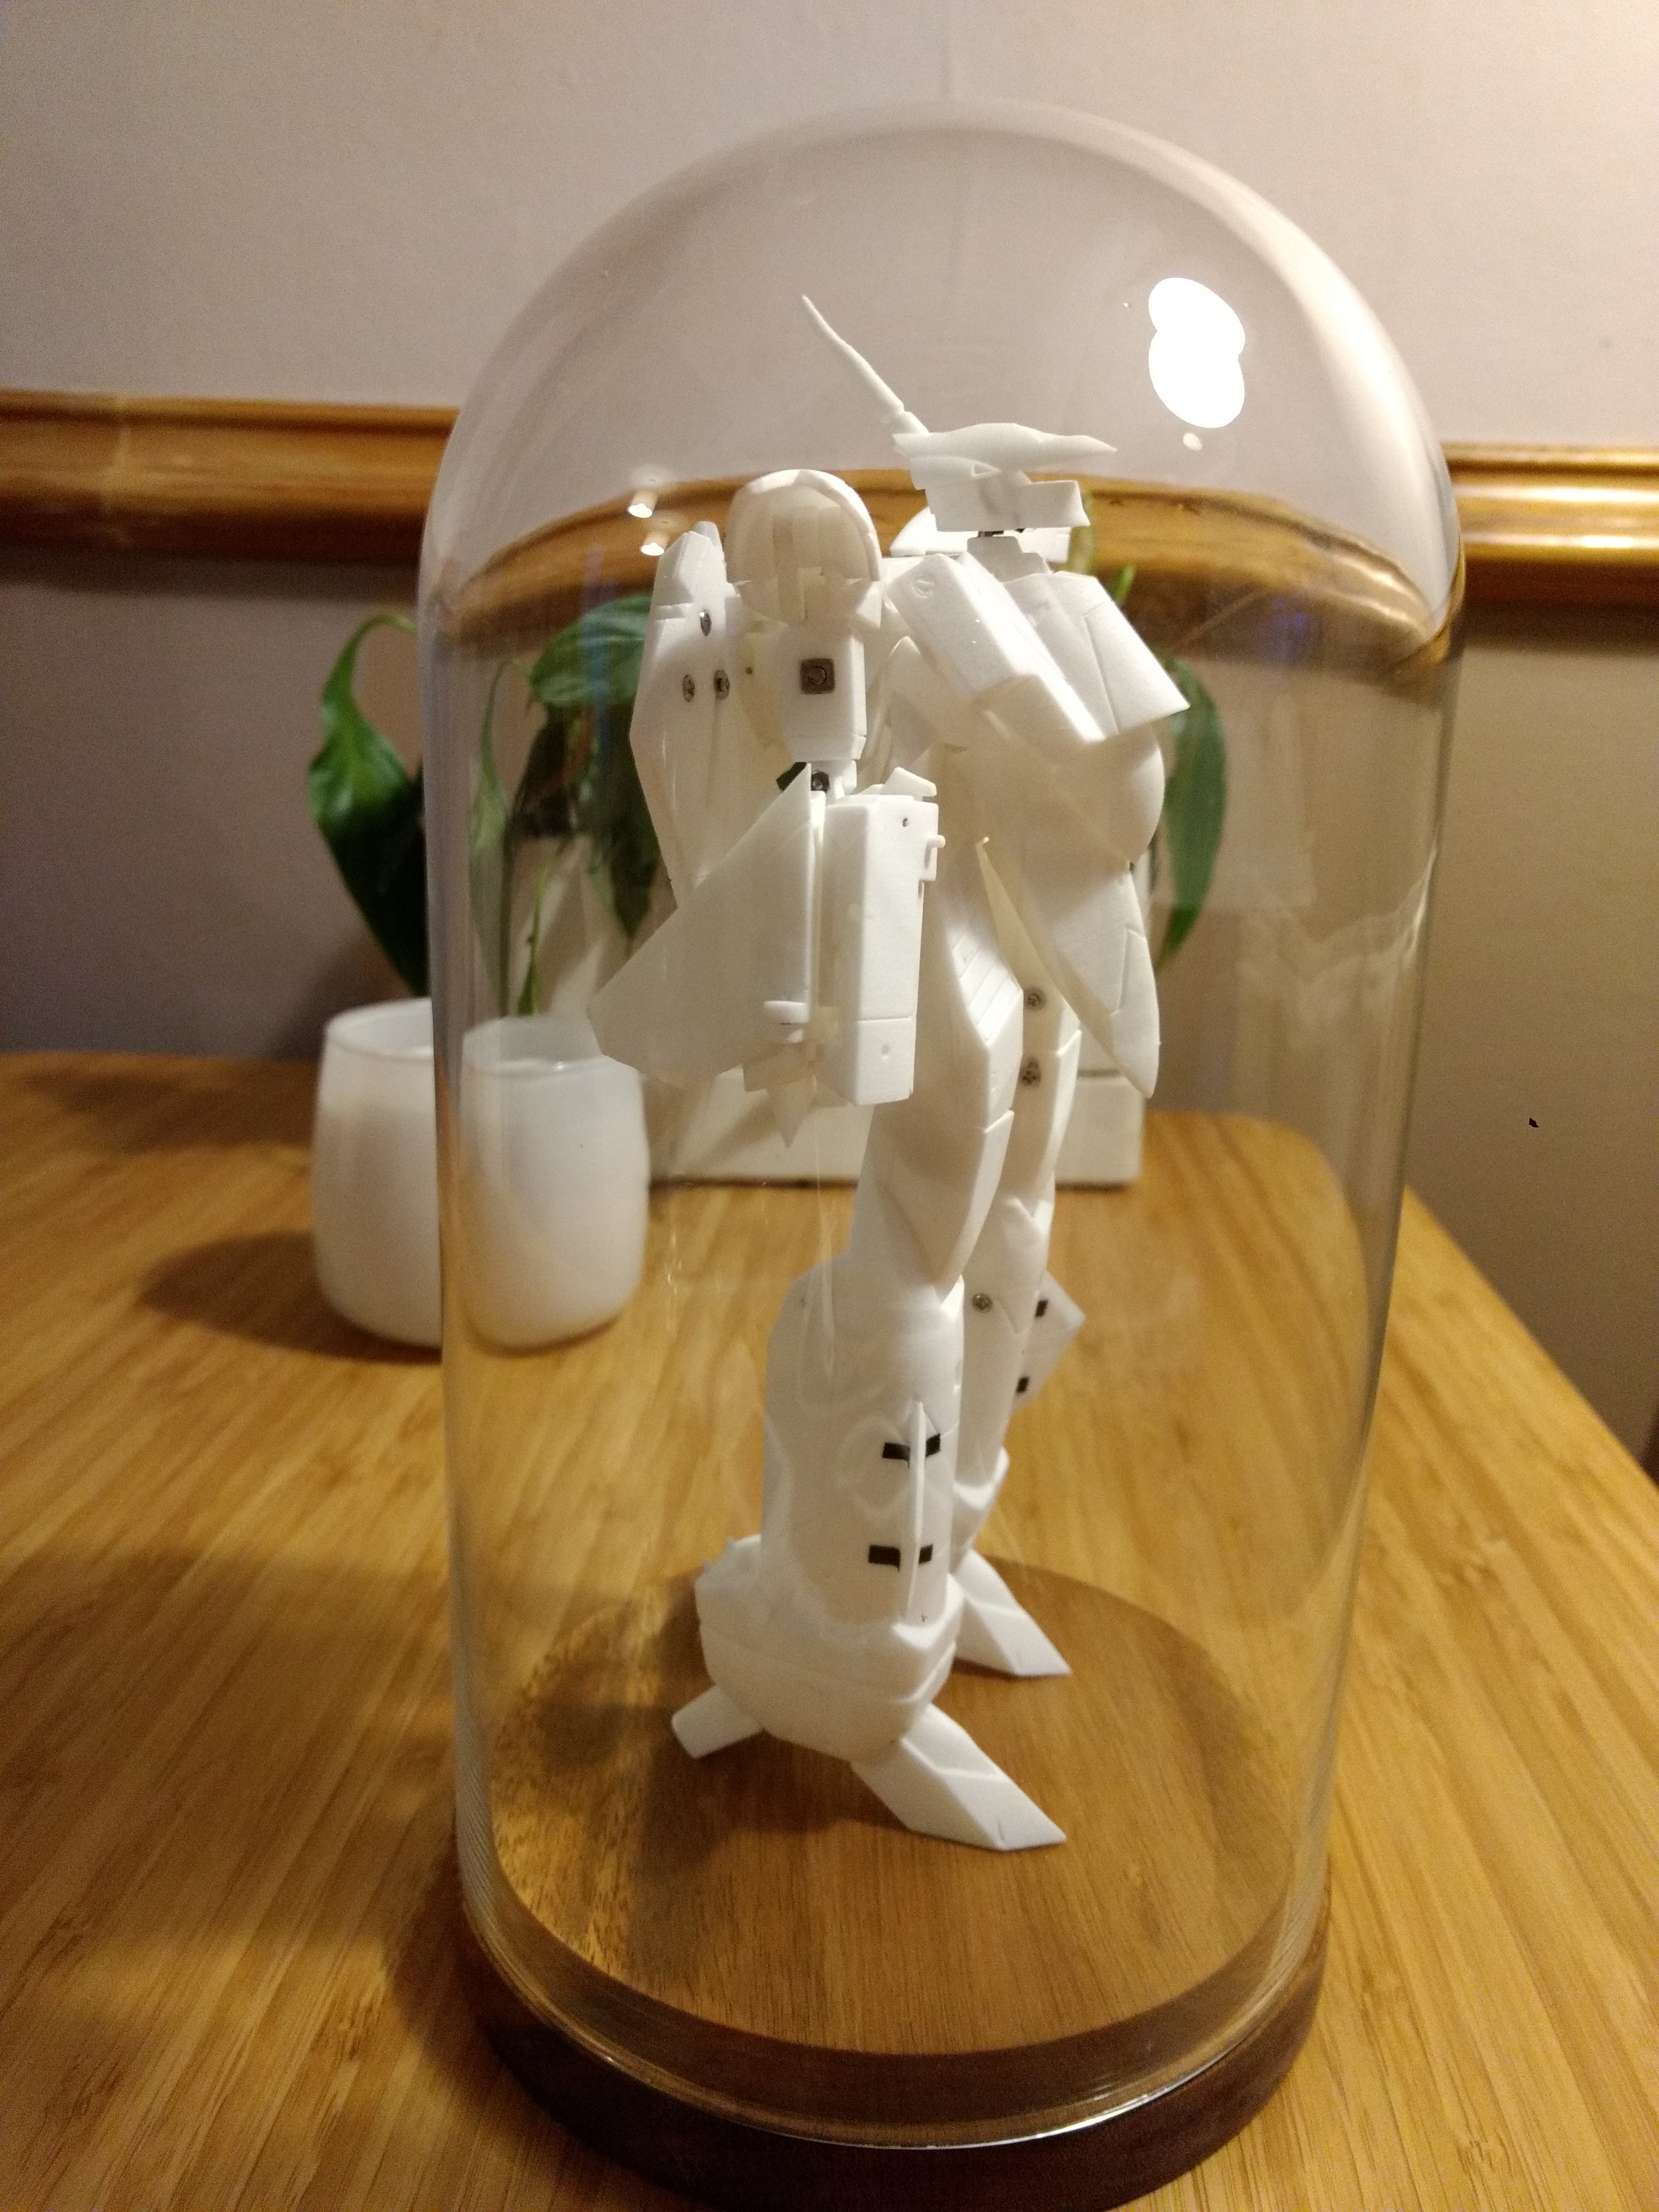
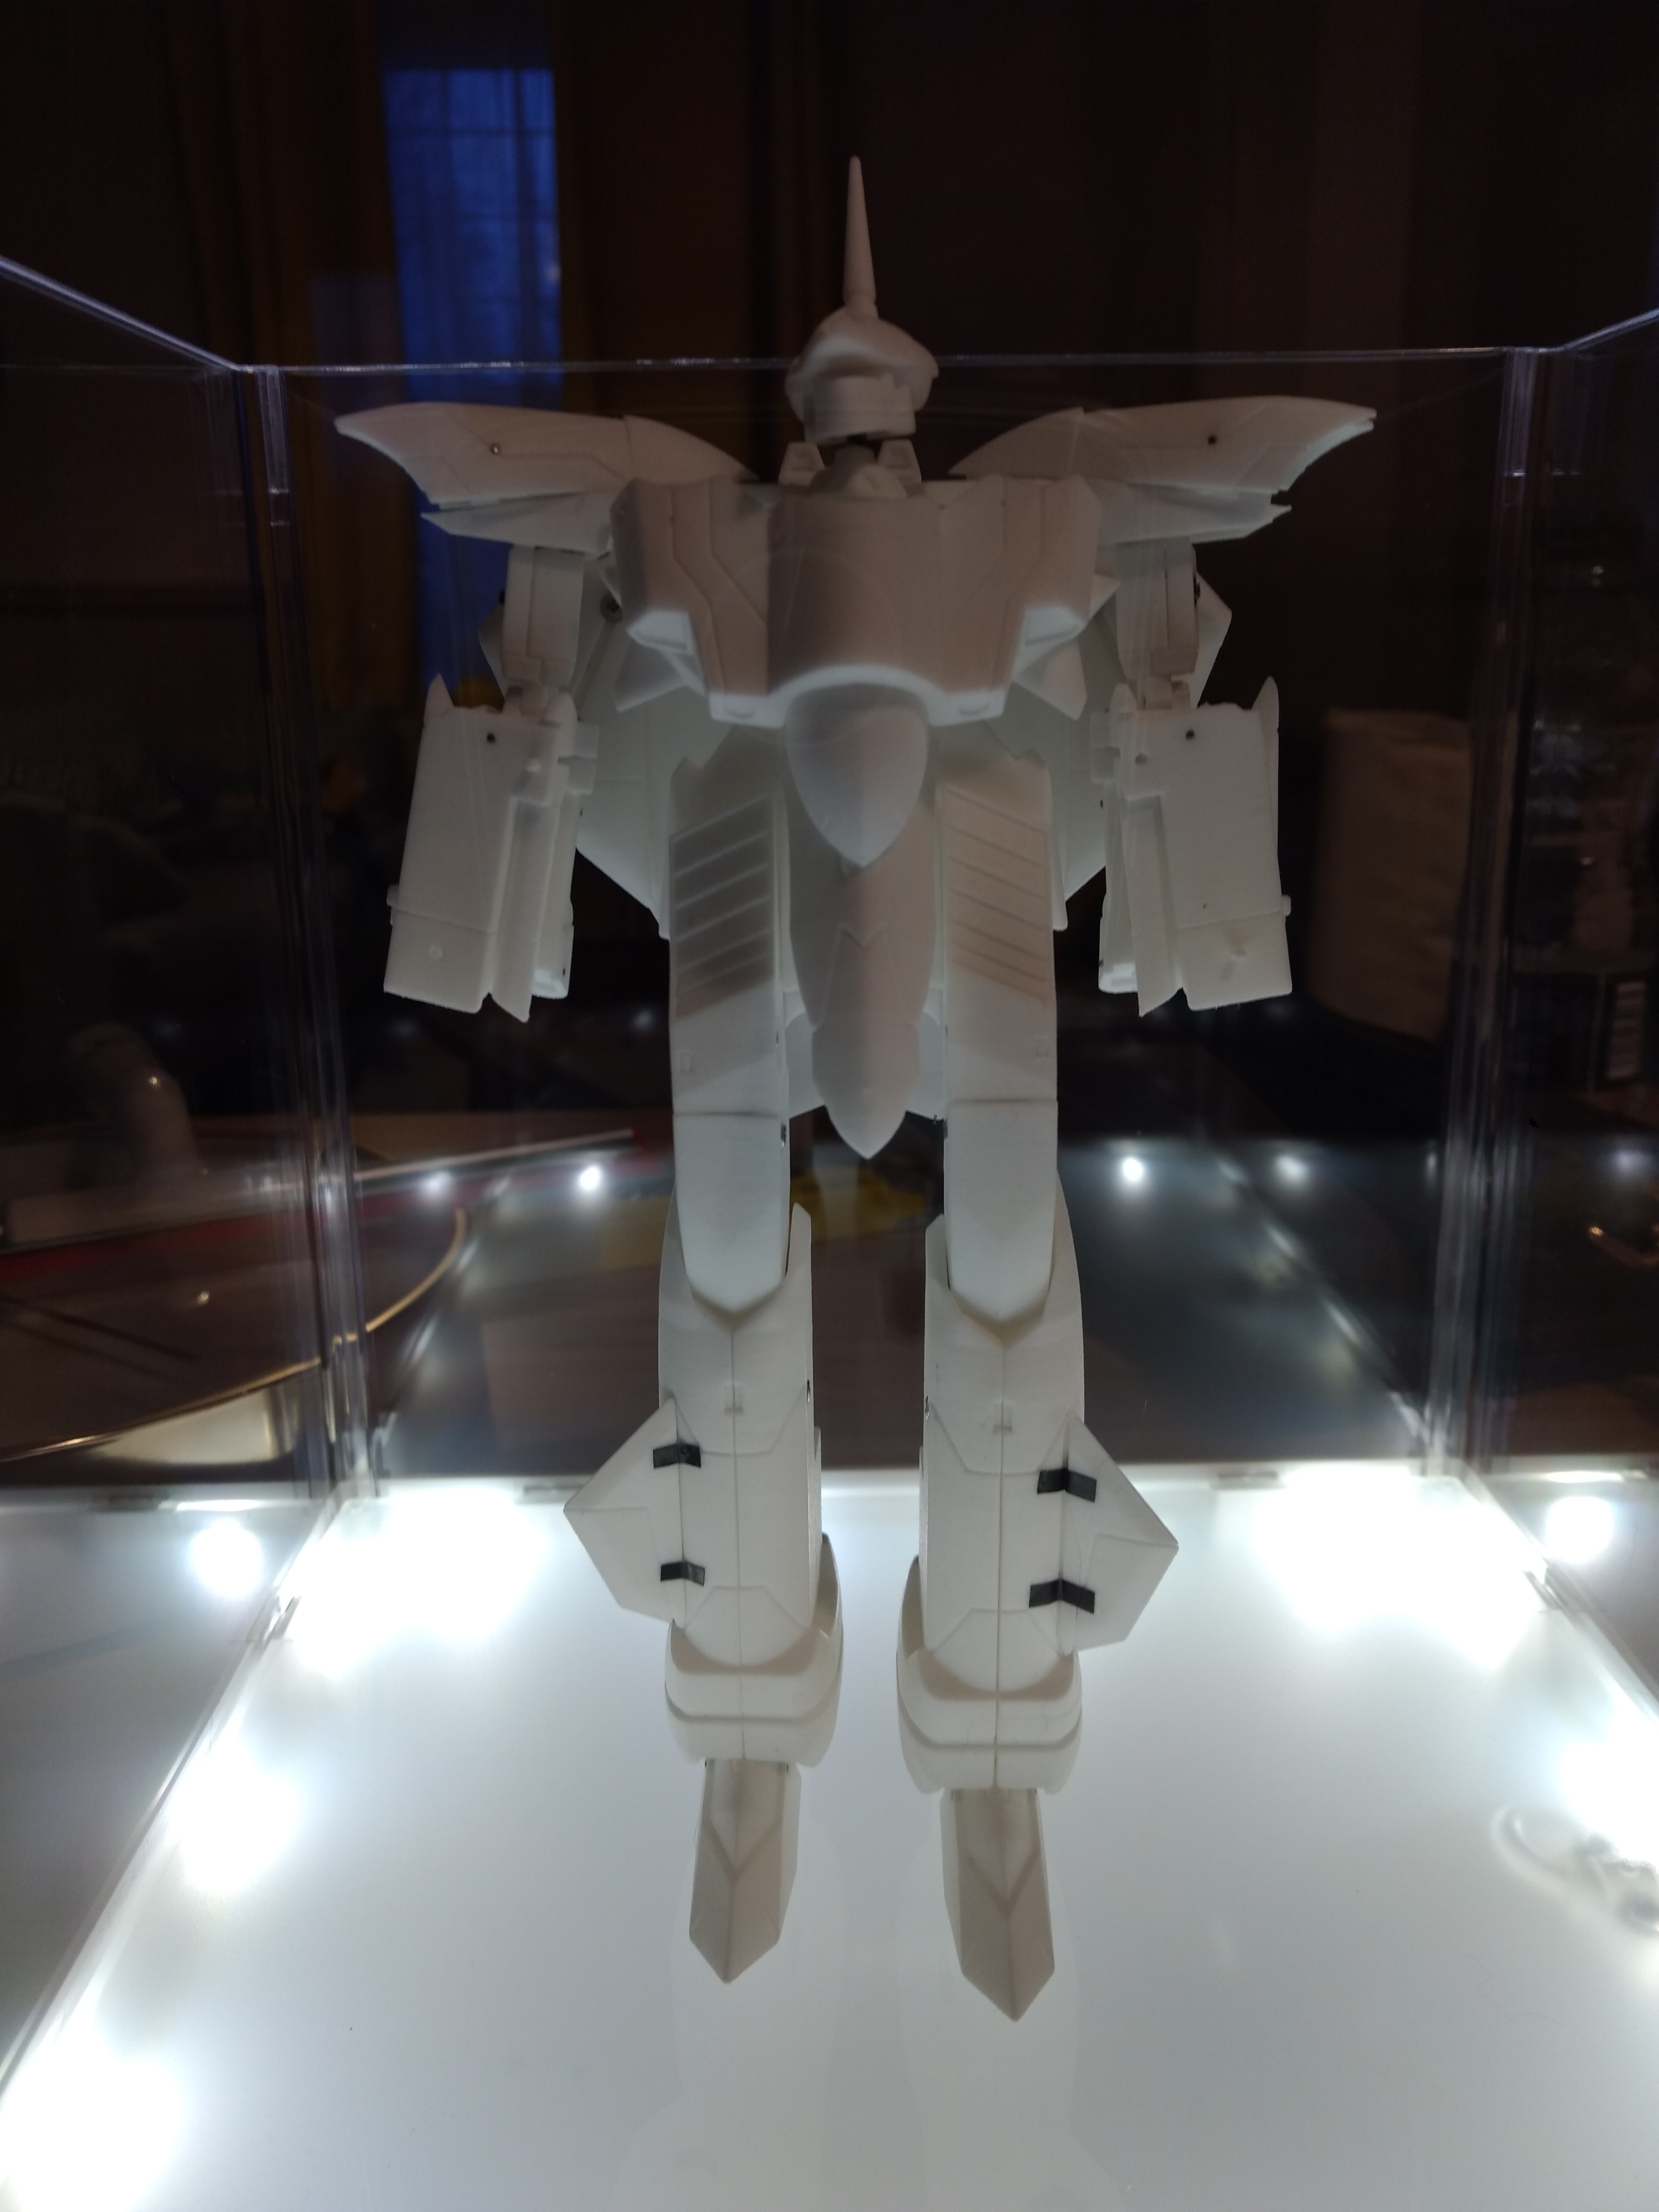
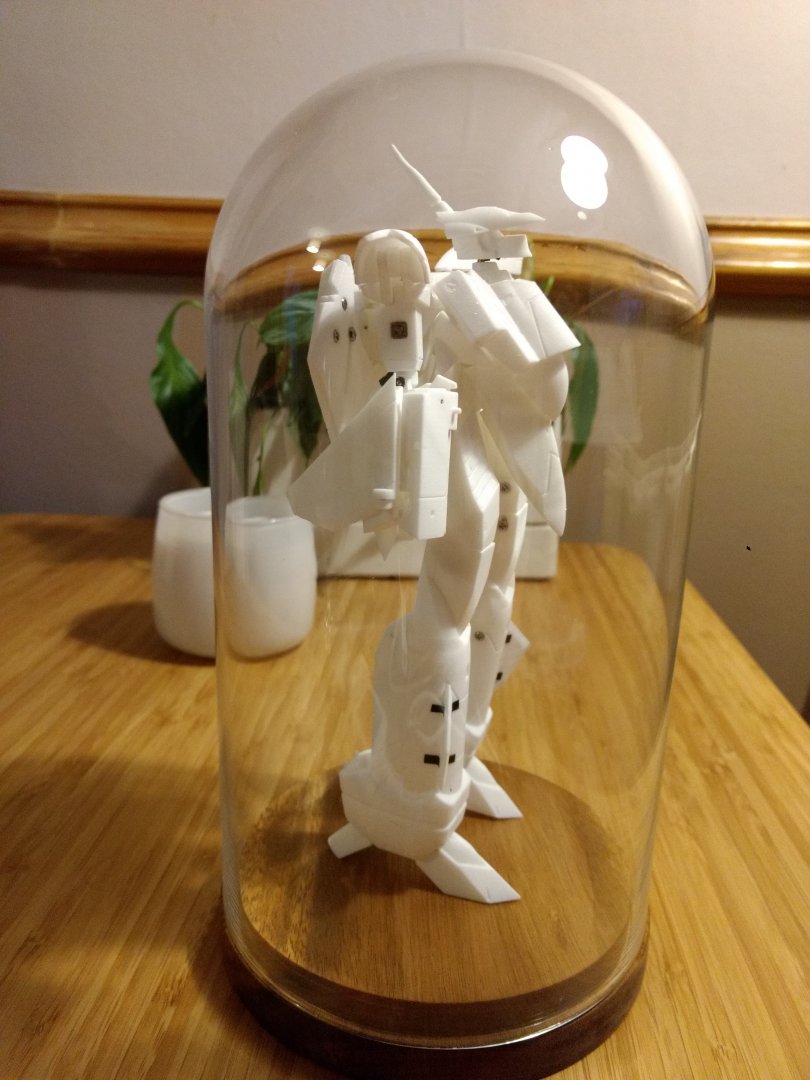
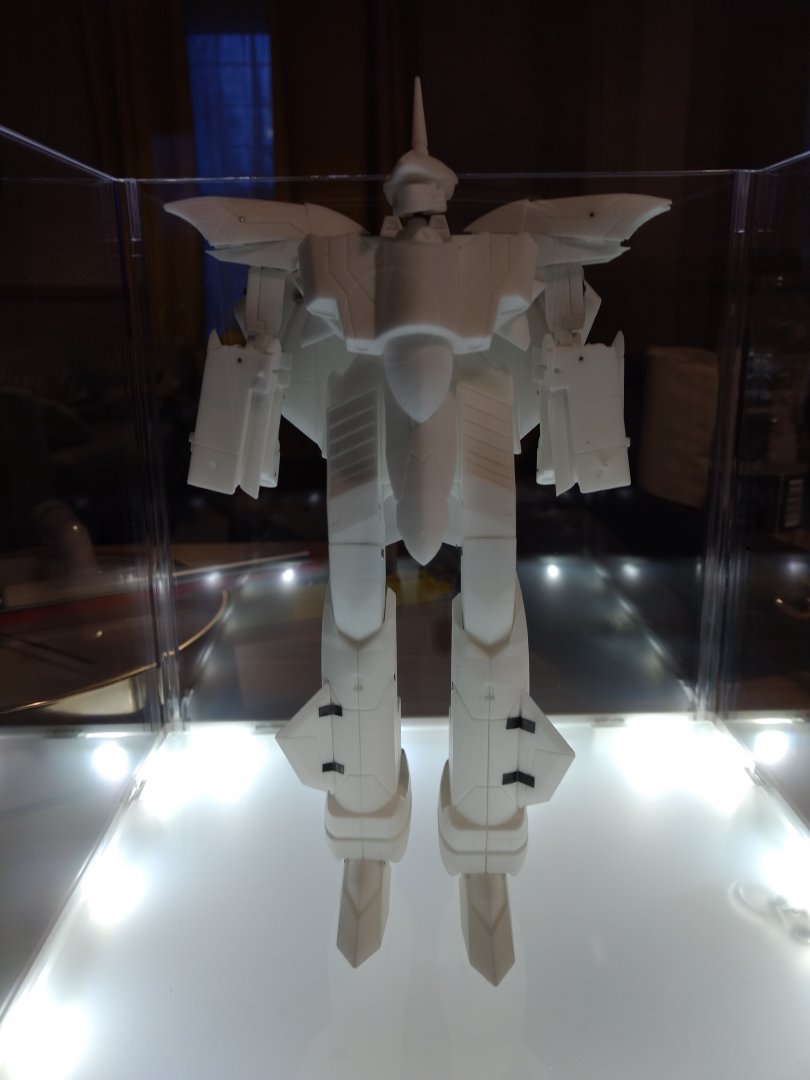
Hey team. Sorry for lack of updates in this final stage. Work has been crazy busy recently. But I thought I'd update you with a few pics with the tail fins on and finally him in his robot mode! Went to IKEA for a couple house things and came across these 2 things that I thought would be great to display him in. The LED box actually comes with a clear top/roof/lid, sadly the top of his head (or as my girlfriend called it 'his pointy hat) is makes him juuuust too tall for it. I'm sure I'll find a smaller bot or 2 to fit in it tho. Under-lighting him in white looks great I thought though. But yeah, the other glass thing works great! Plan is to paint him in the next week or so, meanwhile look for a place to print the clear parts at a good price then I should be able to give you all an accurate cost of this guy for those that are still keen. Chat soon!


-
Hah I will! The guys i'm printing it from had forgotten another couple small parts so i'm waiting on those again. Started work on my next project though while i wait for them, so keep an eye out for that ;-) But also Monster Hunter World is too good, i'm struggling to rip myself away haha.
-
Xigfrid! Done it again! Amazing work mate. So so amazing.
-
PMed you both :-)
-
Hah, I don't know about 'art' but sure! Added you to my little list. Oh and yeah where I can i've tried either already having the holes in some parts, or certainly having small guide holes for where you'll need to screw stuff in easily. As yeah, lining up stuff on those SHE kits (at least the vf-5000 i'm copying from) suuuuuucks. With the way i'm now designing getting the screws in, you'll just have to create a tiny sink just to help the screw take to the material, then screw it in, but that's all - no extra hole drilling. The only real drilling you'll need to do is for the rods. I think there's only 1-2 long (3cm deep) parts that may be a bit tougher than the rest (they're like 1cm deep tops) but i'll do some extra guides so your drill (i'd recommend a Pin-vice) follows the right direction a bit easier. Believe me, when i was putting this test one together, I knew where I was getting frustrated on which parts, so i'll try and not pass that frustration down to you guys haha. As far as other versions - yeah sure maybe in the future. I think i'll need a break from him for a while though hah. But yeah, one thing if i'm already to crit my own work, is the arms, particularly the elbow – it's pretty spindly, i'd love to do it all with those Revoltech proportions. Oddly I'm actually starting to have a few specific valks in my collection where i have the 1/60 toy version in battroid mode, and then a 1/72 model valk mode next to it. It does look nice actually. Right, enough typing, more designing. Chat soon.
-
Yeah that's actually how I started out thinking how I wanted to go about this. As really that's how I display my robots – either just left as a jet or left in robot mode, sometimes I change their stance. But I thought 'why not go all out and do a transforming one' otherwise then I feel like if it's just an articulated model then it really would be what my girlfriend calls a lot of my collection - 'Fancy space dollies' haha I really should have started on something smaller, as i've bitten off more than i can almost chew. But i'm chewing on through it like a very fatty steak haha. But yeah for a later project i did have an idea to do just an articulated Az-130 or VA-3C, as well as their jet modes of course... will see how I go. But yeah i'm planning to make a few of these. I've been keeping track who's interested to get back to them once it's good to go, want me to add you to the list?
-
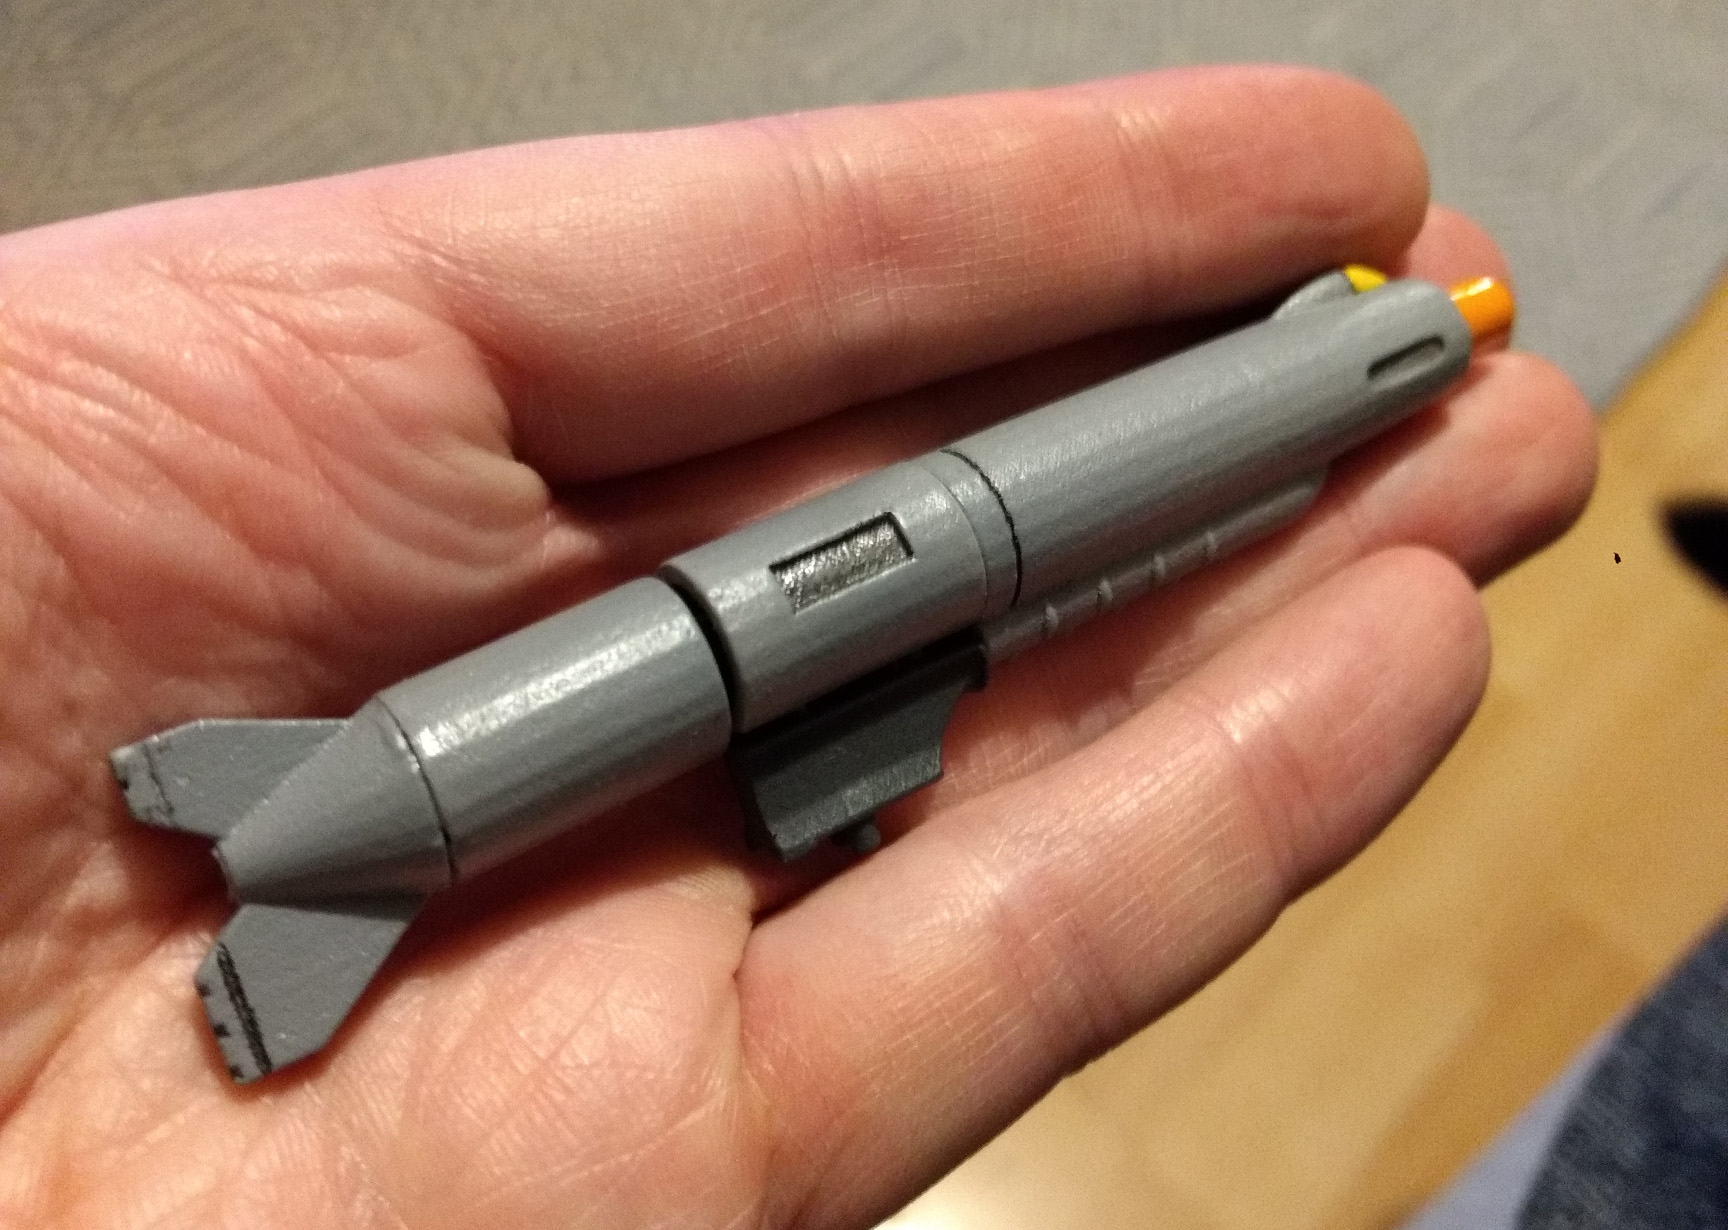
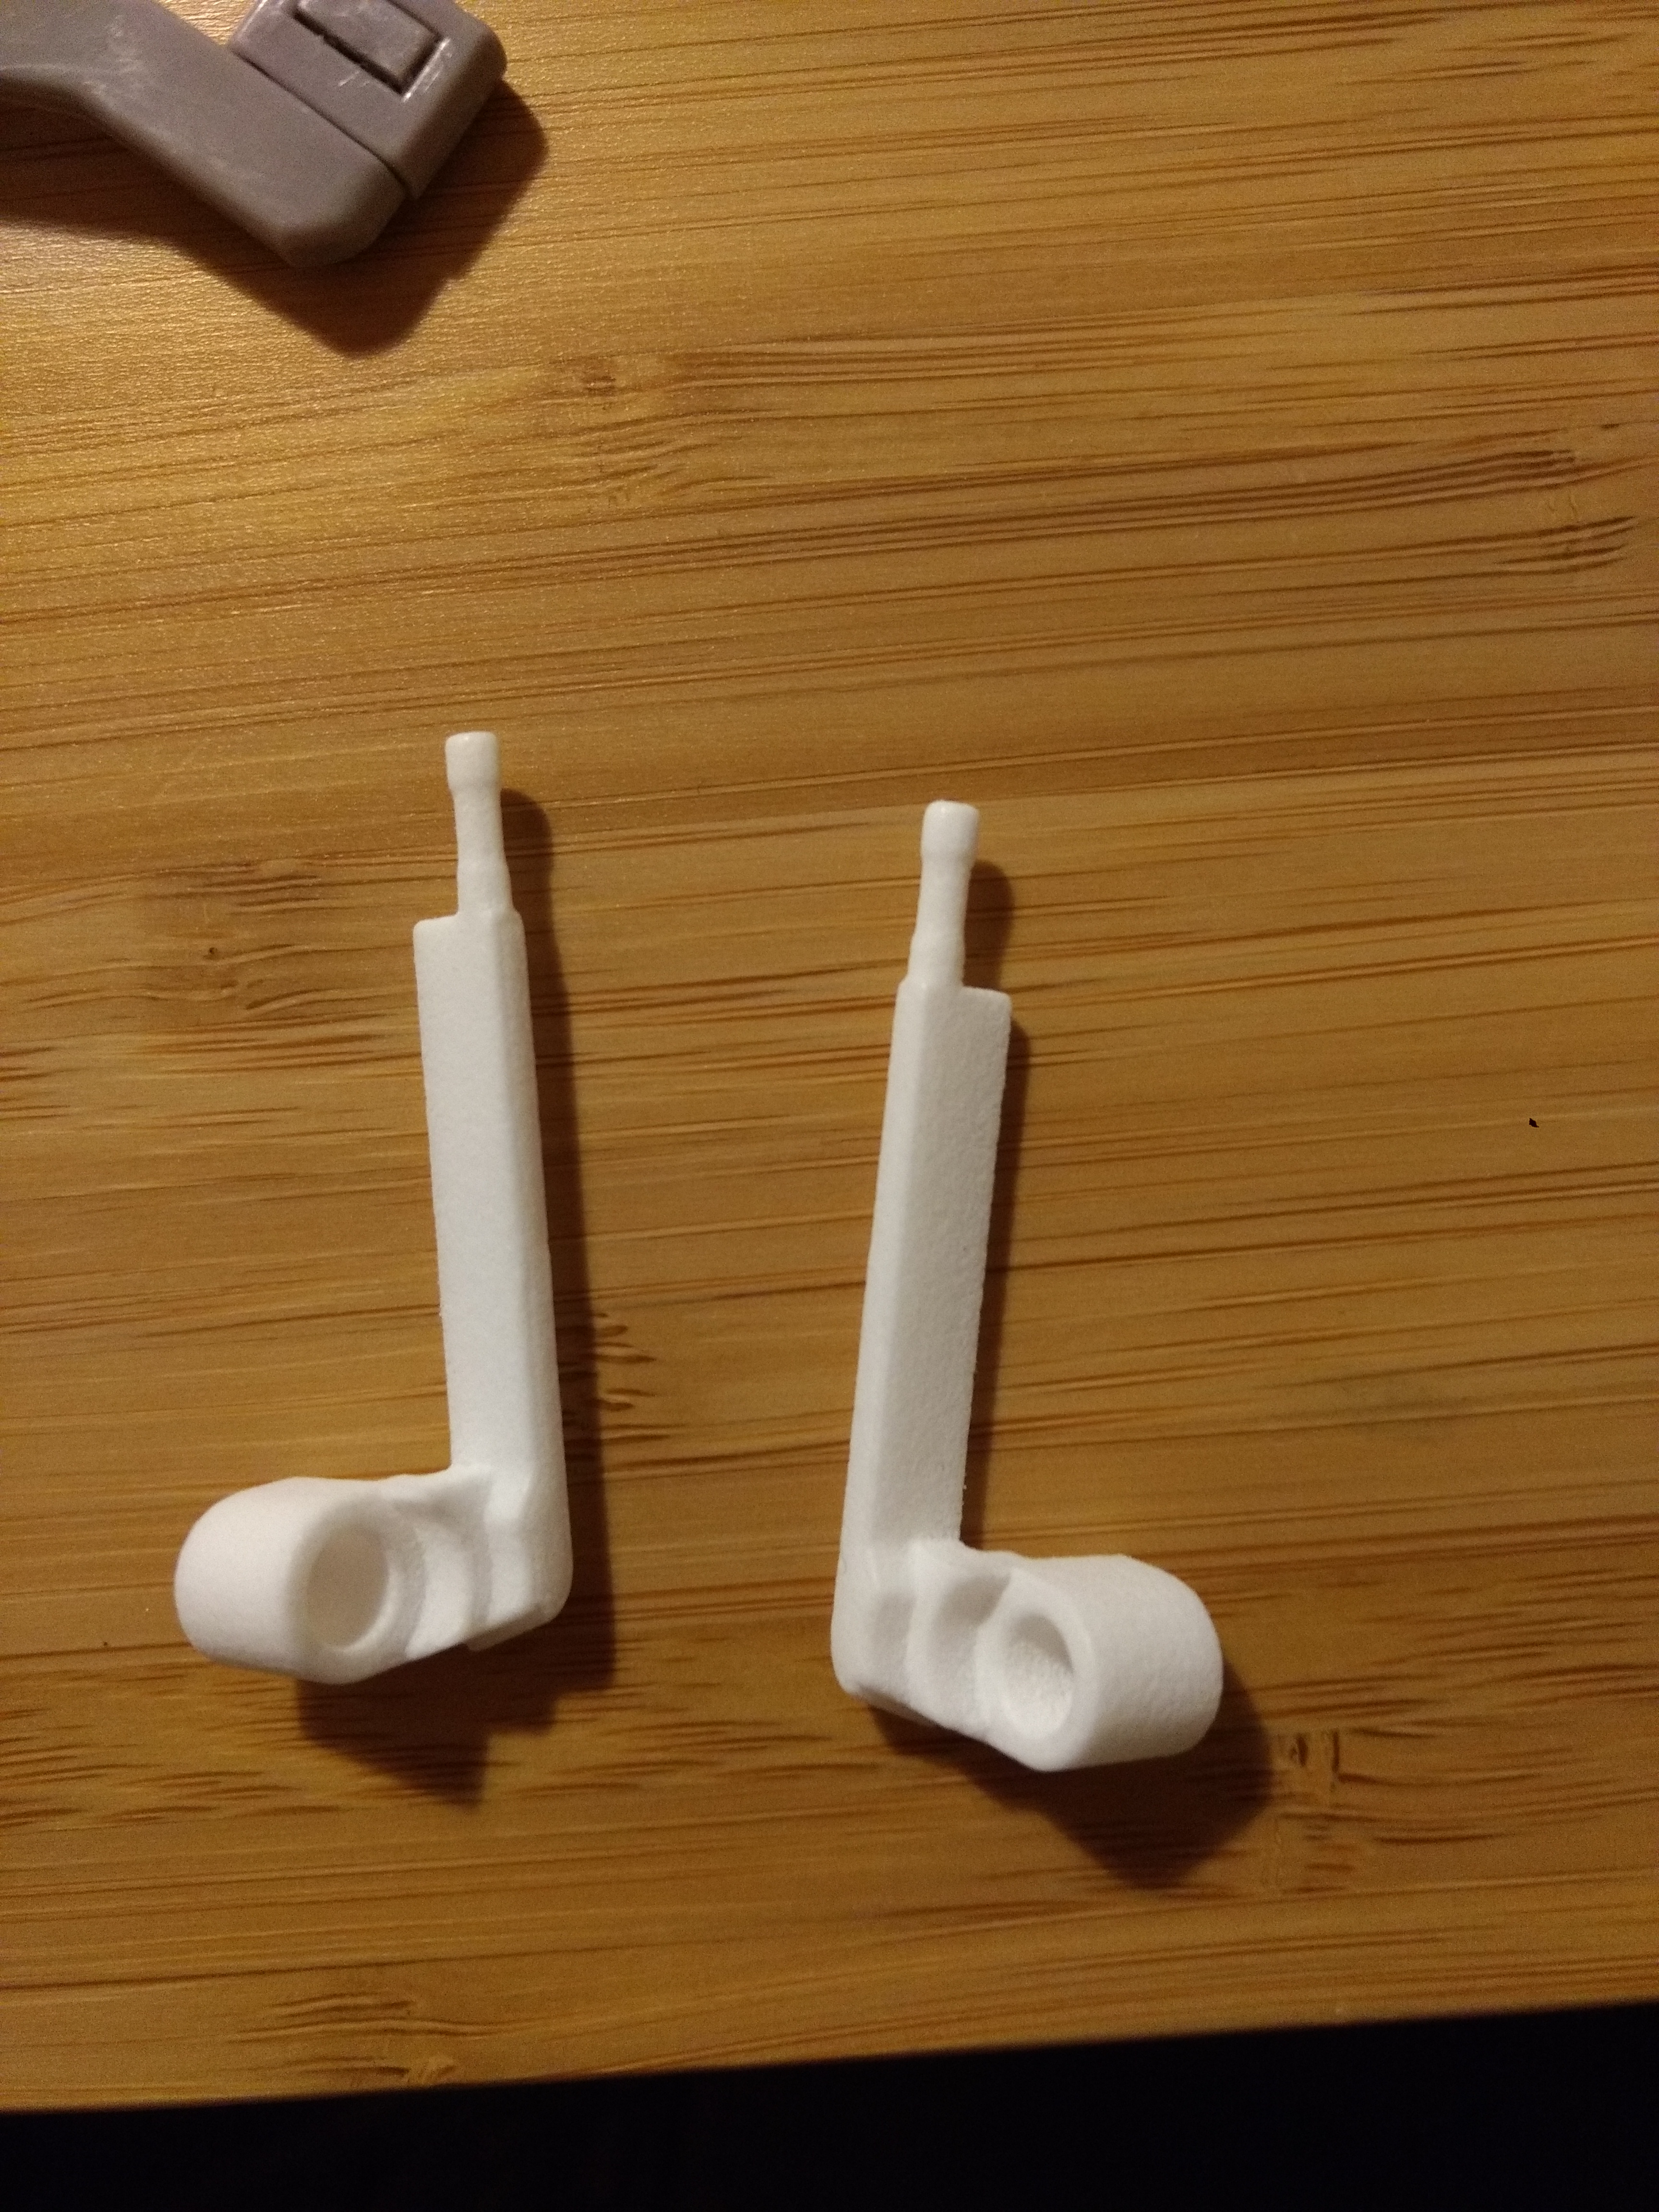
Hey guys - good, bad, good news. Good - new part came through quickly and he's all together now. Yaaaaay. Bad - a few fragile joints where some of the smaller nuts and bolts connect fall out pretty easily sadly, even after a couple of transformations. Boooooo. Good - it's an easy fix! Yaaaaaay. Basically where i thought gluing in the nuts would work holding things together, the smallest over tighten and the screw actually helps dislodge the glued nut. Luckily though after a small test the 3D printed material can take even the smallest screw and hold it well enough. So basically I just need to bulk out the parts where i'd originally made space for some of the nuts and leave a tiny guide hole for the screw. Easy, just gotta find the time! I did this originally as the resin used on the original kit was so fragile, the small screws used would tear away at the resin, so it wouldn't hold any of the thread. So i was a little worried this would happen here too - But it looks like it'll be alright. Starting to realise why these things take so long that's for sure.
-
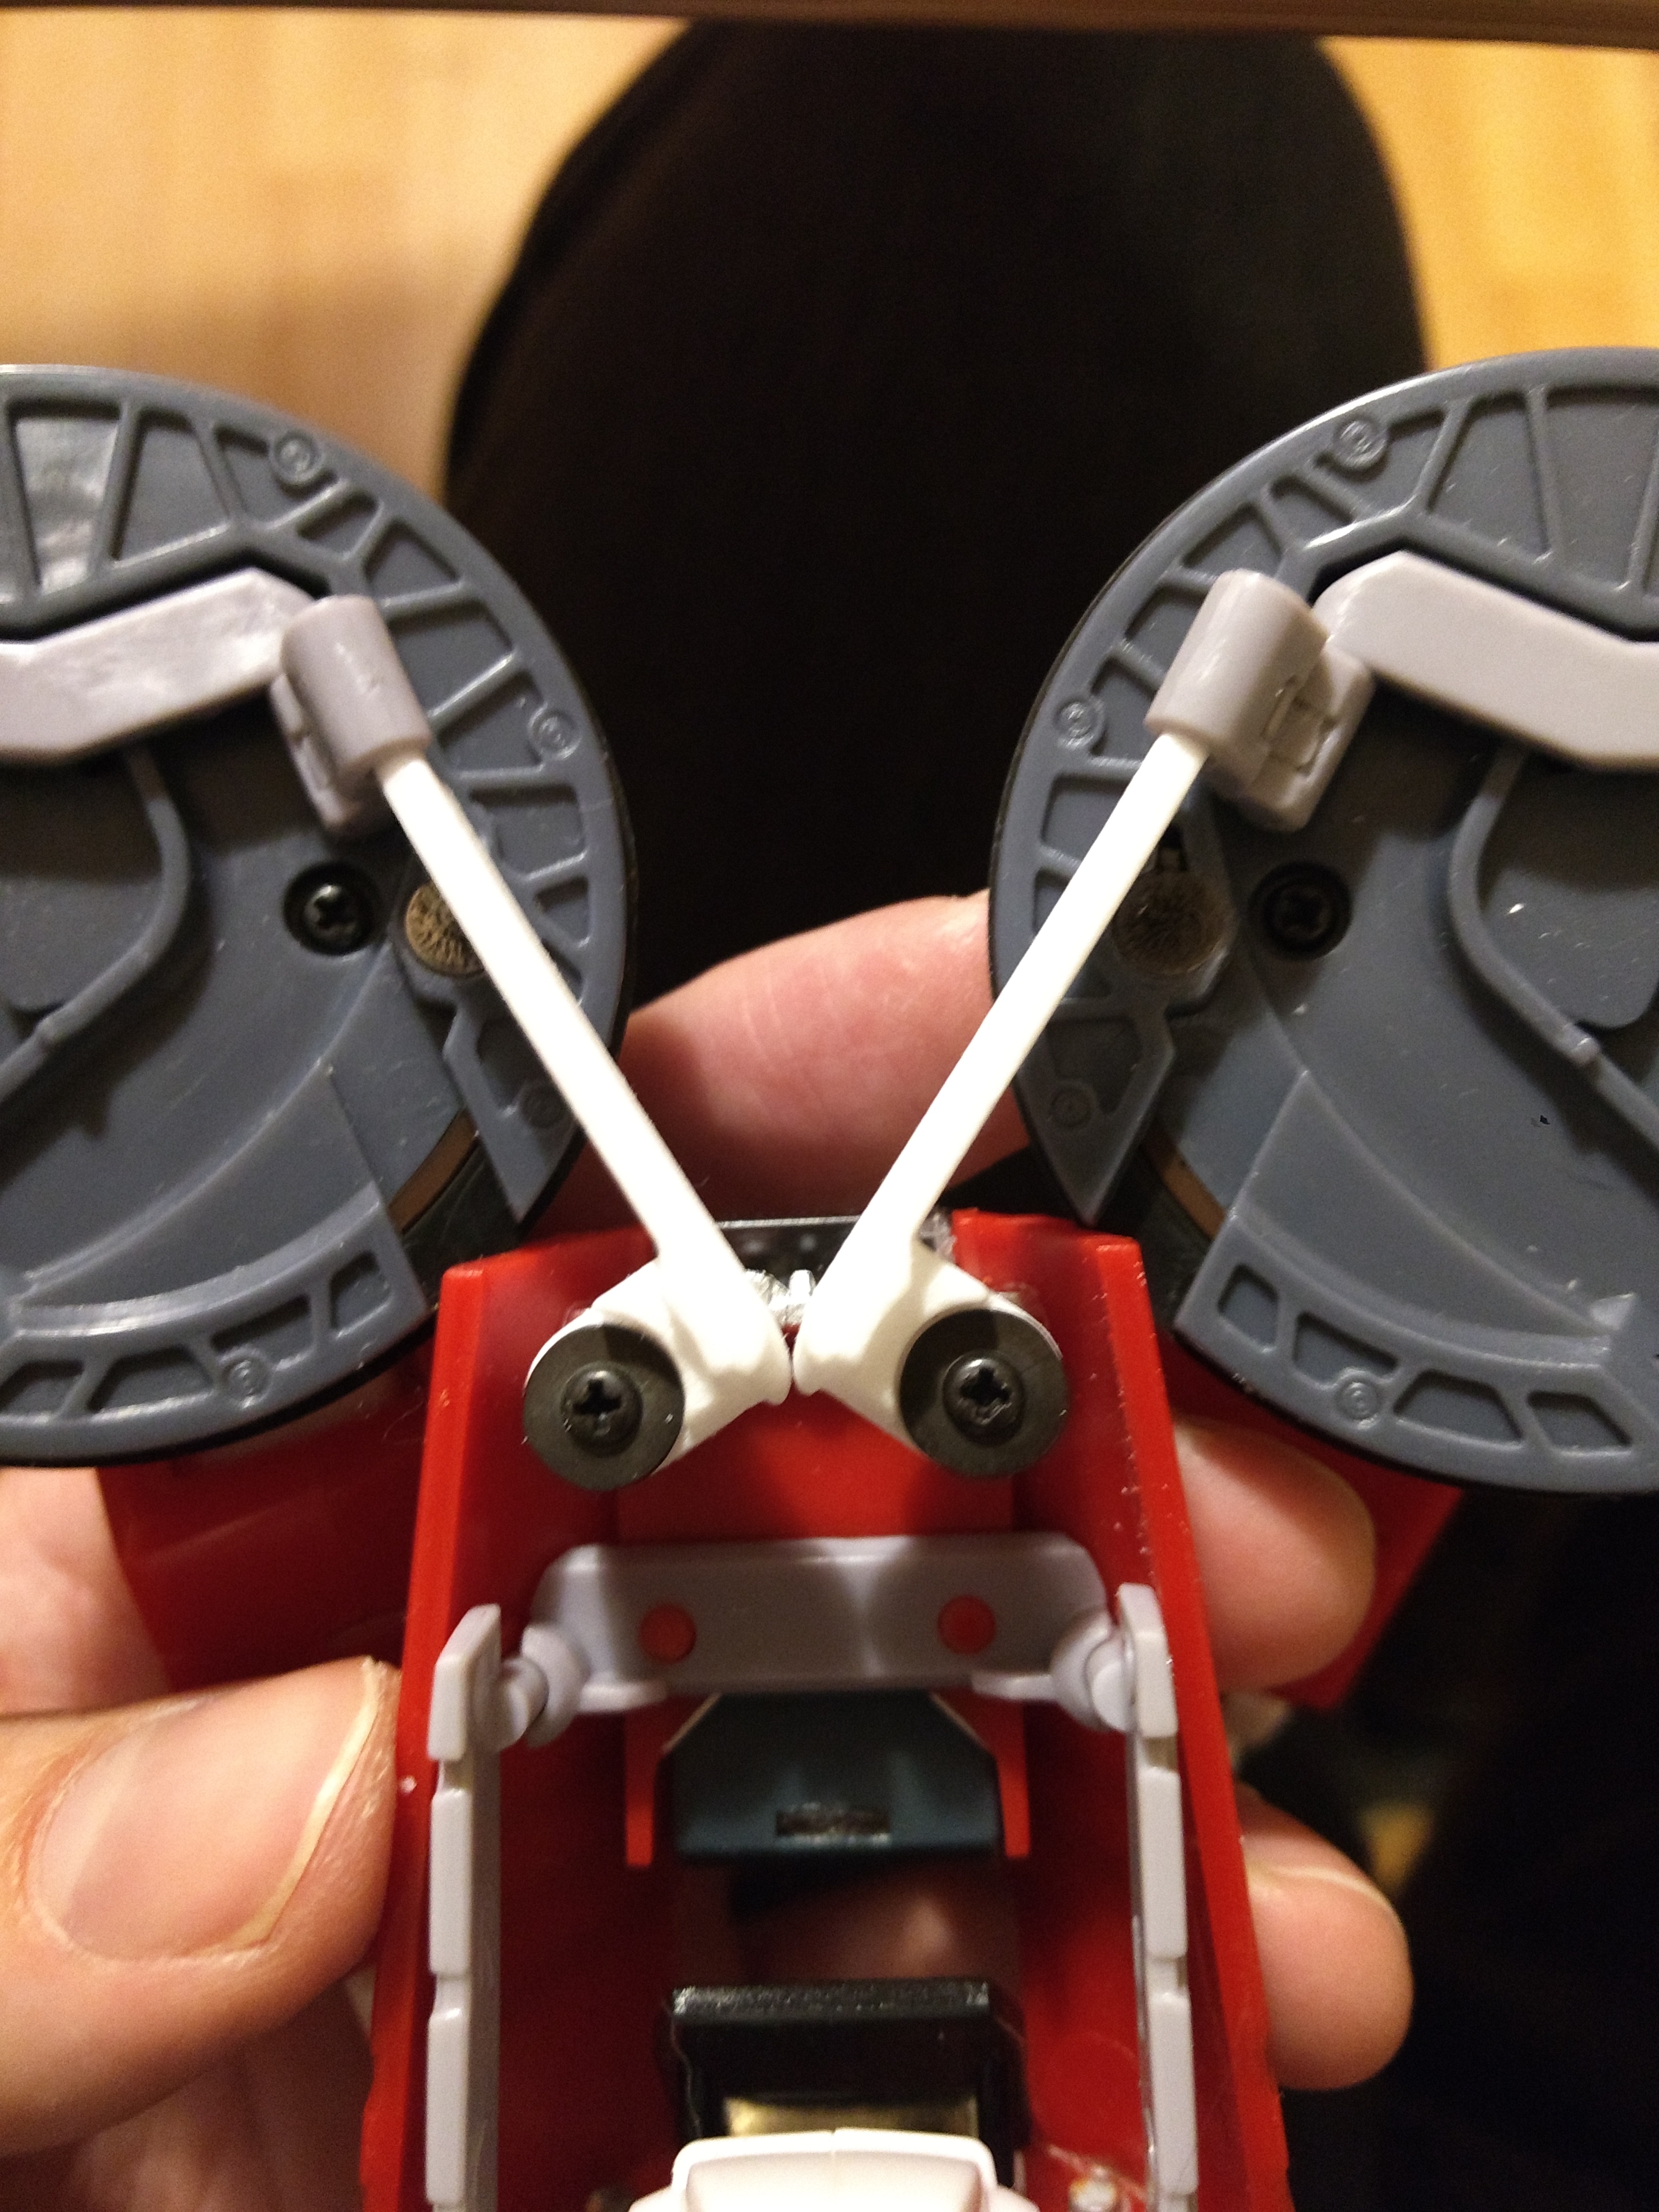
Yeah Shapeways can do it in metal - but the cost goes up a bit... from £3 to £9 per piece actually on my file - so not too bad. I was after a cheap solution. Also I'll need to read up on the material restrictions better if metal is wanted... as some of them have different minimum printing widths etc. But i think the part being light (in weight) and having a bit of flex helps. Shapeways could do it in 18k Gold too if you really wanted ;-)
-
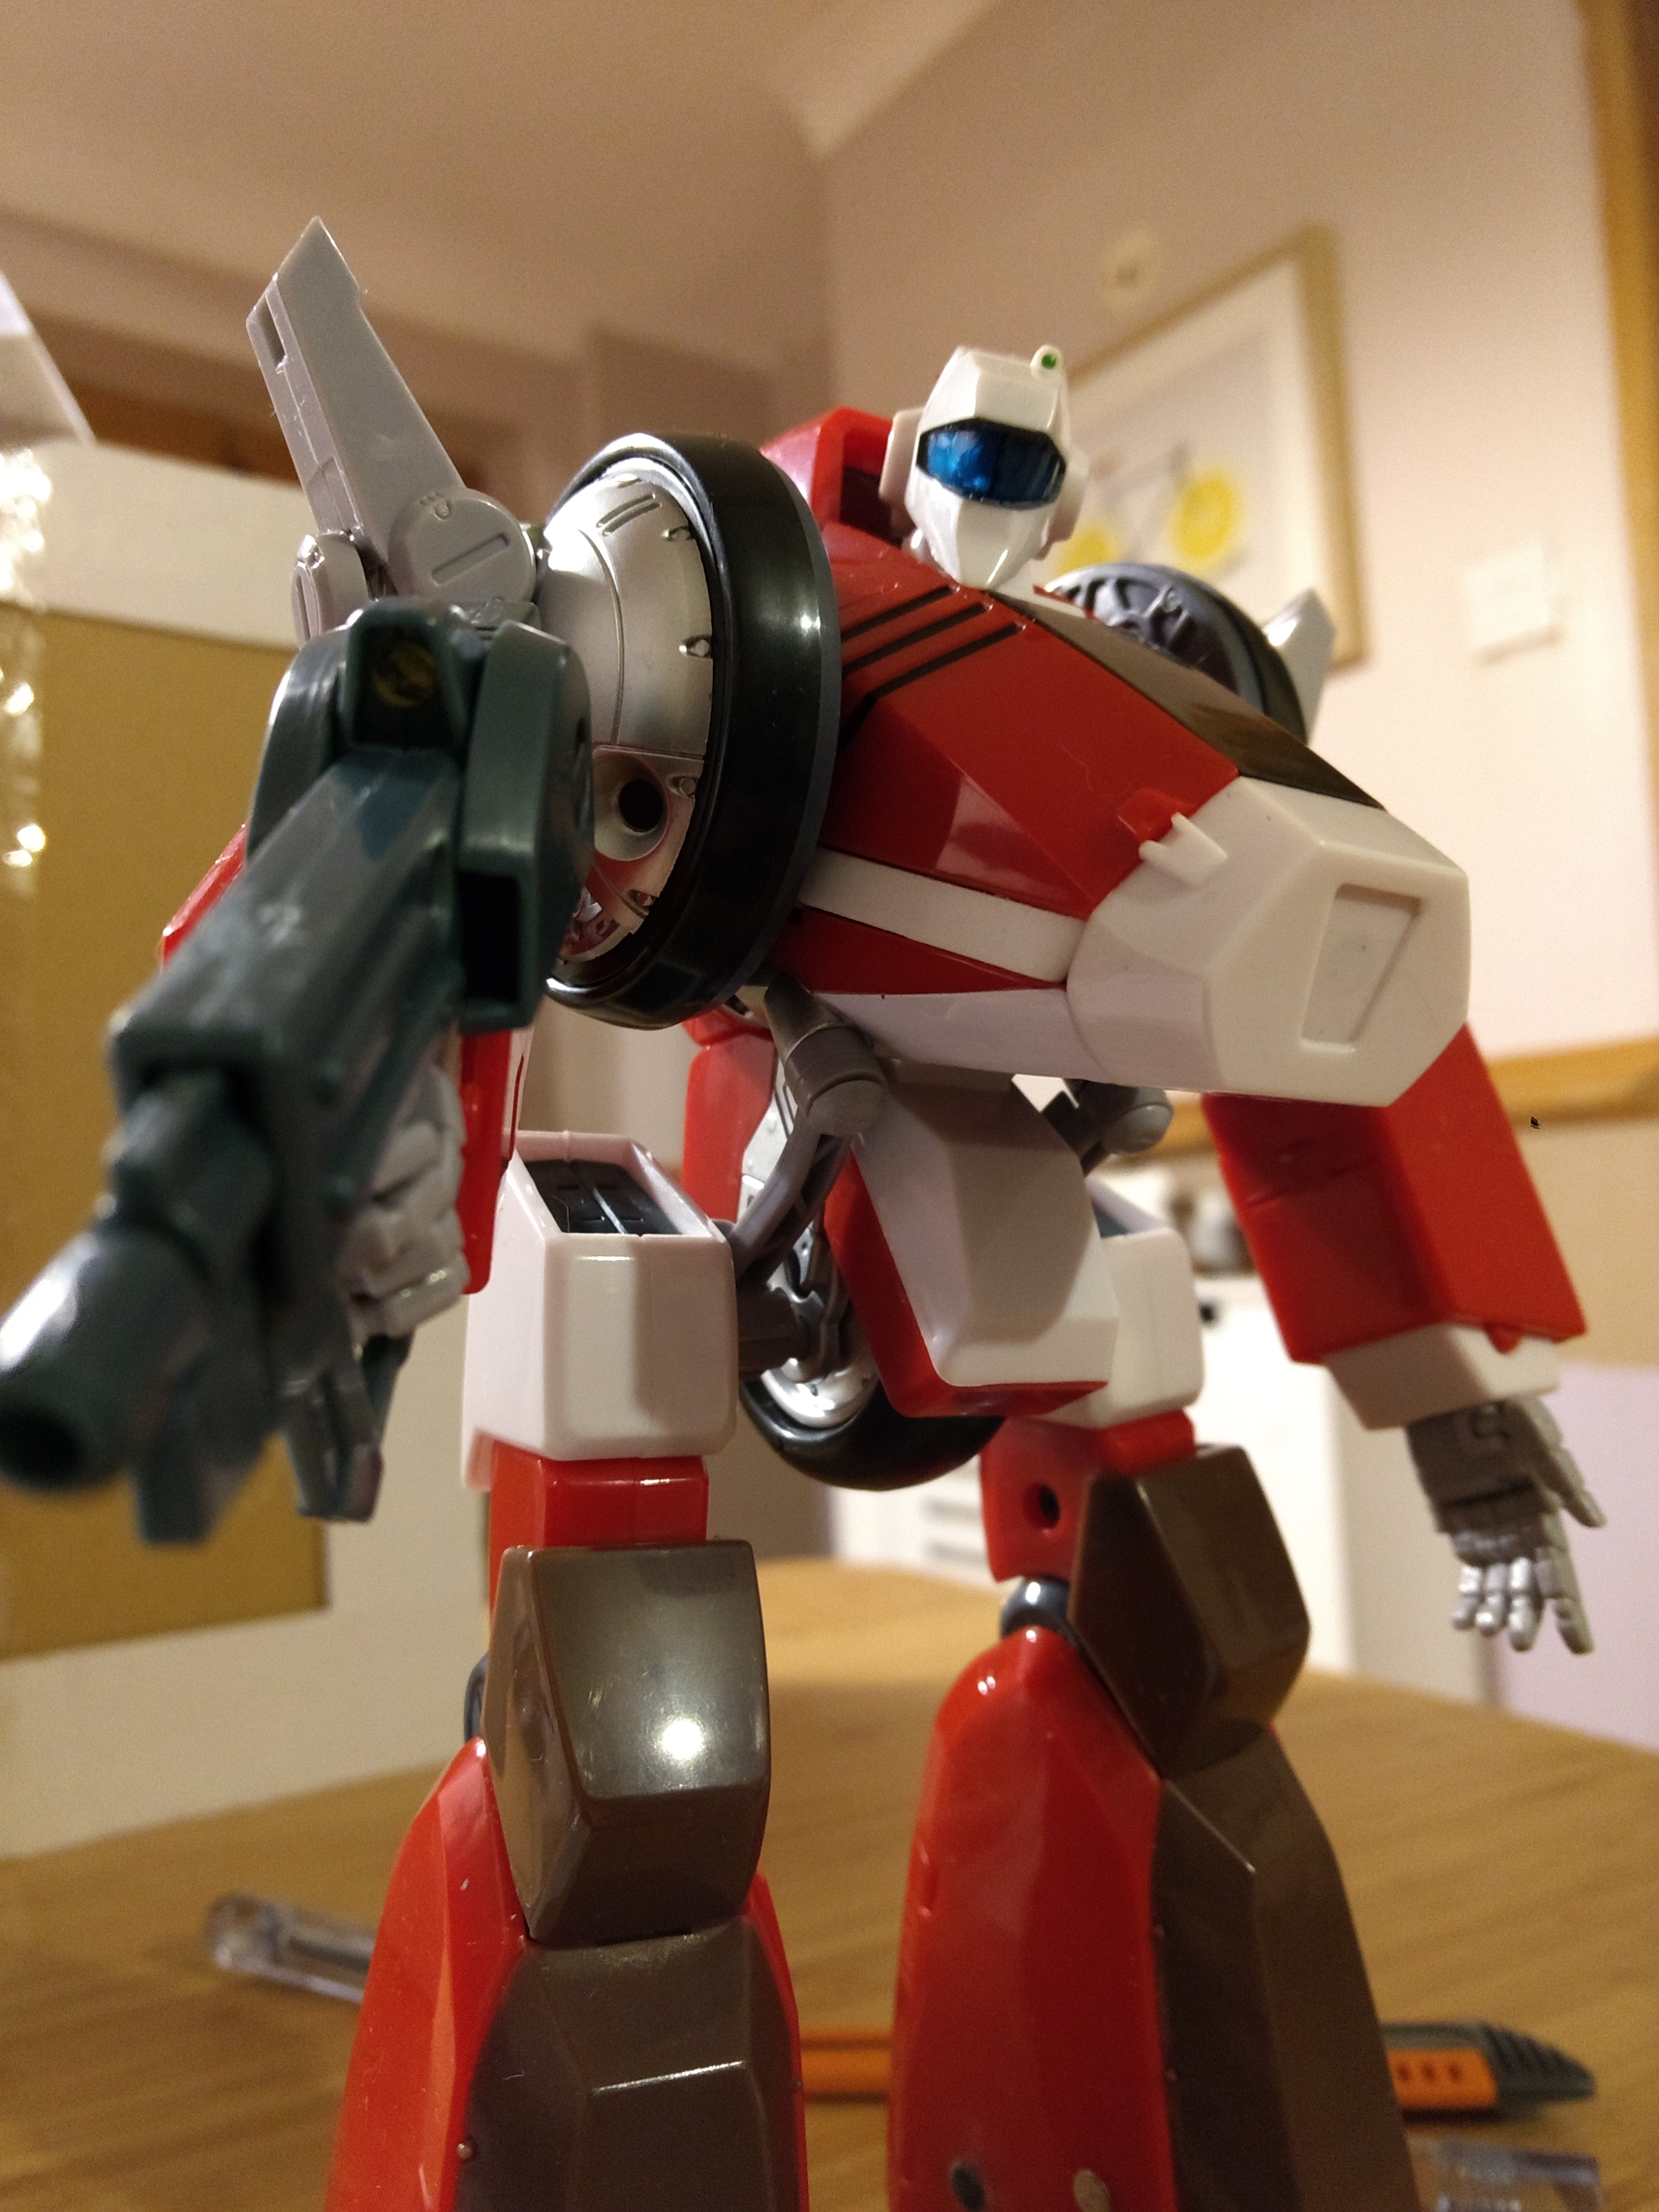
Hey guys, Got a second hand Yamato Garland for Christmas that i was super happy with. Sadly when I went to transform it saw one of the shoulder joints was broken, and the other was on it's way out - so snapped with only the tiniest of movements. So I thought i'd use my newly found 3D sketch up skills to make some replacement parts! Attached below was my fix - did have to shave off a little bit here and there to make it fit but nothing major. I actually quite like the white - makes it look slightly like a go faster stripe haha. Anyway, i was going to amend and upload the parts to shapeways for everyone, as i didn't find anyone that had fixed it beforehand. Then, this morning, just as i'm about to type this post, i thought 'i'm sure someone has done this on shapeways' and on an old old post here and found someone had! They just spelt 'Garland' as 'Garrand' so that's why i didn't find it originally on shapways and even have it available in red. So I will probably order that and install to see the difference. But hey, i thought i'd post up my photos anyway. Cheers


-

vf-31 siegfried WIP: Alternate Weapons Pods for VF-31
Tage replied to Sanity is Optional's topic in The Workshop!
Wow, this is great work guys. Nice one -
Hah - yeah both job and house pretty good thanks! And yeah once done, i'm defo going to do a transformation video - hopefully nothing breaks off as i'm doing it haha.
-
So many quick responses! Thanks guys! Glad you like it :-) And yeah it has almost been 2 years.... :-S I really should be quicker at this stuff huh? haha.
-
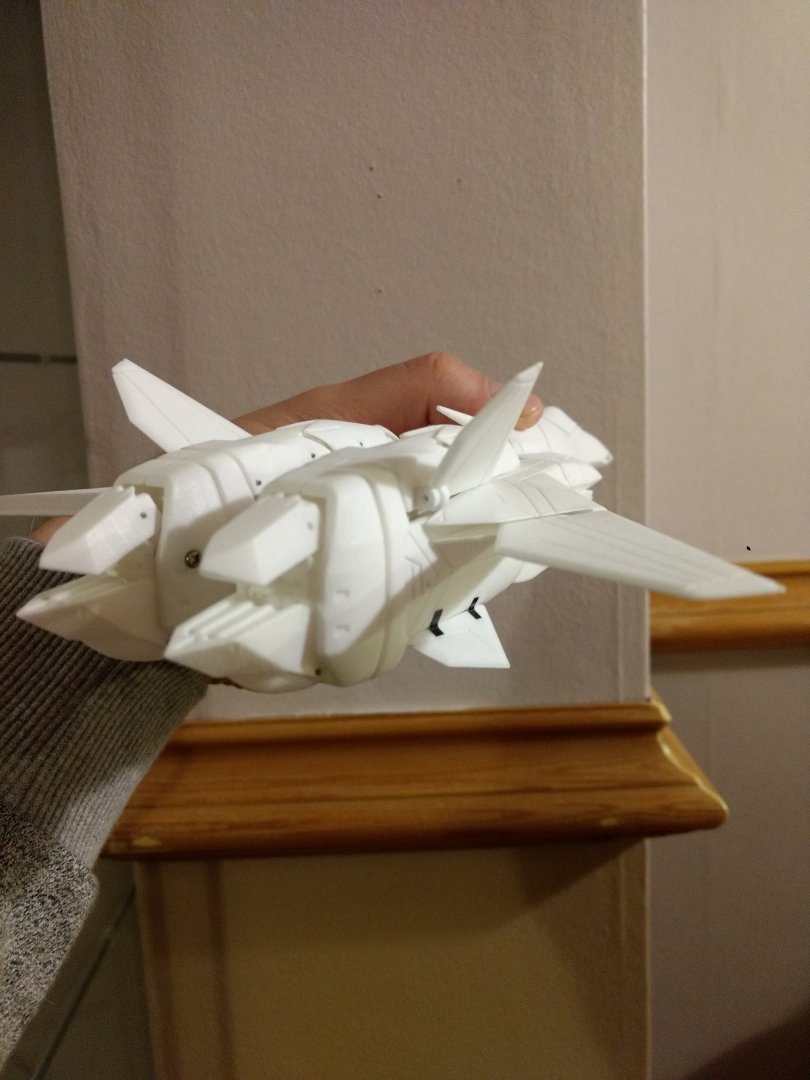
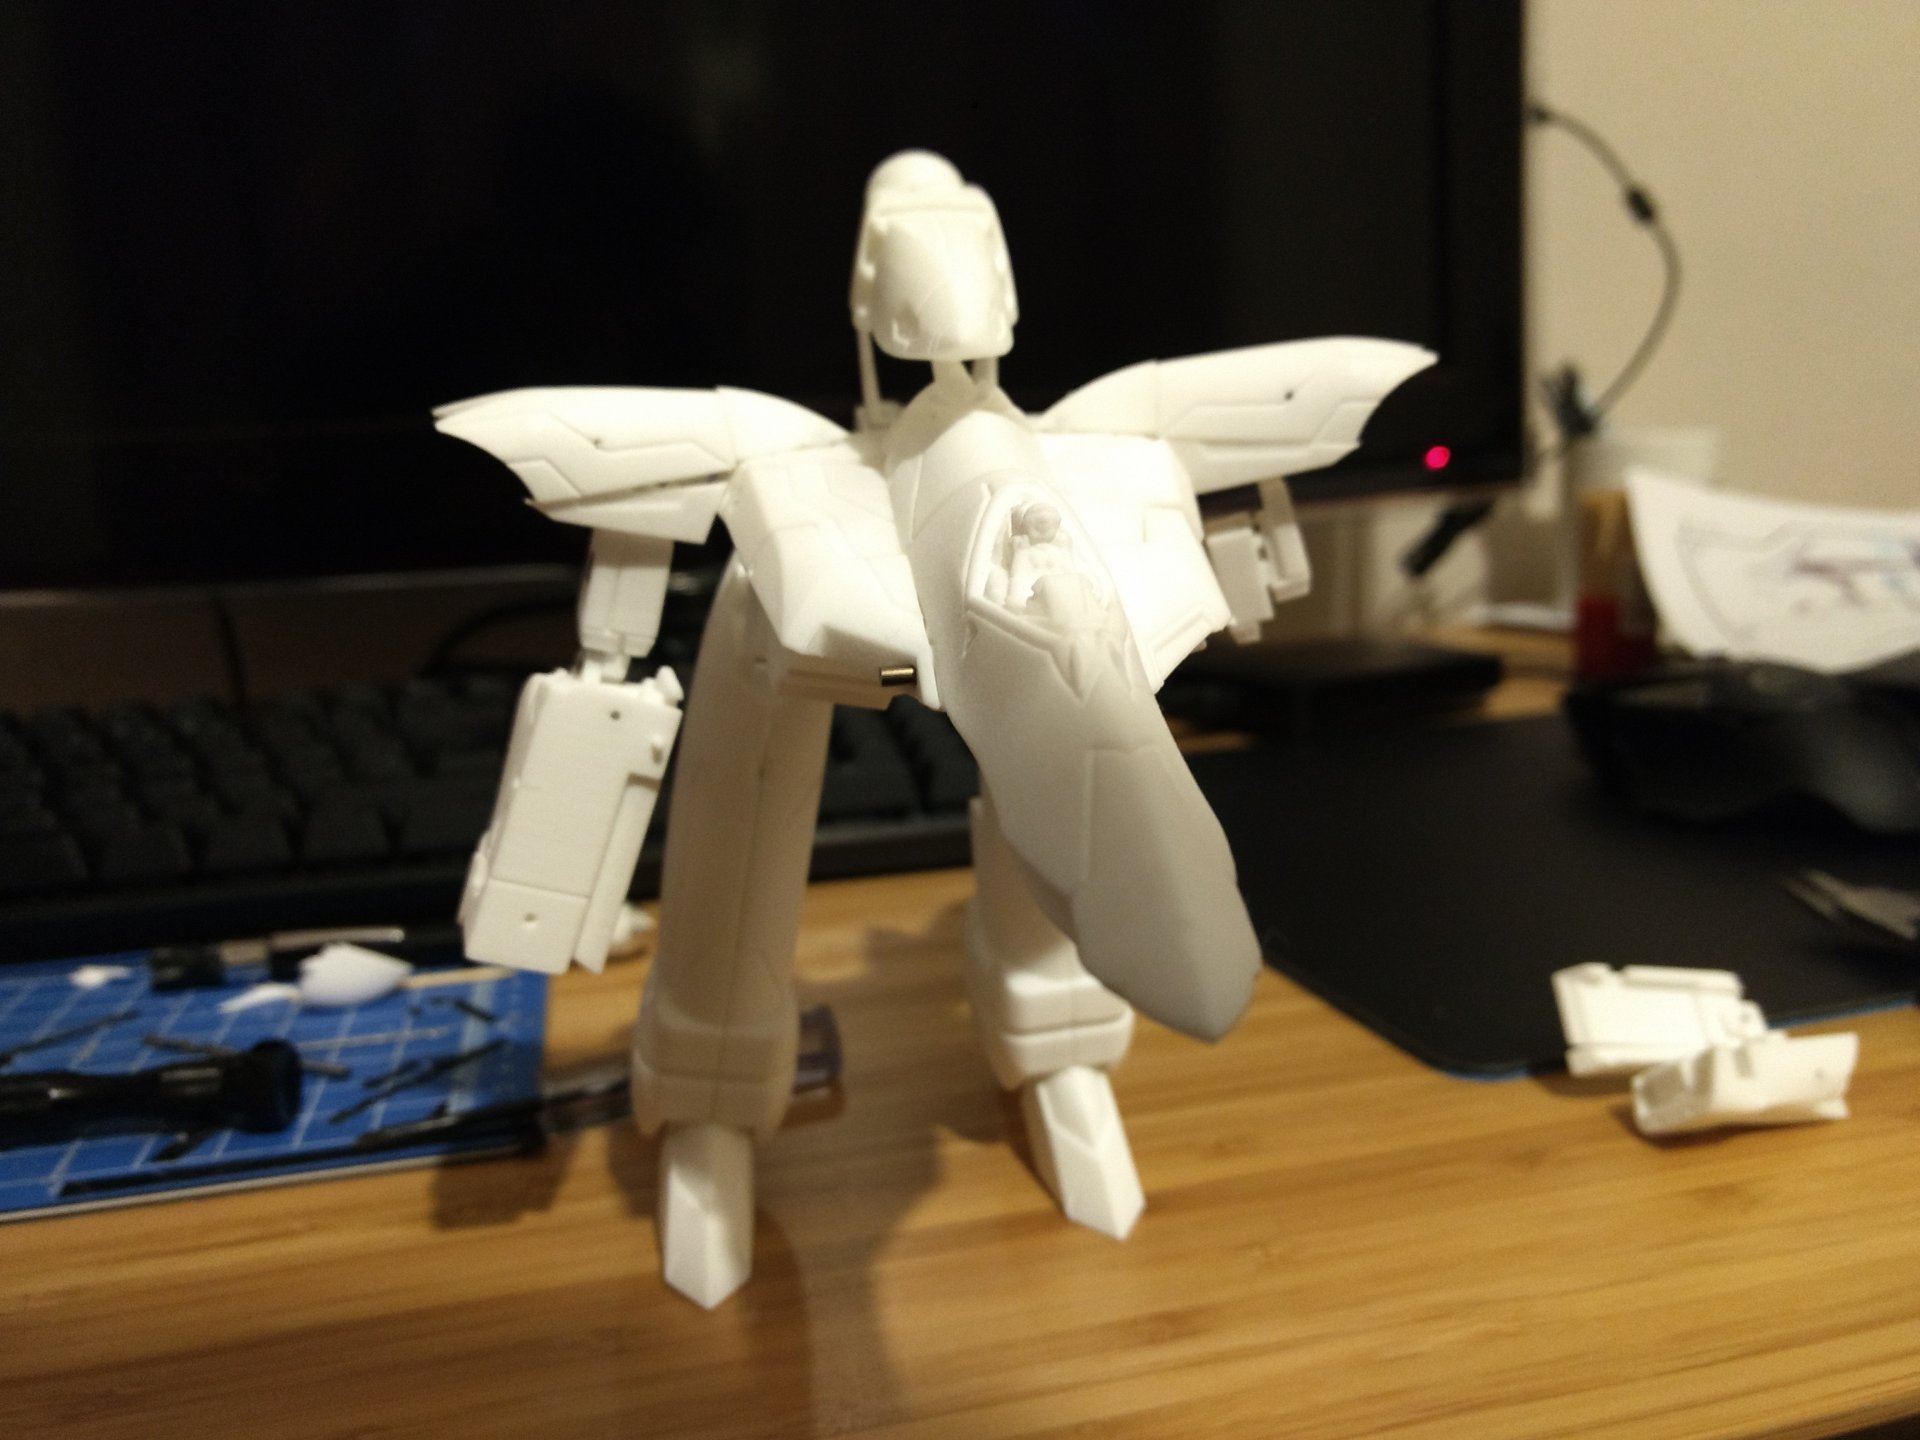
Hey guys, sorry it's been a while. Been pretty busy outside of this hobby recently with new job and house. However, managed to find the time to put all the parts i had together and see if there are any other things to improve on. Everything is working just about as well as i had hoped for. Sadly the printing place forgot about one crucial inner part that joins the chest and shoulder parts together, so can't test his robot mode properly (he literally just falls apart if i try) I'm relieved he stands up in Gerwalk on his own though. I think the way his leg joints are, plus the shear amount of plastic in the top of his body will make him fairly top heavy - so he'll probably have to lean up against something once he's standing up fully in robot mode. My cutter guides for all the rods and screws worked a treat, and i only fowled up one measurement out of about 70ish, so happy with that! Actually, must confess, with my first effort, my brain forgot that metal heats up when being cut at high speed - so my Dremel cutter heated up a few of the 2mm screws enough to melt into the 3D printed guides, never to be salvaged haha. But I've got the method down now, so it's all easy. What was also good for this test, was that i went off my own set of instructions i had made. Made a few notes down here and there as i went on a few parts. Nothing too major change wise... just will make things easier for the guys that are still after a copy of him (again, sorry for the delay, real life has taken over a bit). Just so you guys don't have to drill/sand as much etc. Plus the new gunpod sliding mechanism works like a dream. I'm going to add in a few extra holes and plugs so it makes for an easy glue together job, rather than how it currently is. But yeah I'll get that crucial inner part through so i can fully test his transformation and how he stands, then make any adjustments after that. But so far, we're looking really really good! Also i got a Yamato Garland second hand (the old one, not the fancy looking new one) for Christmas (Thanks Santa) and his shoulders sadly are subject to what i've now read is a really common breakage, so i'll 3D up some replacement parts for him at the same time - probably will stick them on Shapeways for people too. Anyway, Happy Holidays everyone, will update more soon :-)

-
Ah thanks! She looks a little bit square for now... but I think a bit of sanding and some Warhammer green stuff i have around will smooth her out a bit. :-)
-
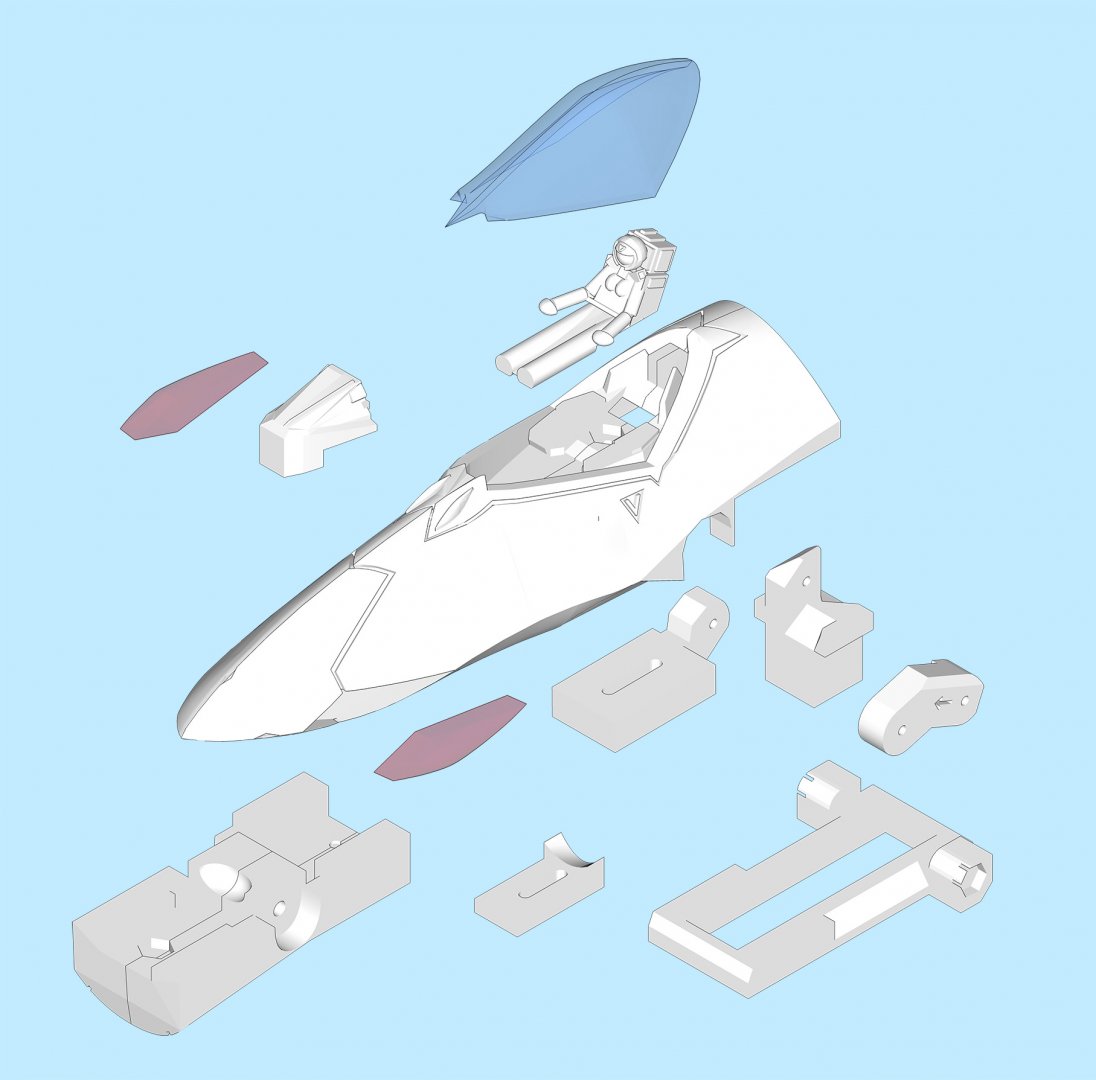
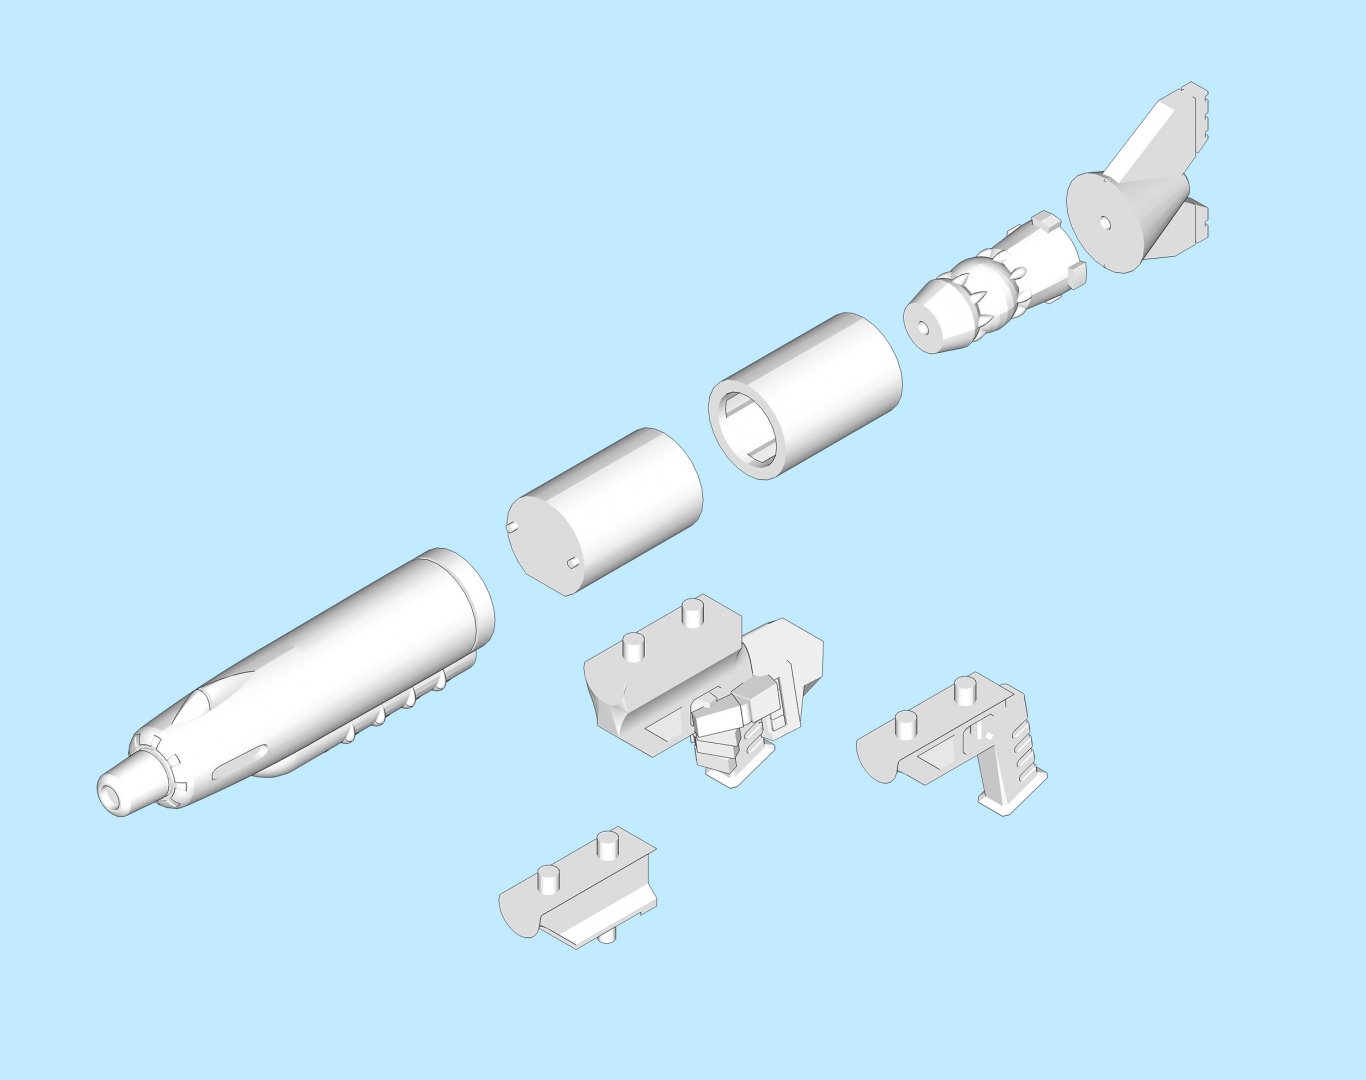
Hey Team, semi exciting news, promise this project isn't dead. Having moved into my house and settled in, i've just sent all the parts off to get printed. To keep the costs down with the place i've ordered it at, i've selected their 'economy' printing option. Which just means it becomes less of a priority in their queue so just takes a bit longer. From memory my last 'test' print took about 3 weeks or so. Other wise i could get it all tomorrow, but at about double the cost! While I wait, i'll chuck together some instructions for those keen on ordering a copy. Attached some pretty pictures for now though. Cheers
-
Sweet as Skull One! Have added you to this list. I'm still doing new house stuff sadly, but he's pretty much good to go. Will let you guys know when there's another update. As i'm very keen to see him fully done myself! :-)
-
Sweet, thanks mate.
-
Thanks guys, glad you like the progress. I got these printed at the very un-inspiringly named 'https://www.3dprint-uk.co.uk/' haha. They're London based like me so postage costs were next to nothing. They do have a minimum spend of £60 though, so not ideal if you need a singular small part. But yeah, i really like how these have come out. They use this stuff called PA 2200 Nylon in their SLS printing that seems to be the key difference. And their polished parts come out great. The non polished parts are a little dusty, but that's to be expected. I gave every part a quick wash with some water and an old toothbrush and they're fine now. I'll do a bit of sanding and use some left over primer to see how smooth i can get a part next i think. I've forgotten what primer i have, if it's too thin, i may have to find something a little thicker to fill in the more rough parts. Xigfrid - Do i remember you saying you use a dremel with a light sanding strip to sand your printed parts down? Arbit - Hah, yeah good idea actually. I'll do a review of it like Anymoon/ScorchedEarthToys' videos too haha.