

vf_1s
-
Posts
246 -
Joined
-
Last visited
Content Type
Profiles
Forums
Events
Gallery
Posts posted by vf_1s
-
-
Thank you for the great work! I love it!
-
YES! +1
I haven't been this excited about a Macross release since the first 1/48 scale toys from Yamato!
Mee too!!! Can't wait!
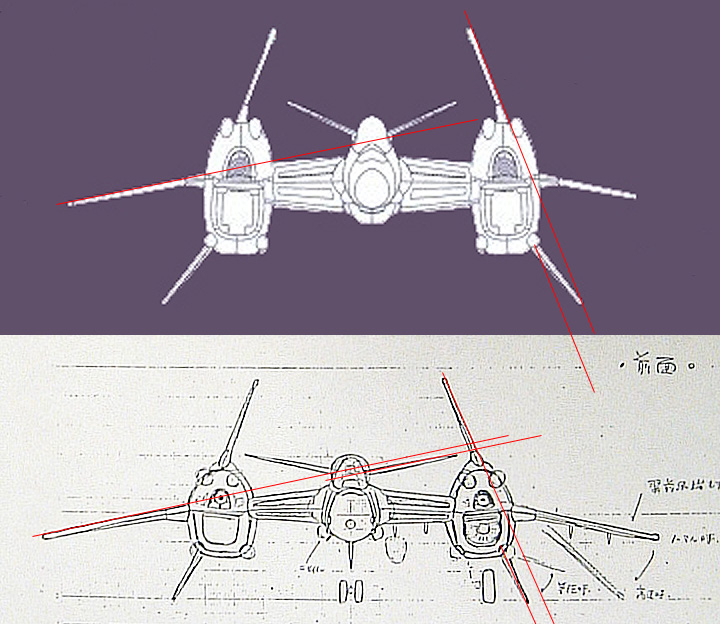
I think you're right. Also, all the fins and wings should be aligned in a slightly different way:

Agree. Wings are a bit short, it is staring to look alot like the SHE vf-4 that I have. Wish Yamato would make the wings a bit bigger.
-
Anybody knows the tentative release date for this thing? What does it says about Feb in the sheet? Have anybody translated the sheet yet?
-
Man oh man, I can't wait!
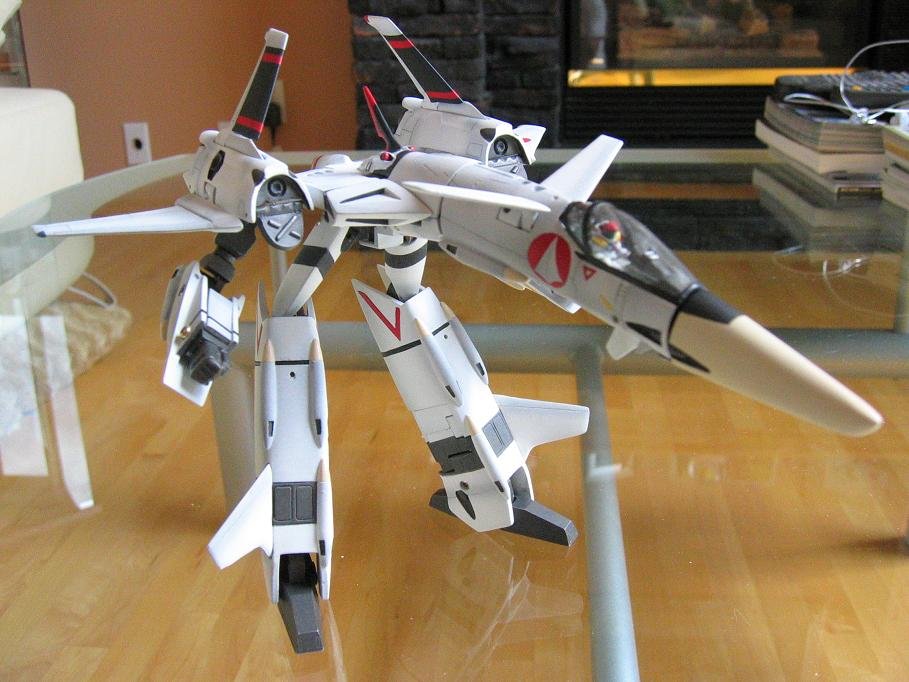
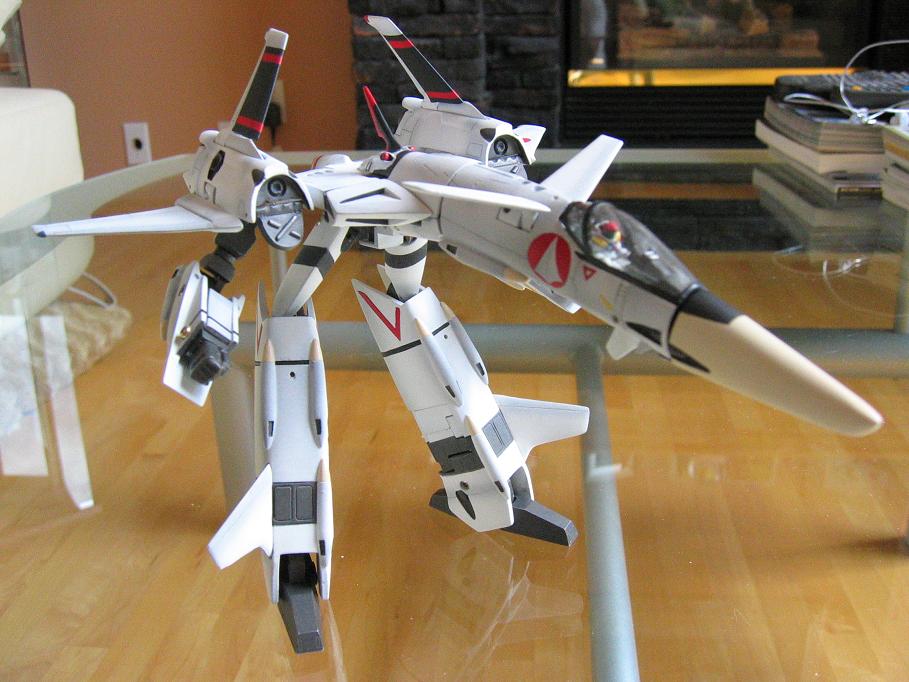
Here is a few shots from my studio half eye


-
Wow, the city looks amazing! Everything looks amazing!!!
-
Can't wait!
-
Great job!!!
-
Way to go Kye Kye!!!
-
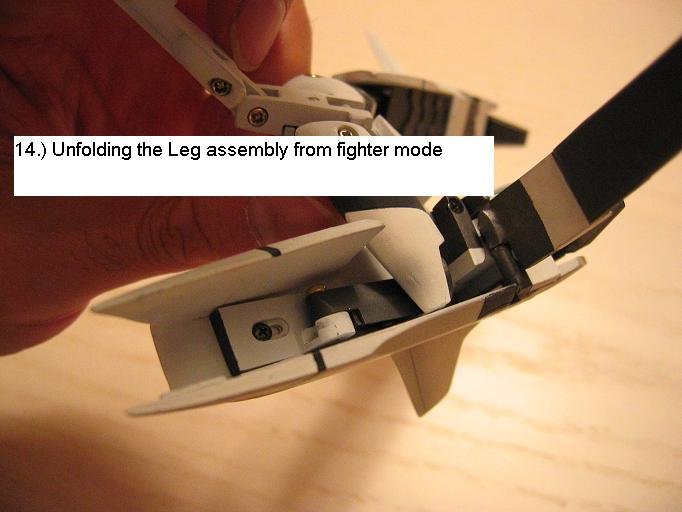
After struggling a while with LED and Wires and Battery holder, I realized that I need to expose the battery..(for replacement later) Somewhere I can get to without going through whole left leg dis-assembly..Again!

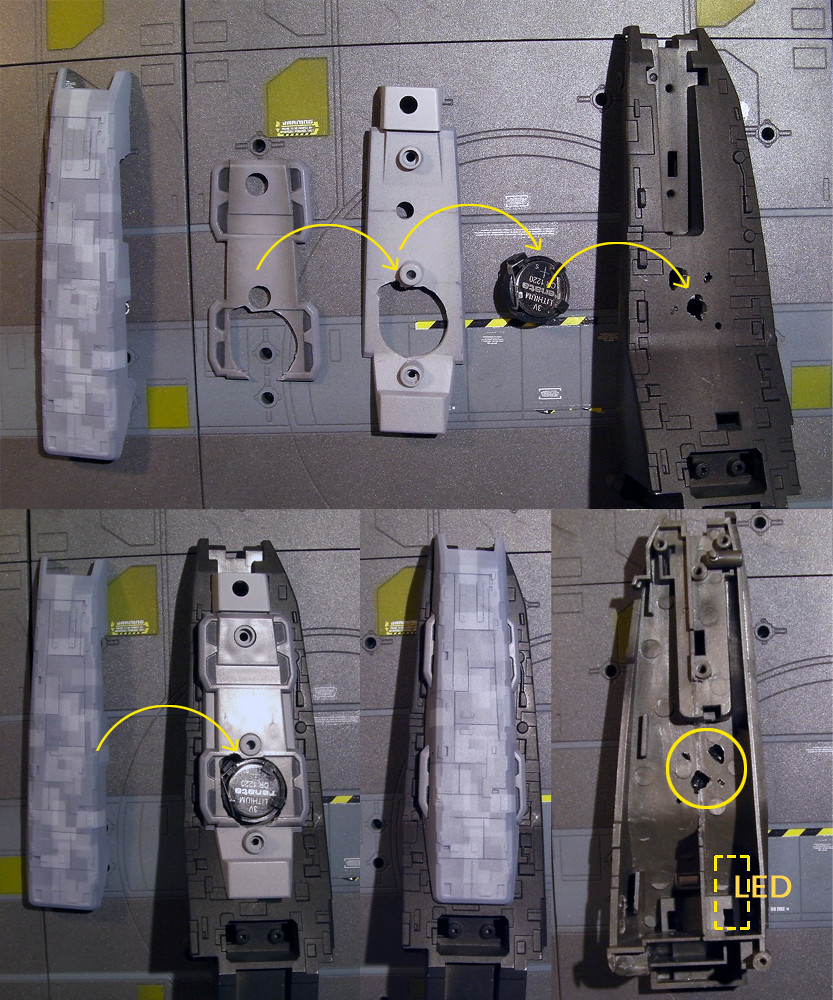
I wasn't able to obtain small battery holder, and the LED Beam saber I got was too big without connector for switch. (It is a very nice thou. I'll give it to other Gundam or FSS machine

Anyways my only option was this one I got from local RadioShack.
Looking here and there for a place to put it while close to LED and switch, I found a good spot!
You can see that its connector leads right inside the area for the LED and Switch. I can fix it permanently and still have easy access to battery for easy replacement!
I still need to paint the other areas and connect wires before fix it to position.
The aztecing panels looks great!
-
I kind of agree with WM Cheng. Being able to open up a box and play with a toy is priceless. However, I think it would be more fair if the choices were availiable up front. Looking at the upgrade parts, I think this is where they will (hopefully) release the 1/3000 vf-1??? It was in their 1/2000 prototype; this explains why it hasn't been released all these times.
-
I knew it was coming!!! All this detailing and modifications is too big of a market not to have a part in. In one of last year's show, one of the signs actually says possible upgrading parts for the 1/2000. I guess they switched focus to the 1/3000 for the bigger market now.
-
WOW!!! that makes a TON of differences!!! Definetly one of the smarter and more effective modifications to make the details come out! It looks amazing! Did you have to spray really thick for the pattern to come out?
That is so clever! The Master is still the master!
-
Spent almost all day on 5" X 1" City block
most of the painting on the city block is done. Still need some touch up here and there. Added some trees Connected Fiber-optic cables on various spots Added some color lenses (0.3mm marble or beads) at the tip of some Fiber-optic cables Added some giant LCD display feel to the 'Transform Warning' background print out.The blue light shows up on the photo, but orange and red lights look like white light in the photo. They are actually pretty nice

Working on these tiny pieces all day is seriously doing some damage to my eyes. I need to NOT look at this for a couple of days


Very Nice!!! the fiber optics is a nice touch. Can't wait to see what it looks like in the dark!
-
Thanks for the heads up. I'm getting ready to paint mine now.
So that powdery residue (especially evident on the darker pieces) is primer? I thought perhaps it was a form of mold realease. Thats good to know. To remove the excess, did you sand or scub or what? Thanks again.
The residue primer was very hard to get off. It was super hard. I used 2000 wet sand paper. on more delicate parts, I use thinner. The good thing about these resin is that thinner doesn't melt it. Good luck!
-
This reminds me of growing up in the Philippines when all the rich kids at school were bringing in their giant Chogokins of Voltes V and Mazinger Z and I'd just look over their shoulders and drool.
Thanks MW... thanks for bringing back that childhood trauma I buried deep inside.

OH NICE!
Hey,exactly the same thing happened to me!!! I know that feeling!!!
-
Did you wind up using a primer on the 1/2000 macross? Yamato had promoted it as not requiring that step [due in part to the surface texture(?)].
I didn't. They already had it primed. But also, they have alot of places that were over done to the point where the transparent primer becomes white. In those cases, I have to re-do it myself.
-
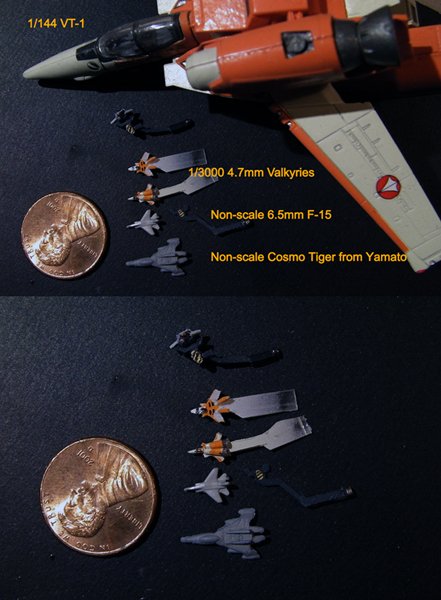
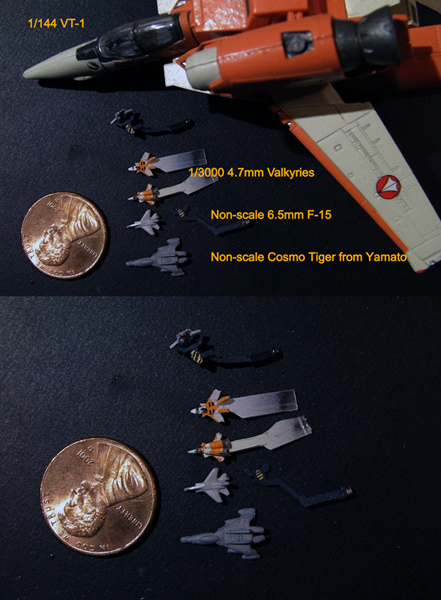
Actually it took me a while to find a penny. Where are the pennies when you need one!
I also got the candy toy part that I was going to use. vf_1s was right. It is slightly bigger than scale. I put another candy toy 1/144 VT-1 next to them.
Frankly though, you gotta see the nail artist doing my kid's nail. Maybe i should have them do my Valkyries!!
Another slow post. Today was kinda busy day...doing non-SDF-1 work.
Doing more panel lines engraving and some prep work for red-light signals.

Everything looks really good. If you are super picky, the wings are just a bit too wide, and the launch arms are still to big IMO, but it can be fixed easily. Honestly, I think nobody will notice that they are a bit out of scale, except may be you and me, so I would just leave it as is. I think one of my vf-1s is slightly bigger too, but who really cares?
Most people would have focus their attention on how small these things are... and be amazed.
By the way, when I was painting mine, I find a Tamaya brush (~$10) that is really good, it was alot firmer than most other ones I have, and has a big grip. Combined effect: I have a lot more control on the micro lines when painting the valks. Let me know if you want to know the name of the brush.
Keep up the good work. This is the first thing I check evey morning!
-
I've checked the link, it's working so far
Thanks. Must be the firewall at work...
-
WoW! KyeKye - YOU ARE THE MASTER!
Those Valks look simply amazing. I don't think most of the folks here appreciate just how tiny they are, you need to put them on a penny and photograph them. Hands of a surgeon buddy!
What's more amazing is the launch arm, even with the yellow and black corss hatch pattern.
-
In the name of Holly Macross, I've put all images in a single file and uploaded it in order to save your precious lunch break
I hope you are not mad at me vf_1s?
Nope, not at all. The more I can share this with others, the better. Thanks for taking the time to upload it. Howcome when I click on the link, it doesn't work?
The little red, white and yellow highlights make a HUGE difference in how the 2000 looks compared to the 3000. Obviously the cost of the 3000 would skyrocket if they painted all of that additional detail but it would make it look a lot less plain against that color scheme.
I agree, this, to me, is one of the most effective modification.
-
That looks great MacrossJunkie!
I'm planning on just cutting out lots of different shaped rectangles and odd-shapes like that and do several passes over the whole ship in strategic spots (the idea is to not cover the entire ship and leave various mottling of greys exposed) - probably on post-it note paper as they are relatively low-tact self-adhesive and I can reposition and rotate them as I spray. Finally I will do several once overs of grey to "blend" all the colours in. At least that's the plan before I add the pencil lines. Of course I haven't the time at the moment, so its just all in my head for now - but planning is an important part of modelling.
Thanks for the links to the licence plate fonts - but isn't that just a font download? I'm sure we can get artwork or fonts that are close, the real trick is getting it onto white decal as there aren't any printers (other than Alps) that will "print" white. How do you proposed to use those fonts?
If you guys are not too picky, you can modify it from the white 01, 02 from the yamato 1/48 or 1/60 GBP sticker sheet
-
Wow, thank you for all the complements guys, especially from big F. It was an honor!
Thank you
-
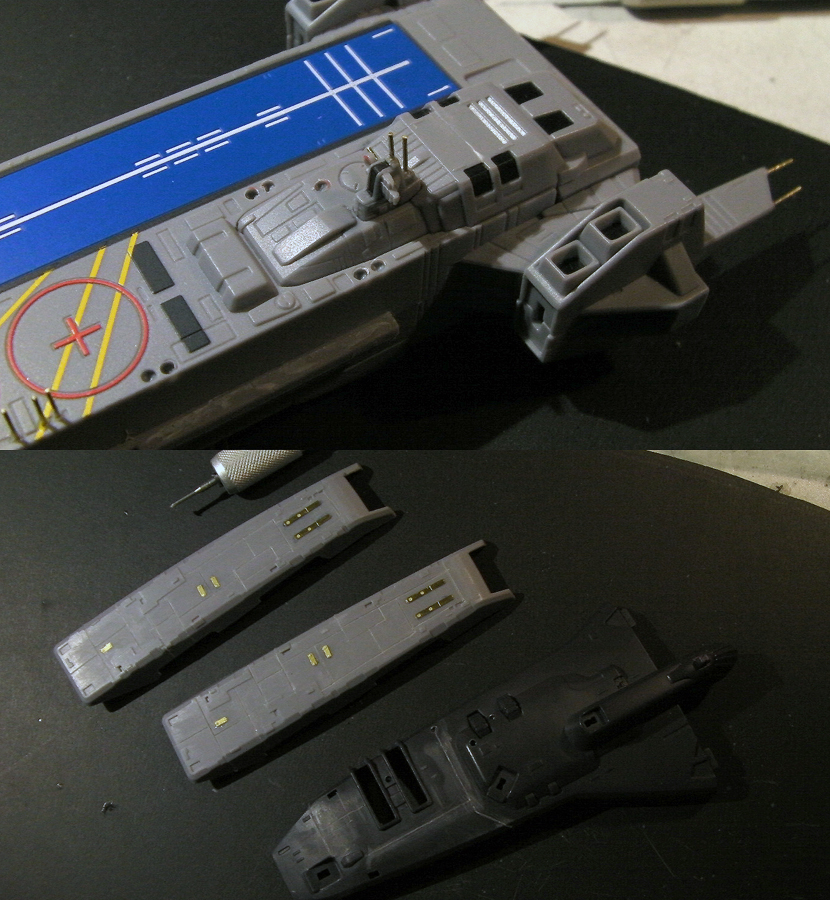
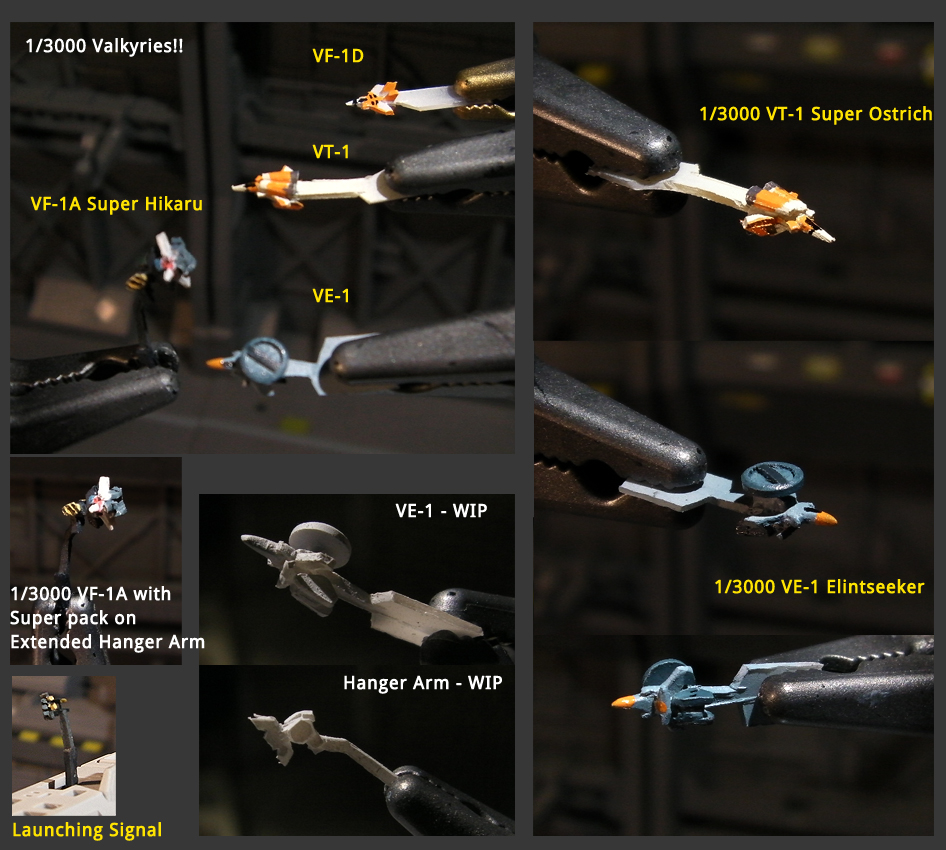
So.. after struggling with 0.3mm thick parts, I put out something resembles Valkyries
As I make more, I got better at it. And the first one I made (VF-1 Hikaru) looked worst. So I glued it to the Hanger arm. Then, primed them, sand them and painted them.
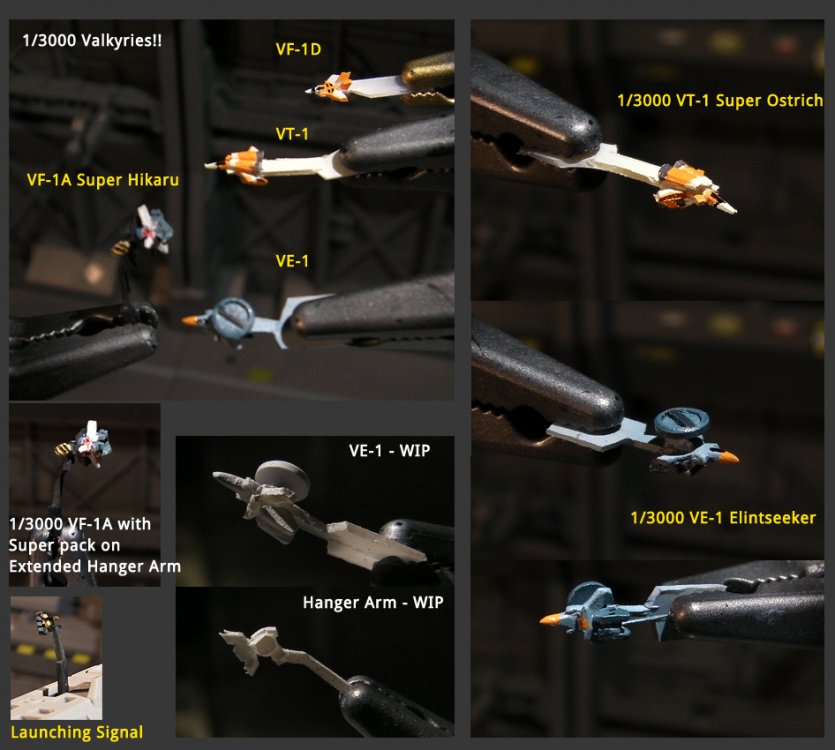
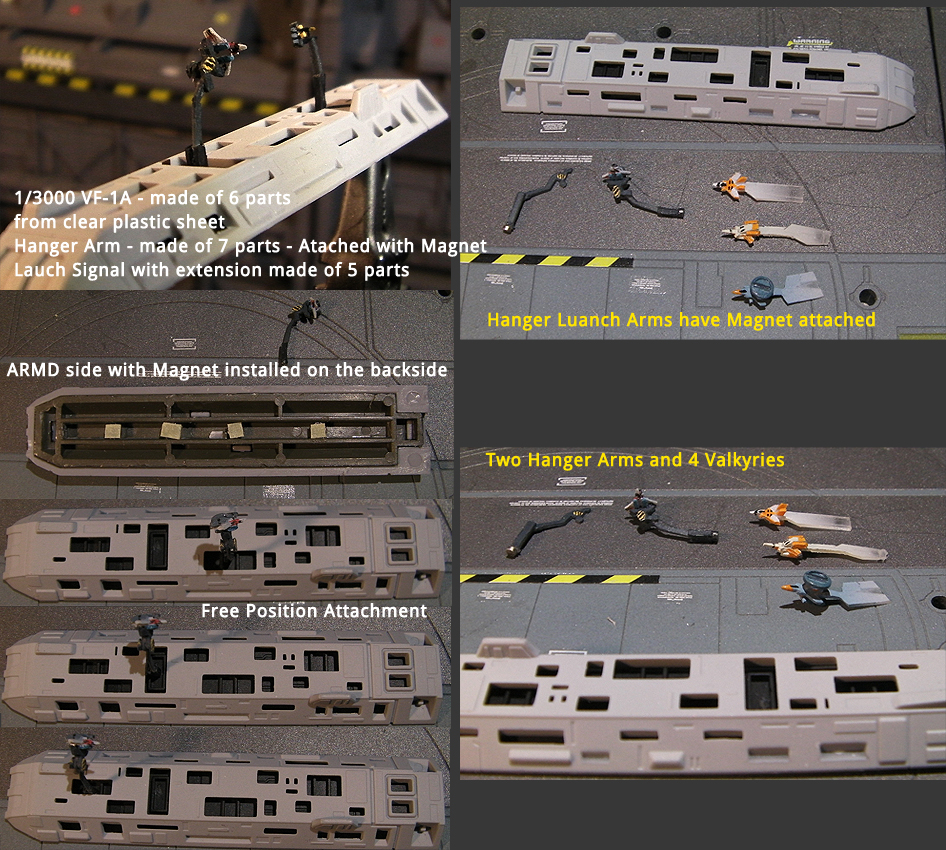
I decided to use magnets to attach the launch arms to ARMD. I tested on and it worked great!
So I installed 4 each on the backside of ARMD Side panels.

The ones on the Launch arm is 1/16" X 1/32" N50 Magnet disks (D101). The ones on the backside of panels are the same ones i used on the head bridge.
...And I'm saving VF-1S for the last!
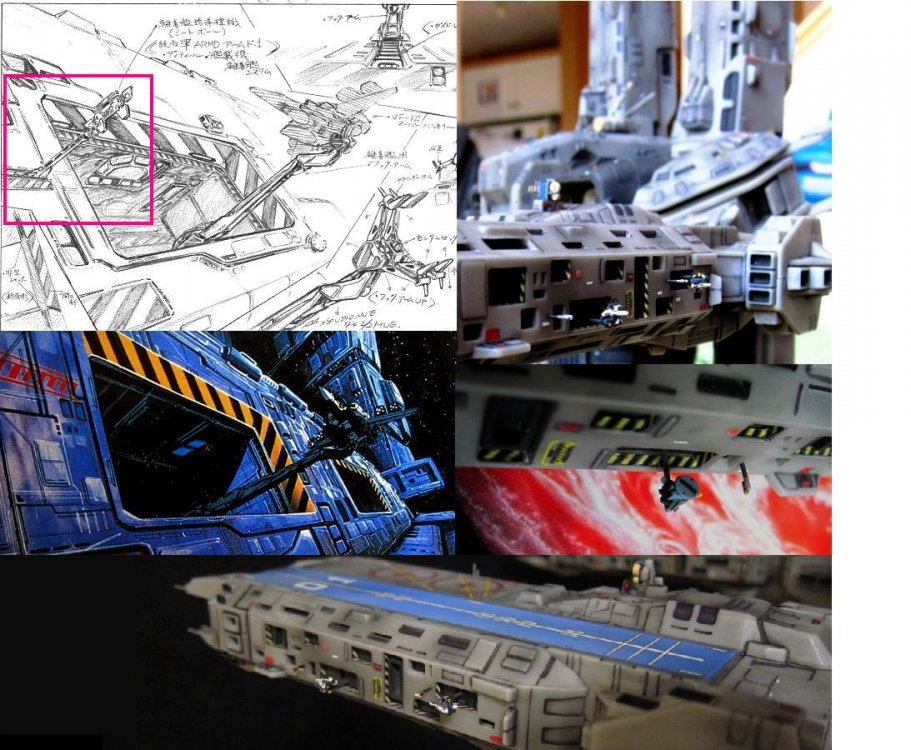
You are amazing. Everything looks really good. Just a friendly suggestion, the arm looks to be sticking out a little bit too far for this scale, also some of the valkyries seems to be too big to come out from the smaller gates. I have this problem too. May be the smaller gates are for smaler crafts? Lastly, according to the reference, the signal arm does not come out of the gate, it is something the "slides up" in front of the gate. Nevertheless, amazing work given the sizes!
-
Awesome, thanks. I ordered Testor's custom decal kit which includes a couple sheets of clear and white decal paper so I think I'll print the stripes on the white decal sheet so I can skip the white paint. Looking at the edges of the 1/3000 ARMD's ports, that's still going to be a real challenge as they are very thin. Hopefully I will manage.
you got it. Oh, and one last trick, when you are done putting on the decals, use a black gundam marker, and trace it around the edge of the gate. It blends in the decal alot better to the "grey gate" in the back.


1/2000 scale valks and battroids
in Toys
Posted
I just got mine, and even on the 1/2000 SDF-1, they are too big. Especially the planes.