
NZEOD
-
Posts
1955 -
Joined
-
Last visited
Content Type
Profiles
Forums
Events
Gallery
Everything posted by NZEOD
-
A bit more work on the vf-4
-
Repaired canopy with UV resin Canopy open idea vs the image in the Master File Undercarriage detail from the Master File showing WAVE has it pretty accurate even though it appears PRETTY simplistic. Detail from the Master File showing the horizontslly folded underside fins for landings, takeoffs and all ground movements.
-
The joys of anime magic. A bit like the impracticality of the twin hooks on the vf1
-
I was waiting for that... remember they use hold back bars... nice bit of research you did. I'e never looked into the other countries methods. Thinking what ever a Rafale does is the way to go? It' the closest in config
-
Arrestor hook would need modelling to deploy down. Not hard. Same with the cat hook if it' to be hooked up and the rear gear would either need extending if it's unloaded in flight or compressing on deck impact. I'm doing another on a cat and a final one arriving on a pitching deck. So one rear leg will be compressed and one extended as the deck will be on an angle.
-
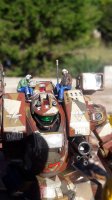
Adding cockpit detailing and then spraying the blue fins and upper nose tomorrow night
-
Look carefully.... there is a faint frame indentation on the rear canopy... G1 needs masking and painting I'm afraid. Landing gear benefits from decent painting and adding at east some brake lines. It sits nose high but you'd lower it (compress it) for a cat shot anyway same as for the vf-1.
-
The first will be the AMM-1, AMM-1H and AMM-1B Arrow missiles and racks for the vf4
-
If you want to model the vf4 in trappi g mode... as in arrest r hook down and touching down nose high... you'll need to remove and reset the lower pod underside fins to be more horizontal as otherwise they will strike the deck long before the undercarriage would. The master file implies they can fold out like this
-
More mods... shave off the locating pin on one side only of each exhaust vane to allow them to be painted and installed after the pods are built. They are such a goid fit they still operating and sit in place just fine.
-
The taunar supremacy armour is sick!!
-
-
Thoroughly recommend if you intend using Alclad II metallized for the engine parts to try using their black gloss base as your base layer. I used stainless steel on the engine turbines and vanes then pale burnt metal on the ends then jet exhaust in a streak down the centre of the inside of the vanes. The finish on the stainless was mirror smooth thanks to the black base.
-
Rear clear glass. Canopy glue to repair. It will dry mostly clear.
-
I
-
5800 yen is the base price
-
BE REALLY REALLY CAREFUL removing the rear canopy from the sprue.... I managed, quite easily... to snap mine in two!
-
Thanks. Getting it tonight to see how i go at making some extra ordnance for the Wave VF4
-
what program do you use?
-
No... it can run hand cannon too. At east according to the master file The GU-11C Now we just need xigfrid skills to come 3d print a few...
-
VF-4 assembled on my lunch break at work and base coated tonight. Detail work begins tomorrow night.
-
Base coated. That will do for tonight. Tomorrow will be the detail parts like verniers, cockpit, Undercarriage, turbin3s and nozzles plus any touchups on the body before a layer of future or slclad clear for decalling.
-
Quick correction. The canopy CAN be modelled open. It just opens in an unexpected way as shown in the VF-4 Master File. My VF is now undercoated and reassembled ready for pre shading and base colour painting. Just off for a quick late night blat round the hills on the other halfs KTM then I'll post up some more progress pics. Super motard mode rocks!
-
-
Ok... so after a total elapsed time of 15mins which includes taking photos the main structure is complete up to filler and primer stage. Pretty impressed. Seam running along the centre of the front section, behind the canopy will need filling. Seam running along the engine nacelles will need filling, especially the piece above the intake/ below the nacelle cannons. Wing bottom centre sections need glue. They have no snap fittings. The cockpit can be built, detailed and then installed separately after body painting.... nice touch that. The intakes, if you are glueing this model together, should have the upper locating pin trimmed off so it can be slid I to plan after nacelle painting. This way the turbine blades can be alclad painted and slipped in after the intakes get the white wash treatment. No masking required! The exhausts, vanes and verniers can all be fitted after painting with ease. Undercarriage and body mounted AA missiles as well. All fins, singlets and wings are well fitted and quite strong so no breakage in handling or incorrectly located and angled fins. Dislikes.... lack of an opening cockpit. Lack of a main gun. The master files show them with one and sometimes two main guns. Minimal decals and a boring version of the fighter chosen. I know why they chose it, it' still boring. That' honestly all i can bag it for so far.

