
Checkmate
-
Posts
206 -
Joined
-
Last visited
Content Type
Profiles
Forums
Events
Gallery
Posts posted by Checkmate
-
-
Free hand? How? Can you describe to us your technique.
-
I'm a noob when it comes to building a kit, so I'm using this kit as my experiment before I tackle the more expansive Yamato 1:60 scale kits. I've made some adjustment to reinforce the fragile areas. I think this is a decent looking kit, it just need some TLC.
Anyone notice that the VF-1S head is a tad to big or is it just me?
Are you sure you're a noob? : ) Applying those strips of metal takes some skill and a lot of patience.
-
Good job!
-
Alclad always amazes me when I spray it for the first time. it really is like "magic in a bottle".
-
-
I mailed the instructions already, Shaiorin. You'll get it in 3-5 days.
-
Yup, I'm sending my copy. Not scans. Like Shaorin, I too prefer an original manual if available. : )
-
My kit is a one seater, but you'll figure it out. That's a good find for $1. I have a couple of after market decals but couldn't find myself spending another $60-90 for a two seater. I'll PM you when I get home.
-
not exactly like it but similar if you just need instructions for assembling it. F/A-18Ejust found this exact kit today at a thrift for $1.00, complete, even a brand-new quality fine brush in there, only problem, a missing instruction manual.
if anyone here has built this kit, or a similar one in 1/48, and can spare their manual to send my way, i'd deeply appreciate it...

-
Beautiful!
-
I couldn't believe the $30 price when I saw this on Amazon. $30 for a 1:48 Hasegawa! I'm so used to the $60-90 range.
-
Thanks guys for the compliments. Checkmate: the hasegawa kits in 48 are awesome... I wish I could build in that scale because you get so many cool details oob that I have to scratch. I should correct you that these are legacy hornets, not supers. Intakes are generally a bear in all kits... so much so that hasegawa neglects to add them in any of their 72nd version. Post some photos of your builds, and maybe we can give you some tips.
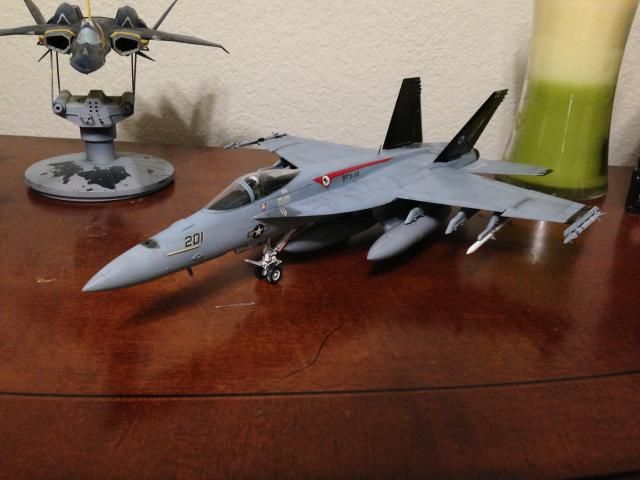
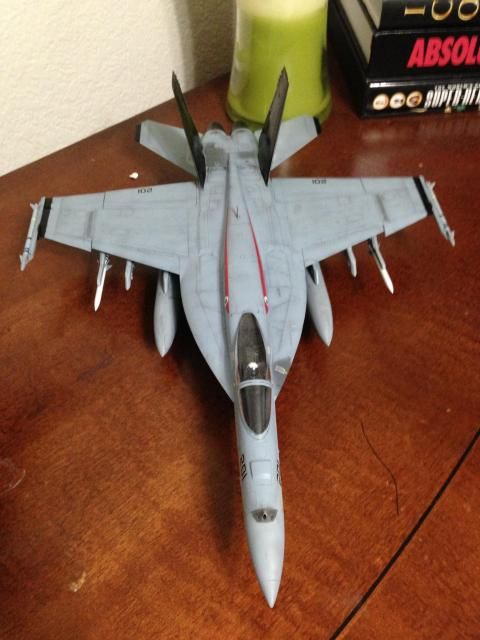
I ruined some of the decals like the star insignia and the numbers. if you notice, the 201 marking should be 200. I haven't installed the two 'spikes' near the nose and also the wheel covers.
It all started so well until I applied my acrylic wash. It did not come off! I should have applied a second coat of future and should noy have added that extra few drops of black acrylic paint.
Panel re scribing: I got a little to eager to re scribe and made some deep panel lines.
You know that feeling when you make mistakes and the enthusiasm that you had from the start just evaporated?
P.S. How do you glue to surfaces that has paint on it already? I used super glue which sometimes worked but it's jusy a mess.
Nice build!!! Very clean and professional paintjob!!
I agree! Anime52k8, can you post your paint/ color recipe? I love the paint job!
-
Noyhauser: Wow! It's like you have a Super Hornet production line there! I just completed...well almost completed a F/A-18E 1: 48 "Top Hatters" Hasegawa kit. It's my second attempt. I got burned out after making a couple of mistakes. It all started with the intakes!
-
Usually, it helps to flip the bottle upside down and drip some appropriate thinner into the lip of the lid so that it'll soak into the threads and soften up the dried paint.
I used to do this but the thinner melted the plastic cap.
Hot water is the best IMO but it sometimes removes the bottle label also.
What really worked for me is cleaning the bottle lip with thinner before re-capping.
-
GN-X
I didn't know about this mecha until you posted it. Made some google search and fell in love with the design!
Yey! More Macross on the workbench!
 Looking forward to seeing your finished Valkyries!
 -
What is it?
-
WOW! It has been years since I got excited with Macross related toy news.
-
My credit card got charged. : )
-
Looking forward to this kit. May have to steal some landing gear from my Hases

Ditto!
-
Head lasers that are independently movable? NICE!
-
Alclad black is ENAMEL? LOL! I've been mixing it with Mr. Color White all this time! ...that's why after a few seconds it kinda separates from the white in my airbrush cup.
-
Derex,
That Valkyrie looks awesome!!! This has inspired me to paint my next 1/ 48 with this scheme.
 :)
:) -
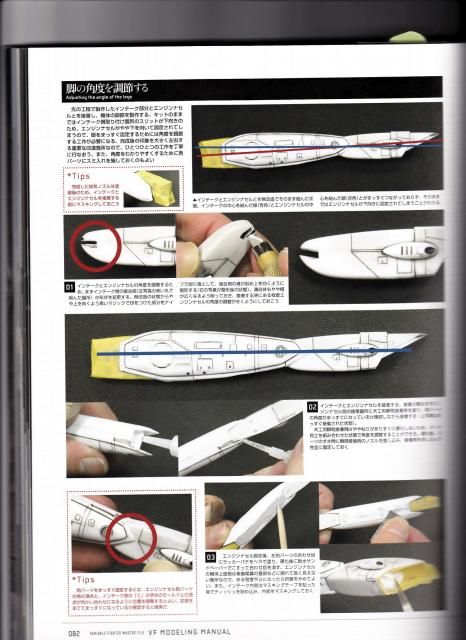
is the droopy leg thing still an issue with the 1/48? I remember it from the 1/72 but I thought they had finally corrected that with the new kit.
I've never built a 1/72 VF, so didn't know about droopy legs. I did encounter droopy FEET in this kit. You'll notice it on the 4th photo.
-
Really love the engine detailing! Question: I read on another thread that Hasegawa's fighter kits have a 'unusual' angle for the lower legs... can they be straightened?
Engine detail:
I used Alcald (I forgot the exact paint) and highlighted it with Armour glass.
Angle: Yes, they can be straightened. I have another thread in the models section asking for translation help. I'm not finished yet with my scans though.
Bay Area Macross Plus BD Screening and Meet! Date: Summer 2013
in Conventions and Local Gatherings
Posted
Guys, Shoji Kawamori will be at the Santa Clara Japan expo next week!