

007-vf1
-
Posts
1141 -
Joined
-
Last visited
Content Type
Profiles
Forums
Events
Gallery
Posts posted by 007-vf1
-
-
Finally we are pretty much done. everything outside in red gets a clear coat. The chest canons are painted with metallic gray and added some detail with tamiya smoke; finish the antenna by pluging a small wire pin for transportation. The Quadlunn 'optical' head is made of 2 parts, the innner head gear and the outer dual shell/rack cover; they were airbrushed with the same blueish color than the shoulder armor and missile covers, the inner gear was then hand painted on black and the 'rack' was glued over and voila you have a red DYRL Miriya Queadlunn Rau

-
The finishing touch...
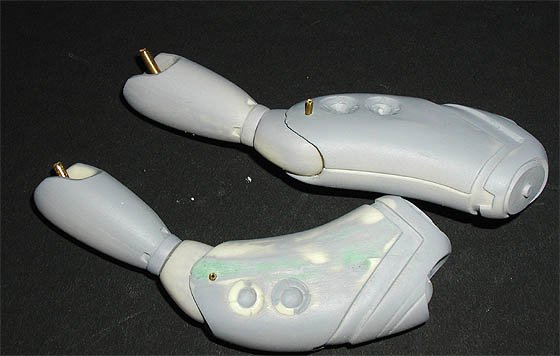
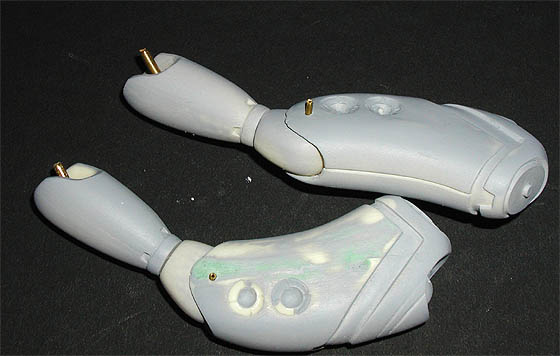
The hands and fingers where painted even with a mix of medium grey and light blue, oil washed and each finger individualy pinned then glued to the "palms" with thin wire leaving extra lengh to add posseability to them, then the hand was also pinned so it can rotate on the wrist (upper pic).
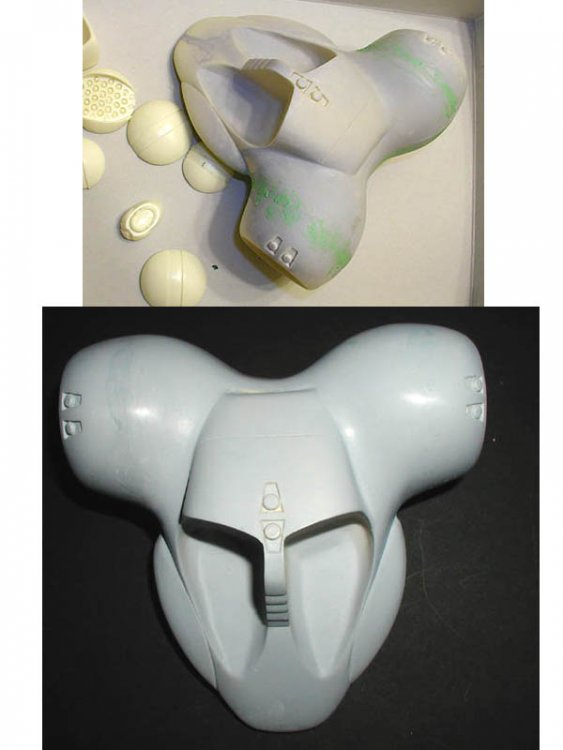
I wanted to have a choice whether I could pose the queadluun with the missile cluster hatches either shut or open; so we go for more pinning. the challenge here was to get the pin and holes in the exact center to keep even space on the borders between the round hatches and the leg attachment (keep in mind they have different sizes)...
What I did is to draw a "X" from corner to corner of the rectangular peg to get the center (pic 1), on all the pieces and the depression on the booster and calf of the Quead's body. Then I cut a piece of paper of the same area by either triming it or folding it to tight fit; find the center by doing a X and then use this as a mask to drill the holes right through the center of the X's
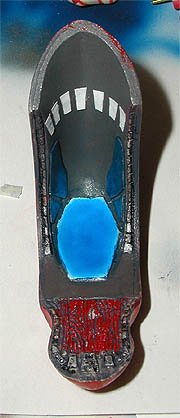
Last; the open clusters were painted with clear grey and white and a subtle pinkinsh mixture. After this the missile holder plate was painted brown, then clear coated, then oil wash and then the missiles painted white, clear coated gain. Then the outside edge on the hatch was shaded with a blueish darker tone. The closed missile hatches where done the same way but on a redish hue; then primed and hand painted the black line along the hatch.

-
The half body Miriya that goes in the cockpit. I painted the helmet (airbrush) and body (hand brush)separately. I didn't put any facial detail to this point (eyes, mouth,etc) because I thought It would distract the viewer of other details in the cockpit. the main detail was to add extra wires from the back of the helmet to some point on the back of the cockpit but since it would take away the ability to make Millia's head turn I just left them "hang" in back there behind of the viewer's eye sight.
I didn't use an styrene piece like I used in the "neck" control panel because of space so I used a regular black electrical wire tape and then epoxyed together.
-
The end detail to the shoulders would be either use micron pens or use an oil wash on the panelled lines.
-Fifth step. The "over-head" sensors and monitor armor I added the small overhead lights cutting small pieces of paper. the main monitor right in front of the pilot is lacking some decals ALA hasegawa YF-19 (will be done later). the color was obtained by mixing clear blue and light sky blue then airbrushed. the other side monitors create a very difficult position to airbrush and mask so it was made with a small brush by hand...
The background base is brown mixed with grey and black. The red wires was painted with red straight from the bottle by hand brush. Gun metal wash was used on the small front hinges and side wires...I still haven't clear coated the inside.
-
As you can see on the above pic I used a cut off piece of styrene rod to keep the wires together, glued and then painted over.
-Second face, the cabin it was airbrushed with a mix of brown and grey just to get a general tone. then I painted some circuits and panels by hand on grey and other shades of browns, this is were you get creative.
when I got what I liked, clear coated it.
-The third face in the cockpit was to add more detail on the cabin so i cut some styrene pieces and add extra panels and monitors that I airbrushed and detailed it by hand, again micron pens and thin detail brushes were used..
Next the bundle of wires in the cockpi background areas, behind the pilot was hand painted red and detailed with micron pens.
I masked the inside of the cockpit with masking tape and paper and trimed it it snug. This is when I finished airbrushing the whole outside of the cockpit/chest block in red.
- Forth face; the shoulder pads and shoulder armor lacked detail so I went to do some panel shading.
the bottom part of the pad didn't have any 'padding'. Using the xacto knife I cut along some lines to create panels, then hand painted it. and then airvrushed some panel shade on them using a lighter color to create a volume effect (pic 3).
The shoulder armor was shaded at the depression points on the panels I used a piece of styrene to keep the airbrush from over spraying beyond the point needed(pics 1 & 2). Then i painted the interior side brown mixed with grey and white to give it a leatherish look; then clear coated and detailed with oil wash.
-
After you have test glued, sanded; pinned and test fitted the parts,is time for an overall painting make up. Since one coat will be able to scratch easily and would be noticeable I airbrushed about 2-3 full coats of tamiya acrylics on the model red staright from the bottle thinned down(by then I have used over half the bottle). but I waited to the very end of the build up to have the last coat done. I didn't use clear coat or sealers in between coats but only until the end.
I have lost the pics of the steps to follow, until I get to the details so well jump to that on the pics. What i did next it was to paint brush in black the big areas and some of the panels; on some small areas I used a Permanent marker intead of paint.
The cockpit is the most detailed areas and the one that took the longest to finish.
-the fist face was to decide how detailed and interactive would it I wanted to be.
the shoulder pads and shoulder armor covers are suposed to be glued shut or open what what if I wanted to make it "openable"? so I used wave's 'Y' hinges for the shoulder armor covers and I used 30 gauge wire for the shoulder pads and the "neck' monitor panel-control (whatever)
 to add realism. Youll have to cut off and drill holes on the small pieces to make this happen.
-
You might have to re-sand and re-apply primer several times until the closest eveness in the seam is adquire.
All of the parts that are supposed to be movable on the mecha were pinned instead or glued, by this I meant elbo,wrist,knee hip,etc. I wasn't sure whether I wanted to add mobility to the knees, hips or shoulders because of the resin weight and the lack on ball-joint strengh; so they were pinned tight, only the shoulders were able to rotate on it's axis.
I pinned a transversal rod on the elbo. Since at first I knew I wasn't going to be able to finish the model in time I had to secure some parts that might get lost. the problem on this is that would make it difficult to paint. In the end seemed to be a better idea to pin it first and paint later; unless you add a ball-joint.
Edit: You can see in the pic that the metal rod in the elbo is longer because is preety ahrd to measure the right lenght because of the concave and balloned areas around it. it was then cut even to the surface and glued with epoxy to avoid extra friction on the outer edge.
-
Here we go again...
I hope this helps other people on their personal customizing ideas and quest for good modeling build up of this kit. For my part I have done everything possible I could at the moment with a deadline to get the best out of the kit.
- I have post this earlier on the year about some of the challenges you'll find once you start building the kit. One of the biggest one will be to make some of the seam, well, seamless to get an even and smooth finish. Also consider than since this kit is an old model It has some limitations and lack of details you encounter in modern kits.
I started by cleaning the model up. I used to leave the resin soaked on hot water with dish soap overnight. I have found out that If you do these for just about 10-20 minutes instead and then scrub and rinse the model with windex and a semy hard brush you end up with the same effect and save a lot of time waiting. after this rinse with warm water.
Once dried the glueing part comes next. I used epoxy mix either the long or 5 minutes fast drying works fine. on big or heavy pieces is better to pin the parts to obtain a better "weld".
Once the glue is dry the next step is to putty the seams or some of the bubbles you'll find on the resin (I will skip the details on many of these steps since they are pretty much standard and there're a lot of posts about this on others treads). The hardest part to fill on the gaps is the back Pack/Booster which doesn't fit quite even. then sanding and more sanding is followed, oh by the way...you have to sand the putty down...a lot. Then Prime, with this step you can see some details that might skip to the eye because of the base resin and the putty contrast.
-
last one, you cann see I oversprayed with gun gray by mistake...
but i don't wanna fix it

-
Druna that color scheme looks awesome...
here goes my VF-11
-
The only physical differences I have seen is a comparison Valkyrie made a while ago on the VF-4 models. The front part of the fuselage (landing gear/cockpit/nosecone) on the 2012 version is different to the one of the VFX2 game version, as in the VE and VT against the VF's, as well as some differences on the rudder sizes and width on wings...
Of course it could have been just a model missinterpretation.
-
007-vf1: you changed the hands don't you? Nice hands!! Are they HGUC hands?
Gerwalker-There're the tect resin optional parts I found a while ago. It comes with a new set of hands a better neck and a gun for the VF-19.
the 19 Kai is not magenta is actually the tamiya red...since the sun was hitting the models directly the picture came too light-colored.
-
I live close to New York City, and I know it does depend alot on how much mail goes through your part of the country.
Yeah, is funny how it seem East coasters get their shipping in less days than the West coasters; and they live closer to Japan...

-
One more..Oh, by the way they are 1/144's bandai
-
Here are my babies the pictures are horrible. Is so hard to get good lighting/pic with these small critters...
-
Too bad people always asks after the fact, once they made the "mistake".
To use SAL shipping from overseas is not highly recomended; some times it takes forever, and ever. Once, I paid surface shipping from Asia it took 1 month and 3 days to get here.
I used fast shipping from HLJ after they have changed their shipping system/service and it took just about a week to get here. In the other hand I have also paid express shipping from Canada, just around the border close to home, and it takes over a week to get here.
An extraordinary example is Monkey Nugget (Rob) from Japan, same fast shipping service.... and I am not exagerating here, 3-4 days or less..!!(that includes customs 'drag' time). How does he do it? I always wonder.
Edit; I forgot to say I live in Virginia, west of Washington DC.
-
Where's Valkyrie with that recast????
I really do not know, we've are still sorting out what kits to do first.
I am missing the VF-17 figther and the VF-VA3 from M7 but I am not interested on them ( the VF-11 booster pack can be scratch-build easily).
I would really like to have the VF-11 Armor to have the whole 1/144 resin line completed...I have all of the others...

PLEASEE!!!

Hint: Sarensaas; if there's a high demand it will be done....
-
No, what I am saying is that since Valkyrie made some recasts available a lot of us didn't go for MIM at all.
May be there wasn't a high demand and they left it on the side...
-
Where's Valkyrie with that recast????
-
I agree, the ddesign is pretty good...but, well "peace through power" ?doesn't ring a possitive accord on me...
-
Thank you Robby-San!!!!
Muchos-Gracias and all that...now...december....that means I have 2 months two build about 50 models!!!

I know the feeling Jessee.
Thanks Rob, at least we know when is coming...and coming sooner than I expected..
-
has anyone started building one in 1/48 yet??
-
Can't afford the real stuff, but am on the look out for the stuff above. Thanks!
the recasts of those kits would cost you even more than the originals...may be more than twice as much.
Besides the wave VF-17 popping every once in a while on e-bay, everything else is pretty much out of production and therefore in high demand.
Better save some greens and spend it on any of them if you ever see one.
-
We were also hyped about their model release until one of our members,Valkyrie, made a recast of the original 1/72 club-M which became available, lower cost and most likely a better recast than the one offered by MiM.


collention display
in Toys
Posted
Dusting is going to be a pain in the arse!!!