

Anasazi37
-
Posts
2029 -
Joined
-
Last visited
Content Type
Profiles
Forums
Events
Gallery
Posts posted by Anasazi37
-
-
Thanks. I guess I wont be spending money on a ALPS printer. SO how much do you do customs?
I charge MW members $15/hr (normally $60 for commercial clients) for my design time plus materials fees ($5 per quarter sheet, 4.25 x 5.5). Most projects take between 1 and 5 hours, depending on the complexity of the original designs and what you want.
-
5. What do you seal it with? I've seen people mention "Future" but I am unfamiliar with what that is.
"Future" refers to Future Floor Polish, which you can get at most large home stores like Kmart, Wal-Mart, etc. It's basically a high gloss (and durable) acrylic coating solution. Dirt cheap, too. You need an airbrush to use it, though. If you're going the spray paint route, Krylon Crystal Clear (glossy) or Krylon Satin (semi-gloss) work really well. They are also available at most large stores.
-
I was seeing a thread in the toys section about printing/making custom stickers for your 1/48, 1/60 etc. Now is the ALPS printer the only printer or are there other printers? Would it be better just to ask some of the fellow MWers here like Taka to make them for me?
You can make stickers using an inkjet or laser printer, but they often do not look anywhere near as good as professionally printed ones or those made using an ALPS printer. One of the big advantages of ALPS printing is that you can print white. No other printer out there can do it.
-
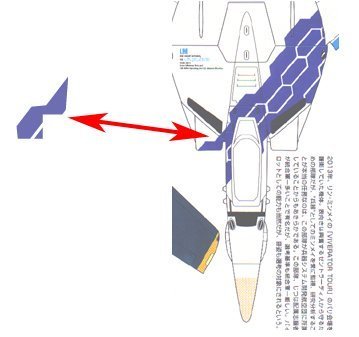
One question about the decals - did you have a small leftover "tire tread" piece? I did and couldn't figure out where it goes.

The only decal I can think of that you might be referring to is the one that appears just to the left of the chestplate decals on the sheet. It's designed to fit on the piece that sits under the chestplate (only visible in fighter mode). Here's a picture of it and where it shows up on the original 1/72 model:
-
Speaking of the "Moon Act", is there any chance that the decals would be available?
I believe so. I'll have to clear it with g3173 first, though. My policy is to not release a commissioned set unless the person who paid me to make it for them is comfortable with the idea. I'll post more info as soon as I have it.
-
Those decals are in the works. g3173 has commissioned me to produce them. They should be ready in about a month if I manage to stay on schedule.

There really isn't much price difference between what I sold my sets for previously and what TMP Anime charges for them now. The MG set was $33, now it's $36. It's an unfortunately necessary price increase, though. I was simply getting too many individual orders to handle them all myself and Tamim was gracious enough to step in and help with distribution. However, to stay in business, he needs to mark up the price just a little to cover his costs.
I shipped out almost all of the decals up for preorder late last week, so they should start going out to those of you who ordered them very soon. The one exception is the Max & Miriya set. I'm still in the process of filling that order inbetween working on a few customs....
-
Wow, nice work as always, Jung. What types/brands/colors of paint did you use for the blue and purple sections normally covered by the decals?
-
THX Devin~! but I found that japan have a model MD-5500(is that a new model replace the MD-5000?)
still on sale, 52290 yen , cheaper than MD-5000
here is the link:
http://www.alps.co.jp/brand/printer/md5500/
ha ha , after hear what you say , I know this product really made you mad~
I also know that this printer is very difficult and expensive to
find a technical support

but I still want to get one..... making my own sticker are fantastic!
I want being like you~!
I remembered after my last post that ALPS was still making printers, just not in the US. For the past few years the printers have been selling under the OKI name brand for some strange reason. I guess ALPS is putting their name on them again. Interesting. That is a good price. I hope you can find one. You'll go through a lot of ink cartridges pretty quickly, so I'd stock up on those, too.
I'd suggest asking Japan-based MW members to grab one for you. Speaking of which, anyone in Japan willing to buy one for me and ship it stateside?
 Despite the fact that it won't be supported by ALPS here, and the cartridges will be hard to get, it might just be worth it.
 -
ALPS stopped making the printers several years ago. You can try eBay, but know that the printer you recieve may or may not work. And that's after spending $300-500 for it. Because they are so expensive and rare, most people don't sell an ALPS printer unless there is something wrong with it. It might require repairs and there's only one facility that will do the work. It's in California and they charge a flat fee of $350. They are substantial investments. Trust me, I know. I'm on my third one.

-
In fact, I believe in years past we've discovered for a fact that they DO look here every now and then.
Examples?
He sent Yamato the link to the MW thread discussing the 1/48 Minmay Guard Strike custom I made recently. Apparently they really like fan customs.
-
Are you selling them in 1/72?
Yes. I have sets available in 1/48, 1/55, 1/60, and 1/72.
-
did i mention that it looks like those decals are applied like butta? they get into those grooves so seamlessly and the end result looks like a paint job! nice!
It's the end result of super-thin decal film, Micro Set, Micro Sol, a really sharp Xacto knife, and a TON of patience.
-
Hey Devin, is it possible to turn a Joke Machine into one of these beauties? Or is it just too small?
All of these designs on a JM? Yikes! The word "headache" comes to mind, but I think it's possible. I can print very small decals, but the resizing, repaint, and decal application process would be very difficult.
-
That is a very nice custom Devin, really impressive.
I think you should´ve used Minmey´s face instead of the grey kite on the fastpack.
But overall it is one of the best customs, very unique.
Thanks! You know, I thought about that. I even printed out a set of booster decals using a portrait version of her (head and shoulders) to see how they would look. I wasn't entirely happy with it so I went with the kites. I'm going to keep playing around with it, though. They're might be a happy medium....perhaps a montage of her portrait and the kite....
-
Did it take you a while to figure out where to place the Minmay Guard decals on the Strike Cannon and Fast Pack?
Figuring out where to place the decals on the armor and fast pack was probably the most difficult part of making this custom. I finally hit upon an idea. I took a picture of the valk in armored fighter mode from above (plan view) so I could get a good idea of where the fast pack would overlap with the tire tread pattern on the chestplate. I then brought that picture into illustrator and extended the chestplate designs to use as a guide. Once I saw that it would overlap with the barrel of the cannon and the front part of the left booster, I masked off those areas with tape and then scanned the tape sections into Photoshop where I created a template from which I could drop in the tire tread pattern in Illustrator. That's actually how I did each section of every Minmay Guard set, so I have the system down pat.
-
Just uploaded some new Armored Battroid pics. I didn't realize how fuzzy the old ones were until this morning. Enjoy!


-
I noticed that in the following batches of pics, in gerwalk mode and whatnot the legs are still not coonnected to the upper plate like they should be, and the arms are not correctly pushed forward in any of the gerwalk pictures. Trying to be extra careful with the new sticker/paint job?
Yes. I am trying to not manhandle it so it's still minty-fresh when min gets it. I don't like to transform customs very much--especially one as complicated as this. You never know when the evil paint scrape monster might rear his ugly head, no matter how well you plan.
It's going to be REALLY hard to let this custom go to its new home....sniff....
-
And my personal favorite, Armored Battroid!
-
Okay, last set of pics! Sorry for the delay....
Battroid


-
To answer the questions posted:
UN SPACY: If I wasn't busy making decals, I could probably get something like this done in about 3-4 weeks. That's not solid time, though. A few hours a day. Since y'all keep buying sets from me, this custom took A LOT longer than expected. Min sent me the valk mid-December. Now that Twin Moons will be carrying most of my sets, I'll have a little more time to work on customs.
Graham: I missed the leg attachment problem last night. I guess I was more tired than I thought. Good eyes! Please feel free to use any pics you like. Thanks for forwarding this thread to Yamato.
Eternal D: I've tried printing the decals both as opaque and semi-translucent. I'm personally much happier with the semi-translucent because it doesn't jump out at you like the solid ones do and detract from the overall effect. It also allows the underlying paint job to come through so it's a little more realistic. The occasional light spot is where some nasty little air bubble refused to go away. With decals this large, the occasional bubble is unavoidable.
Vermillion One: The only difficult large decal was the Minmay on the right leg. Keeping with her character, she was quite stubborn and didn't want to stay put. I had to cut the decal in a few places with a very sharp Xacto knife and use a lot of Micro Sol. Eventually she settled down. The small blue stripes for the knees were the most difficult to apply because the surfaces curve in so many directions. They tended to curl away except on the flat surfaces. I fixed that by letting the flat sections set, then made small incisions in the decals where the surfaces curve, then used a lot of Micro Sol and patted them down repeatedly with a Q-tip until they stayed in place. The RMS-1 decals were also a little difficult since the missles taper towards the front. I ended up cutting the front of the decal about every four millimeters to a depth of about seven millimeters. The end result looked like fringe (until the decal was applied, of course).
I'll get battroid pics uploaded later today. I have to run some errands right now.
-
Armored Gerwalk


-
Armored Fighter


-
Gerwalk


-
As promised, MORE PICS! Sorry for the delay, everyone. I was exhausted last night after spending all day finishing up this bad boy.
The FAST packs, leg armor, and arm armor now sport the same color scheme as the rest of the valk. It took a lot of planning and strategizing to figure out how to make the tire treads work properly since the armor is much darker and the original decals are semi-translucent (on purpose, so they blend into the paint job on the valk) . I ended up adding an opaque undercoat to the patterns and it worked beautifully! I also decked out the RMS-1 and UUM-7 armaments just for fun. I think it adds a nice touch to round out this valk.

IHP VB-6 Koenig Monster Re-cast Project
in Model kits
Posted
I don't know how I completely missed this thread. Guess I'm the perfect candidate for a long ride on the short bus. ChrisB was kind enough to clue me in. This sounds like an awesome project!
I'd be happy to help out with the decal side of things. The original decals do look pretty spartan, but I can fix that. For example, I could toss in a few sets of 0-9 at different scales for custom numbering and I know there's a bunch of kickass artwork in the old Macross Hobby Handbook that would make for great custom markings. If we can scrape together any lineart or screen captures that feature the Monster, I could pull some stuff from those, too.
As several of you have already guessed, I'll definitely need access to the kit when making the decals to ensure proper fitting, etc. I have an efficient system now, so it should go pretty fast.
I'll try to check in on this thread as often as possible, but if someone can keep me in the loop via PM that would be greatly appreciated.