

vf_1s
-
Posts
246 -
Joined
-
Last visited
Content Type
Profiles
Forums
Events
Gallery
Everything posted by vf_1s
-
Wow, the city looks amazing! Everything looks amazing!!!
-
Can't wait!
-
Great job!!!
-
Way to go Kye Kye!!!
-
The aztecing panels looks great!
-
I kind of agree with WM Cheng. Being able to open up a box and play with a toy is priceless. However, I think it would be more fair if the choices were availiable up front. Looking at the upgrade parts, I think this is where they will (hopefully) release the 1/3000 vf-1??? It was in their 1/2000 prototype; this explains why it hasn't been released all these times.
-
I knew it was coming!!! All this detailing and modifications is too big of a market not to have a part in. In one of last year's show, one of the signs actually says possible upgrading parts for the 1/2000. I guess they switched focus to the 1/3000 for the bigger market now.
-
WOW!!! that makes a TON of differences!!! Definetly one of the smarter and more effective modifications to make the details come out! It looks amazing! Did you have to spray really thick for the pattern to come out? That is so clever! The Master is still the master!
-
Very Nice!!! the fiber optics is a nice touch. Can't wait to see what it looks like in the dark!
-
1/3000 SDF-1 lightly weathered vs. 1/2000 SDF-1 customized
vf_1s replied to vf_1s's topic in Model kits
The residue primer was very hard to get off. It was super hard. I used 2000 wet sand paper. on more delicate parts, I use thinner. The good thing about these resin is that thinner doesn't melt it. Good luck! -
Hey,exactly the same thing happened to me!!! I know that feeling!!!
-
1/3000 SDF-1 lightly weathered vs. 1/2000 SDF-1 customized
vf_1s replied to vf_1s's topic in Model kits
I didn't. They already had it primed. But also, they have alot of places that were over done to the point where the transparent primer becomes white. In those cases, I have to re-do it myself. -
Everything looks really good. If you are super picky, the wings are just a bit too wide, and the launch arms are still to big IMO, but it can be fixed easily. Honestly, I think nobody will notice that they are a bit out of scale, except may be you and me, so I would just leave it as is. I think one of my vf-1s is slightly bigger too, but who really cares? Most people would have focus their attention on how small these things are... and be amazed. By the way, when I was painting mine, I find a Tamaya brush (~$10) that is really good, it was alot firmer than most other ones I have, and has a big grip. Combined effect: I have a lot more control on the micro lines when painting the valks. Let me know if you want to know the name of the brush. Keep up the good work. This is the first thing I check evey morning!
-
1/3000 SDF-1 lightly weathered vs. 1/2000 SDF-1 customized
vf_1s replied to vf_1s's topic in Model kits
Thanks. Must be the firewall at work... -
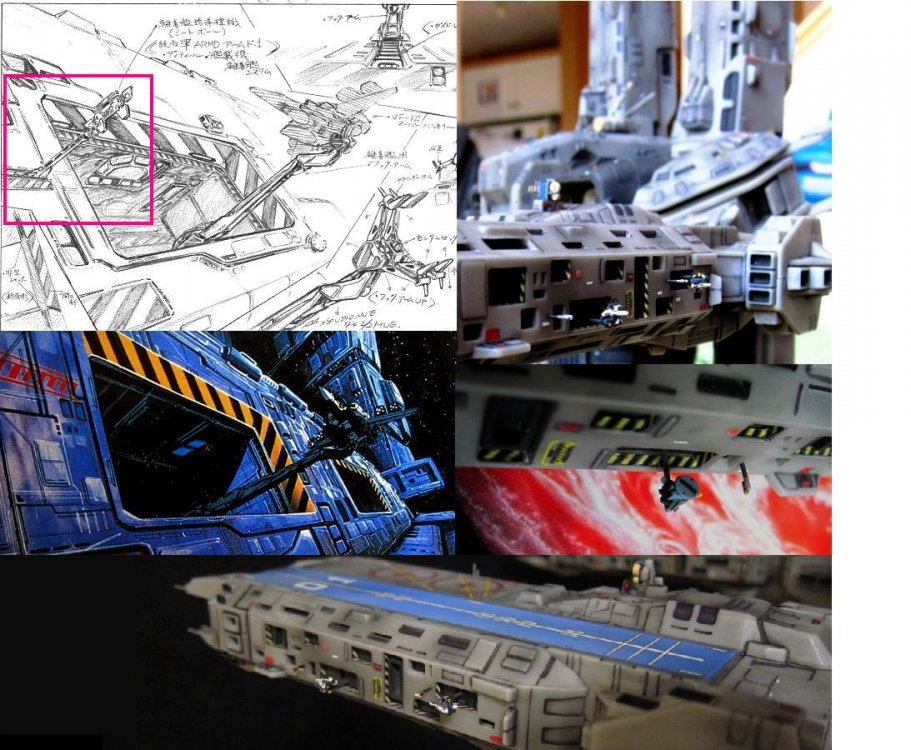
What's more amazing is the launch arm, even with the yellow and black corss hatch pattern.
-
1/3000 SDF-1 lightly weathered vs. 1/2000 SDF-1 customized
vf_1s replied to vf_1s's topic in Model kits
Nope, not at all. The more I can share this with others, the better. Thanks for taking the time to upload it. Howcome when I click on the link, it doesn't work? I agree, this, to me, is one of the most effective modification. -
If you guys are not too picky, you can modify it from the white 01, 02 from the yamato 1/48 or 1/60 GBP sticker sheet
-
Wow, thank you for all the complements guys, especially from big F. It was an honor! Thank you
-
You are amazing. Everything looks really good. Just a friendly suggestion, the arm looks to be sticking out a little bit too far for this scale, also some of the valkyries seems to be too big to come out from the smaller gates. I have this problem too. May be the smaller gates are for smaler crafts? Lastly, according to the reference, the signal arm does not come out of the gate, it is something the "slides up" in front of the gate. Nevertheless, amazing work given the sizes!
-
1/3000 SDF-1 lightly weathered vs. 1/2000 SDF-1 customized
vf_1s replied to vf_1s's topic in Model kits
you got it. Oh, and one last trick, when you are done putting on the decals, use a black gundam marker, and trace it around the edge of the gate. It blends in the decal alot better to the "grey gate" in the back. -
1/3000 SDF-1 lightly weathered vs. 1/2000 SDF-1 customized
vf_1s replied to vf_1s's topic in Model kits
Wow!!! thank you so much! you made my day! -
That looks awesome!!! See, I knew you wouldn't give up. So why did you choose to use clear plastic sheet? Is it because of the canopy? Anyway, it looks awesome!!! Any chance to see what this looks like on the ARMD? The launch arm looks very nice!
-
1/3000 SDF-1 lightly weathered vs. 1/2000 SDF-1 customized
vf_1s replied to vf_1s's topic in Model kits
That is exactly how I did it, just make sure you paint the exit ports white first before your put on the decal, because the yellow cannot cover the grey. Another way to do it is to print it on label stickers, this way, the paper is thick enough to cover the background color. Only thing is now that the paper is thicker, you can really bend them around the corners, so you have to cut to the exact length. -
1/3000 SDF-1 lightly weathered vs. 1/2000 SDF-1 customized
vf_1s replied to vf_1s's topic in Model kits
Thank you. I really shouldn't take too much credit for the 1/3000 SDF-1 toy, as I really didn't spend that much time on it. It was just something simple to make the toy less plasticky. It is the 1/2000 SDF-1 that I am most happy with. But now that I have the 1/3000, I will probably play with the toy more, because I will be less heart broken if I scratch it. Anyway, the oil wash technique that MW Cheng taught in his thread gives the best result. Also, "Promodellers Weathering wash" and gundam markers are among my favorites too because of the ease of use. -
1/3000 SDF-1 lightly weathered vs. 1/2000 SDF-1 customized
vf_1s replied to vf_1s's topic in Model kits
Thanks. I probably will do a bit more detailing in the future, and will put on the 01 and 02 at that time. But at the moment, I am a bit busy, so that's it for the next little while. Thanks again!
