ce25254 Posted November 1, 2007 Share Posted November 1, 2007 Here are a few pictures of a 1/72 Valkyrie that I built around 1988. This is actually the transformable Bandai #0504996 1/72 Variable Valkyrie VF-1J Max Type as shown on this page. I didn't know anything about putty when I built this kit, so you can see lots of seams. Nor did I highlight any panel lines (didn't know about that, either!). I like Millia and her colors in so many ways more than Max, so although the plastic is blue I painted the kit in my vision of the Millia VF-1J scheme. As an inspiration I used the box art from the 1/100 Millia VF-1J Super kit (shown here). I prefer a grey rather than white in this scheme. Wow, it sure was hard to pose this battroid after so many years. After I got it in this pose I thought it best not to try a 2nd pose! Hope you enjoy it. Quote Link to comment Share on other sites More sharing options...
big F Posted November 1, 2007 Share Posted November 1, 2007 The grey does suit it suprisingly Quote Link to comment Share on other sites More sharing options...
jardann Posted November 2, 2007 Share Posted November 2, 2007 Looks pretty good! When you think about it, for a kit that old, and the fact that you didn't work on them, the seams really aren't that bad. It's obvious that with a little bit of work on the seams, they would clean up nicely. I too like the grey accents. I also like the silver and green on the visor. Makes this build unique. Just goes to show that those old kits still have potential! Quote Link to comment Share on other sites More sharing options...
Warmaker Posted November 4, 2007 Share Posted November 4, 2007 I have one of the 1/72 Bandai VF-1J's also. They're not too bad, but posing could be problematic at times. They're not that sturdy for poses. But if left in jet mode, they look good enough. Quote Link to comment Share on other sites More sharing options...
orguss01 Posted November 18, 2007 Share Posted November 18, 2007 I have one of the 1/72 Bandai VF-1J's also. They're not too bad, but posing could be problematic at times. They're not that sturdy for poses. But if left in jet mode, they look good enough. Can we see Gervalk/valk mode? Just curious what it looks like with c/pit piece. Nice build, i have the Revell Robotech Changers kits and was thinking about building it soon... THESE are similar right guys?? The Miria kit on the Changers box is painted a nice color of dark red..i might do somthing like that and maybe use that gray for light areas.. Quote Link to comment Share on other sites More sharing options...
jardann Posted November 19, 2007 Share Posted November 19, 2007 That kit is not just similar Orguss, it is exactly the same. The only differences are in the packaging and the nice English instructions. Even the decals are the same as the Bandai Millia kit. So start building and show us your progress! Quote Link to comment Share on other sites More sharing options...
ce25254 Posted November 20, 2007 Author Share Posted November 20, 2007 Can we see Gervalk/valk mode? Just curious what it looks like with c/pit piece. Yes, I have the cockpit piece. I will (very gently!) transform it and put up a picture soon. Quote Link to comment Share on other sites More sharing options...
MechTech Posted November 24, 2007 Share Posted November 24, 2007 1988. Those were the good ole' days! You could find those things all over it seemed. I had the same Robotech kit, but it was the VF-1S. Mine has not faired nearly as well as your Bandai kit ce25254, but I still have the pieces. The scratched up decals will be nearly impossible to fix. You never forget your first and favorite Valk! At the very worst it will sit in an urn on my mantle someday ! Thanks for sharing. - MT Quote Link to comment Share on other sites More sharing options...
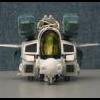
ce25254 Posted November 27, 2007 Author Share Posted November 27, 2007 OK, here is the airplane mode. Unfortunately I broke off one of the head cannons, so most of the pictures don't have the head in place. Those cannons apparently don't like to turn anymore. I don't remember why I didn't add the number decals. In the last picture you can kind of see Millia in the cockpit. Quote Link to comment Share on other sites More sharing options...
jardann Posted November 27, 2007 Share Posted November 27, 2007 (edited) Cool pics! You did a nice job getting the pilot to look like Millia. The cockpit looks clean and detailed too. I especially like the pic of the underside. All of the vertical white lines result in a pretty cool effect. They impart a sense of motion, almost like the plane is racing along. bummer about the head laser. I know that at least the first four Macross kits I built as a kid ended up with broken head lasers right away. Once you add a layer of paint (especially thick gloss white paint as I was prone to use when younger) turning those lasers becomes about impossible. I finally figured it out though and have a kit much like yours here that still has intact, moveable lasers after about 20 years! God could it really be that long? (possibly even longer ) I'm getting old! Careful packing and only moving the lasers by gently turning the base part on the side of the head is the way to go. Probably the best way to fix it would be to carefully drill out the broken areas and insert a thin metal pin. With the right drill bits and a pin vise it's not that difficult. Just be careful to drill as straight as possible. Good job on the kit. It's very nice to see those old warhorses getting some love, and good luck with the repairs! PS: I love the stand you are using too! Though for Millia, you might need a nice bright red Swingline model! Millia: "Excuse me, but that's my stapler.....yes but.....you have my stapler." Edited November 27, 2007 by jardann Quote Link to comment Share on other sites More sharing options...
ce25254 Posted November 28, 2007 Author Share Posted November 28, 2007 Probably the best way to fix it would be to carefully drill out the broken areas and insert a thin metal pin. With the right drill bits and a pin vise it's not that difficult. Just be careful to drill as straight as possible. Good job on the kit. It's very nice to see those old warhorses getting some love, and good luck with the repairs! I've read for the first time about a pin vise recently, but never used one. (I'm just getting back into plastic modeling after doing vinyl kits for several years.) I looked around but haven't been able to locate one at a shop nearby. Do you have any recommendations about what sort of tool to buy and where to buy it online? Would one of these at Starship Modeler be a good choice? http://www.starshipmodeler.biz/index.cfm?f...category_id=152 PS: I love the stand you are using too! Though for Millia, you might need a nice bright red Swingline model! Yeah, as you can see, I've taken all my toys to work to keep them away from my kids. Thanks for the kind words. Quote Link to comment Share on other sites More sharing options...
jardann Posted November 28, 2007 Share Posted November 28, 2007 (edited) Yeah, either the pin vise or the spiral mini-drill from SSM should work fine. I've never used the spiral kind, but it looks like it might be more difficult to work on such a small area. Can't beat those prices and SSM is a great place to shop! You would still need to get some micro drill bits too. Like this, not sure if you can find some a little cheaper. That's less than a dollar per bit, so I guess it isn't a bad price. Edited November 28, 2007 by jardann Quote Link to comment Share on other sites More sharing options...
Isamu test pilot Posted November 28, 2007 Share Posted November 28, 2007 Great job, specially the ainting job, I ove how the gray color made the valkyrie looks different and nice Thank you very much for sharing Quote Link to comment Share on other sites More sharing options...
big F Posted November 29, 2007 Share Posted November 29, 2007 Yeah back in 1986-88 you could get all the Revel changers kits for pennies here in Blighty. My friends and I had all of them at least once over. Quote Link to comment Share on other sites More sharing options...
MechTech Posted December 1, 2007 Share Posted December 1, 2007 (edited) ce25254, I couldn't do a lot of my work without a pinvise! This place is the bomb: http://www.micromark.com/ They are in NY so shippping should be quick. Search "pin vise" and take your pick! 21105 is comfortable for first time use. Then you'll NEED a #60362 set or for the tiny (smaller than needles) stuff #82416. Search for "drill sets" and be amazed. Hope that helps! - MT Edited December 1, 2007 by MechTech Quote Link to comment Share on other sites More sharing options...
Recommended Posts
Join the conversation
You can post now and register later. If you have an account, sign in now to post with your account.