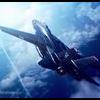
zanderwitaz Posted September 21, 2007 Share Posted September 21, 2007 After doing almost everything I can thing of to the 1/55 line of valkyries, I moved on to a more difficult project. what caught my eye was the transformers armada starscream/thundercracker jets, which are about as big as the 1/55 scale valkyries. It is sleek, macross plus looking, and the nose and cockpit look very close to the vf-11b, my fav. valk ever. since I cant afford a thunderbolt, I decided to copy it as close as I could. Now, keep in mind people, this thing is scratch built, and my first attempt. its not going to be perfect. I started by taking apart the armada starscream I got off ebay. (no wings, no wing mounts, no missles, no launchers.) My god did they overdo it. they use these weird screws all over the place that have no heads. it looks like they shave the heads right off after theyre screwed in, so getting the two main halves apart was accomplished with lots of force. the wires from the electronics were glued in place, so saving the electronics was more work than its worth. the thrusters on the top also had to be forced off. lucky for me nothing broke, just a few stress marks (but im painting it,duh) the thruster intakes were saved for later. after i got everything off, i started on the cockpit assembly. I was orginally going to swap in a clear canopy and some 1/72 cockpit details but prying the halves apart looked more than its worth. the cockpit assembly clicks into an up position and a down position. the up position still pointed down too much, so i sanded it to allign where it should. then I glued it. then i moved on to the underside. man, what a chunky underside. this thing is like 2 inches thick underneath. I ditched the whole bottom half of the jet mold except for the hinge where the "swaybar" mounts. one of the reasons I thought this was a good project was the sort of swaybar thing it had going on. the legs attached via ratchet joints to this swaybar, which locked in in jet mode and robot mode. Since I changed the transformation to be like the macross valkyries, i had to "thin down" the swaybar and move it more towards the front of the jet, so that the legs could mount lower in battroid mode. I liked the upper legs the jet came with, but they were wayyyy too close together. (almost touching) I moved them farther apart by ditching the ratchet joints and adding ball joints. The knees of this toy have ratchet and swivel joints as well, so I decided to keep them. however, the lower legs didn't look anything macross looking and folded towards the front of the jet instead of the back of the jet. (no gerwalk mode for starscream) So, I swapped out some bootleg 1/55 VF-1 legs. then I cut the small fins of the transformer legs that look exactly like the thunderbolt rear fins and put them on the VF-1 legs. The top half of the jet had to be cut horizontally so it could fold in half. this toy originally had the head pop right out of the middle of the chest in robot mode, since the chest faced upwards in robot mode and jet mode. On mine, the chest is designed to face forward. So, after making the cut, I added VF-1 bootleg hinges and scratch built the mounting points using styrene. the head is a ball jointed 1/55 vf-1 bootleg head. I linked the lasers and mounted it back on the 1/55 flip up head platform. I trimmed it down significantly and glued it with some styrene inside of the chest . now the head can flip up between the chest halves, just like the 1/55. the wings were one of the hardest parts. getting the overall thunderbolt shape, layering them, and then making them swivel. I only had a few milimeters to work with. I used some super skinny lego mounts, and some shaved down lego posts to go in them, and glue to the wing. It took many tries to get it right, as the mounting point is not in the same plane as the rest of the jet. here are the pics so far. As you can see, I designed it to have a gerwalk mode ( a good looking one, too) along with the basic modes. I still havent figured out how im going to mount the arms. on the original transformers toy, they just stayed where they are, and stuck out in the front. It looks ugly so im trying to get them to fold between the legs like they should. once im done with that, I'll detail the underside, chest, and mount the other intake that i salvaged. Ill post updates as soon as I can I havent decided on a color scheme, so help me out. Quote Link to comment Share on other sites More sharing options...
Hiriyu Posted September 21, 2007 Share Posted September 21, 2007 Dang Z, that's nuts! Looks like you're having fun! Quote Link to comment Share on other sites More sharing options...
MechTech Posted September 21, 2007 Share Posted September 21, 2007 somebody has been doing a lot of thinkin'. It looks good so far. The only dead giveaway is the head and different looking windscreen. - MT Quote Link to comment Share on other sites More sharing options...
warpaint22 Posted September 22, 2007 Share Posted September 22, 2007 Wow lookin good, some really cool mods. As for colour ideas I've always liked the VF-11 in skull squadron colours but thats MO. I'm sure the colours you pick will look great. Quote Link to comment Share on other sites More sharing options...
big F Posted September 23, 2007 Share Posted September 23, 2007 Looking good so far Z. Keep it up bro. Quote Link to comment Share on other sites More sharing options...
Recommended Posts
Join the conversation
You can post now and register later. If you have an account, sign in now to post with your account.