

QuinJester
-
Posts
497 -
Joined
-
Last visited
Content Type
Profiles
Forums
Events
Gallery
Posts posted by QuinJester
-
-
The new 1/60 VF-1's are envious of the YF-19's mono boob.
"I must, I must, I must increase my bust"
-
The chest looks .... REALLY puffy. Like it bulges out a LOT. Is the chest seriously supposed to be that bulbous? I know people keep saying "it's just because it's not locked down" on all of these photos, but it's so consistent that I really think that's the way it's designed.
Still, the 1A looks awfully pretty. If I'm getting one, that's the one.
-
Looks like it's a wood prototype.
SLA Rapid prototype, a fair bit more sophisticated than wood. They can change anything they want in CAD and print up new versions to their heart's content before moving on to final sculpting and casting.
-
New pics up on GA Graphic
http://ga.sbcr.jp/mreport/010310/
It's Still a rapid prototype model, but at least you can rest assured that the cockpit hinge is gone. Also, a price; 12600 yen.
Still hoping that the knee breaks forward more in Gerwalk mode for properly canted chicken legs, but it's looking rather nice I think.
-
CDX has put one up along with a review for your perusal.
http://collectiondx.com/node/2567
I think if I were to get only one GN-U it would be the 11.
self-quote:
http://www.toysdaily.com/discuz/thread-66848-1-1.html
A nice gallery of shots on Toysdaily, too.
-
Why the hell are there no galleries of the 11? Is it that unpopular in Japan? Maybe its just me, but I've always thought the VF-11 was dead sexy. Look at that anime accurate paint job Yamato gave it too, thats awesome.
CDX has put one up along with a review for your perusal.
http://collectiondx.com/node/2567
I think if I were to get only one GN-U it would be the 11.
-
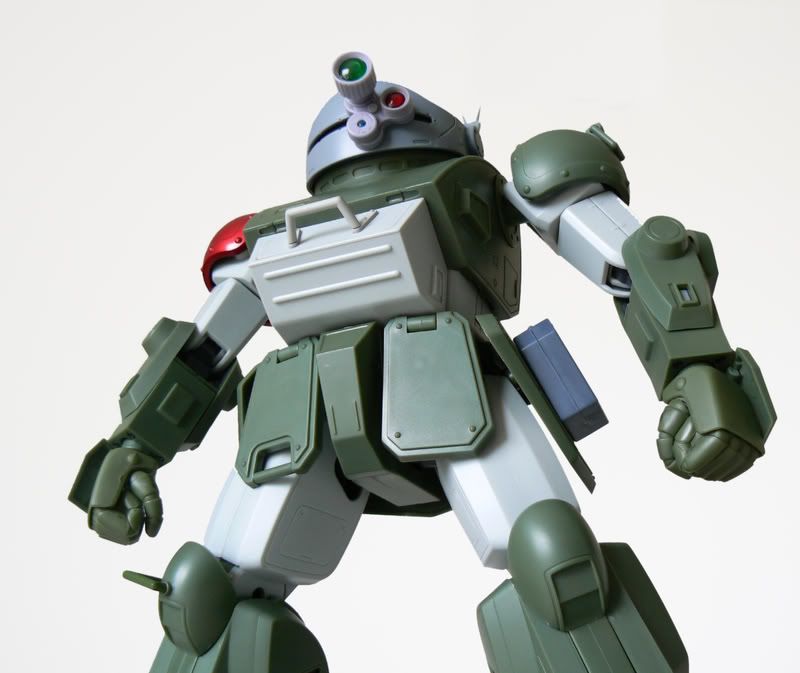
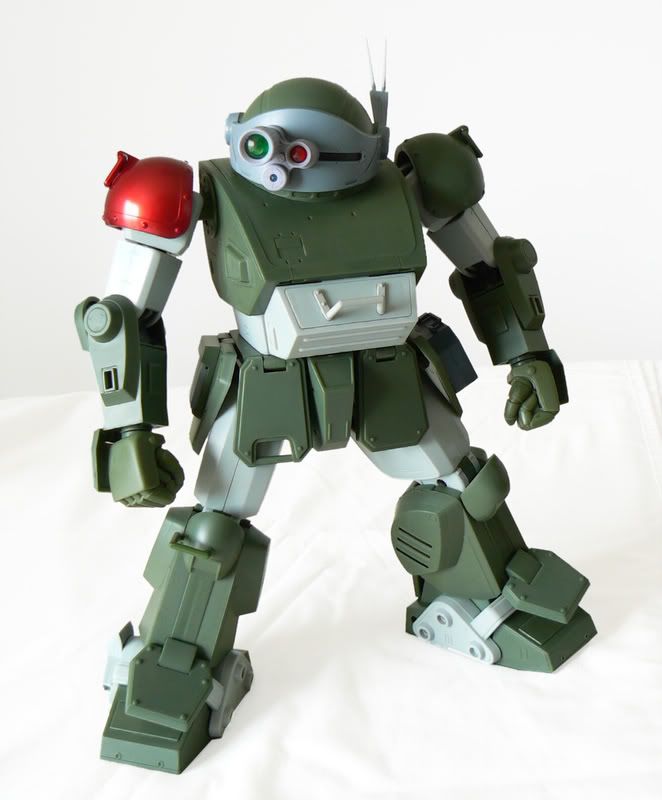
Sorry to bump but wanted to show off my friend's new custom scopedog:
Very cool! I like the way the brown was used as an accent color on the grey parts, especially.
-
Most likely it'll be in China. They already have factories there and it's cheap for mass production.
All of Bandai's products are made in China ... with the exception of their model kits, which are made in their proprietary specialized factory in Tokyo.
-
Eheh. Yeah. I was going crazy with the drybrushing and I knew it. I'm probably going to go over all the bare metal surfaces with some alternate colors to downplay the paint chips, as you say. A good idea with the rust on the metal exposed surfaces so, that makes sense and would fit with the "reclaimed from the scrapyard" aesthetic I'm going for.
-
Well, so far it's been a massive failure trying to get the visor apart, so I've decided to knuckle down and just go for it without disassembling it.
Also, since I seem to have been graced with thread approval for this, I figure I may as well put more photos in.
Junkyard Dog in progress!

I completely failed at matching the paint on the mid-torso for the light grey parts, so at some point I'll have to mask off and paint the inner frame part as well. First things first, though.


Right foot, light mud splashes

I really like the paintjob on the back of the scopedog more than the front, right now. C'est la vie!
Need to do something about the knee joints, too. I didn't think they'd be as visible (while it was in pieces) as they are.
That screw on the right, I have NO IDEA where it's supposed to go. <sigh> "I put it together myself, and look! I have all these spare parts..."

Closeup of the back of the right leg. I wanted it to look like the right leg had been re-built from scrap parts, so the various components are made up of two different greens plus a brown (like the scopedog Chirico fights in the arena) shade. I wore down the brown plates more than the green ones and added some corrosion texture to make them look older and more beaten up.

The mud texturing on the inner foot looks awful. Deciding whether to try and remove it or to just add to it at the moment. I want to
keep the mud coverage fairly consistent across both feet though. You can see a bit of the corrosion texturing on the brown leg plate in this shot though.

I have fun plans for this foot. I need to find a good "no step" decal. Unfortunately, all of my old aircraft kits are 200 miles away...

Yamato sticker attack
 . I tried everything to try and smooth out the transitions on the edges of the stickers but to no avail.
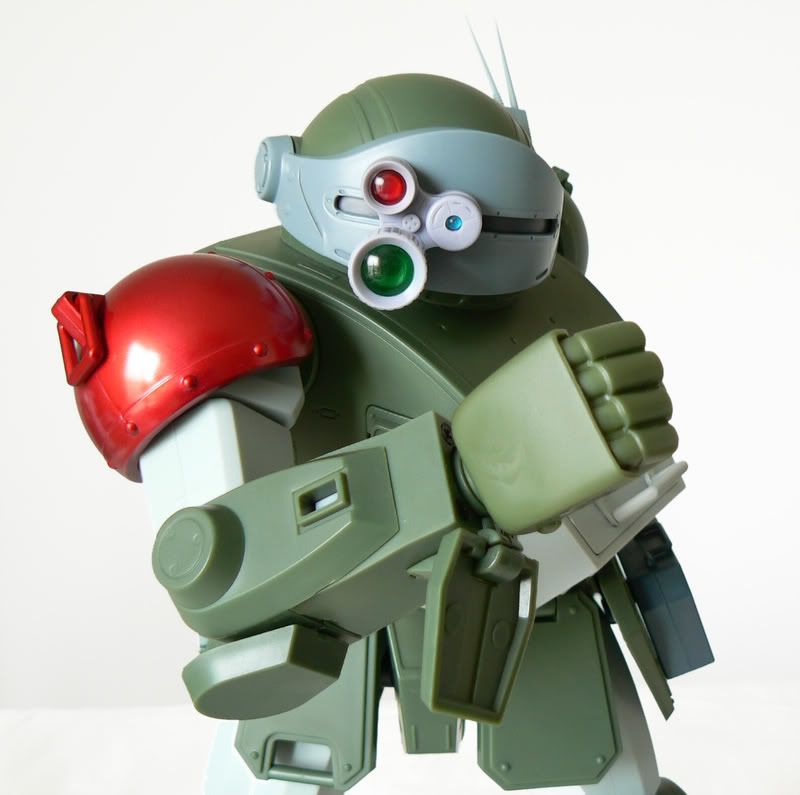
The chest is boring right now. Definitely needs something. Kill marks are a must, and probably some more washes to hide my lazy dry brushing.
Constructive suggestions are more than welcome. Alas, my current living conditions mean I don't have access to an airbrush or a spray booth any more advanced than a cardboard box on my balcony, so airbrush reliant suggestions, while appreciated, probably will be less helpful

-
I customised mine.. It was a while ago and if I remember the visor parts are glued together.. I had to pry them apart with an xacto knife..carefully.
Hmm... did you pry at the actual point of rotation, or did you pry under the whole assembly to pop it off of the slide?
GREAT paint job by the way!Thanks! It's been at least four years since I did any painting, so this has been a refresher course for me :lol. It's been a lot of fun though. I'll probably take some more pics today after work.
-
Where are the plastic pins located?
I got two SOC's eva 01 & 02). I'd like o know what your talking about so i'm careful.

The only one with that problem was the first release of the SOC Spec Eva 01, which had a fragile and shatterable hip joint. The other versions of both Eva 01 and the other evas in the spec line don't have it.
If you have the standard SOC Evas you don't have anything to worry about.
The Spec Eva is also, I think, the only SOC with a breaking problem, so to be worried about that on the DX is kinda excessive. Still, we'll see. You never can tell with crazy Kawamori thin transforming designs.
-
Has anyone had much experience with ripping apart the Yamato Scopedogs? I posted a thread in the "customizing your toys" board but also thought I'd ask here; I'm repainting my 1/12 Red Shoulder but can't find any way to disassemble the visor component, which is going to make painting it a huge, flaking pain. In particular, I'm trying to find a way to get the rotating camera assembly off of the grey visor. The back of the visor I can mask off, but that sliding assembly is really going to be a nuisance.
-
No ideas, eh? Ah well, it was worth a shot. I'll just wing it and see how it goes, then.
-
Honestly, I hope they DON'T change it much from now until the final, because then I wont feel tempted to buy it as the Ingram is one of my favorite (and most-purchased) mecha designs and I'm quite happy with my small die-cast CM's releases.

-
I recently got a Yamato scopedog, and while it was neat and all, the flat dull plastic appearance made me a little envious of the DMZ line, so I decided to do something about it.

So far, the project has been going pretty well, but I've got a bit of a snag in the visor; the sliding camera assembly seems to be irremovably attached to the visor itself, which will make the painting of both a nightmarish undertaking. It seems like there's a pin fixing the rotating assembly to the base, but this also seems to be immovable, and before I start wrenching and prying and breaking things, I was wondering if anyone else had any good ideas on how to get this thing apart.
-
What? You actually liked the first prototype?
 You're the only one I think.
Nah. I was one of the people saying "seriously, give it time. Bandai does change things if need be". My fake indignant rage was merely a impotent mockery.
I think it looks pretty good. I'm excited by the booster pictures on the table, too.
-
Looks like the canopy hinge it's gone. The gunpod looks great!
How dare Bandai make changes from the prototype

-
So uh, I found a three of the 1/12 scale VOTOMS toys for insanely cheap, no box. The Strong Bacchus, Scopedog and Purple Scopedog. I like the VOTOMS designs a lot (especially the Strong Bacchus). How good are these toys? Someone talk me into buying them.
How cheap is insanely cheap? They're stupidly huge and pretty awesome, though a bit plasticy and simple in appearance and just begging to be repainted.

I like mine, obviously, though he's currently in a thousand half-painted pieces and I'm wondering where the hell I left the screws for his left leg.
-
The L-Gaim is beautiful.
If it were a MK-II it would be a no-questions-asked purchase. I'll probably wait and see if I can't find a sale one for this though.
-
Is there any reason why Daimos is a truck in space?
Yes.
Space trucks are awesome.
He joins the upper echelons of the space truck ranks alongside such quality mecha as Xabungle and Ideon's Legs.
Bandai always seems to pull absolutely rediculous transformations out of their hat. I can't wait to see more of Aussenseiter.
-
Aw crap, what if the non FP version has all the fixes we'll demand after fiddling with our FP versions for a month or so? Then we'll have to buy both! CURSE YOU YAMATO!!! I SEE WHAT YOU'RE DOING HERE!!!!!
Uh, sorry, way too much coffee.
At least it'd be a nice reverse of the usual process of "you bought the original one, now we have a fixed version but it comes with extra stuff and costs $50 more"
-
A lot of sensible stuff
I agree wholeheartedly. At this juncture, questionable prototypes nonwithstanding, I have no reason to believe that Bandai wont put out a seriously quality product. They aren't in this to spite Yamato or the non-gundam fans, they're in this for money, and they're no strangers to the high end toy industry.
As for the "Prototypes shown are final!" argument... one of Bandai's pre-production prototypes (that they even photo-opped for magazines!) for Daimos was made out of paper and sheet styrene for goodness' sakes; the panels and details were doodled on it in pencil!
-
The guy knows nothing of japan. He probably was there for DB or Naruto which he thought was cool looking on the internet.
Actually it's a non-serious promotional blog for a character from a TV show that's based on his fictional characterization.
Humor!
Bandai 1/72 Scale Macross Frontier Plastic Models
in Hall Of The Super Topics
Posted
Getting it done ANYWHERE would be pretty damn expensive. The resin alone for SLA models costs about $800 per gallon.