

redfinger61
-
Posts
98 -
Joined
-
Last visited
Content Type
Profiles
Forums
Events
Gallery
Posts posted by redfinger61
-
-
No, unfortunately not... it was just too expensive and the proportions were too high. I am hoping that this "re-issue" might address the tall proportions and make it a little more affordable. Any news on the "re-issue" would be appreciated!

SSM has the lauch base (the one you are doing now, and the launch are, the one you did before, that attaches to the top of a valk, all in the casting que), so that means anywhere from 2 weeks to 2 months...I beleive that the launch base is almost done, I havent heard any details on the launch arm. The same goes for the launch vehicle, no word on that. I dont even know if SSM has the origonal molds for that one.
BTW great work, I just picked up a origonal Samuri Monkey casting of the booster!!! I am really thinking about starting this build up in the near future, your work is inspiring!!! I just cant decide on a color, white is too plain, and the greys have been covered by you, so maybe I will go with a nice olive green, and get a real military feel for it.....keep up the good work WC!!!
Ashton
-
hmmmm....that would be a fun pose to try and get out of a Hasegawa kit
-
Eh... its already got enough missiles. An anti-armor bayonette would be cool ala Macross plus. Also you could attempt to make it a reloadable variant. That would likely entail the top part of the rifle being a detatchable clip, so beefing it up.
Personally I've just added an extra VF-11 gunpod I had to a VF-1. I thought it reflected the 2020 time period I wanted my fighter to be in.
why not all 3!! lol

-
I am in the process of building the 1/72 armored batteroid, you know the resin kit that you usee with the Hasegawa kit?? Anyway I am looking at this kit and I am loving how beefy and tannk-like the VF looks with all this armor on...but then, you look at that little GU-11, and it just really looks so plain a little next to all that armor. So I was thinking of beefing up the gun, maybe adding some sensor greebles, maybe scratch building a launcher that mounts to the bottom, I am thinking of the grenade launcher that mounts to the bottom of a M-4 or M-16 something along those lines.
I know it is not cannon but I thin it would look pretty cool...what do you all think?
Ashton
-
The Club-M is definetly smaller than the Has kit too, i am currentyl working on bolth of them. I also found that the CLub-M fits together really well too, I have had to do very little sanding and cutting to make everything mesh together...mine did not come w/ a pilot, and the Has 1/72 pilot is a little to big for the Has cockpit. I am very happy thought w/ the detail level and I think it iwll look good when I am done with it. I do reccomend getting some new decals, I have some on order from Anasazi that he is making up for me, so we will see how they work out.
Ashton
-
Iwata Eclipse, gravity feed... you wont look back!
I second this as well...I just bought a eclipse the other day from the local art store, it was on sell for 109.95!! Beat any deal I could find on-line...I have since brought it home and put quite a few hours on it already, vary nice brush and far superior to what I was using before.
Ashton
-
That top canopy looks vac-formed to me, it just looks to thin to be a stock one, still looks great!
Ashton
-
I love the 1/72 Hasegawa Valks I think they look great and have a good amount of detail, I just finsihed VF-1 Skull-1 version and as I was building I noticed how much detail was lacking from the cockpit, other then the desplay screen decal there isn't really anymore.
As I prepare form my next 2 Valks I was thinking of getting a resin cockpit from modern fighter, like a F-14 or F-15, or some other one and working it in to give a little mroe detail to the whole thing.
So I have a couple of questions about doing that;
1. I am planning on putting a pilot in as well, would the pilot look out of scale w/ a 1/72 modern figther cockpit?
2. If anyone has done this, how much modifaction is need to the origonal kit to make it fit?
3. Anyone have any pics?
Just a thought, but after lookiing at the cockpit in this link;
http://www.hkml.net/Discuz/viewthread.php?...;extra=page%3D1
it looks like they might have done something similar.
Ashton
-
I am really just trying to figure out what I should put on the tail, or fast pack, if anyhting. Do I need to put a skull or just leave it blank?
Ashton
-
Or a little help in making them...
I want to do 2 1/72 scale Hasegawa Valks one for max one for Millia....I would like to do them w/ fast packs too. I was looking for the model kit but i cant find one any where, so I though i would pay someone to make some for me, or looking for some tips on making them myself. I found the link that has the decal sheet scanned in but the problem is the blue background...
So anyone here wanna please help out?
Ashton
-
Wow!!! those are beautiful!! Very good reference photos.
Any one happen to know the numerical registration for the respective valks?
Ashton
-
http://www.macrossworld.com/macross/models..._65763_vf1j.htm
Like the one pictured above, if you got one and want to sell it please let me know!!
Ashton
-
From the original SDF series does anyone recal what sqaudron Max and Millia were part of? Did it have a call sign? I am also looking for a reference to what number their craft was as well.
For my next project I am planning on a small diorama of Max and Millia inflight in thier valks w/ fast packs...Max w/ the blue and white, and Millia w/ the red and white...in flight together on the same base. Other than the blue and red I dont seem to recall any other real markings, the planes seemed to be patterned after the "cannon fodder" layout, they lacked some of the black line detail that skull-1 had..which I might add anyways unless I can find some kind of other reference.
Any help would be apreciated guys.
Ashton
** just found this,
http://www.macrossworld.com/macross/models..._65763_vf1j.htm
looks like it is about all I need, any other references would be great!!**
-
Looks good!!
A quick suggestion for you, paint the inside of the legs, where the exhaust buckets will be, flat black, also paint inside the body area underneath where the head will be flat black as well, I did that on mine and it really added some depth and got rid of some of that annoying white that you see some times in models..
Ashton
-
So no one here seems to be to sensitive abuot recasts around here so I will give this question a go....
I recently won a Club-M recast of the 1/72 Q-Rau off of e-bay, I am looking at the model and other thatn being a less than perfect recast, the model seems different when compared to the yamo toy version(which I understand in the DYRL version), and more similar to the SDF Macross series.....however the pilot, is definetly modeled after DYRL...so my question is thus; is the club-m version based on the series or DYRL....seeing as I need to put a bit of work in anyway to clean it all up, I figured I might as well getting looking like the DYRL version....
any tips guys?
Ashton
-
Title says it all, just need to know what colors the meltran flight suits are, I know from the series they are a purple color, did it change in DYRL?
Ashton
-
It also works well if you spray an aluminium or rust pattern before you add the salt. Then, when you remove the salt, you see the 'bare metal' or corrosion.
Yes, I have done that before too w/ some suprisingly nice effects, I chose not to do it this time on this model because of the scale....the 1/72 delta-7 is small, so w/ such small paint chipping it just didnt really seem worth the effort to me..
Ashton
-
How did you do the wear and corosion marks ?
Pretty easy really, I primed the model w/ a very thin coat of Mr. SUrfacer 1000 when that dried I tool and little bit of table salt, and some water and a old fine tipped brush. I dipped the brush in the water, then in the salt and worked the salt/water mixture onto the hull of the ship. I tried to place it randomly and not to let each area get too big, the model is pretty small so I didnt want to over do it. After the salt dired, about 3 hours, I then painted the ship my main color, in this case Vallejo Persian Blue. After the paint dried I simply brushed the dried, painted salt off and bam...I was left w/ some paint chipping.
Ashton
-
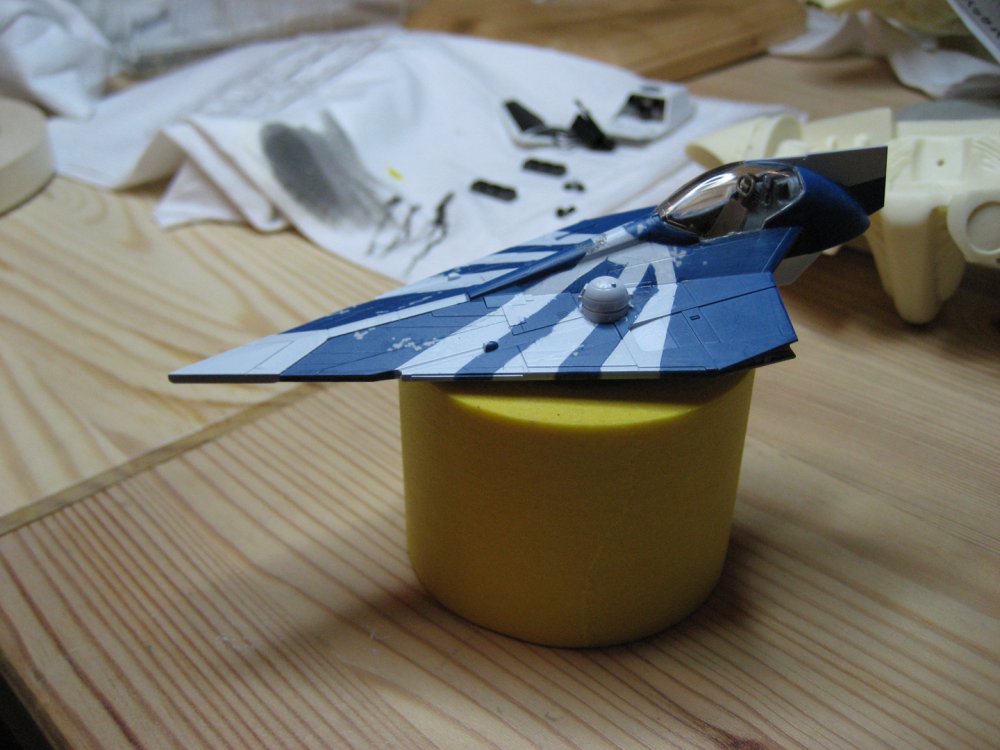
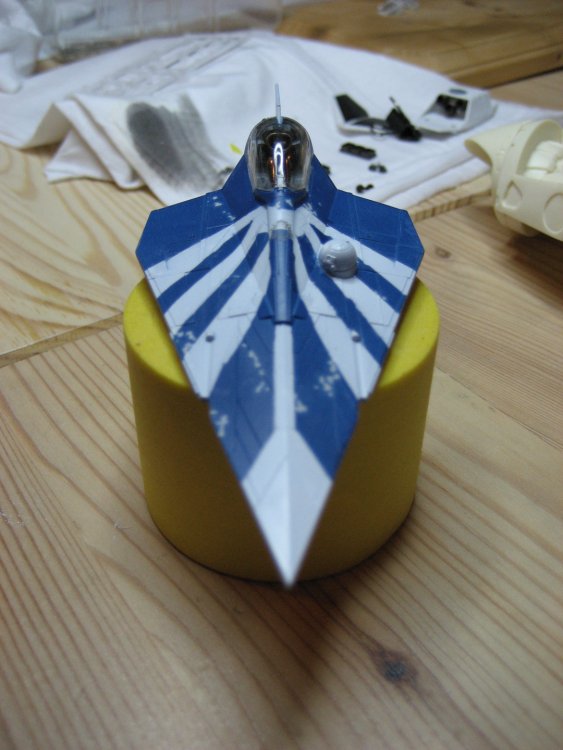
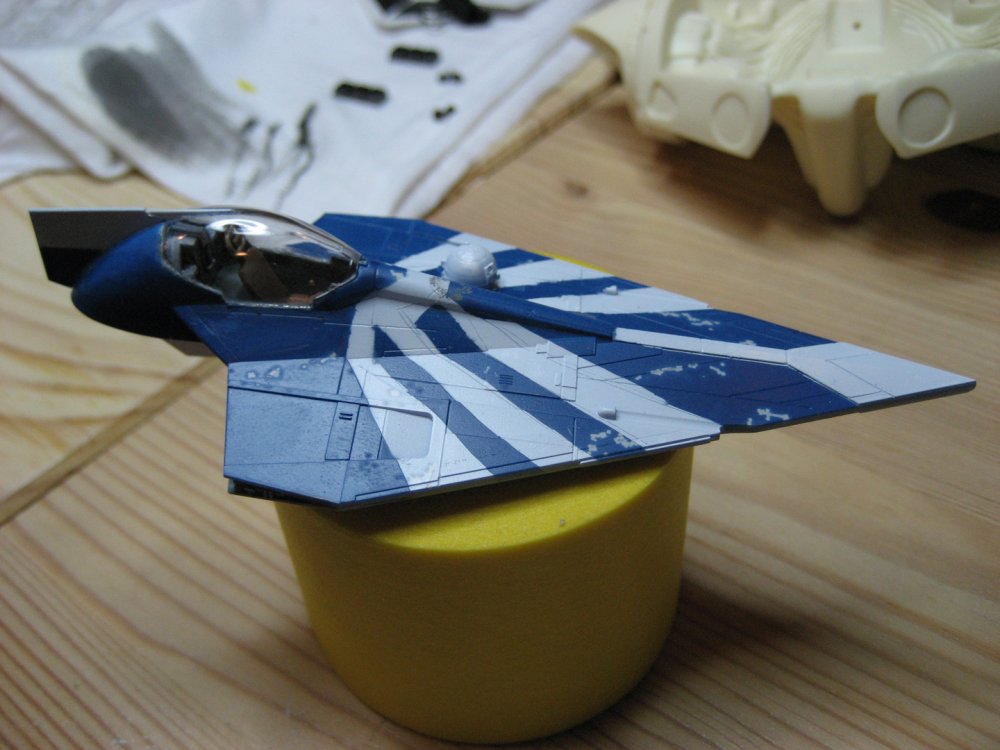
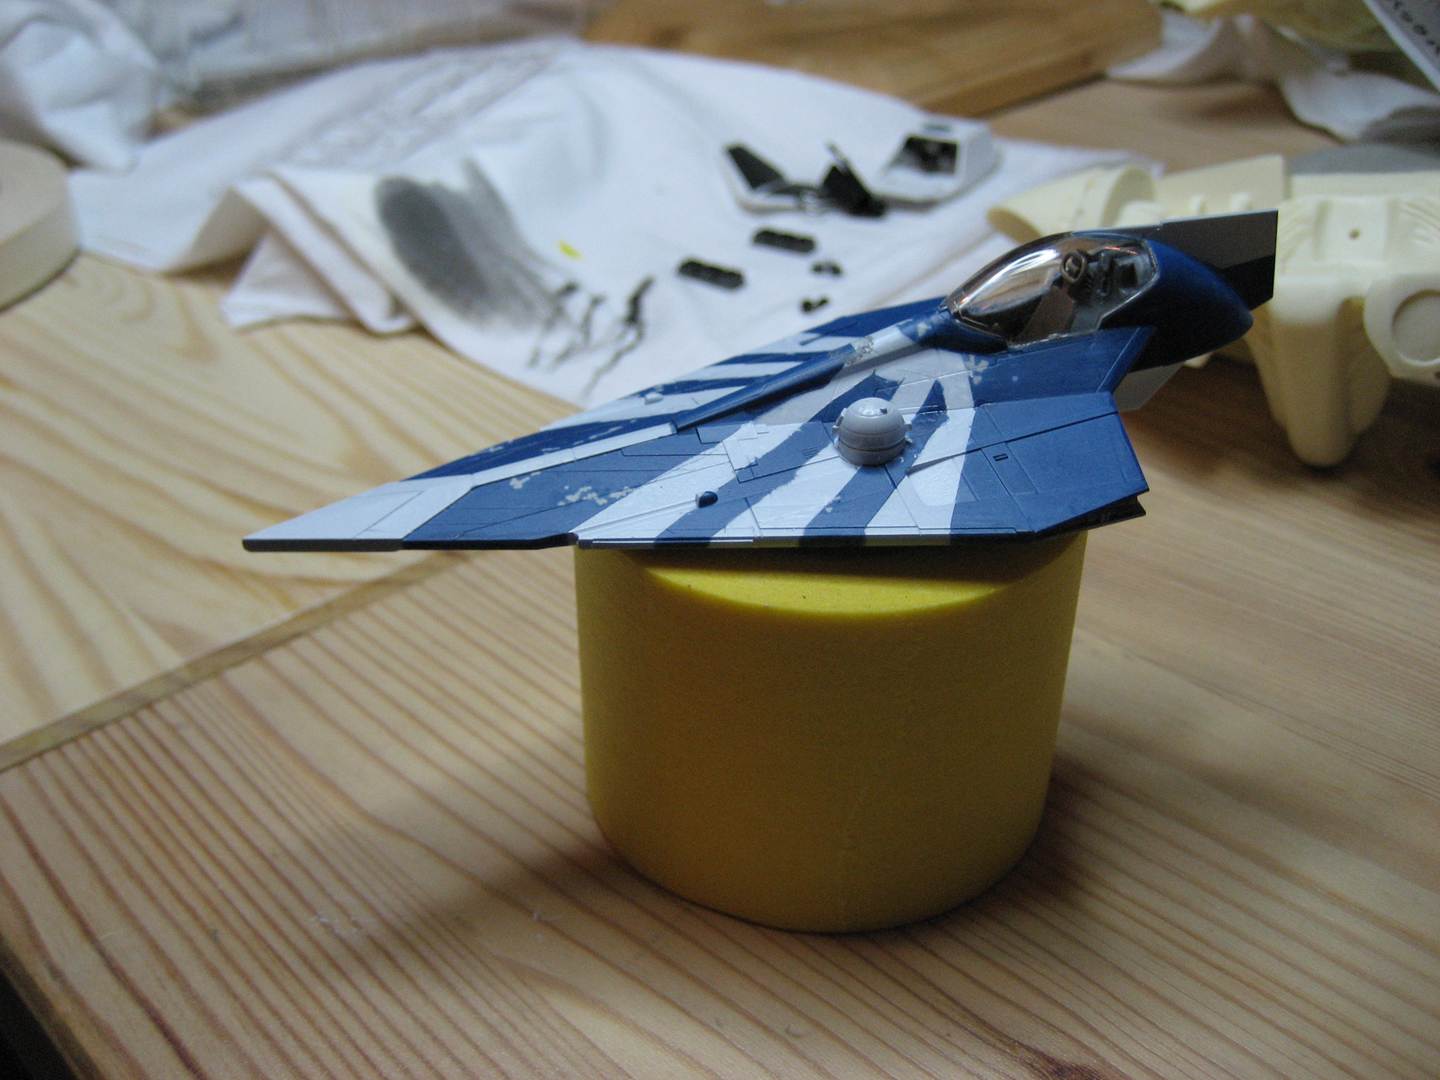
Not Macross, but I thought you guys might like it....It is the Fine Molds 1/72 scale Delta-7 Jedi Starfighter.....This color scheme is the one belonging to a Jedi named Ploo Koon, he gets shot down after order "66" is given, this is the ship he was flying. There were no decal options for this paint scheme so I had to mask it all, it was a quite the chore. Anyway enjoy the pics!
I also have a WIP of a Has VF1-S Bat that is almost done I will post pics of that soon.
Ashton
-
Pretty sure the set is only for the Valk itself. It doesn't have any fast pack bits.
Just bought two, and there are some panels for the fast packs
-
I find by lining up the top of the boosters body first, glue ( I use solvent ) then you find you can line the rest up quite well. The worst part is the raised panels on the top as they are fine and disappear when sanding, the metal etched parts I think have parts for this but I just rebuild them out of thin plastic card. The metal etched set has come back into stock at HLJ. Hope it helps.
Thanks for the tip...I actually just finsihed my order over at HLJ, I bought two!
Ashton
-
I heard there was a photo-etched detail set floating around somewhere of this(if anyone has one I would love to get my hands on it, even just to copy and make etched parts myself)
Anyway, the details on the fast packs is what I am looking for some advice on, particularly the nasty seam lines on the inside underneath the booster, and the raised panels on the top of the fast pack, I dont want to loose detail while I am sanding..
Also, filling the space around the booster, any one have any examples of what they have done?
Ashton
-
I heard something like this was available, anyone got one for sale, or a copy of the etching that I can take and make an etching of my self?
I am particularyly interested in the the fastpack details
Ashton
-
yeah I frequent that site quite a bit, and I have seen those images as well, not quite what I am looking for, I may end up drawing it myself in the end....
Ashton


Misa Hayase with VF-1 cockpit
in The Workshop!
Posted
Awsome work....just an observation on the face....Misa's face seems to be longer or taller than the sculpt you have depicted. The current face you have seems a little "chubby" to me. Perhaps if you lengthened it, it would look more accurate.....great work otherwise!!
Ashton