

rick.vale
-
Posts
81 -
Joined
-
Last visited
Content Type
Profiles
Forums
Events
Gallery
Everything posted by rick.vale
-
Sounds good. If we make it a weekend day, I'll have my buddy come with me. He's another Macross fan.
-
Yeah, I'm feeling like I can give this a go. I did an outdoor work outing last weekend and it was nice to see people. Let's try and make something happen.
-
@RHunterVF1SI PM'ed you an imgur link to a high-res scan of the Marquee. It's the only part of the arcade I've got.
-
Got my first shot. One to go!
-
Which Macross Character Do You Best Identify With?
rick.vale replied to sqidd's topic in Movies and TV Series
Kakizaki. He's the Baloo of Macross. Big, fun-loving, and laid back. Liked to give his buddies crap. That's me all the way. -
If you decide to go that route, let me know. I'll happily layout this work to fit your cab.
-
Never seen that Fabtek instruction art. At least they spelled "Shoot" correctly on that one!
-
Originally that was my goal! But I couldn't find this art in a high enough quality scan to allow for Photoshop work. My attempts at scaling up the imagery didn't pan out. Maybe after I master this process, I'll give that a go.
-
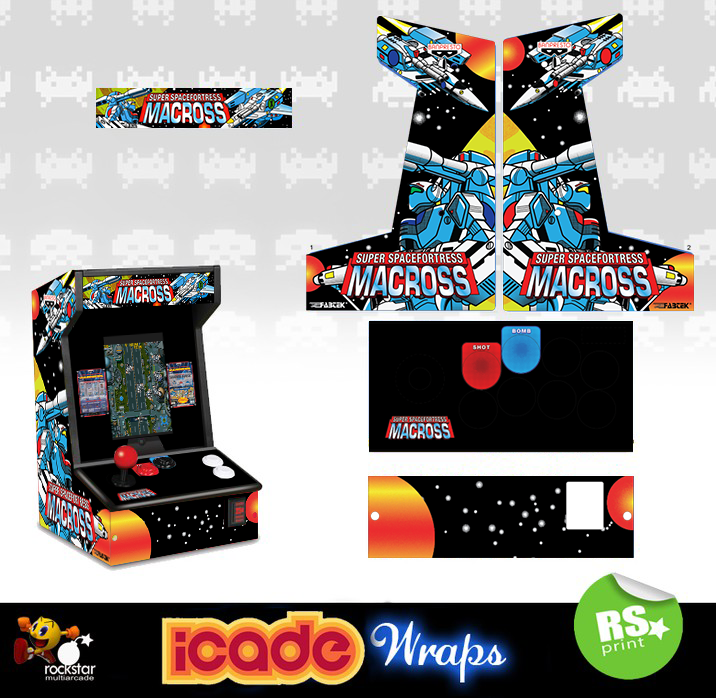
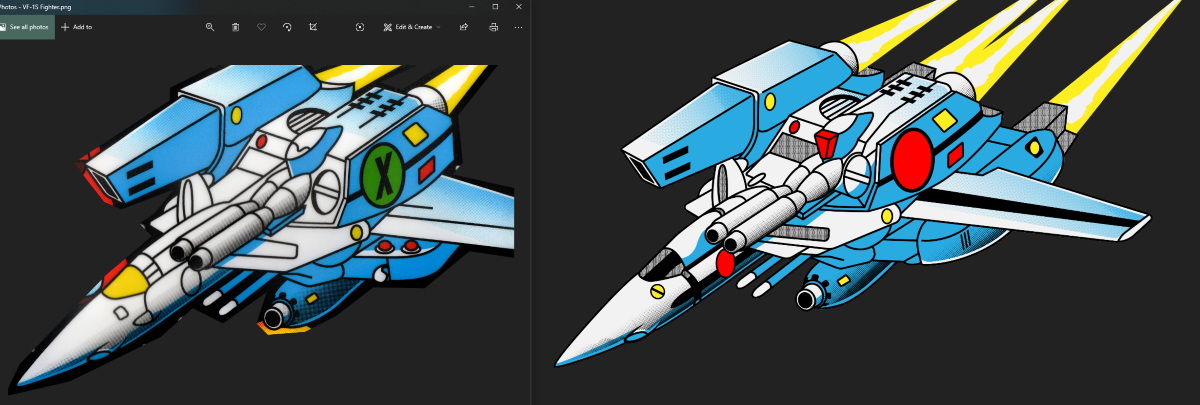
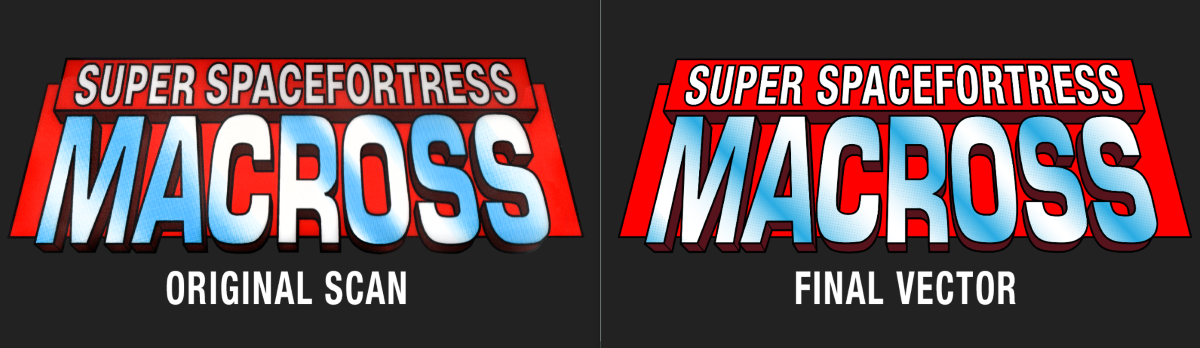
Hi fellow Miclones. I am currently working on a slow but steady project where I convert an iCade into a Super Spacefortress Macross cabinet. I figured that I would share my progress with the you all. As I understand it, Super Dimension Fortress Macross by Banpresto (imported as Super Spacefortress Macross by Fabtek for the states) never had a full stand alone cabinet and was a kit game. So I'll be doing a fair amount of custom design work here. Scope of the project : Convert an iCade into a working Super Spacefortress Macross arcade cabinet with artwork as cheaply as I can. Let it begin: I purchased a very nice second-hand iCade last month for $20 and swapped out the bluetooth controller with a zero-delay USB controller ($9 on Amazon). I also took that moment to remove all the excess buttons as I only need 4 for this game. (Shot, Bomb, Coin, 1P). I'm considering swapping the controls altogether, but for now these work fine. Thanks to the efforts of many others who’ve done iCade conversions, I found instructions on this process simple to understand and easy to replicate. To remove the unused buttons, I first used pliers to pull free the connections and removed the switches. There are two holes on the switches that pegs from the buttons can slot into. A gentle bend of the pegs and the switches free up. Now freed from obstruction, the buttons can be unscrewed and removed from the panel. I proceeded to remove the connections from all the buttons and swapped them for the connectors that came with the USB board. They were a little too small for the original buttons, so I used a flathead screwdriver to pry them open enough to force them onto the existing plugs. After everything was swapped out and the new USB board all plugged in, I had to get all this back into the control box. This required some creative positioning, but I got it to work. I also had to enlarge the hole where the power port was so I could fit my USB cable through it. So an X-acto blade and some careful patience got the job done. The iCade is perfectly proportioned for a vertical shooter like this game, but I don’t have the funds to get a raspberry pi, and a screen, and all the various parts for that sort of project. What I DO have is an old HP Note 8 Windows 10 tablet. So I’m using that as the backbone of the system. It is more than powerful enough to emulate the game. It isn’t as large as I would like to have in the cabinet, but it’ll be fine. I can always upgrade later. I need a USB OTG hub than can both charge the tablet as well as run the USB controller in the cabinet. My first 2 attempts have met with failure in that regard so the search continues. In the meantime, the tablet battery is good, so I can still play the game that way. With the MAME installed and the ROM in place, I wrote a simple .bat file to run the game at startup. This is the extent of my knowledge on that subject. The controller did its magic and the game run and plays well. Since I currently have the iCade completely disassembled, I decided that it was a good time to get the custom artwork completed and ordered for mounting. I recently purchased an original marquee for the game and scanned it in. This gave me a template for the design language as well as assets that I could redraw into Adobe Illustrator for optimal quality. I’m about to get into the weeds of graphic design (my career), so if you don’t care about that stuff, just skip ahead. I knew recreating the logo would be the most time consuming, so I started there. I took my hi-res scan and brought it into Illustrator. I then proceeded to redraw the entire logo. After redrawing the word “MACROSS” and all the background shapes, I didn’t want to deal with redrawing all the letters for “SUPER SPACEFORTRESS” individually. So knowing what I know about being a designer in the early 90’s I figured the probably used a simple block font that was around back then. So I tried the old standards. Lo and behold, turns out the font they used was Helvetica. So I was able to recreate the words and perspective warping in Photoshop then image trace those elements into Illustrator. This sped the work up 10 fold. With the logo recreated, I figured I’d tackle the Battroid next. I wanted to recreate the artwork as authentically as possible, so imperfections and all would be present. I just employed the same techniques that I used for the logo and kept on trucking through the process. My biggest challenge in all this redrawing was the halftones. Illustrator SUCKS at generating halftones. So I grabbed a few variations on Gettyimages.com and manipulated them to get them as close as I could to the original halftone screens the Fabtek team would have used. It isn’t a perfect dot-for-dot reproduction, but I don’t know that it ever could be. I’m very satisfied with the results. So much so that I whipped up some art and threw it on Redbubble for everyone to enjoy. If you’re into retro-game art, that is. Now comes another challenge. The fighter mode. This is where I threw out the rules. I wanted arcade accurate artwork, but whoever drew this clearly had no idea what a Valkyrie was supposed to look like. I mean, look at this thing. It’s horrible. I just HAD to fix it. So I made changes that would help it look more like an actual Valkyrie, but tried to constrain myself into also having it look like it was part of the same family as the Battroid and the logo. I think the end result is leaps and bounds better yet still time-period and style accurate. I went ahead and made that a redbubble product too. Vinyl wraps for the iCade: I found a vendor that does custom printing for iCade wraps. So I had them send me a template and I got to work. I would be making all the planets and stars from the original marquee art to use on the vinyl wrap. The crazy offset color printing methods of the 80’s and 90’s are not the easiest to replicate, so instead I did some pixelating effects in Illustrator to recreate the feel. The big Jupiter-like planet behind the Battroid has green mixed in with the yellow solid. I tried implementing it, but I didn’t like the result, so I decided against it. I used my creative discretion to fill in the areas of the planet that were obscured from view and ended up with a decent element for the side art…that I promptly covered with a giant Battloid. But that’s how these things go. Wanting to pay homage and respect to the developers and designers of the game, I made sure to recreate the company logos for Banpresto and Fabtek as they appear in the marketing materials for the game. I used the same methods and techniques as all my other Illustrator work. With the side art layout completed, I flipped the art and decided that for the opposite side I would color the Valkyrie’s to Max’s scheme since he is player 2 in the game. The bezel-mounted instruction labels in the original had some questionable translations on them. So the SHOT and BOMB buttons would be similarly named on my control panel. I won’t be recreating these bezel labels. There were some hi-res samples that I can use for stickers that I’ll be adhering to the plexiglass bezel I intend to make. I created my controller panel art to mark the two buttons required for play and to hopefully leave the other button spaces uncut from the vinyl. Then I’ll be mounting the art to a sheet of plexiglass and using it to cover the entire joystick panel. Thus covering up the holes left from my removed excess buttons. Anyway that is my progress and intentions for the project so far. The Goal: I'll be sure to post again when I've got substantial updates on my progress. Thank for coming along on my journey!
.png.ebe03259a8c379eb259992129998199f.png)
.png.f7f4e9ddf0c3c9d0b2ff026a4b76576e.png)
.png.6dcc40f6403e0c335a1e1cf2c340700a.png)
.jpg.761f9b4acf4b836e1fb444e06d06b3e5.jpg)
.png.c5082f04b491ddb540e8805a342737e5.png)
.png.77032eaebf8233799db28006dc0cefeb.png)

.png.8ec2ebc6cb54a5b3295318eaa005d292.png)
.png.60d7e294d66ce6b7207607cdad11248c.png)
.jpg.5d994090d28e34ffcfb8e080c05cb5a2.jpg)
.png.218a9275f6939bbf1ec89248b1237ec0.png)
.png.94330e9661568cb1165c166ffab8ce02.png)
.png.ce2fa18ff3a9cbd5aa9529fcba739421.png)
.png.bf0214e15be441bf801e7db18114f386.png)
.png.7598f4043aaf201e6ed18a57578279b3.png)
.png.bac1734e19b52cb59640cbe62ed243cf.png)
-
RIGHT!? I don't do social media, but I've got my wife inquiring about getting one of those. It's beautiful. This dude needs an online store.
-
Ain't that the truth! It's all bittersweet. Glad to have found this place. I've lurked in the past, but I think I'll make a home for myself amongst the sinners. Yack Deculture!
-
Nice DX collection! I ended up selling mine and downsizing to the Hi-Metal's. Shelf space was turning into a premium at my house. Loving that print too.
-
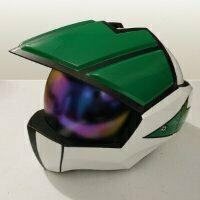
Nice mag. I haven't had the pleasure of reading it. Currently working on converting an iCade into a dedicated Macross mini-arcade. That's about the most exciting thing I've got going on. All this downtime has me designing the artwork for the vinyl wrap on the cab. I did just get my new bubble visor on my Focker helmet. I'm pretty happy with how the mounting turned out.
(1).jpg.c8888501816b0655820e9e68a02f97de.jpg)
-
Awesome! If we ever get out of this COVID-Nightmare, I'd love to attend whatever meet-up you come up with.
-
You guys are all speaking my language! Vegas Macross fan here too. Down in the Mountains Edge area. Sounds like we've got the same ol' story. Carl Macek made me a Macross fan too. Grew up with that until the early 90's when I could start bootlegging the good stuff. If you ever had to spend $35 on a VHS of a 22 minute episode of anime at the local Suncoast video, we are brother's in arms.
