

Hayao Kakizaki
-
Posts
242 -
Joined
-
Last visited
Content Type
Profiles
Forums
Events
Gallery
Everything posted by Hayao Kakizaki
-
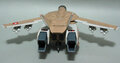
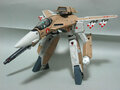
From the album: VF-1A Cannon Fodder by Hayao Kakizaki
-
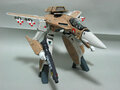
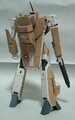
From the album: VF-1A Cannon Fodder by Hayao Kakizaki
-
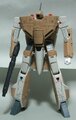
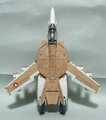
From the album: VF-1A Cannon Fodder by Hayao Kakizaki
-
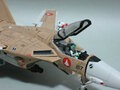
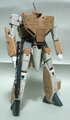
From the album: VF-1A Cannon Fodder by Hayao Kakizaki
-
From the album: VF-1A Cannon Fodder by Hayao Kakizaki
-
From the album: VF-1A Cannon Fodder by Hayao Kakizaki
-
From the album: VF-1A Cannon Fodder by Hayao Kakizaki
-
From the album: VF-1A Cannon Fodder by Hayao Kakizaki
-
FW FORM SOMEWHERE: http://farm4.static.flickr.com/3227/265602..._fdeb6e9b59.jpg IT'S YAMATO FANS CLUB EXCLUSIVE NEWS, SO, CANT SEE THIS PIC ON OFFICIAL WEB IF NOT A MEMBER.
-
Official 1/60 YF-21 News & Picture Thread (ver.2)
Hayao Kakizaki replied to Graham's topic in Hall Of The Super Topics
THE SCALE BETWEEN 1/60 YF-19 & YF-21 ARE WRONG.... NOW WE CAN SEE THE 19 LONGER THAN 21.... -
1/60 perfect transforming vf-1 from yamato?
Hayao Kakizaki replied to Shaggydog's topic in Hall Of The Super Topics
th "vf-2ss" just about bandai reissus the old plastic model. -
THIS IS TV SERIES LD BOX
-
SORRY for TALK ABOUT THE 1/60 VF-1 HERE.... SEE THE PIC OF THE NEW 1/60 VF-1, NOTE MUCH IMPROVEMENT IN THE SHAPE AND THE ARTICULATION OF THE ARM AND FOOT PARTS, 1. the shoulder become smaller, seems make it for better outlook in the fighter mode. and the Upper legs' shape make it like VF-0 style, and I see another pic for the fighter side shot, the upper leg have a bigger proportion then the 1/48, I think it was because the designer want to hide the arm in the fighter mode 2. DOUBLE JOINT'S ARM ,SEEMS CAN FOLD THE ARMS NEAR 90 DEGREE, LIKE MG GUNDAM MODEL. 3. the WHOLE lower legs' shape now much more like the animation design than the 1/48. 4. THE little fin on lower legs can fold , seems prepare for the INSTALLATION OF THE GBP-1S. this mean the foot armor parts 5. The missile pod case are same to the Movie's design sketch. can become smaller. 6. The BACK plate of the battroid now shape like the original design like the previous 1/60 OR HASEGAWA style.
-
no, if u look at it carefully, the second & third fighter shot in the commercial , u can clearly see the FP parts attach on the tail wing(2nd SHOT) and the gray Fp parts at the down side(3rd SHOT) even with the fp parts attach, the fighter still looks thin !! that's grea t!! yamato :lol:
-
don't worry, the pic. state that it's yamato 1/60 perfect transform SV-51 nora type, will release in autum this year~~
-
just go for it if you like, customize one for ur self only. for my own, it is ridiculous !
-
yes,I break a little bit the surrounding of the magnet (FP side), then take out the magnet and install it inverse. I don't think about the to take the legs aparts, because it gluded, may damage the parts . So I take the FP instead. and the out come is , the FP can only install on the problem VF-0.
-
ha ha ,maybe we can expect to pay for a brand new car that without a "openable" engine cover, than told myself " that's ok! I still can live with it, just in case I must open it , get a chain saw to cut it out ,problem solve! that's so easy!"
-
come on~~ u don' t interest in it not mean other must same as u, right? I just concern that why people keep asking something that have been told many times at the same thread~
-
actually, when I planning to do the gunpod fix, I have a number of ideas, 1. sand the peg made it become symmetric 2. drill the gunpod handle hold become bigger 3. increase the thickness of the gunpod handle I try 1. first but the result is no good, no effected. then try 2. have effected a little bit, the gunpod attach become lose, you can turn the gun angle straight by hand, but no stable. So I reallize that the peg maynot the main point of the fix, I took out the VF-1 and VF-0 to compare, I found that the thickness relationship between the gunpod handle and the attach area is the main reason. if there have no surplus space between them, the gunpod will come straight naturally.then follow this idea, that's work finally! and the good point of the "3" is no harm of the YF-19, no need to take out anything of it, and can do fine adjustment to get the best result.
-
PART 2 -- GUNPOD: about the gunpod, the problem is the handle is too thin, after attach on the arms, have a wide gap between them so made the gunpod not in the stright line. the target to fix it is to increase the thickness of the handle, so, many way and hit it , make it become thick enough is the main point! 1.because all I can found is just a old plastic ruler, so ... actually, u can use anything if u think that's work... 2.cut out a little like the pic show 3. use "AA" Glue is on the place that the pic show 4.the outlook is not good, anyway ,I don't care.... see the thickness 5. testing the result 6.OH! very OK!!
-
STEP BY STEP FIX YF-19 BUG: PART 1-- LANDING GEAR: 1. BEFORE MODIFY 2. use modelling hand drill drill out some space that the pic show 3. see ~ 4. FINISH!
-
later, my cam run out of battary, take it tomorrow~
-
ha ha, the "someone" is me... forgot can PM u to talk about the price.... maybe u edit out the price too. anyway, you better jealous the "someone" who can get it for free.
-
just hope what I found will useful for everyone