

modelglue
-
Posts
324 -
Joined
-
Last visited
Content Type
Profiles
Forums
Events
Gallery
Posts posted by modelglue
-
-
..may take a bit of creative license with it and paint it like an F-15 Strike Eagle dark grey kinda scheme.
I'm liking this idea and the one you pointed out in that dark blue metallic looking scheme. I'm also liking the 7th one in if you counted from top left to bottom right.
I'm still shaking my head over that deal you got, congratulations.

modelglue
-
Hey VA,
Did you by chance pay with your Visa or other credit card?
I know it may not be a favorable solution, but you could just charge your purchase back to HLJ if you don't get the service you require, and simply shop somewhere else for your gundam markers.
It seems to me that the seller/shipper should be taking care of all requisite forms, as you are paying for the shipment after all. Not to sound unfriendly, I really enjoy HLJ's service but it sounds like more trouble than it's worth to me to keep juggling responsibility.
modelglue
-
Great job on that GN-X. I wish I could achieve that silky smooth flatness. You use a Tamiya rattle can flat/matte but decanted?
modelglue
-
I've got a conversion set for the hasegawa YF-21/VF-22 to turn it into a battroid. I'm not sure who made it (I bought it on MW), but you need the hasegawa kit to build it. Do you need it for yours?
No Sir, this is a complete kit. I would still love to get my hands on the conversion set you are talking about.
modelglue
-
Noyhauser: Cool '18's! Gotta love Academy. Is that a newer version of the Hasegawa Hornet kit? I've got one older kit on standby with the triple color camo diamond back scheme aftermarket decals.
As I said in PM, please post some pics of the VF-22 Battroid.
Here ya go:
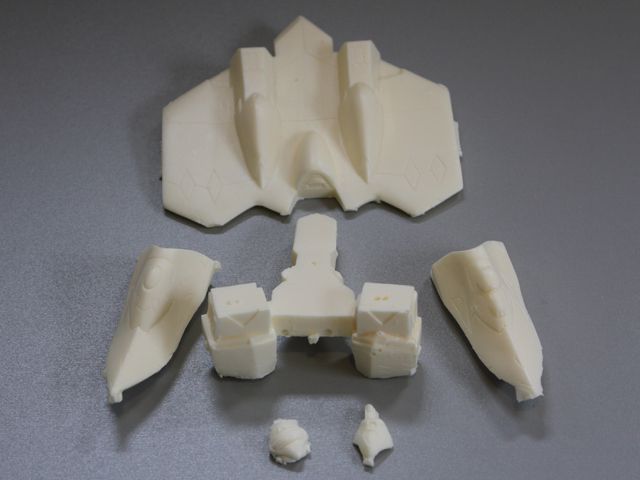
The casting is not what I am used to, call it naivete but I was expecting something different I guess. No offense intended to the artist/casting specialist intended.
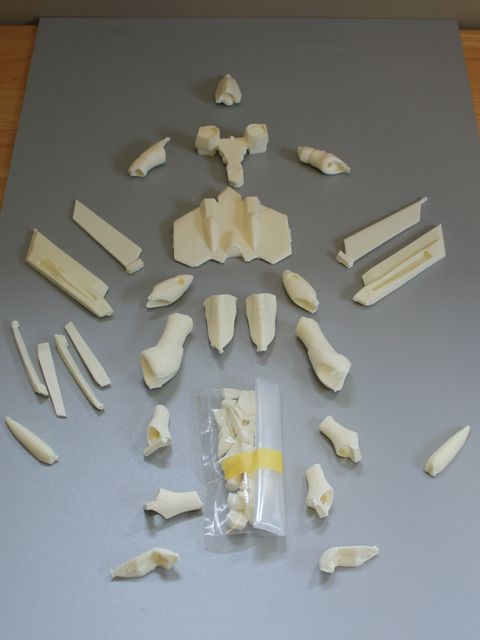
Here is most of the kit, I didn't unpack all of the little baggie. It comes with two heads, and two shins. I'm sure there is more to it than that but I haven't looked to hard yet.
I am going to spend a significant amount of time reworking most of this kit, and I will probably recast it for myself with improvements incorporated. I plan on doing it as the YF-21 in case you are wondering, and will wait until I have the Hasegawa kit on hand before I do any major re-scribing.
modelglue
-
Will do Jefuemon, and thanks for the advice regarding the vinyl.

I'll have to wait for a moment when I can set up the kitchen table for a photo shoot of the resin.
modelglue
-
Well Gents, I have to thank Jefuemon for directing me to Rinkya after asking him about sourcing japan only/hard to get model kits. I sat in awe drooling over the subject matter here, and was so frustrated by the North American eBay prices....
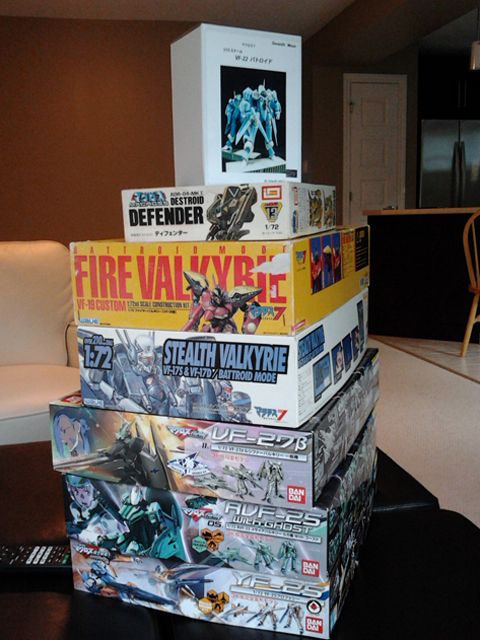
I know this isn't technically my work bench, but it's a bench of sorts. These will be gracing my work area soon enough and I hope to show you how I do along the way.
Don't ask what it cost to ship it or where I had to hide the evidence... (see my sig)
modelglue
-
That's a great blend of blues, I think you nailed it with the top left row of samples. That's my personal take on it, though light differences and your camera could be affecting what I am seeing. It's a scaled color, so you have a bit of leeway.
...needing to make the color your applying slightly different depending on what scale it's in, but I've never understood why.
The scale effect is used for painting smaller scale models. You would add grey or white into your paint color to tone it down to represent that aircraft at a distance. Other, more intense colors tend to make your model look like a toy as opposed to a representation of the real thing... only scaled down to 1/72.
It's not a rule per se, but it is generally recognized as a helpful technique for adding realism to your display case/shelf. I find it helps create more depth with varied panel shading, weathering, and panel line washing.
I hear you on the Tamiya lids, once they get crusty then you are going to have to get out the channel locks. I tend to use testors pipettes to dispense paint into my airbrush, and still inevitably get some on the threaded glass rim. Careful use of window cleaner and paper towel should help to clear that away. Here's hoping your blister subsides.

modelglue
-
...but the sky blue is pretty difficult to nail down.
Maybe this will help, pardon my advice if you already have thought through this option:
Citadel (Games Workshop) has a color in their previous range called 'Ice Blue' which has a new name now, so you'd have to consult a chart to find it's new moniker.
I think this color mixed with grey to dull it down would be a good compromise for your JSDF sky blue dilemma. After googling the plane I see exactly what you mean.
modelglue
-
One thing I don't understand. I don't build Gundam kits, so why do I have about 10 different shades of Gundam grays in my paint inventory??
...happens to the best of us... I've got a bunch of various paints that I found on racks and thought "oh, this would look cool on this hypothetical project!"
 And then never used them.
I've got a Bandai 1J battroid on the go which I want to do in a 'custom' CF scheme which will basically make it look like it belongs on team destroid. This would be a nice color to use.
I'll save the 'fancy' schemes for my eventual Hasegawa Battroids.
Nice work again.
-
Don't think that even I can mess this one up!
I'm glad you've found something that'll work.

This has been a pretty informative thread, with the links posted and a potential build/instructional to follow I can see this being a valuable resource in future times.
Putty and sanding stage on the Valk now, hate that step!!
I don't mind the sanding, I just hate the clean up (vacuuming) and prerequisite 'packing up' of my project. Even with a designated area for my hobby stuff I'm still find it it hard to spend more time on modeling and less on tidying. Good luck Jefuemon!
modelglue
-
I've got two 1/72 aircraft/space fighters on the go ATM, aside from my other meanderings.
My Captain Harlock Space Wolf fighter arrived last week. After drooling over the design since I first saw it a few years back I've pined for one in 1/72. I got my wish when Hasegawa released the new plastic injection kit. For anyone who doesn't have one, it is a bear to clean up but it fits like magic. I am planning a seperate rendition of this kit for my glass shelves, a cross-over version which eliminates some forms present on the craft and adds some details where redundancy occurs with the original design. Now, I haven't watched CH for more than 5 minutes so I don't know my way around a space wolf proper, so bear with me as I create a craft that might look like it belongs in the Macross theatre.
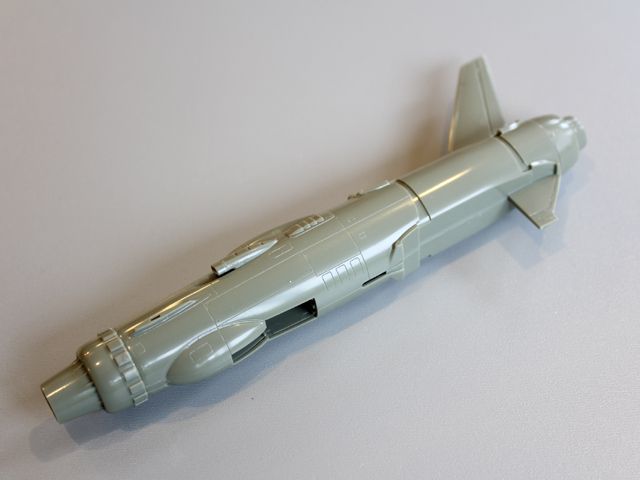
I've assembled the fuselage up to this point, I want to add a rotary cannon of large calibre in the nose intake. Other deviations include clipping all the long eliiptical/spear shapes from the ends of the wings and rudder/stabs.
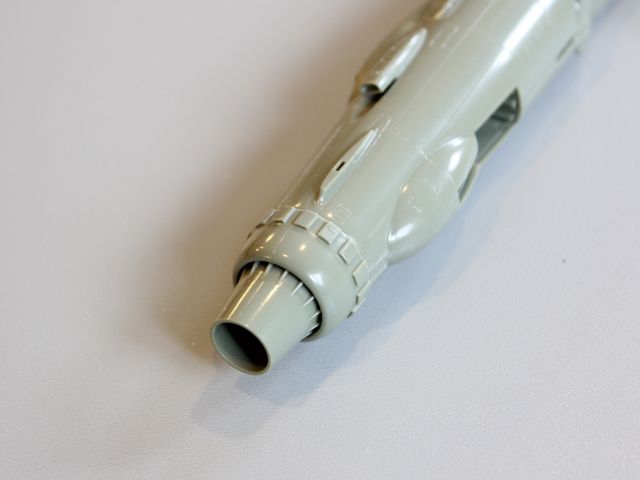
This is where that hefty gatling gun will go. I plan on sourcing some aluminum tubing to keep things neat and tidy. Some smaller gauge tubing will go into the wing gun apertures as well
Next I have this V-37 'Warlock' from Fantastic Plastic's starship design contest a few years back. I have actually painted this and stripped it down a number of times. I have just never been happy with a scheme. I've decided to do this sleek menace up in rebel colors and display it alongside future 1/72 star wars models.
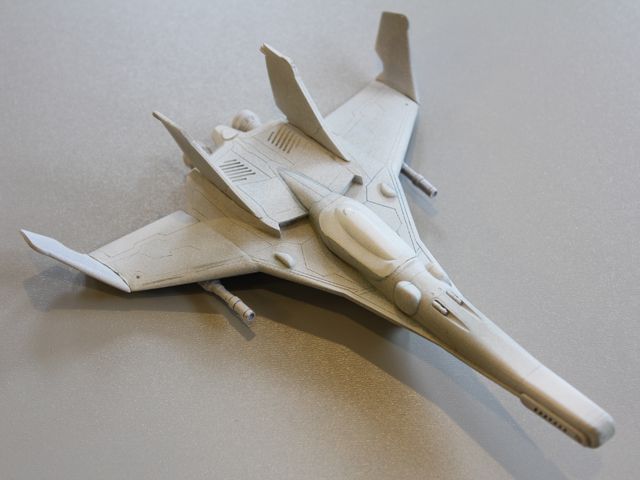
This design takes cues from WW2 fighters much like the space wolf above. Some of the concept art indicated luftwaffe influences and plan profile views sported mottle and rank chevrons like the FW's and BF's of 1942.
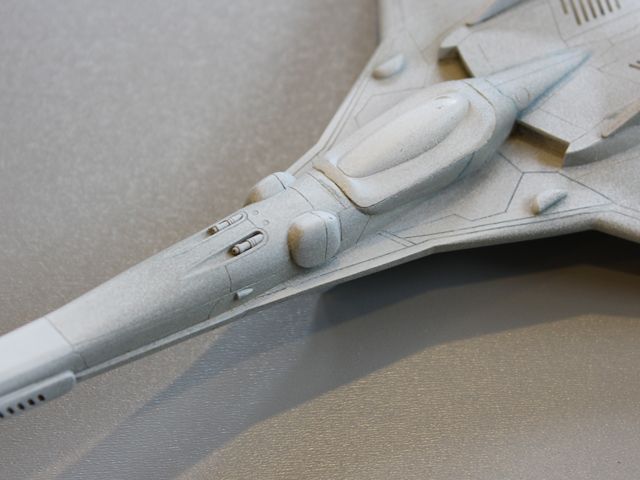
Gun blisters and great detail adorn the topside forward of the cockpit. This model has great detail all around, but good luck finding one...
I'll post up more in a separate thread, which I will link to here upon it's creation.
modelglue
-
Hi MW.
As previously mentioned, I received my other order from HLJ and set to work on the outdoor table with a cold near-beer. A few gulps, Xacto pierced fingers, and glues later I had these:
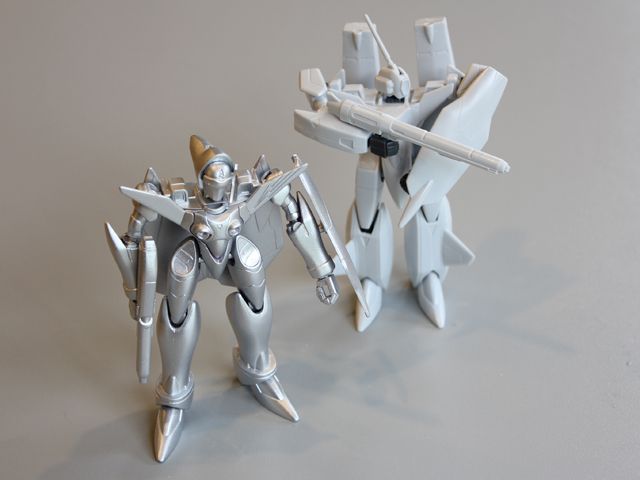
I took some liberties with the VF-11 MAXL due to the loud, vibrant, completely feminine scheme it had. I did however like the fact that it had the hooded style head similar to the YF-21 and so I decided I would do it in a similar scheme. I always start my model with silver, this krylon chrome is my stand in for primer. The VF-11 standing beside the MAXL will be done in a more realistic color pattern.
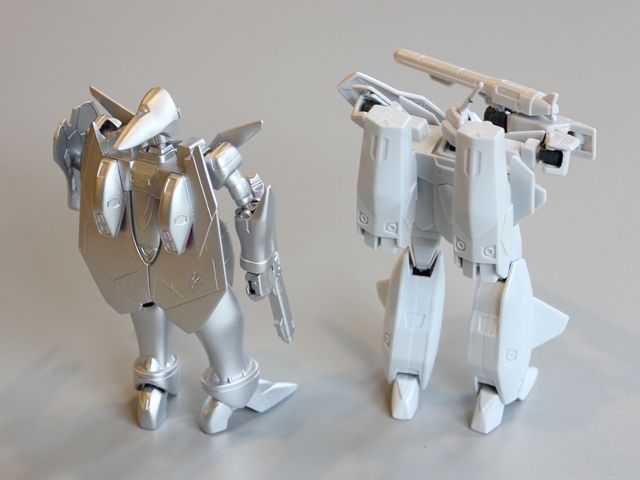
For 1/144 scale kits, these have a surprising amount of surface detail. Don't get me wrong, they are still very simple kits by my standards and are only meant for desktop items at work. I plan on acquiring 1/72 scale copies of these to put in my display case. I'm nearly there....
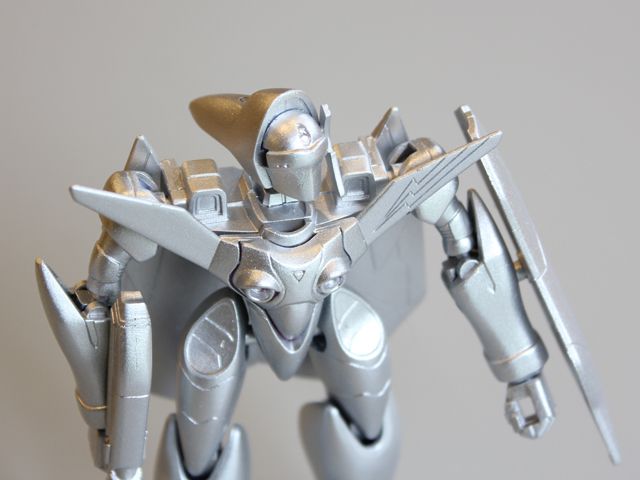
More liberties were taken with the MAXL face portion. If you happen to have read above where I chopped the VF-19 Kai face off, you will know I am not a fan of human-esque designs found on these mecha. I sanded down the facial region to a very 'cobra commander' like plate which will most likely see optical additions such as lenses. You can see the rectangular hole on the starboard side of the face... that is where the curved appurtenance goes which I lost to the lawn. In case you are wondering, I tried my best with the help of my wife for 30 minutes to locate the missing antenna/swoosh.
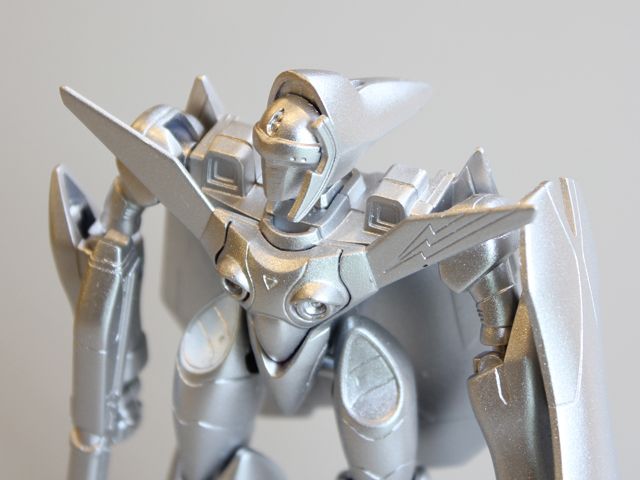
Worst case scenario, I scratch build another cheek guard out of styrene or do something completely different altogether. I have a nice blue set aside to cover this MAXL from head to... shin. I haven't touched the fighter mode version of these 2'n'1 models so that might be a healthy distraction while the paint dries.
I have not watched the series from which these models appear, but from what I have spoiled for myself by reading online I can guess that those concave items on the chest plate are speakers? I have watched Frontier and and currently into the twilight episodes of 'Macross - OS". What is up with all the music? Is that just Macross culture? Oh, and another thing... what does YACK DECULTURE mean?

Comments, critiques, and criticism is/are welcome and read with an open mind to change.
modelglue
-
about ten years ago I bought a Hasegawa Colored Clear VF-1J kit (this thing: http://www.hlj.com/product/hsg65752/Sci )
Firstly, WOW. I wish I had that kit. A lot.
To your question, I would use the following process myself, based on past modelling experience:
1. Coat the entire model in future floor polish of derivative (dependent on region). You may have to set up a 'bath' with a drying rack area for your parts and purchase more than one bottle of the acrylic floor polish. I soak all my clear pieces in future for a day and let them dry in a close compartment on either a non-reactive rack or wax paper. The benefit of doing this, is that you can re-soak your model to remove the future floor polish barrier if something goes wrong. I've done this with botched canopies and it is a stress saver.
2. I would use extra thin types of cement sparingly, and i would recommend using the Revell canopy glue that Noyhauser suggested. I do not have any practical experience with it, but it does seem to be well regarded in other modelling communities. You may want to test it out on regular styrene scraps or even parts of the clear sprue to see how durable it is under duress and handling. I haven't built my Hase' VF-1 yet so I don't know it there will be a lot of frustration in your process but considering the brand you shouldn't really have any major issues. Forgive me if you already have a few models under your belt and don't need this guidance, I figure it is worth posting however for posterity and other viewers as well.
3. I would coat your model again in major sub-assemblies with the floor polish, and have a compartment where you can keep dust etc away from it while it dries. Wear gloves when you handle it, as I have found that the heat from my fingers can leave finger print smudges in nearly cured floor polish.
4. You may be able to use a plastic polish to re-shine your model after final assembly in key areas like the canopy and wings etc. Test on scrap sprue beforehand to make sure that it isn't too hot.
5. Take lots of photos for us so we can see how you made out and secretly wish we had that kit....
modelglue
-
um why are you reviving a six years dead thread? serious thread necromancy there
I thought zombies were 'in' these days?
But in all seriousness, my apologies for not looking into that before replying.
modelglue
-
That's very cool. It looks like you have a lot of patience with the material you chose to use, I hope you finish it without any catastrophe.
modelglue
-
Thanks Benson.
I received the other two I ordered from HLJ and put together the VF-11C in Battroid mode, but haven't touched the MAXL version yet... not sure what to do with that one. It's curvy.
I'll snap some pics once I get her completed and do some sanding.
modelglue
-
There are 3 Yamato versions of the YF-21
1/72, mostly diecast, difficult transformation, chunky.
1/60, plastic, better transformationvery, sleek.
GNU, non-scale, rougly around 1/100, battroid only
the link you provide is the 1/72 yamato
more info here:
Excellent! Thank you. looks like i'll have my work cut out for me if I want to update this to sit next to my 1/72 Hase' stuff.
-
Hello MW!
I wanted to share my builds with some like minded individuals, so here are two that I started a little while back which I plan on further detailing and cleaning up. It was tough photographing the VF-17 Nightmare due to the fact that it is a VERY dark blue model. The pics may look a little washed but that is so I could capture the contours of said kits.
Here we have the built VF-17, I used thin plastic glue (ambroid proweld) which ran into the seams and helped with the gaps. I'll have to do some sanding etc to eliminate them before primer goes on. The kits, as some may already know, do not require glue, but I want to finish these nicely for my desk at work and I won't have any seams showing.
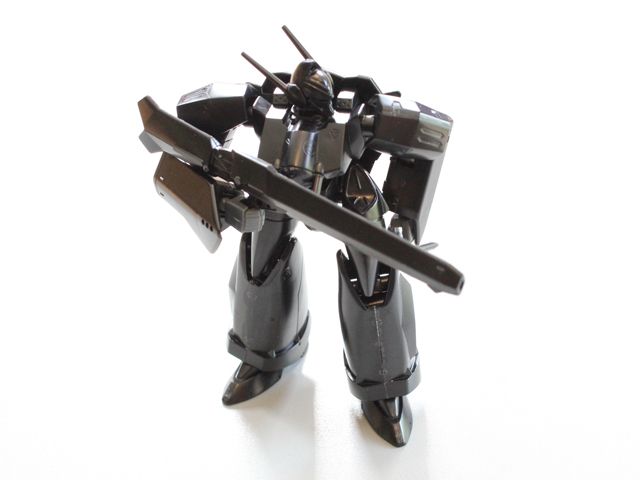
The backside, which isn't all that interesting. The kit comes with polycaps for those interested, which will allow me to remove components and replace them once it's all painted and sealed. I plan to do a lighter variation on the midnight blue color the nightmare typically sports, with a bit of a metallic undertone/additive.

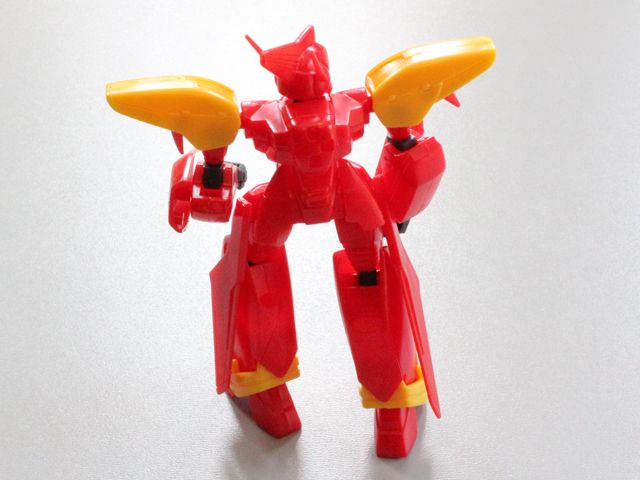
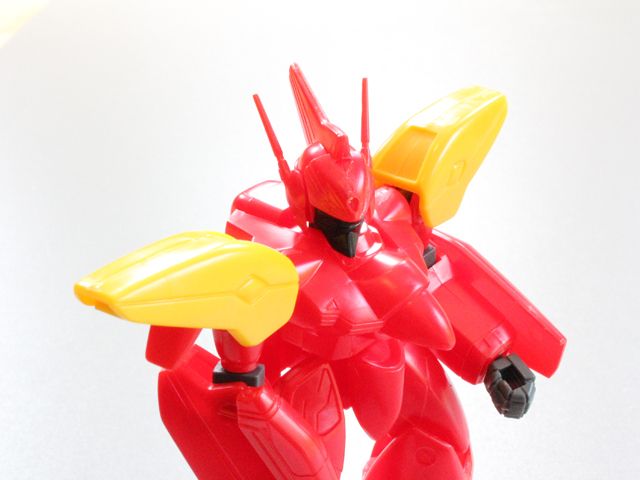
Onto the Fire Valkyrie. I'm not a huge fan of the sonic fighter aspect of this model, and the color scheme is excessively loud. I plan on toning down the red to a dull/dark variation with some brighter reds in place of the yellows. I didn't like the face that came with this kit at all, it was a little too rockstar/samurai grimace for me. More on that to come.
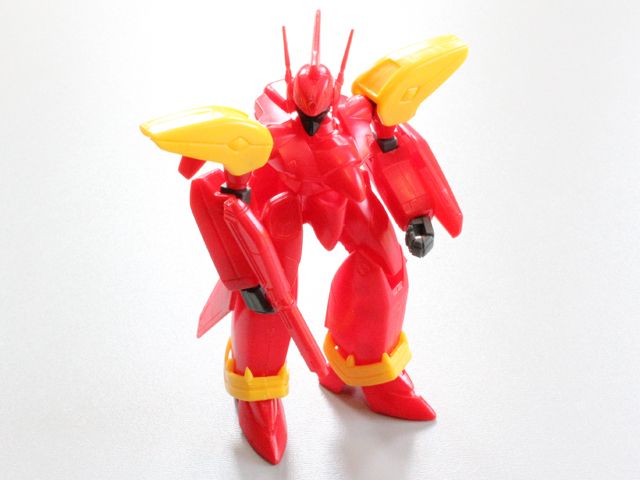
The rear side of the Fire Valkyrie has some cool details that will look nice with a panel line wash once it is painted. I'm not overly impressed with the details present, but I understand that at about $10 a kit you can't ask for much. I bought these accidentally from a seller on eBay who had them listed as 1/72 (my normal collect/build scale) and in the pics you couldn't really make out that they were in fact 1/144.
Going back to the face bit, I used the lower portion of the spare head from the Nightmare kit (came with two, the one mounted and the other, which had a bizarre domed forehead that I just couldn't deal with). I simply cut it away with a razor saw and glued it in place where the snarly rockstar face would go. Sorry for all those out there who deem this BLASPHEMY.
That's all for now, I'll be filling and sanding next week.
modelglue
-
Hello all, I have a question regarding the Yamato YF-21. I am seeing a few examples of what appears to be the same figure listed as 1/60 and 1/72. Is this a non-scale item that sellers are just trying to ballpark? I see no english indication of a scale in any of the examples:
I am looking for 1/72 kits of all the battroids I can get, if anyone has any advice/guidance it would be appreciated if you shared!
Thanks!
modelglue
-
Nice clean finish, I've got a battroid waiting for attention. What color did you use for the tan?
modelglue
-
...What are the downsides of using Super Glue?
Besides those points already mentioned, superglue will fog your canopies and other clear parts, and can sometimes fog plastic and painted parts. I have used Proweld, Tamiya liquid cement (in the clear jar with the brush), and gel superglue with success. I think you are best off with a thin glue like Tenax or proweld, which have 'welding properties' and can diminish seams like jardaan mentioned.
I would stay away from the .99 superglue, this is great for that one time you want to glue the teapot handle back on, but it is hardly economical or handy for building models.
modelglue
-
Hello from South Western Ontario,
modelglue checking in to share in the Macross knowledge and model goodness.
I am an avid modeler, sticking mainly to 1/72 kits but also venturing into 1/144 for Macross and Gundam reasons. I have a pretty decent collection of 1/72 WW2 through modern airplane kits stashed away (200+) and I have recently become the proud owner of some 1/144 Bandai Macross 2'n1 kits. I plan on adding detail to these kits and maybe even scratch building them at 200% for a 1/72 model to share display space with my VF-1.
See you all around!


Whats Lying on your Workbench MK IV
in The Workshop!
Posted
Go get it out of the trash and put it in a shoe box for a time when you have more patience.
I put things away all the time when it's just not going right. I think I have about one model out of every ten that goes smoothly... but there is always something however minor that just doesn't work. Its that 'life is a balance' thing people keep talking about...I think.
But seriously, try it again another day. Might have just been humid.
modelglue