nickster
-
Posts
56 -
Joined
-
Last visited
Content Type
Profiles
Forums
Events
Gallery
Everything posted by nickster
-
Hello Maverick, Great build! Sayang, that you have to trash your DYRL sdf-1. Sana, you can build two versions in the future. Anyway, If I have joined MW Forums earlier, we might have a chance to meet last year or early this year when were still working there, doing DVI work. Hope you find more inspiration to finish your work and MABUHAY! Nick
-
Hello David, you may want to try Gunze Sangyo Spray. Their flat black is not dead flat, but it may have the sheen you want. If you want a fine spray from any canned paints without ruining it, try to spray the model about 8inches away from the can and in faster motion. It will be like misting the model with paint. Press the nozzle before the paint touches the model and move you hand over the model but make sure you depress the nozzle after the paint spray is out of the model. You can go to tamiya site for the video, its in their tips and tricks corner. Hope this helps. Nick
-

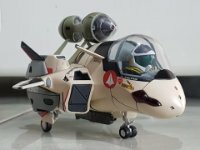
1/72 Hasegawa SV-51 Gamma w/ twin boosters (DD Ivanov type)
nickster replied to nickster's topic in The Workshop!
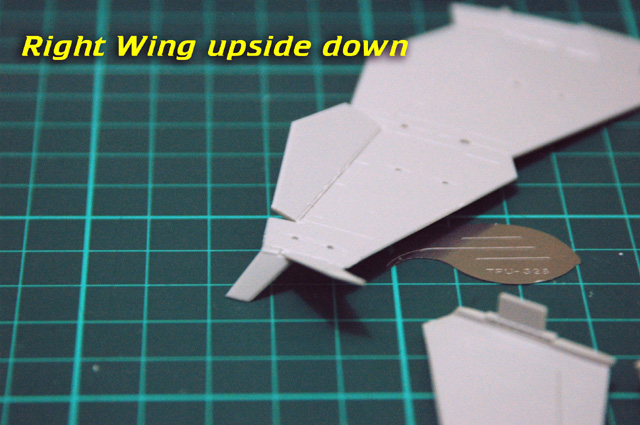
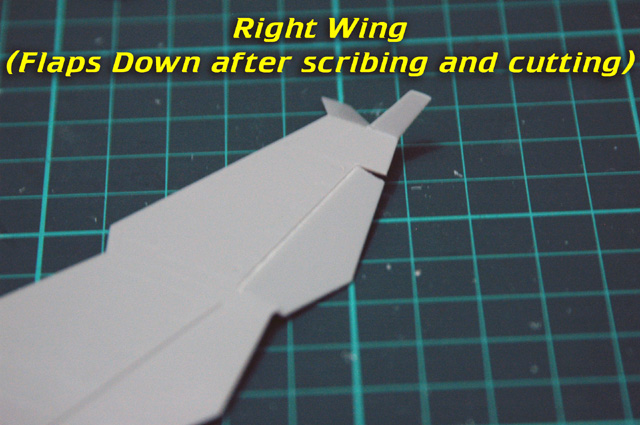
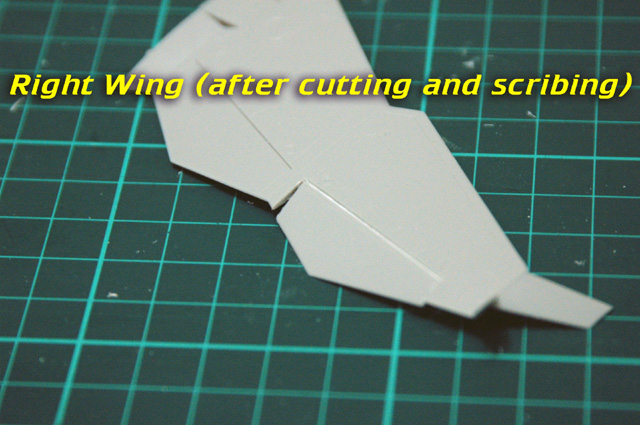
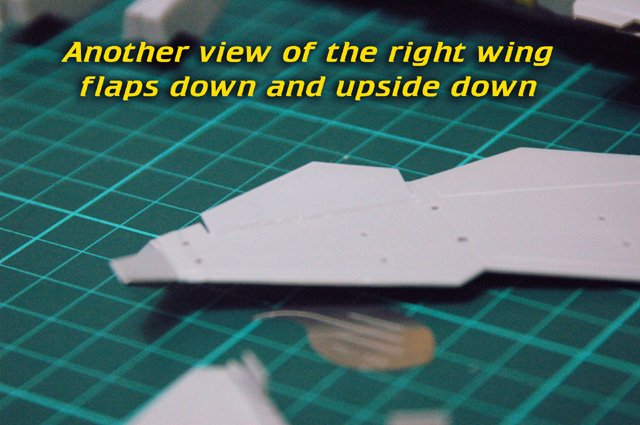
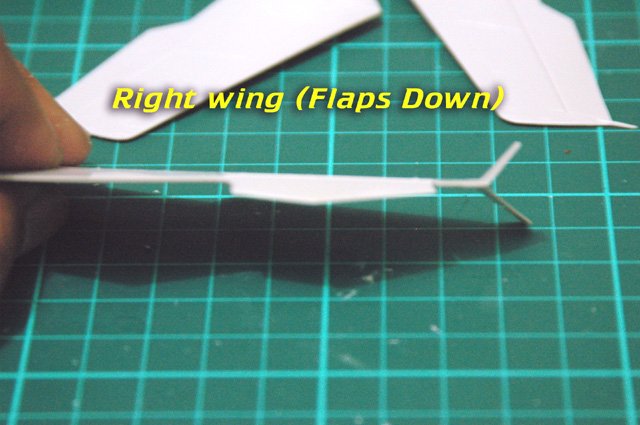
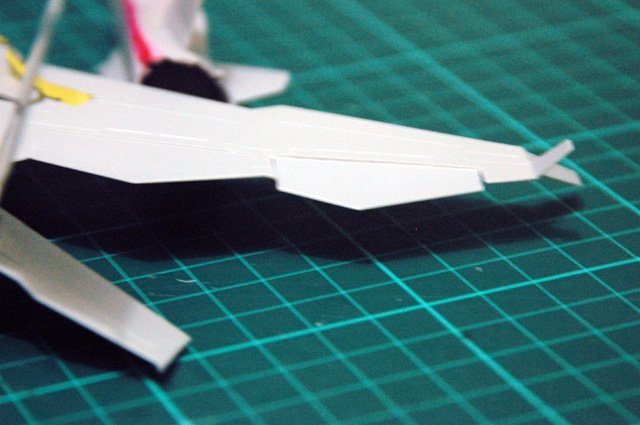
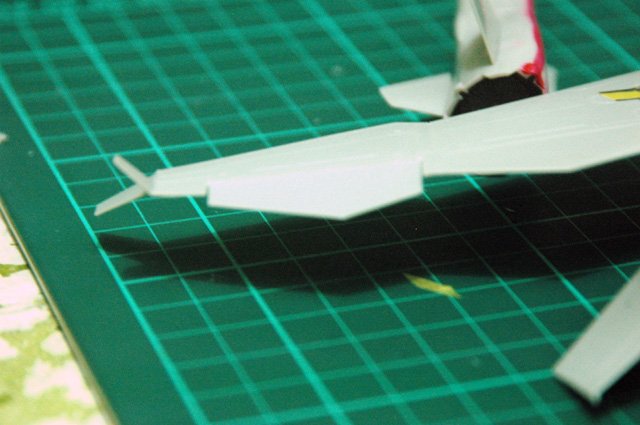
Thanks for the advice Will, no offense taken. I just followed the 1/32 Tamiya f-15 where the outer most moving surfaces are down. Thats the reason why I cut the ailerons of the SV-51. Your info educates me. Its just now that I have learned much regarding aircraft wings. On the next progress, I will be cutting the flaps and bend it with the same angle with the ailerons. Here's some pics of the f-15E (my early reference) and a picture of SV-51 (the new reference) with flaps and ailerons on the same angle. Old F-15 reference: New SV-51 reference: Thanks again and see you next update. Nick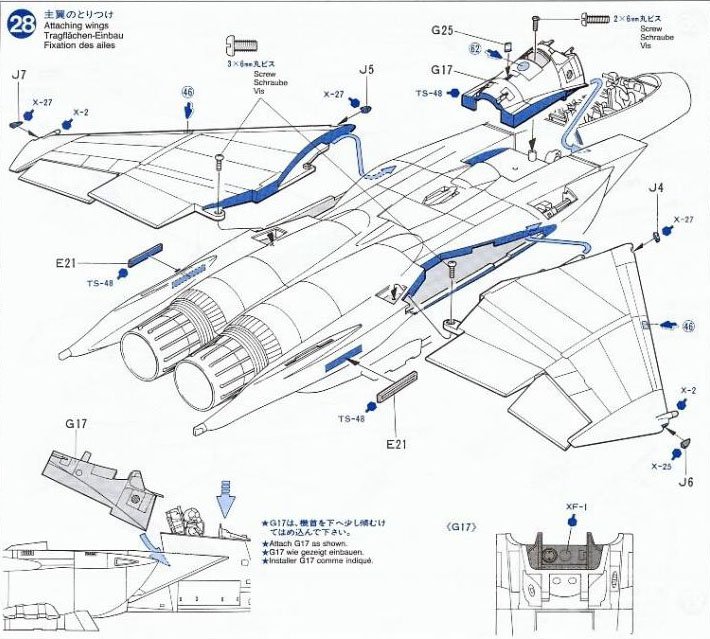
-
1/72 Hasegawa SV-51 Gamma w/ twin boosters (DD Ivanov type)
nickster replied to nickster's topic in The Workshop!
No wayyyyy!!!!!! Bud, dont marry someone who knows the hobby. Trust me on that. You'll never get kits for your birthday or anniversary. She'll keep it for herself. Nick -
1/72 Hasegawa SV-51 Gamma w/ twin boosters (DD Ivanov type)
nickster replied to nickster's topic in The Workshop!
big F, mickeyG, Modeling keeps us at home, thats why our wives loves it. Did you know that all my birthday gifts from her are models? Its just one way of showing her love and to keep me home. But friday night is guys night. Its beer and story telling time. Hahahaha Happy modeling guys! Nick -
1/72 Hasegawa SV-51 Gamma w/ twin boosters (DD Ivanov type)
nickster replied to nickster's topic in The Workshop!
Hello MT, thanks. I havent touched or seen a 1/200 model before but it think scribing it will make the model not realistic since it is smaller in scale. Thanks for the early advice on smaller scales, since some of macross kits are in that scale. Hope to see you again, bud. Happy modeling! Nick -
1/72 Hasegawa SV-51 Gamma w/ twin boosters (DD Ivanov type)
nickster replied to nickster's topic in The Workshop!
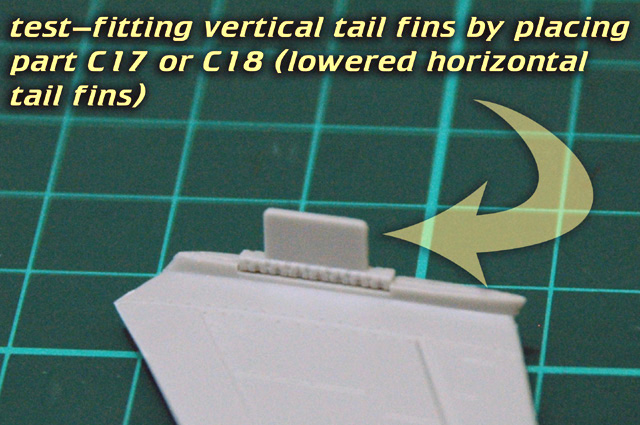
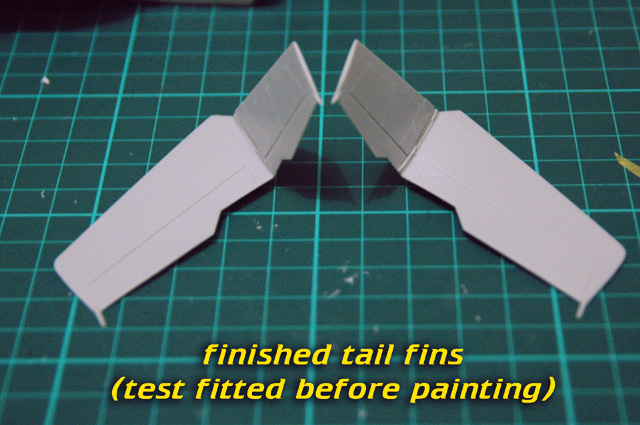
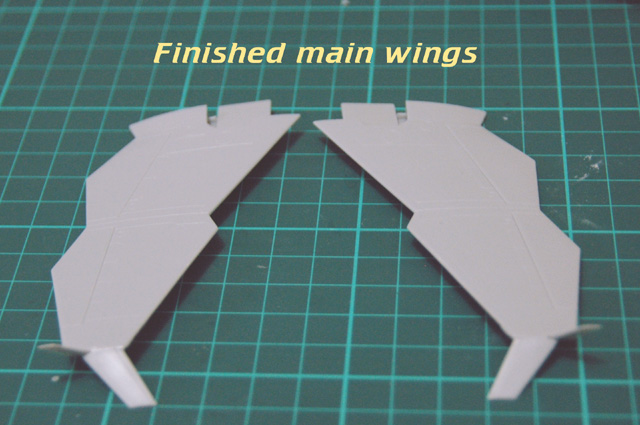
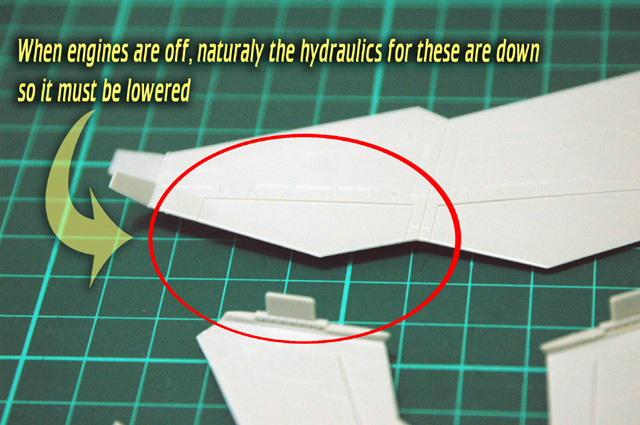
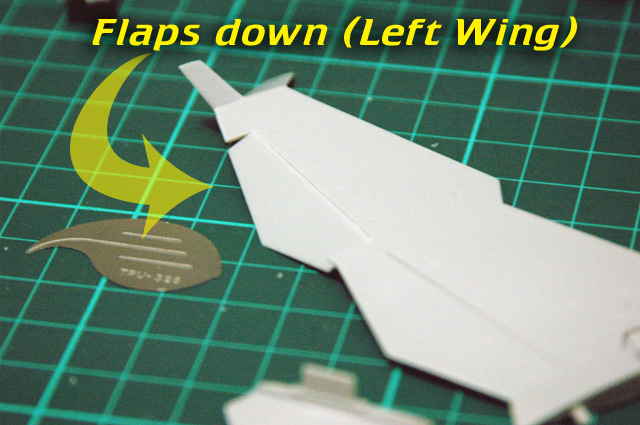
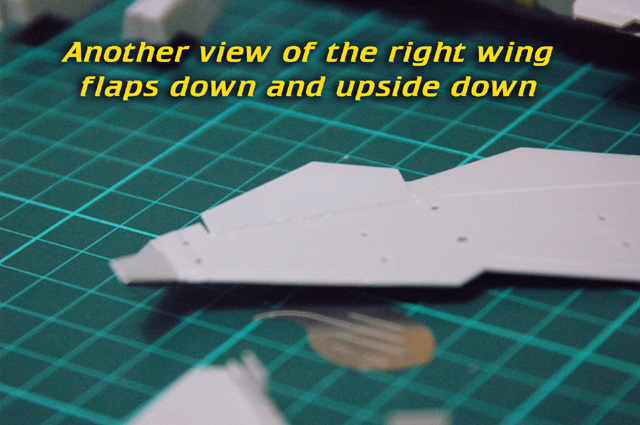
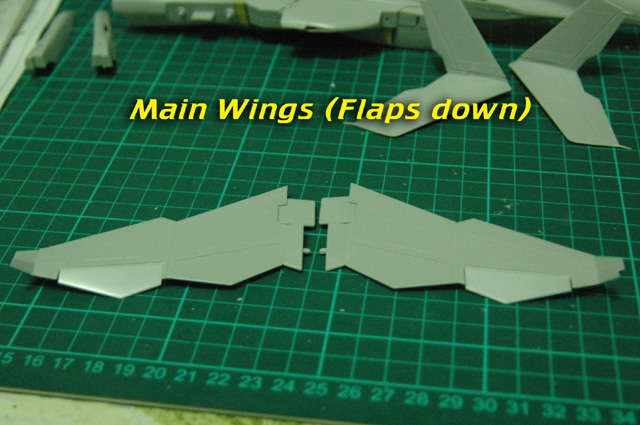
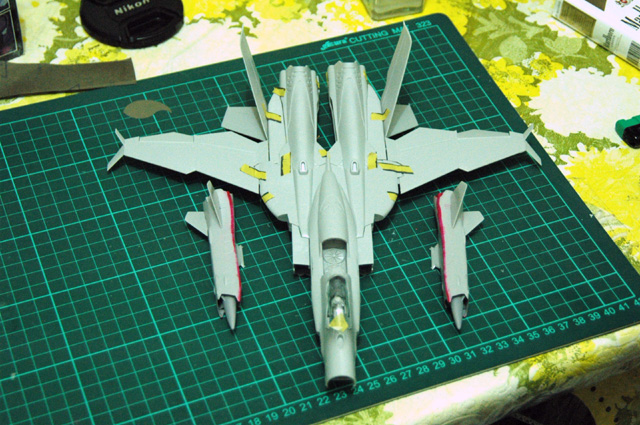
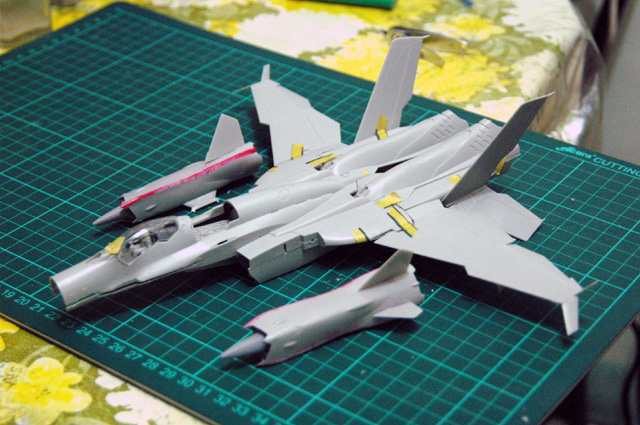
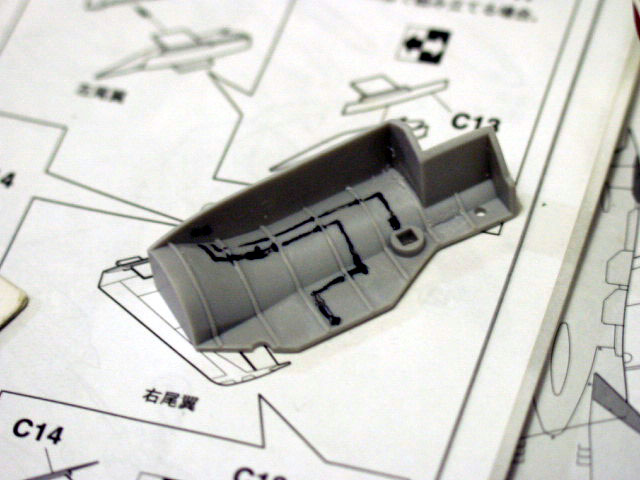
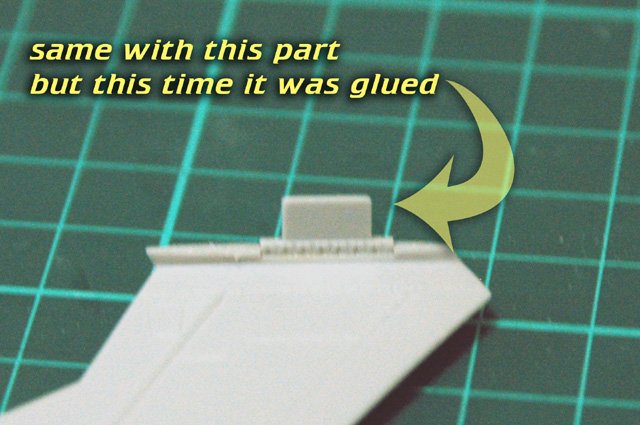
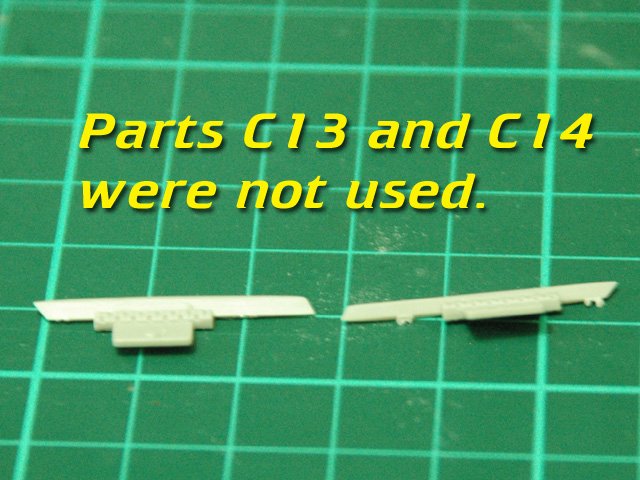
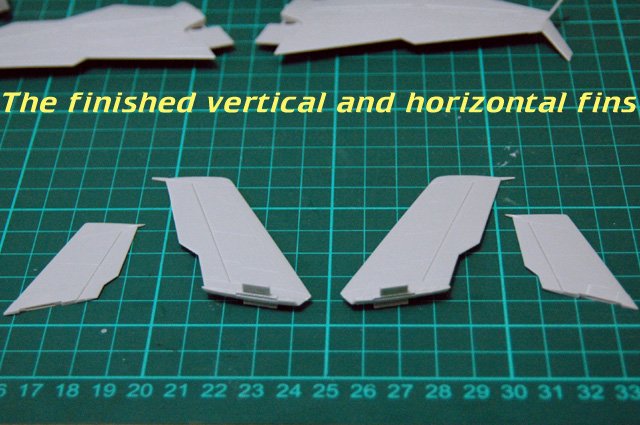
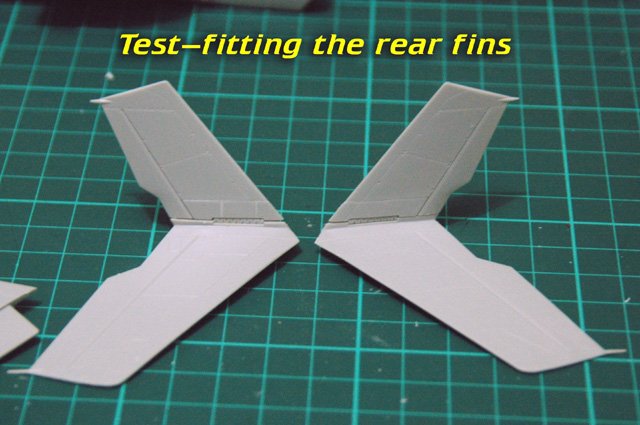
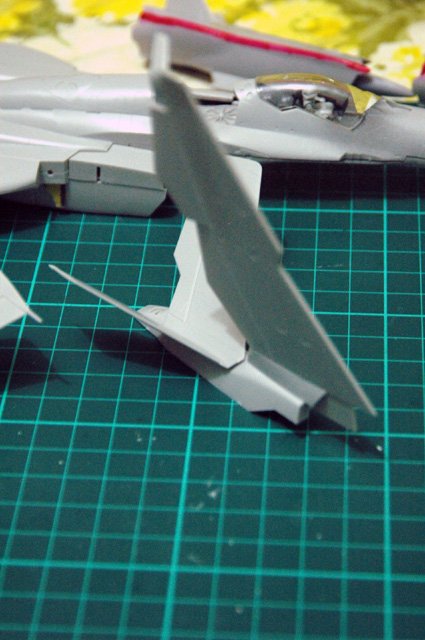
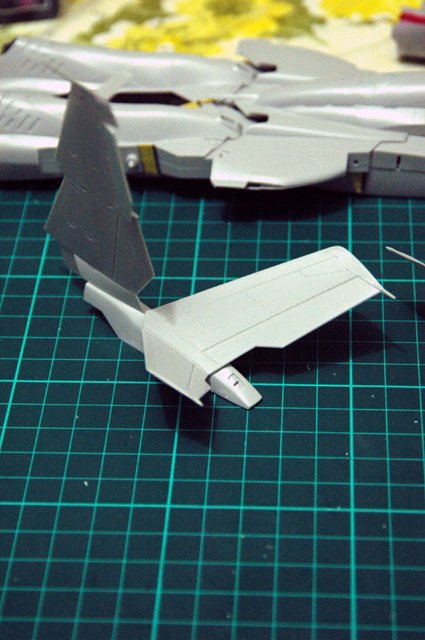
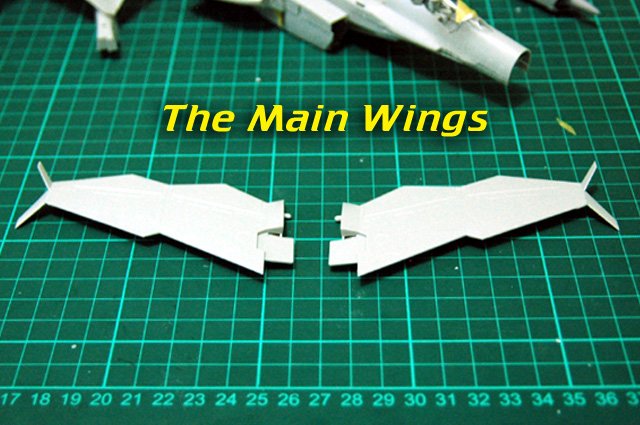
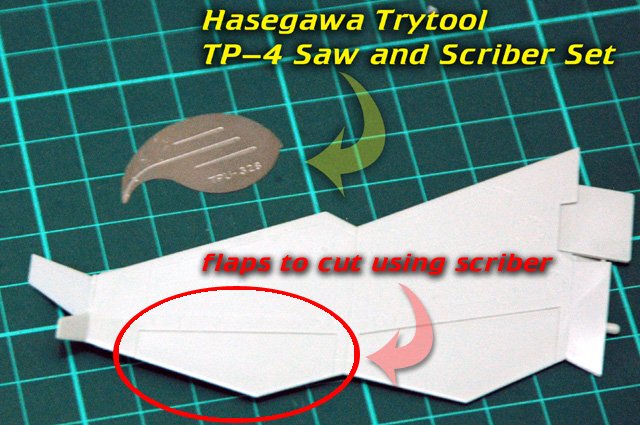
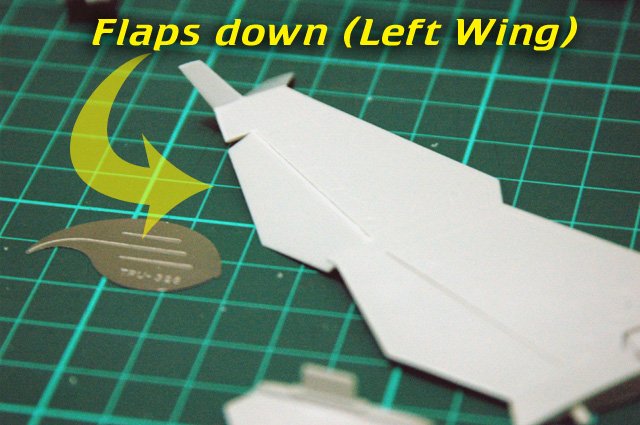
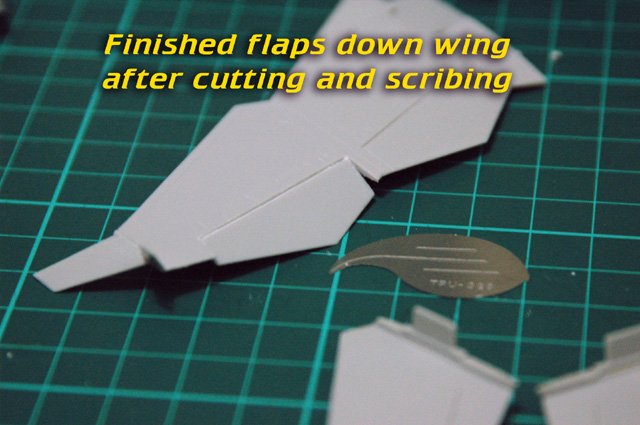
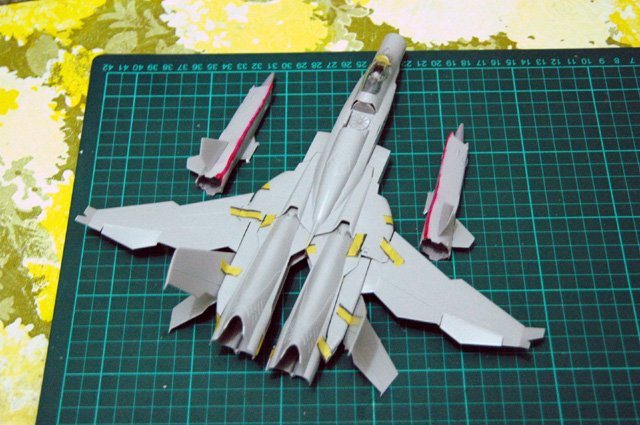
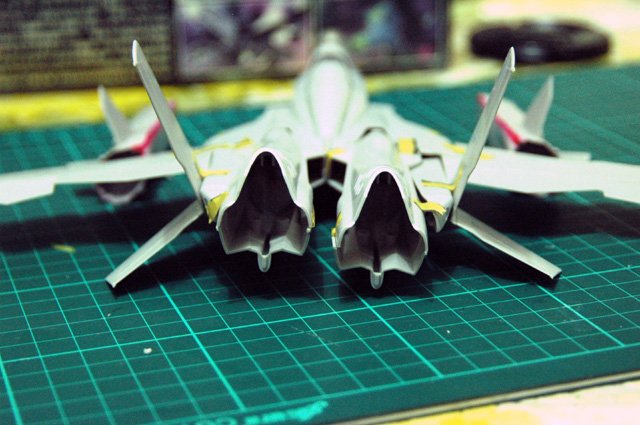
Last weekend, nothng happened to the kit. Got out of town for two days with my friends. But monday night, I happen to open the box again and continue working on this project. Here's what i've done so far. I have finished the tail fins assembly by test fitting them. There is an option to fix the horizontal tail fin in either raised or lowered. You need to use part C13 and C14 for raise vertical fin and C17 and 18. Decided to go for the lowered fins so i used parts C17 and 18. test fitted them before gluing to identify troublesome parts. Lastly, the main wings have been assembled. But after the assembly, I have this need to make the flaps lowered. So I pulled up hasegawa's scribing tool and saw set for this purpose. started by cutting the edge and scribed the edges on the middle of the wing. Scribed deep enough to bend the flaps to make it lowered. Simulated the whole plane by using masking tapes so i can identify what modlues that I can paint independently before final assembly. Next stop. Painting season... I think I have to start with the insides of the canopy then the metallics. See yah! Nick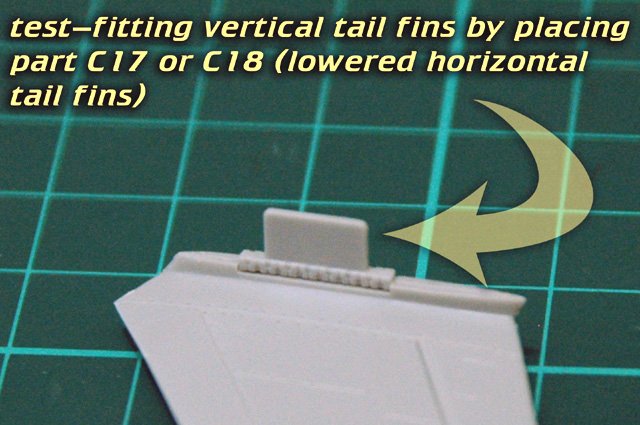


-
1/72 Hasegawa SV-51 Gamma w/ twin boosters (DD Ivanov type)
nickster replied to nickster's topic in The Workshop!
Hi there Schiz, Got your point. When I was your age, how do i put this, its not being lazy at all. I call it divided attention. When Im at home I think about gundams, macross and other modeling stuff. But when im out, Im busy with my friends talking about girls and checking them out. Since I cant check out girls fulltime, now that im almost 37. (what am I saying? hope my wife doesnt visit this forum ) Its mostly modeling stuff both at work and home. Thats why my office is filled with unbuilt kits so I can hide it from my wife and wouldnt ask me questions. Thanks for the compliments bud. Anyway, updates are coming. Regards, Nick -
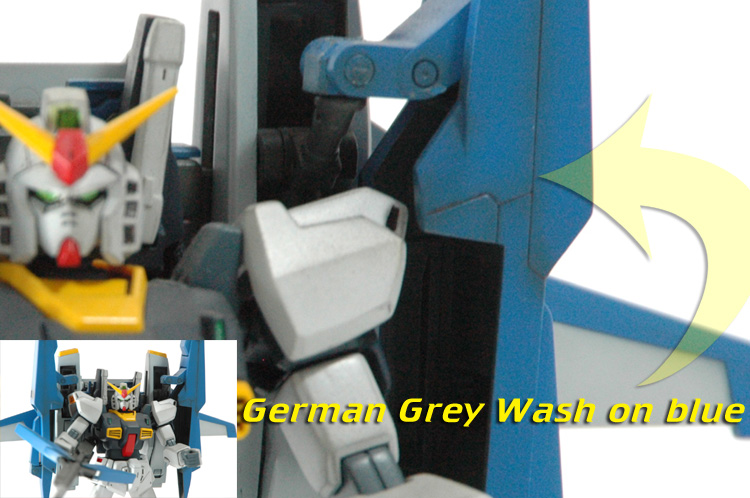
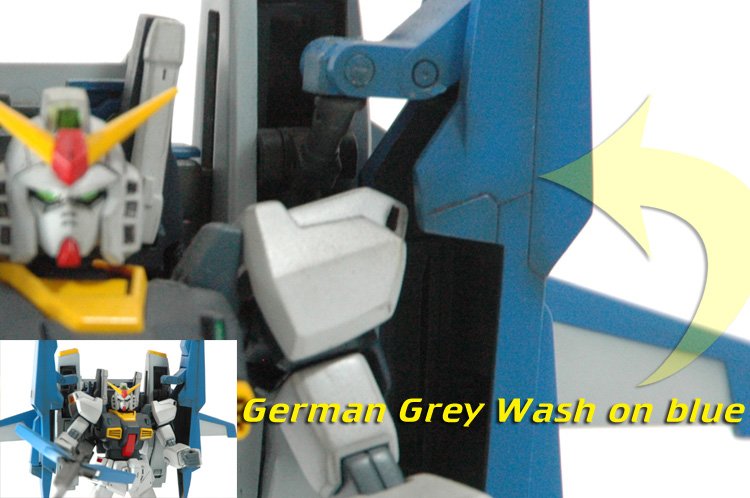
Hi mickyG! nice work on the vf-25G. I would suggest a darker grey wash on the blue. German Grey perhaps is the best color for that type of blue. Heres a pic of my old super gundam with german grey wash. Just my teo cents. Nick
-
1/72 Hasegawa SV-51 Gamma w/ twin boosters (DD Ivanov type)
nickster replied to nickster's topic in The Workshop!
big F, nice to see you again. Forgive me for guessing, but i think you work either on a telco or communications company I got mine from my friends here in the office that works in our electronics and communication division. see you again, bud. Nick -
1/72 Hasegawa SV-51 Gamma w/ twin boosters (DD Ivanov type)
nickster replied to nickster's topic in The Workshop!
Hi there MickyG, Thanks for liking what i'm im doing so far. And yeah, I really have so much fun building because modeling to me is some sort of meditation and relaxation, plus the smell of cement and thinners added to that. More to come and see you again, bud. nick -
1/72 Hasegawa SV-51 Gamma w/ twin boosters (DD Ivanov type)
nickster replied to nickster's topic in The Workshop!
Hello Schiz, Detailing is hard if you dont put your heart and mind on it. You also need to build your confidence, skill and talent. And these things can be improved by building and building and so much building. It doesnt matter if you have done it right or wrong, its your work and its your satisfaction that you have to fill not anyone else's. So why bother posting an ugly work? By posting them you can get tips and suggestions that will make the hobby more closer to you and the group. As the knowledge you have improves, your buddy's here in the forum will get to learn and also increase their knowledge in the hobby as well. This forum is a helping forum, not just showing how good you are. Btw, dont tinker around cheap 00 models, it will just limit your imagination. Nick -
1/72 Hasegawa SV-51 Gamma w/ twin boosters (DD Ivanov type)
nickster replied to nickster's topic in The Workshop!
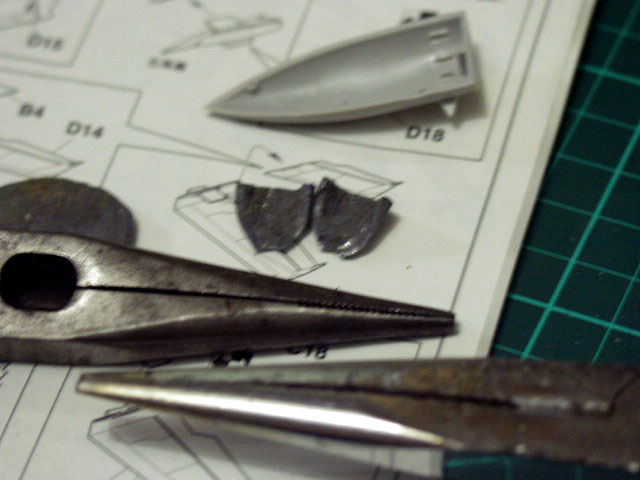
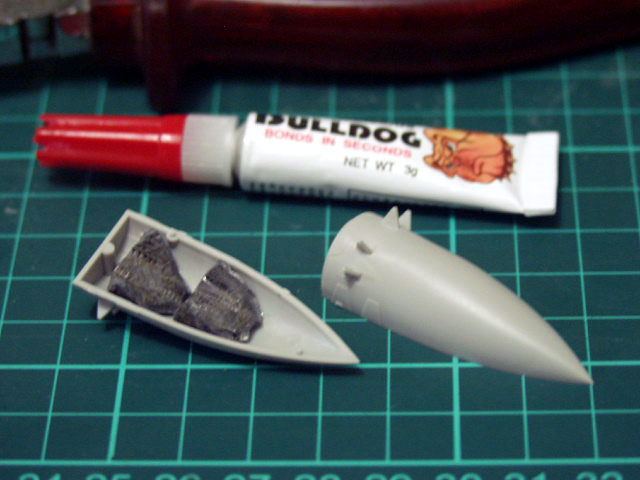
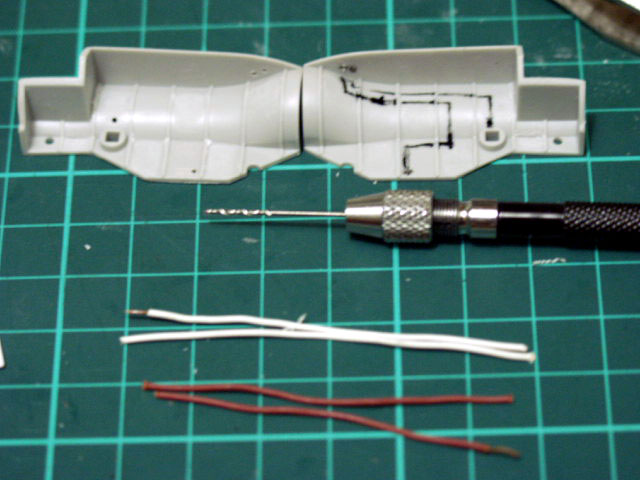
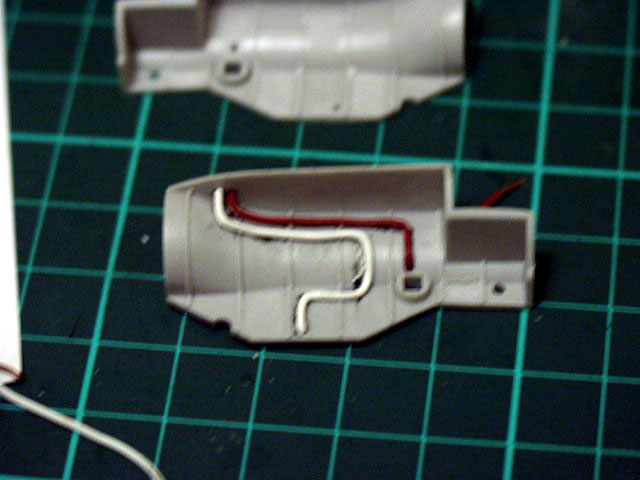
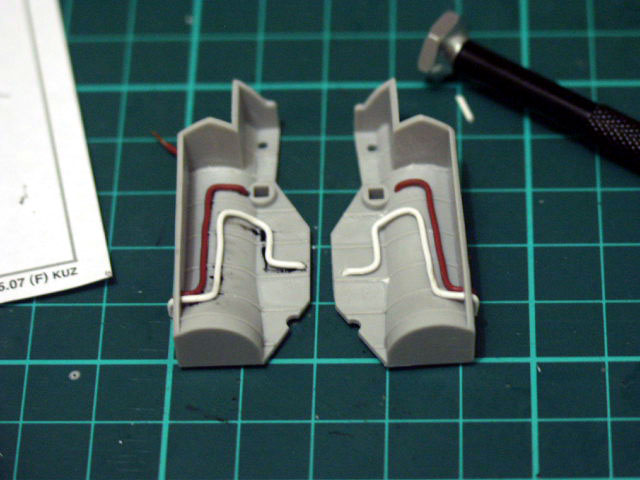
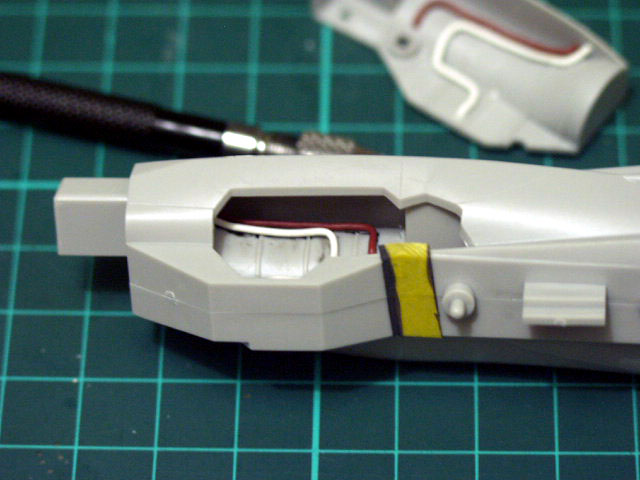
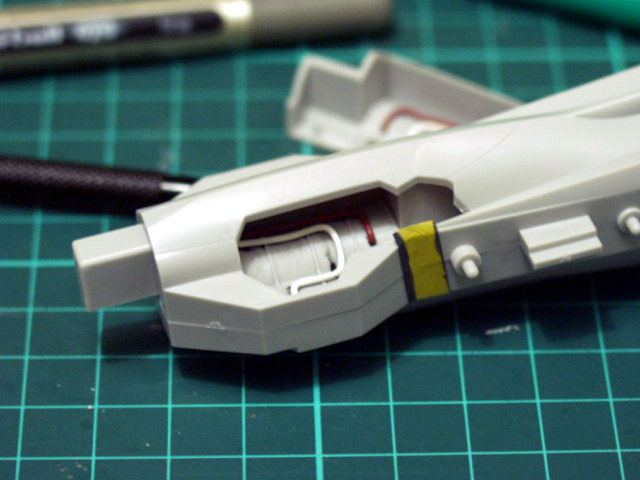
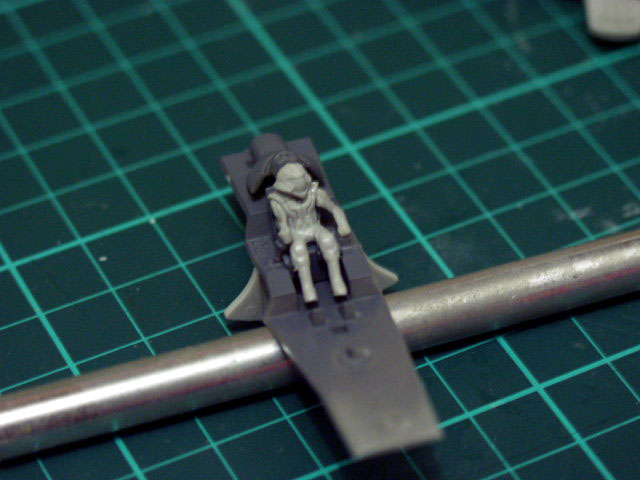
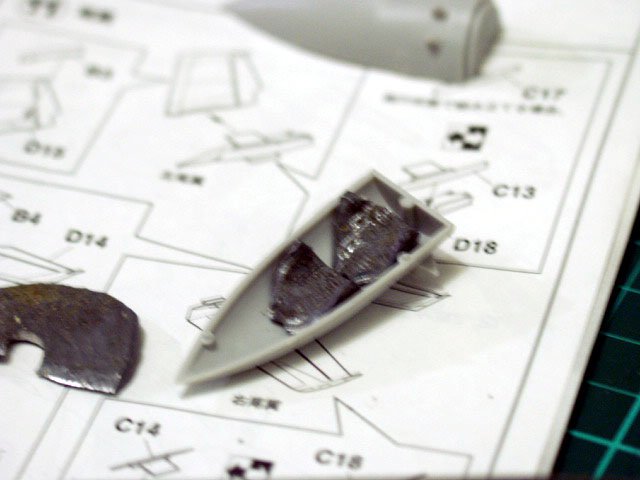
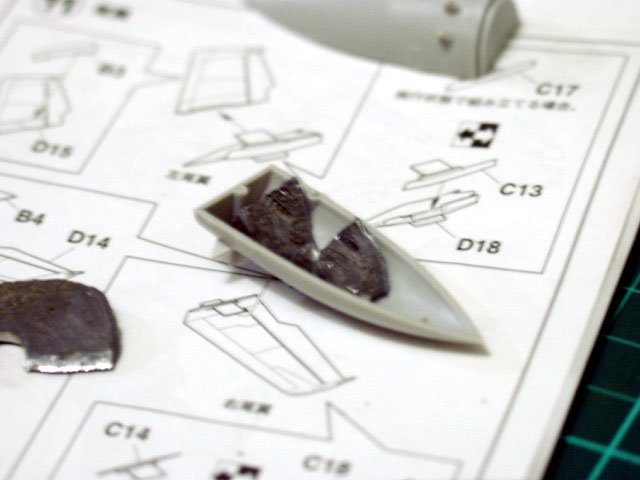
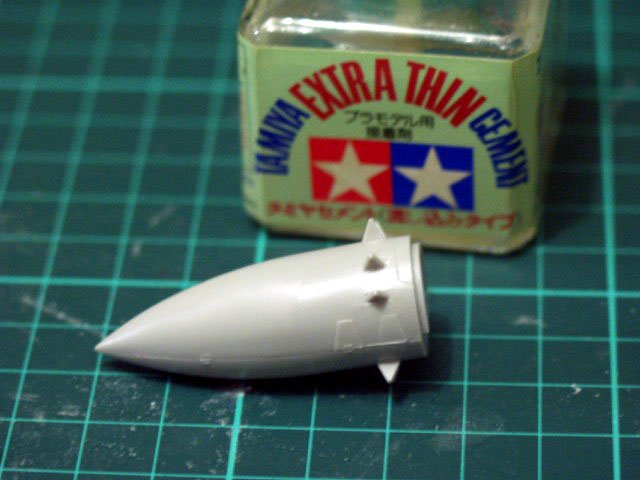
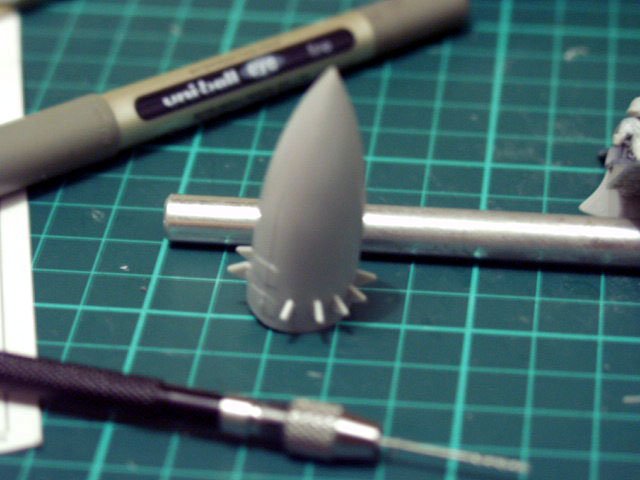
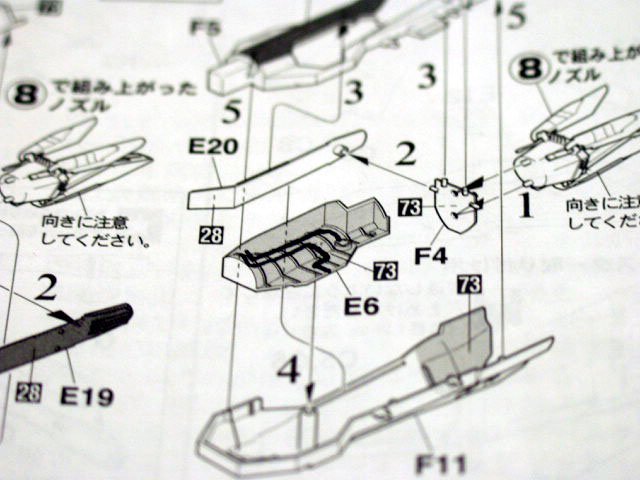
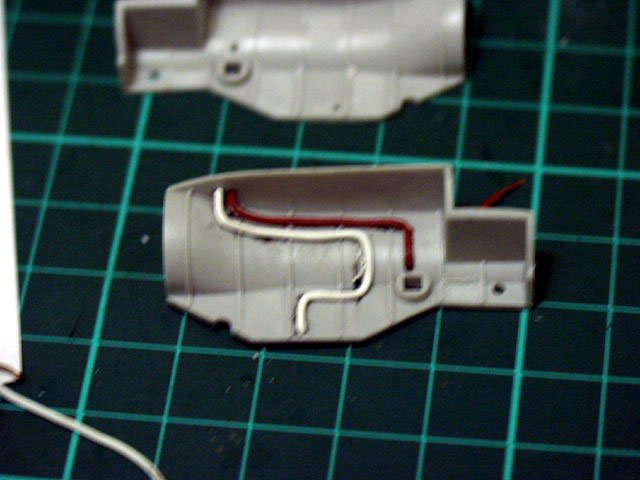
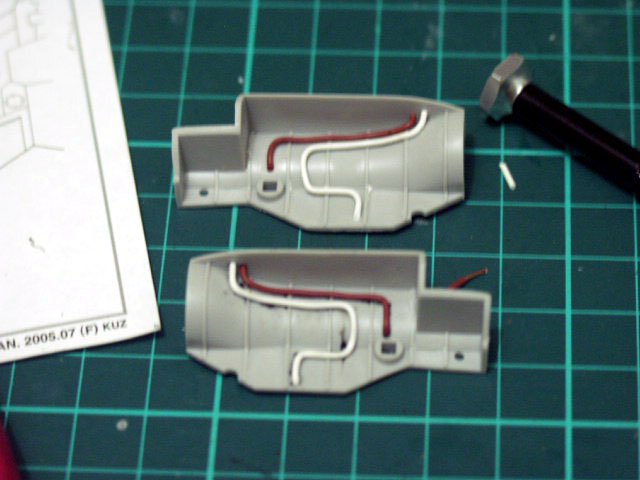
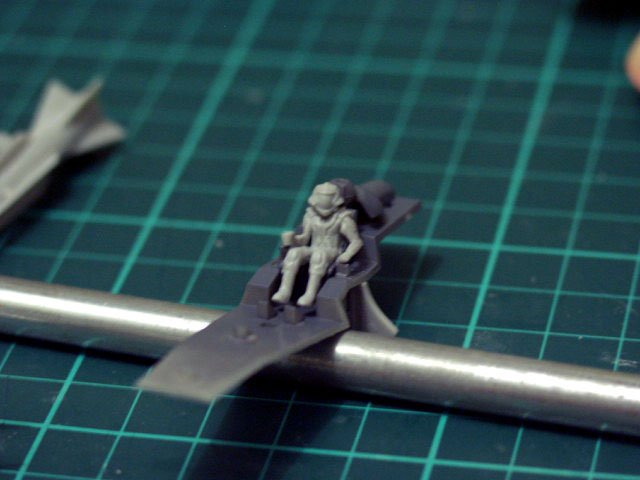
SchizophrenicMC, DrunkenMaster2, big F, thanks for the compliments. I hope I did a good job in explaining the marker technique. By the way, here's some update on the kit. When I showed the pictures of the Ivanov figure to my co-worker/modeling buddy RICKY, he told me to modify the right arm too since it doesnt look good. What i did a while ago is to carefully cut the right arm where it was glued and added a bit of plastic cut out from the sprue. When I glued the arm again and while posing it, i realized that there will be a big gap in between the shoulder/torso and the arms. I used a bit of tamiya basic putty to fill the gap. Then when it was dried, some roughness were removed using x-acto #11 blade. To promote smoothness, I brushed on Mr. Surfacer 1000 to fill the small gaps. Now both arms are in better pose and is ready for painting. Next was the nose cone. I finally decided to add some counterweight on the nose cone. I used a very cheap lead washer, the one that they use on roofs. Since it cost about 0.01 in USD (that is 50 cents in philippine peso). Second these washers are malleable, you can hammer it to thin and you can use some pliers to bend it. Initially, the lead washer was hammered thin then I cut it in two 1/4 rings of the washer with a side cutter. To follow the shape of the half-pipe cone, I bended it with two pairs of long-nose pliers. Test-fitted the leads before finally securing them with CA glue. Then I closed the two halves of the nose cone with thamiya super thin cement. I mentioned earlier in this build that I have to put hydraulic hoses on the rear landing gear bays in this project. I started by drawing the hoses on the instruction sheet, then replicated the lines that i have drawn on the actual gear bay. By using old telephone wire (the twisted pairs), the one that runs outside of your house to the connection box, I have measured two lengths, where the color white will be the outermost and the brown is the inner most. Drilled four 0.8mm (but 1mm is better) holes on each gear bay surface, two in the front where the hoses will originate then one on the foot of the landing gear strut and lastly near the bay doors. By following the pre-drawn line, the wires were bent using the fingers and inserted both ends to the holes. Further arrangements in aligning the wires can be made using tweezers since it is very flexible. The ends were then bent to secure the wires. No glue was used since it fits quite well on the surface. Whew! Got get some sleep now. See you again on saturday for more updates. Cant wait for friday night, MORE BEERS! Til then, happy modeling!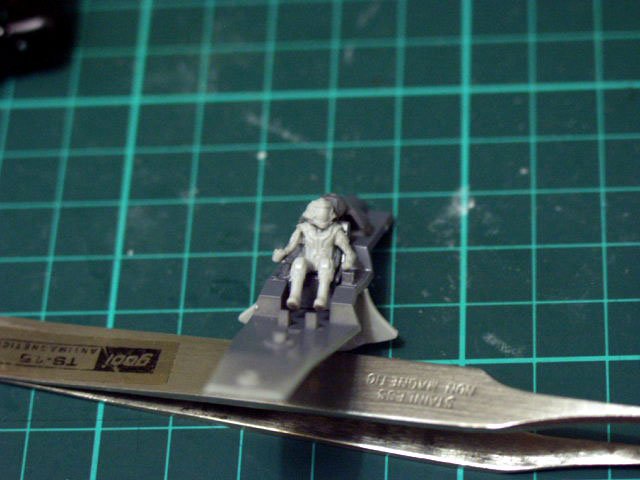


-
1/72 Hasegawa SV-51 Gamma w/ twin boosters (DD Ivanov type)
nickster replied to nickster's topic in The Workshop!
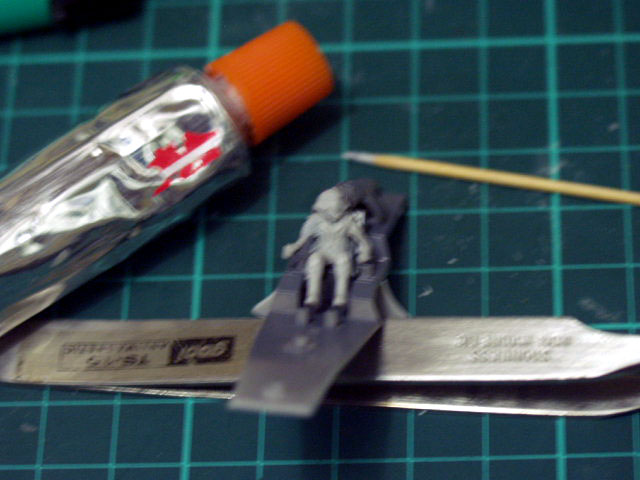
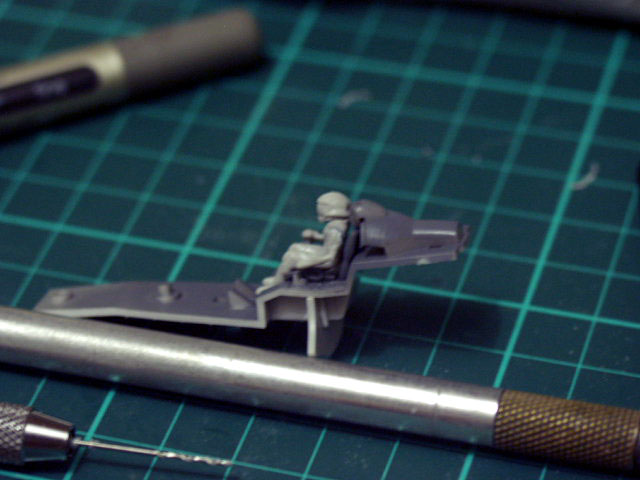
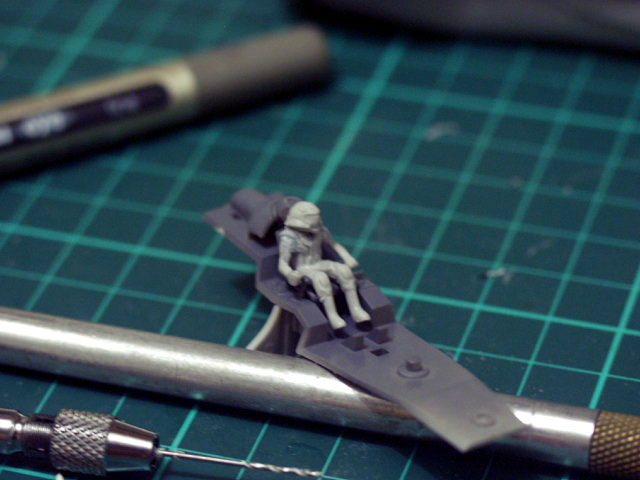
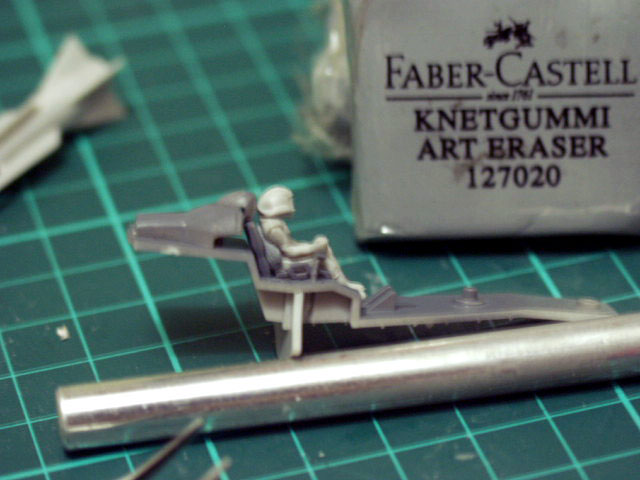
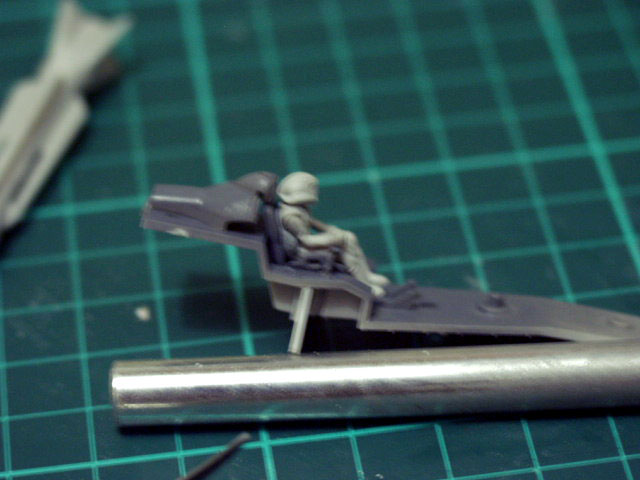
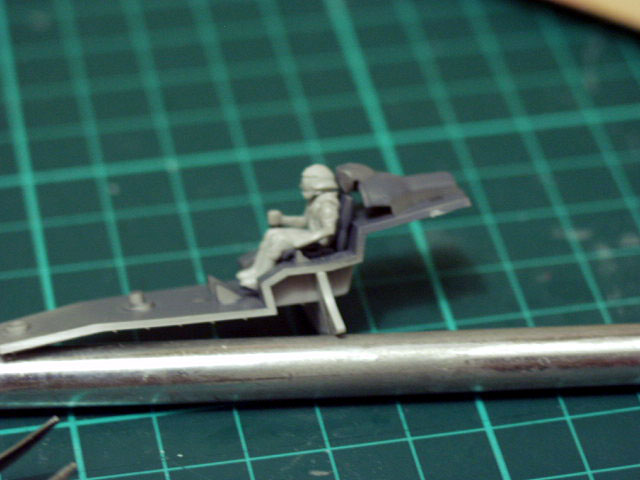
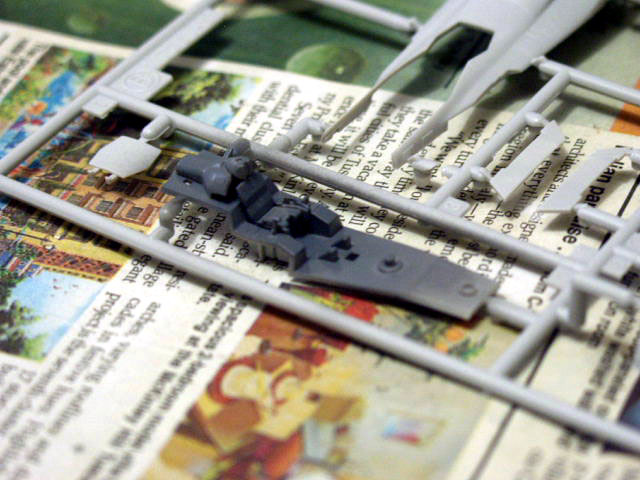
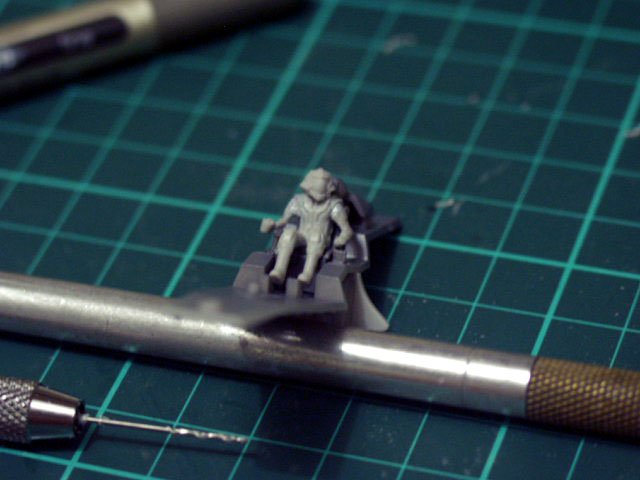
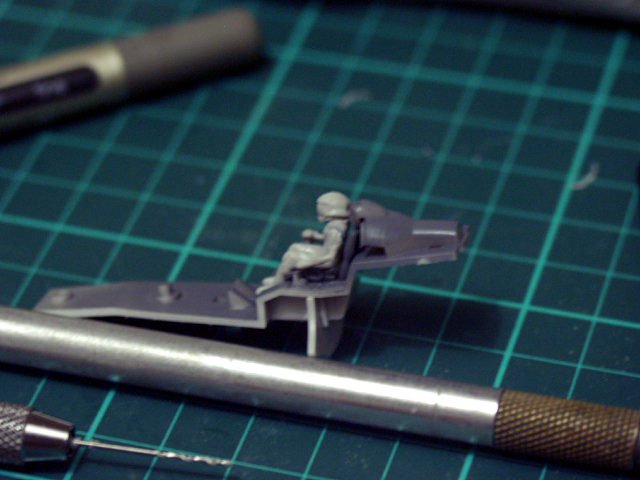
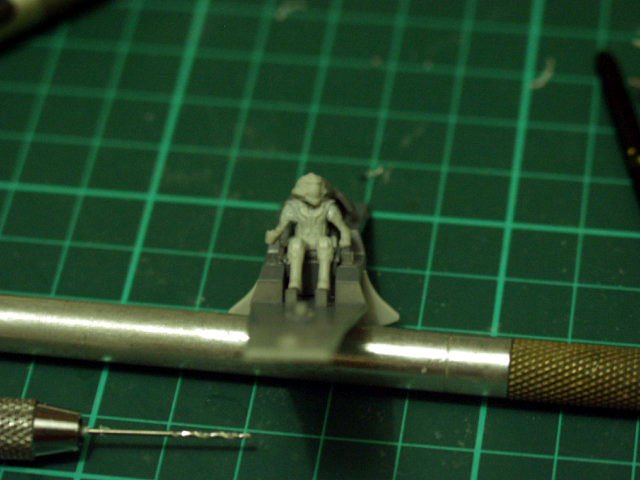
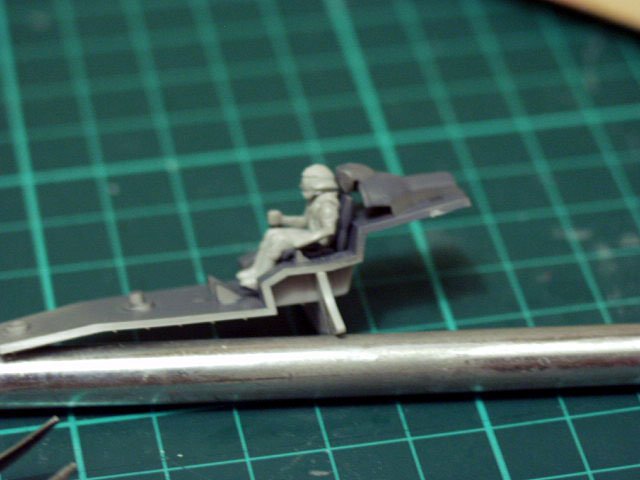
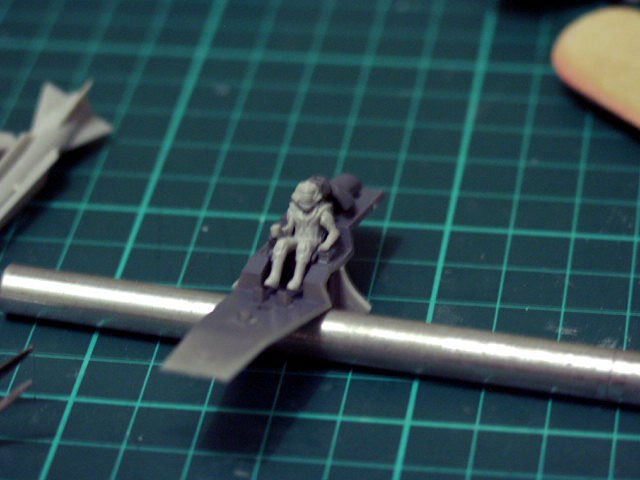
Hello guys! Nothing much happened on the kit today, except the usual sanding using the permanent marker technique on the payload, gunpods and missiles. Second, I was not satisfied with the figure so, i scribed deeper panel lines on the pilot figure. Deeper panel lines will help us determine where will the paint will land due to its small size. The hands are a bit big, managed to scrape some volume out of it. The left arm lands on the figures left leg, unrealistic pose for a pilot. By cutting a piece of very small triangular shape of plastic from the sprue (tree), gluing it on the armpit of the figure, the angle of the arms moved a bir wider. Just enough to for the hands to touch the throttle control. During the test fitting stage of the figure, I find it hard for Ivanov to sit properly. A small piece of kneaded eraser (artist's eraser) helps the figure to sit straight / temporarily be glued on its place. Here's the pics. Happy modeling everyone!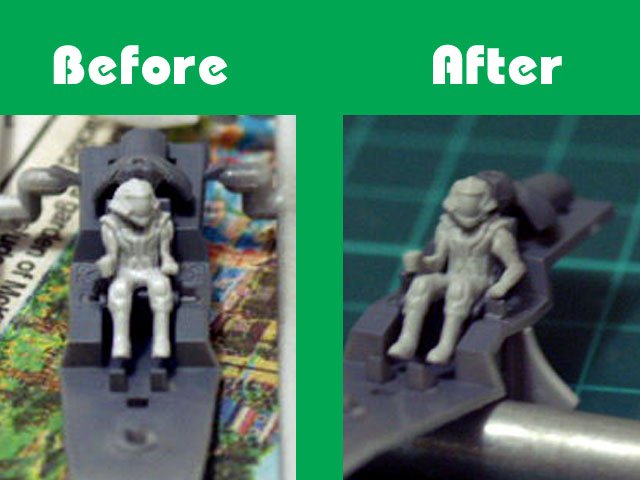


-
1/72 Hasegawa SV-51 Gamma w/ twin boosters (DD Ivanov type)
nickster replied to nickster's topic in The Workshop!
WM Cheng, Paliodor, Jardann... I'm not that fast, a co-worker - modeling buddy of mine is a real fast builder. He can finish a 1/72 kit in one week, without the wash and drybrush details of course. Actually, my 1/32 F-15E is still pending when I accidentally stepped on the front canopy when it fell during dry fitting. You can check my blog at http://talyerpinoy.blogspot.com . For the permanent marker technique. I read this article on Hobby Japan (I dont really read japanese but only following the pictures ) about gunpla for beginners. He started with "seam welding" technique. Seam welding is applying a lot of liquid plastic cement on parts to be mated together. By pressing it, beads of glue will appear on the seam lines. When totally dried (after three hours) the beads of cement will harden and it will look like that the parts were welded together, thus the name "seam welding". But if three hours is long for you, you can try extra-thin cement from tamiya and have the same result, but it takes some practice. Then using 320 grit sandpaper or your wife's / sister's emery board (make sure you have their permission ), slowly sand the bead without applying too much pressure. Using your favorite permanent marker, run the marker on the seam line. Let it dry thoroughly. Slowly wet-sand the ink with 600 grit sandpaper or if you lack patience, 400 is still fine, just don't put too much pressure or you will lose some panel line info that you need to re-scribe later. By this time, you will see the gaps, filled with the color of the marker's ink. From 320 to 600 grit, wet-sanding will remove the unwanted gaps. You can then re-scribe the lost panel lines at this stage. Running the marker again on the smoothened out gaps will give you a preview of the part when painted. Since permanent markers are usually glossy, and your lamp at angle, further verification can be made if you have successfully removed the gaps that you do not want. Note on choosing permanent markers: Before buying one, make sure you test it on white paper. If the line is thicker than the point of the marker, then this is the right marker to purchase. It means that the marker's ink is thin enough to get inside the gaps. Hope this helps. PS. the mold release agent when not removed leaves a patch of somehow "semi-painted" almost thin film of patch compared to some parts where the paint clings properly or evenly. This happens when paint is airbrushed at high pressure and the paint is very thin. About 1:3 paint to thinner ratio. -
Outstanding Diorama! The environment looks great. Great photography too. Makes me feel like I'm inside it. Congratulations!
-
1/72 Hasegawa SV-51 Gamma w/ twin boosters (DD Ivanov type)
nickster replied to nickster's topic in The Workshop!
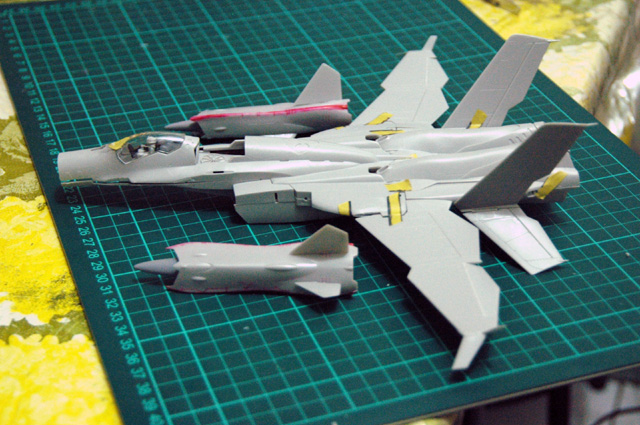
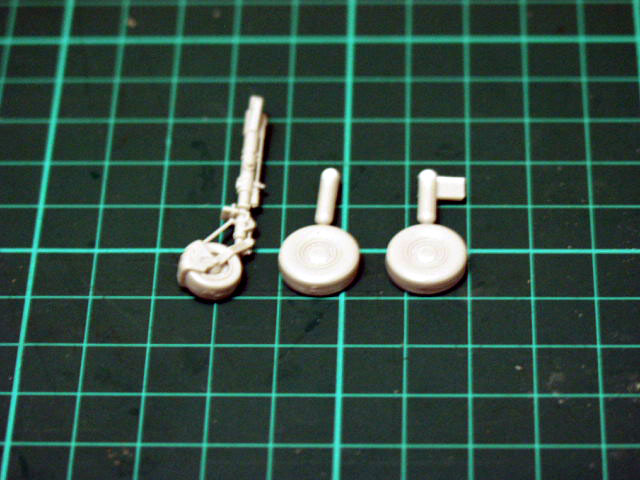
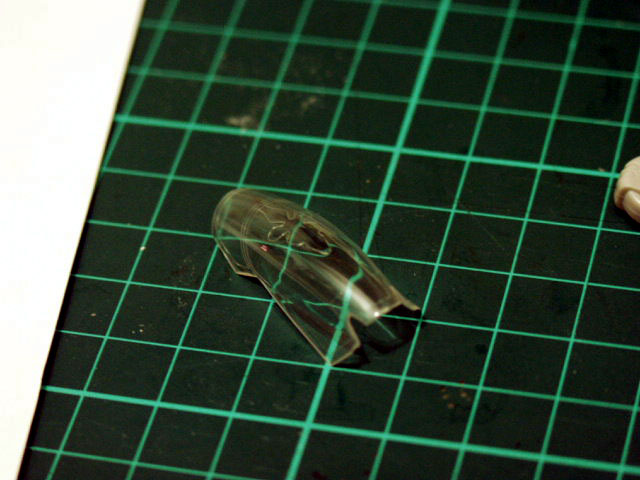
Front landing gear and rear tires were assembled at this stage and sanded smooth with 320 followed by 600 grit sandpaper. The usual parting lines visible on the canopy bubble were removed using 320, 600 then 1000 grit sandpapers. Further smoothness was attained using Micromesh from 3200 grit to 12000 grit. Dry-fitting most of the parts will help us in deciding where to glue, identify troublesome gaps when finished and will let us decide which parts will be painted first and masked. More updates coming soon.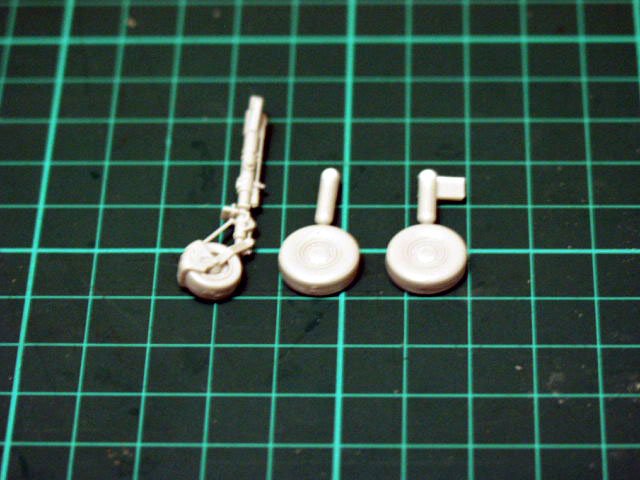


-
1/72 Hasegawa SV-51 Gamma w/ twin boosters (DD Ivanov type)
nickster replied to nickster's topic in The Workshop!
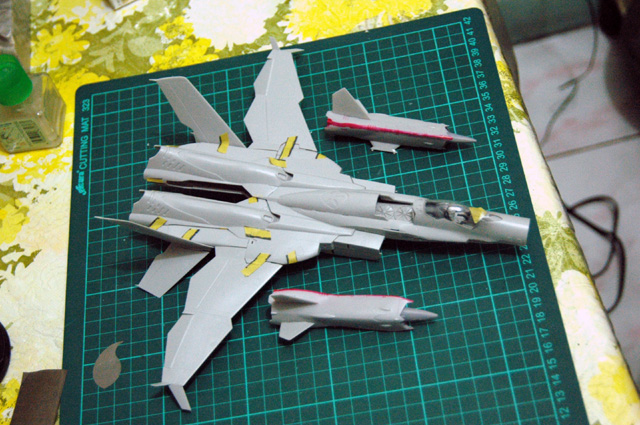
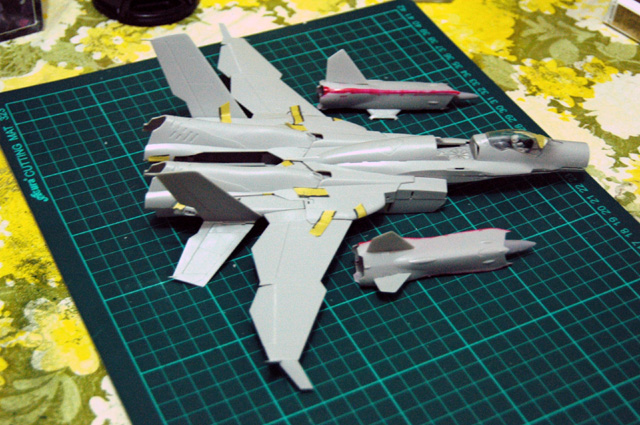
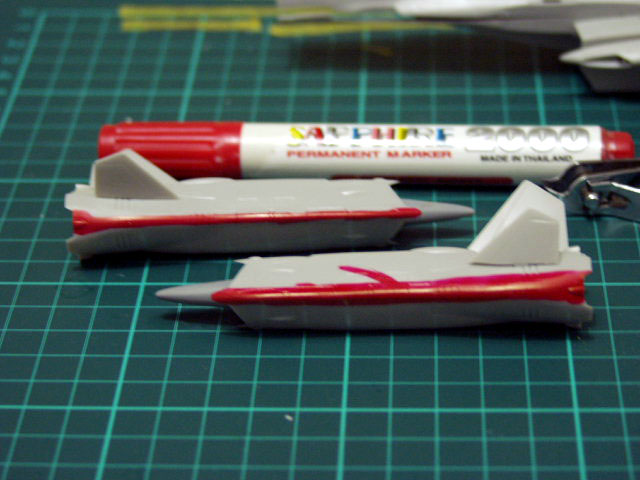
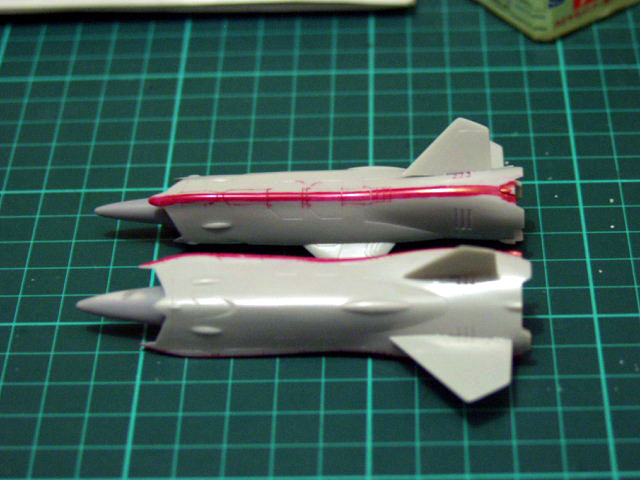
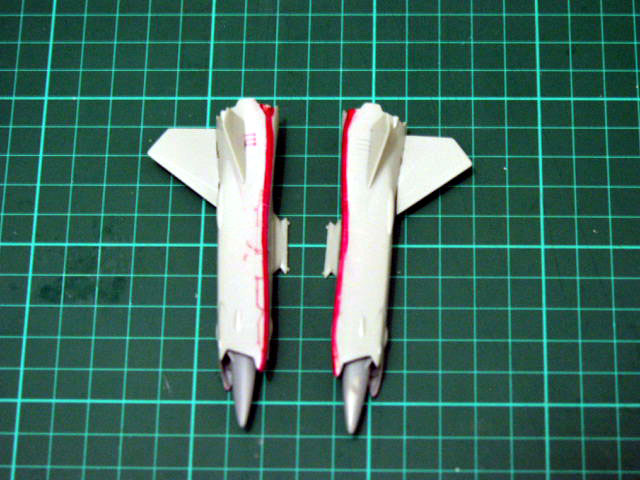
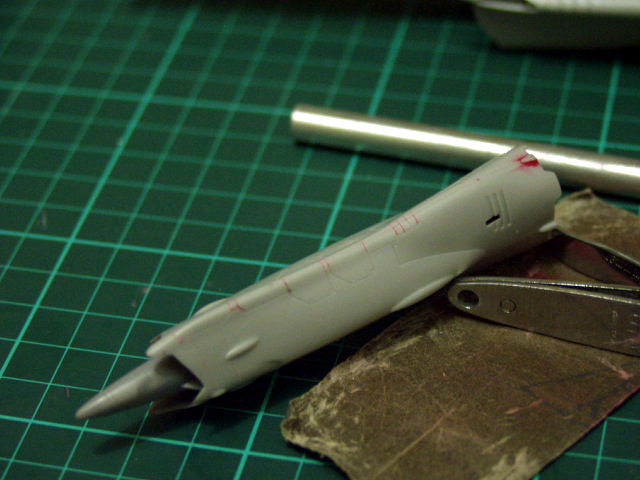
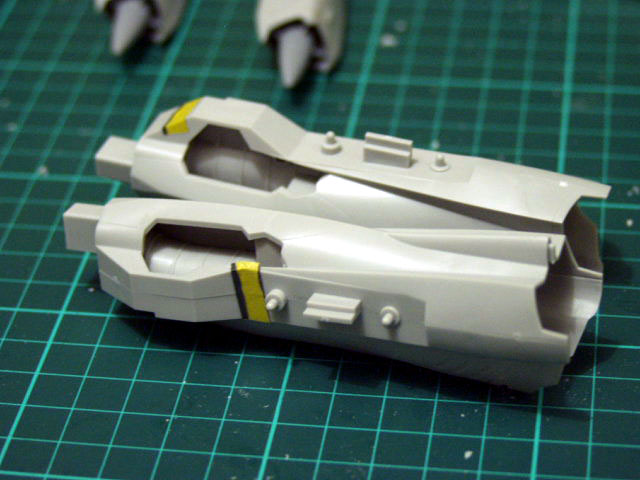
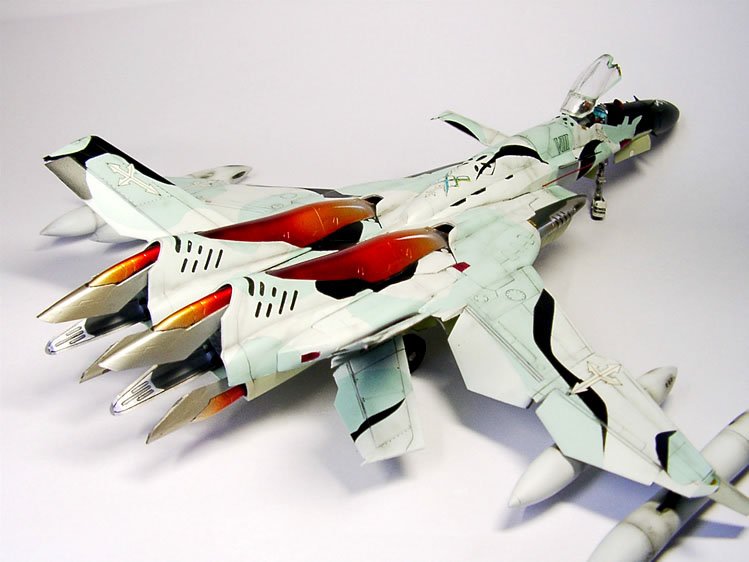
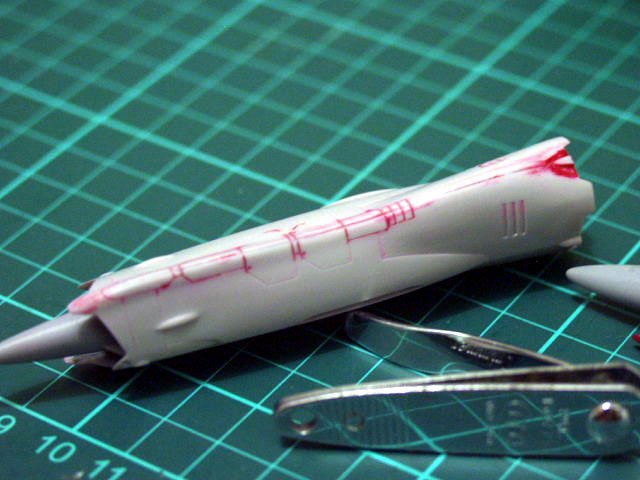
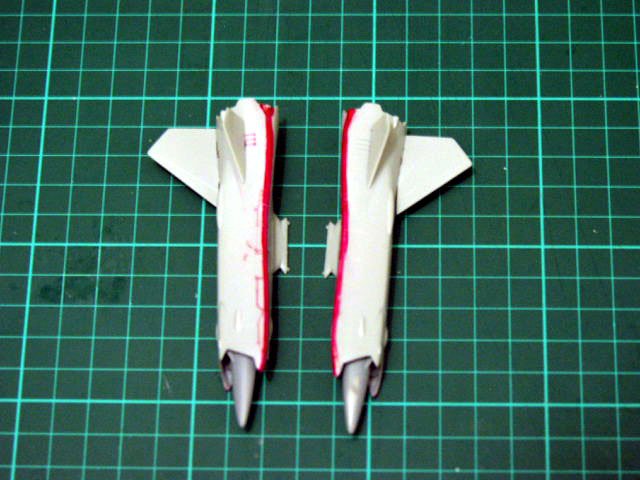
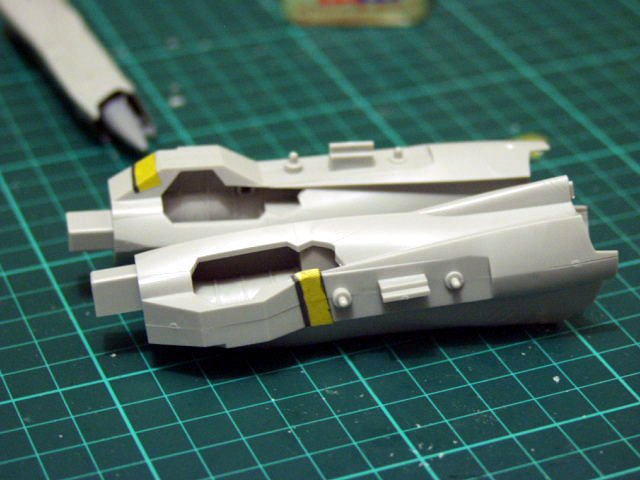
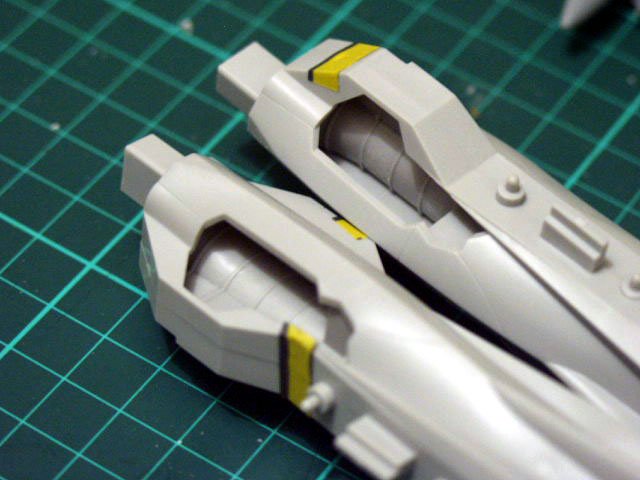
Finishing the assembly with the twin boosters continues... Photo below shows the parts after the cement has totally cured. To make the gaps more visible, a permanent marker was run throughout the seam line crated after it was glued together. The permanent marker may be any color but i prefer red. I learned this technique while making Gundams After sanding the seam with 600 grit sandpaper , the gaps can be readily seen. This will also show the panel lines that needed to be re-scribed using Hasegawa Tritool (saw and scriber) TP-4 or the back of a #11 X-acto blade. But I used both on this project. After careful re-scribing and sanding the seam is now invisible or removed. Running the permanent marker again from where the gap was will let you see if there are still parts to be sanded. The assembled twin boosters with the fins and pylon. It is now ready for painting.


-
1/72 Hasegawa SV-51 Gamma w/ twin boosters (DD Ivanov type)
nickster replied to nickster's topic in The Workshop!
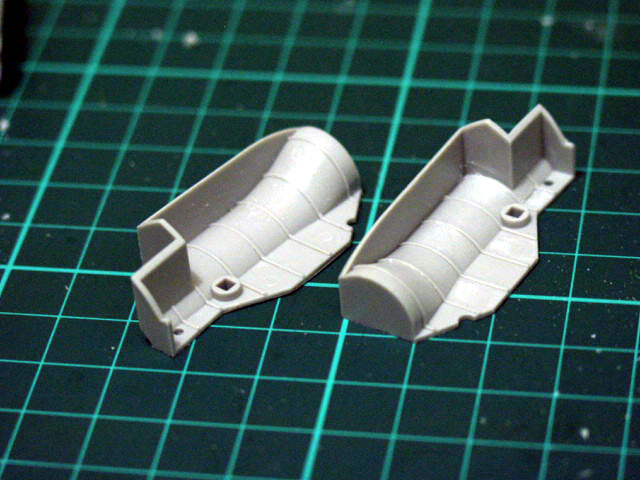
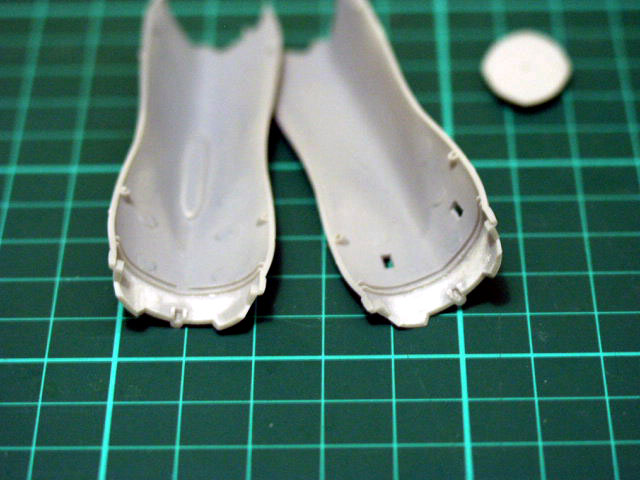
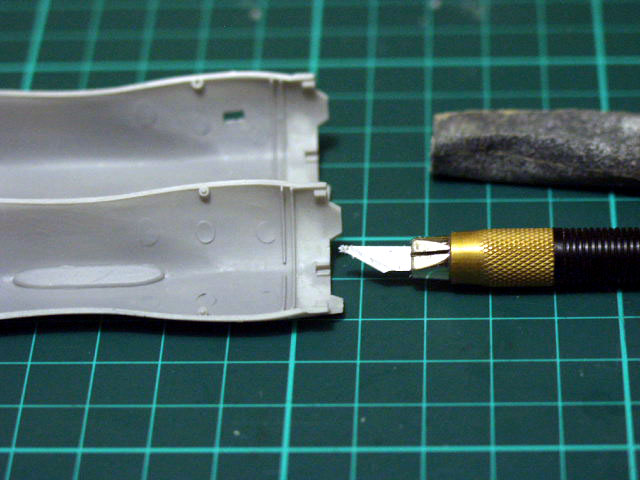
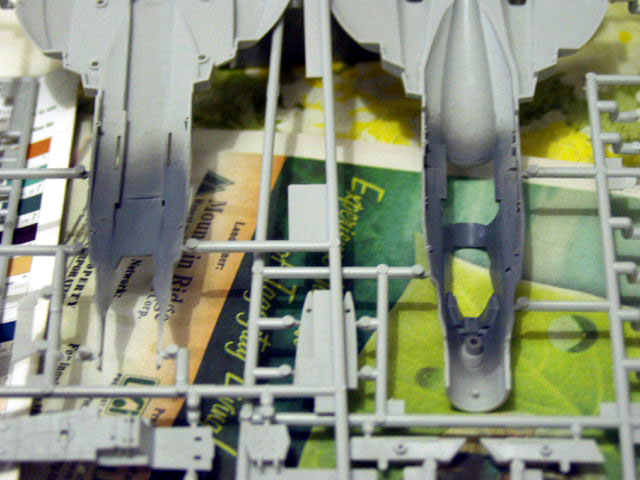
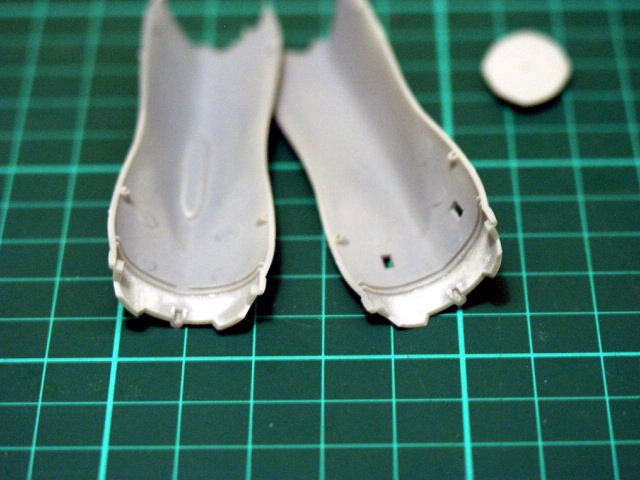
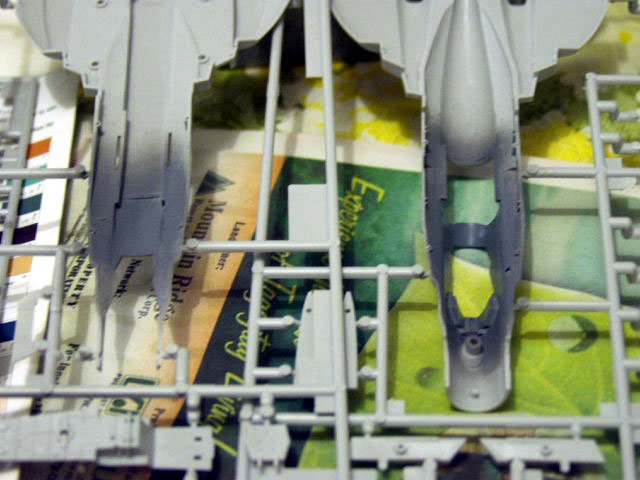
Again, ejector pin marks present on the upper and lower parts of the jet intake. Repaired the insides using a flat knife (OLFA FLAT) attached to an X-Acto knife handle. It was scrapped carefully going out of the intake, carefully not touching the sides, to avoid deep scraping canals. Sanded it again with 320 grit sandpaper for smoothness. Also brushed a few tamiya thin cement to smoothen it futher. Tamiya putty will be employed to fill the small scratches and the gap in the attached ramp on the upper intake parts. The rear landing gear bays also sports the ejector pin marks but this easily removed using 320 grit sandpaper. Test fitted the parts before closing it will glue will be a wise decision, since some parts may leave c\visible gaps or spaces when mated together. You can also observe a few things during test fitting, like where to paint or to add more details. Like in the rear gear bay, more wires will be running inside it to make it look more like the front landing gear bay.


-
1/72 Hasegawa SV-51 Gamma w/ twin boosters (DD Ivanov type)
nickster replied to nickster's topic in The Workshop!
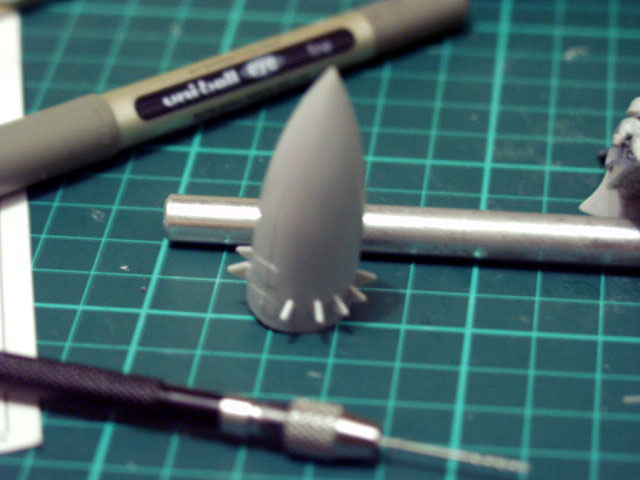
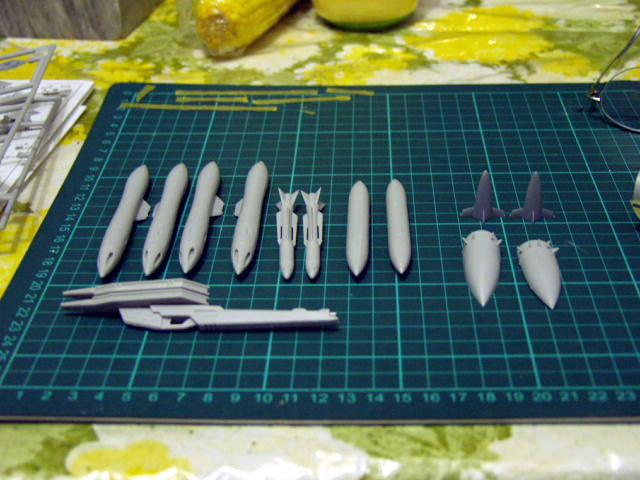
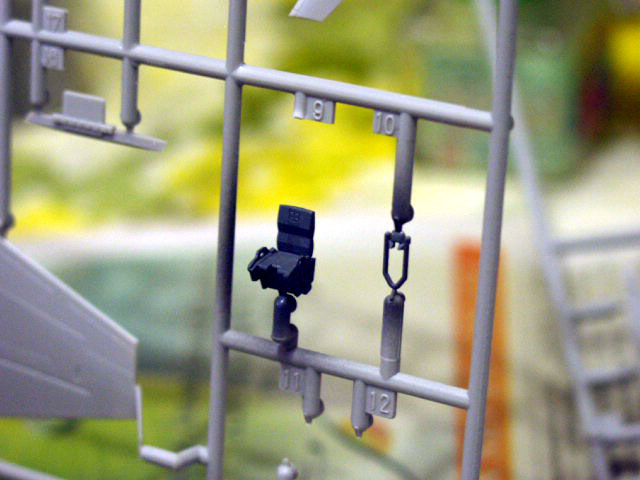
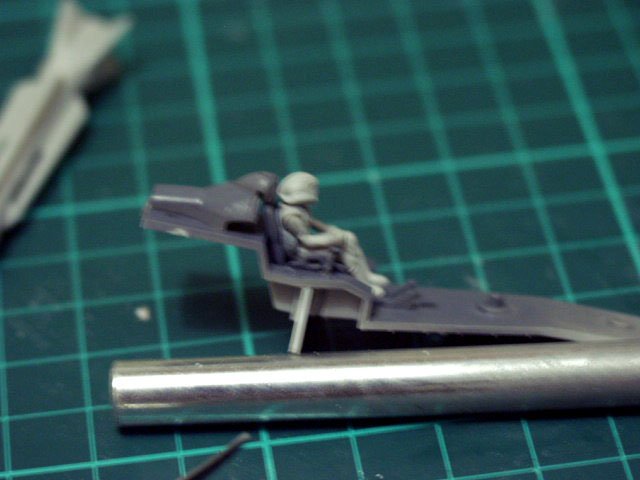
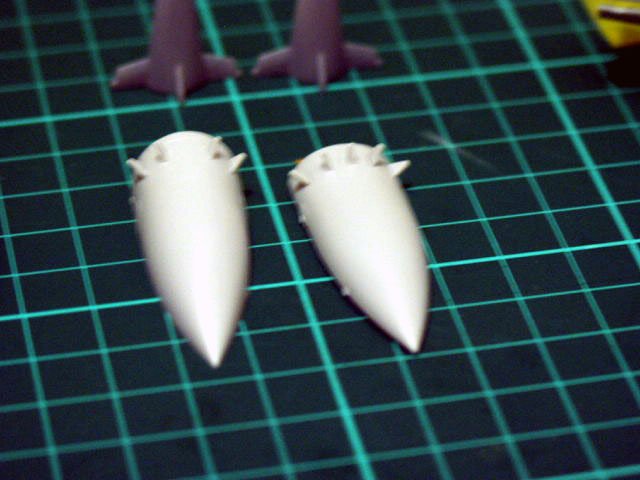
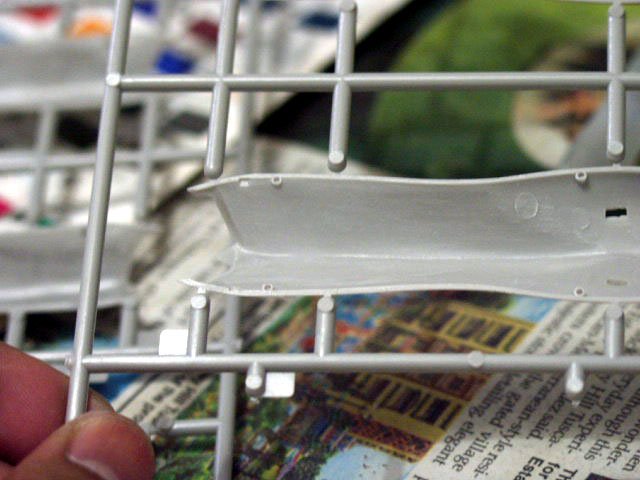
Day three on the SV-51. Continuing on the twin boosters. I have observed that the ejector pin marks on the rear will also be visible when painted with metallics. This problem was remedied by scraping the pin marks with a design knife or modeling knife. Sanded the parts with 320 grit sandpaper to even the surface. Going back to the cockpit, the painted cockpit base seems for additional details like was and drybrish to show the surface details. The DD Ivanov figure was assembled prior to painting. The head was twisted a bit to the right, so the figure will be like looking on his wingman. Some projects can be painted too while waiting for the paint to dry, the picture below shows the parts of an HGUC Kampfer covered in super gloss black for base color. Because later when the time for painting with metallics is due, this baby will be cued for painting too. The weapons or loadout of the plane were assembled at this stage. Because I usually forgot these parts when assembled at a later stage. The nose cone fins were then attached to both halves. I haven't closed the cone yet. Still deciding if i'm going to insert ballast weights on it. Inserting weights was a a regular practice in older hasegawa plane models to balance the plane when laid on the ground with its landing gears.


-
1/72 Hasegawa SV-51 Gamma w/ twin boosters (DD Ivanov type)
nickster replied to nickster's topic in The Workshop!
Hello Schizo. Frankly, As someone new here, I forgot to read the rules... I was so excited when I first logged on as member and forgot the basics in entering new forums. Thank you very much for the reminder. (removing pic in my sig) Honestly, I'm not that knowledgeable. I always learn from forums like these all over the net and by joining our local IPMS chapter here in the Philippines. If time permits, I may be able to finish this kit by next month. Hope to see you again and thanks again for the reminder. -
1/72 Hasegawa SV-51 Gamma w/ twin boosters (DD Ivanov type)
nickster replied to nickster's topic in The Workshop!
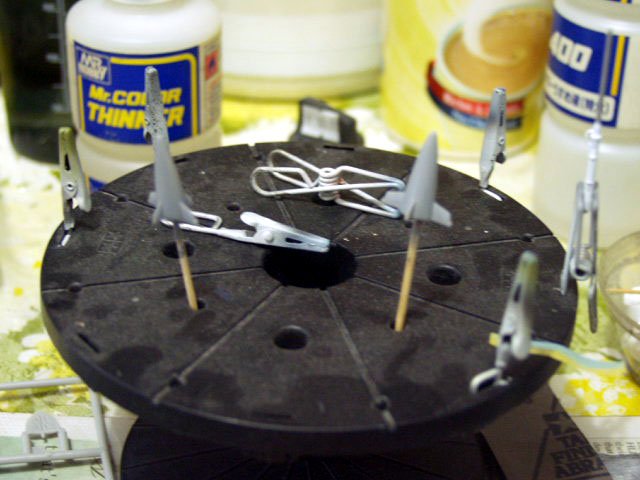
The second night of building the SV-51 includes the painting of the insides of the twin boosters. Observing the insides, nasty ejector pin marks may be visble when the halves are joined. This problem was solved by sanding the pin marks with 320 grit sand paper then followed by 600 grit. The insides were then painted with Gunze Sangyo 306 as per instruction sheet. The forward nose cone of the twin boosters were also painted with the same color. More progress pics later.

-
1/72 Hasegawa SV-51 Gamma w/ twin boosters (DD Ivanov type)
nickster posted a topic in The Workshop!
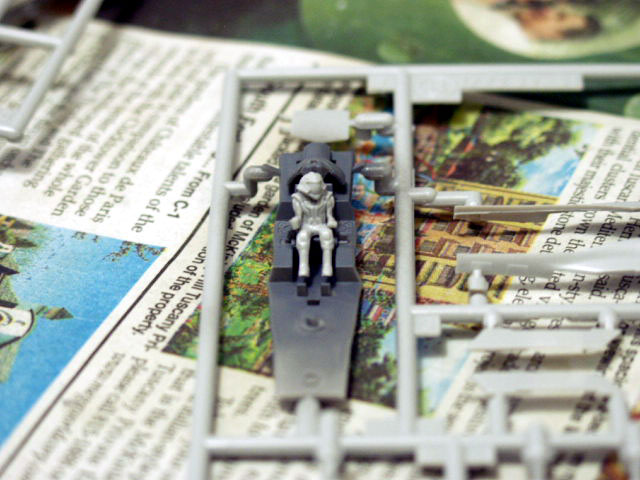
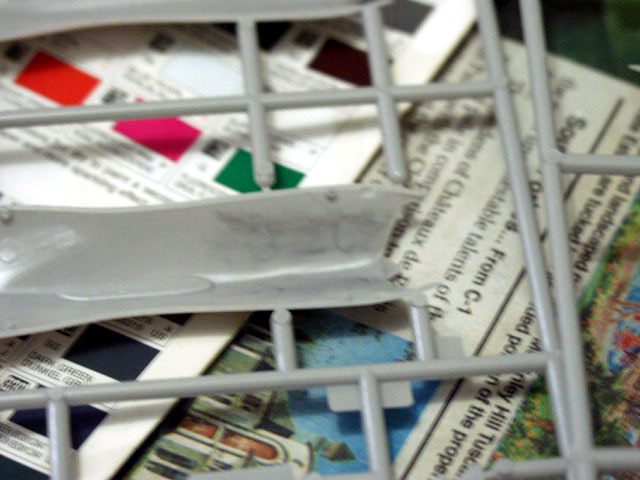
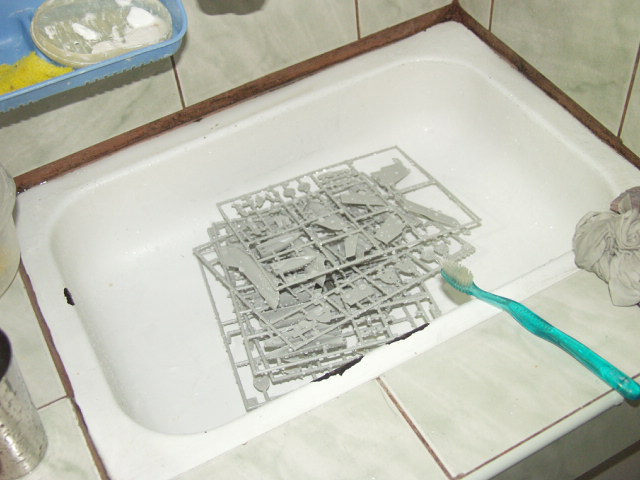
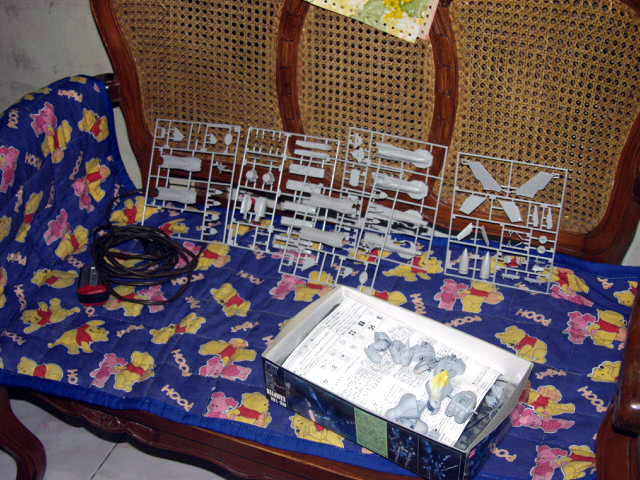
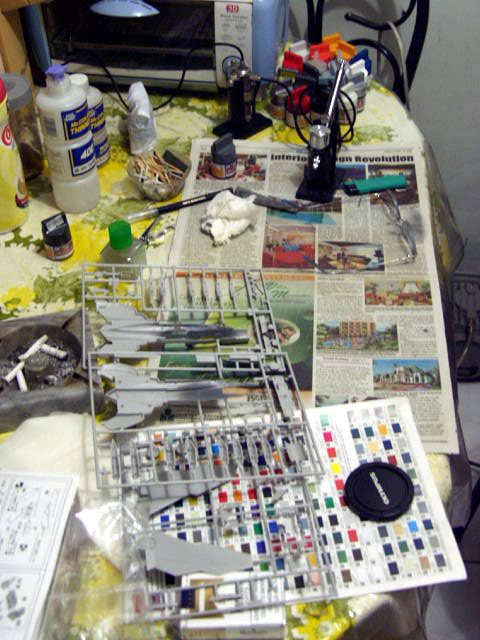
Hello Guys! This will be my second Macross Zero kit to be built. But the truth is, this was my first Hasegawa Macross Zero Kit. The VF-0D was puchased a year after i bought this kit. I was then intrigued by the blue color of the VF-0D so it was the first to be finished. Anyway, the kits was typical hasegawa, molded in gray, and the ever reliable plastic quality that is easy to sand. Canopy is molded in clear including the clear lenses on the various parts of the aircraft. The parting line on the canopy will have to be removed by sanding and polishing. A very large decal sheet was included in the kit giving you the option to build either DD's black SV-51 or Nora's Pink and Yellow 51-Gamma. As usual, after reading the manual, the first thing to build and paint was the cockpit. The insides of the cockpit requires Gunze Sangyo's (GSI nowadays) 305 or Gray. Airbrushed the interior parts with 305 Gray including the seat which I assembled earlier before. The paint was sprayed while the parts are in the tree (sprue). After painting the interior parts of the cockpit, I found that the kits surface, tho it looks clean, is still has those mold release agents that keeps the paint from clinging to the plastic and needs to be treated with soap and water. So the painting of the twinboosters insides were abit delayed until all the parts have thoroughly dried.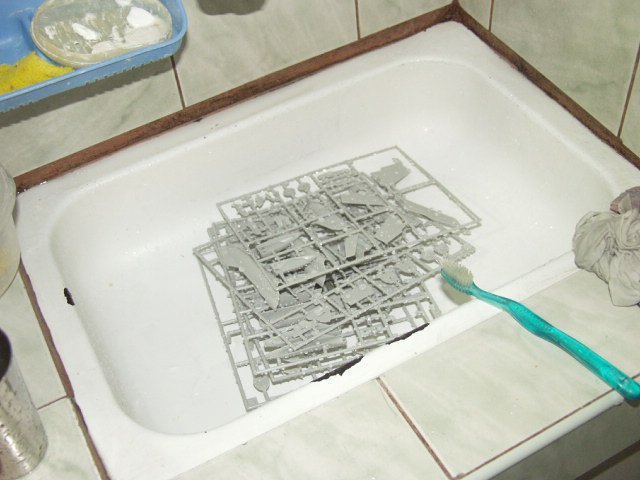


-
Andrew, PetarB, Thanks for the comments. By the way, PetarB, Do you sculpt the 1/72 pilot figs? Nick
-
Hello Lethal, Salamat sa pagbati. Di ko lang sigurado kung makakasama ako sa exhibits at kulang talaga oras ko sa work at hobby pag pinagsama. Pero susubukan ko boss. Salamat uli. <Subtitle: translated in english> Thanks for the welcome. Im not sure if I can join the exhibits and I really dont have much time when work and hobby is combined. But I'll try Boss. Thanks again.