winterdyne
-
Posts
189 -
Joined
-
Last visited
Recent Profile Visitors
3344 profile views
winterdyne's Achievements
")
Destroid Armour Waxer (3/15)
0
Reputation
-
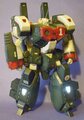
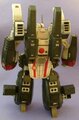
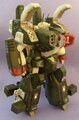
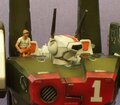
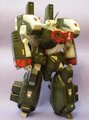
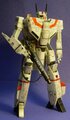
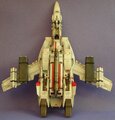
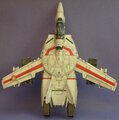
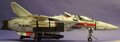
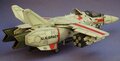
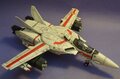
Some tweaks to the Tomahawk: A Regult Tactical Pod: Both together to show sizes:
-
[Commission] Destroid Tomahawk Wargames Mini (Preproduction)
winterdyne replied to winterdyne's topic in Model kits
Some tweaks to the Tomahawk: A Regult Tactical Pod: Both together to show sizes: -
[Commission] Destroid Tomahawk Wargames Mini (Preproduction)
winterdyne replied to winterdyne's topic in Model kits
Yeah, I found the other thread and posted there too. It's simply making contact (and the language barrier) that seem to be the problem. It'd be really nice to have a Macross miniatures game though. The regults are fiddly as hell to put together though. :-) -
Ah, hello. :-) I posted this elsewhere, but will add to this thread too - as it's one of Mech_Dude's models. :-) To reiterate - a Macross (Studio Nue) license would be preferred as it would gives access to all the Macross Zero designs (some of which would still be serviceable during SW1).
-
[Commission] Destroid Tomahawk Wargames Mini (Preproduction)
winterdyne posted a topic in Model kits
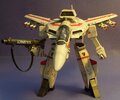
Painted this up - it's one of a number of pre-production prototypes I'll be painting up. I won't name the client in case they don't want it bandying around just yet.... If anyone from Studio Nue or Harmony Gold sees this, drop me an email - the client is desparate to sort out licensing for these to put them into full production for a wargame. I don't check by on here often (sorry guys!), but I will be checking in now and then - if anyone knows how to get in contact with Studio Nue (the client would prefer a Macross, rather than Robotech license) and whether they'd be interested in licensing a miniatures game (with high quality minis), post your thoughts! Anyway, it's a nice little kit, I've worked on a few different models of this design, and I have to say this is one of the nicer ones - clean detail without being cluttered. Went from bare resin to finished inside of 5 hours (including cleaning and drying it), which is pretty good for an item of which you'll only have maybe half a dozen to paint. -
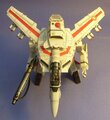
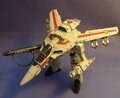
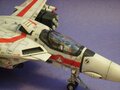
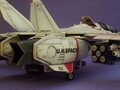
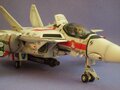
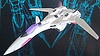
1/48 VF-1J stripped and preshaded. GBP customised with LEDs in legs.
-
-
How do I disassemble the intakes on a 1/48?
winterdyne replied to magicsp00n's topic in The Workshop!
I didn't dismantle that part on my 1J. I repainted the turbine by hand - first with a couple of coats of thin dark grey, then a drybrush up, then gloss and oilwash with everything else. -
Machine mart do an all-metal dual action airbrush very cheaply (about £18 IIRC). That'd do the trick. Unusual for an airbrush to 'pack up' - what was it?
-
Not being familliar with the model, can't say for sure, but a good idea is usually to lightly tack together sub-assemblies that need to be shaded as a whole. Depending on how the joints are made you may be able to mask after assembly but it could be tricky.
-
From what I can see you've got plenty of space to work with. This is assuming that you want an 'invisible' fix. Takes a bit of work, but this should be pretty indestructible when you're done. I'm also sure some of this is second nature, but to some folks it might not be. I'd suggest you glue (with epoxy or something else very strong) some blocks of plastic up to just under (.5mm) the level of the mating surfaces on both sides of the leg. Don't forget to roughen the surface first - scratch and burr it up with the point of a knife. Next - Pinning. Pinning is best done by having the wire clipped into much longer lengths than needed (but small enough to handle - about 1inch / 2cm is fine), then once glued into the first set of holes, use a pair of wire cutters to snip 'em to the right length. Drill pin holes straight in to a depth of about 5mm. Apply a small amount of epoxy to the holes, and insert pins. Clean any excess by drawing it with a toothpick toward the inside of the part. This stops strings being draped over the visible bits of the part. Ensure they're straight, allow to dry then clip, leaving around 3-5 mm exposed. Now 'ink' the ends - put a spot of (oily) paint on the exposed end of the pin, and fit the part. This will mark on the other block where you need to drill for the pins to go in. Dunno where I learned this, nobody else I know does this, but I find it really useful. Drill those *slightly* deeper than required and apply epoxy to the surface of the block with a toothpick, covering the holes, and bringing it to the mating surface level. Do NOT apply epoxy to the other block Again, work towards the inside of the part. What will happen is when you assemble the part the pins will push a little (enough) of the epoxy into the hole to hold them in place and the remainder should be displaced upward to contact the other block without having so much that it oozes out and makes a horrible seam. Hope this helps. :-) Edit: Just because the solvent softens the plastic doesn't mean it'll glue it. Otherwise everyone would use paint stripper instead of plastic cement. The question is does it go tacky, or just dissolved? I strongly suggest an inert adhesive like epoxy or CA.
-
Can you put up a pic of the damaged part and how it's meant to close? I don't have a '19 but I'm generally pretty good at making fairly invisible repairs... EDIT: Do NOT attempt to make the repair with an untried solvent! If unsure, try a little with a q-tip / matchstick on an inside surface. If the plastic melts too much you'll just end up with a wider gap that's harder to hide.
-
I use Daler-Rowney Low Odour Thinners (for oil colour). Doesn't seem to attack the future, and doesn't stink.
-
The primary requirement is the ability to print in white. Up till fairly recently this was only provided by ALPS / OKI sublimation printers, but now there are laser printers that can deposit an opaque white toner (link in previous post). This requires TWO printers. One for the colour dyes, and one for the white (as the colour may stick to the rollers and contaminate a white finish). Printing is therefore a two stage process (on clear waterslide decal film) - first the white layer is printed then that is run through the colour printer. Not sure how accurate the alignment is, but the sample prints I got looked ok. The downside is that laser printers can't do the metallic colours (silver, gold) that the ALPS ribbon printers used to, so they're not so useful for the railway modellers that use those colours.
-
I was thinking about it a while back, but it was a no-go. Simply couldn't get enough cash together to buy the kit (from www.atttranfser.com). Somewhere there's a poll that I used to gauge interest just from this site, and while it wouldn't cover the outlay, it was still fairly significant. Devin had also agreed to allow the use of his sheet designs, so for the macross stuff it could have been ready to go fairly quickly.
-
For preshading you can't beat a dual action airbrush. You can get them at machine mart, about £15. Way, way cheaper than a model shop. Do NOT use white spirit to thin oils for a wash. Get low odour thinner, hobbycraft has it. If you're just getting into doing preshades (or any paintwork blending technique) is to use lower contrast blends - this means for white you'd preshade with grey, not black. It means you do fewer coats and can overpaint errors more easily. Drybrushing... you need a soft brush. VERY soft. And you need to dry it thorouhly - it should leave almost no paint when drawn across the back of your hand. The worst thing you can do is attempt to drybrush with too much paint - you'll get a streaky finish for sure.