

Mechamaniac
-
Posts
3557 -
Joined
-
Last visited
Content Type
Profiles
Forums
Events
Gallery
Everything posted by Mechamaniac
-
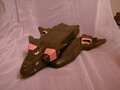
From the album: Konig Monster Transformation Guide
Line up these tabs with the holes on the bottom of the payload area: -
From the album: Konig Monster Transformation Guide
Snap them together: -
From the album: Konig Monster Transformation Guide
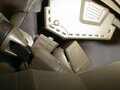
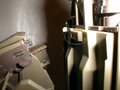
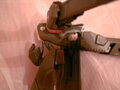
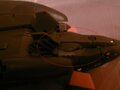
The red-circled peg is going into the yellow-circled hole: -
From the album: Konig Monster Transformation Guide
Now they're connected. If you have the waist pulled out too much the peg won't match up to the hole properly: -
From the album: Konig Monster Transformation Guide
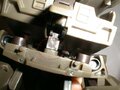
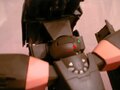
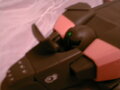
The red-circled pegs will go into the yellow-circled holes: -
From the album: Konig Monster Transformation Guide
Now they're connected: -
From the album: Konig Monster Transformation Guide
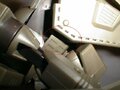
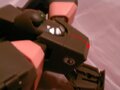
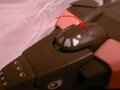
If it hasn't already happened in the course of transforming, push the cockpit down into the chest like this: -
From the album: Konig Monster Transformation Guide
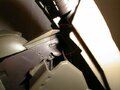
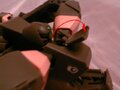
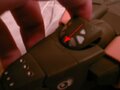
Rotate the head a quarter turn to free the back of the head from the flange that it's tucked under: -

From the album: Konig Monster Transformation Guide
Lift the head and rotate it back - here's a blurry picture of the back edge of the head now on TOP of the flange: -
From the album: Konig Monster Transformation Guide
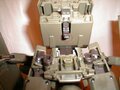
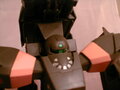
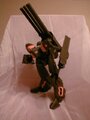
Pose up your Konig Monster battroid. You can separate the knee assembly to get some range of motion. -
From the album: Konig Monster Transformation Guide
Battroid to Shuttle: Basically you reverse a lot of steps, but here are some useful notes: Here the guns are tucked back away and the waist assembly is pulled very loose: -
From the album: Konig Monster Transformation Guide
The loose waist allows the nose assembly to rotate down slightly, as shown by the arrow: -
From the album: Konig Monster Transformation Guide
This makes it easy to pull the cockpit up and out as shown. Leave it out for now: -
From the album: Konig Monster Transformation Guide
Make sure the waist is tucked away like so before reconnecting the payload area pins back to their original location: -
From the album: Konig Monster Transformation Guide
Here's the cockpit left up: -
From the album: Konig Monster Transformation Guide
Flip it down loosely: -
From the album: Konig Monster Transformation Guide
Press the leading edge of the hinge under the nose assembly as shown: -

From the album: Konig Monster Transformation Guide
When you let go, the back edge you were holding will pop down with a little click: -

Back to shuttle mode. Thanks for visiting!
Mechamaniac posted a gallery image in Transformation Guides
From the album: Konig Monster Transformation Guide
-
OK boys and girls. Here's the deal with the Customs section. I am in the process of moving the customs from the main page to the IPB Gallery located right here on the good ol' MW Forums. This will make it possible for you guys to add your own customs to the site rather than the antiquated method of me having to download the pics, create thumbnails, edit HTML tables and update 10 different links back to the main page etc. SO, from now on....add your own customs.... HERE!
-
CM's Miriya in TV Uniform
Images added to a gallery album owned by Mechamaniac in Miscellaneous Customs
Here's a little custom I did using a spare Misa body and spare Miriya head. -
-
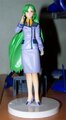
From the album: CM's Miriya in TV Uniform
-
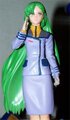
From the album: CM's Miriya in TV Uniform
-
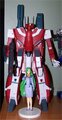
From the album: CM's Miriya in TV Uniform
-
This is JUST the kind of thing that can to go into the IPB Gallery. I've created a Category called "Transformation Guides" http://macrossworld.com/mwf/index.php?autocom=gallery Feel free to add this there.