

captain america
-
Posts
3539 -
Joined
-
Last visited
Content Type
Profiles
Forums
Events
Gallery
Posts posted by captain america
-
-
I design guns and I can't believe I haven't noticed this thread until now

Anyone here into compact, concealed-carry pieces?
I currently carry a Glock 19 and HK USP Compact in .357 SIG as backups when I am working. One on each side of my vest.
off duty, I carry two Glock 33s in .357 SIG.
i usually carry these in either a dual shoulder-rig or in two fobus paddle holsters.
I am looking into getting the HK P2000 subcompact in .357 SIG when it comes out.
Hmm. Those are still fairly bulky pieces to carry. I always had a liking for the PPK, but it's a little bit large for a "modern" .380, and for that size, I'd definitely like something with a bit more stopping-power. Hopefully, what I've got in development will make concealed-carry a little more "concealable"; especially for everyday use.
Essentially, I've been working on a compact semi-auto chambered for 9mm. 5.6 inches in total length, 4" high, and 0.95" across grip & slide. Mag capacity:6 rounds... The best part is that it's DAO, but uses a slide-in trigger like a 1911, and a few other features that I can't really elaborate on... Yet.
-
I design guns and I can't believe I haven't noticed this thread until now
Anyone here into compact, concealed-carry pieces?
-
It just dawned on me that this year will mark the 20th anniversary of Takaya's Bio Boosted Armor Guyver series. I know that they're releasing a new series of poseable figures based on their old vinyl kit series line, but I was wondering if anything else might be planned?
-
Hi Sam.
All I can say is wow, Guyver III never looked so good!
I took a stroll onto HLJ's website, and did a search for both Max Factory and Guyver, but they don't seem to have the item listed--out of stock, or otherwise. Is the original yen price listed on the box, by chance?
-
To call the Exorcist "overrated" is truly unfair. It stands as probably the scariest horror movie of all time, not because of its visual effects, but more because of it's chilling mood and psychological impact. Gore does not mean scary, and vice-versa.
For what it's worth, it boggles me that films like Scream and its carbon-copy immitations are held in such high regard by the average viewer; they're completely devoid of the fundamental psychological "chill" factor necessary to truly frighten a person to the core. That's why the Exorcist will probably always be toted as the king.
-
... I seem to have found the answer to my own question, and the answer is an impressive doosie. Quoted directly from the Hyperscale aircraft forums:
"APPROXIMATE ARRIVAL: SEPTEMBER 1, 2004
___**2224 1/32 SUKHOI SU27 FLANKER-B FIGHTER SRP $149.95
The Su-27 was developed as a long-range air superiority fighter, having improved the quality of the former Soviet fighters. It’s combat abilities compare roughly to the US F-15. Up to 10 air-to-air missiles can be carried and is equipped with a formidable front and rear radar system. This allows the Su-27 to fire at targets in front or behind the aircraft. The Flanker-B variant was placed into service in April, 1981, having been newly equipped with better aerodynamics and an aft radar extension.
Kit consists of 350 parts on 9 giant sprues plus upper and lower fuselage halves, canopy, nose radome and 3 rubber tires. Additional features include white metal landing gear & struts, pitot head and flap shaft, photo-etched aileron and flap hinges and a film instrument panel. Markings are for the 582nd Fighter Regiment, 4th Air Army Frontal Aviation, Chojna, Poland, 1992. Operational parts include the flaps and speedbrake, and opening canopy. Completed kit measures 27 ½” long with a wingspan of over 18".
Oooooh boy, she's gonna be a BIG BIRD!

-
Hi Retracting.
I've been hearing feint whispers of this model since about this time last year, but nothing solid whatsoever. As you can see now, sites are starting to show it as To Be Released, and one actually had a price of $148 for the model.
I think they SHOULD have released it last year, but seem to have held-back in order to improve the tooling and correct a few little details. It's to the point now, that even one aftermarket decal company is planning to release an upgrade decal sheet to coincide with the kit... Unfortunately, still no official date of release.
http://argo.net.au/jbwhole/trumpeter/tr32.htm
http://www.discountmodels.com/trumperter_32_planes.htm
http://www2.stevenshobby.com:5641/si/produ...supplierid=5270
-
though I wouldn't normally bother with a silly "pie-in-the-sky" rumor of this nature, I've seen this listed on at least 3 sites so far as being slated for 2004 release by Trumpeter. Unfortunately, no pictures or prices.
Just wondering if anyone had any solid info of any kind on this (possible) upcoming release?
-
Hi David.
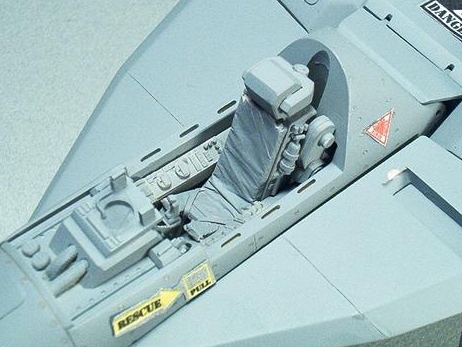
The Techniks and Cutting Edge update sets are one in the same; just packaged differently. With regards to the "incorrect-ness" of hasegawa's wing-glove fairing, it's too flat when you look at the aircraft from the side. The area where the wing-glove meets the foreward fuselage/nose section should have a bit more of a curve to it. In the end, most people won't notice, and despite all my scratchbuilding skills, I deem it as not worth the hassle to repair.
I did a quick write-up on the hasegawa kit here:
http://www.aircraftresourcecenter.com/Fea1...cato/fea681.htm
One sample picture:
-
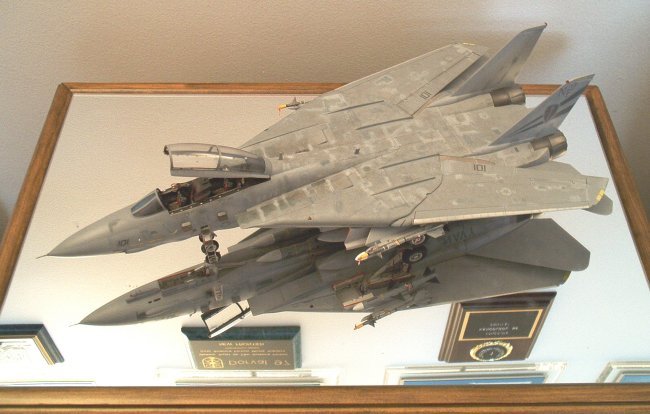
Hi David.
I actually have the 1/32 Tamiya Tomcat ( 1994 re-issue.) All in all, I firmly believe that it has more potential than any other Tomcat kit out there on the market at the moment. The lack of scribed detail on the aft fuselage is a blessing in my eyes: considering tamiya's tendancy to carve very deep trenches in offerings like the 1/32 Eagle and Phantoms, I'll gladly do my own scribing in the proper size.
Regarding the Cutting Edge fuselage/engine nozzle update set, I think it falls rather short in my eyes: there's absolutely no need to cut away the aft fuselage to make it correct, you just need some putty to square-off the outer fairing and re-model the adaptor fitting aft of the alligator plates, which is really just a bare carbon-fiber part. Even worse, the update kit completely ignores the fact that you need new burner cans to go with the GE nozzles, so scratchbuilding skills are necessary if you want to do it right.
Having said that, it's still my pick as the best F-14 kit out there, with the 1/48 Hasegawa a close second. The latter definitely provides more bang for the buck and gives you more lattitude to build alternate versions, but they did screw-up in the shaping of the upper portion of the LEX/wing glove, which is a tad too flat, and the lower aft fuselage just foreward of the engine nozzles is improperly shaped.

-
What? No review of Tamiya's 1/32 Tomcat??
-
Hi Jesse

White metal (pewter) is intrinsically difficult to cast because of the fact that the metal cools/solidifies very quickly. I've tried doing some home pouring myself, but for anything more detailed than a 1.5 by 1.5 inch cube, it'll result in much of the detail not coming out because of the above problem.
As it turns out though, I currently have a supplier that specialises in white metal casting. He uses spin-casting ( centrifuge) to do small stuff, and from firsthand knowledge, his work is quite nice. Just let me know if I can help.
-
OMG... John, besides hijacking this thread, you're making me go broke. Put me down for 1. I wish I had enough to get 4 so I can have all 3 variants plus the stealth version.
Edit - Actually, if you have free time, I would love it if you would take your skills and help us realize a 1/48 high detail cockpit kit, VF-1D, VT-1, and VE-1 conversion kits for the Yamato Valkyries.
There are hordes of buyers waiting for these products. I'll take a full squadron or two.

Hi Anthony
...I really should've been more careful about posting that; looks like I've opened up another can o' worms.
The Vf-1D project sounds like a relatively interesting one. However, if you look at the foreward fuselage of the D conpared to the A/J/S, there's quite a length difference. That, combined with the shortened chest armor and the need for a very long heatshield (to cover the elongated canopy) might result in an engineering "brick wall." Probably the best solution would be a "cheat" technique similar to what Yamato did in 1/60... It's a lot of work though.
-
1/32 scale.
Yeah why don't cha cast it for us, we'll all buy it?
Sure thing.
Just line-up 50 or so people who are willing to shell-out $520.00 apiece for the kit, and I'll get right to work.
-
1/32 scale.
-
That's not a knife... THIS is a knife.
**shameless attempt at self-promotion**

-
...Not just re-casts, his absurdly-high prices didn't help. I still have a few of his catalogs from 12-13 years ago; seems like he just bought the kits for retail in Japan, and tried to make a mark-up on that.
If anything put him out of business, it was HLJ. When his clientele realised what the original kits actually cost, they defected in droves to greener pastures.
-
http://www.macrossworld.com/macross/mwat/j...giosstreadd.jpg
The picture isn't mine, but it IS of my model. The warped port-side wing and angled wing stripes give it away. I also have the magazine article somewhere. I'll try to scan it in the next couple days.
-
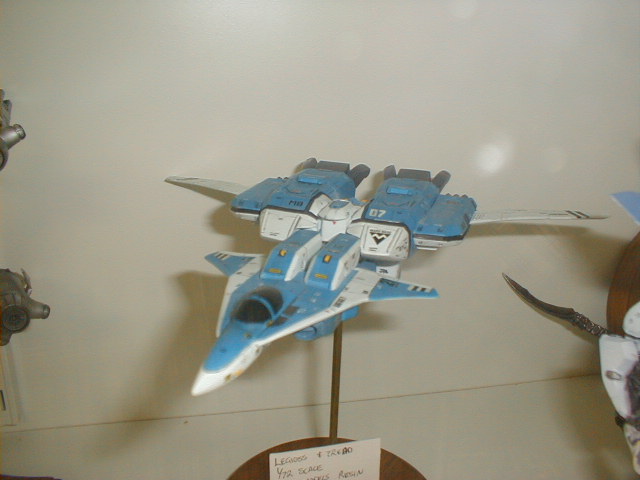
I built the Newtype-issued kit about 11 years ago for a magazine review... Funny, most of the pics I see on the net of the kit built are of my model.
It's an ok kit. As Jesse mentionned, the Legioss' cockpot canopy is opaque resin, but as the Legioss itself is just a resin casting of the 1/72 Imai plastic kit, you may want to swap the resin chunker for its plastic counterpart. The tread portion is cute; nothing spectacular, but detailed enough for what it is. Though not actually transformable, it can be re-worked to transform to Tread Soldier with some minor scratchbuilding and refinement. Decals are plenty, and are of the same type issued in the Imai kits. They go on with no problems.
The only drawback of the kit was the Tread's wings, which are molded in a soft resin which seemingly has a tendancy to sag with time... More so if placed in a warm area. You may want to scratchbuild a set of these out of styrene.
Doubtful that you'll find that kit for $50. They usually fetch over a undred on E-Bay, and that's for the re-recasts.
-
God, some people are cheap.
Truthfully, I've never considered myself a reckless spender, but to limit one's self to a $20-$50 price-point on an item simply because it gets stereotyped as a "toy" in my mind, just seems ludicrous. Unlike my parents, who are the cheapest people I know, and spend absurd amounts of time/effort to save a nickel on everything they buy, I've adopted a slightly different philosophy: you only live once, and you're here for a good time, not a long time, so enjoy.
That having been said, I don't want to wake up one day, look back and say that I've saved-up all this money, knowing that I won't be able to spend it when I die. To me, toys are a healthy part of everyday life, and if I really want something, whether it costs $10 or $10 000, if I really want it, there's a good chance I'll get it.
-
Hi Jesse
Sounds like a fair challenge. I may feel obligated to do a litle bit of tinkering on the VF-0 though... Most likely convert it to 1/32 scale and make it transformable for starters
-
Actually, I'll go with a slightly different answer: if your seam-line still shows-up after puttying & sanding, it's probably because your putty was too viscous to fill it in the first place, and when you sanded-off all the putty that was sitting on top--poof! Seam line's back.
Take a low viscosity Ca glue and fill-in the gap. The glue flows very easily, so be careful, or it'll end-up everywhere. Wait about 5 minutes, and start to sand. If there's a substantial level difference between tour two halves ( poor molding, etc), don't waste your time with air-dry putties, they take forever to dry, and they shrink. In stead, use automotive polyester putty that you can find at a local car-care store. Make sure you get the fine grade, and un-filled. This is a catalized putty, so there's virtually no shrinkage, but be warned, it stinks to high-hell.
The putty should go on very smooth, but make sure you sand your plastic rough first, to give it some bite. It'll start to cure in a few minutes, and you can start sanding in about 15... Faster if you kick-it with a hair dryer(accelerates cure.)
If you still have problems, LMK.
-
Hi Six.
Just a silly question: where'd you get that background? It looks fantastic!
-
Nice, refreshing custom job. You should have no problem unloading it on E-Bay with that scheme.
Have you considered adding the proper markings to it? Technically, they're quite simple and wouldn't even require making decals for; you could quite simply cut the designs out of masking tape to make stencils and litterally paint the markings on.

Official - Weapons Banter Thread
in Hall Of The Super Topics
Posted
Hi Opus.
I was grappling with the issue of mag capacity during the design phase as well. The problem is, when you design a micro-compact, whether you go for single stack, or double-stack to get the 10 rounds, you compromise on compactness and concealability. My own take is that 6+1 rounds is more than adequate for a CC/backup weapon. If you need more rounds than that to take down an assailant or two, it's cos your aim is bad! LOL
Seriously though, for certain situations, nothing beats a full-size gun with the full 10 round mag. The good thing about designing something small, is that it's a lot easier to size-up afterwards, than the other way around.. If I play my cards right, hopefully I'll be able to offer both